DCG FR3505N User manual

FR3505N FRIGGITRICE AD ARIA
AIR FRYER
MANUALE D’ISTRUZIONI - INSTRUCTION MANUAL dcg16.it
CUCINA
Manuale d’istruzioni FR3505N FRIGGITRICE AD ARIA
dcg16.it
1
CARATTERISTICHE TECNICHE / TECHNICAL FEATURES:
220-240V~, 50/60Hz, 1450W
INTRODUZIONE
Gentile cliente, complimenti per il suo nuovo acquisto e grazie per aver
scelto uno dei nostri prodotti. La sua nuova friggitrice ad aria le permetterà
di preparare i suoi piatti e snack preferiti in modo più sano. Questo prodotto
utilizza aria calda abbinata a una rapida circolazione dell’aria (tecnologia
Rapid Air) e una griglia nella parte alta, permettendo così la preparazione
di piatti gustosi in modo facile. Gli ingredienti vengono scaldati su tutti i
lati contemporaneamente, e spesso non serve nemmeno aggiungere olio.
Grazie alla griglia in dotazione, è possibile anche preparare dolci e torte
salate, oltre che cuocere più comodamente alimenti delicati.
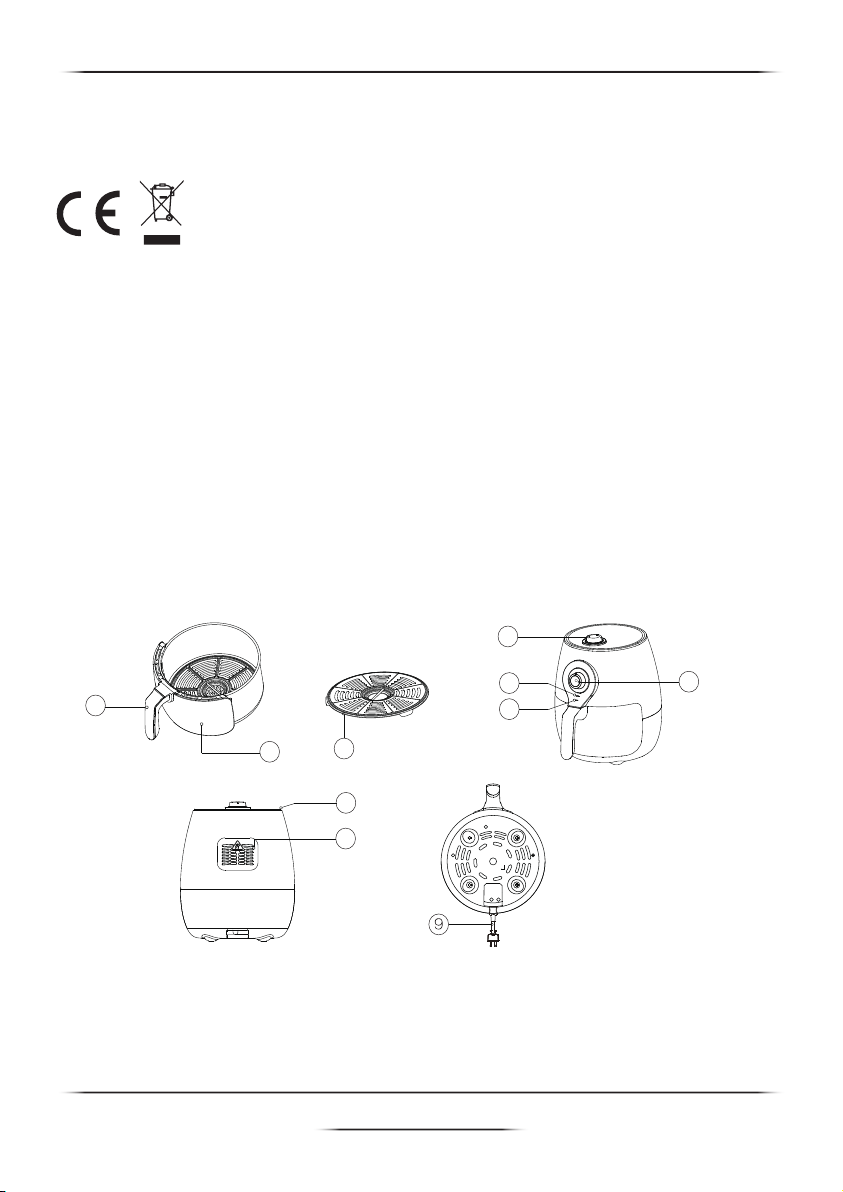
DESCRIZIONE DELLE PARTI
Parti incluse nella confezione
1. Impugnatura
2. Cestello
3. Griglia
4. Manopola
temperatura
5.1 Spia riscaldamento
5.2 Spia accensione
6. Timer
7. Presa d’aria
in ingresso
8. Presa d’aria
in uscita
9. Cavo
di alimentazione
1
23
4
5.1 6
7
8
5.2
Manuale d’istruzioni FR3505N FRIGGITRICE AD ARIA
dcg16.it
2
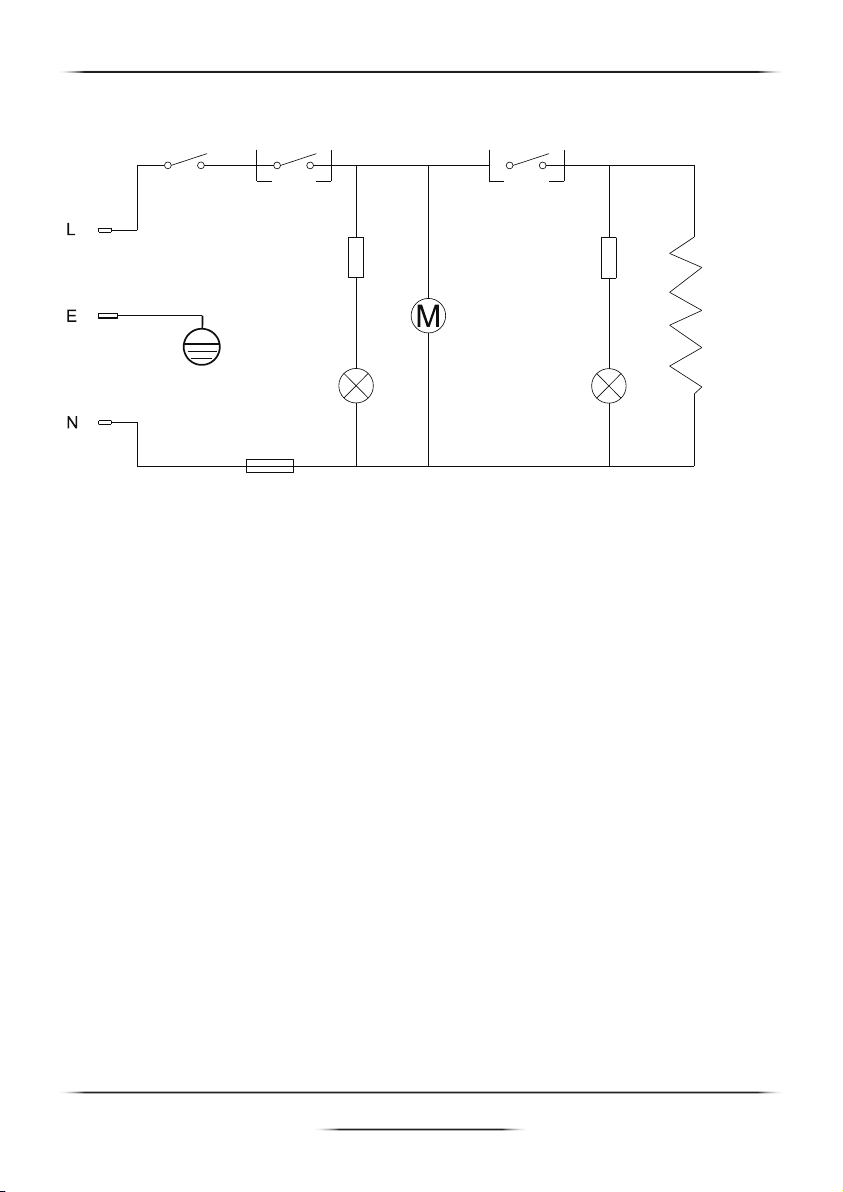
Schema di circuito
1
23
4
5.1 6
7
8
5.2
TimerMicrointerruttore Termoregolatore
Resistenza
Motore Spia
riscaldamento
Fusibile temperatura
Serpentina di riscaldamento

Manuale d’istruzioni FR3505N FRIGGITRICE AD ARIA
dcg16.it
3
INDICAZIONI IMPORTANTI
Prima di usare l’apparecchio, leggere attentamente questo manuale di
istruzioni. Conservarlo per esigenze future.
1. L’apparecchio contiene componenti elettrici e resistenze. Non
immergerlo in acqua e non sciacquarlo sotto l’acqua corrente.
2. Non far entrare al suo interno acqua o altro liquido. Pericolo di scossa
elettrica.
3. Non riempire eccessivamente il cestello, onde evitare che gli alimenti
entrino in contatto con le resistenze.
4. Mentre l’apparecchio è in funzione, non coprire le prese d’aria in ingresso
e in uscita.
5. Non mettere olio nel cestello. Pericolo di incendio.
6. Non toccare l’interno dell’apparecchio mentre è in funzione.
7. Prima di collegare la spina alla presa di corrente, controllare che la
tensione indicata sull’apparecchio corrisponda a quella dell’impianto
domestico.
8. Non usare l’apparecchio se la spina, il cavo di alimentazione o
l’apparecchio stesso sono danneggiati.
9. Se il cavo di alimentazione è danneggiato, per evitare potenziali pericoli
deve essere sostituito da un professionista.
10. L’uso di questo apparecchio non è indicato per persone (bambini
compresi) con ridotte capacità siche, sensoriali o mentali, mancanza di
esperienza e conoscenze, a meno che ricevano supervisione o indicazioni
da una persona responsabile della loro sicurezza.
11. Sorvegliare i bambini afnché non giochino con l’apparecchio.
12. Quando l’apparecchio è acceso o si sta raffreddando, tenerlo fuori
dalla portata dei bambini di età inferiore agli 8 anni, insieme al cavo di
alimentazione.
13. Tenere il cavo di alimentazione lontano dalle superci calde.
14. Non collegare la spina alla presa di corrente o maneggiare il pannello
dei comandi con le mani bagnate.
15. Collegare l’apparecchio esclusivamente a prese di corrente dotate di
messa a terra e assicurarsi sempre che la spina sia collegata correttamente

Manuale d’istruzioni FR3505N FRIGGITRICE AD ARIA
dcg16.it
4
alla presa di corrente.
16. Non collegare l’apparecchio a timer, onde evitare situazioni
potenzialmente pericolose.
17. Non posizionarlo sopra o vicino a materiali combustibili, come tovaglie
o tende.
18. Posizionarlo su una supercie orizzontale, omogenea e stabile.
19. Questo apparecchio è progettato esclusivamente per il normale uso
domestico. Non è destinato all’uso nelle seguenti situazioni: da parte del
personale in negozi, ufci, agriturismi e altri ambienti di lavoro; da parte
dei clienti all’interno di hotel, motel e altri tipi di ambienti residenziali.
20. In caso di utilizzo scorretto, per scopi professionali o semi-professionali
o di mancato rispetto delle istruzioni contenute in questo manuale, la
garanzia perde validità e si declina ogni responsabilità per eventuali
danni provocati dall’apparecchio.
21. Non tentare di riparare l’apparecchio autonomamente, onde evitare
di far perdere validità alla garanzia. In caso di problemi, rivolgersi al
rivenditore.
22. Dopo l’uso, scollegare sempre la spina dalla presa di corrente.
23. Prima di maneggiare o pulire l’apparecchio, lasciarlo raffreddare per
circa 30 minuti.
24. Assicurarsi che gli alimenti cotti risultino dorati, non scuri o marroni.
Rimuovere eventuali residui bruciati. Non friggere patate fresche a una
temperatura superiore a 180 °C (per ridurre al minimo la produzione di
acrilammide).
Spegnimento automatico
L’apparecchio è dotato di una funzione spegnimento automatico: quando il
timer arriva a 0, emette un segnale acustico e si spegne.
Per spegnerlo manualmente, ruotare la manopola in senso antiorario no a
portarla su 0.

Manuale d’istruzioni FR3505N FRIGGITRICE AD ARIA
dcg16.it
5
ISTRUZIONI PER L’USO
Prima del primo utilizzo
1. Rimuovere tutti i materiali di imballaggio.
2. Rimuovere eventuali adesivi o etichette dall’apparecchio.
3. Lavare bene il cestello e la griglia con acqua calda, detersivo e una spugna
non abrasiva. Pulire l’interno della cavità e la supercie esterna con un
panno umido.
AVVERTENZA
Non mettere olio o altri grassi nel cestello. Questa friggitrice funziona grazie
all’aria calda.
Preparazione per l’uso
1. Posizionare l’apparecchio su una supercie piana e stabile.
2. Non appoggiarlo su superci non resistenti al calore.
3. Assicurarsi che la griglia sia inserita correttamente nel cestello.
4. Collegare il cavo di alimentazione alla parte posteriore dell’apparecchio.
Non appoggiare oggetti di alcun tipo sull’apparecchio, onde evitare di
interrompere il usso d’aria, riducendo così le prestazioni della friggitrice e
aumentando il rischio di danni.
Istruzioni per l’uso
La friggitrice ad aria è in grado di cuocere un’ampia gamma di alimenti.
1. Collegare la spina a una presa di corrente dotata di messa a terra.
2. Estrarre con attenzione il cestello.
3. Mettere gli alimenti da cuocere al suo interno.
Attenzione: non usare il cestello senza la griglia.
4. Reinserire il cestello nella friggitrice.
Attenzione: mentre la friggitrice è in funzione e per un po’ di tempo
dopo l’uso, non toccare il cestello o la griglia, che diventano molto caldi.
Tenere sempre il cestello tramite l’impugnatura.
5. Con la manopola corrispondente, selezionare la temperatura desiderata.
Per stabilire quella più adeguata, vedere la guida per la cottura.
6. Stabilire il tempo di preparazione necessario. Anche in questo caso, per
farlo, vedere la guida per la cottura.
7. Per accendere l’apparecchio, selezionare il tempo desiderato usando la

Manuale d’istruzioni FR3505N FRIGGITRICE AD ARIA
dcg16.it
6
manopola del timer.
Se l’apparecchio è freddo, aumentare il tempo di 3 minuti.
Note di utilizzo
~ La spia del riscaldamento rimane accesa no a quando non viene raggiunta
la temperatura desiderata.
~ Durante il processo di frittura ad aria calda, la spia del riscaldamento si
accende e si spegne ciclicamente, a indicare che la resistenza si accende
e si spegne per mantenere la temperatura selezionata.
~ L’unto in eccesso che fuoriesce dagli alimenti viene raccolto sul fondo del
cestello.
8. Alcuni ingredienti richiedono di essere mescolati a metà preparazione. Per
farlo, estrarre il cestello tenendolo per l’impugnatura e – senza togliere
la griglia e sempre tenendo l’impugnatura – scuotere il contenuto. Inne,
reinserire il cestello nella friggitrice e riprendere la cottura.
9. Allo scadere del tempo selezionato, si sente un segnale acustico. Estrarre
il cestello dalla friggitrice e appoggiarlo su una supercie resistente al
calore.
Nota: è anche possibile spegnere l’apparecchio manualmente. Per farlo,
è sufciente portare la manopola della temperatura su 0.
10. Controllare se gli alimenti sono pronti. Se non lo sono ancora, reinserire il
cestello nella friggitrice e regolare il timer per qualche altro minuto. Dopo
la frittura ad aria, il cestello e gli alimenti saranno molto caldi e, a seconda
del tipo di alimento, potrebbe fuoriuscire del vapore.
Consiglio: per togliere più facilmente dal cestello alimenti fragili o grandi
quantità di cibo, usare una pinza, un cucchiaio da portata o simili.
11. Dopo aver cotto degli alimenti, non serve aspettare per ripetere il
procedimento. Dopo diversi cicli, o dopo aver cotto alcuni tipi di alimenti,
nella friggitrice potrebbe accumularsi una quantità eccessiva di unto o
residui. Prima di continuare a friggere, può essere utile rimuoverli. In
questo caso, aspettare che la friggitrice si raffreddi e seguire la procedura
corretta indicata nel paragrafo “Pulizia”.
12. Per rimuovere l’impugnatura e la copertura dal cestello, premere il tasto
di sgancio e rimuoverle inclinandole.

Manuale d’istruzioni FR3505N FRIGGITRICE AD ARIA
dcg16.it
7
Spegnimento automatico
Questo apparecchio è dotato di un timer. Quando questo raggiunge lo 0,
l’apparecchio produce un segnale acustico e si spegne automaticamente.
Per spegnerlo manualmente, ruotare la manopola in senso antiorario no a
selezionare lo 0.
Pulizia
Per evitare accumuli di unto e residui, pulire l’apparecchio dopo ogni utilizzo.
Il cestello è dotato di un rivestimento antiaderente. Non usare utensili in metallo o
materiali per la pulizia e detergenti abrasivi, onde evitare di danneggiare il rivestimento.
1. Scollegare la spina dalla presa di corrente e lasciar raffreddare l’apparecchio.
Nota: afnché la friggitrice si raffreddi più velocemente, rimuovere il cestello
e la griglia.
2. Pulire la supercie esterna dell’apparecchio con un panno umido.
Nota: per pulire la zona delle spie, usare un panno asciutto.
3. Lavare il cestello e la griglia con acqua calda, detersivo per i piatti e una
spugna non abrasiva. Per rimuovere eventuali residui ostinati, usare dello
sgrassatore.
4. Pulire l’interno dell’apparecchio con acqua calda e una spugna non abrasiva.
5. Pulire la resistenza con una spazzola per rimuovere eventuali residui di cibo.
6. Prima di rimettere in funzione la friggitrice, aspettare che sia asciutta.
GUIDA PER LA COTTURA
Nella tabella che segue sono riportate alcune impostazioni comuni che
potrebbero rivelarsi utili.
Nota: è bene tenere a mente che si tratta di riferimenti indicativi. Dato che
l’origine, la forma e il marchio degli alimenti possono variare, non è possibile
garantire che si tratti delle impostazioni migliori per gli alimenti da friggere
nei singoli casi.
Estrarre brevemente il cestello dalla friggitrice durante la frittura ad aria crea
poco disturbo al procedimento. La tecnologia Rapid Air, infatti, riscalda
istantaneamente l’aria all’interno dell’apparecchio.
Per ottenere patate più croccanti, è possibile aggiungere una piccola
quantità di olio.

Manuale d’istruzioni FR3505N FRIGGITRICE AD ARIA
dcg16.it
8
Quantà
min-max (g)
Tempo
(minu)
Temperatura
(°C)
Mescolare Informazioni
aggiunve
Patate e patane
Patane surgelate
spesse
200-400 12-16 200 Sì
Patane surgelate
soli
200-400 12-20 200 Sì
Patane fae in casa
(8 x 8 mm)
200-350 18-25 180 Sì Aggiungere ½
cucchiaio d’olio
Patate a spicchi fae
in casa
200-350 18-22 180 Sì Aggiungere ½
cucchiaio d’olio
Patate a cube fae
in casa
200-400 12-18 180 Sì Aggiungere ½
cucchiaio d’olio
Ros 200 15-18 180
Gran di patate 500 18-22 180
Carne rossa e bianca
Bistecca di manzo 100-300 8-12 180
Braciole di maiale 100-300 10-14 180
Hamburger 100-300 7-14 180
Salsiccia in crosta 100-300 13-15 180
Fusi di pollo 100-300 18-22 180
Peo di pollo 100-300 10-15 180
Salani
Involni primavera
100-300 8-10 200 Sì Scegliere pro-
do già pron
ada alla cou-
ra in forno
Crocchee di pollo
surgelate
100-300 6-10 200 Sì Scegliere pro-
do già pron
ada alla cou-
ra in forno
Bastoncini di pesce
surgela
100-300 6-10 200 Scegliere pro-
do già pron
ada alla cou-
ra in forno
Bastoncini di formag-
gio impana surgela
100-300 8-10 180 Scegliere pro-
do già pron
ada alla cou-
ra in forno
Verdure ripiene 100-300 10 160

Manuale d’istruzioni FR3505N FRIGGITRICE AD ARIA
dcg16.it
9
Consigli
1. Gli ingredienti di piccole dimensioni di solito richiedono un tempo di
preparazione leggermente più breve rispetto a quelli di grandi dimensioni.
2. Una quantità maggiore di ingredienti richiede un tempo di preparazione
solo leggermente più lungo rispetto a una quantità inferiore.
3. Mescolare gli ingredienti di piccole dimensioni a metà preparazione
permette di ottenere un risultato migliore e una cottura più uniforme.
4. Per un risultato più croccante, ungere le patate fresche e friggerle entro
pochi minuti.
5. Non usare la friggitrice ad aria per preparare alimenti estremamente unti,
ad esempio salsicce.
6. È anche possibile usare la friggitrice per riscaldare gli alimenti. Regolarla
su 150 °C per un massimo di 10 minuti.
Preparare patatine fatte in casa
Per ottenere i migliori risultati, si consiglia di usare patatine precotte (ad
esempio surgelate), che spesso sono ricoperte da uno strato di olio. Se
invece si desidera prepararle in casa, seguire questi passaggi.
1. Pelare le patate e tagliarle a bastoncini della dimensione che si preferisce.
2. Immergere i bastoncini in una ciotola d’acqua per almeno 30 minuti,
quindi scolarli e asciugarli con della carta da cucina.
3. Versare ½ cucchiaio d’olio in una ciotola, aggiungere i bastoncini di patata
e mescolare no a condirli bene.
4. Togliere i bastoncini di patata dalla ciotola usando le mani o un utensile
da cucina, in modo che l’olio in eccesso rimanga nella ciotola, e trasferirli
nel cestello della friggitrice.
Nota: non versare tutti i bastoncini nel cestello in una volta sola inclinando
la ciotola, onde evitare che l’olio vada a depositarsi sul fondo della
friggitrice.
5. Friggere le patatine seguendo le istruzioni riportate nella tabella.
Conservazione
1. Scollegare la spina dalla presa di corrente e lasciar raffreddare
completamente l’apparecchio.
2. Assicurarsi che tutte le parti siano asciutte e pulite.

Manuale d’istruzioni FR3505N FRIGGITRICE AD ARIA
dcg16.it
10
RISOLUZIONE PROBLEMI
Problema Possibile causa Soluzione
Gli alimen risultano
co in modo non uni-
forme.
Alcuni pi di alimen
devono essere mesco-
la a metà coura.
Per maggiori informazioni, vedere la
Guida per la coura.
Dopo la friura, i sala-
ni non sono croccan.
Si è scelta una po-
logia di salani da
preparare in una frig-
gitrice tradizionale.
Per oenere una maggiore croc-
cantezza, spennellarli leggermente
con dell’olio.
Il casseo non scorre
correamente nella
friggitrice.
Il cestello è troppo
pieno.
Non riempire il cestello oltre la
quantà massima indicata.
Il cestello non è inse-
rito correamente nel
casseo.
Inserire il cestello nel casseo no a
senre un clic.
Dalla friggitrice fuorie-
sce del fumo bianco.
Si stanno friggendo
alimen grassi.
Quando si friggono ad aria alimen
grassi, la quantà di unto all’interno
è maggiore e provoca il fumo bianco.
Non ci sono conseguenze sull’appa-
recchio o sul risultato nale.
Le patane fresche
non risultano frie in
modo omogeneo.
Prima di essere
frie non sono
state lasciate a
mollo correa-
mente.
Meere a mollo i bastoncini di
patata in una ciotola d’acqua per
almeno 30 minu, quindi scolarli e
asciugarli con della carta da cucina.
Le patane fresche
non risultano croc-
can.
La croccantezza
delle patane
dipende dalla
quantà di olio e
acqua presente
al loro interno.
Prima di friggerle, assicurarsi di
averle asciugate correamente.
Per oenere una maggiore croccan-
tezza, tagliare le patate a pezzi più
piccoli.
Per oenere una maggiore croccan-
tezza, aggiungere una piccola quan-
tà di olio.
Instruction Manual FR3505N AIR FRYER
dcg16.it
11
Microswitch
Handle
INTRODUCTION
Congratulaons on your new purchase and thank you for supporng us.
Your new air fryer allows you to prepare your favourite ingredients and snacks in a healthier way. It
uses hot air in combinaon with high-speed air circulaon (Rapid Air) and an upper grill to prepare a
variety of tasty dishes with ease. Your ingredients are heated from all sides at once, and oen there is
no need to add any oil at all. With the addional baking tray, you can now make food like cakes and
quiches, and cook delicate dishes in a more convenient way.
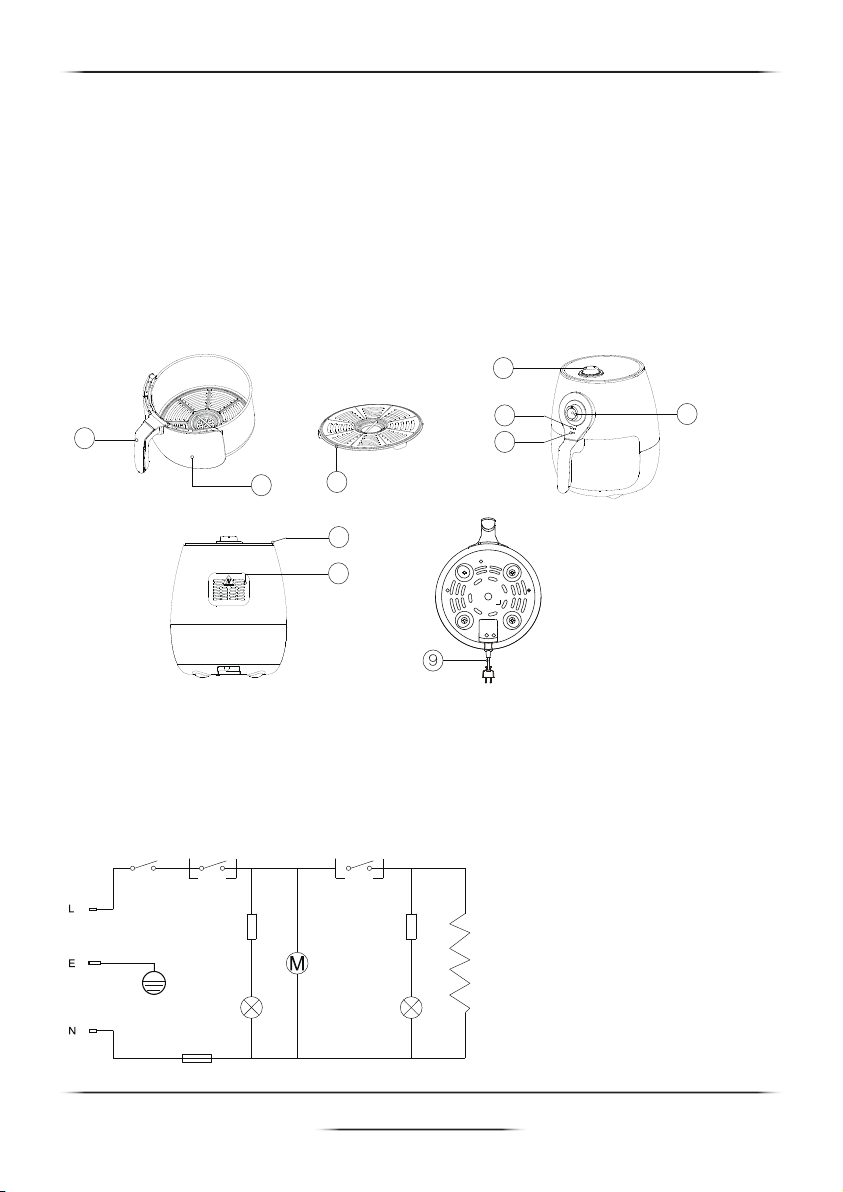
REFERENCE PICTURES
Parts Included
1
23
4
5.1 6
7
8
1.
2.
3.
4.
5.1
6.
7.
8.
9.
Pan
Baking Tray
Temperature Control
Timer
Air Inlet
Air Outlet
Power Cord
Circuit Diagram
Timer Temperature Controller
Motor
Resistance
Heating Coil
Temperature Fuse
Heating Indicator
TROUBLESHOOTING
SoluonProblem Reason
The ingredients are cooked
unevenly.
Certain foods need shaking
halfway through cooking.
See the Cooking Guide for more
information.
Snacks are not crispy when
they come out of the air fryer
The pan cannot be slid into
the appliance properly.
White smoke comes out of
the appliance.
Home-made chips are fried
Unevenly.
Home-made chips are not
crispy when they come out
of the air fryer.
You used food that is meant
to be prepared in a
traditional deep fryer.
The basket is too full.
The basket is not placed in
the pan correctly.
You are preparing greasy
ingredients.
The chips have not been
soaked properly before frying.
The crispness of the chips
depends on the amount of
water and oil in the chips.
Lightly brush some oil onto the snacks
for a crispier result.
Do not fill the basket beyond the max
level.
Push the basket down into the pan
until you hear a click.
When frying greasy ingredients there
will be a larger amount of oil in the pan
which produces white smoke. This will
not affect the appliance or end result.
Soak the potatoes in a bowl for at least
30 minutes, take them out and dry
them on kitchen paper before frying.
Make sure the chips are dried properly
before frying.
Cut the chips smaller for a crispier
result.
Add slightly more oil for a crispier result.
5.2
Heating Indicator
Power Indicator
5.2
Resistance
Power Indicator

Instruction Manual FR3505N AIR FRYER
dcg16.it
12
Microswitch
Handle
INTRODUCTION
Congratulaons on your new purchase and thank you for supporng us.
Your new air fryer allows you to prepare your favourite ingredients and snacks in a healthier way. It
uses hot air in combinaon with high-speed air circulaon (Rapid Air) and an upper grill to prepare a
variety of tasty dishes with ease. Your ingredients are heated from all sides at once, and oen there is
no need to add any oil at all. With the addional baking tray, you can now make food like cakes and
quiches, and cook delicate dishes in a more convenient way.
REFERENCE PICTURES
Parts Included
1
23
4
5.1 6
7
8
1.
2.
3.
4.
5.1
6.
7.
8.
9.
Pan
Baking Tray
Temperature Control
Timer
Air Inlet
Air Outlet
Power Cord
Circuit Diagram
Timer Temperature Controller
Motor
Resistance
Heating Coil
Temperature Fuse
Heating Indicator
TROUBLESHOOTING
SoluonProblem Reason
The ingredients are cooked
unevenly.
Certain foods need shaking
halfway through cooking.
See the Cooking Guide for more
information.
Snacks are not crispy when
they come out of the air fryer
The pan cannot be slid into
the appliance properly.
White smoke comes out of
the appliance.
Home-made chips are fried
Unevenly.
Home-made chips are not
crispy when they come out
of the air fryer.
You used food that is meant
to be prepared in a
traditional deep fryer.
The basket is too full.
The basket is not placed in
the pan correctly.
You are preparing greasy
ingredients.
The chips have not been
soaked properly before frying.
The crispness of the chips
depends on the amount of
water and oil in the chips.
Lightly brush some oil onto the snacks
for a crispier result.
Do not fill the basket beyond the max
level.
Push the basket down into the pan
until you hear a click.
When frying greasy ingredients there
will be a larger amount of oil in the pan
which produces white smoke. This will
not affect the appliance or end result.
Soak the potatoes in a bowl for at least
30 minutes, take them out and dry
them on kitchen paper before frying.
Make sure the chips are dried properly
before frying.
Cut the chips smaller for a crispier
result.
Add slightly more oil for a crispier result.
5.2
Heating Indicator
Power Indicator
5.2
Resistance
Power Indicator
Tips
Smaller ingredients usually require a slightly shorter preparation time than larger ingredients.
A larger quantity of ingredients only requires a slightly longer preparation time than smaller
quantities.
Shaking smaller ingredients halfway through the preparation time optimises the end result and
can help to prevent unevenly-fried food.
Apply some oil to fresh potatoes for a crispy result. Fry your ingredients in the air fryer within a
few minutes of adding the oil.
Do not prepare extremely greasy ingredients such as sausages in the air fryer.
You can also use the air fryer to reheat ingredients. To do this, set the device to 150 °C for up to
10 minutes.
1.
2.
3.
4.
5.
6.
Making Home-Made Fries
For the best results, we advise the use of pre-baked (e.g. frozen) fries as these often have an oily
coating. If you would rather make home-made fries, follow the steps below.
Peel the potatoes and cut them into sticks of your preferred size.
Soak the sticks in a bowl of water for at least 30 minutes, take them out and sit them on kitchen
paper to dry.
Pour 1/2 tablespoon of olive oil into a bowl, put the sticks on top and mix until they are coated
with oil.
Remove the sticks from the bowl with your fingers or a kitchen utensil so that excess oil stays
behind in the bowl. Put the sticks on the baking tray in the pan.
Note: Do not tilt the bowl to put all the sticks into the pan in one go, otherwise you risk excess oi
collecting at the bottom.
Fry the sticks according to the settings in the table.
Storage
Unplug the appliance and let it cool down fully.
Make sure that all parts are clean and dry.
1.
2.
3.
4.
5.
1.
2.
IMPORTANT SAFEGUARDS
Read this user manual carefully before you use the appliance and save it for future reference.
Caution
1. Never immerse the appliance in water nor rinse it under the tap as it contains electrical components
and heating elements.
2. Do not let any water or other liquid enter the appliance to prevent electric shock.
3. Do not overfill the pan to avoid the contents from coming into contact with the heating elements.
4. Do not cover the air inlet or outlets while the appliance is operating.
5. Do not fill the pan with oil as this may cause a fire hazard.
6. Never touch the inside of the appliance while it is operating.
Warning
1. Check that the voltage indicated on the appliance corresponds to your local mains voltage before
you connect the appliance.
2. Do not use the appliance if the plug, power cable or appliance itself is damaged.
3. If the power cable becomes damaged, you must have it replaced by a professional in order to avoid
a potential hazard.
4.This appliance cannot be used by persons with reduced physical, sensory or mental capabilities, or
lack of experience and knowledge, unless they have been given supervision or instruction
concerning use of the appliance by a person responsible for their safety.
5. Children should be supervised to ensure that they do not play with the appliance.
6. Keep the appliance and its power cable out of the reach of children younger than 8 when it is
switched on or is cooling down.
7. Keep the power cable away from hot surfaces.
8. Do not plug in the appliance or operate the control panel with wet hands.
9. Only connect the appliance to an earthed wall socket, and always make sure that the plug is
inserted into the socket properly.
10. Never connect this appliance to a timer switch to avoid a potentially hazardous situation.
11. Do not place the appliance on or near combustible materials such as a tablecloth or curtain.
Notice
1. Place the appliance on a horizontal, even and stable surface.
2. This appliance is intended for normal household use only. It is not intended for use in environments such
as staff kitchens, shops, offices, farms or other work environments, nor is it intended to be used by clients
in hotels, motels, bed and breakfasts or other residential environments.
3. If the appliance is used improperly or for professional or semi-professional purposes, or if is not used
according to the instructions in the user manual, the guarantee becomes invalid and refuses any
ability for damage caused.
4. Do not attempt to repair the appliance yourself, otherwise your guarantee becomes invalid. Contact
your retailer or our company in the event of any problems timely.
5. Always unplug the appliance after use.
6. Let the appliance cool down for approximately 30 minutes before you handle or clean it.
7. Make sure the ingredients prepared in this appliance come out golden-yellow instead of dark or brown.
Remove any burnt remnants. Do not fry fresh potatoes at a temperature above 180°C (to minimise the
production of acrylamide).
Automatic Shut-off
The appliance has an automatic shut-off function meaning that when the timer gets to “0”, it will sound an
alarm and then turn off.
To turn the appliance off manually, turn the dial anti-clockwise to “0”.
When pull out the pan,the unit will stop working and the timer still count down.

Instruction Manual FR3505N AIR FRYER
dcg16.it
13
USING THE APPLIANCE
Before First Use
1. Remove all packaging material.
2. Remove any stickers or labels from the appliance.
3. Thoroughly clean the frying pan and tray with hot water, detergent and non-abrasive sponge.Wipe the inside
and outside with a damp cloth.
WARNING
Never pour oil or fat into the pan. This appliance uses hot air to fry.
Preparing for Use
1. Place the appliance on a stable, horizontal and level surface.
2. Do not place the appliance on non-heat-resistant surfaces.
3. Ensure the baking tray is correctly inserted into the pan.
4. Plug the included power cord into the back of the appliance.
Do not put anything on top of the appliance as this can disrupt the airflow, reducing performance and
potentially damaging the unit
Using the Appliance
The air fryer can prepare a large range of ingredients.
1. Insert the power plug into an earthed wall socket.
2. Carefully pull the pan out of the air fryer.
3. Put your ingredients in the pan.
Caution: never use the pan without the baking tray installed.
4. Slide the pan back into the air fryer.
Caution: Do not touch the pan or tray during and for some time after use, as they get very hot. Only hold
the pan by the handle.
5. Turn the temperature control knob to the required temperature. See the settings guide included to determine
the right temperature.
6. Determine the required preparation time for the ingredient. Again, see the settings guide.
7. To switch on the appliance, turn the timer knob to the required time
Add 3 minutes to the time when the appliance is cold.
Operational Notes
- The heating light comes on until the required temperature is achieved
- During the hot air frying process, the heating light comes on and goes out periodically. This indicates that the
heating element is turning on and off to maintain the set temperature.
~Excess oil from the ingredients is collected on the bottom of the pan.
8. Some ingredients require shaking halfway through the preparation time. To shake the ingredients, pull the pan
out of the appliance by the handle and - without removing the tray from the pan-shake the contents using the
handle. Finally, slide the pan back into the air fryer to resume.
9. When you hear the bell, the set time has elapsed. Pull the pan out of the appliance and place it on a
heat-resistant surface.
Note: You can also switch off the appliance manually. To do this, turn the temperature control knob to 0.
10. Check if the ingredients are ready. If the ingredients are not ready yet, simply slide the pan back into the
appliance and set the timer to a few extra minutes. After air frying, the pan and the ingredients will be hot.
Depending on the type of ingredients in the air fryer, steam may escape from the pan.
Tip: Use tongs, a serving spoon, or similar to aid the removal of fragile or large amounts of ingredients.
11. You don't need to wait to use the air fryer again straight after cooking a set of ingredients. There may be ar
excessive amount of oil or remnants in the pan after several cycles, or certain types of food, which you may
want to remove before continuing to fry. In such a case, wait for the appliance to cool down and follow the
correct procedure outlined in the "Cleaning" section.
12. If you want to remove the handle and fascia from the pan, press the release button and remove on an angle.
Automatic Switch-Off
This appliance is equipped with a timer. When the timer has counted down to 0, the appliance produces a bell
sound and switches off automatically. To switch off the appliance manually, turn the timer knob anticlockwise to 0.
The Air Fryer will automatically Pause if the Pan is removed during the cooking cycle and then the both lights are
going off. Once push back into the fryer, the unit will continue its cooking cycle and then the lights are on.
Cleaning
Clean the appliance after every use to avoid oil and remnants building up.
The pan has a non-stick coating. Do not use metal utensils or abrasive cleaning materials to clean them,
as this may damage the coating.
1. Remove the mains plug from the wall socket and let the appliance cool down.
Note: remove the pan and baking tray to let the air fryer cool down more quickly.
2. Wipe the outside of the appliance with a moist cloth.
Note: you should use a dry cloth to clean the light area.
3. Clean the pan and the baking tray with hot water, some washing-up liquid and a non-abrasive sponge
You can use a degreasing agent to remove any remaining deposits.
4. Clean the inside of the appliance with hot water and a non-abrasive sponge.
5. Clean the heating element with a cleaning brush to remove any food residues.
6. Wait for the unit to dry before operating.
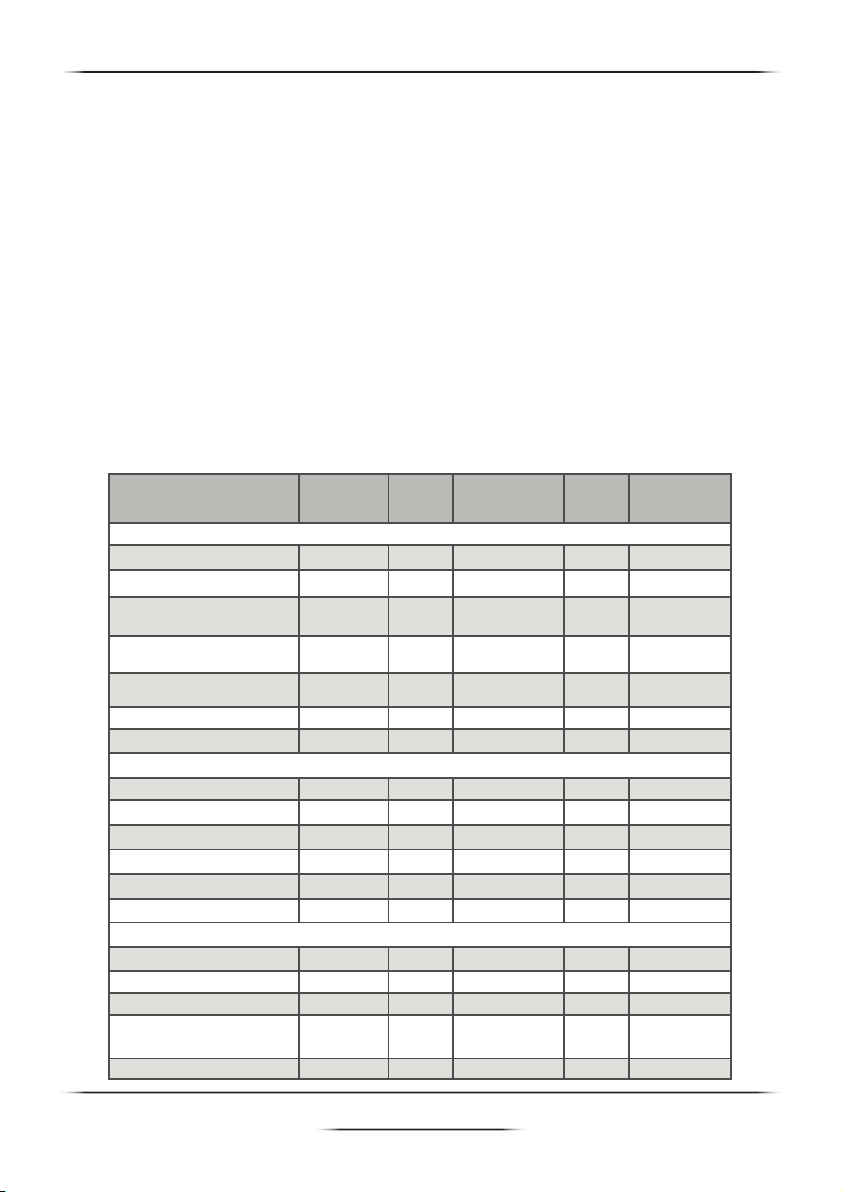
COOKING GUIDE
The table below contains some common settings you may find useful.
Note: Keep in mind that these settings are indications. As ingredients differ in origin, size, shape and brand, we
cannot guarantee the best settings for your particular ingredients.
Because the Rapid Air technology instantly reheats the air inside the appliance, pulling the pan
briefly out of the appliance during hot air frying barely disturbs the process.
When pull out the pan,the unit will stop working and the timer still count down.
Adding a little oil while cooking potatoes will make them crispier.
Min-Max
Amount
(g)
Time
(min)
Temperature
(C) Shake Extra
Information
Thick frozen fries
Thin frozen fries
Home-made fries
(8x8mm)
Home-made
potato wedges
Home-made
potato cubes
Rosti
Potato gratin
200-750
200-750
200-600
200-550
200-600
300
500
100-500
100-500
100-500
100-500
100-500
100-500
100-500
100-500
100-500
100-500
100-500
200
200
200
200
200
180
180
180
180
180
180
180
180
180
200
180
180
180
12-25
12-28
18-28
18-25
12-25
15-25
18-28
8-20
10-18
7-14
13-15
18-25
10-15
8-15
8-10
6-18
6-18
18
Shake
Shake
Shake
Shake
Shake
Shake
Shake
Potato & Fries
Meat & Poultry
Snacks
Use oven-ready
Use oven-ready
Use oven-ready
Use oven-ready
add 1/2 tbsp
of oil
add 1/2 tbsp
of oil
add 1/2 tbsp
of oil
Steak
Pork chops
Hamburger
Sausage roll
Drumsticks
Chicken breast
Spring rolls
Frozen chicken nuggets
Frozen fish fingers
Frozen breadcrumbed
cheese snacks
Stuffed vegetables
Instruction Manual FR3505N AIR FRYER
dcg16.it
14
USING THE APPLIANCE
Before First Use
1. Remove all packaging material.
2. Remove any stickers or labels from the appliance.
3. Thoroughly clean the frying pan and tray with hot water, detergent and non-abrasive sponge.Wipe the inside
and outside with a damp cloth.
WARNING
Never pour oil or fat into the pan. This appliance uses hot air to fry.
Preparing for Use
1. Place the appliance on a stable, horizontal and level surface.
2. Do not place the appliance on non-heat-resistant surfaces.
3. Ensure the baking tray is correctly inserted into the pan.
4. Plug the included power cord into the back of the appliance.
Do not put anything on top of the appliance as this can disrupt the airflow, reducing performance and
potentially damaging the unit
Using the Appliance
The air fryer can prepare a large range of ingredients.
1. Insert the power plug into an earthed wall socket.
2. Carefully pull the pan out of the air fryer.
3. Put your ingredients in the pan.
Caution: never use the pan without the baking tray installed.
4. Slide the pan back into the air fryer.
Caution: Do not touch the pan or tray during and for some time after use, as they get very hot. Only hold
the pan by the handle.
5. Turn the temperature control knob to the required temperature. See the settings guide included to determine
the right temperature.
6. Determine the required preparation time for the ingredient. Again, see the settings guide.
7. To switch on the appliance, turn the timer knob to the required time
Add 3 minutes to the time when the appliance is cold.
Operational Notes
- The heating light comes on until the required temperature is achieved
- During the hot air frying process, the heating light comes on and goes out periodically. This indicates that the
heating element is turning on and off to maintain the set temperature.
~Excess oil from the ingredients is collected on the bottom of the pan.
8. Some ingredients require shaking halfway through the preparation time. To shake the ingredients, pull the pan
out of the appliance by the handle and - without removing the tray from the pan-shake the contents using the
handle. Finally, slide the pan back into the air fryer to resume.
9. When you hear the bell, the set time has elapsed. Pull the pan out of the appliance and place it on a
heat-resistant surface.
Note: You can also switch off the appliance manually. To do this, turn the temperature control knob to 0.
10. Check if the ingredients are ready. If the ingredients are not ready yet, simply slide the pan back into the
appliance and set the timer to a few extra minutes. After air frying, the pan and the ingredients will be hot.
Depending on the type of ingredients in the air fryer, steam may escape from the pan.
Tip: Use tongs, a serving spoon, or similar to aid the removal of fragile or large amounts of ingredients.
11. You don't need to wait to use the air fryer again straight after cooking a set of ingredients. There may be ar
excessive amount of oil or remnants in the pan after several cycles, or certain types of food, which you may
want to remove before continuing to fry. In such a case, wait for the appliance to cool down and follow the
correct procedure outlined in the "Cleaning" section.
12. If you want to remove the handle and fascia from the pan, press the release button and remove on an angle.
Automatic Switch-Off
This appliance is equipped with a timer. When the timer has counted down to 0, the appliance produces a bell
sound and switches off automatically. To switch off the appliance manually, turn the timer knob anticlockwise to 0.
The Air Fryer will automatically Pause if the Pan is removed during the cooking cycle and then the both lights are
going off. Once push back into the fryer, the unit will continue its cooking cycle and then the lights are on.
Cleaning
Clean the appliance after every use to avoid oil and remnants building up.
The pan has a non-stick coating. Do not use metal utensils or abrasive cleaning materials to clean them,
as this may damage the coating.
1. Remove the mains plug from the wall socket and let the appliance cool down.
Note: remove the pan and baking tray to let the air fryer cool down more quickly.
2. Wipe the outside of the appliance with a moist cloth.
Note: you should use a dry cloth to clean the light area.
3. Clean the pan and the baking tray with hot water, some washing-up liquid and a non-abrasive sponge
You can use a degreasing agent to remove any remaining deposits.
4. Clean the inside of the appliance with hot water and a non-abrasive sponge.
5. Clean the heating element with a cleaning brush to remove any food residues.
6. Wait for the unit to dry before operating.
COOKING GUIDE
The table below contains some common settings you may find useful.
Note: Keep in mind that these settings are indications. As ingredients differ in origin, size, shape and brand, we
cannot guarantee the best settings for your particular ingredients.
Because the Rapid Air technology instantly reheats the air inside the appliance, pulling the pan
briefly out of the appliance during hot air frying barely disturbs the process.
When pull out the pan,the unit will stop working and the timer still count down.
Adding a little oil while cooking potatoes will make them crispier.
Min-Max
Amount
(g)
Time
(min)
Temperature
(C) Shake Extra
Information
Thick frozen fries
Thin frozen fries
Home-made fries
(8x8mm)
Home-made
potato wedges
Home-made
potato cubes
Rosti
Potato gratin
200-750
200-750
200-600
200-550
200-600
300
500
100-500
100-500
100-500
100-500
100-500
100-500
100-500
100-500
100-500
100-500
100-500
200
200
200
200
200
180
180
180
180
180
180
180
180
180
200
180
180
180
12-25
12-28
18-28
18-25
12-25
15-25
18-28
8-20
10-18
7-14
13-15
18-25
10-15
8-15
8-10
6-18
6-18
18
Shake
Shake
Shake
Shake
Shake
Shake
Shake
Potato & Fries
Meat & Poultry
Snacks
Use oven-ready
Use oven-ready
Use oven-ready
Use oven-ready
add 1/2 tbsp
of oil
add 1/2 tbsp
of oil
add 1/2 tbsp
of oil
Steak
Pork chops
Hamburger
Sausage roll
Drumsticks
Chicken breast
Spring rolls
Frozen chicken nuggets
Frozen fish fingers
Frozen breadcrumbed
cheese snacks
Stuffed vegetables

Instruction Manual FR3505N AIR FRYER
dcg16.it
15
Tips
Smaller ingredients usually require a slightly shorter preparation time than larger ingredients.
A larger quantity of ingredients only requires a slightly longer preparation time than smaller
quantities.
Shaking smaller ingredients halfway through the preparation time optimises the end result and
can help to prevent unevenly-fried food.
Apply some oil to fresh potatoes for a crispy result. Fry your ingredients in the air fryer within a
few minutes of adding the oil.
Do not prepare extremely greasy ingredients such as sausages in the air fryer.
You can also use the air fryer to reheat ingredients. To do this, set the device to 150 °C for up to
10 minutes.
1.
2.
3.
4.
5.
6.
Making Home-Made Fries
For the best results, we advise the use of pre-baked (e.g. frozen) fries as these often have an oily
coating. If you would rather make home-made fries, follow the steps below.
Peel the potatoes and cut them into sticks of your preferred size.
Soak the sticks in a bowl of water for at least 30 minutes, take them out and sit them on kitchen
paper to dry.
Pour 1/2 tablespoon of olive oil into a bowl, put the sticks on top and mix until they are coated
with oil.
Remove the sticks from the bowl with your fingers or a kitchen utensil so that excess oil stays
behind in the bowl. Put the sticks on the baking tray in the pan.
Note: Do not tilt the bowl to put all the sticks into the pan in one go, otherwise you risk excess oi
collecting at the bottom.
Fry the sticks according to the settings in the table.
Storage
Unplug the appliance and let it cool down fully.
Make sure that all parts are clean and dry.
1.
2.
3.
4.
5.
1.
2.
IMPORTANT SAFEGUARDS
Read this user manual carefully before you use the appliance and save it for future reference.
Caution
1. Never immerse the appliance in water nor rinse it under the tap as it contains electrical components
and heating elements.
2. Do not let any water or other liquid enter the appliance to prevent electric shock.
3. Do not overfill the pan to avoid the contents from coming into contact with the heating elements.
4. Do not cover the air inlet or outlets while the appliance is operating.
5. Do not fill the pan with oil as this may cause a fire hazard.
6. Never touch the inside of the appliance while it is operating.
Warning
1. Check that the voltage indicated on the appliance corresponds to your local mains voltage before
you connect the appliance.
2. Do not use the appliance if the plug, power cable or appliance itself is damaged.
3. If the power cable becomes damaged, you must have it replaced by a professional in order to avoid
a potential hazard.
4.This appliance cannot be used by persons with reduced physical, sensory or mental capabilities, or
lack of experience and knowledge, unless they have been given supervision or instruction
concerning use of the appliance by a person responsible for their safety.
5. Children should be supervised to ensure that they do not play with the appliance.
6. Keep the appliance and its power cable out of the reach of children younger than 8 when it is
switched on or is cooling down.
7. Keep the power cable away from hot surfaces.
8. Do not plug in the appliance or operate the control panel with wet hands.
9. Only connect the appliance to an earthed wall socket, and always make sure that the plug is
inserted into the socket properly.
10. Never connect this appliance to a timer switch to avoid a potentially hazardous situation.
11. Do not place the appliance on or near combustible materials such as a tablecloth or curtain.
Notice
1. Place the appliance on a horizontal, even and stable surface.
2. This appliance is intended for normal household use only. It is not intended for use in environments such
as staff kitchens, shops, offices, farms or other work environments, nor is it intended to be used by clients
in hotels, motels, bed and breakfasts or other residential environments.
3. If the appliance is used improperly or for professional or semi-professional purposes, or if is not used
according to the instructions in the user manual, the guarantee becomes invalid and refuses any
ability for damage caused.
4. Do not attempt to repair the appliance yourself, otherwise your guarantee becomes invalid. Contact
your retailer or our company in the event of any problems timely.
5. Always unplug the appliance after use.
6. Let the appliance cool down for approximately 30 minutes before you handle or clean it.
7. Make sure the ingredients prepared in this appliance come out golden-yellow instead of dark or brown.
Remove any burnt remnants. Do not fry fresh potatoes at a temperature above 180°C (to minimise the
production of acrylamide).
Automatic Shut-off
The appliance has an automatic shut-off function meaning that when the timer gets to “0”, it will sound an
alarm and then turn off.
To turn the appliance off manually, turn the dial anti-clockwise to “0”.
When pull out the pan,the unit will stop working and the timer still count down.
Instruction Manual FR3505N AIR FRYER
dcg16.it
16
Tips
Smaller ingredients usually require a slightly shorter preparation time than larger ingredients.
A larger quantity of ingredients only requires a slightly longer preparation time than smaller
quantities.
Shaking smaller ingredients halfway through the preparation time optimises the end result and
can help to prevent unevenly-fried food.
Apply some oil to fresh potatoes for a crispy result. Fry your ingredients in the air fryer within a
few minutes of adding the oil.
Do not prepare extremely greasy ingredients such as sausages in the air fryer.
You can also use the air fryer to reheat ingredients. To do this, set the device to 150 °C for up to
10 minutes.
1.
2.
3.
4.
5.
6.
Making Home-Made Fries
For the best results, we advise the use of pre-baked (e.g. frozen) fries as these often have an oily
coating. If you would rather make home-made fries, follow the steps below.
Peel the potatoes and cut them into sticks of your preferred size.
Soak the sticks in a bowl of water for at least 30 minutes, take them out and sit them on kitchen
paper to dry.
Pour 1/2 tablespoon of olive oil into a bowl, put the sticks on top and mix until they are coated
with oil.
Remove the sticks from the bowl with your fingers or a kitchen utensil so that excess oil stays
behind in the bowl. Put the sticks on the baking tray in the pan.
Note: Do not tilt the bowl to put all the sticks into the pan in one go, otherwise you risk excess oi
collecting at the bottom.
Fry the sticks according to the settings in the table.
Storage
Unplug the appliance and let it cool down fully.
Make sure that all parts are clean and dry.
1.
2.
3.
4.
5.
1.
2.
IMPORTANT SAFEGUARDS
Read this user manual carefully before you use the appliance and save it for future reference.
Caution
1. Never immerse the appliance in water nor rinse it under the tap as it contains electrical components
and heating elements.
2. Do not let any water or other liquid enter the appliance to prevent electric shock.
3. Do not overfill the pan to avoid the contents from coming into contact with the heating elements.
4. Do not cover the air inlet or outlets while the appliance is operating.
5. Do not fill the pan with oil as this may cause a fire hazard.
6. Never touch the inside of the appliance while it is operating.
Warning
1. Check that the voltage indicated on the appliance corresponds to your local mains voltage before
you connect the appliance.
2. Do not use the appliance if the plug, power cable or appliance itself is damaged.
3. If the power cable becomes damaged, you must have it replaced by a professional in order to avoid
a potential hazard.
4.This appliance cannot be used by persons with reduced physical, sensory or mental capabilities, or
lack of experience and knowledge, unless they have been given supervision or instruction
concerning use of the appliance by a person responsible for their safety.
5. Children should be supervised to ensure that they do not play with the appliance.
6. Keep the appliance and its power cable out of the reach of children younger than 8 when it is
switched on or is cooling down.
7. Keep the power cable away from hot surfaces.
8. Do not plug in the appliance or operate the control panel with wet hands.
9. Only connect the appliance to an earthed wall socket, and always make sure that the plug is
inserted into the socket properly.
10. Never connect this appliance to a timer switch to avoid a potentially hazardous situation.
11. Do not place the appliance on or near combustible materials such as a tablecloth or curtain.
Notice
1. Place the appliance on a horizontal, even and stable surface.
2. This appliance is intended for normal household use only. It is not intended for use in environments such
as staff kitchens, shops, offices, farms or other work environments, nor is it intended to be used by clients
in hotels, motels, bed and breakfasts or other residential environments.
3. If the appliance is used improperly or for professional or semi-professional purposes, or if is not used
according to the instructions in the user manual, the guarantee becomes invalid and refuses any
ability for damage caused.
4. Do not attempt to repair the appliance yourself, otherwise your guarantee becomes invalid. Contact
your retailer or our company in the event of any problems timely.
5. Always unplug the appliance after use.
6. Let the appliance cool down for approximately 30 minutes before you handle or clean it.
7. Make sure the ingredients prepared in this appliance come out golden-yellow instead of dark or brown.
Remove any burnt remnants. Do not fry fresh potatoes at a temperature above 180°C (to minimise the
production of acrylamide).
Automatic Shut-off
The appliance has an automatic shut-off function meaning that when the timer gets to “0”, it will sound an
alarm and then turn off.
To turn the appliance off manually, turn the dial anti-clockwise to “0”.
When pull out the pan,the unit will stop working and the timer still count down.
Microswitch
Handle
INTRODUCTION
Congratulaons on your new purchase and thank you for supporng us.
Your new air fryer allows you to prepare your favourite ingredients and snacks in a healthier way. It
uses hot air in combinaon with high-speed air circulaon (Rapid Air) and an upper grill to prepare a
variety of tasty dishes with ease. Your ingredients are heated from all sides at once, and oen there is
no need to add any oil at all. With the addional baking tray, you can now make food like cakes and
quiches, and cook delicate dishes in a more convenient way.
REFERENCE PICTURES
Parts Included
1
23
4
5.1 6
7
8
1.
2.
3.
4.
5.1
6.
7.
8.
9.
Pan
Baking Tray
Temperature Control
Timer
Air Inlet
Air Outlet
Power Cord
Circuit Diagram
Timer Temperature Controller
Motor
Resistance
Heating Coil
Temperature Fuse
Heating Indicator
TROUBLESHOOTING
SoluonProblem Reason
The ingredients are cooked
unevenly.
Certain foods need shaking
halfway through cooking.
See the Cooking Guide for more
information.
Snacks are not crispy when
they come out of the air fryer
The pan cannot be slid into
the appliance properly.
White smoke comes out of
the appliance.
Home-made chips are fried
Unevenly.
Home-made chips are not
crispy when they come out
of the air fryer.
You used food that is meant
to be prepared in a
traditional deep fryer.
The basket is too full.
The basket is not placed in
the pan correctly.
You are preparing greasy
ingredients.
The chips have not been
soaked properly before frying.
The crispness of the chips
depends on the amount of
water and oil in the chips.
Lightly brush some oil onto the snacks
for a crispier result.
Do not fill the basket beyond the max
level.
Push the basket down into the pan
until you hear a click.
When frying greasy ingredients there
will be a larger amount of oil in the pan
which produces white smoke. This will
not affect the appliance or end result.
Soak the potatoes in a bowl for at least
30 minutes, take them out and dry
them on kitchen paper before frying.
Make sure the chips are dried properly
before frying.
Cut the chips smaller for a crispier
result.
Add slightly more oil for a crispier result.
5.2
Heating Indicator
Power Indicator
5.2
Resistance
Power Indicator
Contents
Introduction.---------------------- 1
Reference Pictures.-------------1
Important Safeguards.----------2
Using the Appliance.-------------3-4
Cooking Guide.-------------------4-5
Troubleshooting.------------------6
value
quality
no compromise
USER GUIDE
ZNC351A
148.50mm
210.00mm

Manuale d’istruzioni FR3505N FRIGGITRICE AD ARIA
dcg16.it
17
INFORMAZIONI AGLI UTENTI
ai sensi del Decreto Legislativo N° 49 del 14 Marzo 2014
“Attuazione della Direttiva 2012/19/UE sui riuti di apparecchiature
elettriche ed elettroniche (RAEE)”
Il simbolo del cassonetto barrato riportato sull’apparecchiatura indica
che il prodotto alla ne della propria vita utile deve essere raccolto
separatamente dagli altri riuti. L’utente dovrà, pertanto, conferire
l’apparecchiatura integra dei componenti essenziali giunta a ne
vita agli idonei centri di raccolta differenziati a seconda dei riuti
elettronici ed elettrotecnici, oppure riconsegnarla al rivenditore al
momento dell’acquisto di nuova apparecchiatura di tipo equivalente,
in ragione di uno a uno, oppure 1 a zero per le apparecchiature aventi
lato maggiore inferiore a 25 cm. L’adeguata raccolta differenziata
per l’invio successivo dell’apparecchiatura dismessa al riciclaggio, al
trattamento e allo smaltimento ambientale compatibile contribuisce
ad evitare possibili effetti negativi sull’ambiente e sulla salute e
favorisce il riciclo dei materiali di cui è composta l’apparecchiatura.
Lo smaltimento abusivo del prodotto da parte dell’utente comporta
l’applicazione delle sanzioni amministrative di cui al Decreto
Legislativo N ° 49 del 14 Marzo 2014.

Manuale d’istruzioni FR3505N FRIGGITRICE AD ARIA
dcg16.it
18
GARANZIA
Per l’apparecchio da noi messo in commercio ci assumiamo una
garanzia di 24 mesi dalla data di acquisto (scontrino) solo per la
parte motore. Per la garanzia è sufciente lo scontrino di acquisto.
Senza questo non sussiste il diritto né ad una sostituzione né ad una
riparazione gratuita.
Nel caso si ricorra alla garanzia, restituire al rivenditore l’apparecchio
completo in ogni sua parte, nell’imballaggio originale unitamente
allo scontrino.
La riparazione e/o la sostituzione di pezzi soggetti a logoramento
(*), come anche operazioni di pulizia e manutenzione non rientrano
nella garanzia e quindi sono a pagamento! La garanzia perde la sua
validità se l’apparecchio è sottomesso all’intervento di terzi.
(*): cursori, ganci impastatori, cinghie di trasmissione, telecomandi
di ricambio, spazzolini di ricambio, lame di seghe, manopole,
guarnizioni, timer, ltri ecc.
DOPO LA GARANZIA
Quando la garanzia è scaduta, le riparazioni devono essere effettuate da
un negozio od un servizio specializzato, contro pagamento.

Manuale d’istruzioni FR3505N FRIGGITRICE AD ARIA
dcg16.it
19
DCG SRL
Via G. Garibaldi 68 - 20861 Brugherio (MB)
MADE IN CHINA
Table of contents
Languages:
Other DCG Fryer manuals


