Decathlon MAGNET 5000 User manual

NOTICE D’UTILISATION
OPERATING INSTRUCTIONS
MODO DE EMPLEO
GEBRAUCHSANWEISUNG
ISTRUZIONI PER L’USO
GEBRUIKSHANDLEIDING
MANUAL DE UTILIZAÇÃO
INSTRUKCJA UŻYTKOWANIA
MAGNET 5000

MAGNET 5000
Réalisation : EVOLUTION + 32 / 69 88 87 89
DECATHLON
4, Boulevard de Mons - 59665 Villeneuve d'Ascq - France
GARANTIE ANS EN USAGE NORMAL
GUARANTEE YEARS UNDER NORMAL USE
GARANTIA AÑOS EN CONDICIONES DE USO NORMAL
GARANTIE JAHRE BEI NORMALEM GEBRAUCH
GARANZIA ANNI IN CONDIZIONI D’USO NORMALE
WAARBORG JAREN BIJ NORMAAL BEGRUIK
GARANTIDO ANOS EM USO NORMAL
GWARANCJA LATA PRZY NORMALNYM UŻYTKOWANIU
2
Made in Taïwan
Notice à conserver
Keep these instructions
Bitte bewahren Sie diese Hinweise auf
Istruzioni da conservare
Conservar instrucciones
Bewaar deze handleiding
Instruções a conservar
Bevar vejledningen
Zachowaj instru cję

3

4
MONTAGE • ZUSAMMENBAU • ASSEMBLY • MONTAGGIO •
MONTAJE • AFWERKING • MONTAGEM • MONTAŻ

5

ENGLISH
10
The MAGNET5000 is a new generation fitness bike, for private home use.
The product is equipped with a magnetic transmission for improved pedalling comfort with no lurching or jolts.
The MAGNET5000 is guaranteed for 2 years, with 1 year for wear parts and labour.
This guarantee applies to normal home use by an individual.
GUARANTEE
PRESENTATION
The exercise bike provides an excellent kind of cardio-training activity. Training
on this equipment is designed to increase your cardio-vascular capacity. On this
principle, you improve your physical condition, your endurance and you burn
calories (an indispensable activity for weight loss in association with dieting).
Finally, the exercise bike allows you to tone the muscles in the legs and buttocks.
The muscles in the calves and the lower abdominals are also worked.
PARTS OF THE
BODY WORKED
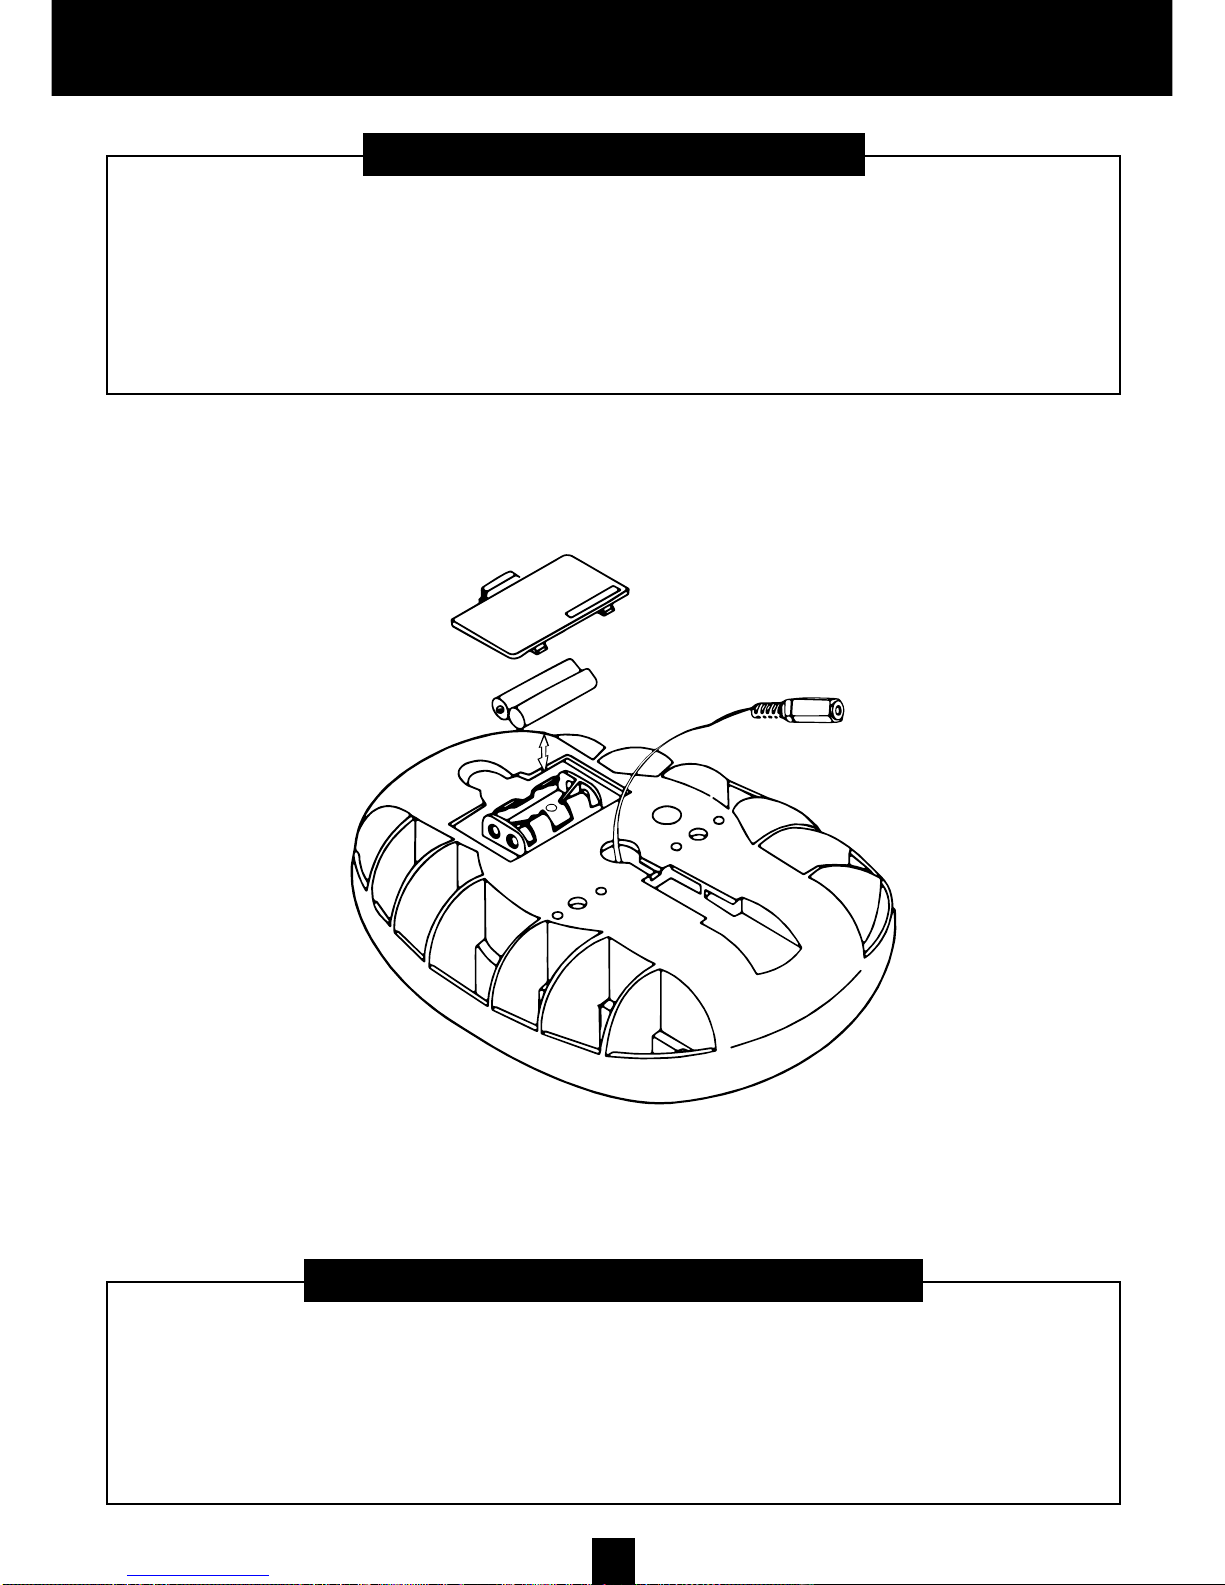
Prior to each use, check that the fastening components have been tightened
and are not protruding; also check the state of the parts most subject to wear.
Have any defective part immediately replaced by the After-Sales Service
Department of your DECATHLON store and do not use the fitness bike until
it has been repaired. Never store the MAGNET5000 in a humid environment
(near a pool, in the bathroom, etc.).
MAINTENANCE
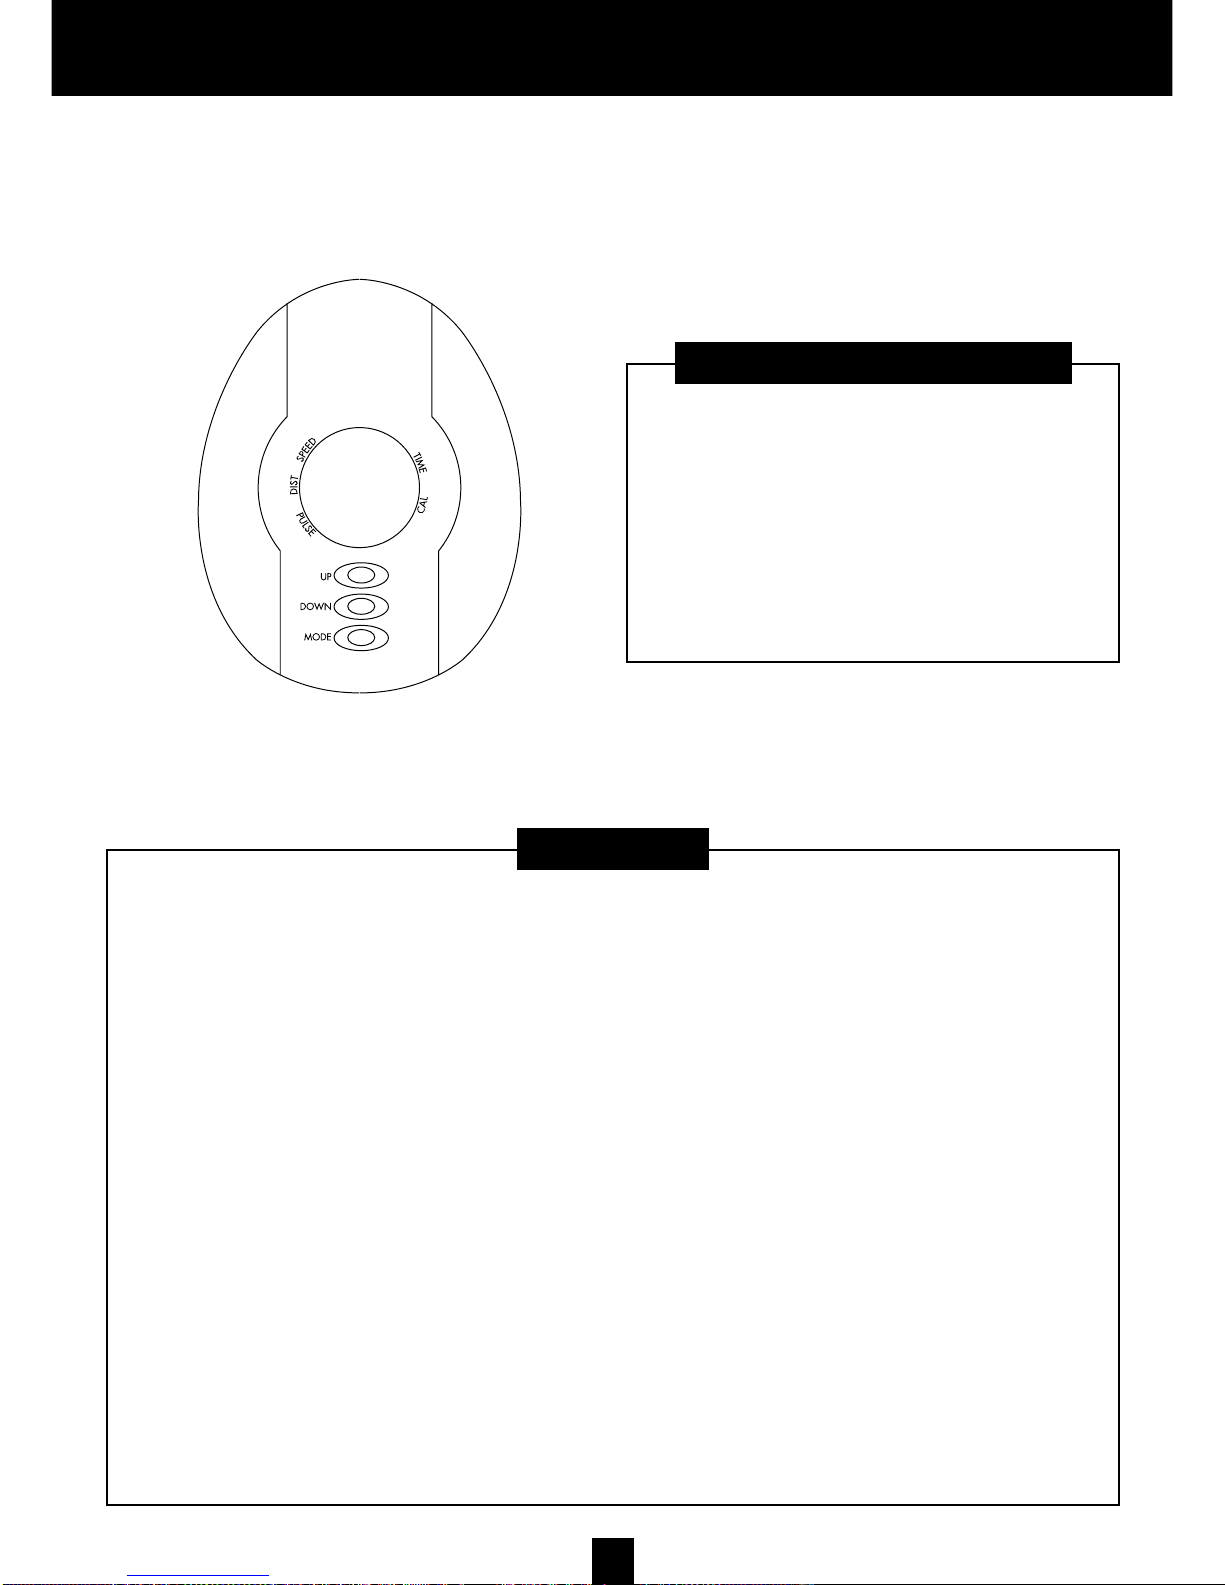
Please note: it is necessary to get off the bike in order to make
all adjustments (saddle, handlebars)
- Saddle height is adjusted with a rapid system. Unscrew the thumbwheel, pull
on the thumbwheel and slide the saddle stem up or down. Ensure that the
thumbwheel engages at the desired level. Re-tighten the thumbwheel to avoid
any play in the saddle.
- To adjust the hardness of pedalling action, use the indexed thumbwheel located
at the front of the handlebar.
Adjustment of saddle depth:
- To make this adjustment, you must first get off the fitness bike.
- Slide the saddle until it is in the desired location.
- Firmly tighten the thumbwheel to avoid any sliding or play.
ADJUSTMENTS
• The device must be assembled by an adult.
• Set up your fitness bike in a room that is sufficiently large for safe use.
• Install the MAGNET5000 on a solid base with correct levelling to the floor.
• Read the usage recommendations carefully before starting your training.
• Never allow children to play near the bike during your training sessions.
• Do not allow children to use the device.
• This device is in accordance with the EN-957-1 and 2 class H standards
pertaining to home use.
• Maximum user weight: 110 kg.
• Before starting any physical training activity, consult a doctor in order to
ensure that there are no contra-indications.
SAFETY TIPS
USAGE
To use your fitness bike under the best conditions, adopt
an anatomical position: the back straight with the arms at
rest. Adjust the saddle height so that when you extend
your leg, with the knee slightly bent, the middle of your
foot just reaches the pedal when it is in the lowest
position.
When just starting out, begin by training over several
days with a slight resistance and pedalling speed, without
forcing, and taking rest breaks as needed. Then
progressively increase the frequency or duration of your
exercise sessions.
WEIGHT MAINTENANCE/WARM-UP:
Progressive effort starting at 10 minutes.
For a workout designed either to keep you in shape or for re-
education purposes, you may train every day for around ten
minutes. This type of exercise is designed to stimulate your
muscles and joints or may be used as a warm-up to
additional physical activity.
To increase the muscle tone of the legs, select a higher
resistance and lengthen the exercise period.
Of course, you may vary the pedalling resistance throughout
your exercise session.
AEROBIC FITNESS WORKOUT:
Moderate effort for a fairly long period (35 min
to 1 hour).
If you wish to lose weight, this type of exercise, combined
with a diet, is the only way to increase the quantity of
energy consumed by the organism. Nevertheless, it is
pointless to push yourself beyond your limits. It is the
regularity of training that will allow you to obtain the best
results.
Select a fairly weak pedalling resistance and exercise at
your own rhythm, but at least for a period of 30 minutes.
This exercise should raise a slight sweat but should under
no circumstances leave you breathless. It’s the duration of
the exercise, at a slow rhythm, that will require your
organism to draw its energy from your fat reserves
provided that you pedal for more than thirty minutes, a
minimum of three times a week.
AEROBIC TRAINING FOR ENDURANCE:
Sustained effort for 20 to 40 minutes.
This type of training targets significant reinforcement of the
cardiac muscle and improved respiratory activity.
The resistance and/or speed of pedalling is increased so as
to increase respiration during the exercise. The effort here is
more sustained than for the maintenance workout.
As your training progresses, you will be able to sustain the
effort for longer periods, at a faster rate or with a higher
degree of resistance. You may train a minimum of three times
a week for this type of training.
Training at a faster rate (anaerobic workout and workout in
the red zone) is reserved for athletes and requires adequate
preparation.
After each training session, take several minutes to pedal
with diminishing speed and resistance in order to cool down
and progressively bring the body to a state of rest.

11
Warm-up phase : progressive effort.
Warming up is a preparatory phase before any activity. It puts the person INTO OPTI-
MUM CONDITIONS for carrying out his or her favorite sport. It is a METHOD OF PRE-
VENTING ACCIDENTS TO TENDONS AND MUSCLES. There are two aspects :
WAKING UP THE MUSCULAR SYSTEM, GENERAL WARMING UP.
1) The muscular system is prepared in a SPECIAL STRETCHING SESSION which PRE-
PARES FOR EACH ACTIVITY : each group of muscles is used, joints are used.
2) Global warming up gradually brings the cardiovascular and respiratory system
into action, improves irrigation of the muscles and prepares for making efforts. It
must be sufficiently long : 10 min for a leisure sport activity, 20 min for a compe-
tition sport activity. Note that warming up must be longer : after 55 years old, in
the morning.
Training
TRAINING is the main phase of your physical activity. You can improve your physi-
cal condition by REGULAR training.
• Anaerobie exercice to develop endurance.
• Aerobic exercice to develop cardio-pulmonary resistance.
Slowing down
This is the continuation of an activity at low intensity, the gradual “return to rest”
phase. SLOWING DOWN brings the cardiovascular and respiratory system, the
blood flow and muscles back to “normal” (eliminating the counter effects of an exer-
cice, such as lactic acids, the accumulation of which is one of the major causes of
muscular pains such as cramps and stiff muscles).
Stretching
STRETCHING must follow the slowing down phase while joints are still warm in order
to reduce risks of injury. Stretching after an activity : minimizes MUSCULAR STIFF-
NESS due to an accumulation of LACTIC ACIDS, “stimulates” BLOOD
CIRCULATION.
CARDIO - TRAINING
PHASES OF A PHYSICAL ACTIVITY
CONTROLLING YOUR HEARTBEAT
It is vital to measure your pulse periodically in order to control your
degree of exercising. If you do not have an electronic measuring device,
follow this procedure :
To take your pulse, position two fingers : on the neck, or below the ear,
or at the inside wrist beside the thumb.
Do not press too hard : excessive pressure reduces the blood flow and
can slow down the heartbeat. After counting the pulsations for 30
seconds, multiply by 2 to obtain the number of pulsations per minute.
Example : 75 pulsations counted in 30 seconds corresponds to a heart
beat of 150 pulsations per minute.
CARDIO-TRAINING EXERCICE
AB
C
D
• Exercise from 80 to 90% and
beyond : Anaerobic zone and red
zone reserved for high perfor-
mance and specialised athletes.
• Exercise of 70% to 80% of the
maximum cardiac rate :
Endurance exercise.
• Exercise from 60 to 70% of the
maximum cardiac rate : Getting
fit / favourable consumption of
fat.
• Exercise from 50 to 60% of the
maximum cardiac rate :
Maintenance /Warm up.
200 195 185
190 180 175 170 165 160 155
20
60%
70%
80%
100%
60%
50%
70%
80%
100%
25 30 35 40 45 50 55 60 65
160 156 148
152 144 140 136 132 128 124
140 136 129
133 126 122 119 115 112 108
120 117 111
114 108 105 102 99 96 93
100 97 92
95 90 87 85 82 80 77
50%
WARNING, TECHNICAL INSET
WARNING TO USERS
You must work towards getting fit in a controlled
manner.
Do no hesitate to consult a doctor before any
physical activity, especially if : you have not
practiced any sports activities in recent years,
you are more than 35 years old, you are not sure
about your health, you are following medical
treatment.
CONSULT A DOCTOR
BEFORE PRACTISING ANY SPORT.
Beats per minute
Exercice range
Age
Cardio-training exercice is a form of aerobics (conditioning the body in the presence of oxygen) and allows you
to improve your cardio-vascular capacity. To be more precise, you will improve the tonicity of the heart and
your blood vessels. Cardio-training exercice carries the oxygen breathed in from the air to your muscles. It is
the heart that pumps this oxygen through the body and, in particular, to the muscles being exercised.
ENGLISH

ENGLISH
12
BC-85352 COUNTER
INSTRUCTION MANUAL
MODE Key: Allows you to select which data you wish to program: the choice
of data to be programmed follows this chronology: Exercise duration, distance
to be covered, calories to be burned and desired heart rate. The data to be
programmed will blink when you press on the MODE key. To avoid having to
reset your data, do not press the MODE key.
Hold the key down for 2 seconds to return values to zero.
UP Key: Allows you to increase the value of the function selected: Time -
Distance covered - Calories burned - Heart rate.
DOWN Key: Allows you to reduce the value of the function selected: Time -
Distance covered - Calories burned - Heart rate.
KEY FUNCTIONS
USAGE
PROGRAMMING THE DEVICE:
Exercise duration:
Stopwatch function: the counter displays the exercise duration from 0 to 99
minutes 59 seconds.
Countdown function: sets the desired exercise duration from 1 to 99 minutes,
with an alarm that sounds when the time has expired.
How to preset the time:
Press on the MODE key until the word “TIME” appears and blinks.
Press on the UP key to increase the exercise time. Press on the DOWN key to
reduce it. Stop pressing when you have reached the desired duration.
Wait 5 seconds without pressing any keys. The recently programmed data will
then be saved. Just start your exercise to start the time running.
An alarm will alert you 12 seconds before the end of the exercise. Press any key
to turn it off.
Speed:
Your instantaneous speed is displayed throughout the exercise.
Calories burned:
The counter displays the number of calories burned during the duration of the
exercise from 0.0 to 999 kilo calories (Kcal).
You may also program the number of calories you wish to burn from 1 to 999
Kcal (use the same procedure as for the time). An alarm will sound once you
have reached the value set. Follow the same procedure for cutting the alarm.
Please note: the calculation of calories burned is an estimation and should not
be interpreted as medical data.
Distance covered:
The counter displays the distance covered from the start of the exercise, from 0.1
to 999.9 km.
You may also set the distance you wish to cover from 0.1 to 999.9 km. An alarm
will sound once the value has been reached.
Follow the same procedure as for setting the time.
Heart Rate:
When your palms are positioned over the sensors, the counter displays your
heart rate (pulse) in number of beats per minute (BPM) on the LCD screen, as
indicated in the diagram below.
Determination of maximum heart rate:
Select the maximum value to be reached between 90 and 240 beats per minute.
Follow the same procedure for setting the time. The system will determine your
instantaneous heart rate and if you reach your maximum value, the display will
start to blink until your pulse returns to below this value. Please note: no alarm
will sound.
Comment: If you do not select a value for your heart rate, the default value of
90 beats per minute will be utilised. In this case, the display will start to blink
when you exceed the threshold of 90 beats per minute.
Note: If no information on your heart rate is detected for a period of 16
seconds, the display will indicate the letter " P ".
Press on any key to restart the heart rate function.

13
ENGLISH
MEDICAL WARNING
Please note: The measurement always starts from 90 PBM and requires a
stabilisation time (around 30 seconds). During the exercise, the time to calculate
the beats per minute requires an interval of roughly 20 seconds between the
actual and displayed heart rates.
The information communicated by your counter is only a guide line and does not
have scientific value. The data displayed may vary depending on the position of
the palms and the pressure placed on the product. If your hands do not have
good contact with the sensors, the measurement will be affected.
This device is not intended to be used to make a medical diagnosis nor for
purposes of prevention of cardiac problems.
Consult a doctor before undertaking any training program, especially if you have
experienced an extended period of inactivity, if you have cardiac problems, if
you smoke or if you suffer from hypertension and / or excess weight.
If you use a pacemaker or cardiac stimulator, please do not use a heart monitor
without first consulting your doctor.
REPLACING THE BATTERY
Make sure that you install 2 LR6 (AA) 1.5-Volt batteries in the proper place at the
back of the counter.
Make sure that the batteries are correctly positioned and that you have respected
the polarities.
Nonetheless, should the display not appear or appear only partially, remove the
batteries, wait 15 seconds and put them back.
The display values are systematically reset to zero when the batteries are
removed.
If you do not intend to use the counter for an extended period, remove the
batteries in order to avoid oxidation of the contacts, which could adversely effect
the functioning of your apparatus.
To protect the environment, collect used batteries and dispose of them properly.
+
+
-
-
Table of contents
Other Decathlon Exercise Bike manuals