Decibullz CUSTOM MOLDED TRUE WIRELESS EARPHONES User manual

CAUTION:
CHOKING
HAZARD
WHAT IS INCLUDED
Decibullz True Wireless
Earphones (L&R)
Decibullz Custom Molded
Earpieces (L&R)
Charging Case
Silicone Canal Tips
(S,M,L)
Molding Tool
USB-C
Charging Cable
HOW TO USE
EARBUD FUNCTIONS
DIGITAL AWARENESS
These earphones come equipped with a Digital Awareness
feature that allows you to hear your surroundings when you
choose to. Simply quick double press the logo button on
the left earphone to turn Digital Awareness On and Off.
90DB SAFETY FEATURE
To better protect you, these earphones have been equipped with a
safety feature that automatically turns off Digital Awareness (if in
use) when sounds above 90dB are detected. Digital Awareness will
automatically turn back on when external sounds drop below 90dB.
CUSTOM MOLDED
TRUE WIRELESS
EARPHONES
Keep away from children. Parts are
nontoxic but may interfere with
breathing if caught in windpipe.
WARNINGS
The molding process involves heating your molds in very hot water
and forming them to your ears. DO NOT PLACE THE HOT MOLD INTO
YOUR EAR! Wait until the mold is warm and pliable.Do not leave
your earphones or custom molds in your car or any other place that
may expose them to temperatures above 120°F/49°C.The molds
will melt and your earphones can become damaged.
PAIRING TO YOUR DEVICE
Remove both earphones from the charging case. After a few seconds,
the right earbud will begin to flash red and blue. Now on your device,
go to the Bluetooth settings and select "DECIBULLZ".
Join the Decibullz community on social media for the latest
product news, special discounts and promotions.
PAIRING
INDICATOR
LIGHT
MUSIC CONTROLS
Play–Quick press logo button (L or R)
Pause –Quick double press logo button (R)
Digital Awareness On and Off – Quickly double press the logo (L)
Volume–Quick press logo button (R)
Volume–Quick press logo button (L)
Skip Forward – Long press (2 sec.) logo button (R)
Skip Backward – Long press (2 sec.) logo button (L)
OTHER FUNCTIONS
Power On Without Charging Case
Long press logo button for 2 seconds (L and R)
Power Off Without Charging Case
Press and hold logo button for 5 seconds (L and R)
VOICE ASSISTANT
& CALLING
Voice Assistant – Pause audio (if listening) and double quick
press logo button (R)
Answer Call – Quick press logo button (L or R).
Silence a Call – Long press (2 sec.) logo button (L or R)
Case Battery Light
1 Flash for every 25% of battery remaining in the charging case.
Solid light for charging or charged.
L and R Case Lights
The L and R lights will illuminate when the earphones are
charging and will turn off when they are fully charged.
LOGO
BUTTON LED LIGHTS
BATTERY CASE LIGHT
L & R CASE LIGHTS
Earphone LED
Alternating red and blue lights means the
earphones are in pairing mode.
@decibullz
@decibullz
@decibullz
@decibullz
FOLLOW US
USE #DECIBULLZ
@decibullz
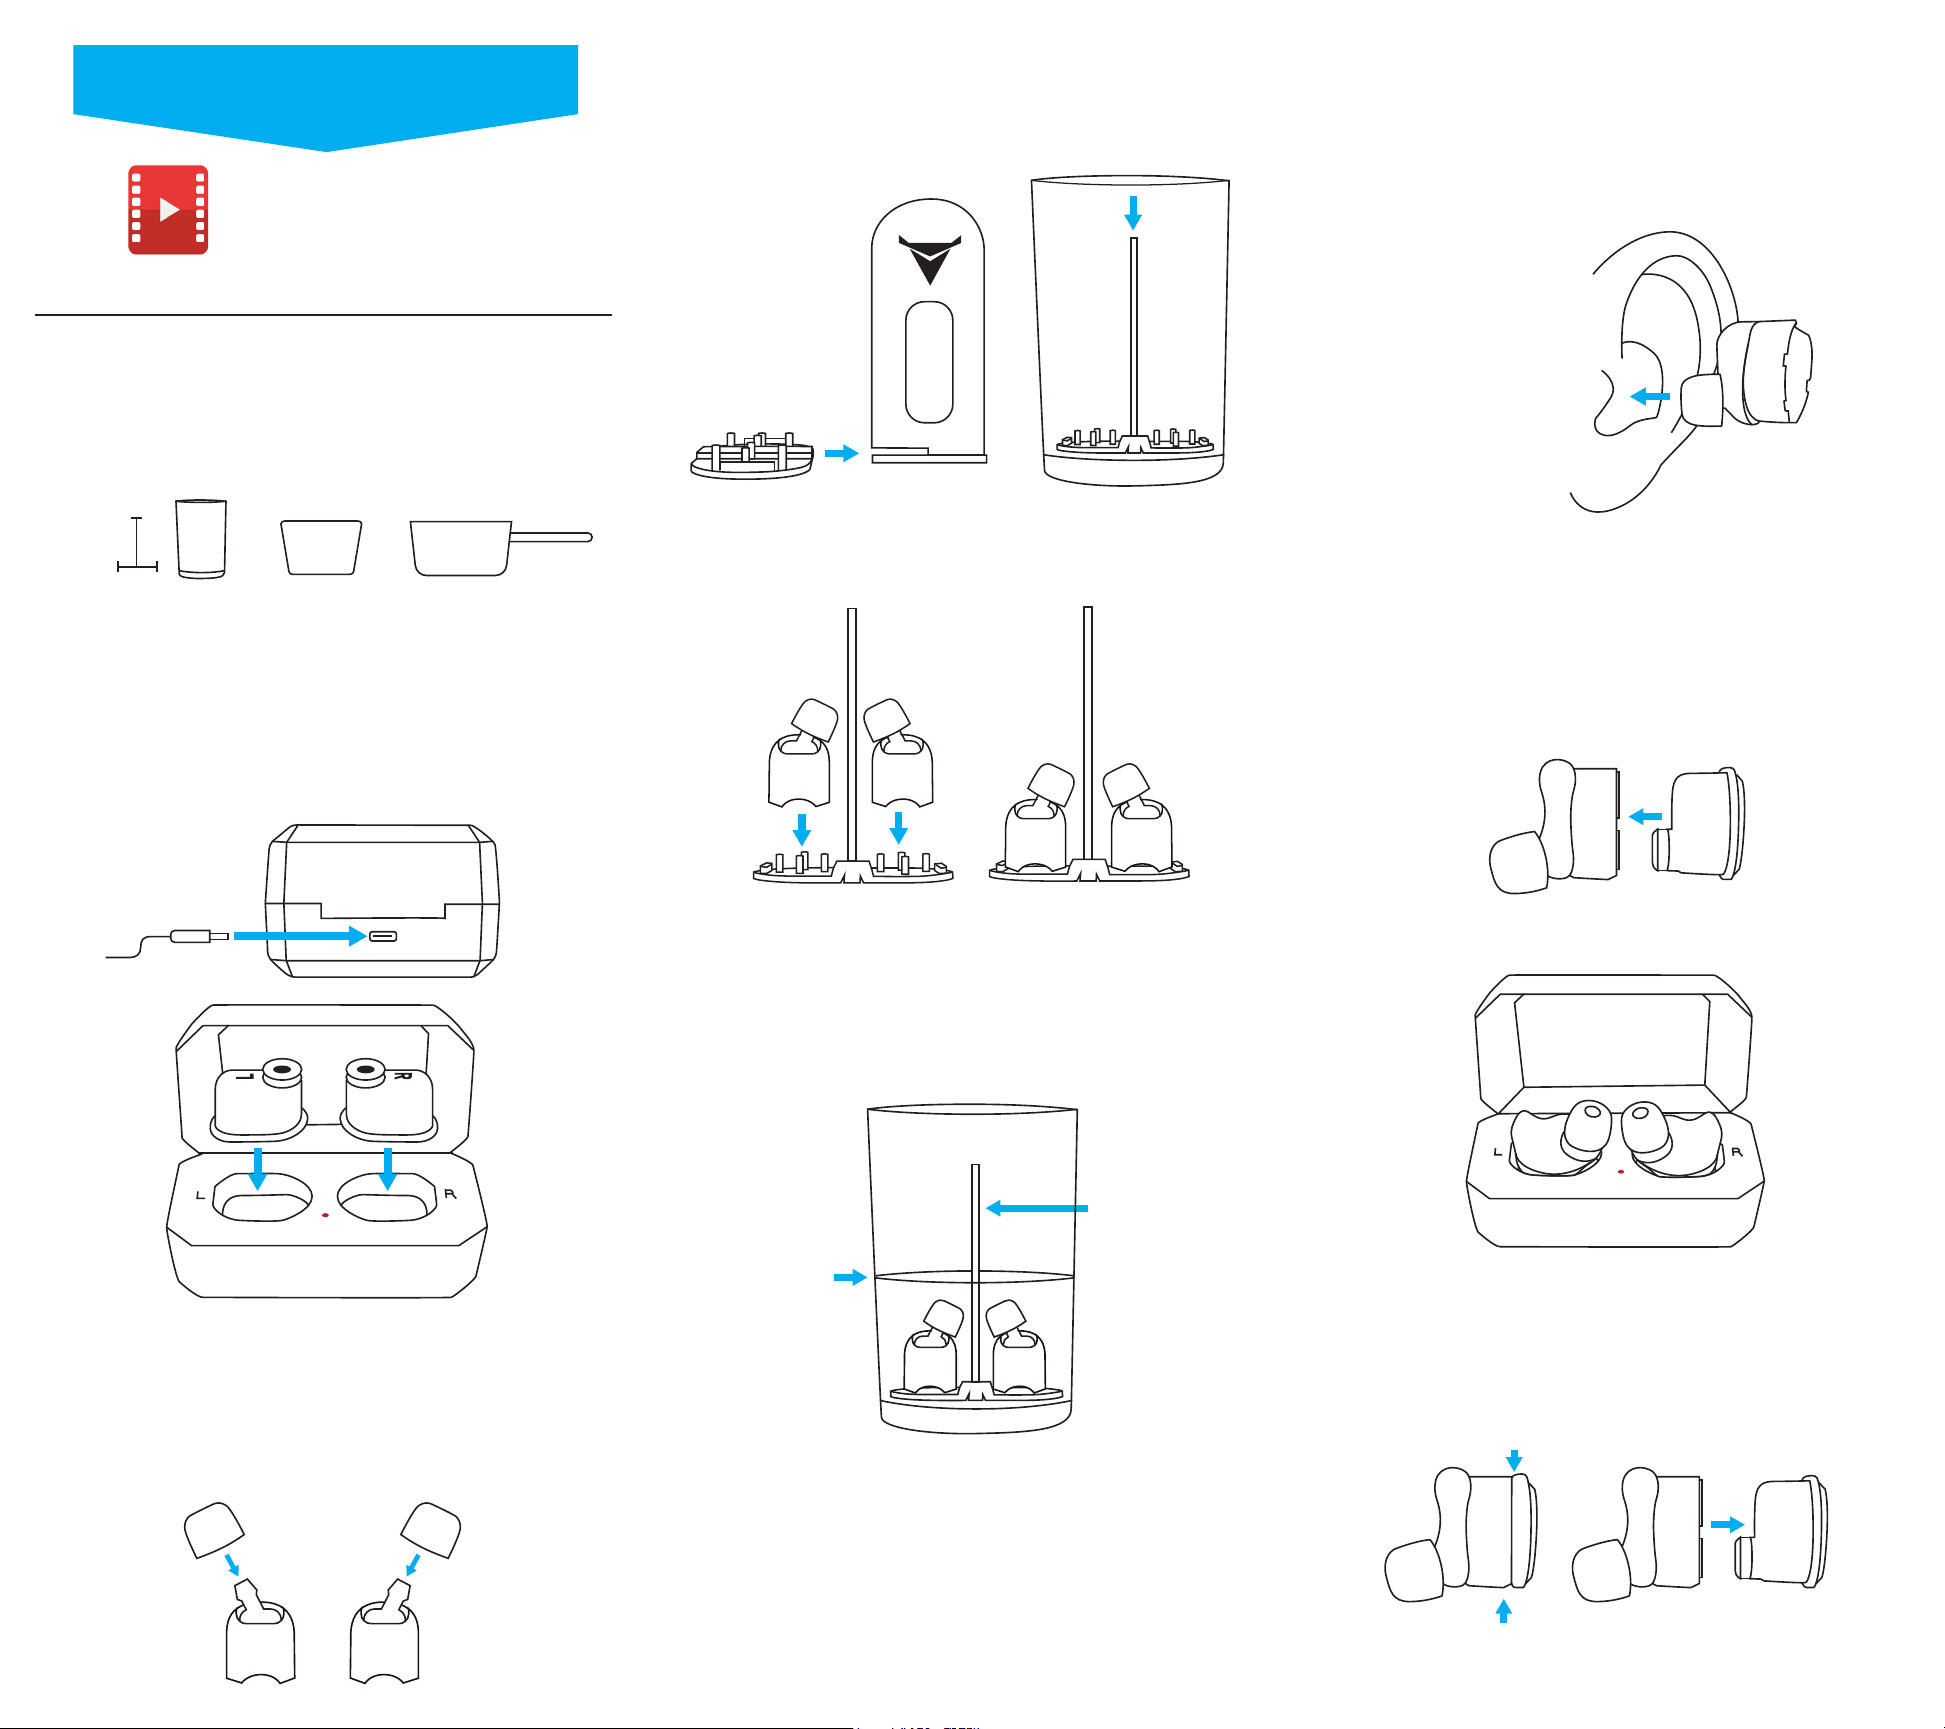
STEP 2
Select silicone tip size
Choose the silicone tips that will fit you best and securely place them onto
the custom earpieces. Check to make sure the silicone tips are securely
attached. ONLY PLACE THE CUSTOM MOLDS AND THE MOLDING TOOL INTO
THE WATER. DO NOT PLACE EARPHONES INTO THE WATER!
STEP 3
Place custom molds on molding tool
Assemble molding tool as shown.Test the molding tool to
make sure it fits into your container and sits flat on the base.
Place custom molds on the molding tool making sure the left and
right earpieces are on the left and right side of the molding tool.
STEP 4
Heat water to a boil
Stovetop: Boil 3in of water and remove from heat source.
Kettle or Microwave: Fill a container with 3in of boiling water. Slowly insert
the molding tool and earpieces into the hot water and let sit for 5 minutes.
STEP 5
Preparing to mold the earpieces
Carefully remove the molding tool and molds from the hot water and
remove one of the custom molds. Place the tool and remaining
earpiece back in the water. Wait 30 seconds for the earpiece, that you
have just removed from the molding tool,to cool.
STEP 7
Snap in the earphones
Once the earpieces have cooled for 4 minutes, remove them from your
ears and snap in the earphones. Make sure the right earphone goes
into the right earpiece and the left earphone goes into the left earpiece.
STEP 6
Molding the earpieces
Be sure the “R” custom mold goes in your right ear.The silicone tip should be
towards the bottom. Now firmly press the earpiece into your ear. You may need to
press and smooth the molding material slightly for a cleaner appearance.
Immediately repeat the process for the other ear with the remaining mold. Leave
the earpieces in your ear for 4 minutes to cool.Repeat the process for the other ear.
Note: You will not feel an acoustic seal until the
earphones are inserted in the next step.
For the best results, watch
our instructional video at
www.decibullz.com/truewireless
STEP 1
Charge the case and earphones
Place the earphones into the charging case and fully charge earphones and
charging case before setting up. The left earphone will only charge in the
left cavity and vice versa.The "L" & "R" on the charging case will light up
while the earphones are charging. If the Custom Molded Earpieces are
attached to the earphones remove them at this time.
CAUTION: DO NOT PLACE
THE MOLD INTO EAR WHILE IT
IS HOT! WAITUNTIL THE
MOLD IS WARM AND PLIABLE.
TIP Using a mirror can make the process easier.
CAUTION:
WATER AND
OTHER ITEMS WILL
BE VERY HOT.
Place both earphones back into the charging case and
follow pairing and use instructions on the next page.
HOW TO MOLD
REMOLDING
If you do not feel an acoustic seal after molding try various sizes and
combinations of canal tips before re-molding. If for any reason you would
like to re-shape your earpieces simply unsnap the earphones from the
custom molds by using the notches to gently release the earphones.
Then repeat steps 2-6.
To separate the custom mold from the earphone, place your thumb and
finger on the notches at the top and bottom of the earphone and gently pull.
USB-C
CABLE
START HERE
Please review these instructions first to familiarize
yourself with the molding process.
YOU WILL NEED
A cup, bowl, or pan at least 4 inches deep with a flat base
at least 3 inches in diameter and boiling water.
3in of Water.
The top of the molding
tool should remain
above the water for
safe removal.
-OR-
4in
3in
-OR-


