Deen brothers SH-ST40D User manual

1
4.2QT DEEP FRYER
Instruction Manual
MODEL SH-ST40D

IMPORTANT SAFEGUARDS
When using electrical appliances, basic safety
precautions should be followed as follows:
• Read all the instructions.
• Do not use the unit for anything other than intended use.
• Never immerse the unit fully into water or other liquid to avoid
damage to the unit.
• Do not leave the unit unattended during operation.
• Do not place the unit on or near gas or electric cooktops to
avoid damages. Never place near flammable materials on or
near the unit.
• Avoid frying solid fats such as butter or animal fat, the high heat
can forcibly release hot contents.
• Make sure the unit is unplugged before moving the unit.
• Place the unit on a level surface away from walls and
cupboards. Do not let the cord hang over the edge of a table or
counter or touch hot surfaces.
• Close supervision is necessary when any appliance is used by
or near children.
• Do not move the appliance during cooking.
• If you are using plastic utensils, do not leave them inside the
appliance when hot.
• Do not touch hot surfaces.
• Do not use the unit near or under surfaces that are heat
sensitive or those that may be damaged.
• Extreme caution must be used since the unit contains hot food,
hot oils and liquids.
• Do not use the unit with an extension cord, always plug into a
wall outlet.
• Unplug from outlet when not in use and before cleaning. Allow
to cool before cleaning.
• To prevent electrical shock do not immerse the cord in water or
other liquid.
• Do not operate unit with a damaged cord or plug or after the
unit malfunctions or has been damaged in any manner.
2

• A short power supply cord is supplied to reduce the risk of the
cord becoming tangled or tripping over a long cord.
• The appliance has a polarized plug (one blade is wider than the
other). To reduce the risk of electric shock, this plug is intended
to fit into a polarized outlet only one way.
• If the plug does not fit fully into the outlet, reverse the plug. If it
still does not fit, contact a qualified electrician. Do not attempt
to modify the plug in any way.
• The unit is equipped with an automated safety switch. This unit
will shut off if it overheats. See page 5 for how to reactivate the
machine.
• Do not use outdoors.
• SAVE THESE INSTRUCTIONS.
3

PARTS IDENTIFICATION
4
1. Lid
2. Basket Handle
3. Frying Basket
4. Removable inner bowl
5. Electric Box
6. Plug
7. TImer Control Knob
8. Power Light
9. Ready indicator
10. Temperature Control Knob
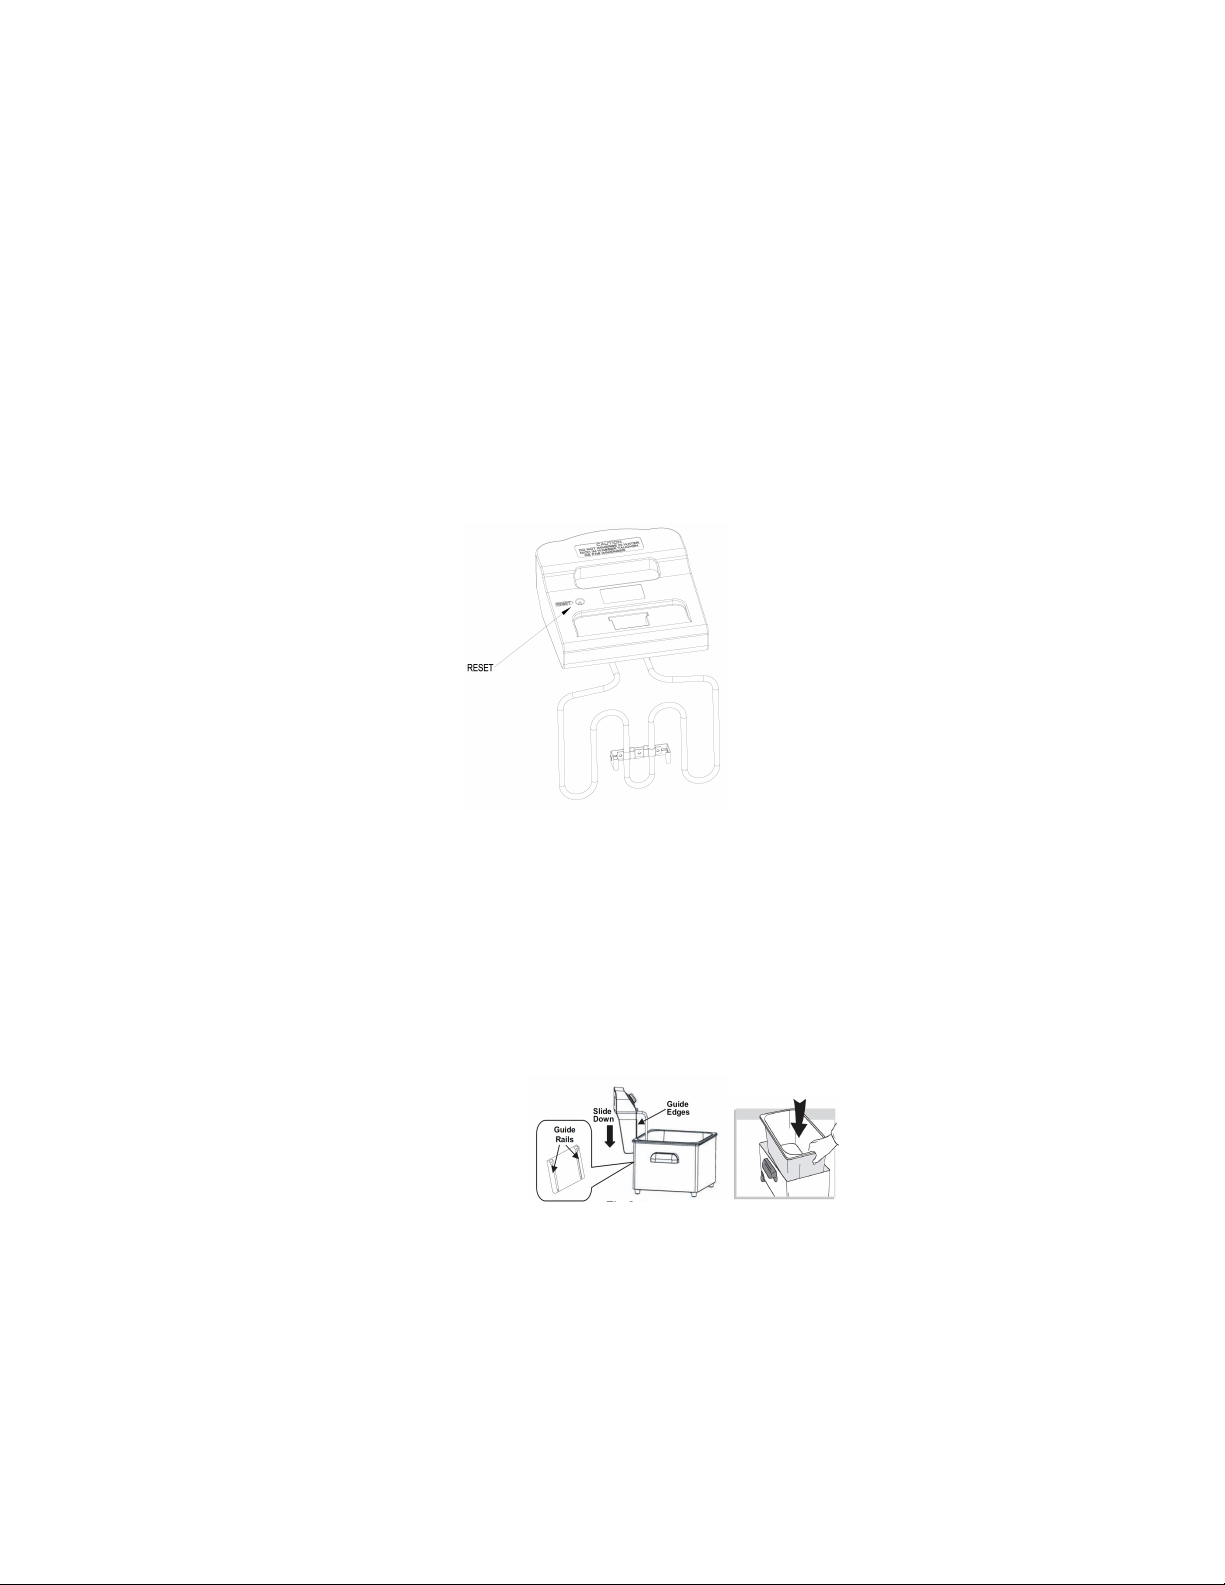
AUTOMATED SAFETY SWITCH
The unit is equipped with a safety cut-out to protect
the appliance from overheating. Below are the steps
needed to reactivate the appliance in the case the
unit turns off:
1. Let the unit cool for 30 minutes.
2. Press the reset button located at the back of the
electric box. See image below.
ASSEMBLING THE UNIT
1. Place the inner bowl inside the unit.
2. Slide the electric box into the guide rails.
3. The frying basket will go on top of the inner bowl in
the unit.
4. Place the handle on the basket by squeezing the
two prongs together. Slide them into the two holes
inside on the basket. Make sure that the prongs
and holes match up, and then release. Next, pull
the handle back to latch it into place around the
loop at the top of the basket.
5

BEFORE FIRST USE
1. Remove all packaging materials. Locate all included parts
before discarding the box.
2. Clean the inner bowl, fryer lid and fry baskets by placing
in the dishwasher.
3. Clean the electric box and heating element with a damp
cloth and mild dishwashing soap.
4. Wipe the outside of the unit with a soft cloth.
USING THE APPLIANCE
1. Place the unit on a level surface. Attach the cord to the
the unit. Note: It is a magnetic power head.
2. Fill the inner bowl with oil. Note: The minimum amount
of oil is 3.2QT and the maximum is 4.2QT.
3. Plug cord into an electrical outlet. Note: If the micro
switch on the electric box is not connected to the unit, it
will not turn on. Ensure it is properly assembled.
4. Select the desired temperature and time.
5. The green power light will illuminate. The red ready light
will then illuminate when the desired temperature is
reached. This should take 8 to 12 minutes to heat up.
Note: The red ready light will intermittently go on and off
during the cooking process.
6. Once the red ready light is illuminate, fill the basket with
food and lower into the inner bowl. Place the lid on the
unit.
7. When cooking time is complete the unit will ding
indicating the selected time has elapsed. Use extreme
caution when lifting the lid as the unit and contents
inside are extremely hot.
8. Carefully lift the basket out of the unit and drain food of
excess oil prior to serving. Unplug unit.
6

REMOVING OIL AFTER USE
Never pour hot oil down the drain, allow the unit to
cool before removing. There are two suggested
ways of removing oil after use in the unit below:
1. Save the container the oil came in and funnel
back into the container. Then dispose of properly.
2. To keep the oil, strain with a sieve and reuse it.
Make sure to store in a cold dark place. Note: Do
not store for more than two months. Dispose of
oil if there are signs of odor, smoke, or
discoloration.
CLEANING
Clean after every use.
1. Ensure the unit is unplugged and let the unit
completely cool for 30 minutes.
CAUTION: To prevent injury or electric shock, do not immerse cord, electric
box or unit in water or other liquid.
2. Clean the inner bowl, fryer lid and fry baskets by
placing in the dishwasher.
3. Clean the electric box and heating element with
a damp cloth and mild dishwashing soap.
4. Wipe the outside of the unit with a soft cloth.
STORAGE
1. Unplug the cord.
2. Make sure all parts are clean and dry.
7

LIMITED ONE YEAR WARRANTY
This warranty covers all defects in workmanship or materials in the parts, arising
under normal use and care in this product for a period of 12 months from the date of
purchase provided you are able to present a valid proof-of-purchase. A valid proof-of-
purchase is a receipt specifying item, date purchased, and cost of item. A gift receipt
showing item and date of purchase is an acceptable proof-of-purchase. Product is
intended for household use only. Any commercial use voids the warranty.
This warranty covers the original retail purchaser or gift recipient. During the
applicable warranty period within normal household use, we will repair or replace, at our
discretion, any part which proves defective, or replace unit with a comparable model.
Shipping and handling costs are not included for warranty replacements and are the
responsibility of the customer.
To obtain service under the terms of this warranty, send an email to
listed on the bottom of this page when contacting us.
THIS LIMITED WARRANTY COVERS UNITS PURCHASED AND USED WITHIN
THE UNITED STATES AND DOES NOT COVER:
•Ordinary wear and tear including scratches, dents or stains.
•Heat discoloration, minor imperfections and slight color variations in the
ceramic coating, metals or glass.
•Damage caused by extreme temperatures changes such as pre-heating
cookware empty, letting liquids boil dry or immersing a hot pot or lid into
cold water.
•Improper cleaning methods causing scratches.
•Damages in transit.
•Defects other than manufacturing defects.
•Damages from misuse, abuse, accident, alteration, lack of proper care and
maintenance.
•Damage from service by other than authorized dealer or service center.
•Shipping and handling costs.
•This warranty gives you special legal rights and you may also have other
rights to which you are entitled which may vary from state to state.
Manufacturer does not assume responsibility for loss or damage for return
shipment. We recommend that you keep your original packaging should you require
repair service. Before returning product please contact our customer care department
for return authorization. When returning product for repair please include your full name,
return address, and daytime phone number. Also include a brief description of the
problem you are experiencing and a copy of your sales receipt or other proof of
purchase in order to validate warranty status.
MODEL DBSH-ST40D
8
Table of contents


