Deity Smart Slate TC-SL1 User manual

Product Manual
English
SmartSlateTC-SL1

-1-
Thank you for purchasing the Deity SmartSlateTC-SL1.
Instructions
Foreword
Please read this product manual carefully.
Keep this product manual. Always include this product manual when passing the products on to
third parties.
Heed all warnings and follow all instructions in this product manual.
WARNING: Do not place the product near any corrosive chemicals. Corrosion may cause
the product to malfunction.
Only use a microfiber or dry cloth to clean the product.
Operate carefully - dropping or hitting the product may cause damage.
Keep all liquids away from the product. Liquids entering the product can short-circuit the
electronics or damage the mechanics.
Store the product in a dry, clean, dust-free environment.
If your product malfunctions, please have it serviced by an authorized shop. The warranty does not
cover repairs to devices that have been subjected to unauthorized disassembly, although you may
request such repairs on a chargeable basis.
The product is certified by RoHS, CE, FCC, KC and Japan MIC.Please adhere to the operation
standards. The warranty does not cover repairs arising out of the misuse of the product, although
you may request such repairs on a chargeable basis.
The instructions and information in this manual are based on thorough, controlled company
testing procedures. Further notice will not be given if the design and specifications change.
FCC Compliance Statement
This device complies with Part 15 of the FCC Rules. Operation is subject to the following two
conditions:
(1) This device may not cause harmful interference, and(2) This device must accept any interference
received, including interference that may cause undesired operation.
Warning: Changes or modifications not expressly approved by the party responsible for compliance
could void the user's authority to operate the equipment.
NOTE: This equipment has been tested and found to comply with the limits for a Class B digital device,
pursuant to Part 15 of the FCC Rules. These limits are designed to provide reasonable protection
against harmful interference in a residential installation. This equipment generates, uses and can
radiate radio frequency energy and, if not installed and used in accordance with the instructions, may
cause harmful interference to radio communications. However, there is no guarantee that interference
will not occur in a particular installation. If this equipment does cause harmful interference to radio or
television reception, which can be determined by turning the equipment off and on, the user is
encouraged to try to correct the interference by one or more of the following measures:
-2-
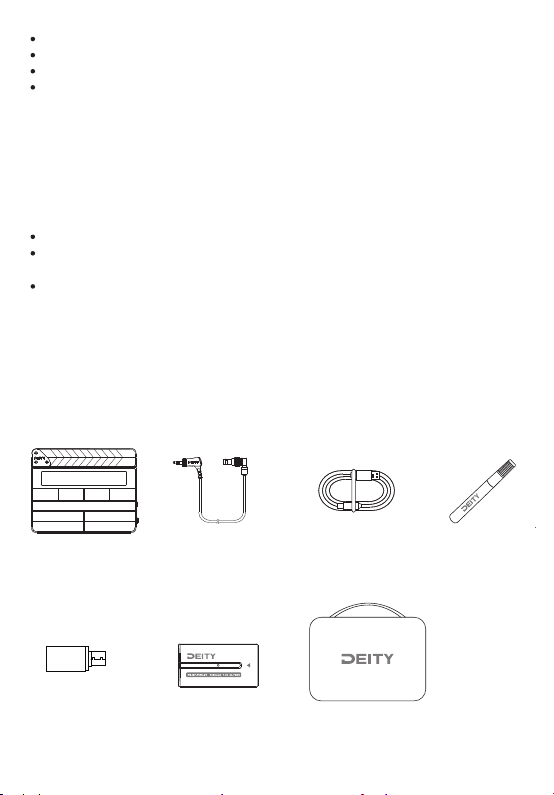
Packing List
Package includes the following items:
USB-C Charging Cable
(1 pc)
TC-SL1
(1 pc)
Erasable Marker
(1 pc)
FB-NP-F550-DT
Rechargeable Battery (2 pcs)
Soft Case
(1 pc)
1. Smart Slate TC-SL1 (Global)
USB-C to USB-A
Firmware Update
Adapter (1 pc)
3.5mm Locking TRS to 5P
Timecode Cable (1 pc)
Intended Use
RF warning statement:
The device has been evaluated to meet general RF exposure requirements. The device can be used in
portable exposure condition without restriction.
Intended use of the Deity Smart Slate TC-SL1 includes:
The user has read the instructions of this manual.
The user is using the products within the operating conditions and limitations described in this
product manual.
“Improper use” means using the products other than as described in these instructions or under
operating conditions which differ from those described herein.
Reorient or relocate the receiving antenna.
Increase the distance separating the equipment and receiver.
Connect the device to a different power supply than that which the receiver is connected to.
Consult the dealer or an experienced radio/TV technician for help.
-3-
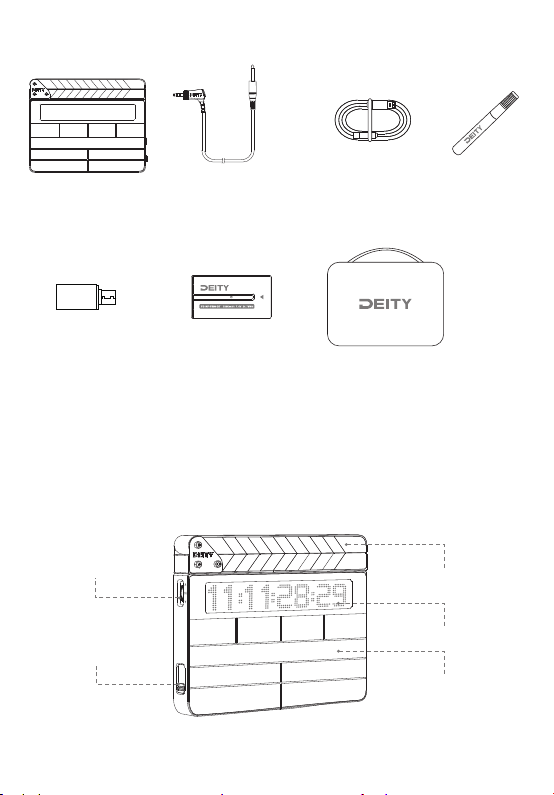
Nomenclature
2. Smart Slate TC-SL1 (EU)
Walnut Clapper Sticks
with Inlaid Chevrons
USB-C Charging Cable
(1 pc)
TC-SL1
(1 pc)
Erasable Marker
(1 pc)
Soft Case
(1 pc)
USB-C to USB-A
Firmware Update
Adapter (1 pc)
3.5mm Locking TRS to
6.35mm Timecode Cable (1 pc)
Red Dot Matrix Display
Function Control Wheel
On/Off Switch
Matte Slate Board
FB-NP-F550-DT
Rechargeable Battery (2 pcs)

-4-
Front Screen Flip Switch
5P Timecode Input/Output
6.35mm TRS Timecode Output
Rear OLED Screen
Handle
A Battery Compartment Slider
A Power LED
B Power LED
B Battery Compartment Slider
USB Type-C Charging Port
1
2
34
5
1=GND
2=TC IN
3=No Signal 4=No Signal
5=TC OUT
* 5-PIN Connector Pin Assignment:

-5-
Deity Timecode Family
TC-1 and TC-SL1 form a highly accurate Deity timecode system . It can easily and
intuitively synchronizes cameras and audio recorders, making the alignment of
captured material a one-click operation. The most eye-catching device is the TC-SL1.
It is primarily used to facilitate timecode workflow in music video and narrative film
productions but also serves as a backup visual reference. This workflow is the
quickest and most cost-effective because it allows you to focus on the creative tasks
involved in post-production.
-6-
Functions and Operations
1. Function Control Wheel
Rotate the wheel back and forth to select various options and short-press the function
control wheel to enter the selected highlighted item. Long-press the function control
wheel to return to the previous screen or menu item.
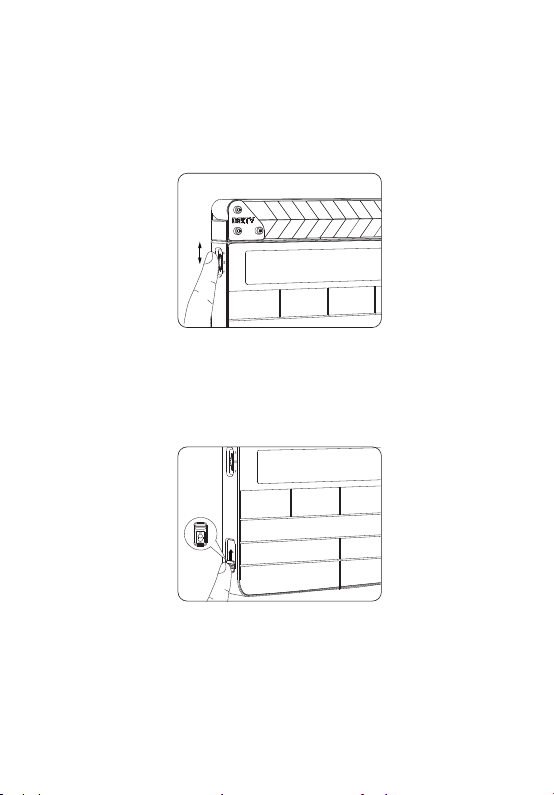
2. On/Off Switch
Slide the switch cover up, toggle the switch up/down to turn the TC-SL1 on/off.
3. A/B Battery Compartment Slider
Unlock the battery compartment slider and the battery will pop out. Insert
batteries, close the cover and push it down to secure it.

-7-
4. Front Screen Flip Switch
Toggle the front screen flip switch up and the display will rotate 180 °, allowing you
to slate upside down for a tail slate.
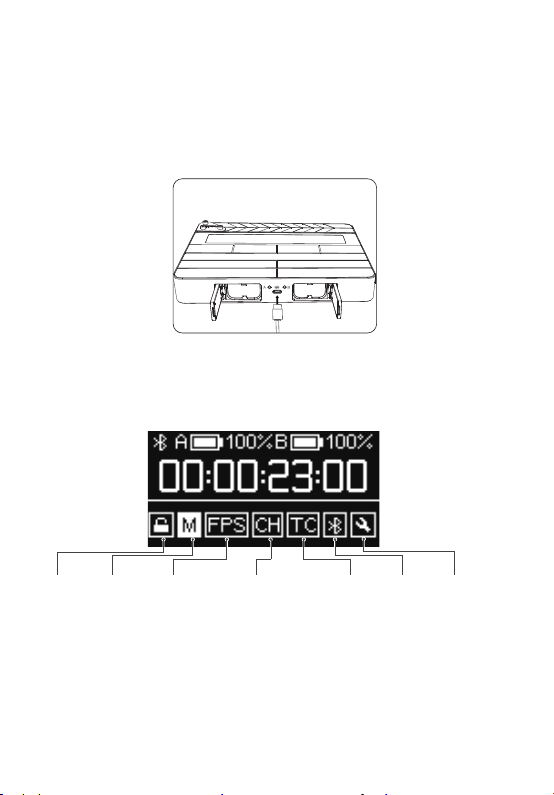
5. Charging
The TC-SL1 features dual NP-F battery bays. Install two FB-NP-F550-DT Rechargeable
Batteries. The TC-SL1 is designed so you can hot-swap the two included NP-F550
rechargeable batteries without having to power down your smart slate. The batteries
are charged using the included Type-C charging cable connected to a DC adapter
(not included).
TC-SL1 supports PD3.0/QC2.0/FCP/AFC quick charging protocols. It is suggested to
use the charger with 15V 2A output to experience the fastest charging.
-8-
6. OLED Display Overview
Channel:
A group~
H group
FPS
Mode:
Master Run
Auto Jam
Jam Once And Lock
Lock/
Unlock
TC:
SYNC
SET
EXT
OFFSET
BT:
ON
OFF
Reset
General Settings:
DID (Deity ID)
BRIGHTNESS
REAR SCREEN
SYS RESET
FIRMWARE
UPDATE
Charging at temperatures below 10 degrees will cause damage to the battery.
The battery is replaceable if performance has declined after years of use.
*The power LED glows green when the battery is in the clear.
* The color changes to red when there is about less than 20% battery life left.
* When charging, the power LED will flash between red and green.
* When fully charged, the power LED stays green.
-9-
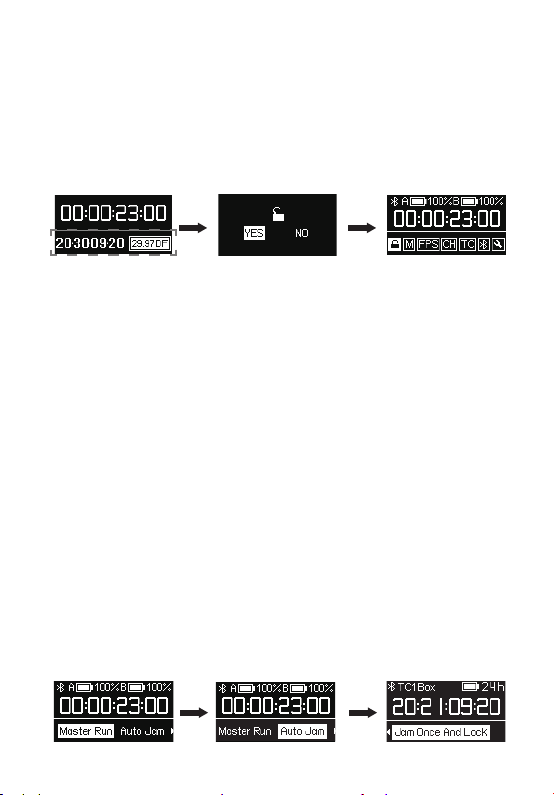
7. Lock/Unlock Setting
Enter the Lock/Unlock option in the main interface and you can select "LOCK" to
lock the rear screen immediately. When the rear screen is locked, the buttons will
not work. This helps to prevent settings from changing during operation. Select
”AUTO” to follow the previous screen locking setting.
You can unlock the screen by short-pressing the Function Control Wheel. A unlock
window pops out and select yes to unlock the rear screen.
Display the clapped
timecode on last closed slate
8. TC-SL1 Mode Selection
Rotate the function control wheel to select the mode and short-press to select the
desired working mode. There are three options:
Master Run:
In this mode your TC-SL1 wirelessly outputs timecode to other TC-1 or TC-SL1 units in
the same group in either Auto Jam mode or Jam Once And Lock mode. It can also be
jam-synced via a 3.5mm cable. It is suggested to use Deity timecode cables: C13, C14
or spare part 6.35mm TRS to 3.5mm TRS cable
Auto Jam:
In this mode your TC-SL1 waits to be jam-synced by an external timecode source.
Jam Once And Lock:
In this mode your TC-SL1 locks after being synced once. The mode changes from
Jam1 to JMD. The TC-SL1 will then not follow any commands from master TC-SL1.
You will need to change the mode to unlock or control TC-SL1 through Sidus Audio™
App.
* The three working modes below can output timecode to other devices. The system default
mode is Master Run.

-10-
9. FPS Setting
Select "FPS " and you can set the frame rate for timecode as 23.98, 24, 25, 29.97,
29.97DF, 30. DF stands for drop frame. The system default frame rate is 25.
We recommend setting a suitable frame rate in advance so the TC-SL1 can feed
each recording device with timecode.
10. Channel Setting
If you don’t have a mobile device at hand, you can synchronize TC-SL1 units with
each other via wireless sync technology if they have the same channel setting.
The system default channel is group A.
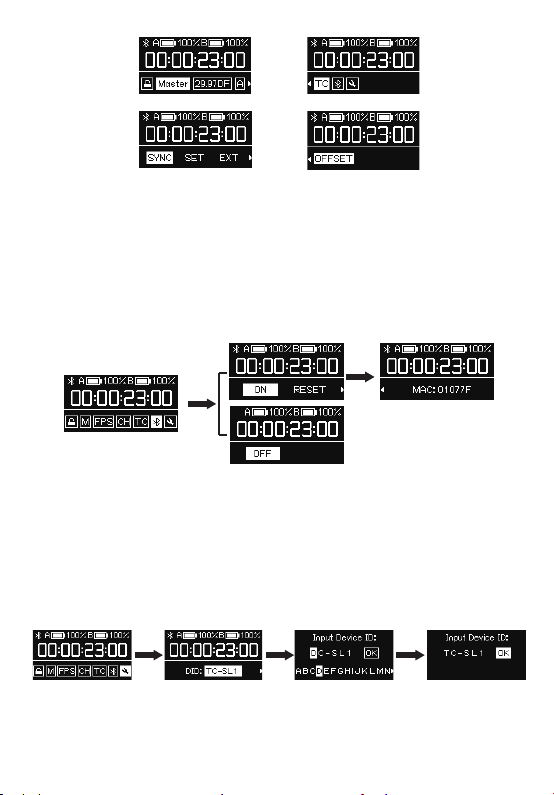
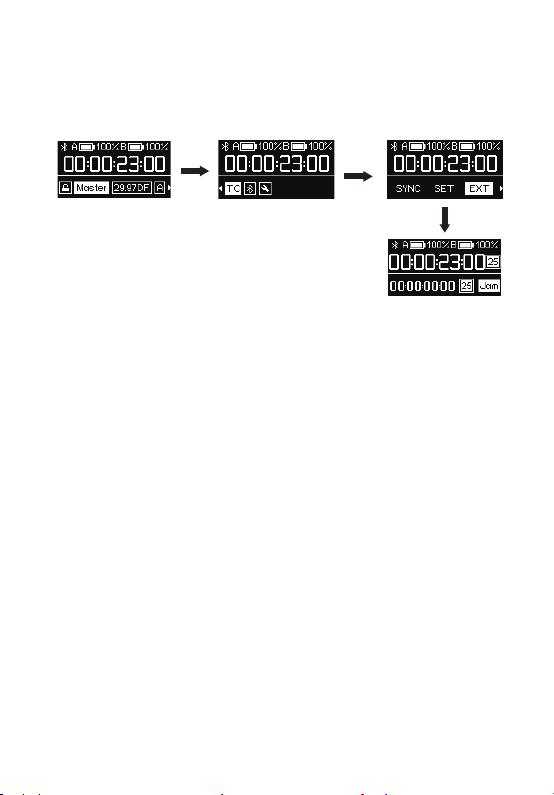
11. TC Setting
When the TC-SL1 working mode is set to "Master Run," there are four options for TC
setting:
SYNC:
Feed timecode to other devices.
SET:
Feed timecode to other devices starting from 00:00:00:00 or any custom
timecode starting point.
EXT:
TC-SL1 can detect and be jam-synced by an external timecode source through
the 5P timecode input jack.
OFFSET:
Shifts the TC output up to +/- 10 frames in .1 increments on only front
display on TC-SL1 against the generator. This allows for compensation of frame
processing delay on TC-SL1 against cameras and TC offset to 3rd party equipment.
-11-
13. General Settings
(1) Enter the "DID" option in General Settings to set a new device name by simply
short-pressing the control wheel. Choosing different names for your TC-SL1 will help
to better identify different TC-SL1 units in the monitoring screen of the Sidus Audio™
App.
12. BT setting
Select BT symbol and you can turn the Bluetooth function on/off. Bluetooth is activated
by default. Select RESET and YES to reset the Bluetooth. The “SUCCESS” message
indicates that the reset is complete.
Rotate the function control wheel , to view the MAC address of your TC-SL1.
-12-
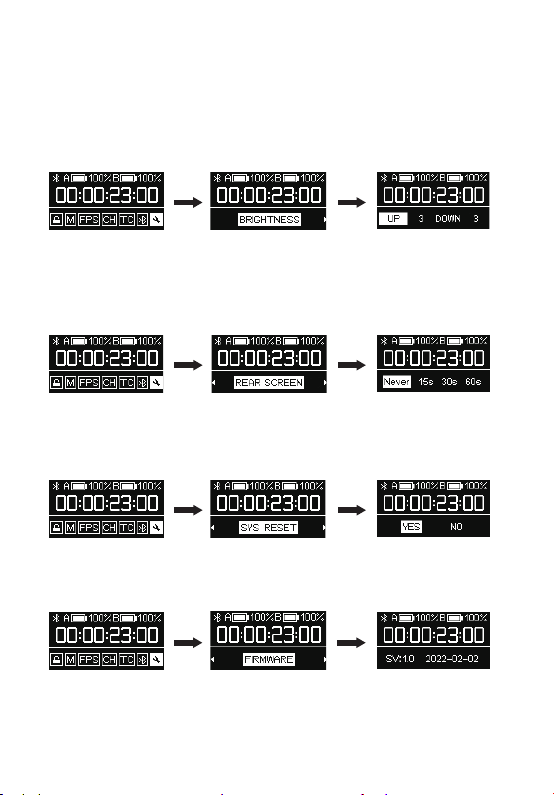
(2) Enter the “BRIGHTNESS” option in the General Settings menu to set the brightness
of red lattice screen and backlight of slate board sticker until desired level. Select
“UP” to adjust the brightness of red lattice screen and “DOWN” to change the
brightness level of backlight of slate board sticker.
(system default “UP” and “DOWN” as level 3). There are seven options for DOWN
option : 0, 1, 2, 3,4,5,6. And there are six options for UP option: 1, 2, 3,4,5,6 . After first
use, TC-SL1 will boot with your last brightness level setting.
(3) Enter the “REAR SCREEN” option in the General Settings menu to set the lock
screen time (system default 15s). The are four options: Never, 15s, 30s, 60s. After first
use, TC-SL1 will boot with your last screen lock setting.
(4) Enter “SYS RESET” option in the menu to reset the system and restore the default
settings.
(5) Enter “FIRMWARE” option to see which FW version your TC-SL1 is running.
-13-
14. Setup Sidus Audio™ App for iOS & Android
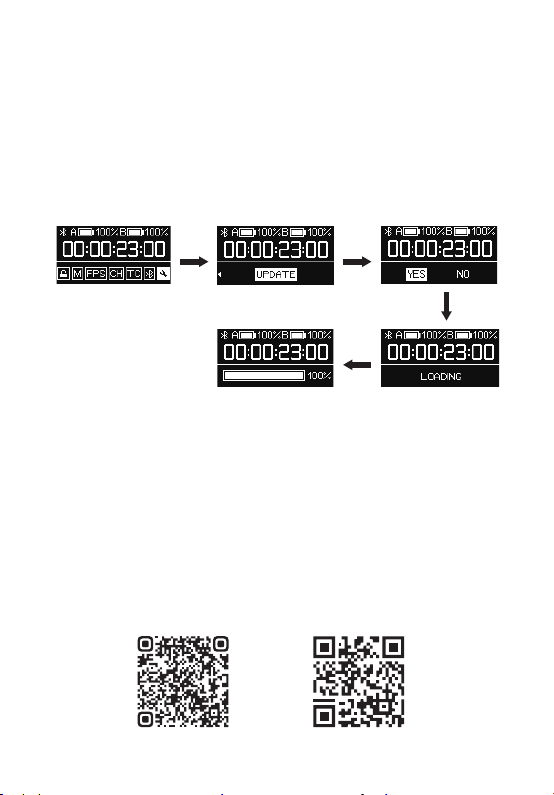
(6) Firmware Update
You can update the firmware with a U disk (exFat/Fat32 USB flash drive). Download
the latest update from our website. Place the Firmware in the root directory of the U
disk. Use the “USB-C to USB-A Firmware Update Adapter” to connect the U disk to the
USB-C input port , select “UPDATE” option from menu, and update the firmware
following the on-screen instructions. After the firmware update is completed, the
updating process bar goes to 100% and TC-SL1 automatically restarts. The firmware
version will reflect the update and you can enter FIRMWARE in the General Settings
menu to check.
* TC-SL1 also supports firmware update via Sidus Audio™ OTA process.
You can download the Sidus Audio™ app from the iOS App Store or Google Play
Store for enhancing the functionality of the TC-SL1. Please visit https://www.si-
dus.link/support/helpcenter for more details regarding how to use the app to
control your Deity Smart Slate TC-SL1.
* The Setup Sidus Audio™ App will need to communicate with your TC-SL1 devices via
Bluetooth. Make sure Bluetooth is activated on your mobile device. You must grant
the app the necessary permissions as well. The Android version also asks for a location
permission. This is only needed to receive Bluetooth data from your TC-SL1.
The App does not use or store your current location data in any way.
sidus.link/support/helpcenterGet Sidus Audio™ App

-14-
15. Timecode Synchronization
TC-SL1 uses a precision oscillator that generates timecode with a high degree of
accuracy (approximately less than 1 frames per 48 hours). You can also use the
TC-SL1 as timecode source. We recommend to feed every recording device with the
timecode from a TC-SL1 to ensure frame accuracy for the entire production.
You can use the included 5P Timecode Cable (excluding the European version ) or a
suitable adapter cable to Jam the TC-SL1 to an external timecode. Follow the steps
below : Set TC-SL1 mode to Auto Jam or Jam Once And Lock . When connected to 5P
timecode cable, TC-SL1 automatically detects and takes over incoming frame rate
and timecode immediately on jam-sync.
If you don’t have a mobile device at hand, you can synchronize TC-SL1 unit with each
other or TC-1 via wireless master sync.
Start one TC-SL1 in Master Run mode and all other TC-1 and TC-SL1 units in Auto Jam
or Jam Once And Lock mode. Set all units to the same channel (A group, for instance).
Enter the master unit’s TC setting , and select SYNC to perform the wireless master
sync using the timecode that master TC-1 is running. All units will synchronize within
a few seconds. You also can select SET to synchronize timecode starting out from
00:00:00:00 or custom starting point.
(1) Cable Sync
(2) Wireless Master Sync
*Even after powering down the TC-SL1, timecode will continue running for 6 hours.
-15-
Note: During Master Run mode, TC-SL1 also can be jam-synced by an external
timecode source or other TC-1 via the 5P cable. Set TC-SL1 mode to Master Run
mode, enter TC setting, select EXT option and TC-SL1 will detect the external
timecode and frame rate automatically. Press the function control wheel to select
Jam and synchronize to an external timecode source.
The Sidus Audio™ App for the TC-SL1 allows you to wirelessly sync a number of
TC-SL1s with each other via Bluetooth. (Tested with more than 20 units). You can
synchronize, monitor, set up, perform firmware updates and change basic
parameters of your TC-SL1 via Sidus Audio™ . This includes settings such as
timecode, frame rate, device name, TOD (Time of Day) timecode and more. Sidus
Audio™ communicates with your TC-SL1 via Bluetooth. Make sure Bluetooth is
activated on your mobile device and TC-SL1. To perform the wireless sync, just
open Sidus Audio™ on mobile device and add all TC-SL1 units to the monitoring
list. In that list you will find the button Set. Before wireless sync it is recommended
to use the DID to set individual device names to better identify TC-SL1 units. Tap
Set Up and a window will pop up with a Sync All option. This will synchronize all
TC-SL1 units to the ”master“ TC-SL1 timecode or TOD timecode it fetches from
mobile device.
· Tap on SYNC for each TC-SL1 to synchronize to this “ master ” TC-SL1 individual.
3) Wireless Sync via Sidus Audio™

The Sidus Audio™ App allows you to define the slate displaying on clap. Successively
apply 0.2 to 5 seconds for FPS, User Bit, Clapped TC and other customized text and
preset pictures.
16. Show Extras/Always Features on Clap
You can download the detailed user manual of Sidus Audio™ here
https://m.sidus.link/support/sidusAudio/index.
-16-
Specifications
Tips: The illustrations in the manual are only diagrams for reference (Apply to SV: 1.1
version). Due to the continuous development of new versions of the product, if there
are any differences between the product and the user manual diagrams, please refer to
the product itself.
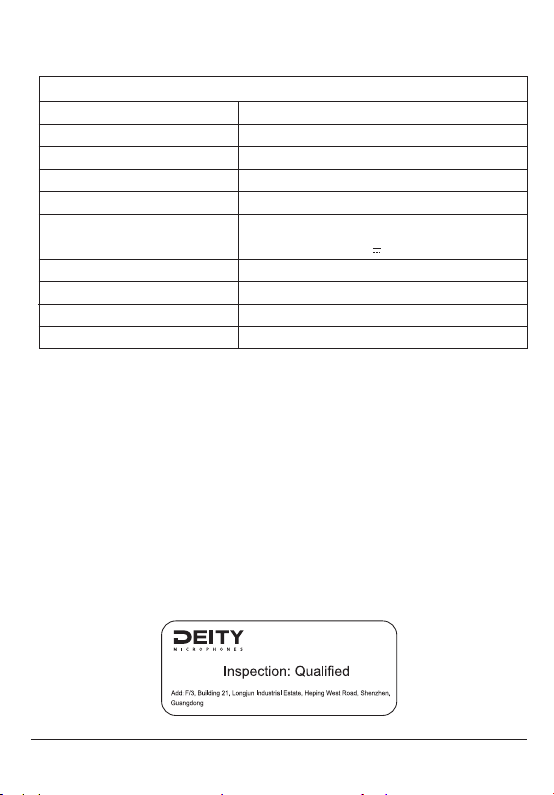
Smart Slate TC-SL1
Timecode
Wireless Type
Display Type
Battery Type
Battery Capacity
Battery Charger
Timecode Accuracy
TC-SL1 Net Weight
TC-SL1 Dimensions
Temperature Range
SMPTE
2.4G RF & Bluetooth
0.96″OLED Display
FB-NP-F550-DT Rechargeable Battery *2 pcs
3350mAh *2
+/-0.5PPM
1130 g
233*185*41mm
–20 °C to +45 °C
Detailed product manual for Smart Slate TC-SL1can be found on www.deitymic.com
-17-
USB-C Quick Charging
(A full charge takes less than 3 hours by using
the charger with
15V 2A output)
Table of contents
Popular Camera Accessories manuals by other brands


PROAIM
PROAIM SL-CSMO-01 instruction manual

SIRCHIE
SIRCHIE FlexOpod FLXP100 technical information

Nauticam
Nauticam SFE2860-F instruction manual

Okina USA
Okina USA SIR-754AILP-IO Operation & installation manual

Sachtler
Sachtler CamCrane EFP user manual

Autel Robotics
Autel Robotics Dragonfish Lite quick start guide