DelAgua Portable Water Testing Kit User manual
The DelAgua Kit Components 1
DELAGUA PORTABLE
WATER TESTING KIT
USER MANUAL VERSION 5.1

DELAGUA PORTABLE
WATER TESTING KIT
USER MANUAL VERSION 5.1

DelAgua Portable Water Testing Kit
User Manual
Revised May, 2017
This equipment was designed to test for the critical parameters specied in World Health
Organization (WHO) Guidelines for Drinking Water Quality, Second Edition, Volume III.
The equipment should only be used by trained personnel familiar with those guidelines.
For more information about the kit and for technical help and guidance, please contact DelAgua
Water Testing Ltd.
DelAgua Water Testing Ltd,
The Old Dairy, Lower Fyeld,
Marlborough, Wiltshire,
SN8 1PY
Tel: +44 1672 861 198
Fax: +44 1672 861 724
Email: [email protected]
Website: www.delagua.org
Facebook: www.facebook.com/delaguawater
Twitter: www.twitter.com/del_agua
Copies of this manual are available in several languages. Please consult our website for current
availability. Abridged versions of the manual are available to download.
If you regularly use the DelAgua water testing kit and have translated the manual into another
language, please send us the translation. Under these circumstances, we normally organise
printing and give free copies to the programme which provided the translation.
We are continually trying to improve the DelAgua water testing kit and because of this, some
components may be different from those which appear in the manual. We also welcome
suggestions from users about ways for improving the kit to meet their own particular needs.
Note: Text with this symbol draws your
attention to additional information.
Caution: Text with this symbol contain
information on health and safety. They
enforce best practice methods and protect
users and others against accidents, injury or
hazardous contamination when using the kit.
Video Link: Headings with this symbol
indicate that there are video sequences
which accompany the manual instructions.
These videos can be found on our website
www.delagua.org .
Step No. Numbers in a blue circle
indicate the incremental steps of
a procedure which should be followed in
numerical order.
Indicates the section continues on the next
page.
Signies the end of the section.
iNote: The main sections of this manual describe the use and maintenance of the single
incubator water testing kit. The additional procedures for the operation of the dual
incubator kit are described in Appendix J.
Training
Manual Icon Key
Purchasers of the kit are entitled to participate
in a one-day course at DelAgua. We can also
carry out training via webinar if this is more
convenient. The course is free of charge.
Alternatively, you can nd step-by-step videos
of all the key processes on our website
www.delagua.org.
Please contact us at [email protected] for more
information.
i!
1

1. The DelAgua Kit Components
1.1 The DelAgua Kit
1.2 Filtration Apparatus and Components
1.3 Contents of the Spares Case
1.4 Additional Materials Needed for Testing
2. Sampling Programmes
2.1 Selection of Sites and Frequency of Sampling on a Network Supply
3. Preparation of the Kit
3.1 Sterilisation of the Filtration Apparatus
3.2 Preparation of Culture Medium in the Laboratory
3.3 Preparation of Culture Medium in the Field
3.4 Storage of Culture Medium
3.5 Sterilising the Petri Dishes
3.6 Disposal of Contaminated Material
3.7 Absorbent Pads and Dispenser
3.8 Methanol Dispenser
4. Sampling Methods
4.1 Sampling from a Tap
4.2 Sampling from a Lake, Reservoir or other Surface Water Sources
4.3 Sampling from an Open Well or Storage Tank
5. Processing of Samples Using the Kit
5.1 Introduction
5.2 Analysis of Free and Total Chlorine Residual and pH
5.3 Turbidity Analysis
5.4 Bacteriological Analysis of Water
6. Care and Maintenance of the Kit
6.1 The Battery
6.2 Electrical Components and The Incubator
6.3 Filtration Apparatus
6.4 Chlorine/pH Comparator and Turbidity Tubes
6.5 Kit Case
6.6 Maintenance
8
8
9
10
11
12
12
14
14
16
18
19
19
20
20
21
22
22
23
24
26
26
27
29
31
42
42
43
43
43
43
44
Contents

Contents
46
46
48
51
52
54
55
56
58
60
61
62
63
64
66
67
68
7. Evaluation and Repair of the Kit
7.1 Troubleshooting Guide for the DelAgua Kit
7.2 Checking and Recalibrating the Incubator
Appendices
APPENDIX A
APPENDIX B
APPENDIX C
APPENDIX D
APPENDIX E
APPENDIX F
APPENDIX G
APPENDIX H
APPENDIX I
APPENDIX J
APPENDIX K
APPENDIX L
APPENDIX M
Spares List
Field Checklist
Alternative Types of Media that can be used with the DelAgua Kit for
the Isolation of Coliform Bacteria
Appropriate Sample Volumes for Coliform Analysis
Assembly of the Filtration Manifold
Daily Report Sheet
Alternative Sources of Water for Media Preparation
Safety Guidelines
General Hygiene in the Field
Additional Instructions for Operating the Dual Incubator Kit
Three Power Sources for the Incubator
Counting Colonies
Incubator Electronic Circuit Diagram

8 DelAgua Water Testing Kit Manual | Version 5.1
1
2
5
9
10
14
16
17
18
22
15
11
21
19
20
13
12
8
4
6
7
1. Portable Incubator
2. 2 Part Turbidity Tube
3. 48 Petri Dishes in Strap Housing
(3 × stacks of 16)
4. Empty Methanol Dispenser
5. Electronic Timer
6. Kit Manual
7. Empty Media Bottles × 10
8. Thermometer
9. Calibration Lid
10. Incubator Lid
11. Filtration Manifold
12. Vacuum Pump
13. Sample Collection Cup
14. 10 Disposable Pipettes
15. Chlorine/pH Comparator Block
16. Phenol Red Tablets (250 Tablets)
17. DPD1 Tablets (250 Tablets)
18. DPD3 Tablets (250 Tablets)
19. Membrane Lauryl Sulphate Broth – 38.1g
20. Membrane Filters
21. Sterile Pads
22. Pad Dispenser
1.1 The DelAgua Kit
3

The DelAgua Kit Components 9
1. Vacuum Cup
2. Vacuum Pump
3. Vacuum Pump Connector
4. Vacuum Pump Connection
5. Black Rubber O-Ring
1.2 Filtration Apparatus and Components
1
6
7
8
10
9
5
4
3
2
6. Aluminium Gasket
7. Silicone Rings (Pair)
8. Bronze Disc
9. Funnel (marked 10ml, 50ml, 100ml)
10. Plastic Collar
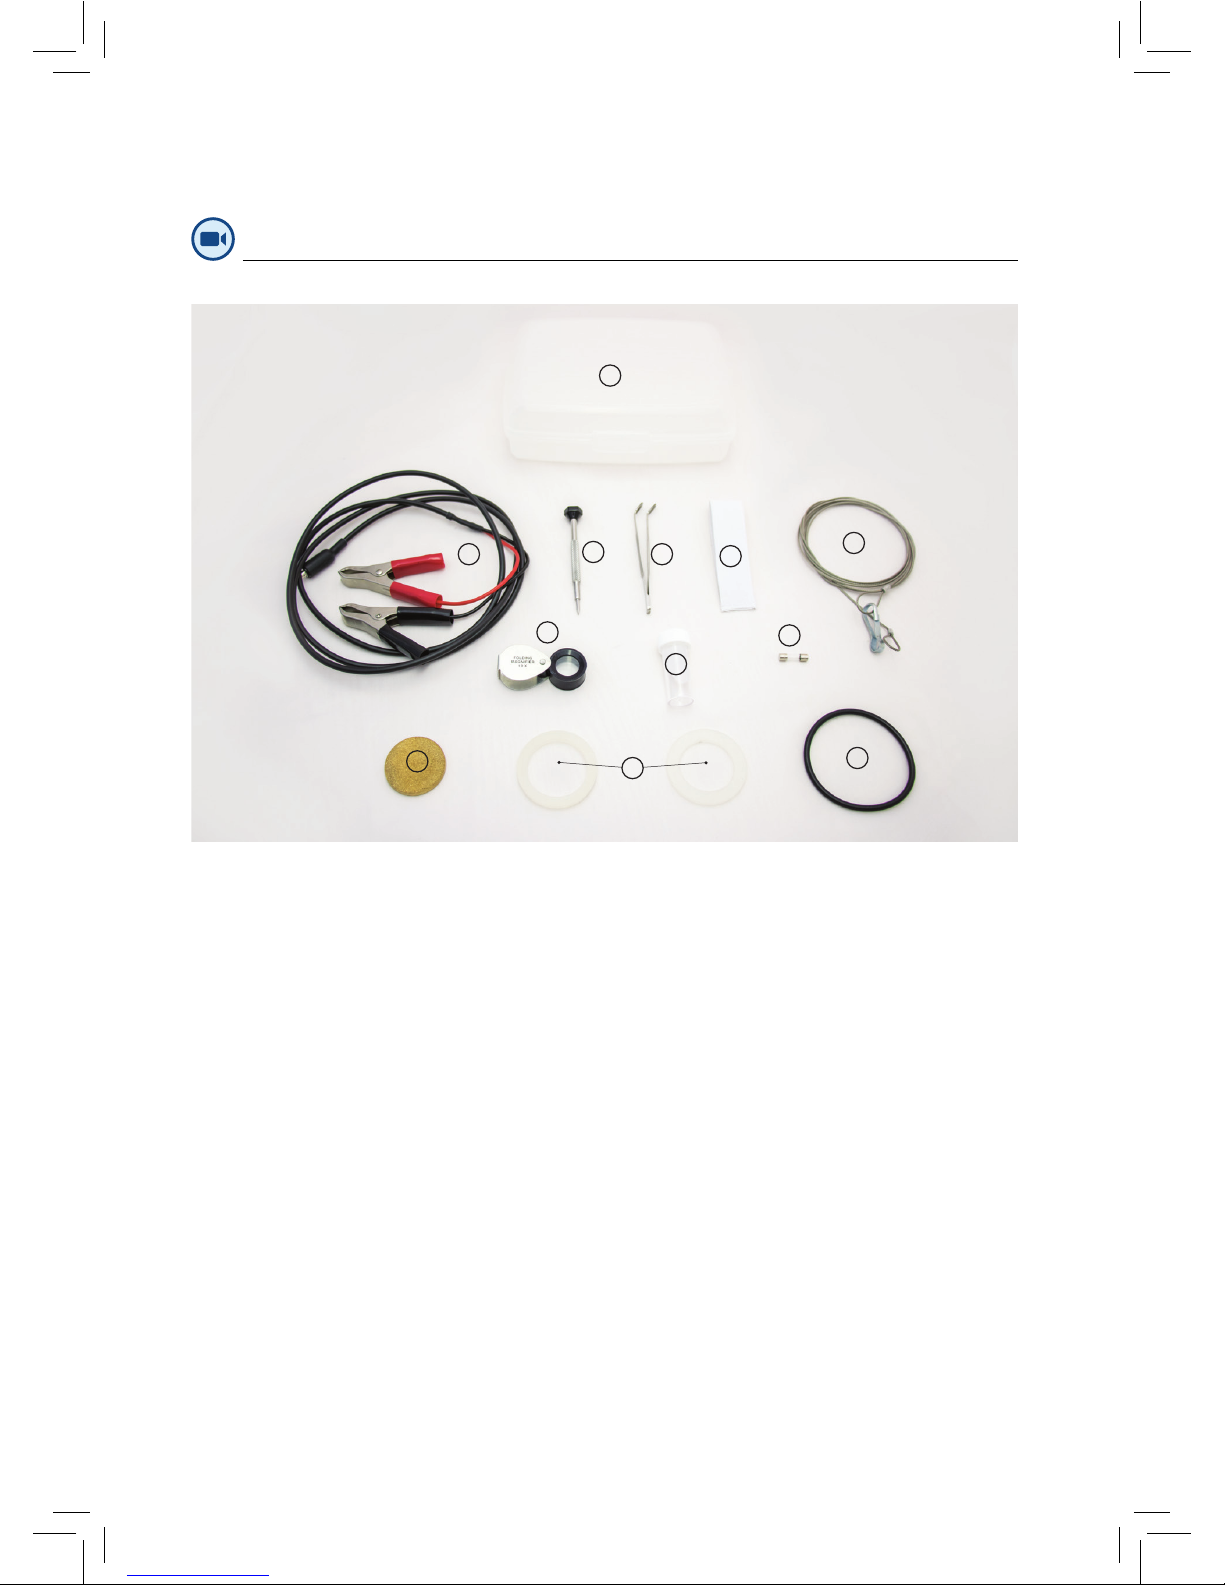
10 DelAgua Water Testing Kit Manual | Version 5.1
1. Box
2. External Battery Connection Cable
3. Trimmer Tool
4. Tweezers
5. Elastic Strap
6. Steel Sampling Cable
1
6
9
12
5
4
3
2
11
10
7
8
7. Handheld Magnier
8. Lubrication Grease
9. Fuse
10. Bronze Disc
11. Silicone Rings (Pair)
12. Black Rubber O-Ring
1.3 Contents of the Spares Case
The DelAgua Kit Components 11
iNote: It is recommended that you fully recharge the battery in all new DelAgua kits
(Section 6.1)and check the operating temperature of the incubator on receipt
(Section 7.2).
To use the DelAgua water testing kit, the following materials are also required:
For preparation of culture medium:
1. Pressure cooker, portable steriliser or autoclave.
2. Electric heating element, gas burner, stove or similar to heat the portable steriliser or
pressure cooker.
3. Distilled water (for alternatives see Appendix G).
4. Means of measuring distilled water e.g. measuring cylinder or graduated beaker.
For using the kit in the eld:
1. Methanol (for alternatives see Section 3.1).
2. Paper towels or clean cloths.
3. Wax pencil or marker pen.
4. Report sheets (see Appendix F).
5. Lighter, matches or other sources of ame.
1.4 Additional Materials Needed for Testing

12 DelAgua Water Testing Kit Manual | Version 5.1
• Samples should be taken from locations that
are representative of the water distribution
network and household connections.
• Where there are several sources and a
mixed distribution system, it is necessary to
take account of the variation that may exist
in the system and incorporate this into the
sampling programme.
• Where there is a branched distribution
system, samples should be taken at random
points evenly spread throughout the system.
• Where there are main branches and a
remote periphery (as shown), attention
should be devoted to both the main
branches and remote points in the network.
2.1 Selection of Sites and Frequency of Sampling on a Network
Supply
Minimum Frequency of Sampling and Analysis of Piped Water Supplies:
POPULATION SERVED MINIMUM FREQUENCY OF SAMPLING
Less than 5,000 One sample per month
5,000 to 100,000 One sample per 5,000 population per month
More than 100,000 20 samples monthly plus one extra sample per 10,000 population
2. Sampling Programmes

Sampling Programmes 13
2. Sampling Programmes
Recommended Minimum Frequency of Sampling and Analysis of Unpiped/Point Water Supplies:
Source: Adapted from WHO Guidelines for Drinking-Water Quality Volume III. Second Edition, Geneva,
1985.
* For a full, comprehensive description of sanitary protection measures, please refer to the
referenced WHO guidelines (above).
SOURCE &
MODE OF SUPPLY
BACTERIOLOGICAL PHYSICAL/
CHEMICAL
REMARKS
Open well Sanitary protection
measures * and testing
only if situation
demands
Once initially for
community wells
Pollution usually
expected to occur
Covered well.
Shallow tube well
with handpump
Sanitary protection
measures * and testing
only if situation
demands
Once initially.
Thereafter as
situation demands
Testing needed when
environmental conditions
change or when an
outbreak or increase
in waterborne disease
occurs
Deep tube well with
handpump
Once initially.
Thereafter as situation
demands
Once initially.
Thereafter as
situation demands
Testing needed when
environmental conditions
change or when an
outbreak or increase
in waterborne disease
occurs
Springs and piped
supplies
Once initially.
Thereafter as situation
demands
Test periodically for
residual chlorine if
water is chlorinated
Testing needed when
environmental conditions
change or when an
outbreak or increase
in waterborne disease
occurs
Community rain
water collection
systems
Sanitary protection
measures * and testing
only if situation
demands
Not needed
iNote: We would recommend that you refer to the WHO website (www.who.int)for
the latest advice regarding sampling and analysis of water supplies.
14 DelAgua Water Testing Kit Manual | Version 5.1
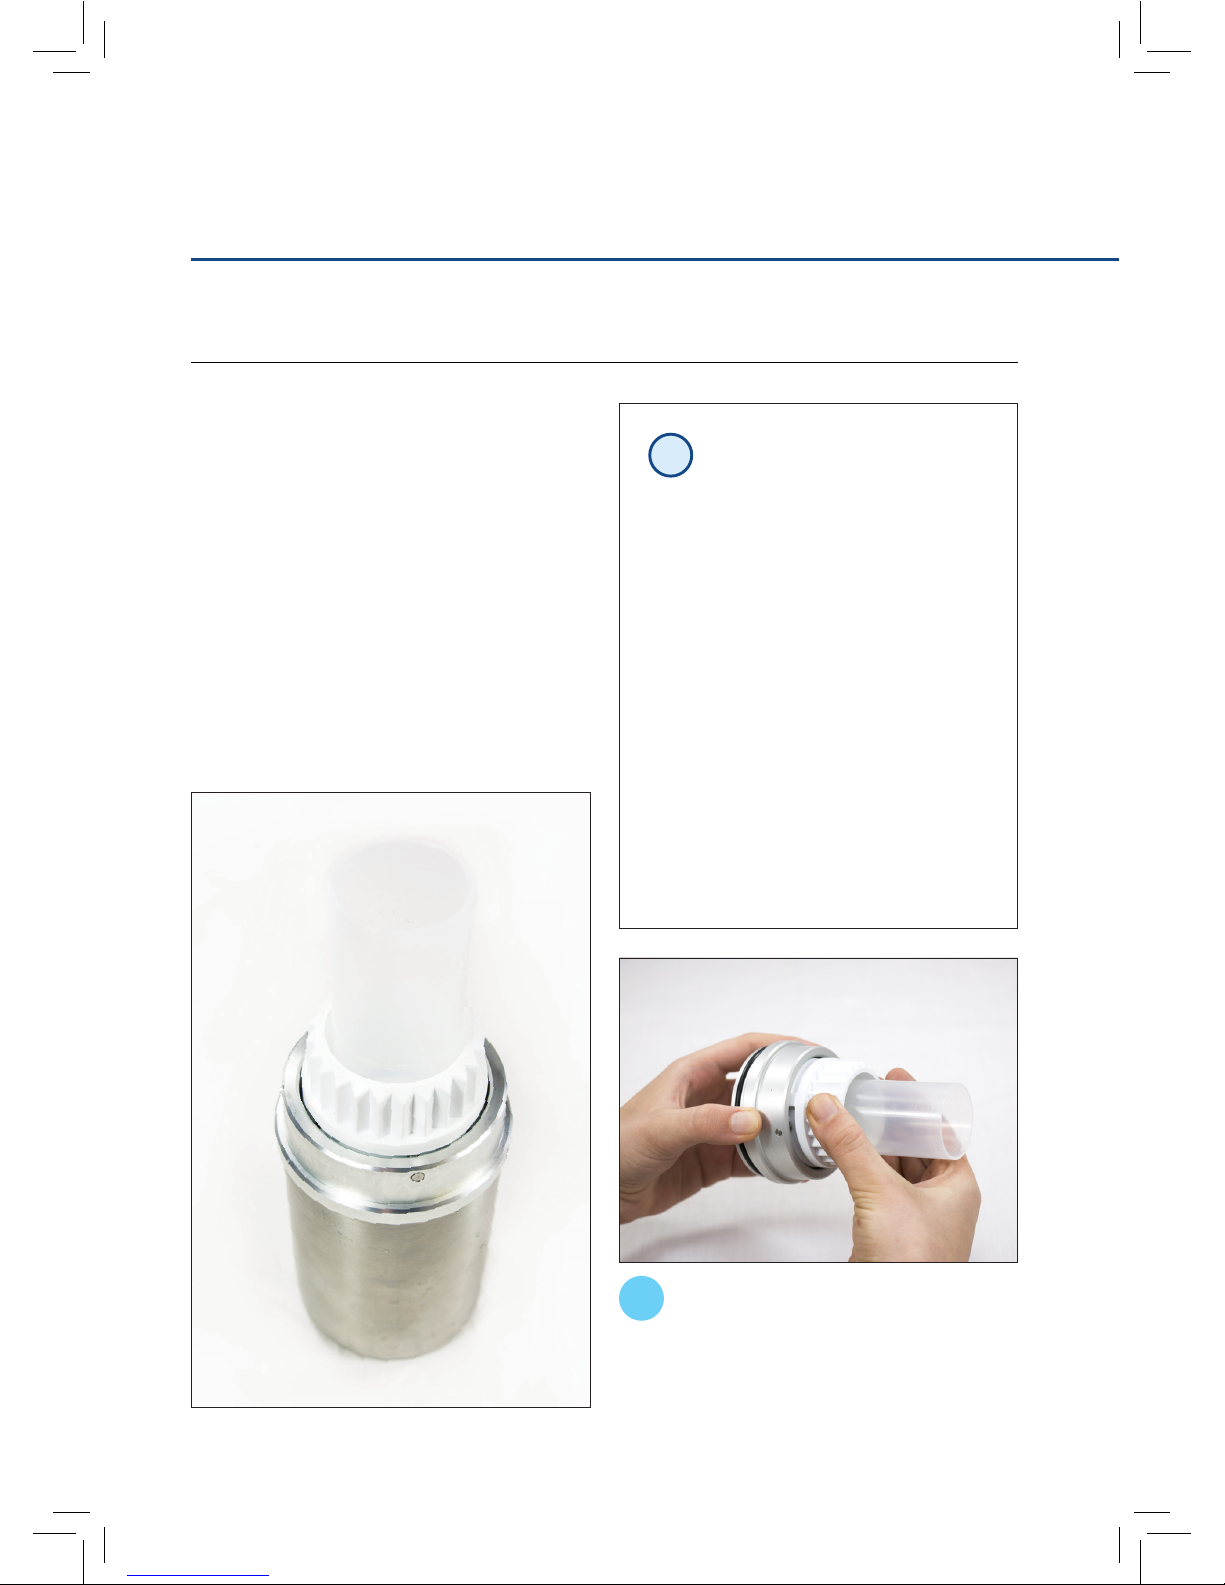
Take the plastic collar and secure the
ltration funnel in the loose but not free
position (see Section 5.4.3 [pg. 35]) which will
allow the formaldehyde gas to penetrate all
areas of the lter head.
The vacuum cup and the ltration apparatus
(below) must be sterilised before use and
re-sterilised between samples when analysing
water from two different sources.
Sterilising equipment in the eld presents some
practical difculties. The simplest method
is with methanol, which is described below.
When methanol is burnt in a low oxygen
atmosphere — for example, in the closed
vacuum cup — formaldehyde gas is produced as
a by-product of combustion. Formaldehyde gas
is a very effective disinfectant.
iNote: Methanol is expensive to
freight and requires special
transport conditions. We would
recommend that you try to obtain
methanol in-country from a
pharmaceutical supplier, a local
hospital or university laboratory. If
necessary, however, methanol can be
supplied by DelAgua on request. If
methanol is not available, the ltration
apparatus and vacuum cup can be
sterilised by immersion in boiling water
for 10 minutes.
Methanol is the only alcohol suitable
for sterilising the ltration apparatus;
there is no substitute.
3.1 Sterilisation of the Filtration Apparatus
1
3. Preparation of the Kit
Preparation of the Kit 15
3. Preparation of the Kit
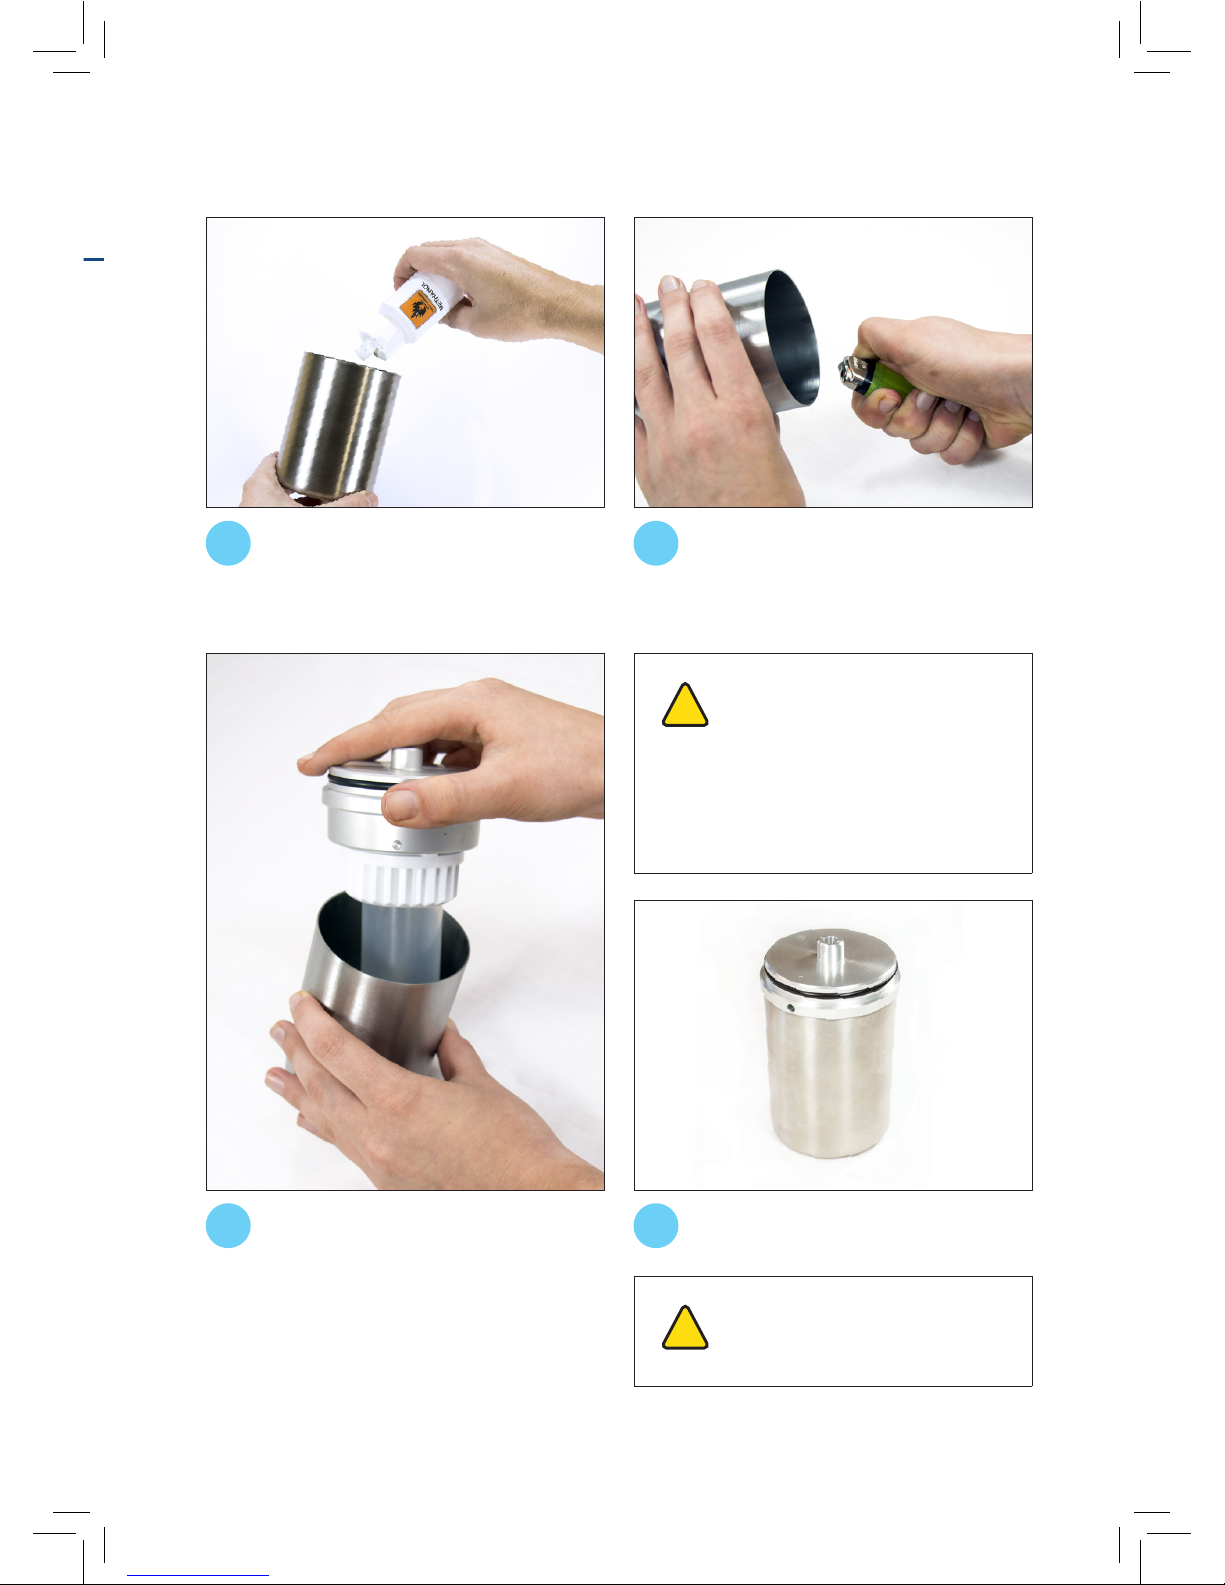
Pour about 10–15 drops of methanol
into the vacuum cup.
Ignite the methanol in the vacuum cup
using a cigarette lighter. Place the cup
on a at surface which will not be damaged by
heat.
!Caution: Keep the sample cup
turned away from your face and
tilted slightly to prevent methanol
running onto your hand. Methanol is
extremely ammable when in contact
with a naked ame.
!Caution: Filtration apparatus will
be hot. Be careful when handling
Allow the methanol to burn for several
seconds and, when almost completely
burned up (i.e. as the ames are dying down),
place the ltration head over the vacuum cup
and push rmly into place to form a good seal.
Keep the ltration apparatus sealed for
at least 15 minutes before use.
2 3
45

16 DelAgua Water Testing Kit Manual | Version 5.1
The culture medium will be a bright red colour
when dissolved. (Below)
Wash the plastic polypropylene bottles in
clean, warm water before use. If necessary, use
a little detergent and then rinse well with clean
water to remove all traces of the detergent.
Measure out 500ml of distilled water
using the measuring cylinder or
graduated ask. Decant approximately 400ml
of the water into the clean ask or beaker.
Add the 38.1g of MLSB powder to the
distilled water in the clean ask or
beaker and stir until the powder has dissolved.
Gentle heat can be applied if the powder is slow
to dissolve. Use the remaining 100ml of water
to rinse out the MLSB pot, then add this to the
beaker. Stir to thoroughly mix the broth.
3.2 Preparation of Culture Medium in the Laboratory
You will need the following items:
1. 38.1g of Membrane Lauryl Sulphate Broth (MLSB) *
2. Distilled water. ** Check that the pH of the water is between 7.0 and 7.8 using the
comparator and phenol red tablets (Section 5.2)
3. Ten polypropylene bottles (60ml)
4. Measuring cylinder or graduated ask
5. Clean ask, approximately 1 litre capacity
6. Pressure cooker, portable steriliser or autoclave ***
7. Heating element, stove or burner if using a pressure cooker or portable steriliser
* The medium is available in 38.1g, pre-weighed amounts from DelAgua
** See Appendix G for suggested alternative sources of water
*** A portable steriliser kit is available from DelAgua
iNote: Sterilise the ltration apparatus immediately after each analysis. In this way,
the ltration apparatus is always ready for use.
Method
1
2

Preparation of the Kit 17
If you DO NOT have access to an
autoclave, then a household pressure
cooker or portable steriliser may be used.
Place the bottles in a rack inside the cooker
(they may melt if placed directly on the base
of the cooker), replace the lid and heat to full
pressure (about 1 bar or 15psi).
Once the cooker has reached full pressure,
allow steam to release from the valve for 5
minutes, then time the 15 minutes sterilisation
cycle using a stopwatch or clock. At the end of
the 15 minutes, switch off the heat and allow
the cooker to cool until it is comfortable to
touch. Remove the media bottles and tighten
the caps.
Label the bottles to indicate sterilised
contents and the date and batch of
medium.
Pour approximately 50ml (no less than
40ml) of culture medium into each of
the 10 polypropylene bottles. This provides
sufcient medium in each bottle to carry out 16
tests; the maximum that can be performed in
one day using the DelAgua kit.
Replace the screw caps on the
polypropylene bottles. Ensure the caps
are secure but DO NOT tighten. Leaving the
caps slightly loose prevents the bottles from
collapsing during sterilisation.
If an autoclave is available (above),
sterilise the bottles at 121°C (equivalent
to 1 bar, or 15psi steam pressure) for
15 minutes. Tighten the caps carefully once the
medium has cooled.
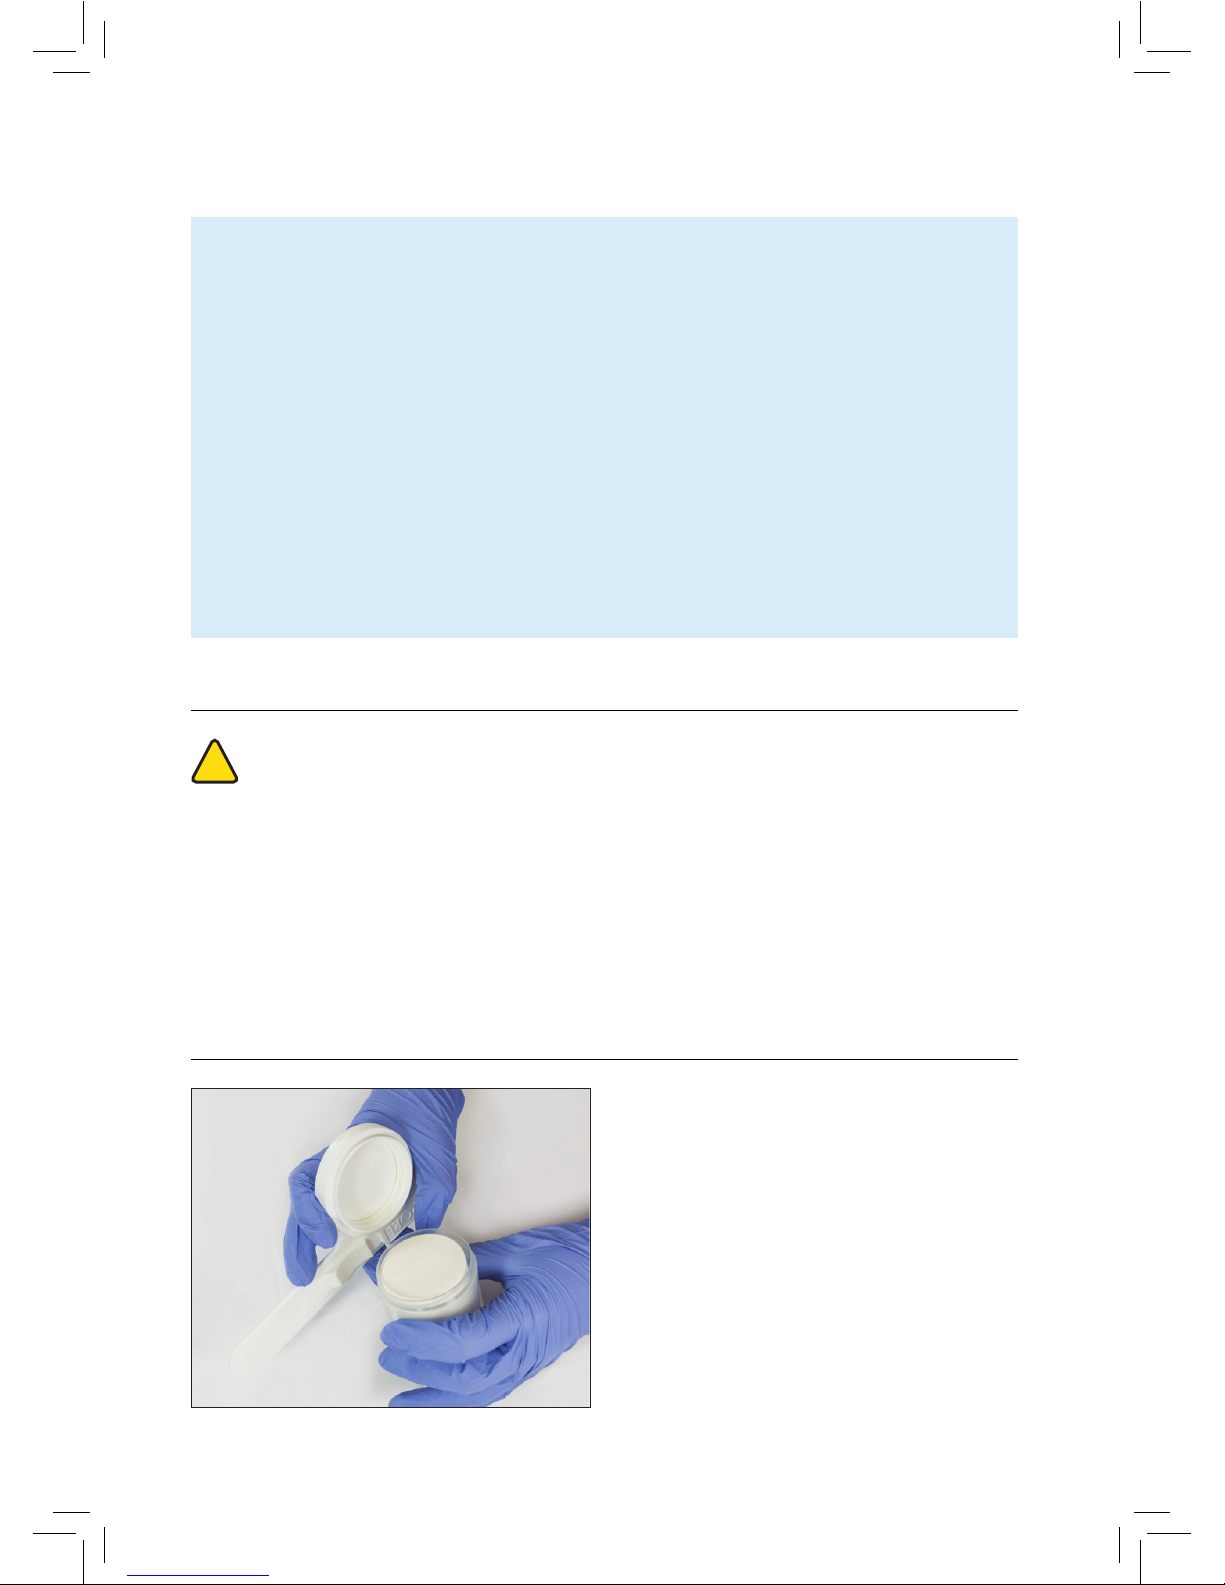
!Caution: MLSB is a ne, but
non-hazardous powder; avoid
creating excess dust which may irritate
the nose or upper respiratory tract if
inhaled. Spillages can be cleaned up
using water and an absorbent cloth.
3
4
5
6
7

18 DelAgua Water Testing Kit Manual | Version 5.1
3.3 Preparation of Culture Medium in the Field
You will need the following items:
1. 38.1g of Membrane Lauryl Sulphate Broth (MLSB) *
2. Distilled, or clean water **
3. Ten polypropylene (60ml)
4. Measuring cylinder or graduated beaker
5. Portable steriliser *** or pressure cooker or cooking pot or pan
6. Heating element, stove or burner
* The medium is available in 38.1g, pre-weighed amounts from DelAgua
** See Appendix G for suggested alternative sources of water
*** A portable steriliser kit is available from DelAgua
Method
Wash the plastic polypropylene bottles
in clean, warm water before use. If
necessary, use a little detergent and then rinse
well with clean water to remove all traces of
the detergent.
Use distilled water if possible. If this is
not available obtain the cleanest water
possible. DO NOT use water that has been
treated with chlorine or any other chemical
disinfectant.
Use the comparator and phenol red
tablets in the kit to check that the pH of
the water is between 7.0 and 7.8. If it is not, it
will be necessary to nd an alternative source
of water.
Measure out 500ml of clean water in a
beaker.
Add 38.1g of the MLSB powder to the
500ml of water in the beaker. Mix to
dissolve the powder completely. Apply gentle
heat if the powder is slow to dissolve.
The culture medium will be clear with a bright
red colour when dissolved.
Pour a suitable volume of culture
medium (approximately 50ml, but no less
than 40ml) into each of the 10 polypropylene
bottles. This is sufcient medium in each bottle
to carry out 16 tests; the maximum that can be
performed in one day using the DelAgua kit.
Replace the screw caps on the
polypropylene bottles. Ensure the caps
are secure but DO NOT tighten. Leaving the
caps slightly loose prevents the bottles from
collapsing during sterilisation.
If a pressure cooker is available, sterilise
the culture medium as described in
Section 3.2 [4–6].
If a pressure cooker or portable steriliser
is NOT available, the medium can be
sterilised using a process called Tyndallisation.
Tyndallisation procedure on following page.
1
2
3
4
5
6
7
8
9

Preparation of the Kit 19
Tyndallisation: This procedure takes 3 days.
1. Place the bottles of culture medium into a cooking pot or pan of boiling water, taking
care to ensure that the bottles do not come into contact with the base of the pan (use a
rack or stand) or become submerged.
2. Boil for 20 minutes.
3. Leave the medium to stand for 24 hours at room temperature (20–30°C) in the dark.
4. On the following day heat the medium in boiling water for a further
20 minutes and, once again, leave to stand for 24 hours.
5. On the third day repeat the heat treatment.
6. The medium should now be sterile.
• Sterile MLSB will be stable for up to 6
months if stored in a refrigerator (between
4 and 6°C).
• Alternatively, the medium can be stored for
up to 3 months in a cool, dark place.
• If the medium has been stored for several
days below 6°C a deposit may form which
dissolves when the medium is warmed and
gently shaken. The deposit is caused by the
lauryl sulphate coming out of solution.
• If signs of deterioration are observed, e.g.
cloudiness or yellow colouration (as shown
in the image to the right), the contents of the
bottle must be discarded.
• Wash the dishes in a solution of mild
detergent, rinse thoroughly with clean water
and dry.
• Assemble the dishes into batches of 16 in
the straps.
3.4 Storage of Culture Medium
3.5 Sterilising the Petri Dishes
20 DelAgua Water Testing Kit Manual | Version 5.1
Options for Sterilising:
•Sterilise the petri dishes in an autoclave, steam steriliser or pressure cooker at 121°C for
15 minutes (see Section 3.2 [5 & 6]). OR
•Place the dishes in a conventional oven at 180°C for 30 minutes. OR
•Plunge the bases and lids of the dishes into boiling water for 10 minutes. Pour away the
water and assemble the dishes as they dry, but while they are still hot. OR
•Add a few drops of methanol (or ethanol) to a clean cloth and wipe the inside of the
lid and the base of each petri dish. Assemble the petri dishes and allow the alcohol to
evaporate before use.
Whenever possible, always use one of the above methods. If this is not possible, then the
following method can be applied: ame the bases and lids of the dishes with a lighter or gas
burner using the tweezers to hold the bases and lids. Assemble while still hot.
Caution: To minimise the risk of
infection from contaminated materials,
take care not to touch contaminated
membranes directly with your hands. DO
NOT eat, drink or smoke while handling
contaminated materials. Wash your hands
immediately after you have touched any
contaminated material and after you have
nished your work.
3.6 Disposal of Contaminated Material
Contaminated material must be disposed
of safely. DO NOT discard contaminated
membranes and pads into the environment.
After you have completed analysis place the
pads and membranes in a biohazard bag and
destroy by incineration. Wash the petri dishes
with detergent after use, rinse with clean water
and dry prior to sterilisation.
The pads are supplied sterile in packs of 100
units. A pad dispenser is also supplied with
the kit. NEVER leave the dispenser without
a pack of pads attached as it will increase the
possibility of contamination. If the dispenser
is lost or damaged, pads may be dispensed in
the eld using the sterile tweezers (see Section
5.4.3 [4] for sterilisation methods).
3.7 Absorbent Pads and Dispenser
!
Table of contents
Popular Test Equipment manuals by other brands

AlcoLimit
AlcoLimit Enforcer 3 user manual

VOLTCRAFT
VOLTCRAFT IRS-350 Blackbody operating instructions

Xtramus
Xtramus DApps-QoS user manual

PeakTech
PeakTech 1205 Operation manual

InstruStar Electronic Technology
InstruStar Electronic Technology ISDS205C user manual

Tohnichi
Tohnichi DOTE4-G Operating instruction


