Delco DH 2004 User manual

INSTRUCTION MANUAL
MANUEL D’ INSTRUCTIONS
MANUAL DE INSTRUCCIONES
DH 2004
HOT WATER CLEANER
NETTOYEUR EAU CHAUDE - HIDROLIMPIADORA POR AGUA CALIENTE
150
100
50
200
250
150
100
50
200
250

F
GB
INDEX Page
Préparation 15
Description des symboles 16
Préface 17
Emplois de l’ appareil 18
Opérations préliminaires 18
Instructions générales pour l’ installation
et l’ utilisation 20
Utilisation 21
Conseil pour l’ emploi des détergents 22
Entretien 22
Rangement 24
Mise au rebut 24
Pannes et remèdes 25
CONTENTS Pag.
Preparation 3
Description of symbols 4
Introduction 5
Intended use 6
Preliminary operations 6
General warnings for installation and use 8
Use 9
Advice on using detergents 10
Maintenance 10
Storage 12
Scrapping 12
Trouble-shooting 13
INDICE Pág.
Preparación 27
Descripción de los símbolos 28
Prefacion 29
Aplicaciones 30
Operaciones preliminares 30
Advertencias generales de instalación y
de uso 32
Uso 33
Consejos para el uso de detergentes 34
Manutención 34
Almacenamiento 36
Desguace 36
Inconvenientes y remedios 37
E

English
- 3 -
Connecting the lance.
Water supply connection.
Electrical connection.
The text has been carefully checked, however, please notify the manufacturer of any misprints.
The manufacturer also reserves the right to alter and update this publication without prior notice for the sake of
product improvement.
All reproductions of this manual, in whole or in part, are forbidden without the manufacturer's authorization.
Continue reading this manual without connecting the cleaner to the power mains and the water supply.
PREPARING THE CLEANER
for buying this cleaner. You have shown that you do not accept compromises: you want the best.
We have prepared this manual to enable you to fully appreciate the qualities and high performance that this cleaner can offer
you.
Please read it completely before using the machine.
Congratulations! We wish to thank you

English
- 4 -
SWITCHING OF THE PUMP
MOTOR.
LIGHTING THE BURNER.
ADJUSTING THE WATER
TEMPERATURE.
FUEL (DIESEL).
CHEMICALS
(DETERGENT).
ANTI-SCALE PRODUCT.
DO NOT DIRECT THE JET
AGAINST PEOPLE, ANI-
MALS, POWER SOCKETS
OR THE MACHINE ITSELF.
ATTENTION: RISK OF BUR-
NS.
ATTENTION: RISK OF
ELECTRIC SHOCK.
GROUND.
WATER INPUT.
WATER OUTPUT.
DESCRIPTION OF SYMBOLS ON THE CLEANER

English
- 5 -
CLASSIFICATION
The user must observe the conditions of use of the applian-
ce prescribed by the Rules, and particularly he must respect
the following classication:
As for the protection against electric shock, the H.P. Cleaner
belongs to CLASS I.
The H.P. cleaner is factory set and all its safety devices are
sealed. It is forbidden to alter their adjustment values.
In the Hot water cleaner the water is heated by a burner fed
with Diesel fuel.
The H.P. cleaner must be always used on a rm and at
ground, furthermore it must not be moved while it is working or
connected to the electric supply.
Failure to observe this prescription may cause danger for the
user.
The H.P. cleaner must not be used in the presence of corrosive
or potentially explosive atmospheres. (vapours or gas)
The electric connection must be performed by qualied tech-
nicians who are able to work in observance of the governing
rules and of the manufacturer’s instructions.
A wrong electric connection may cause damage to persons,
animals or things, and the manufacturer cannot be considered
responsible for these.
The H.P. cleaners with power lower than 3 kW are equipped
with a plug for connection to the electric supply.
In this case please check if the electric power system and the
electric sockets are compatible with the max. power of the
appliance indicated on the plate. (kW)
In case of doubt, seek qualied assistance.
If the socket and the plug of the machine are not compatible,
have the plug replaced with a suitable type by qualied per-
sonnel.
Before connecting the machine make sure that the data indica-
ted on the plate correspond to those of the electric supply.
Do not use extension cords.
The electric safety of this machine may be assured only when
it is properly connected to an efcient grounding system in
accordance with the governing laws for electric safety.
It is necessary to check this essential safety requisite. In case
of doubt, ask for accurate control of the power system by
qualied personnel.
The manufacturer may not be considered responsible for dama-
ges occurred because of the lack of the grounding system.
Do not disable or isolate the ON/OFF switch located on the
main panel.
The appliance is disconnected from the electric supply only by
pulling out the plug or switching off the ON/OFF switch.
Failure to respect the above absolves the manufacturer of all
liability and represents negligent use of the product.
The water cleaner is considered as a xed device.
Water cleaners with the “Total Stop” device should be con-
sidered as off when the ON/OFF switch is in the “OFF” position
or the plug is unplugged from the socket.
The most important instructions
are marked with the symbol:
INTRODUCTION
This manual must be read before installing, setting up and
using the cleaner. The manual is an integral part of the product.
It is composed of two parts, one of which is yellow.
Read the warnings and instructions in this manual carefully as
they provide important indications as to SAFETY IN USE and
MAINTENANCE, paying special attention to the general rules
for safety listed in the yellow booklet.
SAVE THIS MANUAL FOR FUTURE CONSULTATION.
The contents of this booklet must be brought to the atten-
tion of persons using or carrying out routine maintenance on
this water cleaner.
!
!
!
!

English
- 6 -
UNPACKING
After unpacking, ensure that the cleaner is undamaged.
If in doubt, do not use the machine.
Contact your dealer.
Packaging (bags, boxes, nails, etc) is potentially dangerous and
should be kept out of reach of children. It should be disposed of
or retained in respect of national environmental legislation.
FITTING THE SEPARATE PARTS OF THE MACHINE
All the fundamental parts and safety devices of the machine are
assembled by the manufacturer.
For reasons of packing and transport, some secondary cleaner
parts are supplied separately.
The user must t these parts as explained in the instructions
supplied in each assembly kit.
DATA PLATE:
The data plate bearing the main technical characteristics of your
cleaner is located on the frame and is always visible.
When buying your cleaner, ensure that it has an
identication plate. If there is no plate, inform the manu-
facturer and/or the dealer immediately. Machines without
a plate must not be used and the manufacturer declines
all responsibility for them. Products without a plate must
be considered anonymous and potentially dangerous.
This appliance is intended exclusively for cleaning machines,
vehicles, buildings and general surfaces suitable for treatment
with a high pressure jet of detergent solution between 25 and
250 bar (360 - 3600 PSI).
This appliance has been designed for use with the detergents
supplied or recommended by the manufacturer. The use of
other detergents or chemicals may inuence the safety of the
appliance.
This appliance must be used only for the purpose for which it
was specically designed.
All other uses are to be considered incorrect and therefore
unreasonable.
Examples of unreasonable use:
- Washing surfaces not suitable for cleaning with a high
pressure jet.
- Washing people, animals, electric equipment or the machi-
ne itself.
- Using unsuitable detergents or chemicals.
- Blocking the trigger (lever) of the lance in ON position.
The manufacturer cannot be held responsible for any damage
due to improper, incorrect or unreasonable use. As far as safety
rules are concerned, the cleaners are manufactured according
to the European Standard.
INTENDED USE
PRELIMINARY OPERATIONS
!
FILLING THE FUEL TANK.
Fill the tank with Diesel fuel
(g. 1).
FIG. 1
Do not use different fuel from that indicated on the
identication plate.
Check the fuel level from time to time while the cleaner
is operating.
Attempting to use the cleaner without fuel may cause
damage to the fuel pump.
!
Diesel

English
- 7 -
ELECTRICAL CONNECTION
Connection of the cleaner to the mains must be carried out
be skilled technicians able to ensure that all regulations in
force are complied with use in respect of current standards
and legislation.
Ensure that the mains voltage available is the same as the vol-
tage at which the cleaner is supposed to work; this is indicated
on the identication plate.
The electric cable must be protected from accidental cru-
shing.
Do not use the machine if the supply cable is damaged.
The use of any electric appliance requires the respect of
some basic rules:
• Do not touch the appliance with wet or damp hands or feet.
• Do not use the appliance bare-footed or with unsuitable
clothing.
• Do not pull the supply cable or the appliance itself in order
to disconnect the plug from the electric supply.
(For water cleaners rated at less than 3 kW tted with plug).
As for the protection against electric shock, the H.P.cleaner
belongs to CLASS I.
Failure to observe the above warning frees the manu-
facturer from all responsibility and constitutes negligent
use of the product.
FIG. 3
COMMAND AND CONTROL DEVICES
Before connecting the machine to the water supply and
to the power mains, it is essential to know the function of the
cleaner's command and control devices.
FIG. 2
FIG. 6
FIG. 5
WATER SUPPLY CONNEC-
TION
Connect the water hose to
the water supply (g. 5A) and
to the inlet on the cleaner
(g. 5B).
Check that the pressure and
quantity of the water supplied
by the mains are sufcient for
the cleaner to work properly: 2
to 8 BAR (29 to 116 PSI).
Maximum temperature of fee-
ding water 50°C (122°F).
Connect the high pressure
hose to the cleaner (g. 5C)
and to the lance (g. 6).
IMPORTANT.
The cleaner must operate
with clean water. Dirty or
sandy water, corrosive che-
micals and solvents can
cause severe damage to
the cleaner.
Failure to respect the above
absolves the manufacturer
of all liability and repre-
sents negligent use of the
product.
FILLING THE DETERGENT
TANK.
From the range of recommen-
ded products, choose the one
most suited to the washing job
to be done (g. 2) and dilute
it with water according to the
instructions on the pack.
Fill the detergent tank with the
diluted product (g. 3).
Ask your dealer for the cata-
logue of the detergents that
can be used depending on
the type of washing job to be
done and the type of surface
to be treated.
After using a detergent, the
detergent intake circuit must
be flushed out with clean
water.
!
!
!
!
!
FIG. 4
FILLING THE WATER SOF-
TENER TANK.
Fill the tank with water soften-
er solution. Use only products
recommended by the manu-
facturer and/or dealer. Follow
the instructions given on the
packaging meticulously. (Do
not disperse water softener in
the environment).
Chemical
Anti-Scale
Anti-Scale

English
- 8 -
The use of the H.P. cleaner must be considered according
to the place where the washing is performed (for example: food
plants, pharmaceutical plants, etc.)
Pertinent rules and safety conditions must be followed.
As for the protection against electric shock, the H.P.cleaner
belongs to CLASS I.
Do not direct water spray at your own or other people’s
body in order to clean clothes or shoes.
While working it is forbidden to stop the trigger (lever) of
the lance in ON position.
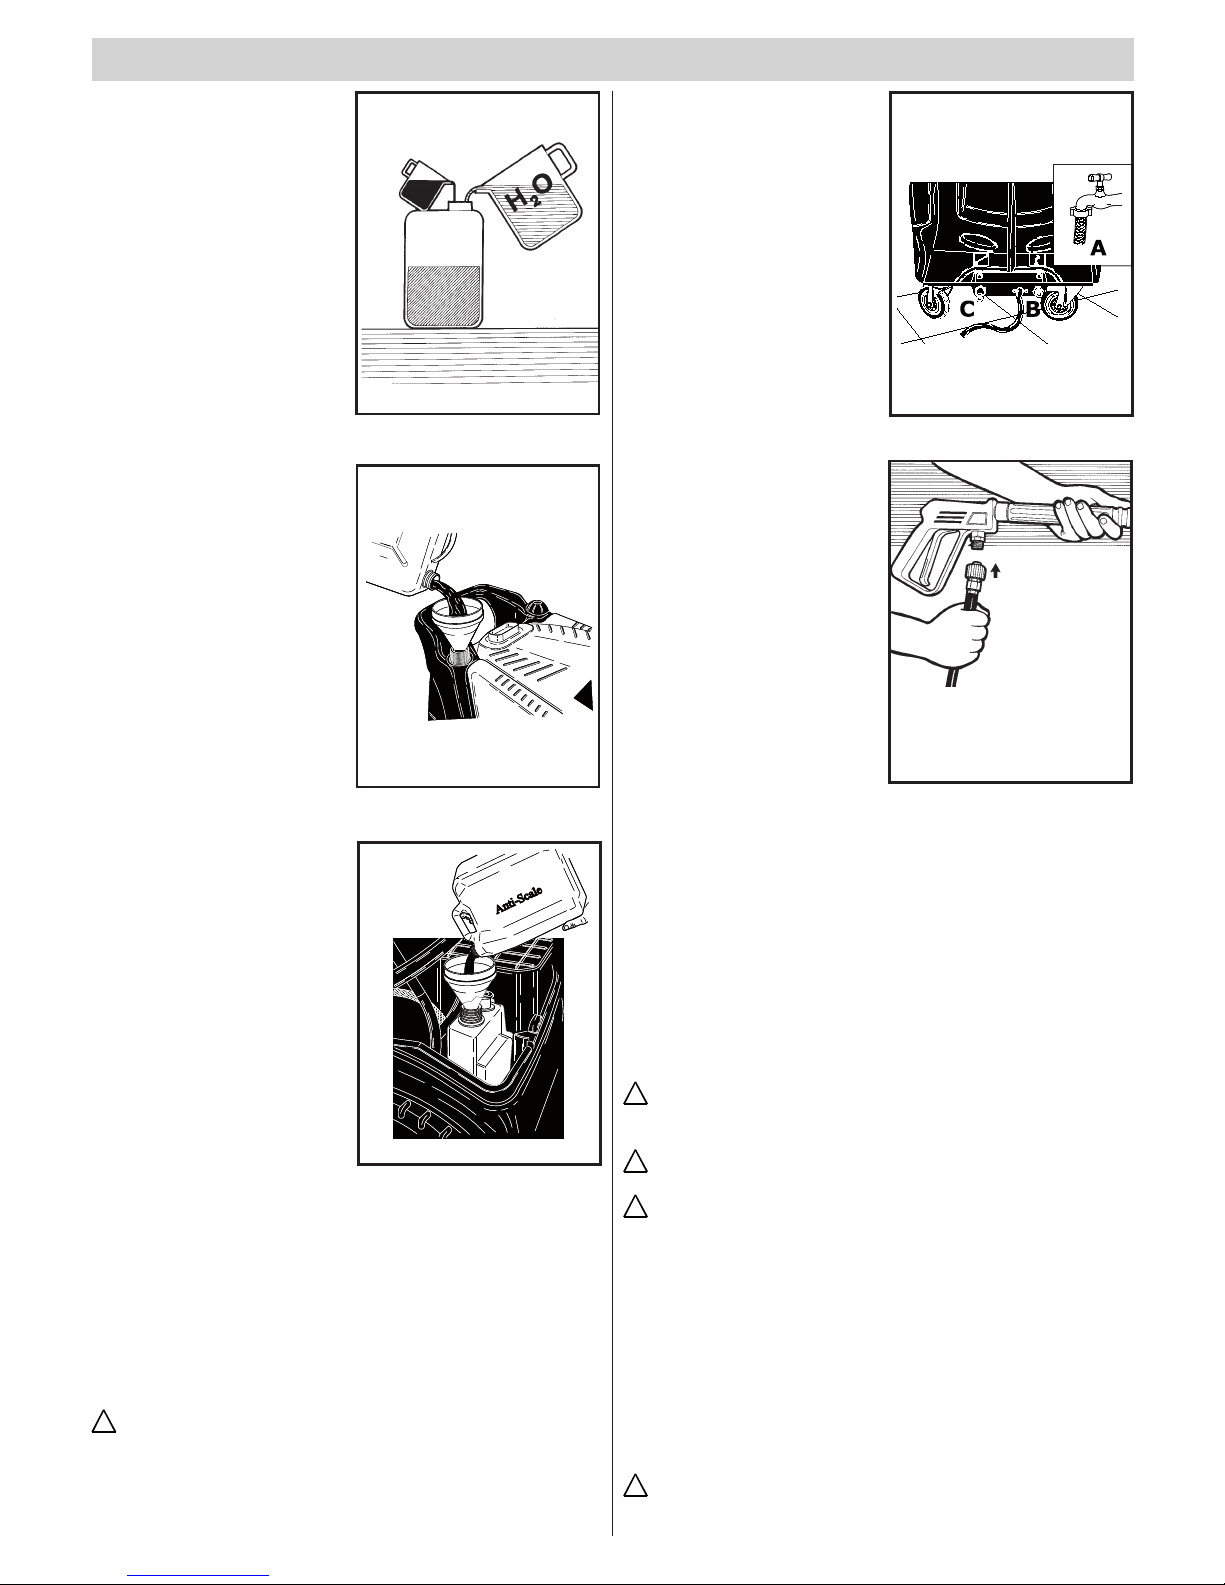
In the hot water H.P. cleaners a Diesel fuel burner is used
for water heating. The use of other fuels is dangerous.
Before starting any cleaning or maintenance operation,
disconnect the machine from the electric and water supply
networks.
Periodically, at least once a year, have the safety devices
checked by one of our authorized dealers.
If the appliance is to be used in an enclosed space, install
a ue gas extraction system and guarantee adequate ventila-
tion.
The hot water cleaner must be monitored while it is
working.
Do not clog the openings or the ventilation grilles and the
heat and smoke extraction systems in the hot water cleaners.
Do not use the machine if the supply cable is damaged.
For the replacement of the damaged cable apply exclusively
to one of our authorized dealers.
The supply cable of this appliance must not be replaced by
the user.
The electric power cable must never be under mechanical
tension and must be protected against accidental crushing.
In case of damage or malfunction, switch off the applian-
ce (disconnecting it from the water main and from the electricity
main via the ON/OFF switch or by unplugging the plug in the
case of water cleaners rated at less than 3 kW) without tampe-
ring with it.
Contact one of our authorized dealers.
The use of any electric appliance requires the respect of
some basic rules:
• Do not touch the appliance with wet or damp hands or feet.
• Do not use the appliance bare-footed or with unsuitable
clothing.
• Do not pull the supply cable or the appliance itself in order
to disconnect the plug from the electric supply.
(For water cleaners rated at less than 3 kW tted with plug).
The H.P. cleaner must not be used by children, teen-agers
or incapable persons (under the inuence of alcohol, etc.)
Use only original accessories that can allow safe working
of the appliance.
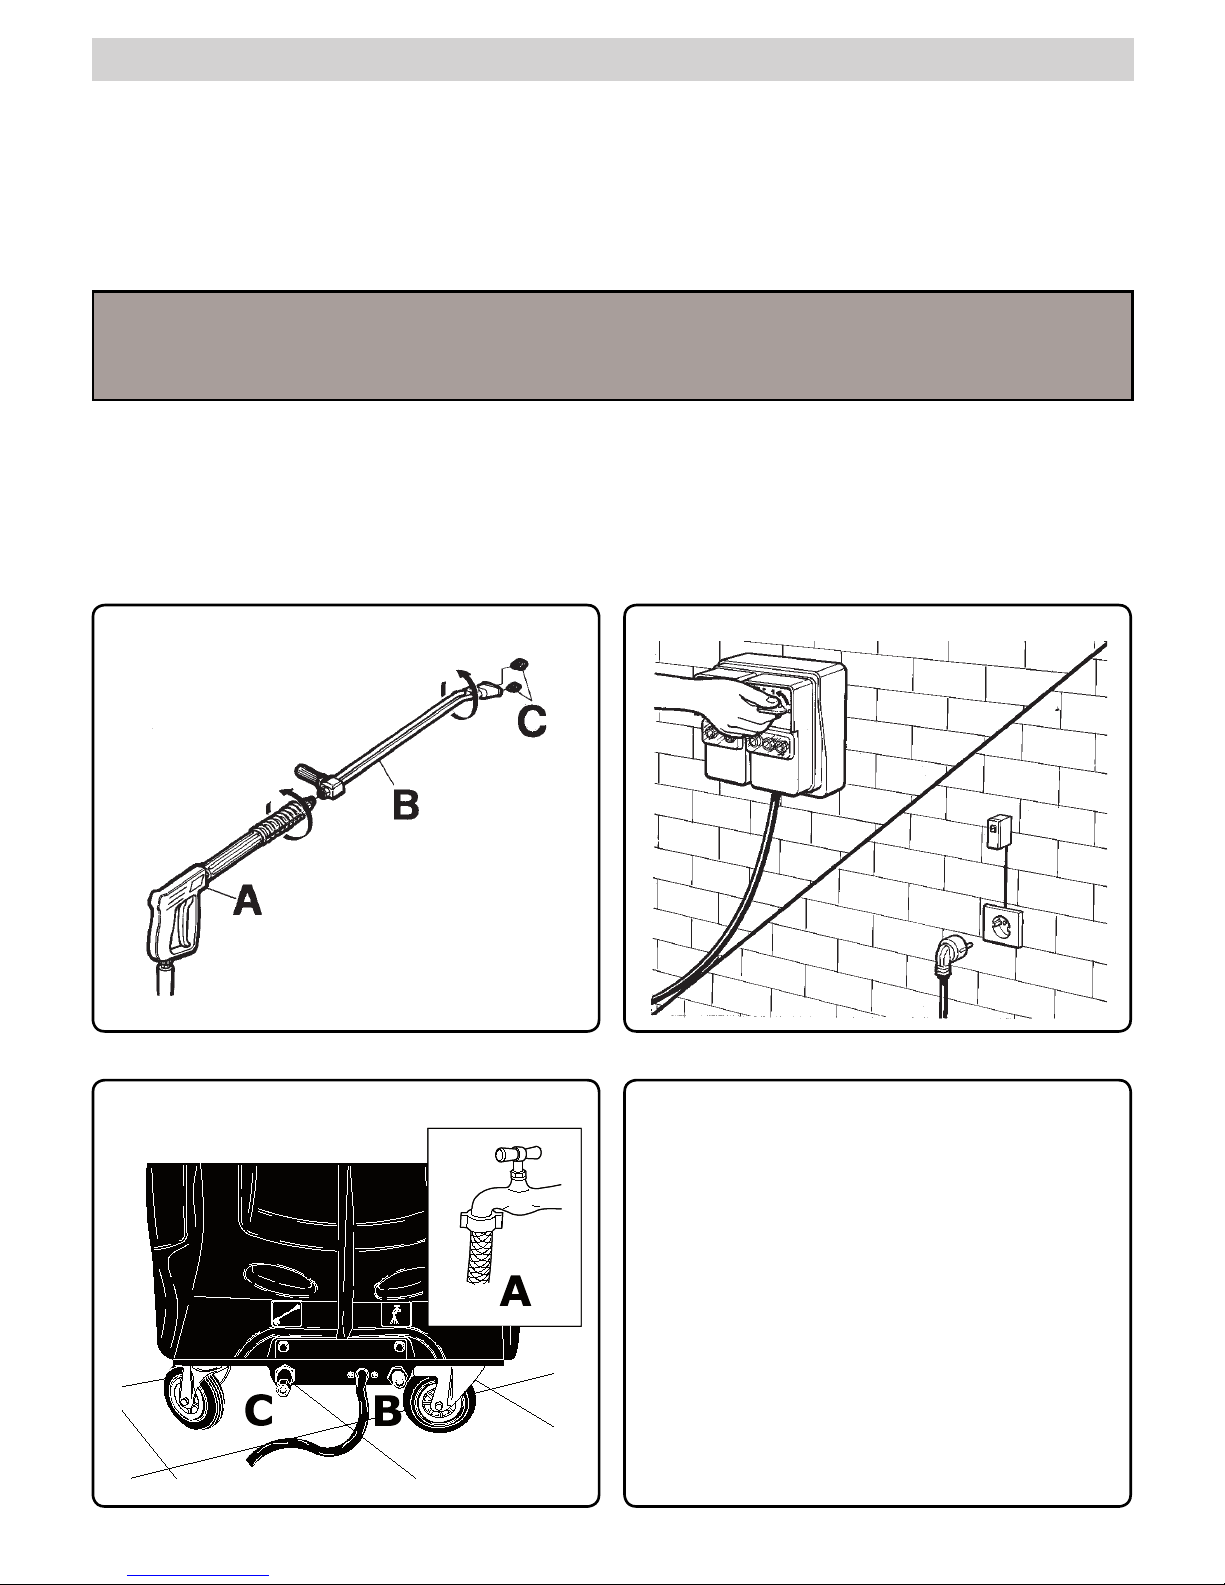
The exible hose connecting the lance to the H.P. cleaner
must not be damaged.
In case of damage, replace it immediately.
Hoses, connections and ttings for high pressure systems
are very important to guarantee the safety of the H.P. cleaner.
Use only original spare parts which have the manufacturer’s
approval.
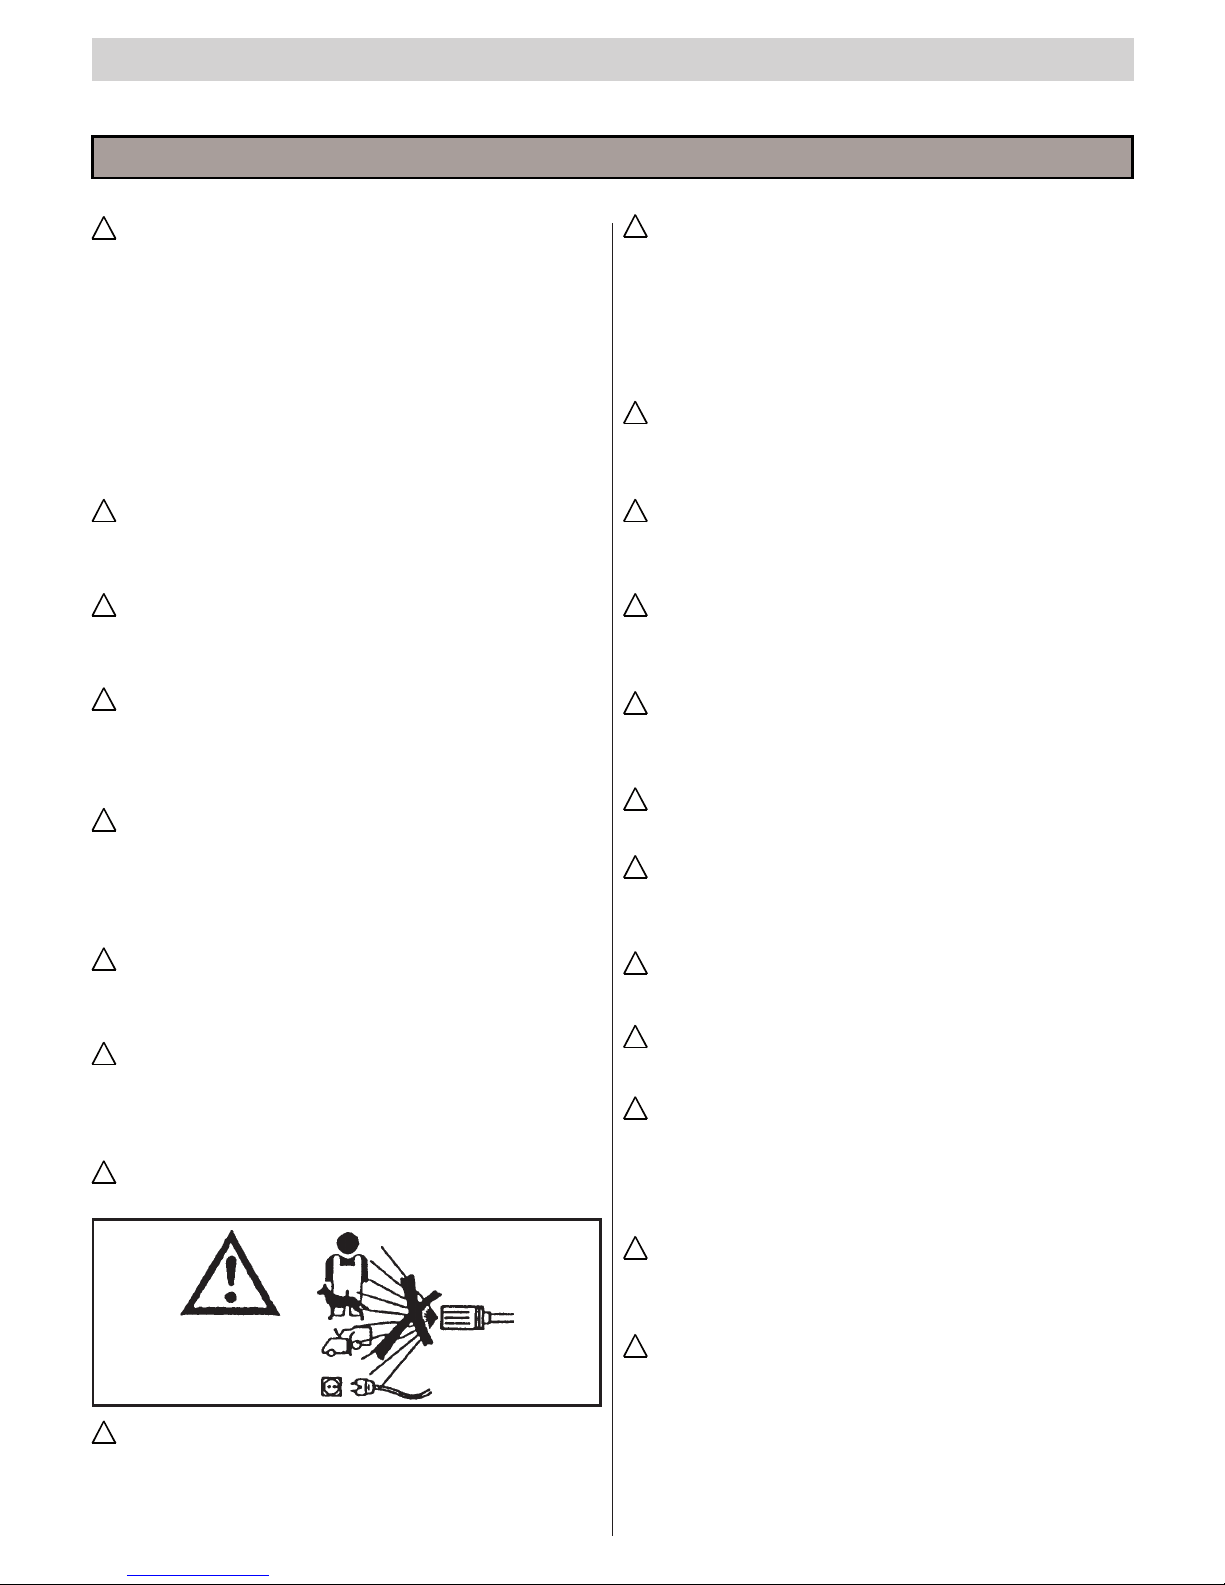
Do not use the H.P. cleaner when persons or animals are
in the area being cleaned.
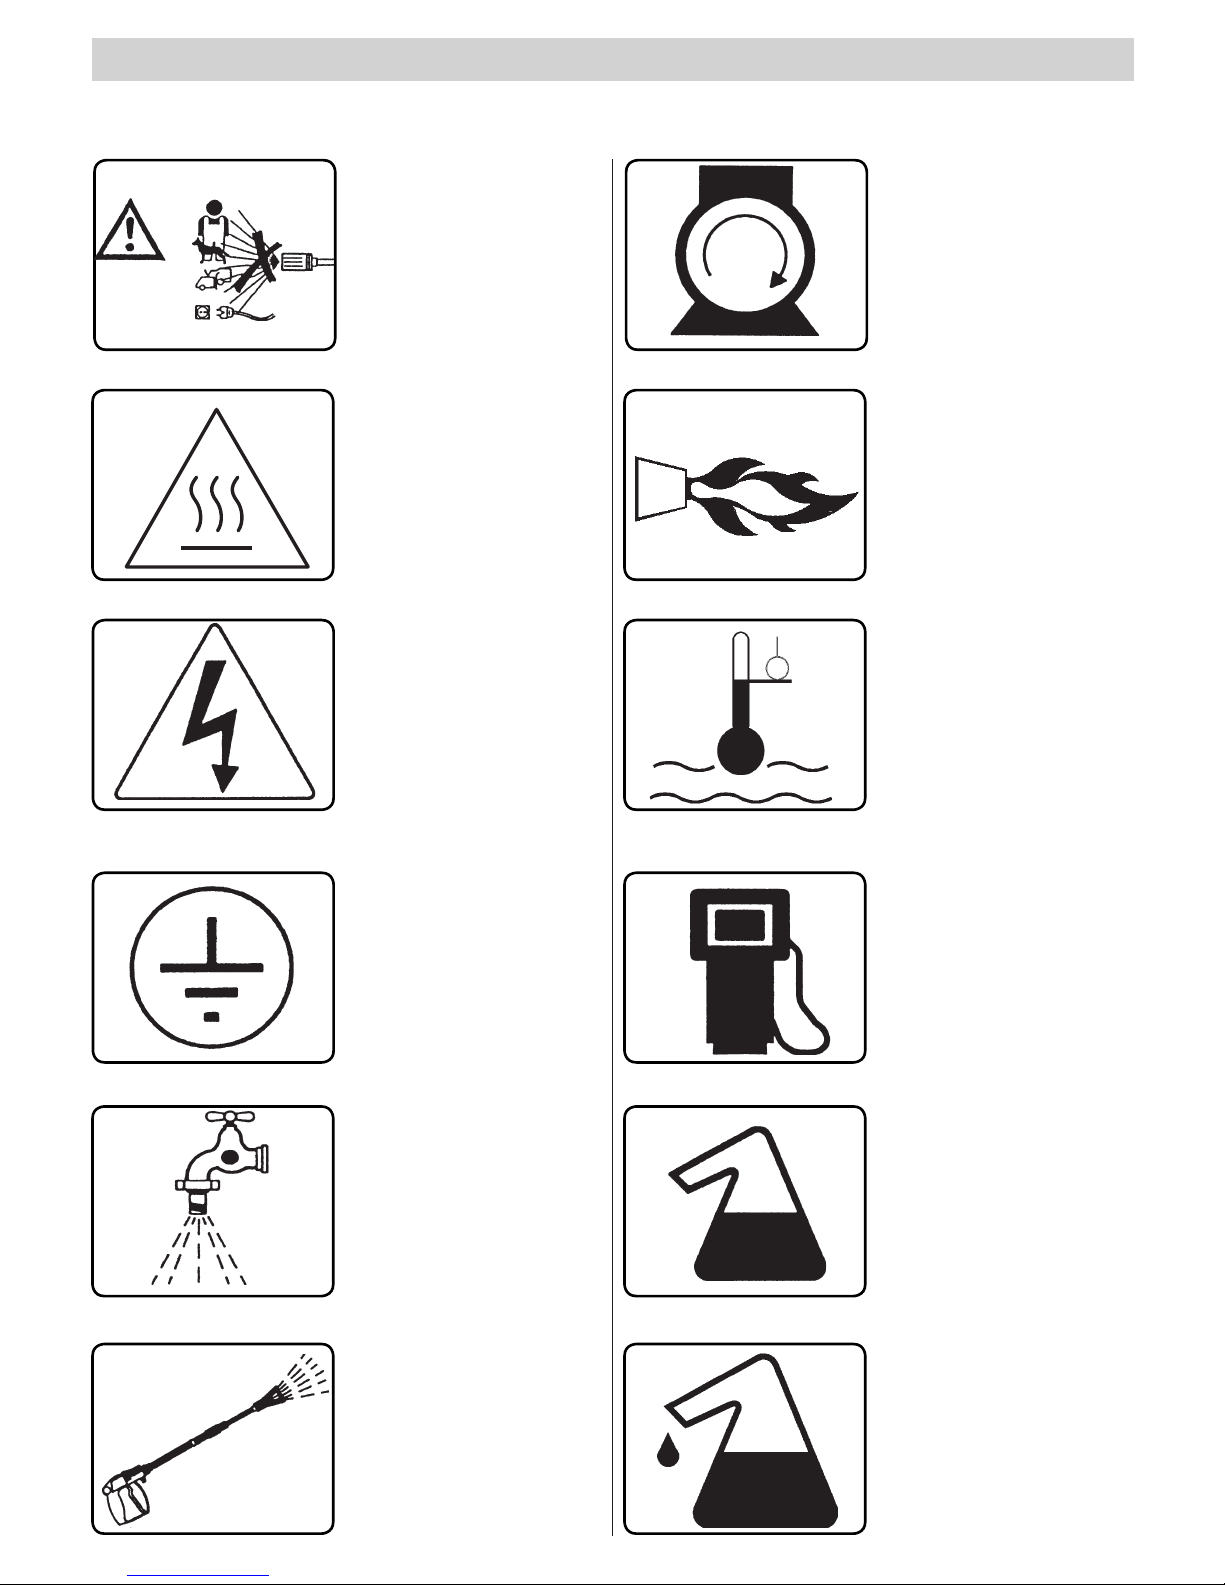
High pressure jets may be dangerous if not properly
used.
The jet must never be directed at persons or animals, electric
appliances or at the appliance itself.
The high pressure water jet causes a reaction power on
the lance. Hold the lance grip vigorously.
The use of the H.P. cleaner must be considered according
to the kind of washing which must be performed.
Protect yourself against the ejection of solid materials or corro-
sive substances by means of adequate protective clothing.
GENERAL WARNINGS ABOUT INSTALLATION AND USE
!
!
!
!
!
!
!
!
!
!
!
!
!
!
!
!
!
!
!
!
!

English
- 9 -
FIG.10
STOPPING THE CLEA-
NER.
1) Switch off the burner by
turning the pressure regulator
to pos. "0" (g. 7B).
2) Let the cleaner run with
cold water only for at least
30 seconds to cool down the
boiler.
3) After use with detergent,
rinse the high pressure water
circuit by operating the pump
for one minute with the deter-
gent tap completely closed.
4) Stop the cleaner by turning
the ON/OFF switch to pos.
"OFF" (g. 7A).
5) Discharge the pressure
from the H.P. hose by pressing
the trigger on the gun.
6) Disconnect the water clea-
ner from the electricity supply
by removing the plug from
the socket.
7) Turn off the water supply
tap (g. 5A).
If the water cleaner is left,
even temporarily, turn it off by
using the on/off switch or by
unplugging the plug from the
socket.
Water cleaners with the
“Total Stop” device should be
considered as off when the on/
off switch is in the “O” position
or the plug is unplugged from
the socket.
When the water cleaner
is not used, close the safety
device on the handle. (g.10)
Dry use of the water
cleaner causes serious dam-
age to pump gaskets.
FIG. 7
FIG. 8
USING
THE CLEANER
CONTROL PANEL.
A- On/off switch.
B- Temperature regulator.
C- Detergent control tap (if
available).
D- Light indicating connection
to the mains/microleakages (if
available).
E- Burner light (if available).
F- Light indicating diesel fuel
empty (if available).
G- No descaler indicator light
(if available).
STARTING THE CLEANER.
1) Turn on the water supply (g. 5A).
2) Connect the water cleaner to the main electrical supply by
plugging the plug into the socket.
3) Start the cleaner by turning the ON/OFF switch to ON (g.
7A).
Keep a rm grip on the lance handle.
4) Press the trigger on the gun and begin washing.
5) To use the cleaner with hot water, turn the temperature regu-
lator (g. 7B) to the recommended washing values.
For some models turn the ignition switch (g. 7A) onto the
hot water position before effecting the operations described
in this point.
In water cleaners with the “Total Stop” system, the motor
starts and stops when the trigger on the gun is activated or
released.
Do not block the handle lever in the delivery position.
IMPORTANT !
To eliminate any impurities
or air bubbles from the wa-
ter circuit we advise starting
the cleaner for the rst time
without the lance and letting
the water run out for a few
seconds.
Impurities could block the
nozzle and cause malfunc-
tion (Fig. 8).
FIG. 9
USE OF THE DOUBLE LAN-
CE (g. 9).
The double lance allows the
operator to select a low or high
pressure jet. The pressure is
selected with the gun in pos.
1. High pressure: pos. 2. Low
pressure pos. 3.
!
!
!
!
!
!

English
- 10 -
FIG.11
REGULATING PRESSURE
AND USING STEAM.
(If available).
This chapter concerns only
those models provided with
the “pressure regulating” de-
vice. The pressure regulator,
g. 11, allows the operator to
adjust the working pressure.
When knob C is turned in
an anti-clockwise direction
(B) (minimum), the working
pressure is reduced.
ADVICE ON USING DETERGENTS
This cleaner has been designed for use with the detergents
supplied or recommended by the manufacturer.
The use of other detergents or chemicals may inuence the
safety of the cleaner.
1) For environmental compatibility, we recommend a rea-
sonable use of detergents, according to the instructions
on the pack.
2) From the range of recommended products, choose the
one most suited to the washing job to be done and dilute
it with water according to the instructions on the pack or
in the catalogue of the detergents most suited for the
type of hot or cold water cleaner.
3) Ask your dealer for the detergents catalogue.
During use with boiling water, "Steam Phase", keep
away from the openings for fumes discharge (risk of bur-
ning).
When you have nished using the "Steam Phase", turn
the thermostat knob "B" to position "0" (g. 7) and let
the machine cool down for about 3 minutes with the gun
turned on.
OPERATING PHASES FOR CORRECT CLEANING WITH
DETERGENTS.
1) Prepare the solution of detergent at the concentration
most suitable for the type of dirt and the surface that is
to be washed.
2) Start the cleaner, turn on the detergent tap (if present),
switch on the detergent suction control on the lance and
spray the dirty surface with the diluted product, working
from bottom to top.
Let it work for a few minutes.
3) Rinse the whole surface well from top to bottom with hot
or cold water at high pressure.
4) After use with detergent, rinse the high pressure water
circuit by operating the pump for one minute with the
detergent tap completely closed.
MAINTENANCE
ONLY THE OPERATIONS AUTHORIZED IN THIS IN-
STRUCTIONS MANUAL MAY BE CARRIED OUT BY
THE USER.
ALL OTHER OPERATIONS ARE FORBIDDEN.
For maintenance of the boiler, high pressure pump, the
electrical parts and all parts with a safety function, please call
an authorized dealer.
Disconnect the water cleaner from the main electrical
supply via the ON/OFF switch or by unplugging the plug from
the socket and close the water supply tap (see chapters on
connecting to the electricity and water mains)before carrying
out any maintenance jobs. Once maintenance has been
completed, ensure that the closing panels have been correctly
reassembled and anchored with the screws provided before
reconnecting the cleaner to the power supply.
Failure to do so may cause a risk of electric shock.
PRECAUTIONS AGAINST FROST
The cleaner must not be exposed to frost.
If the cleaner is left in premises where it is exposed to frost,
when work is over or for storage, antifreeze must be used to
prevent serious damage to the hydraulic unit.
!
!
!
Turn the thermostat knob “B” (g. 7) to steam position to obtain
an increase in the temperature of the water at delivery.
At work temperatures higher than 95°C (203°F), the work
pressure must be < 32 bar (460 PSI).
Use the steam nozzle (supplied as an accessory).
CB

English
- 11 -
FIG.12
FIG.16
FIG.15
FIG.13
FIG.14
OPERATIONS FOR USING
ANTIFREEZE. (g. 12)
1) Turn off the water supply
(tap), disconnect the hose
and run the cleaner until it is
completely empty.
2) Stop the water cleaner with
the ON/OFF switch in the “O”
position.
3) Prepare a container with the
solution of antifreeze.
4) Immerse the tube in the
container with the anti-freeze
solution.
5) Start the water cleaner with
the ON/OFF switch in the “I”
position.
6) Start the cleaner and let it
run until antifreeze comes out
through the lance.
7) Suck up antifreeze with the
detergent intake system too.
8) Disconnect the water clea-
ner from the main electricity
supply via the ON/OFF switch
or by unplugging the plug from
the socket.
9) For high pressure cleaners
provided with water tank, the
antifreeze solution prepared
as described in the point 3,
must be poured directly into
the tank.
FIG.17
CLEANING THE FUEL FIL-
TER AND TANK.
Remove and replace the in-
line fuel lter (g. 15).
Change it from time to time.
Empty the fuel tank.
Open the drain cap (g. 16) (if
available) and let any impuri-
ties drain out into a container.
Flush out the tank with clean
fuel and close the drain cap.
CLEANING THE WATER
FILTER.
Clean the water intake lter
regularly and free it from any
impurities (g. 17).
CHANGING THE NOZZLE.
The high pressure nozzle tted on the lance must be
changed from time to time, as this component is subject to
normal wear during use. Wear may generally be detected
by a drop in the working pressure of the cleaner. To replace
it, consult your dealer for instructions.
DESCALING.
Descaling must be carried out from time to time because the
scale present in the water partially deposits inside the hydraulic
circuit and the coil which with time becomes clogged.
Contact your authorized dealer to have the machine desca-
led from time to time; this will save you money and increase
the efciency of the cleaner.
CHECKING PUMP OIL LE-
VEL AND OIL CHANGE.
From time to time check the
oil level in the high pressure
pump by means of the sight
glass (g. 13A) or the dipstick
(g. 13B).
If the oil has a milky appea-
rance, call the your authorized
dealer immediately.
Change the oil after the rst
50 hours' work and subse-
quently every 500 hours or
once a year.
Proceed as follows:
1) Unscrew the drain cap
situated under the pump (g.
13C).
2) Unscrew the cap with the
dipstick (g. 13B).
3) Let all the oil drain off into
a container and deliver it to an
authorized oil collection and
disposal center.
4) Replace the drain screw
and pour fresh oil in through
the filling cap on top (fig.
14A) until it reaches the level
indicated on the sight glass
(g. 14B).
Use only SAE 15 W40 oil.
Anti-freeze may cau-
se environmental pollution.
Always follow the instructions
given on the pack. (Dispose of
carefully.)
For water cleaners with-
out oil drain plug, contact our
authorized dealer for replace-
ment.
!
!
!

English
- 12 -
TABLE OF EXTRAORDINARY MAINTENANCE
TO BE PERFORMED BY THE AUTHORIZED
DEALER.
Description of operations:
Boiler:
Clean Coil.
Descale coil.
Clean fuel pump.
Change fuel nozzle.
Regulade electrodes.
Change electrodes.
Change seals on H.P. pump.
Change lanze nozzle.
Calibrate and check the safety devices.
IMPORTANT:
These intervals refer to normal working conditions. For heavy duty use decrease the interval for each job.
For maintenance and/or repairs, use only original spare parts which offer the greatest characteristics of quality and
reliability. Failure to use original spare parts absolves the manufacturer from all liability and transfers it to the
person carrying out the operation.
STORAGE
If the machine is to remain inactive for a long period, disconnect the supply sources, drain the tank(s) of all the operating uids
and protect any parts that could be damaged by the accumulation of dust.
Grease the parts that could be damaged by drying out, such as the supply hoses. When bringing back into use, ensure that
there are no cracks or cuts in the water supply hoses.
Oil and chemical products must be disposed of according to current legislation.
SCRAPPING
If you decide that the cleaner is no longer to be used, render it inoperative by removing the electric power cable. Ensure that all
parts of the cleaner that could be a source of danger are made harmless, especially for children who might use the old cleaner
for play. As the cleaner is considered special waste, dismantle it and divide the material according to type, then dispose of them
as required by the legislation in force.
Do not use parts dismantled for scrap as spare parts.
Every 200 hours
Every 300 hours
Every 200 hours
Every 200 hours
Every 200 hours
Every 500 hours
Every 500 hours
Every 200 hours
Once a year
Each use
After 50 hours
Every 500 hours
Every 100 hours
Every 100 hours
Every 50 hours
TABLE OF ROUTINE MAINTENANCE TO BE PER-
FORMED BY THE USER.
Description of operations:
Check power cable - pipes - high pressure
connectors.
Ist oil change in H.P. pump.
Subsequent changes in H.P. pump.
Change and clean fuel lters.
Clean fuel tank.
Clean water lter.

English
- 13 -
FAULTS
When the switch is turned the cleaner
does not start.
No spray delivered.
The pump turns but does not reach
the rated pressure.
When the lance is turned on the pres-
sure falls and rises. After 10 pulses,
the water cleaner stops and indicator
light “D” (g. 7) ashes.
In by-pass or total stop phase, the wa-
ter cleaner shuts down and indicator
light “D” (g. 7) ashes.
After the total stop phase, the water
cleaner does not start up and the indi-
cator lights is on.
When the thermostat reaches the
chosen temperature the boiler does
not light.
Indicator light “F” (g. 7) ashes.
Water not hot enough.
Too much smoke from the ue.
Insufcient detergent suction.
TROUBLE-SHOOTING
Before carrying out any operations, disconnect the water cleaner from the main electrical supply via the ON/OFF
switch or by unplugging the plug from the socket.
CAUSES
Faulty electric connection.
Thermal protection has tripped.
Faulty water circuit connection.
Clogged water lter.
Mains tap turned off.
Detergent tap turned on.
Water intake lter blocked.
Faulty water circuit connection.
Pressure regulation valve is set at
minimum.
Lance nozzle is worn.
Dirty or worn valves.
Detergent intake device on the lance is
turned on.
The nozzle is clogged or deformed.
Insufcient supply.
Micro-leaks of water from the high pres-
sure circuit.
The water cleaner has been unused for
at least 20 minutes and is in a state of
total shutdown.
No fuel.
Fuel lters are clogged.
Thermostat setting.
Clogged lters.
Boiler coil clogged with scale.
No fuel.
Incorrect combustion.
Impurities or water in the fuel.
Tap turned off.
No detergent in the tank.
Control on the lance not switched on.
Coil or pipe clogged.
REMEDIES
Check the main voltage/circuit breaker.
Reset (if it trips again, apply to the
technical service center).
Check it.
Clean it.
Turn it on.
Turn it off.
Clean it.
Check it.
Regulate it.
Call your authorized dealer.
Turn it off.
Clean or consult our technical service
center
Check it.
Contact Service Center.
Restart by rotating the ON/OFF switch
(g. 7) into the “O” position and subse-
quently into the “I” position.
Check the fuel level in the tank and see
that the fuel intake circuit is clean (no
water).
Change the in-line lter.
Check it.
Clean the fuel lters.
Call your authorized dealer.
Fill the fuel tank.
Clean the various fuel lters.
Empty the tank and clean it carefully.
Clean the various fuel lters too.
Turn it on.
Fill the detergent tank.
Set the control on the lance.
Call your authorized dealer.
!

English
- 14 -
IMPORTANT:
For maintenance and/or repairs, use only original spare parts which offer the greatest characteristics of quality and
reliability. Failure to use original spare parts frees the manufacturer from all responsibility.
FAULTS
Indicator light "G" (g. 7) ashes.
Water leaks from head.
Presence of water in oil.
CAUSES
No water softener.
Gasket worn.
Oil seal rings worn.
REMEDIES
Fill the tank with water softener.
Call your authorized dealer.
N.B. To reset the indicators on the control panel, rotate the ON/OFF switch “A” (g. 7A) to the “O” position and then
to the “I” position.

Français
- 15 -
Continuer la lecture de ce livret sans brancher le nettoyeur haute pression au secteur et au réseau de distribution d'eau.
Raccordement hydraulique.
Branchement électrique.
Compliments ! Nous tenons à vous remercier...
pour l'achat de ce nettoyeur haute pression. Vous avez démontré que vous n'acceptez pas de compromis : Vous voulez ce
qui se fait de mieux.
Nous avons préparé ce manuel pour vous permettre d'apprécier pleinement les qualités et les hautes performances que ce
nettoyeur haute pression vous garantit.
PREPARATION DU NETTOYEUR HAUTE PRESSION
Montage de la lance.
Le texte a été attentivement contrôlé ; toutefois les éventuelles erreurs d'impression devront être communiquées
au constructeur. Celui-ci se réserve le droit, dans le but d'améliorer le produit, d'apporter toute modication pour la
mise à jour de ce manuel sans préavis. Enn toute reproduction, même partielle, du présent manuel est interdite en
l'absence d'autorisation du constructeur.

Français
- 16 -
DESCRIPTION SYMBOLES SUR LES NETTOYEURS HAUTE PRESSION
ALLUMAGE MOTEUR
POMPE.
ALLUMAGE BRULEUR.
REGLAGE TEMPERATURE
DE L'EAU.
CARBURANT (GASOIL).
PRODUIT CHIMIQUE (DE-
TERGENT).
ANTICALCAIRE.
NE PAS DIRIGER LE JET
VERS LES PERSONNES,
LES ANIMAUX, LES PRISES
DE COURANT ET L'APPA-
REIL LUI-MEME.
ATTENTION : DANGER DE
BRULURE.
ATTENTION : DANGER
D'ELECTROCUTION.
MISE A LA TERRE.
ARRIVEE DE L'EAU.
EVACUATION DE L'EAU.

Français
- 17 -
Les instructions les plus importantes sont si-
gnalées par le symbole :
PREFACE
Ce livret doit être lu avant de procéder à l'installation, à la
mise en service et à l'utilisation du nettoyeur haute pression.
Il constitue partie intégrante du produit.
Il se compose de deux parties, dont une de couleur jaune.
Lire attentivement les avertissements et les instructions conte-
nus dans ce manuel car ils fournissent d'importantes indications
sur la SECURITE D'EMPLOI et l'ENTRETIEN, et prêtent une
attention particulière aux normes générales de sécurité conte-
nues dans la notice jaune.
CONSERVER SOIGNEUSEMENT CE LIVRET POUR POU-
VOIR LE CONSULTER ULTERIEUREMENT.
Le contenu de ce livret doit être porté à la connaissance
de l’utilisateur du nettoyeur haute pression et de qui effectue
les opérations d’entretien courant.
signalétique (kW).
En cas de doute, s’adresser à des techniciens qualiés.
En cas d’incompatibilité entre la prise et la che de l’appareil,
faire remplacer la prise avec un type de prise adéquat par des
techniciens qualiés. Avant de brancher l’appareil, s’assurer
que les données de la plaque signalétique correspondent à
celles du réseau électrique.
Ne pas utiliser de rallonges pour alimenter le nettoyeur haute
pression.
La sécurité électrique de cet appareil n’est assurée que lorsque
celui-ci est correctement branché à une installation de mise à la
terre en état, conformément aux normes de sécurité électrique
en vigueur.
Il est nécessaire de vérier cette condition de sécurité fonda-
mentale ; en cas de doute, demander à des techniciens qualiés
d’effectuer un contrôle rigoureux de l’installation.
Le constructeur ne peut être tenu pour responsable en cas de
dommages éventuels causés par le manque de mise à la terre
de l’installation.
Le nettoyeur haute pression doit être branché au secteur par un
interrupteur omnipolaire avec une ouverture des contacts d’au
moins 3 mm et des caractéristiques électriques appropriées à
l’appareil (cette condition n’est pas applicable aux nettoyeurs
haute pression munis de che ayant une puissance inférieure
à 3 kW).
Pour débrancher l’appareil du réseau électrique, il suft d’en-
lever la che de la prise de courant ou d’éteindre l’interrupteur
omnipolaire sur l’installation.
Le non respect des prescriptions données plus haut dégage le
constructeur de toute responsabilité et représente une utilisa-
tion négligente du produit.
Le nettoyeur haute pression est considéré comme un appareil
à installation xe.
Les nettoyeurs haute pression avec dispositif “Total
stop” sont éteints quand l’interrupteur omnipolaire est en
position “O” ou quand la che est débranchée de la prise
de courant.
CLASSIFICATION
L’usager doit respecter les conditions d’utilisation de la machine
prévues par les normes ; en particulier, il doit se conformer à la
classication décrite ci-dessous.
Pour ce qui concerne la protection contre la décharge électri-
que, le nettoyeur haute pression est un appareil de Classe I.
Le nettoyeur haute pression est réglé à l’usine et tous les
dispositifs de sécurité qu’il contient sont scellés. Il est interdit
de modier leur réglage.
Le nettoyeur haute pression doit toujours être utilisé sur un
terrain ferme et plat et ne doit pas être déplacé durant son fon-
ctionnement ou quand il est branché au réseau électrique.
Le non respect de cette prescription peut se révéler dange-
reux.
Le nettoyeur haute pression ne doit pas être utilisé en cas
d’atmosphère corrosive ou potentiellement explosive (vapeurs
ou gaz).
Le branchement électrique doit être effectué par des techni-
ciens qualiés travaillant dans le respect des normes en vigueur
et en accord avec les instructions du constructeur.
Une erreur dans le branchement peut causer des dommages
à des personnes, à des animaux ou à des choses, dommages
pour lesquels le constructeur ne peut être tenu pour respon-
sable.
Les nettoyeurs haute pression ayant une puissance inférieure
à 3 kW sont pourvus d’une che de branchement au réseau
électrique.Dans ce cas, vérier que la puissance électrique de
l’installation et des prises de courant sont compatibles avec
la puissance maximum de l’appareil indiquée sur la plaque
!
!
!
!

Français
- 18 -
L'appareil est destiné exclusivement au nettoyage des machi-
nes, des véhicules, des bâtiments, des outils et, de manière
générale, des surfaces pouvant être traitées avec un jet de
solution détergente à une pression comprise entre 25 et 250
bars (360 - 3600 PSI).
Cet appareil a été conçu pour être utilisé avec des détergents
fournis ou conseillés par le constructeur. L'emploi d'autres
détergents ou d'autres substances chimiques peut nuire à la
sécurité de l'appareil.
Cet appareil devra être destiné exclusivement à l'usage pour
lequel il a été spéciquement conçu.
Tout autre emploi doit être considéré comme inadéquat et donc
déraisonnable.
Exemples d'emplois déraisonnables :
- Lavages de surfaces non appropriées à un traitement avec
un jet à haute pression.
- Lavage de personnes, d'animaux, d'appareils électriques et
de l'appareil lui-même.
- Utilisation de détergents ou de substances chimiques non
adéquats.
- Bloquer le cran (levier) de la lance en position de sortie du
liquide.
Le constructeur ne peut être tenu pour responsable des éven-
tuels dommages causés par un usage inadéquat, incorrect ou
déraisonnable.
En matière de sécurité, les nettoyeurs haute pression sont
construits conformément à la Norme européenne.
DEBALLAGE.
Après avoir déballé l'appareil, s'assurer que le nettoyeur haute
pression est intact.
En cas de doute, ne pas utiliser le nettoyeur haute pression.
S'adresser au détaillant.
Les éléments de l’emballage (sachets, boîtes, clous, etc.) ne
doivent pas être laissés à la portée des enfants car ils sont
une source potentielle de danger et doivent être mis au rebut
ou conservés dans le respect des normes nationales pour la
protection de l’environnement.
MONTAGE DES PIECES DETACHEES DE L'APPAREIL.
L'appareil est assemblé par le constructeur pour ce qui concer-
ne ses parties fondamentales et de sécurité.
Pour des motifs d'emballage et de transport, certains élé-
ments secondaires du nettoyeur haute pression sont fournis
démontés.
Il reviendra à l'utilisateur de monter ces pièces conformément
aux instructions fournies dans chaque lot de montage.
PLAQUETTE SIGNALETIQUE
La plaquette signalétique indiquant les principales caractéristi-
ques techniques de votre nettoyeur haute pression est placée
sur le chariot et est toujours visible.
S'assurer au moment de l'achat que le produit est muni
de la plaquette. Si ce n'est pas le cas, avertir immédiate-
ment le constructeur et/ou le détaillant.
Les appareils qui ne sont pas munis de la plaquette ne doi-
vent pas être utilisés : dans le cas contraire, le constructeur
serait dégagé de toute responsabilité.
Les produits qui ne sont pas munis de plaquette doivent
être considérés comme anonymes et potentiellement
dangereux.
OPERATIONS PRELIMINAIRES
EMPLOIS DU NETTOYEUR HAUTE PRESSION
!
REMPLISSAGE DU RESER-
VOIR CARBURANT.
Remplir le réservoir avec du
carburant pour moteurs die-
sels (g. 1).
FIG. 1
Ne pas utiliser de carburant différent de celui qui est
indiqué sur la plaquette signalétique.
Durant le fonctionnement du nettoyeur haute pression,
contrôler régulièrement le niveau du carburant.
Le fonctionnement sans carburant peut causer des dom-
mages à la pompe de gasoil.
!
Diesel

Français
- 19 -
BRANCHEMENT AU SECTEUR.
Le branchement au secteur du nettoyeur haute pression doit
être effectué par des techniciens qualiés en mesure de travail-
ler dans le respect des normes et des lois en vigueur.
Contrôler que la tension du secteur disponible sur l'installation
correspond à la tension prévue pour le nettoyeur haute pression
et indiquée sur la plaque signalétique.
Le câble électrique doit être protégé contre les écrasemen-
ts accidentels.
Ne pas utiliser l’appareil avec le câble d’alimentation
détérioré.
L’emploi d’un quelconque appareil électrique comporte
l’observation de certaines règles fondamentales :
• Ne pas toucher l’appareil avec les mains ou les pieds mouillés
ou humides.
• Ne pas utiliser l’appareil avec les pieds nus ou avec des
vêtements non appropriés.
• Ne pas tirer sur le cordon d’alimentation ou sur l’appareil pour
débrancher la che de la prise de courant.
(pour nettoyeurs haute pression de puissance inférieure à 3
kW munis de che).
Pour ce qui concerne la protection contre la décharge électri-
que, le nettoyeur haute pression est un appareil de Classe I.
Le non respect de la recommandation ci-dessus dé-
gage le constructeur de toute responsabilité et constitue
une utilisation négligente du produit.
FIG. 3
DISPOSITIFS DE COMMANDE ET DE CONTROLE.
Avant le raccordement au réseau de distribution d'eau et au
secteur, il est nécessaire de connaître la fonction des dispositifs
de commande et de contrôle du nettoyeur haute pression.
Effectuer cette opération en suivant les indications du manuel
d'instructions et en se reportant aux gures correspondantes.
FIG. 2
FIG. 6
FIG. 5
REMPLISSAGE DU RESER-
VOIR DETERGENT
Choisir dans la gamme des
produits conseillés le déter-
gent le plus approprié au type
de lavage à effectuer et le
diluer avec de l'eau (g. 2) en
se conformant aux indications
reportées sur l'emballage du
produit.
Remplir le bidon du détergent
avec le produit dilué (g. 3).
Demander à votre détaillant
le catalogue des détergents
qui peuvent être utilisés en
fonction du type de lavage à
effectuer et du type de surface
à traiter.
Après l'emploi d'un détergent,
le circuit d'aspiration du déter-
gent doit être rincé avec de
l'eau propre.
RACCORDEMENT AU RESEAU DE DISTRIBUTION
D'EAU.
Relier le tuyau d'alimentation au réseau de distribution (g.
5A) et au raccord du nettoyeur
haute pression (g. 5B).
Vérier que le réseau de distri-
bution d'eau fournit la quantité
et la pression d'eau néces-
saires au fonction-nement du
nettoyeur haute pression
2 ÷ 8 bars (29 ÷ 116 PSI).
Température maximum de
l'eau d'alimentation : 50°C
(122 °F).
Relier le tuyau haute pression
à l'appareil (g. 5C) et à la
lance (g. 6).
IMPORTANT
Le nettoyeur haute pression
doit fonctionner avec de
l'eau propre.Les eaux sales
ou sableuses, les produits
chimiques corrosifs ou
les diluants provoquent
de graves dommages au
nettoyeur haute pression.
Le non respect des pre-
scriptions données plus
haut dégage le constructeur
de toute responsabilité et
représente une utilisation
négligente du produit.
!
!
!
!
!
FIG. 4
REMPLISSAGE DU RÉSER-
VOIR ANTI-CALCAIRE.
Remplir le réservoir avec
une solution anti-calcaire.
Utiliser exclusivement des
produits conseillés par le
fabricant et/ou le revendeur
en suivant scrupuleusement
les instructions indiquées sur
l’emballage. (Ne pas jeter le
produit anti-calcaire dans la
nature).
Chemical
Anti-Scale
Anti-Scale

Français
- 20 -
AVERTISSEMENTS GENERAUX POUR L’INSTALLATION ET L’EMPLOI
L’emploi d’un quelconque appareil électrique comporte
l’observation de certaines règles fondamentales :
• Ne pas toucher l’appareil avec les mains ou les pieds
mouillés ou humides.
• Ne pas utiliser l’appareil avec les pieds nus ou avec
des vêtements non appropriés.
• Ne pas tirer sur le cordon d’alimentation ou sur l’appareil
pour débrancher la che de la prise de courant.
(pour nettoyeurs haute pression de puissance inférieure à 3
kW munis de che).
Le nettoyeur haute pression ne doit pas être utilisé par des
enfants, des adolescents ou
des personnes inaptes (en état d’ébriété, etc.).
Utiliser exclusivement des accessoires d’origine qui offrent
la garantie d’un fonctionnement sûr de l’appareil.
Le tuyau exible qui relie la lance au nettoyeur haute
pression ne doit pas être détérioré.
En cas de détérioration, le remplacer immédiatement.
Les tuyaux, les joints et les accouplements pour la haute
pression sont importants pour la sécurité du nettoyeur haute
pression. Utiliser exclusivement des pièces de rechange d’ori-
gine approuvées par le constructeur.
Ne pas utiliser le nettoyeur haute pression quand des
personnes et/ou des animaux sont présents dans son rayon
d’action.
Les jets à haute pression peuvent être dangereux s’ils ne
sont pas utilisés correctement. Le jet ne doit pas être dirigé vers
les personnes et/ou les animaux, vers les appareils électriques
ou vers l’appareil lui-même.
Le jet d’eau à haute pression génère une force de réaction
sur la lance. Tenir très fermement la poignée de la lance.
L’utilisation du nettoyeur haute pression doit être déter-
minée en fonction du type de lavage à effectuer.
Se protéger contre l’éjection de corps solides ou de substances
corrosives en portant des vêtements de protection adéquats.
L’utilisation du nettoyeur haute pression doit être déter-
minée en fonction de la zone dans laquelle est effectué le lavage
(ex. : industries alimentaires, industries pharmaceutiques,
etc.).
Les normes et les conditions de sécurité des différentes zones
devront être respectées.
Pour ce qui concerne la protection contre la décharge électri-
que, le nettoyeur haute pression est un appareil de Classe I.
Ne pas diriger le jet contre vous-même ou vers d’autres
personnes pour nettoyer des vêtements ou des chaussures.
Durant l’utilisation, il est interdit de bloquer la gachette de
la lance en position de refoulement.
Le nettoyeur haute pression à eau chaude utilise pour le
réchauffement de l’eau un brûleur fonctionnant à gasoil. L’em-
ploi d’autres combustibles est dangereux.
Avant d’effectuer toute opération de nettoyage et/ou d’en-
tretien, séparer l’appareil des réseaux de distribution d’électri-
cité et d’eau.
Régulièrement, au moins une fois par an, faire inspecter
les dispositifs de sécurité par l’un de nos centres de service
après-vente.
Si on utilise l’appareil dans une pièce close, installer un
système d’aspiration des fumées et une ventilation des locaux
appropriée.
Ne pas boucher les ouvertures et les fentes de ventilation
et d’évacuation de la chaleur ou la cheminée d’évacuation de
la fumée, sur les nettoyeurs haute pression à eau chaude.
Ne pas utiliser l’appareil avec le câble d’alimentation
détérioré.
Pour remplacer le câble en cas de détérioration, s’adresser
exclusivement à l’un de nos centres de service après-vente.
Le câble électrique de cet appareil ne peut pas être changé
par l’usager.
Le câble d’alimentation électrique ne doit jamais être
soumis à une tension mécanique et son parcours doit être
protégé contre les écrasements accidentels.
En cas de panne et/ou de mauvais fonctionnement de l’ap-
pareil, l’éteindre (en coupant l’alimentation électrique à l’aide de
l’interrupteur omnipolaire ou en débranchant la che de la prise
pour les nettoyeurs haute pression de puissance inférieure à 3
kW, et en coupant l’alimentation en eau) et n’effectuer aucune
intervention.
S’adresser à l’un de nos centres de service après-vente.
!
!
!
!
!
!
!
!
!
!
!
!
!
!
!
!
!
!
!
!
This manual suits for next models
2
Table of contents
Languages:
Other Delco Pressure Washer manuals

Delco
Delco DC 1302 User manual

Delco
Delco VERSA 100 User manual

Delco
Delco C984040V User manual

Delco
Delco Dominator Series User manual

Delco
Delco Pressure Washers User manual

Delco
Delco Avenger 1000-3 NG User manual

Delco
Delco EQ3200 User manual

Delco
Delco KING BRUTE PN 09301 A User manual

Delco
Delco 2000 - 4 LP 091 User manual

Delco
Delco DCV2420 User manual