Deli 888T User manual

USER MANUAL
MODEL: 888T
THERMAL LABEL PRINTER

CONTENTS
MANUAL INFORMATION...................................................................................................1
SAFETY PRECAUTIONS....................................................................................................1
CHAPTER 1. PRODUCT INTRODUCTION........................................................................5
1.1 Unpacking checklist.......................................................................................................................................5
1.2 Physical appearance and components......................................................................................6
1.3 Product dimensions......................................................................................................................................7
CHAPTER 2. PRODUCT SPECIFICATIONS....................................................................8
2.1 Technical specifications...........................................................................................................................8
CHAPTER 3 INSTALLATION AND OPERATION.............................................................9
3.1 Installation media...........................................................................................................................................9
3.1.1 Loading the paper roll...............................................................................................................................9
3.1.2 Installing folding paper..........................................................................................................................12
3.1.3 Installing the external paper roll bracket...............................................................................14
3.1.4 Installing the ribbon.................................................................................................................................15
3.2 Power connection .....................................................................................................................................17
3.3 Interface connection................................................................................................................................18
3.4 Label detection.............................................................................................................................................18
3.5 Printing test......................................................................................................................................................19
3.6 Basic function..............................................................................................................................................20
3.6.1 Power ON/OFF.............................................................................................................................................20
3.6.2 Paper feed...................................................................................................................................................20
3.6.3 Printing test ..............................................................................................................................................20
3.6.4 Label printing training.........................................................................................................................21
CHAPTER 4 INTERFACE SIGNAL.................................................................................22
CHAPTER 5 CLEANING THE PRINTER........................................................................23
5.1 Cleaning the print head..........................................................................................................................23
5.2 Cleaning the sensor, roller and paper path..........................................................................23

Manual information
This user manual contains essential information for the installation and use
of the product.
The following section provides a more detail description about various tech-
nical issues and information.
1.Windows Driver Manual
This manual provides Windows driver installation instructions.
2.Printer Utility Manual
The manual specifies how to use the product's function selection software
and its operating conditions.
3.Programming manual
This manual provides information on label printer instructions.
SAFETY PRECAUTIONS
Please read the precautions carefully before operating the printer to avoid
personal injury or machine damage.
1. Warning symbols
WARNING Must be followed to avoid injury to the user and/or damage to
the equipment.
Note Signals important information and tips for printer operation.
2. Safety precautions
WARNING: Violating following instructions may cause serious injury or
death.
1) Do not insert several plugs into a multi-outlet power strip at the same
time.
• This can cause overheating and a fire.
• If the plug is wet or dirty, dry or wipe it clean before use.

Note: Violating following instructions can cause slight wound or damage
the appliance .
1) If you find smoke, smell or noise coming out of the printer for unknown
reason, please unplug the power cord and take proper emergency mea-
sures.
• Turn off the printer and unplug power cord.
• After the smoke clears, call the dealer for repairs.
2) Place the printer on a stable and flat surface.
• If the printer drops to the ground, it may break and cause personal injury.
3) You should only use approved accessories, and do not attempt to disas-
semble, repair or modify the printer by yourself.
• Please call the dealer if you need any of the above-mentioned services.
4) Do not let water or other objects get inside the printer.
•In case it happens, turn off the printer and unplug the power cord Then
call the dealer for service.
5) Do not use the printer when there is a malfunction, as this may cause
fire or electric shock.
• Please turn off the printer and unplug the power cord. Then call the dealer
for service.
• Do not use the electrical outlet if it’s not compatible with the power cord
plug.
• You should only use standard multi-outlet power strips.
2) You should only use the adapter provided in this package.
• It is not safe to use other adapters.
3) Do not unplug it by pulling on the power cord
• This may damage the power cord and cause a fire or printer malfunction.
4) Do not plug or unplug the power cord with wet hands.
• This may cause electric shock.
5) Do not bend the power cord excessively or place heavy objects on it
• Damaged power cords may cause a fire.

6) Other matters to note.
Leave enough space around the printer for operation and maintenance pur-
pose
Keep the printer away from water, direct sunlight, strong light and heat
sources.
Do not use or store the printer in places with high temperature, high humidi-
ty or heavy pollution.
Avoid placing the printer in places subject to vibrations and shocks.
Connect the printer's power adapter to a properly grounded electrical outlet,
and avoid using the same outlet with large appliances or devices that can
cause voltage fluctuations.
Please disconnect the power supply if you are not going to use the printer
for a long period of time.
To ensure print quality and extend the life of of the printer, it is suggested
to use recommended or equivalent quality printer paper.
Shut off the power before plugging or disconnecting of interfaces, otherwise
it may damage the printer control circuits.
Please keep this manual in a proper place for future references.
3. Other matters to note
Although we have been very careful on the compiling of this manual, however,
errors and/or omissions are still inevitable. The company will not assume any
responsibility for any losses on anyone due to the use of information in this
manual. For users and third parties, the company and its subsidiaries will not
be liable for any product damage, failure or misuse caused by not following or
ignoring the operation, maintenance information and/or instructions provided
by the company; and for losses, costs or expenses caused by unauthorized
changes, repairs or modifications to the product. The company shall not bear
any responsibility with regard to damages and/or problems caused by the use
of counterfeit accessories, parts or unauthorized products.
Note: Due to continuous product improvement, specifications, accessories
and/or procedures described herein are subject to change without notice.

6) Other matters to note.
Leave enough space around the printer for operation and maintenance pur-
pose
Keep the printer away from water, direct sunlight, strong light and heat
sources.
Do not use or store the printer in places with high temperature, high humidi-
ty or heavy pollution.
Avoid placing the printer in places subject to vibrations and shocks.
Connect the printer's power adapter to a properly grounded electrical outlet,
and avoid using the same outlet with large appliances or devices that can
cause voltage fluctuations.
Please disconnect the power supply if you are not going to use the printer
for a long period of time.
To ensure print quality and extend the life of of the printer, it is suggested
to use recommended or equivalent quality printer paper.
Shut off the power before plugging or disconnecting of interfaces, otherwise
it may damage the printer control circuits.
Please keep this manual in a proper place for future references.
3. Other matters to note
Although we have been very careful on the compiling of this manual, however,
errors and/or omissions are still inevitable. The company will not assume any
responsibility for any losses on anyone due to the use of information in this
manual. For users and third parties, the company and its subsidiaries will not
be liable for any product damage, failure or misuse caused by not following or
ignoring the operation, maintenance information and/or instructions provided
by the company; and for losses, costs or expenses caused by unauthorized
changes, repairs or modifications to the product. The company shall not bear
any responsibility with regard to damages and/or problems caused by the use
of counterfeit accessories, parts or unauthorized products.
The symbol placed on the product indicates that the item should not
be mixed with general household waste. If such waste is not properly
managed, it may harm both environment and human health. To
prevent possible harm to the environment or human health from
uncontrolled waste disposal, please separate these items from other types of
waste and recycle them responsibly to promote the sustainable reuse of ma-
terial resources. Household users should contact either the retailer where they
purchased this product, or their local government office, for details of where
and how they can take these items for environmentally safe recycling. Busi-
ness users should contact their supplier and check the terms and conditions
of the purchase contract. This product and its accessories should not be
mixed with other commercial wastes for disposal.
4.WEEE (Waste Electrical and Electronic Equipment)

1 PRODUCT INTRODUCTION
Power cord USB cable
User manualPrinter
Warranty card
Warranty card
Power adapter
Carbon ribbon + Paper
roll (DL-888T only)
1.1 Unpacking checklist
1) Unpack the printer and save the packing materials in case you need to
repack the printer for shipping or storage.
2) Please contact the dealer for any defect and/or missing of accessory.
Printer,power adapter, power cord,USB cable,installation CD, carbon ribbon +
paper roll ( carbon ribbon is exclusively for DL-888T), user manual, warranty
card, QA certificate.
Note: The printer supports Bluetooth function.

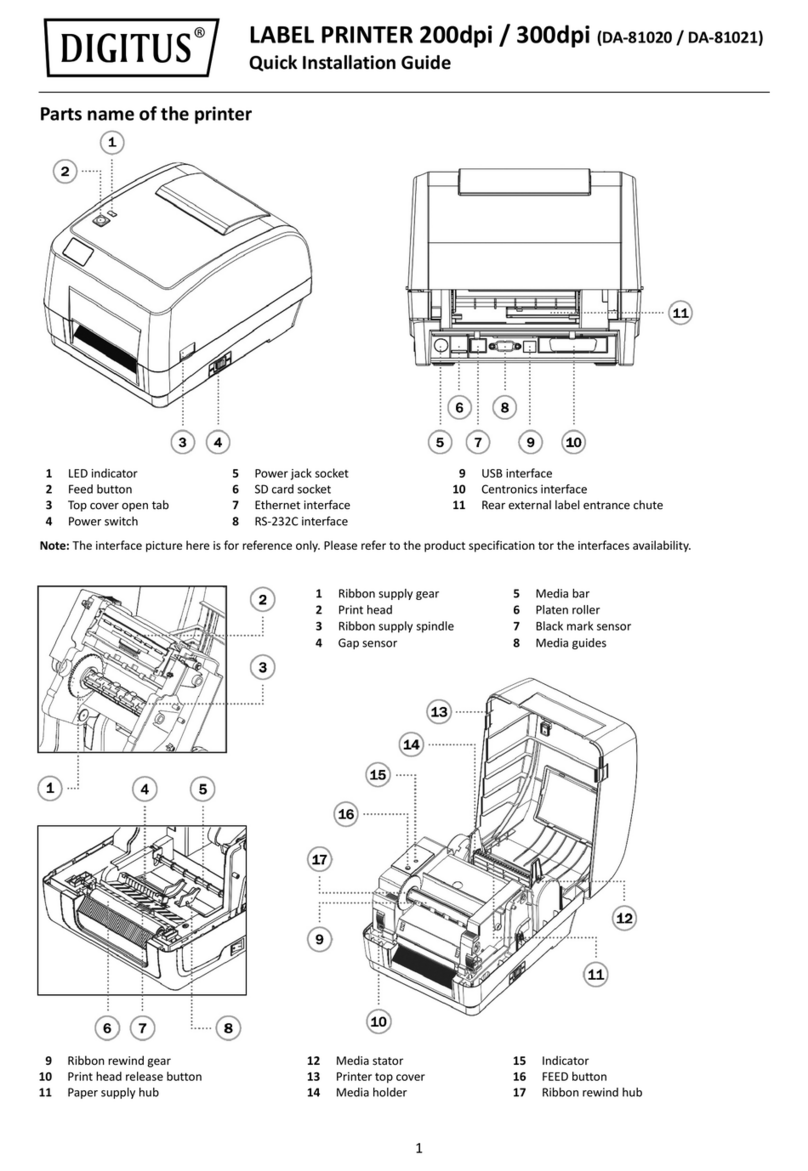
top cover
USB port
power connector
paper feed button
(status indicator)
top cover release button power switch
rubber roller
tape recovery shaft
tape supply shaft
paper roll holder
(adjustable)
latch
paper guide
(adjustable)
movable paper detector
Top cover bracket lock
1.2 Physical appearance and components

1.3 Product dimensions

2 PRODUCT SPECIFICATIONS
CE

1. Facing the front of the printer, open the top cover button in the direction
indicated by the arrow and lift the top cover upward.
2. Open the paper roll holder and adjust the width in according to the width
of the paper roll, insert the paper roll.
3 INSTALLATION AND OPERATION
3.1 Installation media
3.1.1 Installing the paper roll

3. Ensure the paper roll is securely attached to the paper roll holder, and then
press down the latch.
4. Pull out part of the paper roll through the paper guide, and close the paper
guide according to the paper width to regulate both sides of the paper.

5. Hold the top cover of the printer with your left hand, press the top cover
bracket lock with your right hand in the direction of the arrow, and lower the
top cover.
6. Press down until you hear a click. Tear off any excess paper in the direction
of the cutting blades.

3.1.2 Installing folding paper
1. Place the folded label paper at the back of the printer. With the printing
side facing up, insert into the printer from the external paper roll inlet.
2. Open the printer top cover, pull out the paper roll to the front of the printer,
and adjust the paper guide according to the paper size.

3. Hold the top cover with your left hand, and press the top cover bracket
lock with your right hand in the direction shown.
4. Press down the top cover until it locks with a click.

3.1.3 Installing the external paper roll bracket
When folding paper is used, or the paper roll is too large to be put into the
paper bin, you can feed the paper from the paper inlet of the external paper
roll as shown in the figure below, and then pass the paper underneath the
paper guide, adjust the guide based on the paper width to regulate the
paper.
Remarks: The paper roll bracket can be fixed on both sides with locking pins.

1. Facing the front of the printer, press the open button for the top cover with
both hands simultaneously, lift the top cover up, and the printing support
brackets will automatically open.
2. First pass the ribbon recovery core through the print support set from top to
bottom, then press the right end of the ribbon supply core onto the spring-load-
ed ribbon pin on the ribbon supply shaft, and then install the left end of the
ribbon into the ribbon For the rear dial group, rotate the supply shaft core until
the notches are aligned and locked to the rear dial group on the left side of the
supply shaft. The installation method of the ribbon recovery shaft is the same
as above, press its right end on the ribbon recovery
On the ribbon pin of the shaft, put the left end of it into the ribbon front wheel
set and lock it.
printing support
brackets
ribbon supply core
ribbon pick-up core
rear ribbon wheel set
carbon ribbon
rubber roller
front ribbon wheel set
3.1.4 Install the Thermal Transfer Ribbons(DL-888T only)

3. Turn the ribbon pick-up shaft gear counterclockwise to rewind the ribbon
to a tight and flat condition. (ribbon supply core, ribbon pick-up core, rear
ribbon wheel set, front ribbon wheel set, ribbon pin)
4. Close the top cover of the printer, and the print head assembly will
automatically close.

OnOff
1. Make sure the printer's power switch is off (O).
2. Connect the power adapter to the printer.
4. Plug the power cord into the other end of the power supply.
3. Connect the power cord to the power adapter.
Power adapter
Power cord
3.2 Power connection
Note:
Please use our company's original power adapter to avoid damage to the
product and the possible cause of injury.
If you do not use the printer for a long period of time, unplug the printer
power cable.
Power is interrupted, or the data cable becomes disconnected during
printing: When all data has been transmitted to the printer and the power
or data cable becomes disconnected, the unprinted content will not be
printed or reprinted. When the data is partially transmitted to the printer,
any unprinted content will be reprinted after the power and data cables
are reconnected.
Boot positioning:
To better position the self-adhering label paper with a height of ≤80 mm
when it is turned on for the first time, this model will display the blank
paper positioning function after printing the first copy to better identify
the label height.

3.3 Interface connection
Connect the interface cable as shown in the figure below.
This printer supports the following communication interface standards:
--USB B-Type cable
1) Turn off the printer (O).
2) Please plug the communication cable to into the corresponding
communication connectors of printer.
3.4 Label detection
Please connect the USB B-Type cable to the USB interface.
This manual suits for next models
1
Table of contents
