DELIVITA PRO User manual
Create Your Finest
Moments With DeliVita
DELIVITA PRO
INSTALLATION AND INSTRUCTIONS

1. What’s in the box?
2. Introduction and sa ety
3. The oven – set-up, materials and curing
4. The oven – lighting and cooking
5. DeliVita equipment and accessories
6. Care o the oven
7. FAQs
WELCOME TO THE WORLD OF DELIVITA INSPIRED
BY ITALY AND HANDCRAFTED IN YORKSHIRE
CONTENTS
Thank you or choosing the DeliVita Pro – the world o outdoor
cooking just got a whole lot bigger and tastier.
No matter what culinary journey you’re embarking on we’re pretty
sure it’s going to be ull o sensational flavours, per ectly cooked easts
and un-filled delicious moments that can be enjoyed by you,
your amily and riends.
We know you can’t wait to get going but please read the installation and
instruction manual be ore commencing on the ood journey o your li e.
ENGLISH

SYMPTOMS OF EXPOSURE TO CARBON MONOXIDE
• Tightness across the orehead
• Headache
• Severe headache, weakness, dizziness, nausea, vomiting.
• Coma, intermittent convulsions
• Depressed heart action, slowed respiration.
I the exposure has been severe, it may cause death.
IF YOU SMELL GAS:
1. Turn the gas o and isolate the appliance.
2. Put out any live fire or flames.
3. Open the door to the oven.
4. Consult a qualified gas engineer.
This appliance may be converted rom LPG to Natural or vice-versa using the DeliVita
supplied conversion kits. Follow the instruction or contact a qualified gas engineer.
• WARNING improper installation, adjustment, alteration, service or maintenance
can cause property damage, injury or death. Read the installation, operating and
maintenance instructions thoroughly be ore installing or servicing this equipment.
• CHECK there are no obvious de ects in the oven, such as cracked floor tiles or
damage to the outer shell. Please contact us immediately i a de ect is ound.
• ALWAYS handle the oven with care and DO NOT DROP the oven.
• ALWAYS ensure the oven is sited on a level solid base and does not overhang. I you
are using the Fold Away Oven Stand, ensure it has been erected correctly and that
it is stood on level and stable ground.
• FOLLOW the instructions or curing the oven care ully. Failure to cure the oven
correctly can cause damage and will void the warranty.
• CAUTION is required when the oven is in use, as the mouth and inside o the oven
gets very hot with temperatures possibly reaching over 550°C.
• ENSURE all accessories, tools and materials used in the oven are appropriate or
high temperatures. All DeliVita accessories have been designed to work with the
oven and can be purchased on our website.
• PLEASE TAKE EXTREME care when using the oven, use the right accessories, tools,
gloves, and gauntlets to avoid any injuries and burns.
• ALWAYS ensure that children and pets are kept at a sa e distance rom the oven,
both during and a ter operation.
• WARNING i this appliance is not being used turn o the gas at the Gas Bottle or
isolation tap.
1. WHAT’S IN THE BOX?
Please check all the items in the box against this list:
• Your DeliVita Pro
• Installation and Instruction manual
• Recipe book
• Any accessories you have purchased
Please note: i you have ordered the Fold Away Oven Stand, Dough To Go or other
accessories, these may be dispatched separately.
Retain this manual or uture re erence.
2. INTRODUCTION AND SAFETY
This guidebook is designed to help you through each step o owning your DeliVita
Pro, rom installation to use. Please read it care ully be ore you start using your
product, as we have endeavored to answer as many questions as possible and provide
you with as much support as possible.
I , however, you should find something missing or not covered, please get in touch
with our Customer Care team (details on the back o this book)
GAS LEAKS MAY RESULT IN FIRE OR EXPLOSION AND CAUSE SERIOUS PERSONAL
INJURY OR DEATH OR PROPERTY DAMAGE.
CARBON MONOXIDE
Carbon monoxide (CO) is a highly poisonous gas and that can be released i an
appliance is not working correctly. It is di ficult to recognise as it has no colour, smell,
or taste. (Carbon Monoxide detectors (complying with BS:EN:50291) are widely
available, and it is recommended that every property has one). Symptoms o
CO poisoning are similar to that o a viral in ection. It a ects the mental ability causing
a person to become incapable without knowing.
ENGLISH
DO NOT
• MODIFY THE OVEN in any way rom the manu acturer’s design and specification.
• USE THE OVEN INDOORS, in tents, marquees or any enclosed spaces. It must be
used in a well-ventilated area to avoid inhalation o smoke and umes.
• LEAVE THE OVEN OUT IN THE RAIN or allow it to become extremely wet. I the
oven becomes wet, ollow the curing instructions again..
• BURN RUBBISH in this appliance.
• USE ANY TYPE OF FLAMMABLE LIQUIDS OR FUELS in this appliance. These
include, but are not limited to firelighter fluid, petrol, diesel, kerosene, oil, or any
other flammable chemical compounds.
• KEEP ANY COMBUSTIBLE MATERIAL near, on top o , or within range o the oven at
any time. This includes urniture, tea towels, clothing, electronics, flammable
materials, etc.
• PLACE HANDS OR ARMS INSIDE THE OVEN during use or a ter when the oven is
still hot. I any burns or scalds occur, immerse in cold water immediately and seek
medical advice.
• USE THE OVEN FOR EXCESSIVELY LONG PERIODS over 3 hours at very high
temperatures (400°C plus). Allow the oven to rest or 30 minutes.
• USE WATER to cool the oven, except in an emergency. This will result in severely
damaging the components o the oven.
• LEAVE THE OVEN OUTSIDE WITHOUT ITS ALL WEATHER COVER. Protect the
oven rom sun damage, cold and damp as this may cause the oven interior to crack,
or the exterior to discolour or crack.
• USE THE OVEN DOOR whilst the oven is operating at temperatures o over 200°C
or the first 8 times o use, and NEVER use the door when the oven is operating at
temperatures o over 400°C.
• COVER the oven with anything until the interior is completely cooled.
• STORE unused or empty gas cylinders near the appliance.
• USE DISHES OR CONTAINERS MADE OF PLASTIC material. The high temperatures
inside the oven will melt or burn the plastic, damaging the appliance.
EXCLUSION OF LIABILITY
Correct and sa e use o the DeliVita oven is the responsibility o the owner/user.
Neither the manu acturer, DeliVita Ltd, nor its distributors can be held liable or any
personal injury, damage, or loss incurred caused by the operation o the DeliVita oven
and other DeliVita products. The owner/user accepts responsibility or sa eguarding
others, including third parties. Please keep these instructions to hand and re er to
them when using your DeliVita.
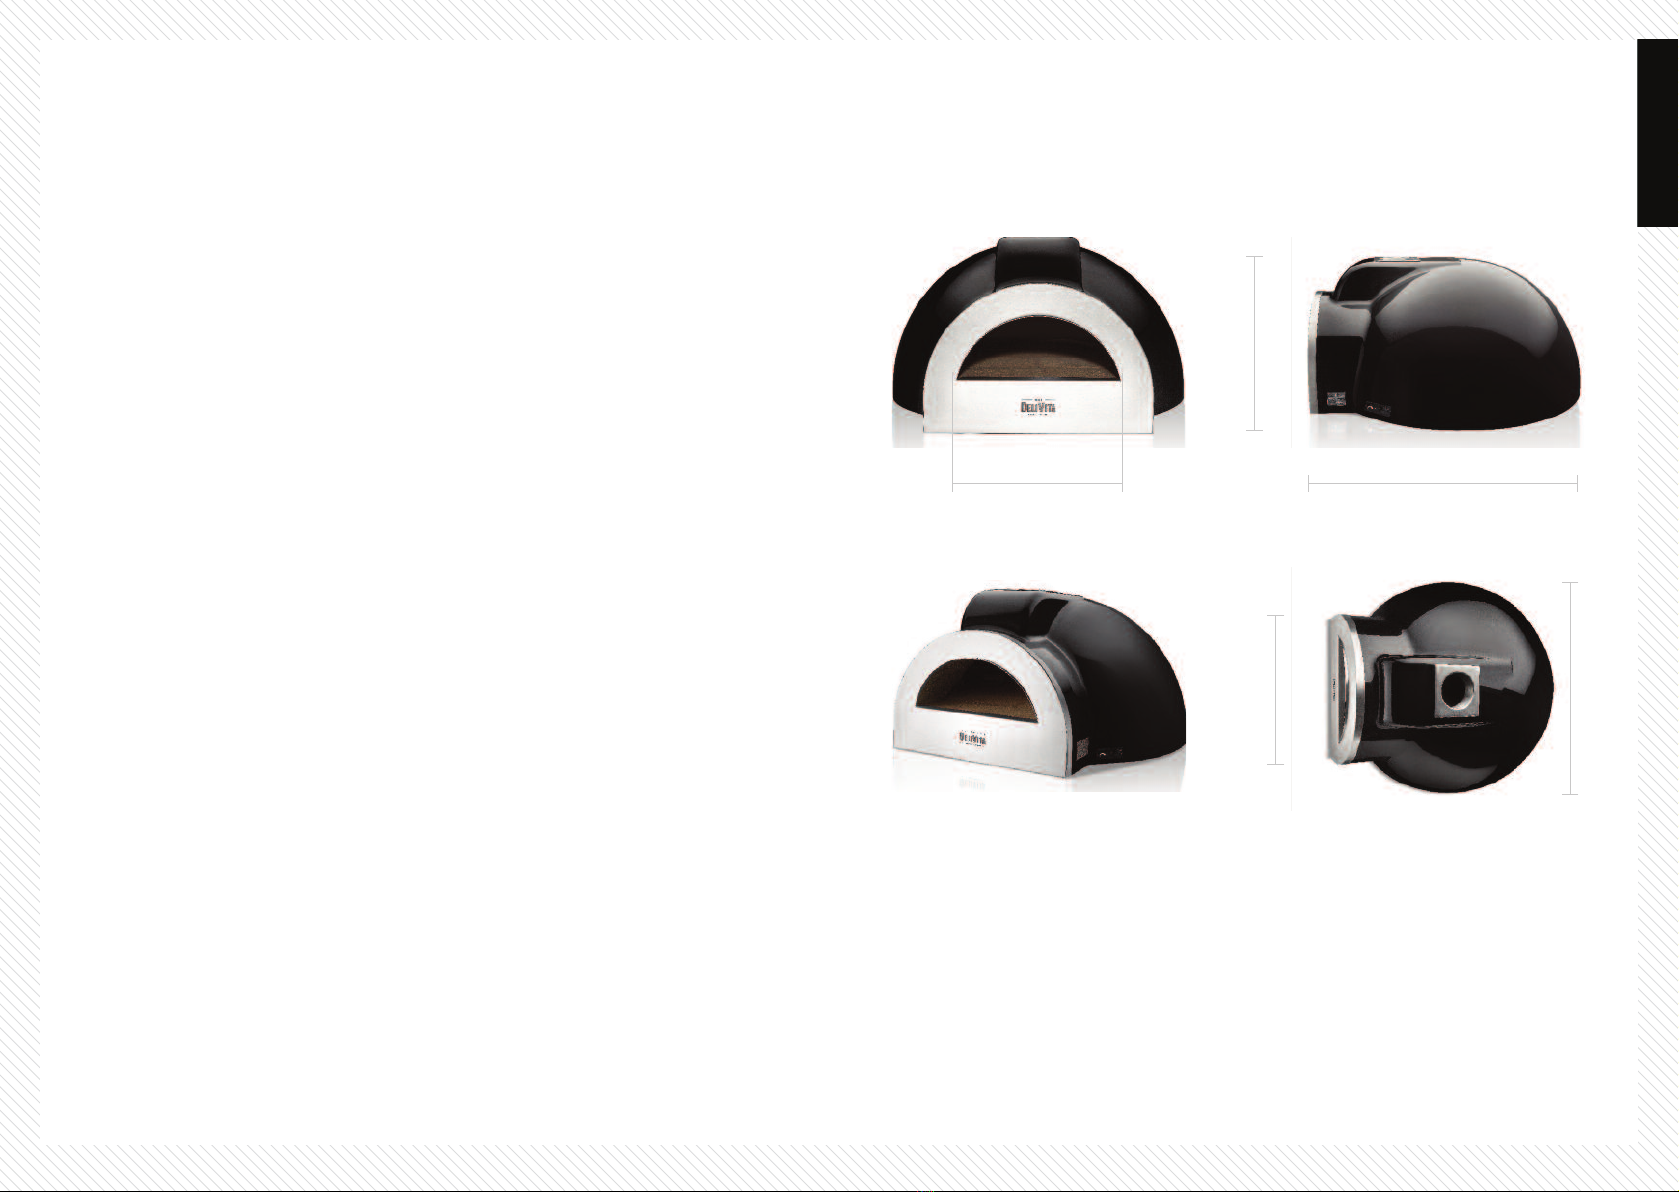
PRODUCT DIMENSIONS
Width: 450mm
Height: 500mm
Depth: 1,060mm
Width: 1000mm
Width: 600mm
ENGLISH

TECHNICAL DETAILS
Country o use:
Country Natural
AT Austria I2H, G20 at 20 mbar
BE Belgium I2E+, G20/G25 at 20/25 mbar
BG Bulgaria I2H, G20 at 20 mbar
CH Switzerland I2H, G20 at 20 mbar
CY Cyprus I2H, G20 at 20 mbar
CZ Czech Republic I2H, G20 at 20 mbar
DE Germany I2ELL, G25 at 20 mbar
I2E, G20 at 20 mbar
DK Denmark I2H, G20 at 20 mbar
EE Estonia I2H, G20 at 20 mbar
ES Spain I2H, G20 at 20 mbar
FI Finland I2H, G20 at 20 mbar
FR France I2E+, G20/G25 at 20/25 mbar
GB United Kingdom I2H, G20 at 20 mbar
GR Greece I2H, G20 at 20 mbar
HU Hungary
HR Croatia I2H, G20 at 20 mbar
IE Ireland I2H, G20 at 20 mbar
IS Iceland
IT Italy I2H, G20 at 20 mbar
LT Lithuania I2H, G20 at 20 mbar
LU Luxembourg I2E, G20 at 20 mbar
LV Latvia I2H, G20 at 20 mbar
MT Malta
NL The Netherlands I2L, G25 at 25 mbar
I2EK, G25.3 at 25 mbar
I2(43.46 -45.3 MJ/m3 (0°C)), G25.3 at 25 mbar
NO Norway I2H, G20 at 20 mbar
PL Poland I2E, G20 at 20 mbar
PT Portugal I2H, G20 at 20 mbar
RO Romania I2E, G20 at 20 mbar
SE Sweden I2H, G20 at 20 mbar
SL Slovenia I2H, G20 at 20 mbar
SK Slovakia I2H, G20 at 20 mbar
TR Turkey I2H, G20 at 20 mbar
TECHNICAL DETAILS
Country o use:
Country LPG
AT Austria I3P(50),G31 at 50 mbar; I3B/P(50),G30/G31 at 50 mbar
BE Belgium I3+,G31/G31 at 28/37 mbar; I3P(37),G31 at 37 mbar;
I3B/P(30),G30/G31 at 30 mbar
BG Bulgaria I3B/P(30),G30/G31 at 30 mbar
CH Switzerland I3P(50),G31 at 50 mbar; I3+,G31/G31 at 28/37 mbar;
I3P(37),G31 at 37 mbar; I3B/P(50),G30/G31 at 50 mbar
CY Cyprus I3+,G31/G31 at 28/37 mbar;
I3B/P(30),G30/G31 at 30 mbar
CZ Czech Republic I3P(50),G31 at 50 mbar; I3+,G31/G31 at 28/37 mbar;
I3P(37),G31 at 37 mbar; I3B/P(50),G30/G31 at 50 mbar
DE Germany I3P(50),G31 at 50 mbar; I3B/P(50),G30/G31 at 50
DK Denmark I3B/P(30),G30/G31 at 30 mbar
EE Estonia I3B/P(30),G30/G31 at 30 mbar
ES Spain I3+,G31/G31 at 28/37 mbar; I3P(37),G31 at 37 mbar
FI Finland I3P(30),G31 at 30 mbar; I3B/P(30),G30/G31 at 30 mbar
FR France I3+,G31/G31 at 28/37 mbar; I3P(37),G31 at 37 mbar;
I3B/P(30),G30/G31 at 30 mbar;
I3B/P(50),G30/G31 at 50 mbar
GB United Kingdom I3+,G31/G31 at 28/37 mbar; I3P(37),G31 at 37 mbar;
I3B/P(30),G30/G31 at 30 mbar
GR Greece I3+,G31/G31 at 28/37 mbar; I3P(37),G31 at 37 mbar;
I3B/P(30),G30/G31 at 30 mbar
HU Hungary I3B/P(30),G30/G31 at 30 mbar
HR Croatia I3P(37),G31 at 37 mbar; I3B/P(30),G30/G31 at 30
IE Ireland I3+,G31/G31 at 28/37 mbar; I3P(37),G31 at 37 mbar
IS Iceland
IT Italy I3+,G31/G31 at 28/37 mbar; I3P(37),G31 at 37 mbar;
I3B/P(30),G30/G31 at 30 mbar
LT Lithuania I3+,G31/G31 at 28/37 mbar; I3P(37),G31 at 37 mbar;
I3B/P(30),G30/G31 at 30 mbar
LU Luxembourg
LV Latvia
ENGLISH

TECHNICAL DETAILS CONTINUED...)
Country o use:
Country LPG
MT Malta I3B/P(30),G30/G31 at 30 mbar
NL The Netherlands I3P(50),G31 at 50 mbar; I3P(30),G31 at 30 mbar;
I3P(37),G31 at 37 mbar; I3B/P(30),G30/G31 at 30 mbar
NO Norway I3B/P(30),G30/G31 at 30 mbar
PL Poland I3P(37),G31 at 37 mbar
PT Portugal I3+,G31/G31 at 28/37 mbar; I3P(37),G31 at 37 mbar
RO Romania I3P(30),G31 at 30 mbar; I3B/P(30),G30/G31 at 30 mbar
SE Sweden I3B/P(30),G30/G31 at 30 mbar
SL Slovenia I3+,G31/G31 at 28/37 mbar; I3P(37),G31 at 37 mbar;
I3B/P(30),G30/G31 at 30 mbar
SK Slovakia I3P(50),G31 at 50 mbar; I3+,G31/G31 at 28/37 mbar;
I3P(37),G31 at 37 mbar; I3B/P(30),G30/G31 at 30 mbar;
I3B/P(50),G30/G31 at 50 mbar
TR Turkey I3+,G31/G31 at 28/37 mbar; I3P(37),G31 at 37 mbar;
I3B/P(30),G30/G31 at 30 mbar
Product Ident ficat on Number: 2575DN31370
G20
I2H,I2E
GAS TYPE G20G25
I2E+
G25G25.3
I2L I2EK
I243.46 45.3
MJM3 0°C
G20G25
I2ELL
20
Supply
Pressure mbar 20 / 25 25 20
18
Nom nal Heat
Input
Gross (Hs)
kW18 / 16.3 16.3 15
16.2
Nom nal Heat
Input
Nett (H )
kW 16.2 / 14.7 14.7 13.5
1.69
Consumpt on m/hr 1.69 / 1.78 1.78 1.7
17
Burner
Pressure
(hot)
mbar 17 / 22 22 17
Injector Mark ng 1200
PILOT SIT OXYPILOT NG 9043
G30G31
I3BP
30
GAS TYPE
30
Supply
Pressure mbar
16.5
Nom nal Heat
Input
Gross (Hs)
kW
15.2
Nom nal Heat
Input
Nett (H )
kW
0.45
Consumpt on m/hr
28.5
G30G31
I3BP
50
50
16.5
15.2
0.53
35.5
G30G31
I3+
30 / 37
16.5
15.2
0.53
35.5
G31
I3P50
50
16.5
15.2
0.45
28.5
G31
I3P37
37
16.5
15.2
0.53
35.5
G31
I3P30
30
14
12.9
0.455
28
Burner
Pressure
(hot)
mbar
Injector Mark ng 480
PILOT SIT OXYPILOT LPG 9228
ENGLISH
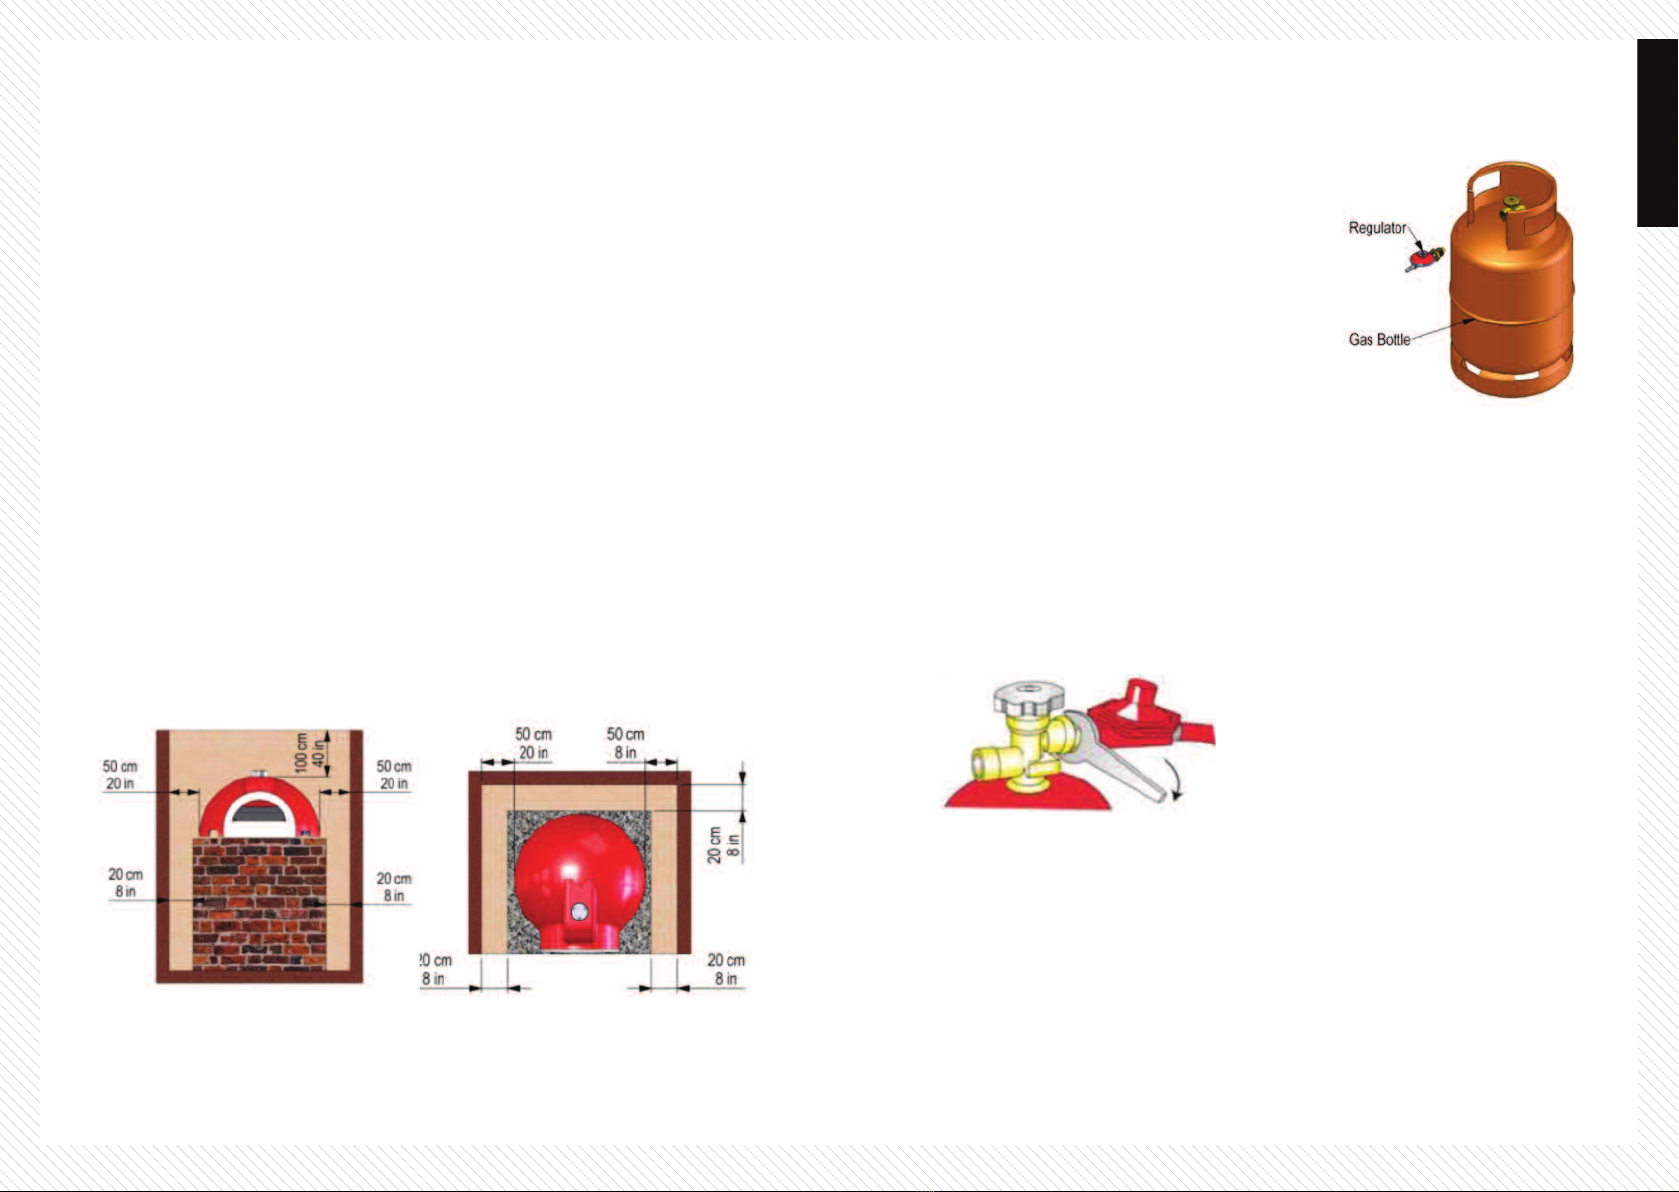
CONNECTION FOR LPG
Parts required (not included):
• Gas Bottle 13 – 47 kg recommended
• Pressure regulator - Gas G 30 28-30 mbar
• Gas G 31 30 – 37 mbar
• Flexible Hose ؽ”, 1.5m (maximum). Use only
hoses that are certified to BS:3212, BS:EN:1763-1
or BS:EN:16436-1 or stainless steel convoluted
hoses certified to EN:10380 as LPG attacks and
erodes natural rubber.
Propane cylinders have a “ emale” valve connection. Check the connection is clean
and undamaged. This is a “ ace to ace” seal and requires the correct size spanner and
is to be ully tightened. (Le t hand thread).
1. Check that the valve hand-wheel is OFF by turning clockwise.
2. Remove the protective plug and leave hanging to replace later.
3. Inspect the bull-nose connection o the regulator or damage be ore connecting.
4. Fit the connecting nut (le t hand thread) to the cylinder, using the correct spanner.
Note that Propane cylinder connections must be tight.
5. Ensure the appliance is turned o .
6. Connect the Flexible pipe to the Input o the Gas Valve (on the under-side o the
appliance).
7. Connect the second end o the flexible pipe to the output o the regulator.
8. Turn the hand-wheel to ON by turning anti-clockwise.
9. Check all connections or leaks using a leak detection fluid. (Bubbles in the Leak
detection Fluid will indicate a leak, and its location).
3. INSTALLATION
Remove the packaging and use the side handles to li t the oven out o the box.
Place your oven onto a stable sur ace; it can be positioned on the Fold Away Oven
Stand or a solid hard level sur ace (such as a wooden table). The Fold Away Oven
Stand or table must be situated on a solid and even sur ace and must be able to hold
the oven weight o around 30kg.
WARNING - there is a risk o toppling over i the oven is not placed on level ground or
i sited on so t ground. Make sure the oven is at a sa e distance rom any flammable
items or sur aces and that there is enough space around the entrance o the oven or
smoke and umes to disperse.
WARNING – the outer sur aces o this appliance can reach temperatures above 50°C
(120°F). No flammable materials must be used within 1 meter o this appliance.
FRONT VIEW TOP VIEW
FITTING CLEARANCE
ENGLISH
CURING THE OVEN
Your DeliVita Pizza oven is made rom heat-resistant clay, the water used to orm the
clay must be slowly dried out be ore your oven can be used. This process is called
curing. The first step involves drying the water out o the clay and the second is
tempering the clay.
When curing, small hairline cracks can appear on the sur ace o the clay, the oven can
smell o plastic, and small amounts o water may leak rom the sides when curing and
during first uses. This is completely normal and will not a ect the oven’s per ormance,
however, the water could stain wood and urniture. Please protect your urniture rom
warm water during the curing process. DO NOT use the DeliVita chimney when
curing the oven. Ovens should be cured when they are new, become damp, or as a
precaution i stored or several months.
SET GAS TO MINIMUM FOR AT LEAST EIGHT HOURS BEFORE INITIAL USE
Gradually build-up heat over 30 minutes - Once desired temperature is reached start
adding wood to LEFT HAND SIDE, ensuring gas injector is NOT covered.
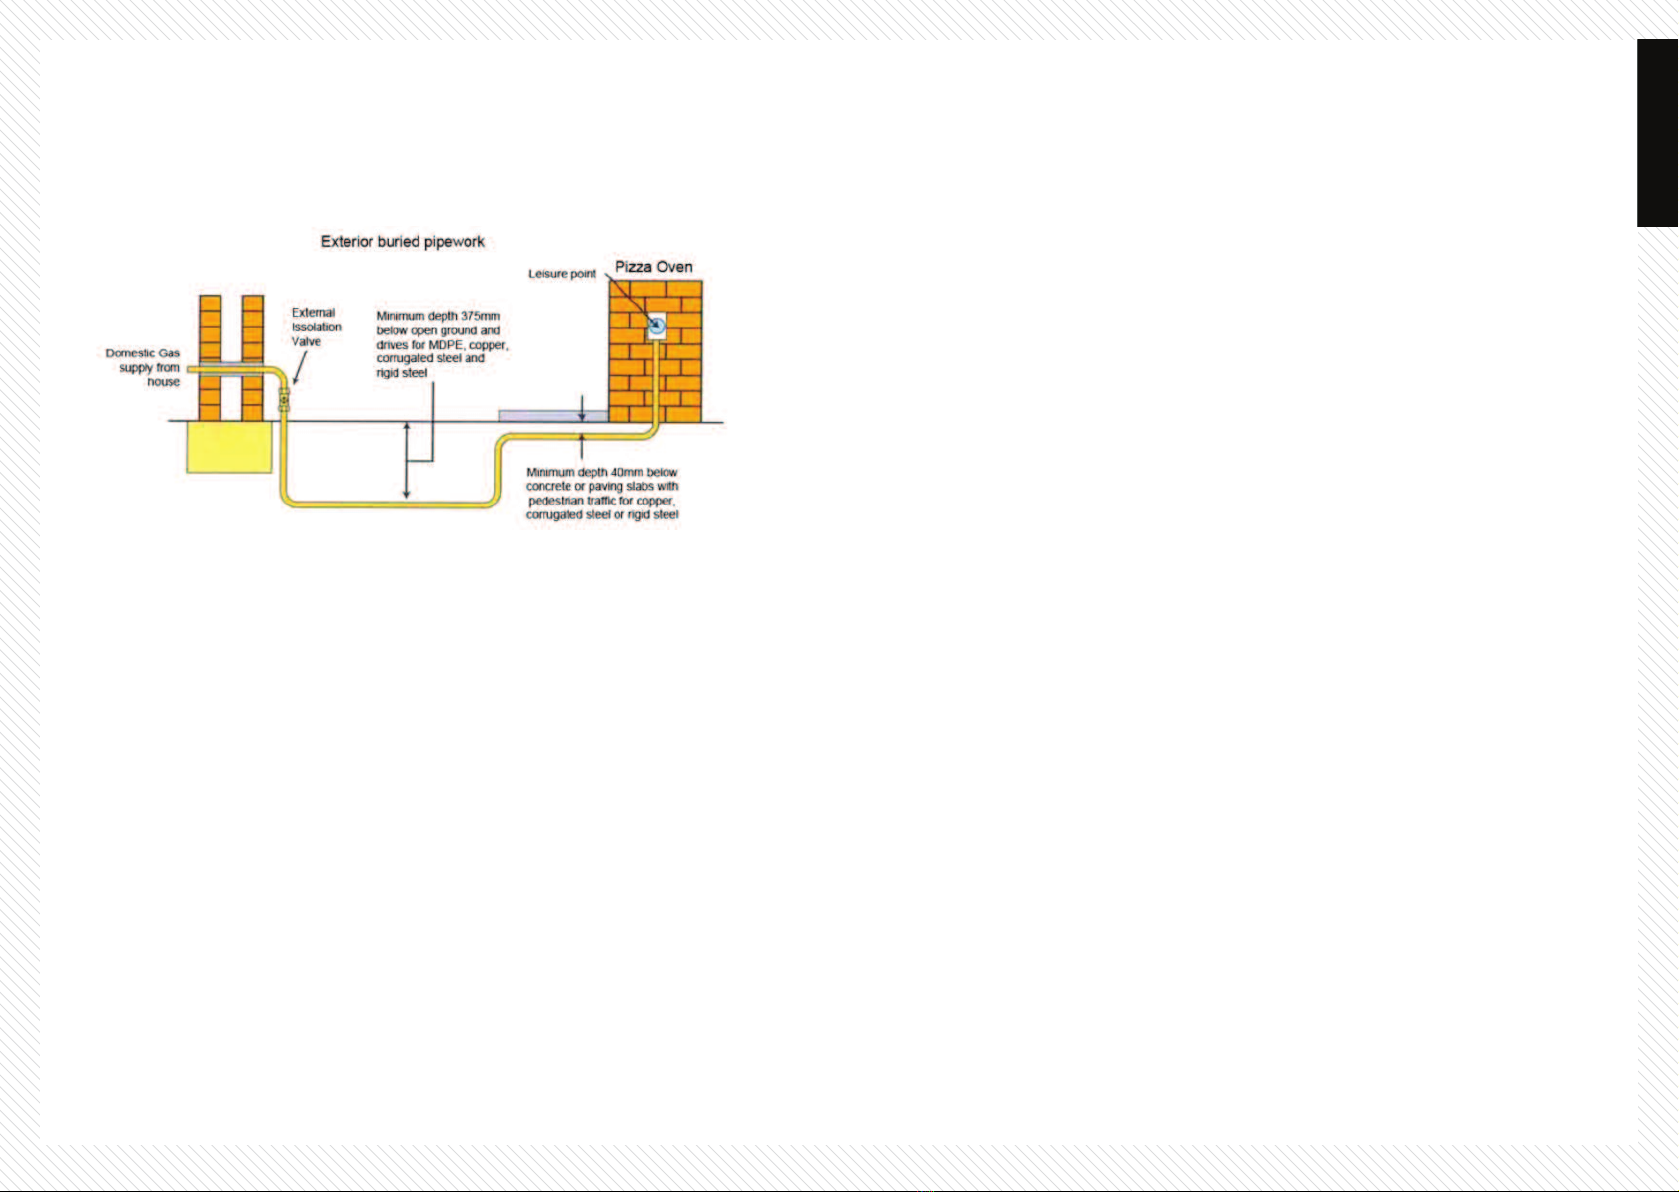
CONNECTION FOR NATURAL GAS
Be ore Proceeding with the installation, ensure that the appliance is setup or Natural
Gas. Connecting to an improper gas type will result in poor per ormance.
An External Isolation valve must be installed on the outside o the building, as the gas
supply exits. The natural gas supply must be made with Ø1/2” (minimum) galvanized
pipe, copper pipe or MDPE pipe. It is recommended that a Leisure Point is installed
close to the site o the Pizza Oven, this Leisure Point should ideally have a quick
release bayonet fitting.
Your local approved Gas Engineer will know how to install underground gas pipes, we
recommend that the eed should be as close to the meter as possible.
Warning - Failure to ad ere to t e local standards in place may invalidate your
insurance and will be illegal.
Connect the Pizza Oven supply stud (Ø8mm) to the Leisure point using a flexible pipe,
Ø1/2” (minimum), with the Bayonet quick release.
ENGLISH
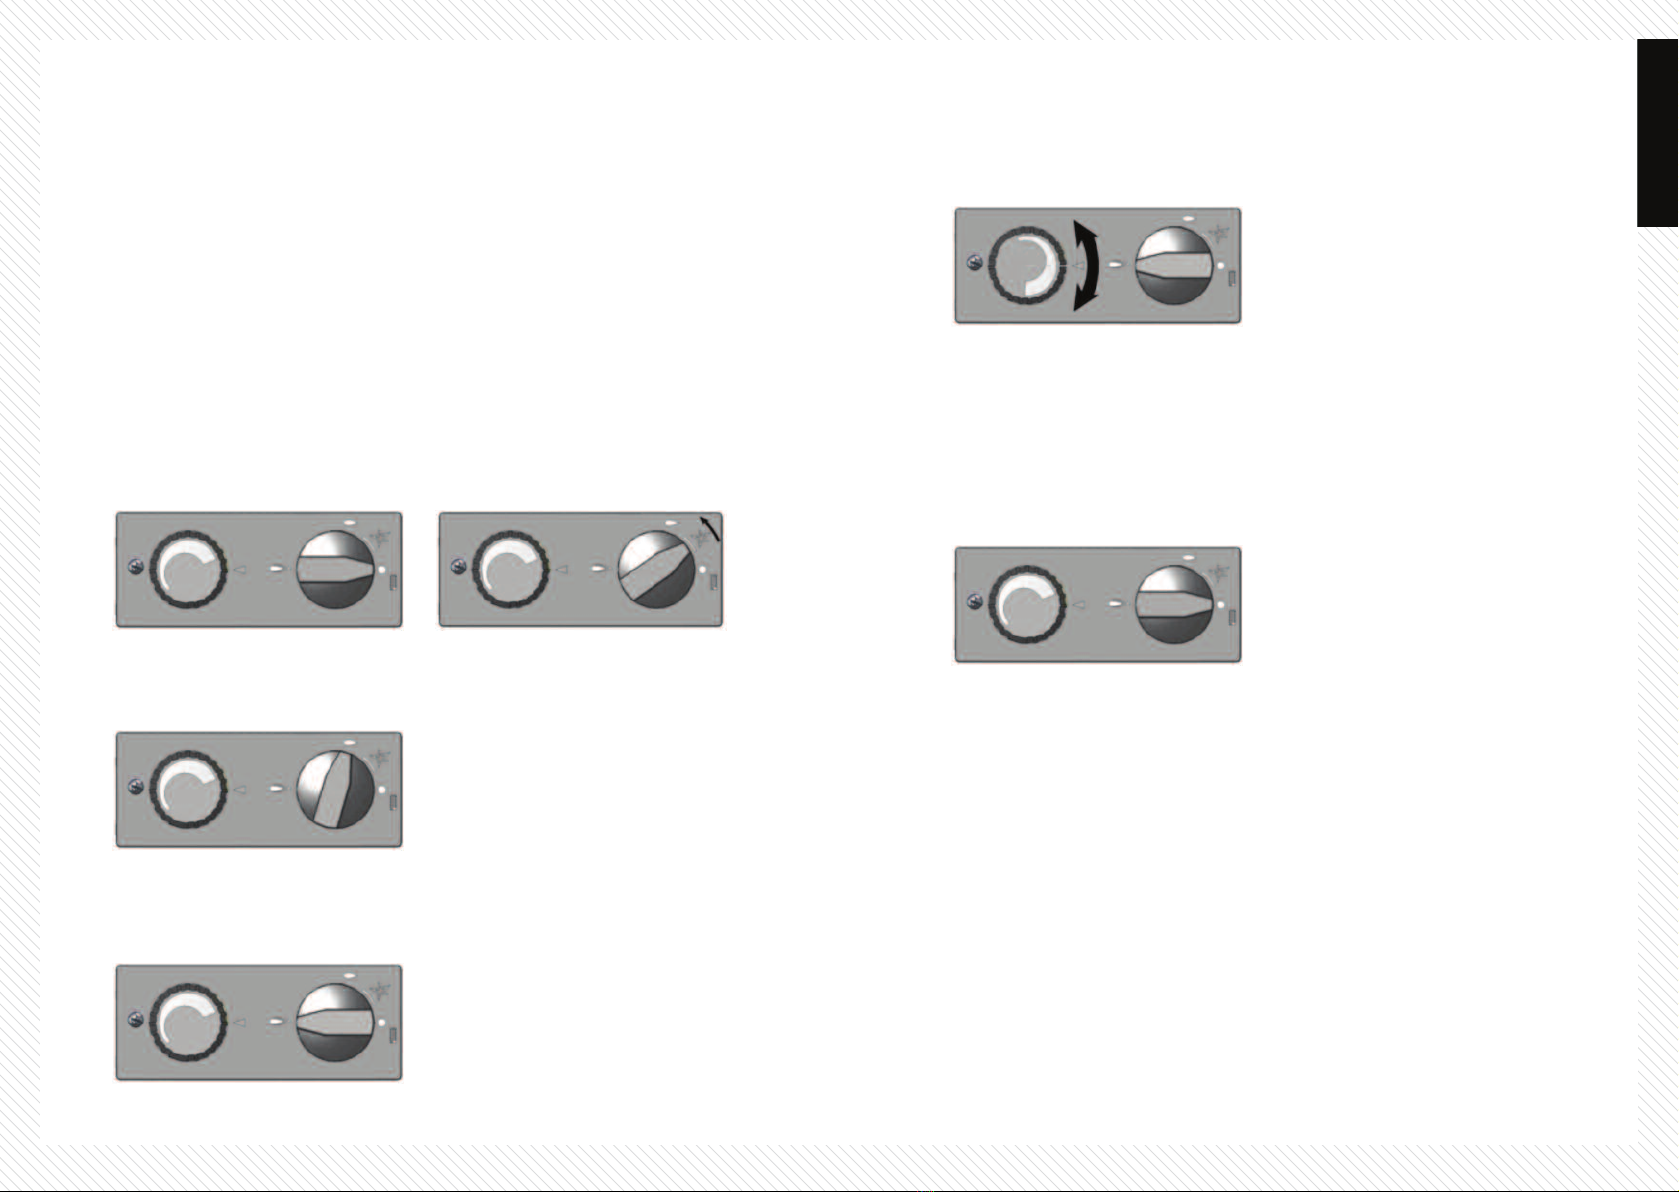
Adjust ng Heat Sett ng
Leave the right-hand control knob set to the large flame decal.
Turn the Le t-Hand control knob Anti-clockwise to increase the Flame height and
thus temperature setting. Turn the le t-hand control knob Clockwise to decrease the
flame height and thus the temperature setting.
Turn OFF the burner
From any heat setting, turn the right-hand control knob ully clockwise to the “OFF”
mark.
I the appliance is to be le t unused or a prolonged period, turn o at the Gas Cylinder
or turn the Isolation Valve o or natural gas.
4. USER INSTRUCTIONS
Be ore use, ensure that the oven and burner are ree rom blockages (e.g. ood
residue and insect nests – Ants, Bees, Wasps etc.). I an insect is ound, they can be
dangerous and must be cleaned out thoroughly. Please re er to Care o the oven or
guidance.
Should the appliance go out or any reason, no re-ignition should be attempted
within 5 minutes.
L ght ng the P lot
From the OFF position, Depress the Right-Hand control knob and hold in or 10
seconds, this will allow gas to flow to the Pilot, turn the right hand control knob Anti-
Clockwise through the “Spark” decal to the small flame logo.
The Pilot should now light, i not repeat the process. Continue to hold the control
knob in or a urther 10 seconds and release.
Turn on Ma n Burner
From the pilot position, turn the right-hand control knob to the large flame decal.
The Main burner should not light.
ENGLISH
Cook ng
To cook in your DeliVita simply bring the oven to around its maximum temperature
then let it cool down until it reaches your ideal cooking temperature. This is called
regulating the oven. The ideal cooking temperature will depend on what you are
planning to cook. For tips see our website or YouTube videos.
You can use your DeliVita to bake, roast, smoke, slow cook, and grill.
To cook your ood within the oven, place your ood onto the stainless-steel plate, then
place both onto the stone base o the oven. Let’s start with a couple o basics:
P zza
Maintain a stable cooking temperature. The center base o the oven floor should read
about 300°C+ on your in rared thermometer. There should not be any visible black
carbon build-up on the ceiling o the oven and the rolling flames should reach the
middle o the oven ceiling. Clean the oven floor in between cooking each pizza with
the oven brush.
Place your pizza near to the fire, ensuring you rotate it regularly. Your pizza should
cook within 90 seconds (depending on toppings). For best results ollow our dough
stretching tips and don’t overload the middle.
Roast ng
Prep your oven to reach a high temperature or searing meat (certain oods may need
covering with oil to avoid burning). Remove meat once seared and allow the
temperature to drop to around 150°C - 220°C or slow roasting.
I you need more heat, adjust the le t-hand control knob. Push the ood urther into
the oven i you want it to benefit rom more heat or bring it orward i you want it to
cook more slowly. Rotate regularly or even cooking.
For more nsp rat onal rec pe deas buy ‘F red Wood Oven Cook ng’ rec pe book
that uses the Del V ta oven and v s t www.del v ta.co.uk/rec pes
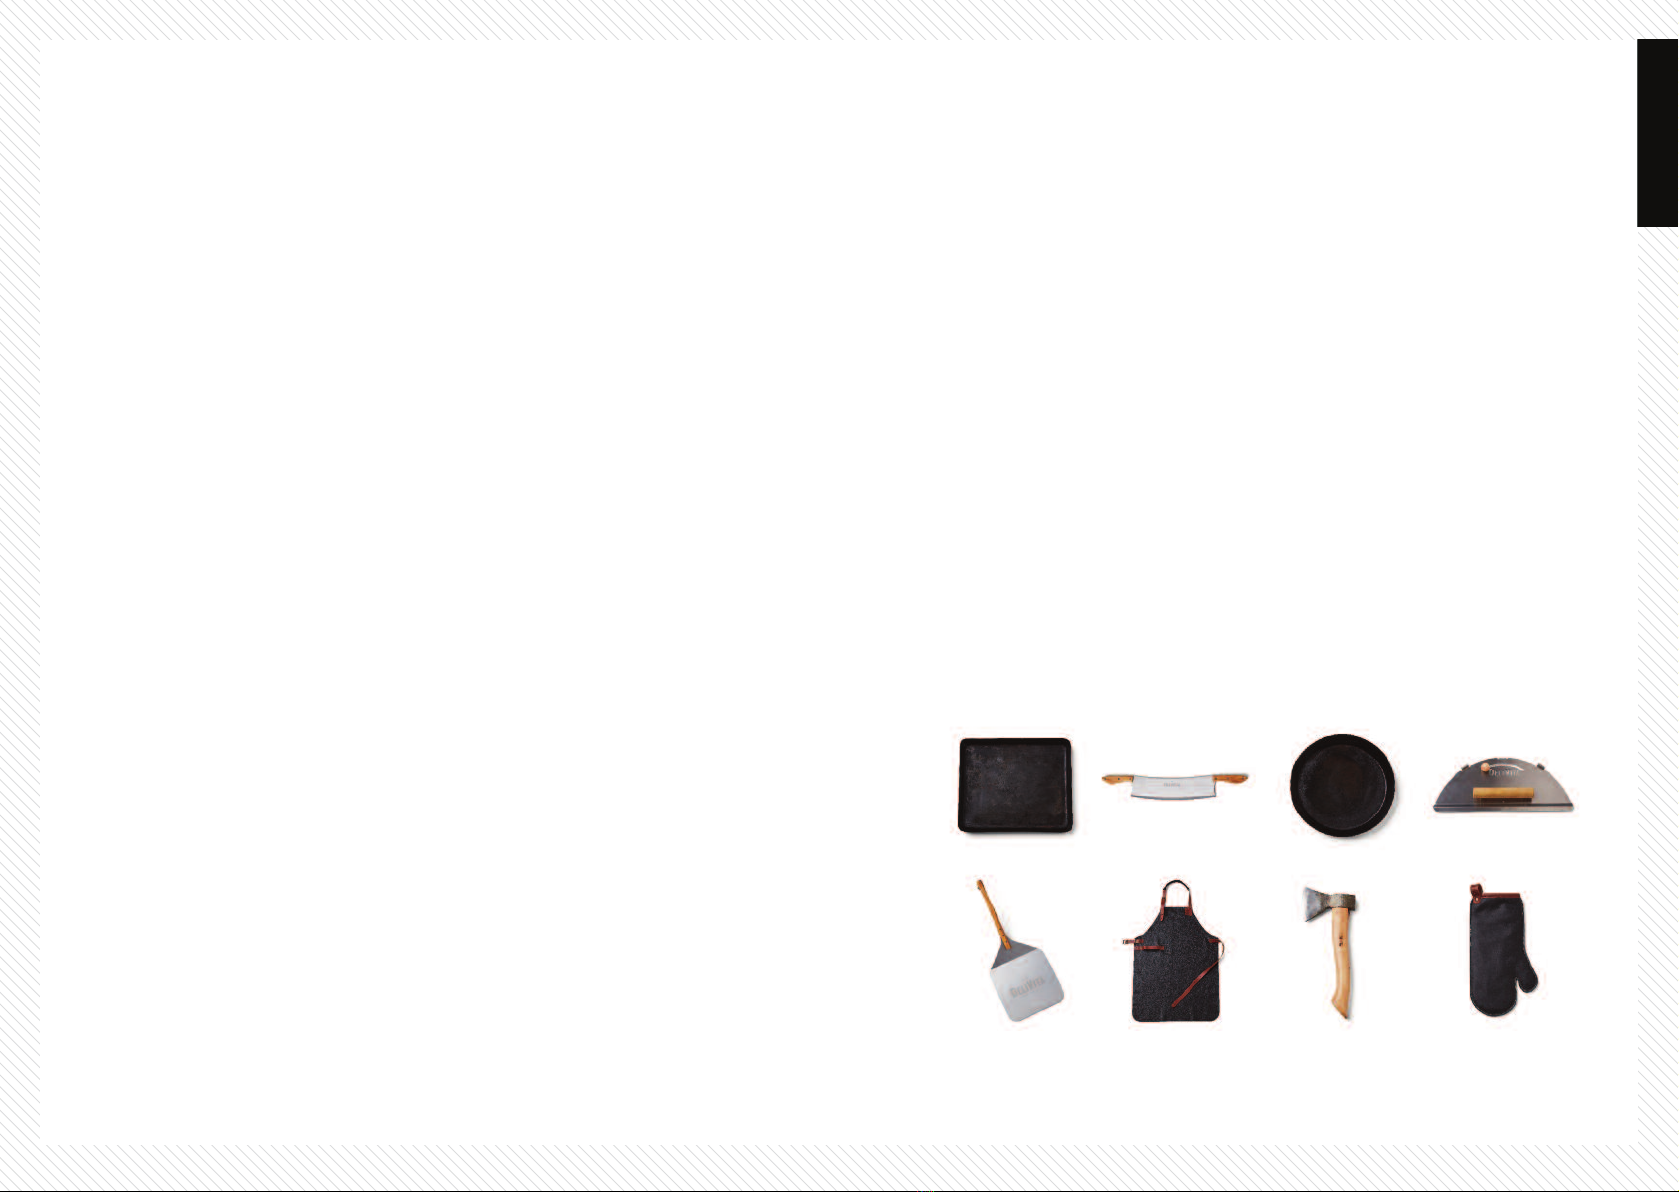
5. DELIVITA EQUIPMENT AND ACCESSORIES
In order to use your oven sa ely and e ficiently, and or ease o cooking, it is essential
to have the correct equipment. You will need to ensure that your equipment and
accessories are suitable or high temperatures.
DeliVita sell a range o accessories specifically designed or our wood-fired oven, these
include:
We are constantly adding exciting new products to our range. All of our
products, as well as great tips and recipe ideas, are featured on our website:
www.delivita.co.uk
• Rectangular Black Iron Dish
• Round Black Iron Dish
• All-Weather Cover
• Fold-Away Oven Stand
• Dough Scraper
• In rared Gun
• Leather Apron
• Leather Glove
• Oven Brush
• Oven Door (per ect or baking
and smoking)
• Pizza Cutter
• Prod & Blow
• Axe
• Pizza Peel
• Chimney
• Pizza Turner
• Reflector
ENGLISH

6. CARING OF THE OVEN
Caring or your oven is very easy and requires little e ort. A ter each use, and when the
oven has cooled down, use the oven brush to remove any debris on the stone. Do not
use any cleaning products inside the oven as the high temperatures will kill o any
bacteria; any trace le t over ood spillages will be burnt o .
Whilst the oven is still warm, but sa e to touch, clean the stainless-steel ront panel
with warm soapy water and a clean cloth. Use an abrasive sponge scourer pad (do not
use metal scrubs) on the stainless steel or stainless-steel cleaner to remove any
blackening. To maintain a shiny finish, use a little olive oil.
Once cooled down, to maintain a per ect finish to the outer cover, use a damp cloth
and warm soapy water. For deeper scratches, we recommend using T-Cut rom your
local car accessory store, then give it a quick polish.
Once cooled down, or a per ect finish, cover your DeliVita with the All-Weather Cover.
WARNING: Do not use water ns de the oven as th s could permanently damage
the nter or components.
As our ovens are hand-cra ted, your DeliVita may ade or discolor slightly over time
and very small air pockets/black dots may be visible on colored sur aces.
HAVE FUN AND ENJOY
ENGLISH
7. FREQUENTLY ASKED QUESTIONS
Q1. CAN I POSITION THE OVEN INDOORS OR INSIDE MY GARAGE?
No, the oven must never be positioned in an enclosed area as the smoke and umes
need to escape properly.
Q2. WHY IS MY PIZZA BASE STICKING TO THE OVEN FLOOR?
First o all, remember to sprinkle flour on to your Pizza Peel and make sure your
preparation area is floured well. Don’t wait too long to cook your pizza a ter adding
your topping as it will cause the dough to become sticky. Make sure you don’t have
any holes or thin spots in your pizza base as these can allow moisture to penetrate
and cause sticking. Turn your pizza regularly during cooking and use the Oven Brush
to properly clean the oven base between cooking.
Q3. HOW CAN I TELL WHAT TEMPERATURE MY OVEN IS OPERATING AT?
You can use an In rared Gun. Position it around 30cm outside o the oven, NOT inside.
Once you have become accustomed to your oven, you will get a “ eel” or the
temperature.
Q4. IS THIS OVEN ONLY GOOD FOR COOKING PIZZA?
Whilst it cooks amazing pizzas, it’s as versatile as a conventional oven (and more so).
Although it can reach high temperatures you can control the heat by adding more or
less wood. Use it to BBQ, slow cook, smoke, bake and grill.
Q5. CAN I COOK MEATS AND FISH DIRECTLY ON THE OVEN FLOOR?
We recommend that meat and fish, or any dish that will produce at or
liquid rom cooking, should be placed in a suitable dish (that can withstand very high
temperatures, such as iron or Le Creuset). See our accessories list.
Q6. IS THE OVEN FROSTPROOF?
Yes, i the DeliVita All-Weather Cover is being used. The cover has been tested by the
manu acturer to be rostproo at -20°C. I it isn’t being used or long periods o time,
we recommend that it is stored somewhere sheltered.
Q7. IS THE OVEN WEATHERPROOF?
The oven is showerproo , however, persistent wetting will a ect the oven
and moisture will be absorbed. We recommend that you use your DeliVita
All-Weather Cover.

Q8. IF I HAVEN’T USED MY OVEN FOR A WHILE OR IT’S WET,
WILL IT STILL BE OKAY TO USE?
Absolutely, however, you would need to cure it again to ensure the clay is dried
properly prior to cooking.
Q9. HOW LONG CAN I USE MY OVEN FOR?
I you are using the oven or more than 3 hours, it can get very hot inside and out; you
should allow the oven to rest every 3 hours by not adding any wood or 30 minutes.
The oven is durable with proper use and can be used or commercial use, cooking up
to 40 pizzas per hour.
Q10. WHAT HAPPENS IF I GET CRACKS IN MY OVEN?
As this products interior contains natural materials, hairline cracks will occur. You can
simply fill the cracks with fire cement putty. This can be ound at most hardware
stores. The stone base may develop cracks. This will not a ect the cooking
per ormance o the oven.
Q11. HOW DO I STOP MY PIZZA BASE FROM GOING BLACK/BURNING?
There are two common reasons this can happen. The oven is too hot, don’t use more
than two logs o 8-10cm wide and 22-26cm, or there may be surplus flour remains on
the oven floor. Scrub the oven floor using the Oven Brush a ter every pizza to remove
any remains o excess flour and turn pizzas regularly.
Q12. HOW DO I STOP MY PIZZA BASE FROM GOING BLACK / BURNING?
There are two common reasons this can happen:
• The oven is too hot. Adjust the temperature.
• There may be surplus flour remains on the oven floor. Scrub the oven floor using
the Oven Brush a ter every pizza to remove any remains or excess flour and turn
pizzas regularly.
Q13. CAN I USE THE OVEN ALL YEAR ROUND?
Absolutely. They are per ect or all seasons, warm and snug in the cooler months,
and great or all those summer parties. For our full FAQs visit www.delivita.com
CREATE SUMPTUOUS FOOD,
MAKE MEMORABLE OCCASIONS.
NOTHING BRINGS PEOPLE
TOGETHER LIKE DELIVITA.
Create Your Finest
Moments With DeliVita

Copyright DeliVita Ltd. All rights reserved. We’d like to thank everyone who contributed to this book.
Keep updated and s are your DeliVita journey
@HelloDelivita @DeliVitaLife @HelloDeliVita DeliVita
www.delivita.com +44 (0)1484 08989 h[email protected]
DV04/22
Table of contents
Other DELIVITA Oven manuals


Popular Oven manuals by other brands


Indesit
Indesit IS5G4PHSS/UK operating instructions

Euro Appliances
Euro Appliances EO60SOSX Usage and care guide

Black & Decker
Black & Decker CTO9500 Series Use and care book

Nectre Fireplaces
Nectre Fireplaces Big Bakers operating instructions

Salton
Salton RSB-1056 Instruction booklet

Whirlpool
Whirlpool AMW 518 Instructions for use


