dellonda DL21 User manual
Model No. DL21
Thank you for purchasing a Dellonda product. Manufactured to a high standard, this product will,
if used according to these instructions, and properly maintained, give you years of trouble free performance.
www.dellonda.co.uk
Dellonda 13ft Deluxe Steel Swimming Pool with Filter Pump
DL21 Issue:2 09/03/22
Important Information
Please read these instructions carefully. Note the safe operational requirements, warnings & cautions. Use the product correctly and with care
for the purpose for which it is intended. Failure to do so may cause damage and/or personal injury and will invalidate the warranty. Keep these
instructions safe for future use.
Refer to
instruction
manual
Keep children
under supervision
in the aquatic
environment
No diving Wear personal
otation
devices
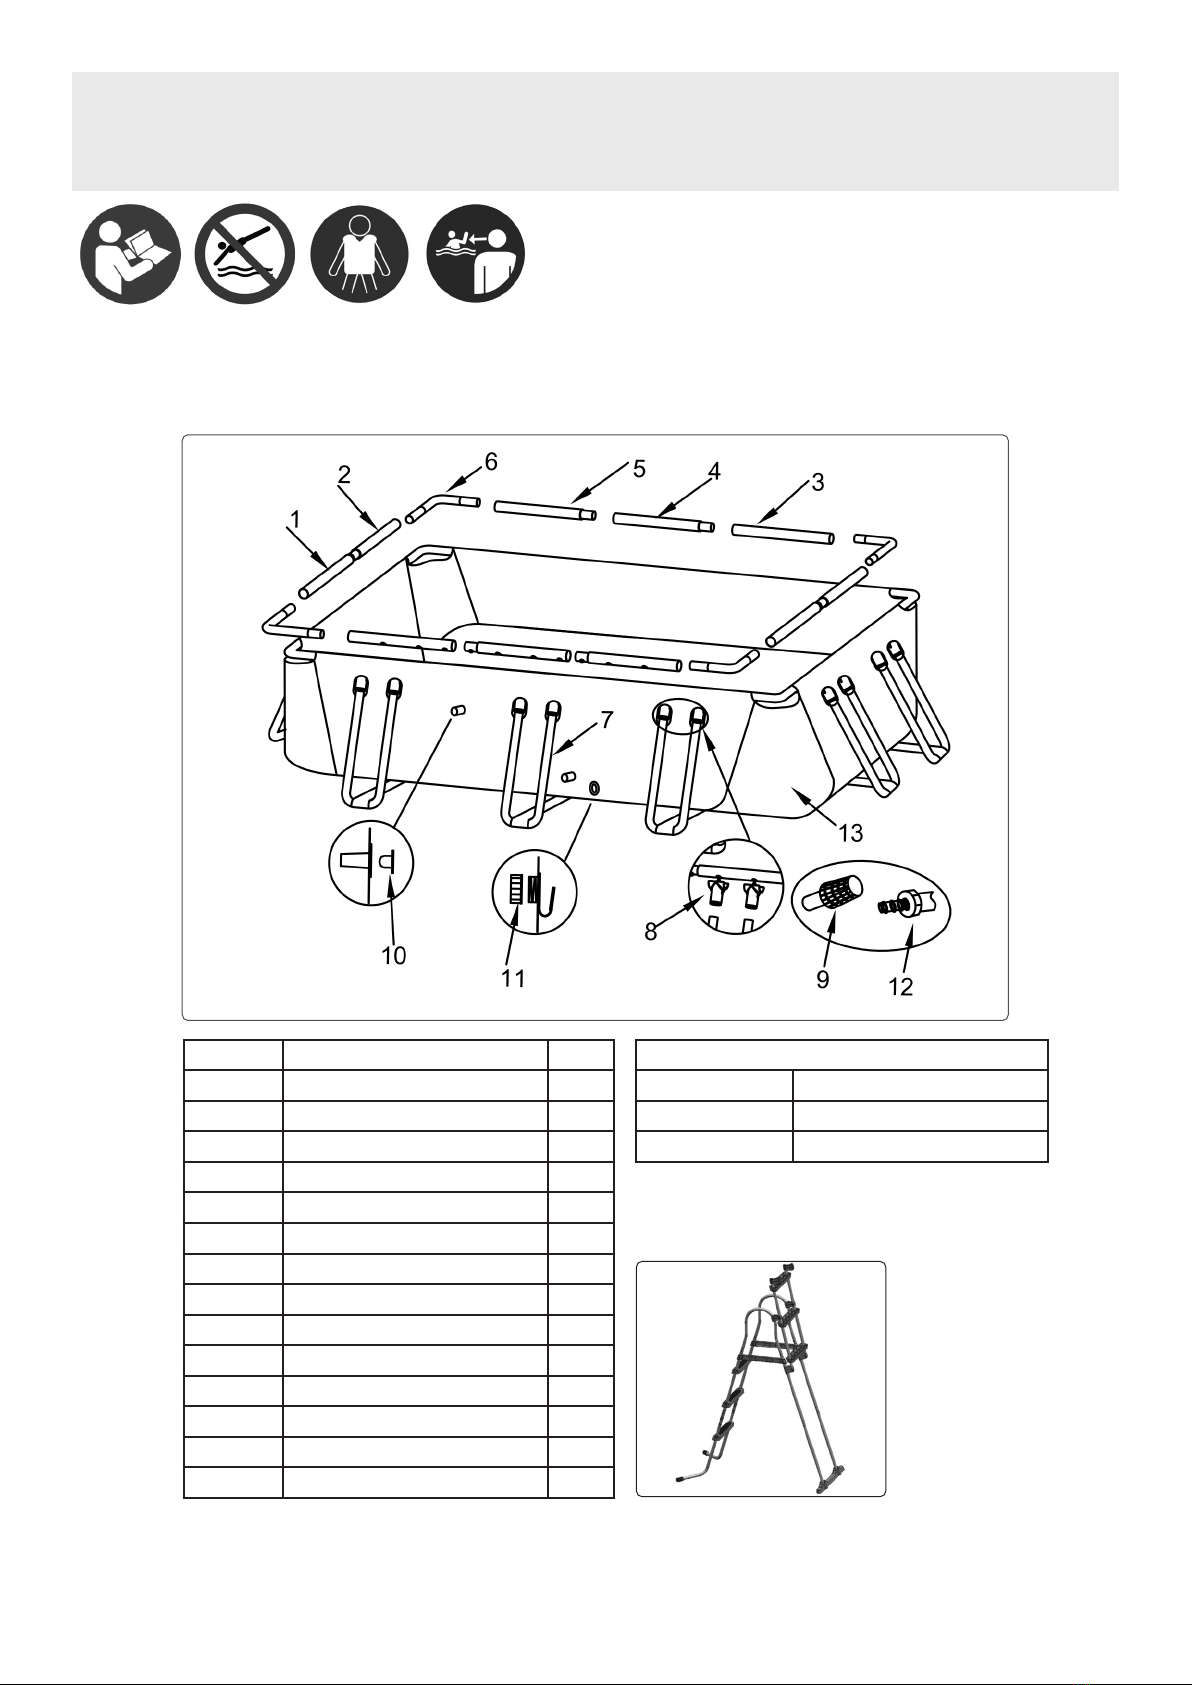
Contents
NAME QTY
1 Horizontal Beam A 2
2 Horizontal Beam B 2
3 Horizontal Beam C 2
4 Horizontal Beam D 2
5 Horizontal Beam E 2
6 L-Tube 4
7 U-Tube 10
8 T-Joint 20
9 Hole Strainer 2
10 Stopper 2
11 Drainage Valve Cover 1
12 Drainage Valve Connector 1
13 Pool Liner 1
DL10064 Ladder (shown to right) 1
Pool Accessories
DL42 Top cover
DL46 Ground sheet
DL36 & DL38 Replacement lters

About The Product
Easy set up with no tools required. Anti-corrosion steel structure and triple layered PVC walls make this pool extremely strong and durable. Water
capacity (90% of wall height) 7020L/(1854gal). Assembled dimensions (L x W x D) 400 x 200 x 99cm Supplied with 530gal/hr lter pump, ladder
and repair kit.
Safety Instructions
• ELECTRICAL SAFETY
• WARNING! REFER TO AND FULLY COMPLY WITH THE ELECTRICAL AND SAFETY INSTRUCTIONS IN THE ENCLOSED FILTER PUMP MANUAL.
• WARNING! The pool must be accessible to a 110 or 230V AC outlet protected by a Ground Fault Circuit Interrupter.
• The pool should be set no closer than 2m to the power source, but no further than the length of the ller pump cord. Under no circumstances
should an extension cord be used to extend the range of the connection.
• GENERAL SAFETY
• WARNING! Carefully read, understand, and follow all information in this user manual before installing and using the swimming pool. These
warnings, instructions, and safety guidelines address some common risks of water recreation, but they cannot cover all risks and dangers in
all cases. Always use caution, common sense, and good judgment when enjoying any water activity. Please read carefully and keep for future
reference.
• WARNING! The use of a swimming pool implies compliance with the safety instructions described in the operating and maintenance guide. In
order to prevent drowning or other serious injuries, pay particular attention to the possibility of unexpected access to the swimming pool by
children under 5 by securing the access to it, and, during the bathing period, keep them under constant adult supervision.
• Non-swimmers safety
• Continuous, active, and vigilant supervision of weak swimmers and non-swimmers by a competent adult is required at all times
(remembering that children under five are at the highest risk of drowning).
• Designate a competent adult to supervise the pool each time it is being used.
• Weak swimmers or non-swimmers should wear personal protection equipment when using the pool.
• When the pool is not in use, or unsupervised, remove all toys from the swimming pool and its surrounding to avoid attracting children to the pool.
• Safety devices
• In order to prevent children from drowning, it is recommended to secure access to the pool with a protection device. It is recommended to install
a barrier (and secure all doors and windows, where applicable) to prevent unauthorized access to the swimming pool.
• Fences, safety covers, enclosures or similar safety devices are helpful aids, but they are not substitutes for continuous and competent adult
supervision.
• Safety equipment
• It is recommended to keep rescue equipment (e.g. a ring buoy) by the pool.
• Keep a working phone and a list of emergency numbers, by the pool.
• Safe use of the pool
• Encourage all users especially children to learn how to swim.
• Instruct all pool users, including children, what to do in case of an emergency.
• Never dive into any shallow body of water. This can lead to serious injury or death.
• Encourage all users especially children to learn how to swim.
• Learn Basic Life Support (Cardiopulmonary Resuscitation - CPR) and refresh this knowledge regularly. This can make a lifesaving difference in
the event of an emergency;
• DO NOT use the swimming pool when using alcohol or medication that may impair your ability to safely use the pool.
• When pool covers are used, remove them completely from the water surface before entering the pool.
• Protect pool occupants from water related illnesses by keeping the pool water treated and practicing good hygiene. Consult the water treatment
guidelines in the user’s manual.
• Store chemicals (e.g. water treatment, cleaning or disinfection products) out of the reach of children.
• Use the signage as outlined on below.
• This safety sign must be posted in a prominent visible position within 2 m of the pool. Alternatively you may purchase a vinyl base glue (not
included) to glue the sign to the pool wall next to the entry and exit point,assuring it is prominently visible to all users when approaching the pool.
• Removable ladders shall be placed on a horizontal surface. Ladders must not be used for another purpose.
• WARNING! a drained pool outdoors may cause unknown hazards.
• WARNING! Installation and assembly shall be done by adults.
• WARNING! Read and follow the instruction for use and maintenance to ensure a safe use of the swimming-pool kit. Not following the instructions
for use and maintenance can cause serious health hazards, in particular for children.
• WARNING! Only for domestic outdoor use.
• WARNING! Drowning hazard. Children have drowned in portable swimming-pools.
• WARNING! Empty the pool when not in use. DO NOT leave a small pool empty outdoors.
• WARNING! Keep children under supervision in the aquatic environment.
• WARNING! No diving.
No diving Wear personal
otation
devices
Keep children
under supervision
in the aquatic
environment
Site Selection
• WARNING! Pools installed on inadequately level surfaces are subject to leaking, forming irregularities, or collapse, which can result in property
damage or serious injury for those in or around the pool area!
• WARNING! DO NOT use sand during setup process. If it appears that there is a need for use of a “levelling agent”, then your set-up site is
unsuitable.
• FAILURE TO OBEY THIS WARNING MAY RESULT IN SERIOUS PERSONAL INJURY.
• CAUTION: Please choose your set-up area carefully, as lawn and other desirable vegetation underneath the ground sheet (if applicable) will die.
Furthermore, try to avoid setting the ground cloth (if applicable) in areas prone to aggressive plant and weed species, as they may grow through
the ground cloth (if applicable).
• CAUTION: The pool must be accessible to a 110 or 230-volt AC outlet protected by a Ground Fault Circuit Interrupter (GFCI). The pool should be
set no closer than 2 m to the power source, but no further than the length of the lter pump cord. Under no circumstances should an extension
cord be used to extend the range of the connection.
• It is absolutely essential to select a suitable site for your pool BEFORE attempting to ll it with any water. Please select a set-up site which strictly
conforms to the following guidelines:
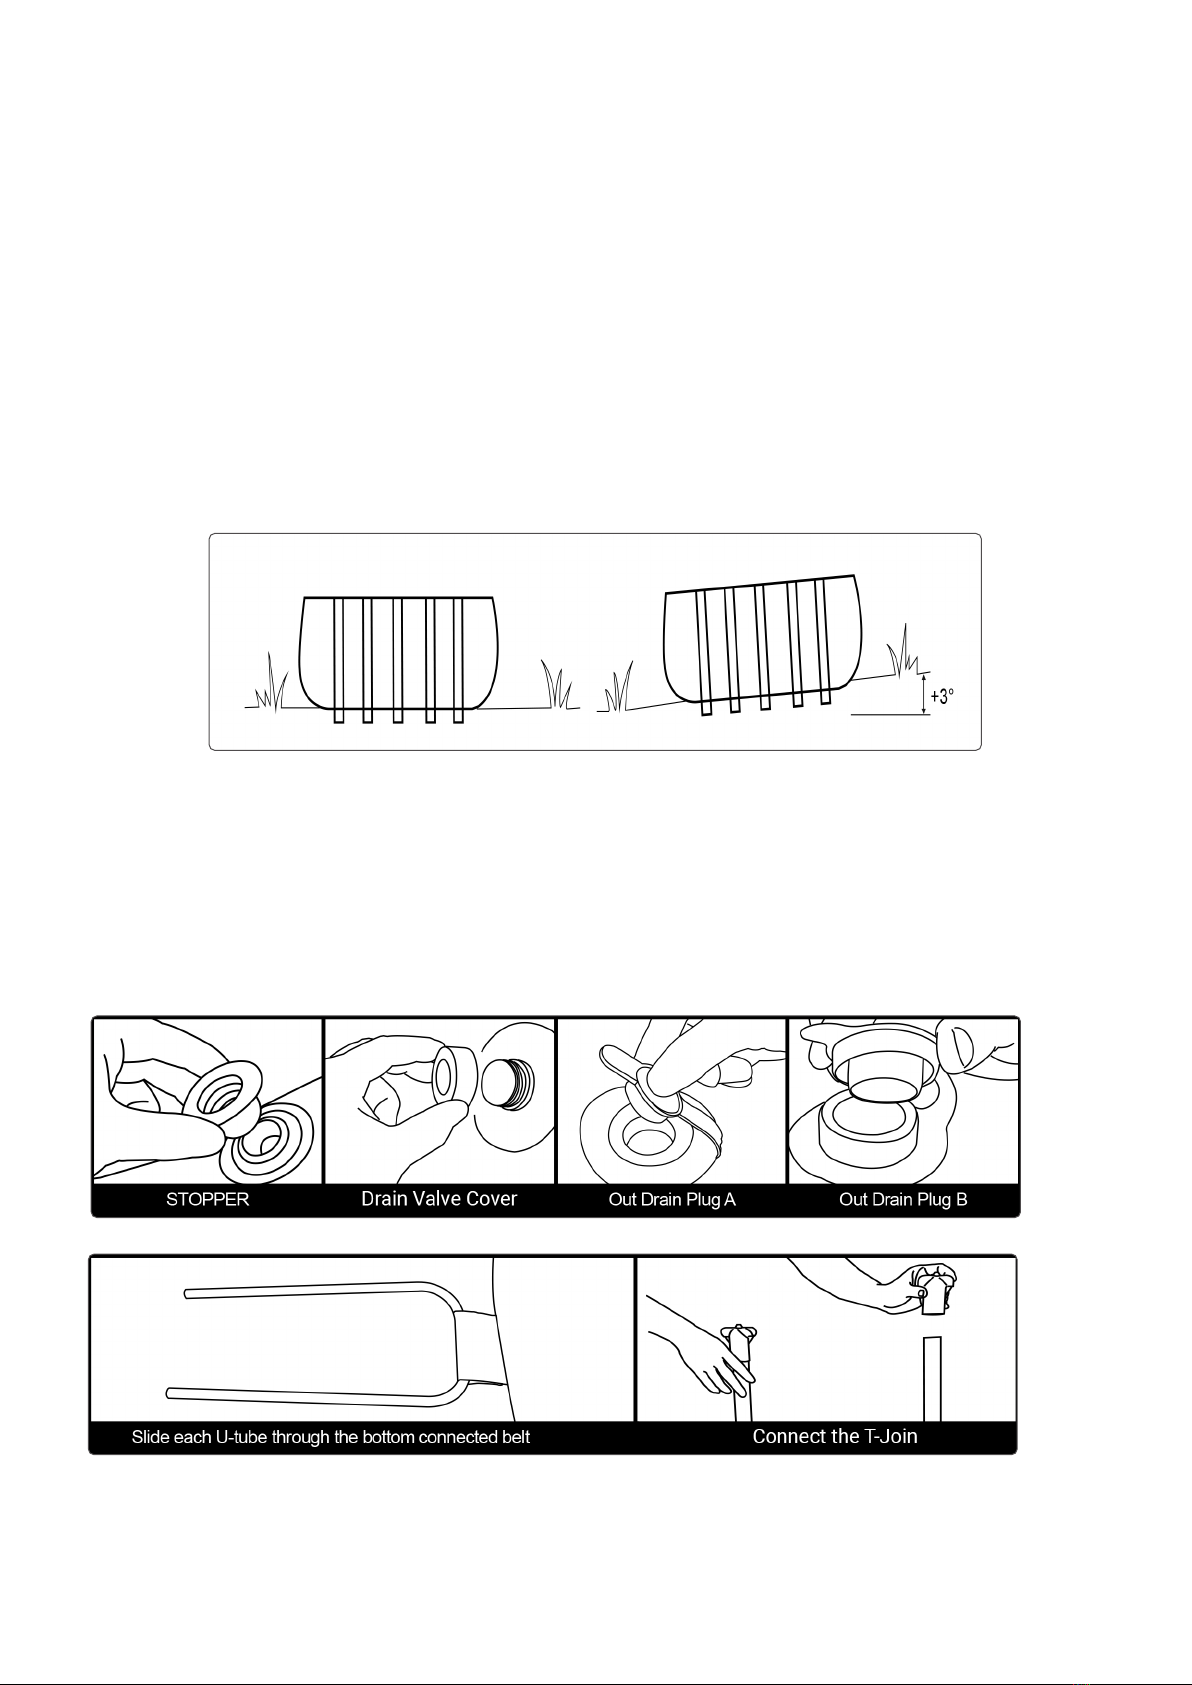
• 1. Ensure that the area is rm, at (no bumps or mounds of earth) and extremely level, with a grade not exceeding 3° of slope at any point in the
set-up area.
• 2. Make sure that the area you have selected to set-up the pool is completely free of sticks, stones, sharp objects or other foreign debris.
• 3. Select an area that is not directly underneath overhead power lines or trees. Additionally, make sure that the pool set-up area does not contain
underground utility pipes, lines, or cables of any kind.
• 4. If a ground cloth is provided with your pool kit, its use, is highly recommended. The ground cloth will help protect the pool liner from damage
due to weed growth, sharp objects, and debris.
• 5. If at all possible, choose an open location on your property that is exposed to direct sunlight. This will help to warm your pool.
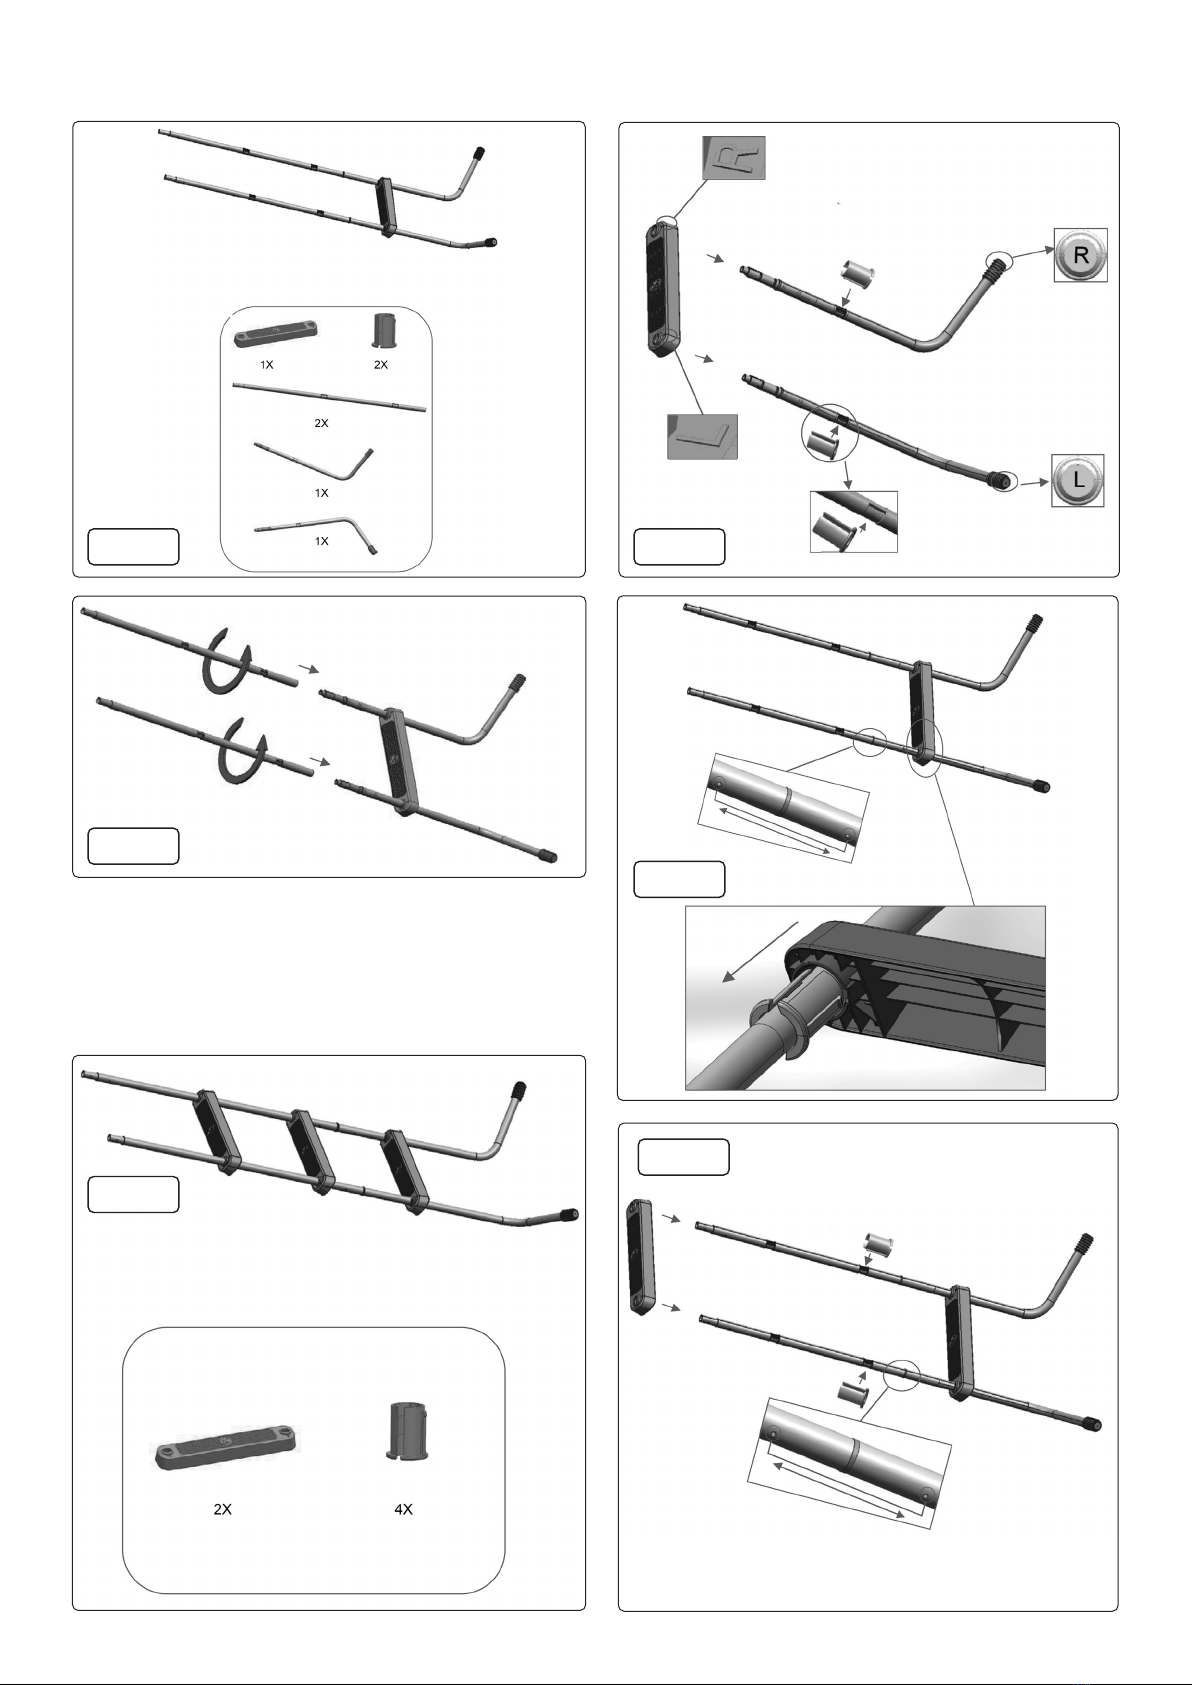
Pool Setup
• IMPORTANT: DO NOT start assembly if any pieces are missing. For replacement pieces call the Dellonda Service telephone number.
• The number of adults required for installation: at least 2 adults.
• Total installation time except the time for site preparation and water lling:
approximately 60 minutes.
• Step 1. ACCOUNT FOR ALL PARTS.
• Remove all the parts from the carton(s) and place them on the ground in the location where they are to be assembled Check each part according
to “CONTENTS PAGE” make sure all the pieces to be assembled are accounted for.
• Step 2. INSTALL DRAIN VALVE COVERS AND STOPPER
• Make sure that the outer drain plug is inserted into the outer drain cap and the drain valve cover is screwed on tightly. Plug the connection holes
with the stoppers. (The out drain plug changes according to different size of pool.)
• Step 3. INSTALL THE U-TUBES
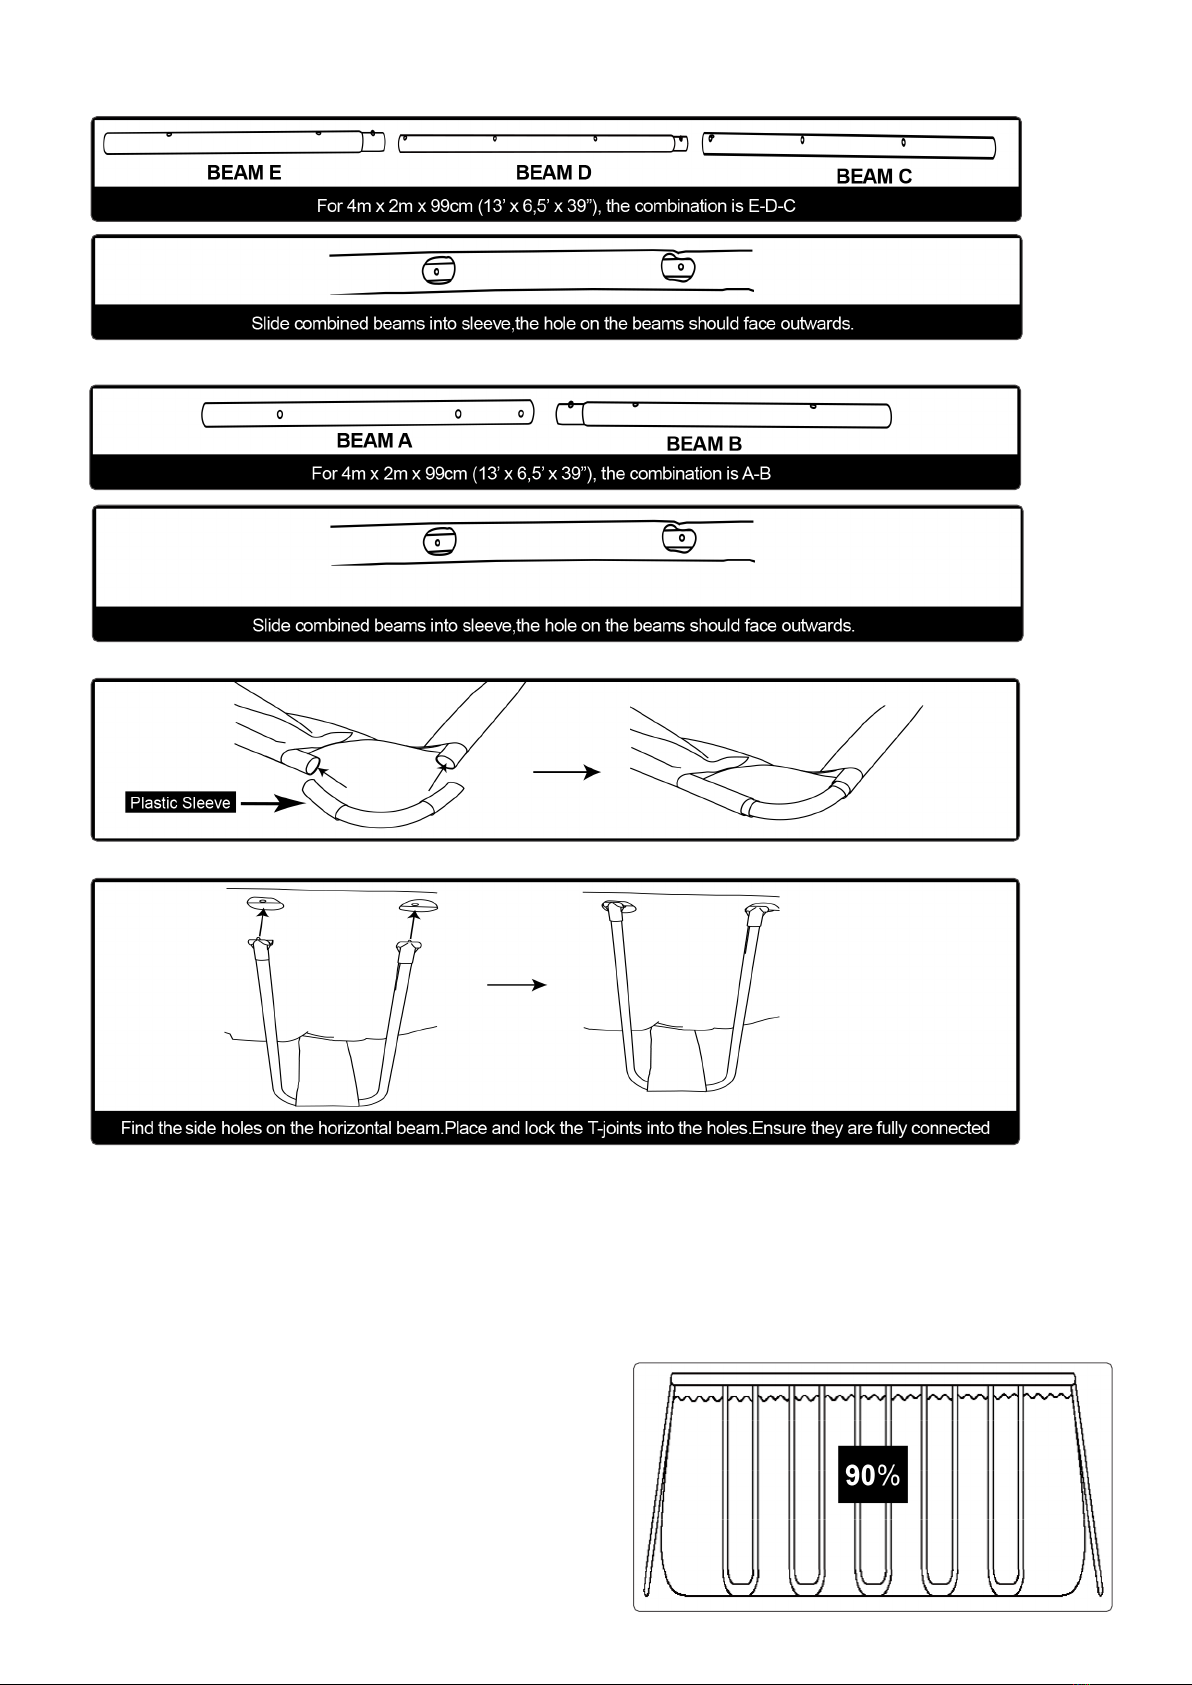
• Step 4. INSTALL HORIZONTAL BEAM
• For the long side sleeve of the pool:
• For the short side sleeve of the pool:
• Step 5. INSTALL HORIZONTAL BEAM AND L-TUBE
• Step 6. INSTALL HORIZONTAL BEAM AND U-TUBES
Fill the pool with water
• WARNING! DO NOT leave pool unattended while lling with water.
• WARNING! If more than 1~2 inches of water collects on any one side before you start lling in the centre, the pool is not level enough, and must
be corrected! Pull out the drain plug, release the water completely, disassemble the pool completely, locate the pool on a level surface, repeat set
up instruction.
• WARNING! DO NOT OVERFILL as this could cause the pool to collapse. In times of heavy rainfall you may need to empty some of the water to
ensure the level is correct.
• 1. Make sure the drain tting is plugged securely and the cap is in place. Start lling the pool with water. After about 1-inch of water is on the
bottom, stop lling and smooth wrinkles out of the bottom of the pool. Pull the outer wall out from the top edge, all around the bottom of the pool,
so that it lls evenly.
• 2. Continue lling the pool until water level is reached as shown in the
below image
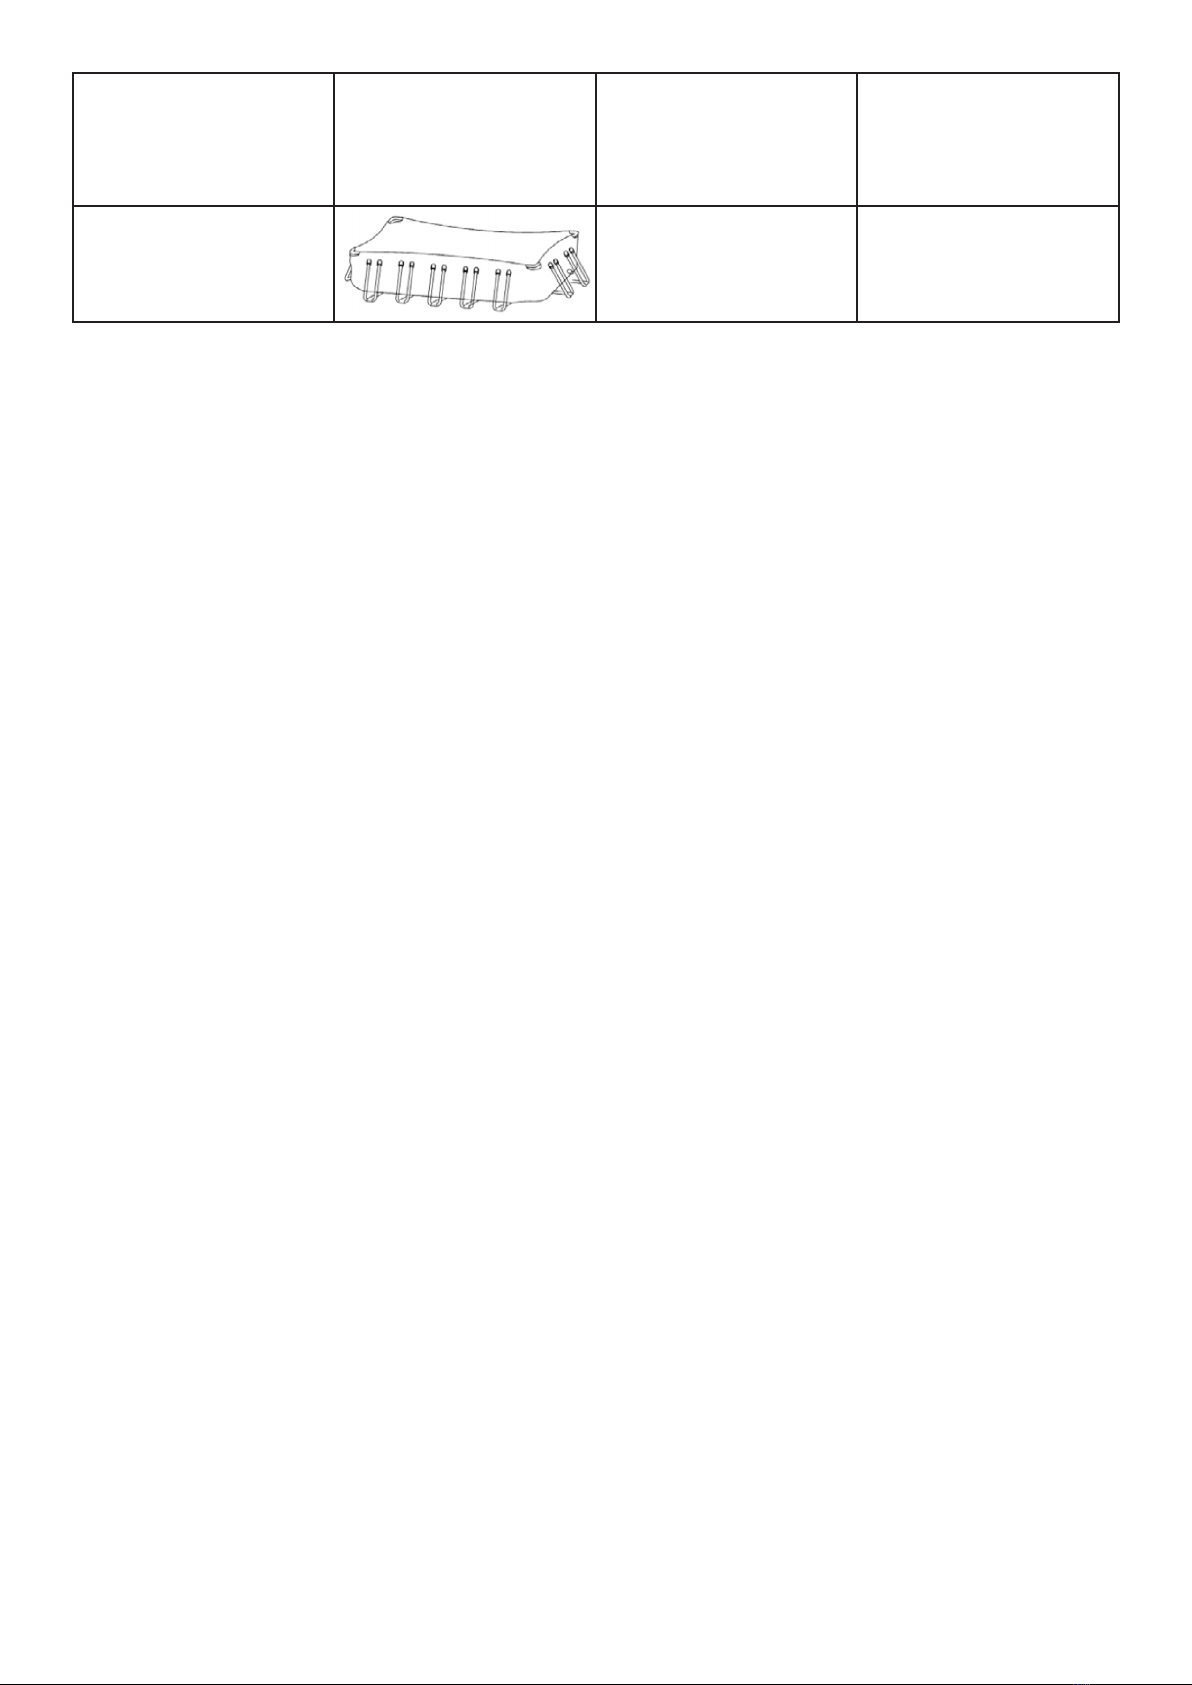
Assembling The Ladder
fig.1 fig.1.1
fig.1.2
fig.1.3
fig. 2
fig. 2.1
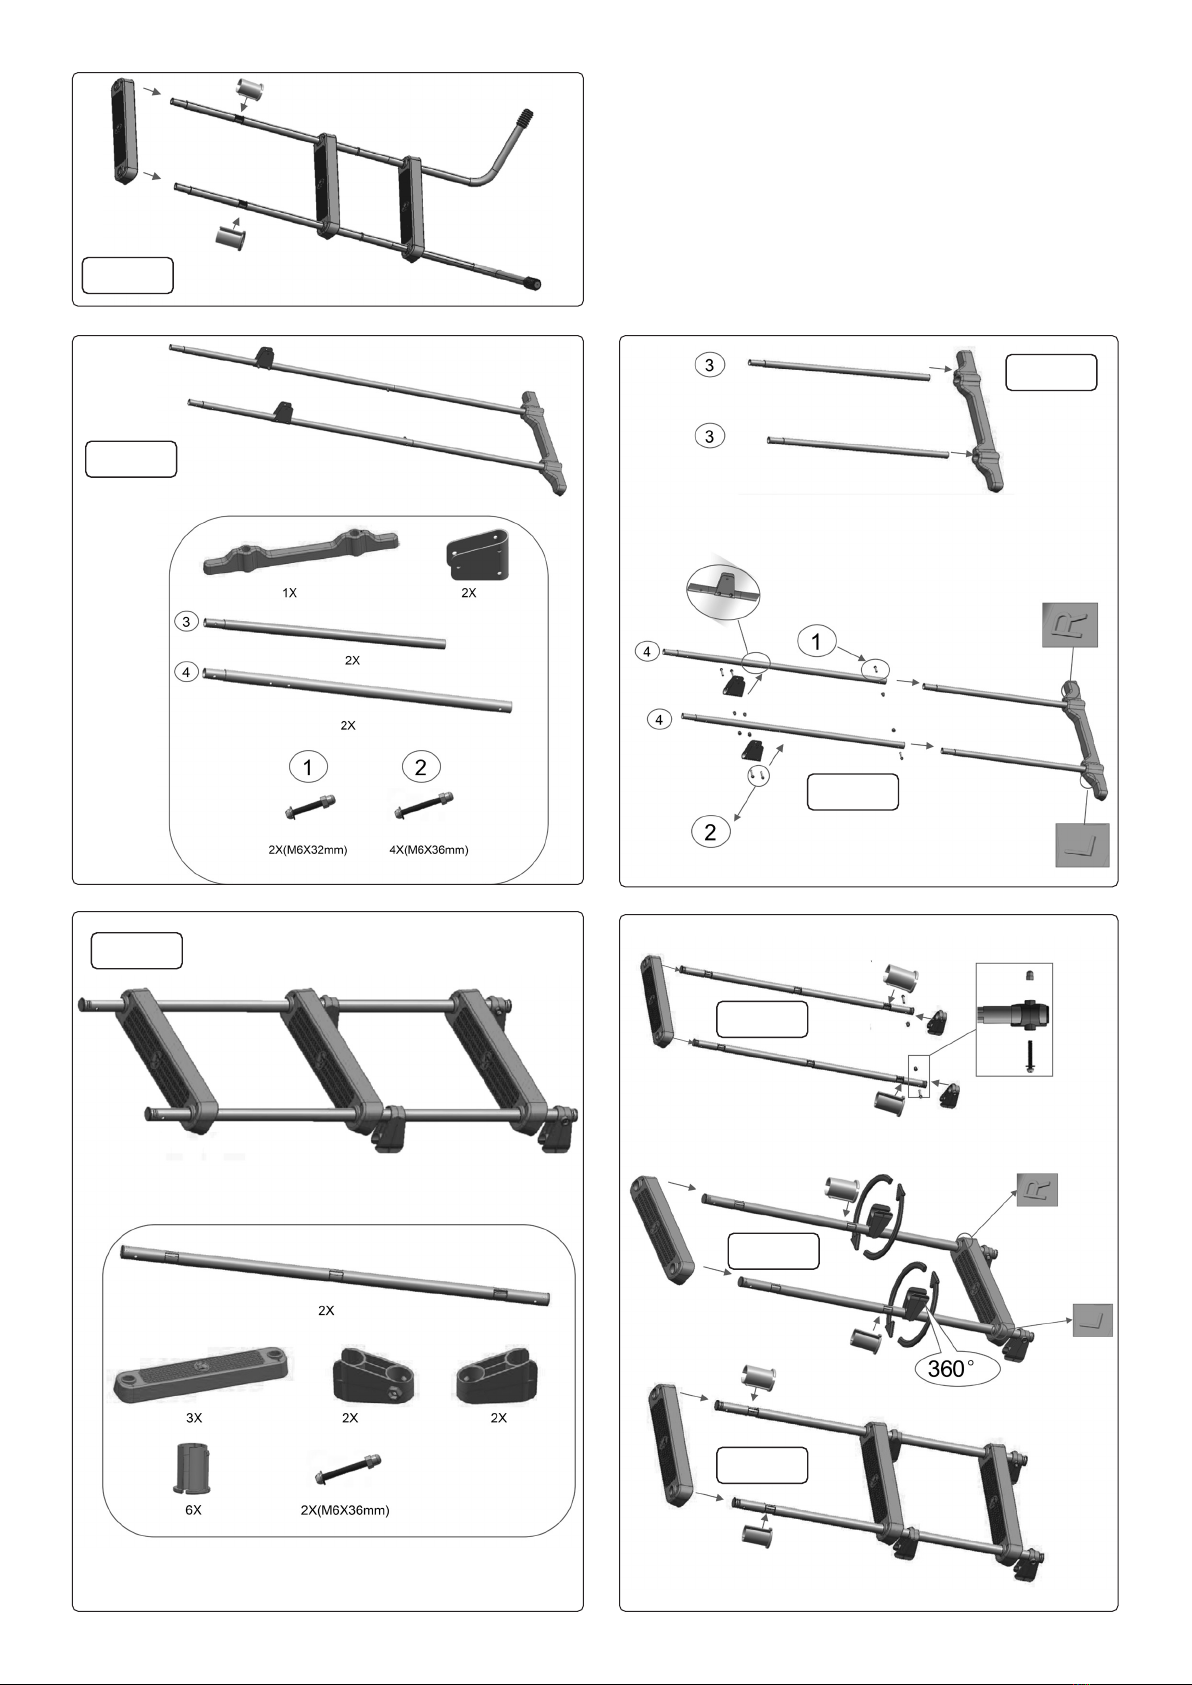
fig. 2.2
fig. 3
fig. 3.1
fig. 3.2
fig. 4
fig. 4.1
fig. 4.2
fig. 4.3

fig. 5.1
fig. 5
fig. 5.3
fig. 5.2
fig. 6 fig. 6.1
Winter and Long-Term Storage
• WARNING! DO NOT let your children stand at outlet and face the water outlet during the drainage. The water current may sweep children away.
• WARNING! Pool should be stored in a cool and dry place, with no sharp objects around it, and no heavy objects lying above, which may cause
damage to the pool.
• Step 1. If you have a lter pump, make sure that the electricity source to the lter pump has been disconnected.
• Step 2. Check to ensure that the outlet plug is rmly inserted on the inside of the pool.
• Step 3. Attach your garden hose to the drainage valve connector, and placing the other end of the hose in an area where the water can drain
safely, such as a storm drain or street gutter. Remember that because water always nds its own level, the end of the hose must be lower in
elevation than the pool to ensure complete drainage.
• Step 4. If you have a lter pump, insert the stopper into the inlet and outlet xtures, on the inside of the pool, and then disconnect the lter pump
hoses.
• Step 5. Attach the drainage valve connector to the drain outlet by turning connector in a clockwise direction.
• Step 6. Open the outlet plug on the inside of the pool and the water will begin to drain immediately.
• Step 7. Disconnect the hose and drainage valve connector when nished.
• Step 8. Replace the outlet plug on the inside of the pool.
• Step 9. Be sure that the pool liner is completely dry before folding the pool for long-term storage. Leaving the pool exposed to sunlight for a few
hours will clean and speed the drying process and make it easier to fold the pool for storage. (Never attempt to fold or stow a pool that is not
completely dry as this could lead to a proliferation of mould or mildew build-up during the time the pool is in storage.)
• Step 10. Remember, proper off-season storage is critical to protect your investment in your pool (especially in winter). Once drained and dry,
your pool should be carefully folded and wrapped in a ground cloth (if available) or other similar protective tarp - like material. The pool and all
applicable accessories such as the pump, cover, ground cloth, ladder, hoses, clamps, and hardware should be kept together and stored indoors, in
a reasonably warm, dry and weatherproof location.
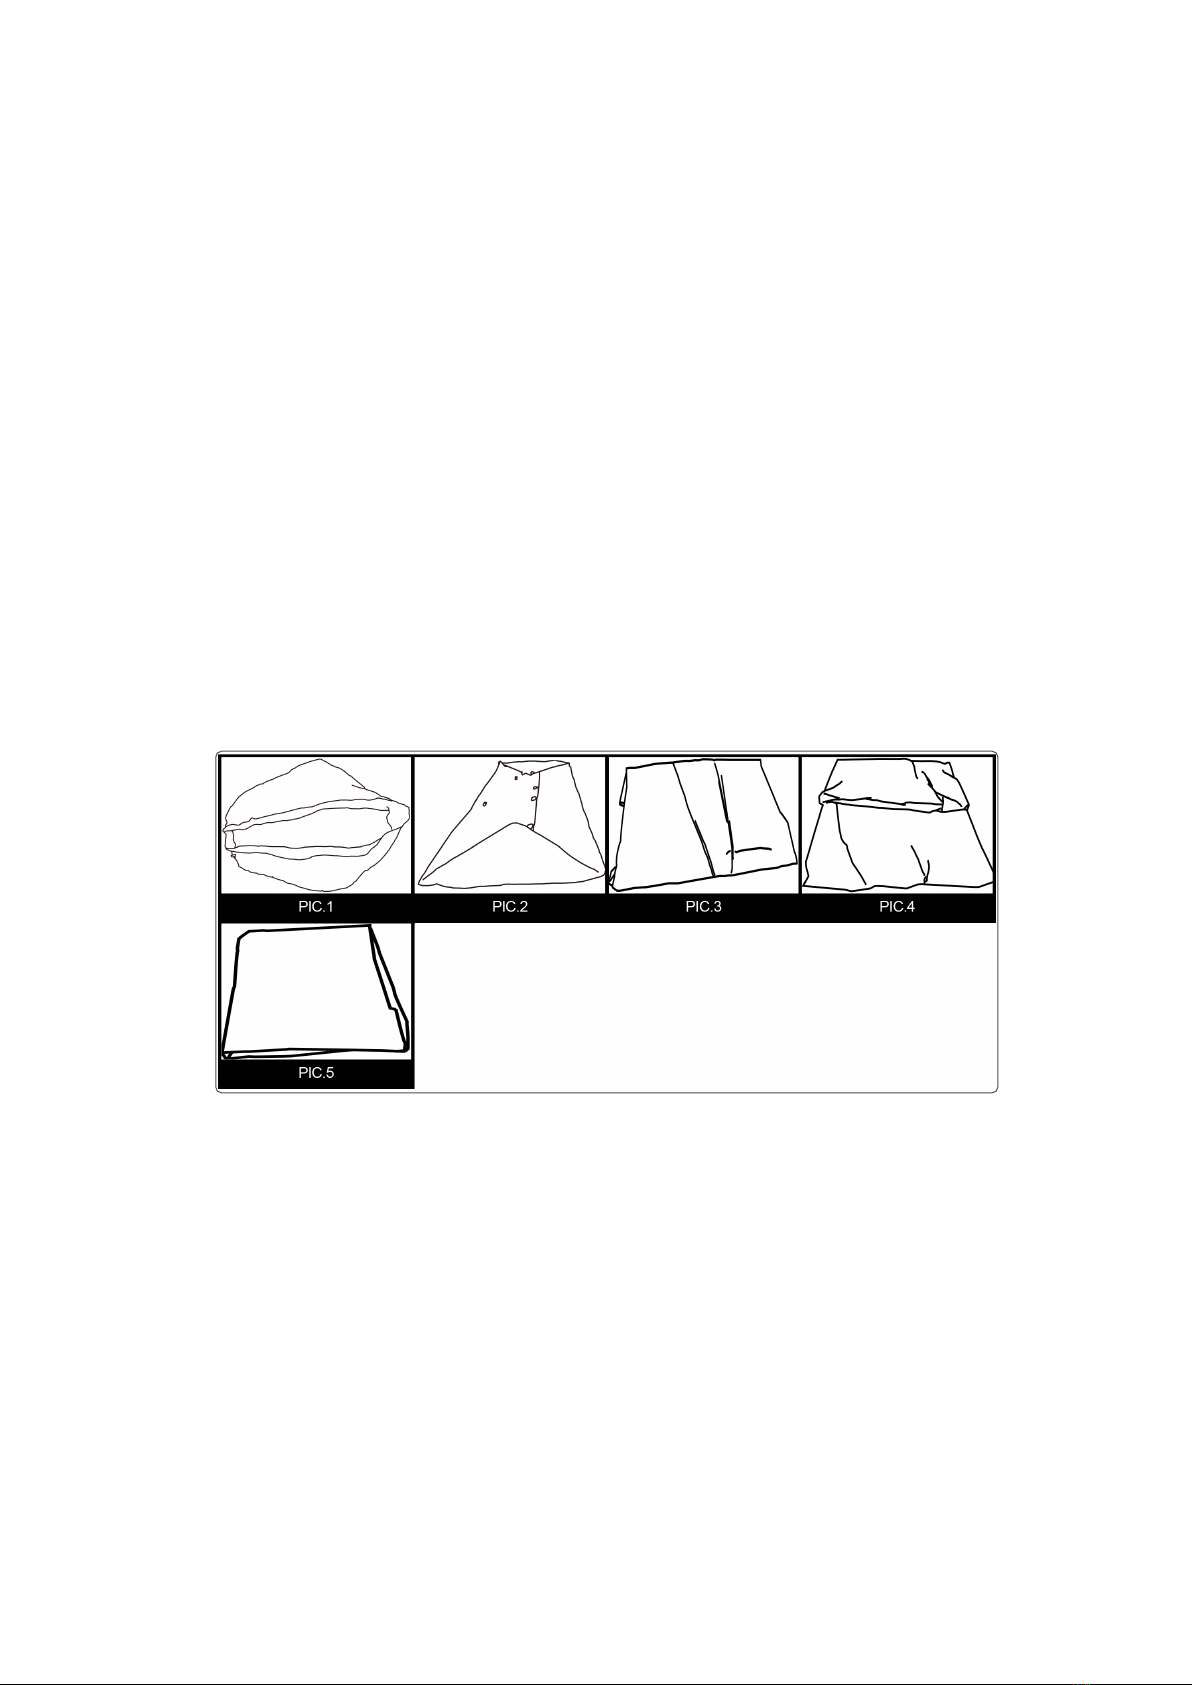
Folding Instruction
• Before folding, it’s better to dry all parts of the pool completely by lying them in the sun for one hour or so.(PIC.1). And then, spread some talcum
powder to prevent the vinyl from sticking together.
• FOLDING INSTRUCTION
• Step 1. Please fold the protrusion sides inside to create a rectangle shape. (PIC.2).
• Step 2. Fold each half of the rectangle to create a smaller rectangle shape. (PIC.3).
• Step 3. Fold each end backwards. (PIC.4).
• Step 4. Fold the ends together to create an ultimate rectangle. (PIC.5).
• TIPS 1. Please remove air inside to make the folded pool thin and at.
• TIPS 2. The original packing can be used for storage.
In-Season Pool Maintenance and Water Care
• WARNING! If applicable, the lter pump included with your pool is designed to remove dirt and other small particles from your pool water.
However, to maintain pool water that is perfectly clear, algae free, and safe from harmful bacteria, it is VERY IMPORTANT TO ENGAGE IN A
CONSISTENT REGIMEN OF CHEMICAL TREATMENT. Contact your local pool supply retailer for guidance on the safe and effective use of
chlorine, shock, algaecide and other such chemicals.
• WARNING! To avoid skin and eye irritation or even injury to bathers, never add chemicals to the pool while it is occupied. Never add any
chemicals or substances to your pool if you cannot verify the exact quantity or type to add to the water. Consult a pool supply retailer for specic
instructions and guidelines concerning the use of chemicals in your pool.
• WARNING! It is highly recommended that pool owners frequently test their pool water to ensure that the pH and chlorine concentration in the
water is optimal for safe and enjoyable bathing throughout the season. Please consult your pool supply retailer to nd a suitable testing kit and
instructions on its use.
• WARNING! Non-respect of the maintenance rules may result in serious hazards for health and especially for children.
• This product is designed to be a storable, seasonal pool. If you live in a temperate area in which the pool will not be in use year-round, it is
STRONGLY RECOMMENDED that you drain your pool, clean and dry it thoroughly, and store it in a protected area for the off-season. This will help
extend the life of your pool and prevent a safety hazard from developing while the pool is not in use. During the season of use of the pool kit,
the ltration system (if applicable) must be put into service each day, long enough to ensure at least a complete renewal of the volume of water.
Irrespective of materials used for swimming pool construction, accessible surfaces have to be checked regularly to avoid injuries.
• In order to keep your pool water clean and hygienic all season long please closely adhere to the following guidelines:
• A: The proper and consistent use of basic pool chemicals are required to maintain the proper pH balance in your pool water.
• Furthermore, the application of chemicals will help prevent the growth of harmful bacteria or algae in your pool, and assist your lter-pump in
keeping your water crystal clear. Chemicals that your pool may require include but are not limited to:
• 1) Tabular, Granular, or Liquid Chlorine: Disinfects pool water and inhibits algae growth.
• 2) PH Adjusting Chemicals: These are used to correct PH level and make water more or less acidic.
• 3) Algaecides: These chemicals are formulated to remove algae.

• 4) “Shock” (Super chlorinator): Eliminates certain organic and other combination compounds that can affect water clarity.
• In order to obtain specic details on the use of chemicals, please consult a local pool retailer and provide them with the volume of water in your
specic pool, and if desired, a sample of your pool water. This will enable them to properly instruct you on: 1) which chemicals to purchase, 2)
what quantities of chemicals to purchase, and 3) how to use specic chemicals safely and effectively.
• B: Never let chlorine come into direct contact with the pool liner until it has completely dissolved. This means that granular or tabulated chlorine
is rst dissolved in a bucket of water before applying to pool water, and likewise, liquid chlorine is slowly and evenly poured into pool water from
various locations around the pool perimeter.
• DANGER: NEVER add water to chemicals. INSTEAD, always add chemicals to water. Also, never mix separate chemicals together, rather, add
chemicals to the pool separately and allow them to circulate throughout the pool before adding additional types of chemicals.
• C: We recommend that you purchase a Dellonda test kit (pool Starter Kit: Model no. DL63 and Test Strips: Model no. DL32 test kit) and frequently
test your pool water to make sure that your PH balance and chlorine levels are optimal.
NOTE: Excessive chlorine levels or low (acidic) pH levels can damage your pool liner, so please take corrective action as soon as possible if
testing reveals either condition.
• The tasks of removing larger debris from your pool and keeping the inside of the pool liner clean are simplied by using a leaf skimmer and
garden hose powered vacuum. Please contact the Dellonda service centre if you want to get advice on any repair during the life of the pool kit.
• D: Check your lter-pump cartridge every two weeks (or more frequently during periods of heavy usage) to verify whether it needs to be cleaned
or replaced. If your cartridge is no longer white in colour, attempt to spray it clean with a strong blast of water from your garden hose. If your
cartridge cannot be cleaned in this manner, the cartridge must be replaced, refer to lter pump manual.
• Failure to frequently clean and/or replace your cartridges will affect the effectiveness of your lter pump and could shorten its useful life.
• E: If your pool system included a cover, try to keep your pool covered at all times when not in use. This will help keep the wind and other elements
from depositing dirt and debris in your pool, and will also prevent excess rainwater from overlling your pool.
• F: Remind your family and friends to always hose or rinse off any dirt or tanning oil from their hands, feet, and body prior to entering the pool.
• G: It’s necessary to monitor the bolts and hardware of the pool (eg. rust stain) when possible (if applicable).
• H: Once your pool has been lled with water for the season, take note if your pool becomes overlled due to rainwater or accidental overll. If this
should occur, it is important to drain or bale out the excess water as soon as possible.
• I: Irrespective of materials used for swimming pool construction, accessible surfaces have to be checked regularly to avoid injuries.
Troubleshooting
• REPAIR PATCH INSTRUCTIONS
• Small pinhole and small puncture leaks can be repaired with the included repair patch.
• a) Locate the source of the leak.
• b) Clean the area surrounding the leakage and wipe up all water from the surface.
• c) Take out the repair patch, cut it into required shape and size, which should be larger than the leaking area, put the patch on leaking area and
press tightly.
• d) Wait 30 minutes for open-air drying of the repaired position.
• If the damaged area is large, we recommend using a Silicone or rubber based glue for repair.
• GLUE REPAIR INSTRUCTIONS
• 1. Find the location of the leak.
• 2. Drain completely.
• 3. Clean the area surrounding the leak and wipe up all water from the surface.
• 4. Thoroughly clean the area surrounding the leak .Cut a piece of repair material in round shape, which should be larger than the damaged area.
• 5. Glue (need to purchase adhesive separately) one side of the material patch to the repair area.
• Note: The glue needs to be evenly applied to the material patch.
• 6. Put the patch on the damaged area and press tightly. Wait 12 hours for drying. After patch has dried, apply glue around the edges for a
complete seal (dry 4 hours).
Troubleshooting
PROBLEM DESCRIPTION CAUSE REMEDY
Coloured Water • Water turns blue, brown, or
black when rst treated with
chlorine.
• The chlorine is oxidizing
minerals in your water. This
commonly occurs with water
from different sources.
• Adjust pH to recommended
level.
• Run lter until water is clear.
• Regularly clean cartridge.
Particle’s Suspended in
Water
• Water looks “milky” or cloudy. • “Hard Water” caused by an
elevated pH.
• Chlorination is inadequate.
• Foreign debris in water.
• Bathers are not cleaning their
feet prior to entering pool.
• Adjust pH. Check with a
swimming pool supply retailer
for correct water treatment.
• Ensure proper chlorine level.
• Clean or replace your lter.
• Spray off dirt with a high-
pressure hose before entry.
Persistent Low Water
Level
• Pool appears to be losing water
on a daily basis.
• Tear or hole in pool liner.
• Tear or hole in a lter pump
hose.
• Hose clamps are too loose.
• Evaporation from high summer
temperatures.
• Locate damage and repair with
the included patch kit.
• Repair or replace hoses.
• Tighten all hose clamps.
• Keep pool covered when not
in use.
Algae • Water has greenish tint.
• Green, brown or black spots
appear on pool liner.
• Pool bottom is slippery and/or
an unpleasant odour is present.
• Warm weather.
• Poor Circulation.
• Low free Chlorine.
• Apply “shock” treatment
(superchlorinator). Check pH
and adjust to an appropriate
level per your local pool supply
retailer.
• Vacuum or lightly scrub pool
liner.
• Test water often to maintain
proper chlorine levels.
Pool Water is Cool • Water is not warming to
a comfortable swimming
temperature.
• Pool was set up in an
excessively shady or tree lined
area.
• Heat is escaping from pool
water.
• Relocate pool to a more open
location where it can get
maximum exposure to sunlight
during peak daylight hours.
• Keep your pool covered
whenever it is not in use.
Deformation from Frame • Did not ll with water to water
level.
• Suggest continue to ll with
water to water level.

Filter Pump
Safety Instructions
• ELECTRICAL SAFETY
• WARNING! It is the user’s responsibility to check the following:
• Check all electrical equipment and appliances to ensure that they are safe before using. Inspect power supply leads, plugs and
all electrical connections for wear and damage.
• WARNING! The pump must be supplied through a Residual Current device (RCD) having a rated residual operating current
not exceeding 30mA.
• Dellonda recommend that an RCD (Residual Current Device) is used with all electrical products. If the product is used in the course of business
duties, it must be maintained in a safe condition and routinely PAT (Portable Appliance Test) tested.
• Electrical safety information, it is important that the following information is read and understood.
• Ensure that the insulation on all cables and on the appliance is safe before connecting it to the power supply.
• Regularly inspect power supply cables and plugs for wear or damage and check all connections to ensure that they are secure.
• Important: Ensure that the voltage rating on the appliance suits the power supply to be used and that the plug is tted with the correct fuse - see
fuse rating in these instructions.
• DO NOT pull or carry the appliance by the power cable.
• DO NOT pull the plug from the socket by the cable.
• DO NOT use worn or damaged cables, plugs or connectors. Ensure that any faulty item is repaired or is
replaced immediately by a qualied electrician.
• This product is tted with a BS1363/A 13 Amp 3 pin plug.
• If the cable or plug is damaged during use, switch off the electricity supply and remove from use.
• Ensure that repairs are carried out by a qualied electrician.
• Replace a damaged plug with a BS1363/A 13 Amp 3 pin plug. If in doubt contact a qualied electrician.
• a) Connect the GREEN/YELLOW earth wire to the earth terminal ‘E’.
• b) Connect the BROWN live wire to the live terminal ‘L’.
• c) Connect the BLUE neutral wire to the neutral terminal ‘N’.
• Ensure that the cable outer sheath extends inside the cable restraint and that the restraint is tight.
• WARNING! The mains cable can not be replaced. If it is damaged the appliance should be scrapped.
• Dellonda recommend that repairs are carried out by a qualied electrician.
• GENERAL SAFETY
• DO NOT connect to the mains supply with wet hands or while standing in water.
• Mains supply must be protected by a RCD, see above.
• DO NOT use a damaged or frayed mains cable.
• WARNING! The pump must be installed at least 2m from the pool.
• WARNING! The pump must be xed to the ground or a suitable stable pedestal, using Ø5mm screws, to prevent accidental falling.
• WARNING! Filter pump is not to be used by children. Adult assembly and operation only.
• DO NOT bury the mains cable. Locate it where it will not be damaged by lawn mowers, hedge trimmers and other garden equipment.
• Ensure before each use of the pump, that all clamps are tightened and that all hoses are properly connected.
• WARNING! DO NOT use this lter pump to vacuum the pool.
• WARNING! This lter pump is designed ONLY for use with storable pools. It must not be used for permanently installed pools.
Improper use will cause overheating and the motor to be damaged.
• WARNING! To avoid overheating of the pump motor, make sure the pump is pumping water. Never allow to run dry.
• WARNING! Air in the system will make the pump race and will cause damage to the pump. Refer to Operation section.
• This product can be used by children aged from 8 years and above and persons with reduced physical, sensory or mental capabilities
or lack of experience or knowledge if they have been given supervision or instruction concerning use of the appliance in a safe way
and understand the hazards involved. Children shall not play with the appliance. Cleaning and user maintenance shall not be made by
children without supervision.
• WARNING! The pump must not be used when people are in the water.
• The maximum total head is 0.9m.
Recommended fuse rating
13 Amp

Contents
Installation
• Refer to Contents and Installation diagrams
• Before installation of lter pump ensure pool is fully assembled and lled with water to the correct maximum level.
• Low water level in the pool (and therefore the lter pump) will cause the lter pump motor to be noisy and could cause damage.
• Remove lter pump from its packaging.
• Place the pump at least 0.2m below the level of the pool water and not more than 1m below the level of the pool water.
• Mount the lter pump on solid and even ground (use the holes in the base of the pump to secure it to a solid surface, see Safety section.)
• DO NOT place the pump in tall grass as it may cause the motor to overheat.
• Make sure the lter pump is correctly assembled, as shown in the contents diagram.
• Finger tighten the lter chamber cover retainer (P3), clockwise.
• Connect lter hose (P12) to the inlet port of the lter pump (top) to the lower hose connection of the pool. Fix the hose with the clamps (P11).
• Gently turn the air purge cover (P1) anticlockwise 1-2 turns.
• Connect the second lter hose (P12) to the upper hose connection of the pool and the outlet port (bottom) of the lter pump. Fix the
hose with the hose clamp, (P11).
Operation
• Ensure that all Safety and Installation instructions have been carried out.
• With water owing into the pump, water pressure will allow the air in the system to escape from the air purge cover (P1).
• Then gently tighten clockwise, the air purge cover (P1).
• Connect the mains supply after ensuring that all electrical and safety instructions have been carried out (refer to Electrical and General
safety sections above.)
• Operate the lter pump until water becomes clear.
• Pump must NOT be used when the pool is occupied.
Maintenance
• WARNING! Disconnect from the mains supply before carrying out any maintenance procedures to the pool or the lter pump.
• It is recommended to keep 2 spare lter cartridges at all times.
• CLEANING
• Wash the outside of the lter with mild detergent and water DO NOT use solvents.
• FILTER CLEANING/REPLACEMENT
• Remove lter chamber cover retainer (P3), anticlockwise.
• Clean the lter cartridge (P6), with running water, or replace if necessary.
• Check the inside of the lter chamber, (P7). If dirt or sediment is found in the bottom of the chamber, ush the chamber out with a bucket
of water or use a hose.
• Carefully ret the lter and the lter chamber cover and retainer ensuring all o rings are correctly positioned.
• Reconnect the mains supply.
• STORAGE
• After the pool water has been completely emptied out remove all hoses from the pool and lter pump.
• Empty water from all the housings of the lter pump.
• Store all components in a dry and ventilated location. Ensure all parts are dry.
Part no. Description Quantity
P1 Air purge cover 1
P2 Air purge cover seal 1
P3 Filter chamber cover retainer 1
P4 Filter chamber cover 1
P5 Filter chamber cover gasket 1
P6 Filter chamber 1
P7 Filter chamber 1
P8 Number not used 1
P9 Power cable 1
P10 Oring 2
P11 Hose clamp 4
P12 Connector hose 2
P13 Filter net 2
P14 Connector 2

Troubleshooting
• PUMP DOES NOT OPERATE:
• Check for blown fuses, trip switches or disconnected mains supply.
• Check the motor, if it is too hot or overloaded turn it off and let the motor cool down.
• Seek professional help with the repair.
• PUMP MOTOR RUNS BUT DOES NOT PUMP WATER OR WATER FLOW IS SLOW:
• Check for obstructions in the intake or discharge hoses or in the pool itself.
• Tighten hose clamps, check hoses for damage, check pool water level.
• Clean/replace lter cartridge.
• PUMP LOSES PRIME
• Ensure water level is at least 5cm above the outlet pipe.
• Ensure there are no leaks in the suction piping.
• Check if lter cartridge is dirty.
• FILTER DOES NOT CLEAN POOL
• Adjust chlorine and pH level.
• Clean or replace lter cartridge.
• Check for holes in cartridge.
• Let pump operate for longer.
• Clean away debris from lter net at pool wall.
• Seek expert help.
Dellonda Limited
Kempson Way, Suffolk Business Park, Bury St Edmunds, Suffolk. IP32 7AR
Environment Protection and Waste Protection and Electrical Equipment Regulations (WEEE)
Recycle unwanted packaging materials. When this product is no longer required, or has reached the end of it’s useful life, please
dispose of it in an environmentally friendly way. Drain any fluids (if applicable) into approved containers, in accordance with local waste
regulations. Under the Waste Batteries and Accumulators Regulations 2009, Dellonda would like to inform the user that this product
contains one or more batteries. It is our policy to continually improve products and we reserve the right to alter data, specifications and
parts without prior notice. No liability is accepted for incorrect use of this product. Guarantee is 12 months from purchase date, proof of
which is required for any claim.
Other dellonda Swimming Pool manuals


