DELTA DORE DFR TYXAL+ User manual

Lithium 9Vdc - Lithium CR123 3 Vdc
Autonomie 10 ans
Autonomy 10 years
Consumption stand-by : 2µA
Consumption : 16,2 mA max.
85 dBA max. - 3 m.
868,7 Ý 869,2 MHz /
868 Ý 868,6 MHz
100 m Ý 300m
-10°C / +70°C
0°C / +50°C
IP IP 30 - IK 04
75%
Ø 120 x 55 mm
Maximum power radio < 10 mW
Receiver category: 2
Important product
information (Ì)
164 gr.
Instructions
Important
Product
Informations
Piles à l’intérieur / Batteries inside /
Mit Batterien / Pile all’interno /
Pilas en el interior / Baterie wewnątrz /
Batterijen binnenin
Contenu / Contents / Inhalt /
Contenuto / Contenido / Spis treści
/ Inhoud
DFR TYXAL +
FR Détecteur de fumée
EN Smoke detector
DE Rauchmelder
IT Sensore di fumo
ES Detector de humo
PL Czujnik dymu
NL Rookdetector
YEAR
10
BATTERY
EN14604: 2005 + AC2008
“Conforme au référentiel NF DAAF”
(15)
n° DoP 0333-CPR-292119-1
www.marque-nf.com
- 8 - - 9 -
EN
1. Presentation
2. Location
Locations to avoid
Do not install the detector:
• Within a metre from vents for heating, cooling or circulating air.
The smoke could be blown away from the detector or be diluted.
• In a place where the temperature could drop beneath 0°C or rise above
+50°C; risk of detector not working correctly.
• In a place where there is a risk of condensation. Bathrooms and laundry
rooms are not recommended.
• Places where smoke could gather (kitchen or poorly ventilated garage) and
cause false alarms.
• In a place that is excessively dusty.
Do not install in non-converted attics.
Additional installation recommendations, as well as the "Mandatory
Performance Declaration" for this equipment are available in the
product file for DFR TYXAL+ on our website www.deltadore.com
Material manufactured by SHD BP10809 under reference DOF79R.
The detector can be associated with a DELTA DORE wireless X3D alarm and
control system.
Functional check and maintenance:
You must check that your detector is functional once a
month or after each battery change.
Pressing the “test” button on the case for a few seconds
will light up the LED and the detector will emit 2 beeps.
Quick flashing from the detector means that it has
switched to pre-alarm mode (multiple readings).
If the detector’s sensors confirms the presence of smoke,
the alarm will be activated.
Do not try to trigger the alarm any other way (using a lighter, etc.) because you
could damage the detector or even start a fire.
Your detector has been designed to require the minimum maintenance possi-
ble. However, some simple actions need to be performed once a year.
After having removed the detector:
• Clean the cracks in the detector (located on the side) with a vacuum clean-
er, using a soft brush or a vacuum cleaner accessory.
• Use a slightly damp cloth to clean the outside of the case.
• Do not blow on the detector to avoid lifting dust.
4
OK
21 3
>3s
It is recommended that the detector be replaced after 10 years.
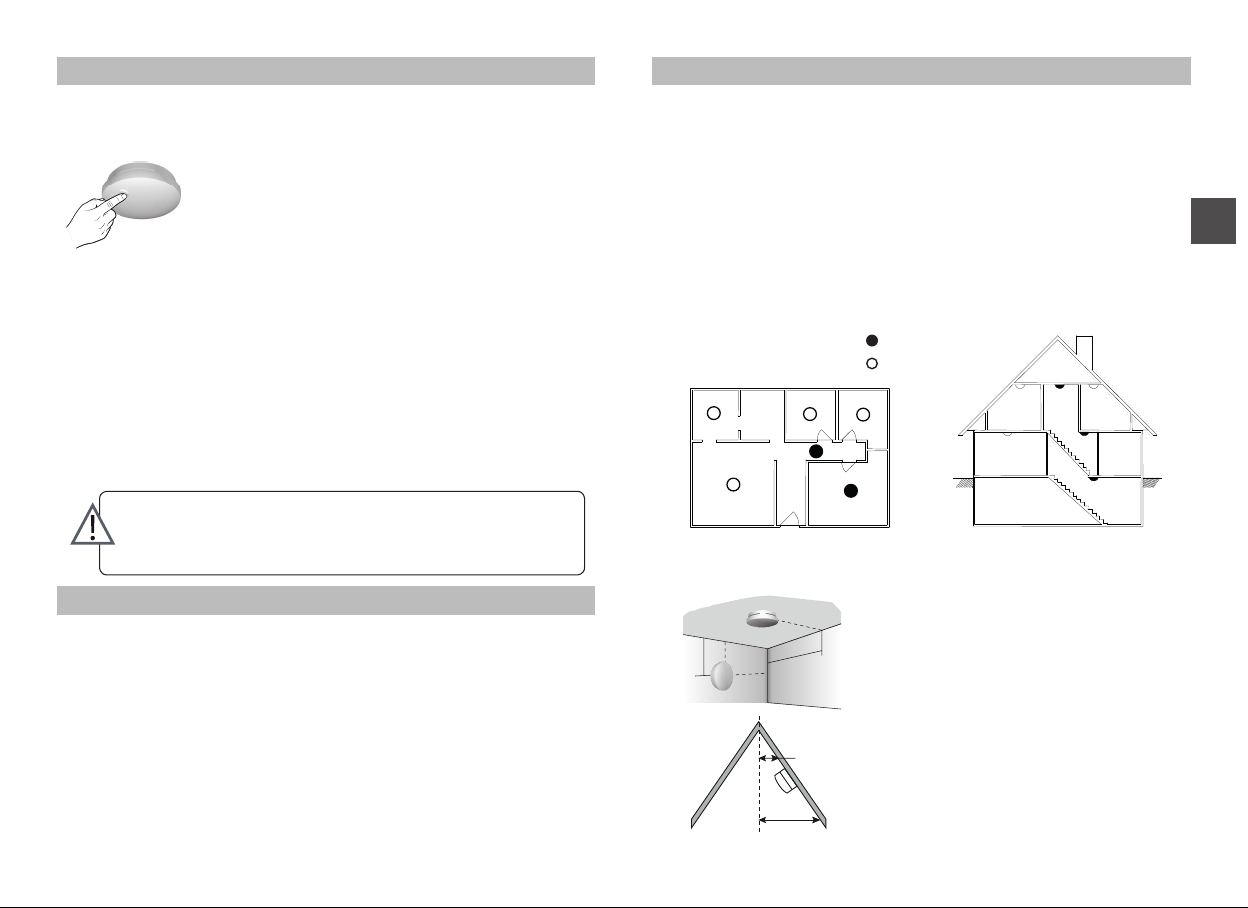
2. Location
20 cm
90 cm
15-25
cm
60 cm
• The detector should preferentially be at-
tached to the ceiling in the middle of the room.
Otherwise, attach it more than 20cm from any
obstacle (partition wall, beam, etc.) and over
60cm from any room corner.
• If this is impossible, attach the detector to
the wall at a distance of between 15 and 25cm
from the ceiling.
• In the case of an angled ceiling, attach the
detector at a location between 20 and 90 cm
vertically below the highest point.
In the home:
In the room:
Recommended locations:
• For enhanced protection:
- Place a detector in each room, avert using listed places to avoid.
• For basic protection:
- Place a detector on each floor.
- Place a detector close to sleeping areas
(for example, in the corridor leading to rooms; in the case
of a long corridor > 10m, place 1 detector at each end).
- Place a detector in each bedroom occupied by a smoker.
Flat House
Dining
room
Kitchen Bedroom
Smoker
bedroom
Lounge
Bedroom
Basic protection
Enhanced protection
Bedroom Bedroom
Lounge Kitchen
Basement
Corridor

- 10 - - 11 -
EN
3. Mounting
2
1
Ê Separate the 2 parts of
the unit.
Ë Mark and drill fitting
holes.
Attach the base with suitable fixings for
mounting.
4. Activation
2 3
+
-+
-
1
+
-+
-
Ê Note, 9V battery
provided on reverse.
Ë Install the 9V battery,
ensuring it is installed
in the correct direction.
Remove the strip from
the 3V battery.
Ì Mount the detector
on its base.
7. Operation in standalone mode (without control unit)
with a Si Tyxal+ siren
6. Associate home automation functions
• Association with an alarm system
• Selection of triggering method
• Test
Read system installation
guide
5. Operation with an alarm system
T2
> 5s
OK
BIP
123
> 5s
ÊSet to the siren to
association mode
(see instructions).
Press the T2 button
for 5 seconds until
the red LED comes
on constantly.
ËPress the smoke alarm
button for 5 seconds.
ÌThe siren beeps
once to confirm
the association.
Briefly press
button T2 to
exit association
mode.
• Association with a roller shutter
sensor
• Association with a Rollia roller
shutter motor
Association with the siren
Read system installation
guide

- 12 - - 13 -
EN
8. Battery replacement
1
+
-+
-
+
-+
-
2
If the detector beeps and the LED comes on every 40 seconds, the battery is
dead.
Do not use rechargeable battery.
> 90s
OFF
Or
Smoke alarm
Operation
Example with
a remote
control
7. Operation in standalone mode (without control unit)
with a Si Tyxal+ siren
Other manuals for DFR TYXAL+
2
This manual suits for next models
1
Other DELTA DORE Smoke Alarm manuals


