DELTACALOR DRYER ELECTRIC PLUS Specification sheet

OPERATION AND INSTALLATION MANUAL
These instructions must be read carefully to ensure the product operates
safely.We would therefore strongly recommend reading them before starting
on installation and keep them for future reference. Call a qualified technician
for help if you have any doubts about installing the product.
DRYER ELECTRIC PLUS
Electric towel heater and clothes rack
DOC.IS.002529 EN 04.04.2016

SAFETY INSTRUCTIONS
• Should damages be caused from breach of these regulations, the
manufacturer’s guarantee shall be invalidated.
• Do not use the appliance outdoors.
• Your appliance is intended for domestic use. It may not be used
for other purposes.
• If the appliance has been dropped, has been damaged or does
not function correctly, do not use it and ensure that the appli-
ance power supply has been disconnected (fuse or switch).
• Do not dismantle the appliance.A poorly-repaired appliance can
cause risks for the user. Contact your retailer for any problem.
• If the power lead has been damaged, it must be replaced by
the manufacturer, after-sales service or another professional to
avoid all danger.
• Warning: the power lead must not touch the heating body.
• Warning: to avoid a risk of overheating, do not cover the unit.
If you do, the rise in temperature will activate the built-in pro-
tection device.
• This appliance is intended only to dry laundry washed with water.
WARNING
In order to avoid any hazard to young children,
it is recommended to install the unit so that the lower
radiant bar is at least 600mm above the floor.
[ 2 ]

WARNINGS FOR DISABLED
PEOPLE AND CHILDREN
• This equipment may not be used by people with reduced phys-
ical, sensory, or mental capacity, those without any knowledge
of the equipment, or children over 8 years of age, unless super-
vised and instructed on safe use of the equipment, and aware of
all the risks.
• Children must not play with the equipment.
• Cleaning and maintenance tasks must not be done by children
without supervision.
• We recommend keeping the device out of reach of children
below 3 years of age, unless under constant adult supervision.
• Children between 3 and 8 may only switch the device on and
off, providing it is installed regularly in the stipulated position,
that the children are under constant adult supervision or have
been instructed in the safe use of the equipment, and that they
fully understand potential dangers.
• Children between 3 and 8 must not set up, regulate or clean the
device, nor undertake maintenance on it.
ATTENTION
Some parts of this product may overheat
and cause burns. Be especially careful in the presence
of children and vulnerable adults.
[ 3 ]

[ 4 ]
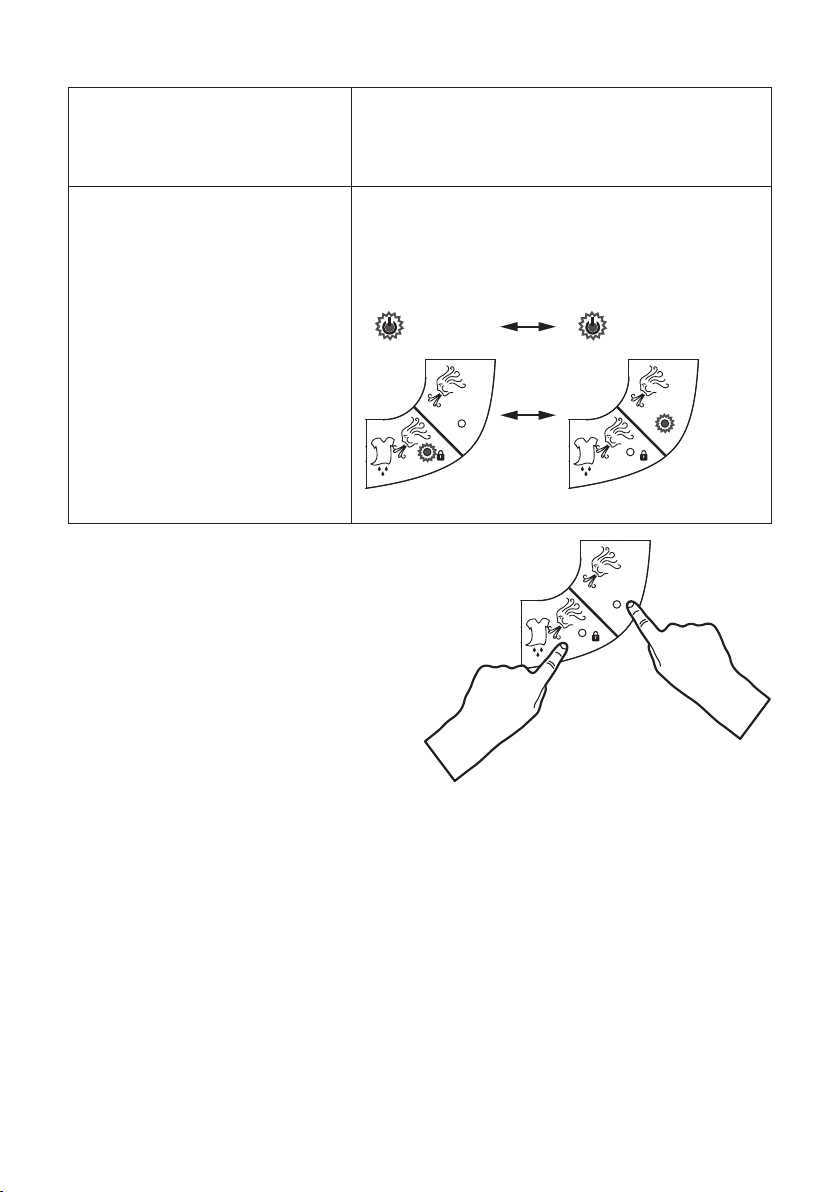
CHILDREN SAFETY
Keyboard lock “ ”
To enable or disable the keyboard lock, press and hold the DRYER
button for 5s.
5 sec
When keyboard lock function is enabled, the device continues op-
eration with default settings.
In this mode, it is not possible to modify the program settings or
the temperature, or to activate the BOOST or DRYER functions.
In this mode, only switching off of the device is allowed.
The DRYER LED flashes quickly once per second.
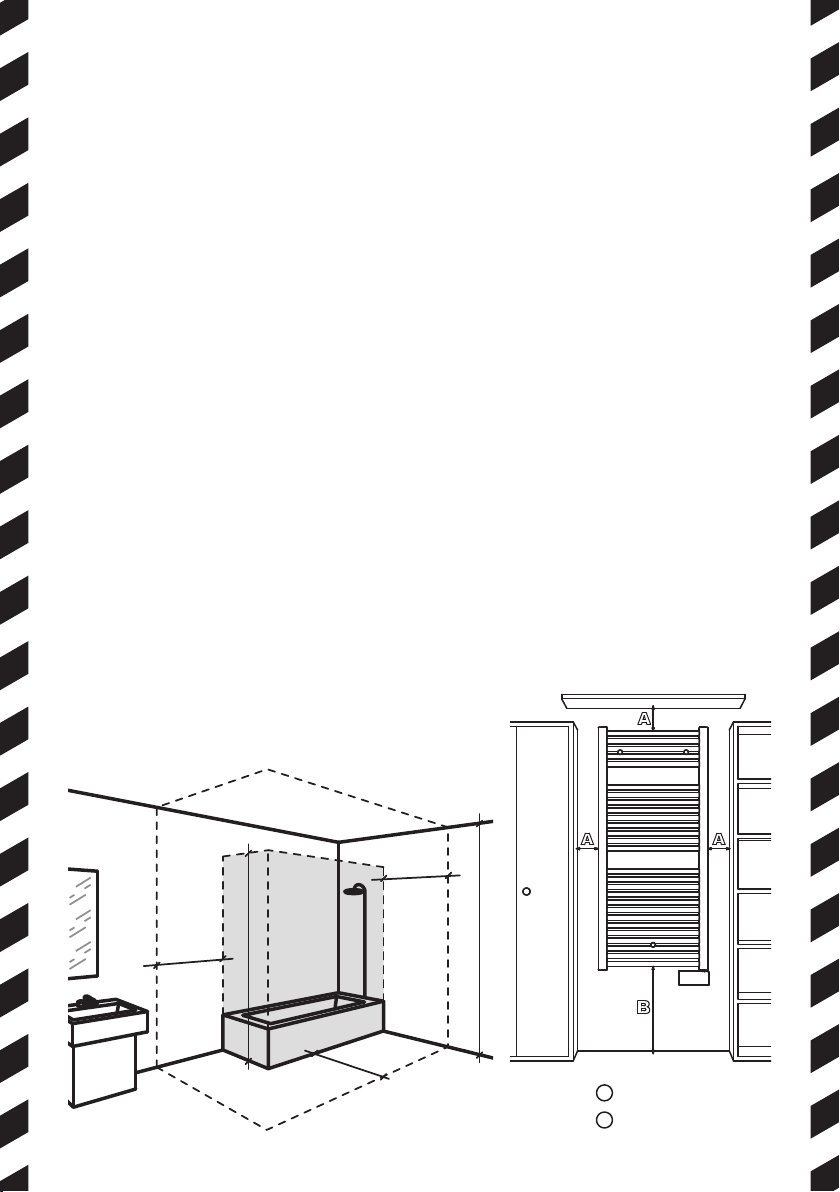
PREPARATION FOR INSTALLATION
Before connecting the heating appliance, disconnect the
power supply using the general switch.
This heating appliance is a class II appliance.As such, it may be in-
stalled in all rooms of the house, including in protection volumes 2
and 3 of a bathroom (IP24).
The heating appliance must be installed in such a way that the
switches and other control devices cannot be touched by some-
one in the bath or shower (ref. standard NF C15-100).
The heating appliance must not be installed beneath a socket.The
heating appliance must be installed at least 15 cm away from all
obstacles (shelves, curtains, furniture, etc.).
The power circuit of this appliance must include an all-pole circuit
breaking device (ref. standard NF C15-100).
60 cm
225 cm
300 cm
60 cm
60 cm
Volume
3
Volume
2
Volume
1
15 cm MIN
60 cm MIN
A
B
[ 5 ]

POWER SUPPLY AND ELECTRICAL CONNECTIONS
• In accordance with the rules in force, the power of the heating
appliance must be protected by an RCD of 30 mA and an over-
current protection device, suitable to the characteristics of the
connection line.
• Before using the appliance the first time, check that the voltage
used corresponds to that specified on the appliance.
• This heating appliance is a class II appliance (double electrical
insulation).
• Earth connection is prohibited.
• Connection of the three wires must take place in an electri-
cal junction box compliant with current regulations.
• In terms of French regulations, do not fit a plug to the cable
for connecting it to an electrical socket.
• The pilot wire must be disconnected if not in use.
Single-phase power supply 230 V~ ±10% 50Hz.
• Blue/gray wire: Neutral
• Brown wire: Live
• Black wire: Pilot Wire
[ 6 ]
• In accordance with the rules in force, the power of the heating
appliance must be protected by an RCD of 30 mA and an over-
current protection device, suitable to the characteristics of the
connection line.
• Before using the appliance the first time, check that the volt-
age used corresponds to that specified on the appliance (sin-
gle-phase power supply 230 V~ ±10% 50Hz).
• This heating appliance is a class II appliance (double electrical
insulation). For this type of equipment, no earth connection is
required.
• For units fitted with a plug, the connection must only be formed
using a suitable electrical socket.
• In the version with a power supply cable without a plug, the
three-wire connection must be done in an electrical connection
box that conforms to the current norms.
• In the version without a plug, in accordance with French regu-
lations, do not fit a plug to the cable for connecting it to an
electrical socket.
• The pilot wire must be disconnected if not in use.
• Blue/gray wire: Neutral
• Brown wire: Live
• Black wire: Pilot Wire

[ 7 ]
WALL MOUNTING THE FIXING KIT
3 ×3 ×
Ø 10
A
NO
NOTE
The screws and anchors
are not supplied.
1
2
3
4
[ 8 ]
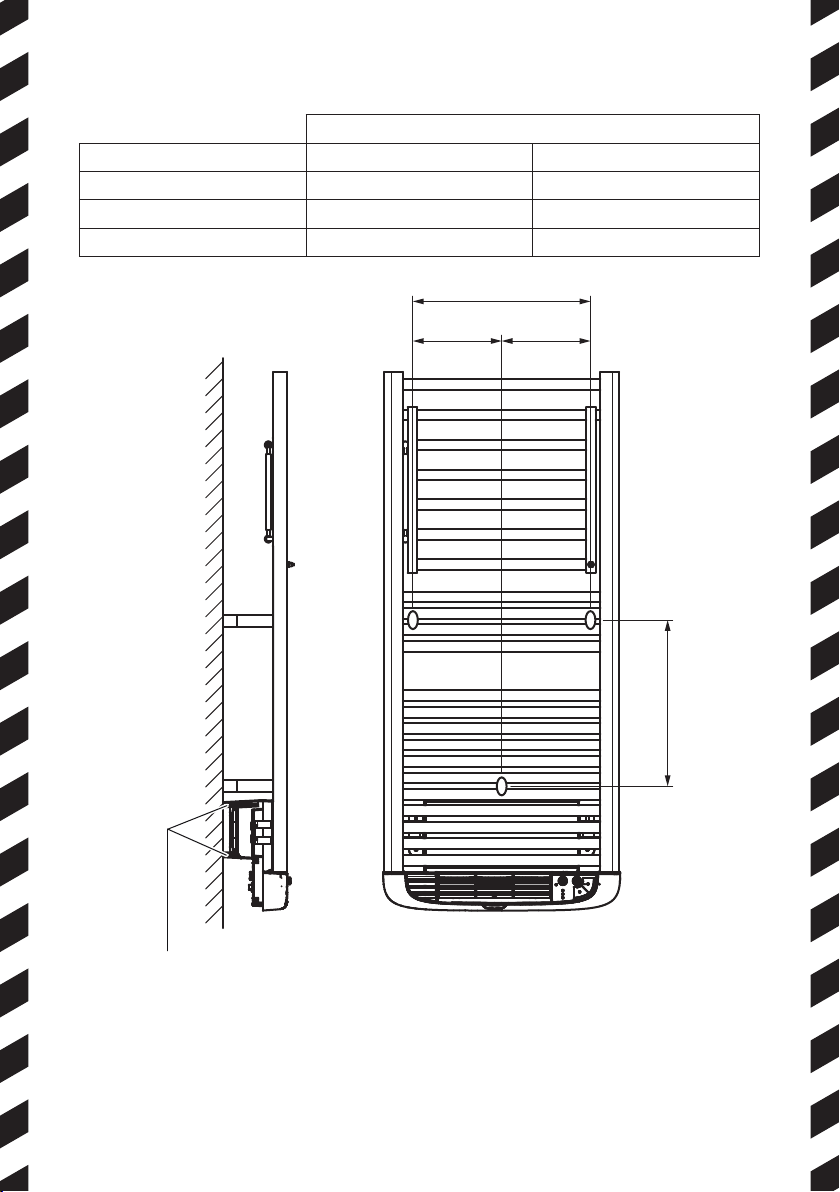
INSTALLATION
WHITE
Power 500 W 750 W
Power with hot air blower 1500 W 1750 W
L 380 mm 380 mm
H 385 mm 625 mm
L
= =
H
How to install: ensure that the device plastic spacers rest against
the rear wall.

CORRECT USE
Use the product as shown in figure 1. Never cover the entire unit
with towels or clothing (figure 2). The manifolds (vertical pipes)
cannot be covered. Incorrect use can cause dangerous overheat-
ing, and compromise how the equipment works.
To clean the equipment, do not use chemical products, but only a
non abrasive damp cloth.
[ 9 ]
NOTE - Keep panel wide open
to fully exploit heated towel rail.
Do not cover rear or front grid with any sheet or similar
1 2
Do not cover the heating device.

[ 10 ]
OPERATION
Synoptic
15
30
60
ON/OFF switch and
temperature setting
Programme selector switch
Programme indicator and
towel warmer heating LED
Endurance indicator LED
BOOST button (BOOST
+ MORNING, EVENING
programming)
BOOST LED
Keyboard lock
DRYER LED
DRYER button ( DRYER +
keyboard lock)
(over temperature cancelled
and reset)
COMFORT
MORNING
EVENING
MORNING + EVENING
ECO
AUTO
ANTIFREEZE
General guide lines
ON/OFF LED (A):
• it remains switched off when turned in OFF
mode.
• Steady or flashing green until the resistance of
the heated towel rail is enabled.
• steady red when the resistance of the heated
towel rail is enabled.
BOOST LED (B) steady red until the device is en-
abled in BOOST mode.
DRYER LED (C) steady red until the device is en-
abled in DRYER mode.
The fan will be enabled at reduced speed for one minute at the end of the BOOST and DRYER
modes to allow device to cool down properly.
NOTE - When turned on, device fan and internal resistance are enabled at the same time.Wait a few
seconds to feel the hot air from the front grid.
15
30
60
A
B
C

[ 11 ]
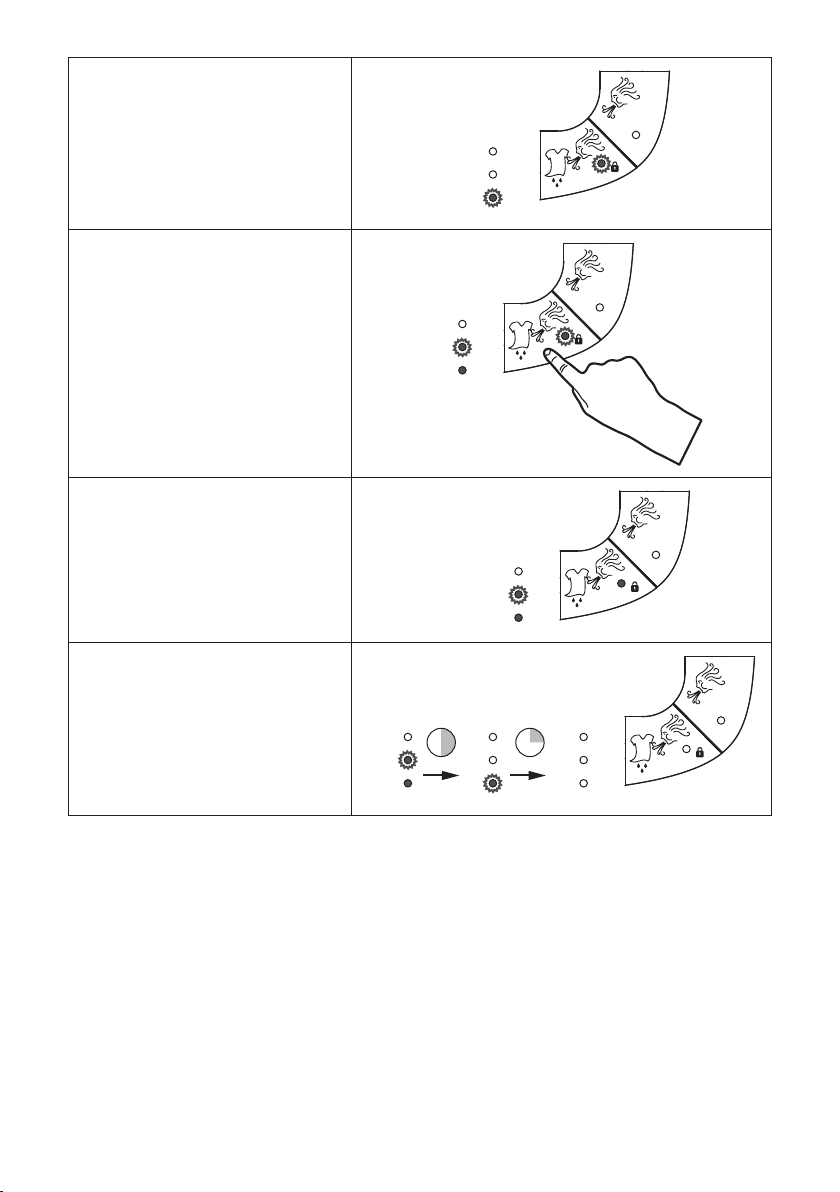
ON/OFF mode and temperature setting
OFF mode: rotate the selector switch counter-clockwise until the limit stop.
All LEDS are off, the heated towel rail and the device are off. All functions
are disabled.
WARNING -The room temperature may drop below 0°C in this mode.
A mechanical lock allows you to identify the OFF position.
ON mode and ambient temperature regulation: rotate the selector clockwise. The green LED
that indicates that the unit is on may be steady or flash, depending on the settings chosen using
the program selector. By rotating the knob the ambient temperature setting can be adjusted from
a minimum of 5°C (knob turned completely anti-clockwise) to a maximum of 30°C (knob turned
completely clockwise).The LED turns red when the resistance inside the radiator is switched on.
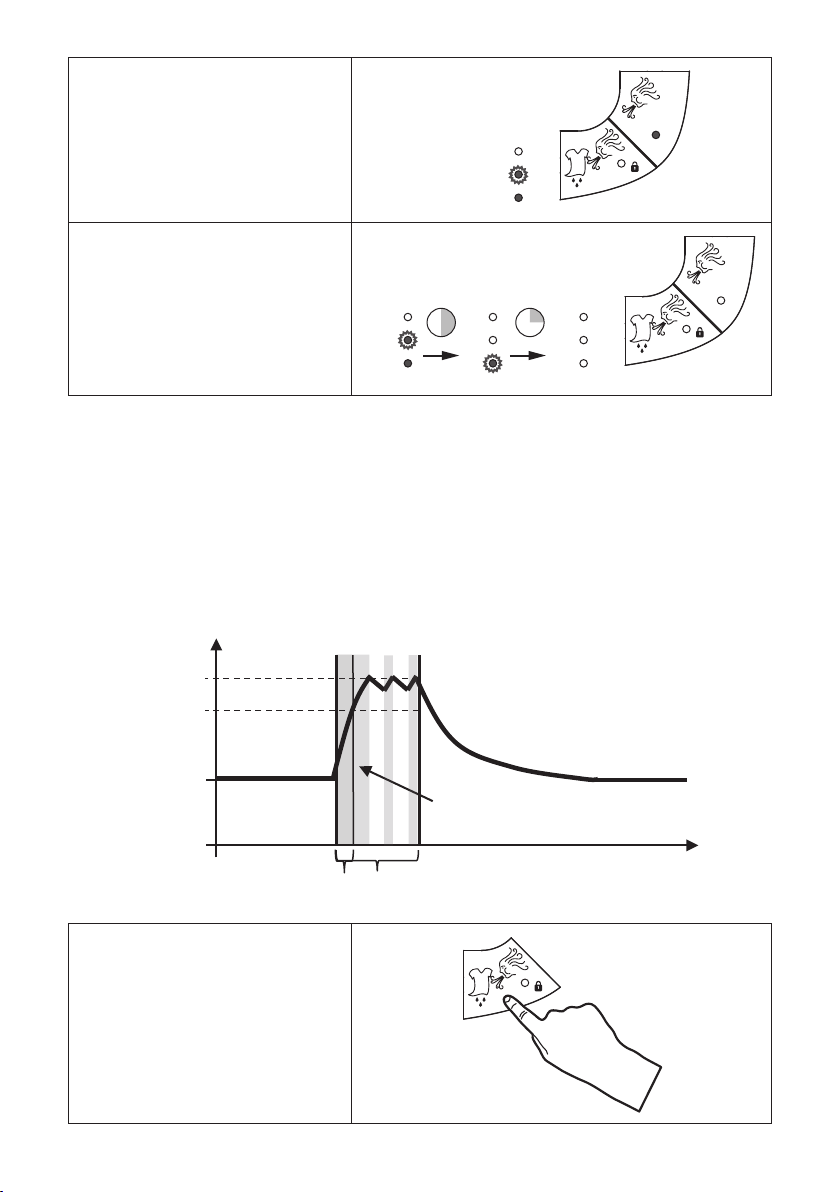
COMFORT mode “ ”
It adjusts the room temperature according to the comfort mode set on the
selector switch using only the resistance of the heated towel rail.
A comfortable temperature can be chosen of between 5°C and 30°C, by
turning the adjustment knob.
This feature is identified by the steady green LED.
If room temperature is heated, the LED turns to steady red.
ECO mode “ ”
The set temperature is automatically reduced by 3.5°C compared to the
COMFORT MODE temperature.Turn on the heated towel rail to manage
the room temperature.
The ECO temperature is limited to 19°C.
This feature is identified by the flashing green LED at 50%.
If room temperature is heated, the LED turns to steady red
ANTIFREEZE mode “ ”
Prevents the room temperature from dropping below 7°C. The resistance
of the heated towel rail is enabled for this feature.
This feature is identified by the flashing green LED at 10%.
If room temperature is heated, the LED turns to steady red.

[ 12 ]
AUTO mode (this function is only enabled on models without
a plug, and with a “pilot wire” connecting wire)
Press the comfort mode temperature set on the selector switch, to adjust
room temperature through the signals received from the pilot wire by only
using the resistance of the heated towel rail.
No connection with the pilot cable => comfort mode.
Based on the type of signal set by the pilot cable:
• OFF - The LEDS are off
• ANTIFREEZE - ON LED flashing green at 10%
• ECO - ON LED flashing green at 50%
• -2K - ON LED double flashing green at 80%
• -1K - ON LED single flashing green at 90%
• COMFORT - steady green LED
• During heating steady red LED
If the model supplied has a plug for connecting to the electricity supply, the AUTO mode (opera-
tion using the pilot wire) is not enabled. In this case, when the selector is turned to AUTO mode,
the radiator will work in COMFORT mode.
MORNING mode “ ”
In this mode the appliance will maintain the comfort mode temperature
indicated on the temperature selector switch for a specific time (15, 30 or
60 minutes).Then it will turn to ECO mode.As long as the program selector
is in MORNING mode, the program will be repeated every day of the week
at the time programmed by the user (if the programming is set at 7:00, the
program will be repeated every day at 7:00).
To reach a comfortable temperature as quickly as possible, both the heated towel rail and the
blower device are used to heat the room. The device will work with reduced ventilation until
the temperature set -1°C is reached, after which the device will stop working and maintain the
ambient temperature using only the heated towel rail.
NOTE - The hot air device will work if the temperature in the room is 2°C lower than the temperature
set.
T° COMFORT
T° COMFORT - 1°K
T° ECO
MORNING COMFORT
Temperature management
with the heated towel rail.
Rapid increase in temperature
using both the device and the
heated towel rail.

[ 13 ]
MORNING mode programme: the ON/OFF selector turned to the required ambient tempera-
ture (position other than OFF).
Press the BOOST button for 5
seconds.
5 sec
The BOOST, DRYER and 15 min
LEDS will start flashing.
Do the next operation within 5
seconds.
15
30
60
By pushing the BOOST button, it
is possible to select the duration
of the required program. It will
then be possible to choose the
duration of the programme by
briefly pressing the same button
The duration leds will flash. 15
30
60
The morning programme will be
validated 5s after pressing the
boost button.
The red LED on the BOOST
button will stop flashing. 5 sec
15
30
60
Once 5 seconds have passed since
the boost button was last pushed,
the MORNING program will be
validated.
The duration leds will switch off
at the end of each time segment
set and will indicate how long the
COMFORT temperature setting
will last.
The BOOST LED will be red until
the device warms the room.
The ON/OFF LED will be red until
the heated towel rail warms the
room.
15
30
60
15
30
60
15
30
60 30
min
15
min

[ 14 ]
If the user wishes to change the duration or the programme’s start time, the procedure will be
started all over.
If the user modifies the programmes selector mode, the programme will not be recorded if it is
moved from the MORNING mode before the programme is confirmed.
The MORNING mode is saved; after a power outage the system will resume from the point
where it was interrupted after the recovery.
Example:A MORNING programme is enabled daily from 6am to 7am. If there is a power failure
for 30min, the MORNING programme will start the following day from 6.30am - 7.30am.
If there is no programming mode, the MORNING mode is identical to the ECO mode.
EVENING mode “ ”
The EVENING mode works in the same way as the MORNING mode.
As long as the program selector is in EVENING mode, the program will
be repeated every day of the week at the time programmed by the user (if
the programming is set at 17:00, the program will be repeated every day at
17:00).
The EVENING mode is saved; after a power outage the system will resume from the point where
it was interrupted after the recovery.
Example: An EVENING programme is enabled daily from 6.00pm to 7.00pm. If there is a power
failure for 30min, the EVENING programme will start the following day from 18.30pm - 19.30pm.
If there is no programming mode, the EVENING mode is identical to the ECO mode.
MORNING + EVENING mode “ ”
The MORNING + EVENING mode makes it possible to use the MORN-
ING and EVENING programs set by the user, every day, combined, at the
times set for the MORNING and EVENING modes.
To change the programme it will be necessary to position the programme
selector on the MORNING or EVENING mode and retrace the relevant
programming procedure.
The MORNING + EVENING mode is saved.After a power outage the system will resume from
the point where it was interrupted after the recovery.
Example:A MORNING + EVENING programme is enabled daily from 6pm to 7pm. If there is a
power failure for 30min, the MORNING + EVENING programme will start the following day from
6.30pm to 7.30pm (the system is unable to recognise and correct the duration of any black out).
Without any programme, the MORNING + EVENING mode matches the ECO mode.

[ 15 ]
BOOST mode
The device will operate at reduced fan speed in BOOST mode.
The heated towel rail resistance will be enabled.
The room temperature is limited to 35°C.
The device will continue running at a reduced speed up to 34°C; beyond this temperature adjust
by using the heated towel rail resistance.
The device will start only if the room temperature is below 33°C.
The BOOST mode is the highest priority and can be enabled from any mode (except when the
device is switched off).
35°C
34°C
BOOST
Maintain temperature with
heated towel rail only.
Rapid increase in temperature using
the device and the heated towel rail.
Programming the BOOST mode:
Press the BOOST button briefly.
The LED on the BOOST button
and the led indicating 15min will
flash.
15
30
60
Adjust duration within 5s by briefly
pressing the BOOST button.
The duration selected will be
displayed through the green flashing
led.
15
30
60
[ 16 ]
5s after the last brief pressure, the
BOOST programme is enabled.
The BOOST LED stops flashing.
5 sec
15
30
60
The duration LEDS start the
countdown to indicate the time left.
The BOOST LED is steady red as
long as the device warms up.
The ON/OFF LED is steady red
as long as the heated towel rail
resistance is enabled. 15
30
60
15
30
60
15
30
60 30
min
15
min
Press the BOOST button to end the BOOST programme before the period specified. If there
is a sudden lack of voltage below 5s, the BOOST will continue to operate autonomously. If the
interruption is above 5s the BOOST programme will be stopped.
DRYER mode
In the DRYER mode the fan runs at full speed and the resistance of the device is enabled. The
heated towel rail resistance will be enabled according to the temperature selector. The heated
towel rail resistance will be enabled as long as the room temperature is lower than that set on
the selector.The maximum room temperature is 39°.The DRYER mode is the highest priority and
can be enabled from any mode (except when the device is switched off).
39°C
SETTING
DRYERHEATED TOWEL RAIL
Increase temperature by using the maximum
fan speed device until the maximum temperature
of 39°C is reached and use the heated towel rail
until the set-point temperature is reached.
Programming the DRYER mode:
Press the DRYER button briefly.
[ 17 ]
The DRYER and the 15 min leds
will start flashing.
15
30
60
Press the DRYER button briefly to
change duration within 5s.
The duration selected will be
displayed with a green flashing LED.
15
30
60
5s after the last time the button is
pressed the DRYER programme is
enabled.
5 sec
15
30
60
The duration LEDS start the
countdown to indicate the time left.
The DRYER LED is steady red as
long as the device warms up.
The ON/OFF LED is steady red
as long as the heated towel rail
resistance is enabled. 15
30
60
15
30
60
15
30
60 30
min
15
min
Press the DRYER button to end the DRYER programme before the period specified. If there is a
sudden lack of voltage below 5s, the DRYER will continue to operate autonomously. If the inter-
ruption is above 5s the DRYER programme will stop.

[ 18 ]
Clarifications on the BOOST and DRYER modes
The BOOST and DRYER modes are essential
No need to cancel one or the other mode to switch between them.
The device is in the BOOST mode:
• Press BOOST button => the BOOST mode stops.
• Press DRYER button => the BOOST mode stops and you can set the DRYER mode duration.
• Press the selector switch to change mode => the BOOST mode stops.
• Turn switch OFF => the BOOST mode stops.
The device is in DRYER mode:
• Press DRYER button => the DRYER mode stops.
• Press BOOST button => the DRYER mode stops and you can set the BOOST duration.
• Press the selector switch to change mode => the DRYER mode stops.
• Turn the switch OFF => the DRYER mode stops.
The selector is in MORNING, EVENING, MORNING + EVENING, COMFORT, ECO,
AUTO or ANTI-FREEZE mode:
• Press BOOST button => you can set the BOOST duration.
• Press DRYER button => you can set the DRYER duration.
• When the BOOST or DRYER mode is completed, the device will return to the previous mode.
Keyboard lock “ ”
To enable or disable the keyboard
lock, press the DRYER button for
5s.
The device will be enabled as it
was before the keyboard lock was
pressed as long as the keyboard
lock is activated.
Changes in the selector switch
positioning or in the temperature
will not have any effect unless the
temperature selector is turned
OFF.
The DRYER LED will flash quickly
once per second.
5 sec

[ 19 ]
Clarifications on the keyboard lock mode
When activating the keyboard lock, the set mode and the temperature set point are recorded.
If the keyboard lock is enabled:
• The device will return to the modes and temperature set-point before using the keyboard lock
feature if there is a power outage after the next recovery.
• Any change with the selector switch or the set-point temperature, and BOOST or DRYER
buttons has no effect.
• The BOOST, DRYER, MORNING, EVENING and MORNING+EVENING modes will continue
to function normally.
• The OFF mode is a priority, so if the switch is turned to OFF the device will be turned off.
• If returned to ON mode, when the keypad is blocked the device goes back to working in the
mode set before the keypad was blocked.
Keyboard lock indicator:
The DRYER LED flashes quickly once to indicate the keyboard lock is enabled.
• DRYER not enabled => OFF LED, switched off, with flashing once a second.
• DRYER enabled => ON LED, switched on, with switching off once a second.
RESET Function
Press BOOST and DRYER buttons
simultaneously for 30s to reset
device.
This function is similar to a long
power failure. Having reset the
product, the MORNING and
EVENING programs will be
cancelled. 30 sec
[ 20 ]
Temperature error
Flashing LED red / green alternately
=> temperature error
The problem may be due to incorrect reading of the
inside temperature sensor.
The user cannot intervene to solve the
problem.
Flashing LED red / green alternately
+ BOOST/DRYER led alternately
=> temperature error
Internal overheating.
Thermo mechanical security on device internal
resistance enabled.
If the dust filter is clogged see p.21 for filter
cleaning.
Green Red
The user can intervene to solve the problem.
Having cleaned the filter or eliminated what-
ever is obstructing the intake of air, the user
must hold the BOOST and DRYER keys
down simultaneously for 5 sec.
If the temperature goes too high, the device
resistance is turned off and the fan runs at
reduced speed for the next minute. 5 sec
Table of contents
Popular Bathroom Fixture manuals by other brands

Kohler
Kohler Mira Sport Max J03G Installation and user guide

Moen
Moen 186117 Series installation guide

Hans Grohe
Hans Grohe Raindance Showerpipe 27235000 Instructions for use/assembly instructions

Signature Hardware
Signature Hardware ROUND SWIVEL BODY SPRAY 948942 Install

fine fixtures
fine fixtures AC3TH installation manual

LIXIL
LIXIL HP50 Series quick start guide


