Deluge Synthstrom Audible User manual

Synthstrom Audible Deluge
Instruction manual
We created a set of walkthrough videos to accompany this manual. You can view them here.
This manual is a work in progress and will be updated as we add new features.
This document is best navigated using “Document Outline”.
If you cannot currently view the chapters to the left hand side, switch this mode on via Tools >
Document Outline

d. Learn
9. Headphone Jack.
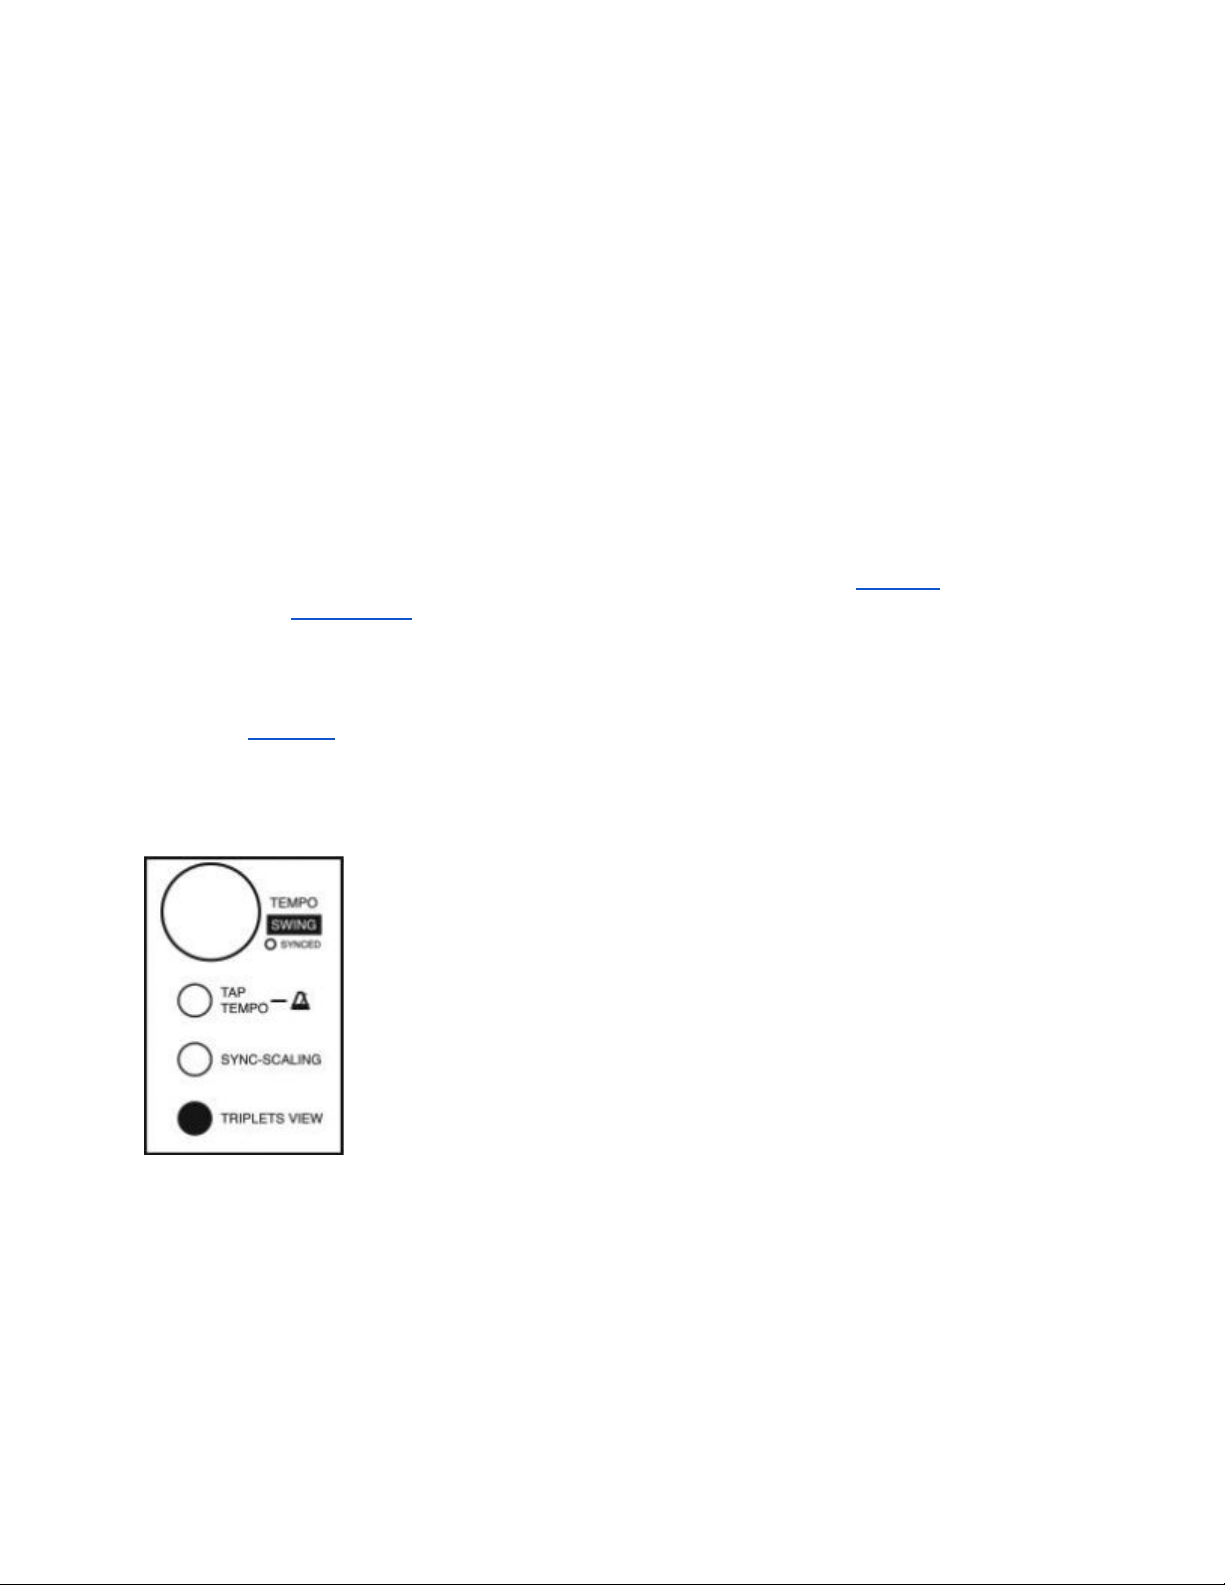
10. Tempo and Timing Group
a. Tempo
b. Swing
c. Tap Tempo
d. Metronome
e. Sync-Scaling
f. Triplets View
11. Sampling Group
a. Line In
b. Gain
c. Internal Mic
12. Mode Group
a. Play
b. Record
c. Shift
13. Audition/Section
14. Mute/Launch
15. SD Card Slot
16. Grid
17. Zooming and Scrolling

Track view
Sequence editing basics
Synth and kit presets
Kit tracks
Sound parameters
Scrolling and zooming
Editing track length
Shifting track contents horizontally
Scales
Notes of different length
Editing note velocity
Triplets view
Recording notes
Parameter automation and recording
Undo / redo
Clear track
Cross-screen edit mode
MIDI and CV tracks
MIDI CC control and sequencing
Song view
Stopping and launching tracks via arming
Deleting, cloning and re-ordering tracks
Parameter knobs in Song View
Song sections
Keyboard view
Saving and loading songs
Switching song during playback
The file browser and loading samples
Adding samples to an existing kit
Loading a sample for use as a melodic “synth” instrument
Slicer
Recording samples
Recording additional samples to an existing kit
Resampling / recording the Deluge’s output
The sound editor
Sound editor shortcuts
Sound editor nested menu
Decimal values
Patching
Patching to control the depth of another patch “cable”
Assigning knobs to parameters
Saving sound presets
Sound editor for MIDI and CV tracks
Time stretching and pitch shifting
Live audio input
Sidechain compression
Reverb
Sample and RAM management
Processing power and CPU management
CV, gate, and trigger clock
Disclaimer
CV / gate compatibility and settings
Trigger clock
Outputting CV / gate
Tempo and syncing
Setting tempo
Swing
Syncing
Tempo magnitude matching
Sync-scaling
Controlling functions via MIDI
Settings menu
Global MIDI commands
Hardware connections
USB
DC power socket (9 - 12V)
Battery
SD card slot
L / MONO and R outputs
Headphone output


Track view
Sequence editing basics
Powering on the Deluge automatically creates a blank
song with one blank track with a synth assigned to it, and
puts the device into track view
for this track.
In this view, the main 16x8 grid of pads
represents a piano-roll-style view of the
sequence of notes that the track contains. The
left-most column of pads represents the first
beat in the sequence, while the columns further
to the right represent increasingly later points in
time.
Vertically, pitch is represented (except for kit tracks) - the
bottom row of pads represents the lowest note on display,
and higher rows represent increasingly higher notes.
Pressing the Deluge’s “play” button plays the entered sequence.
With each row representing a different pitch, the user may wish to audition any of the
available pitches in advance of actually placing those notes in the sequence. This can
be achieved by pressing the very right-most pad (the “audition” pad) for a given row.
Notes in the sequence itself
may be created by pressing a
pad in the main 16x8 group
corresponding to a pitch and a
moment in time. The pad will
light up to indicate the
presence of a note. If the
Deluge is not
in play-mode,
the note will sound
immediately, as an aid to the
user. This will not happen if
the Deluge is
in play-mode,
when the user might be in the
middle of a performance and
would likely prefer for their editing to be allowed without
additional audible aids. Tapping a pad for which a note is
already present will delete the note.
The colour of the notes on display is arbitrary,
and may be changed by the user. This is
handy when the user has created multiple
tracks and wishes for them to appear as
different colours in song view. Simply hold
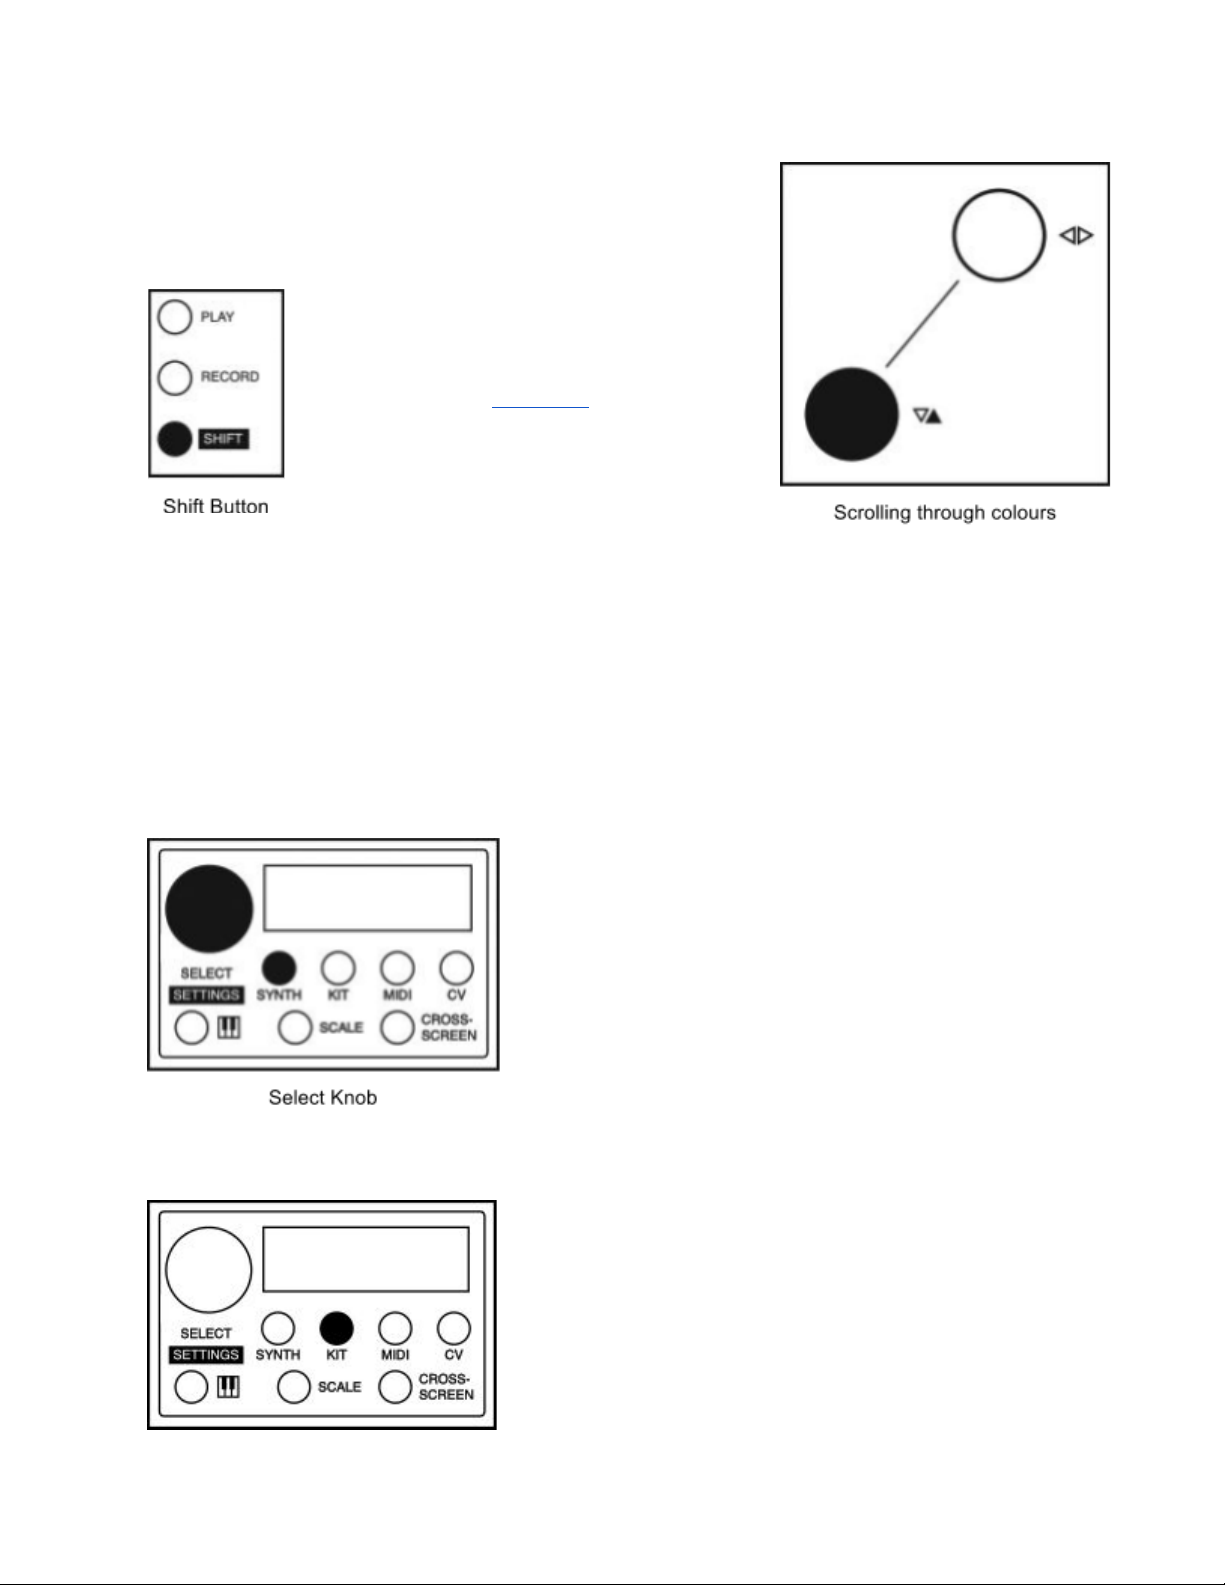
down the shift button and turn the ▼▲ knob to
change the colour of a track.
To adjust the brightness of the Deluge’s LEDs, hold down the
shift button and
the learn button and turn the ▼▲ knob.
Synth and kit presets
The Deluge comes with a variety of synth and kit sound presets for you to use. The user may
also create, edit and save their own. Presets are stored on the SD card - if you remove this or
delete certain files from it, you will no longer have access to these presets.
In track view
, simply turning the select knob cycles
through synth or kit presets for the track currently being
edited. The current preset number is shown on the
numeric display.
Later, we’ll cover how to edit presets’ sounds. For now, it
may be useful to at least know that you may create a
new, blank synth or kit preset by pressing shift+synth or
shift+kit respectively.
Kit tracks
Instead of having a synth assigned, a track may have a
“kit”. For kit tracks, each row of pads represents an
entirely different sound, as opposed to a different pitch for
the same sound as with synth tracks. One of the obvious
applications of this function is the creation of drum beats -
one row of pads could represent the kick drum, another
the snare, etc.

To turn a track into a kit track, simply press the kit button. One of the supplied kit presets will
take effect, and each row of pads will now correspond to a different sound. You may edit and
audition notes exactly as with a synth track.
The Deluge comes with a
number of kits consisting of
drum sounds. It also comes
with kits consisting of a variety
of other samples. While drum
sounds are typically short and
sharp, many of these other
samples are longer, and the
user may wish to control how
long a sample plays for. When
adding a “note” of one of
these longer samples, by
pressing one of the 16 main
pads on its row, a “longer”
note will automatically be created, occupying multiple pads horizontally on the grid. See Notes
of different length to learn how to understand and edit the length of these longer notes.
Some of the samples in the
provided kits even include
pre-recorded beats or loops.
These are set up to
time-stretch so that they
always play at whatever tempo
you have the Deluge set to.
When you create an instance
of one of these samples, again
it will appear as one long
“note” occupying many pads
horizontally - however many it
needs based on its length. If it
is longer than the current track, the track’s length may automatically be extended too, to make
room for it.
An entire sound (common example: the kick drum) may be muted out by pressing the
corresponding pad-row’s mute pad (second from the right; green). It will turn yellow to indicate
that the row is muted. The mute-row function is also available for synth tracks, though perhaps
less applicable.
In kit tracks, each sound / row has a different colour. The colour of an individual row may be
altered by holding the shift button, holding the audition pad (far-right) for the row, and turning the
▼▲ knob.
For kit tracks, the sounds / rows may be re-ordered. To do this, hold down the audition pad
(far-right) for the row, and hold down the ▼▲ encoder while turning it. Scrolling will occur, but
the selected row will move along with the scrolling (i.e. it will appear to stay still while the other
rows scroll past it).
New sounds (samples from the SD card in the most basic case) may be added to an existing kit,
too. See the corresponding section.
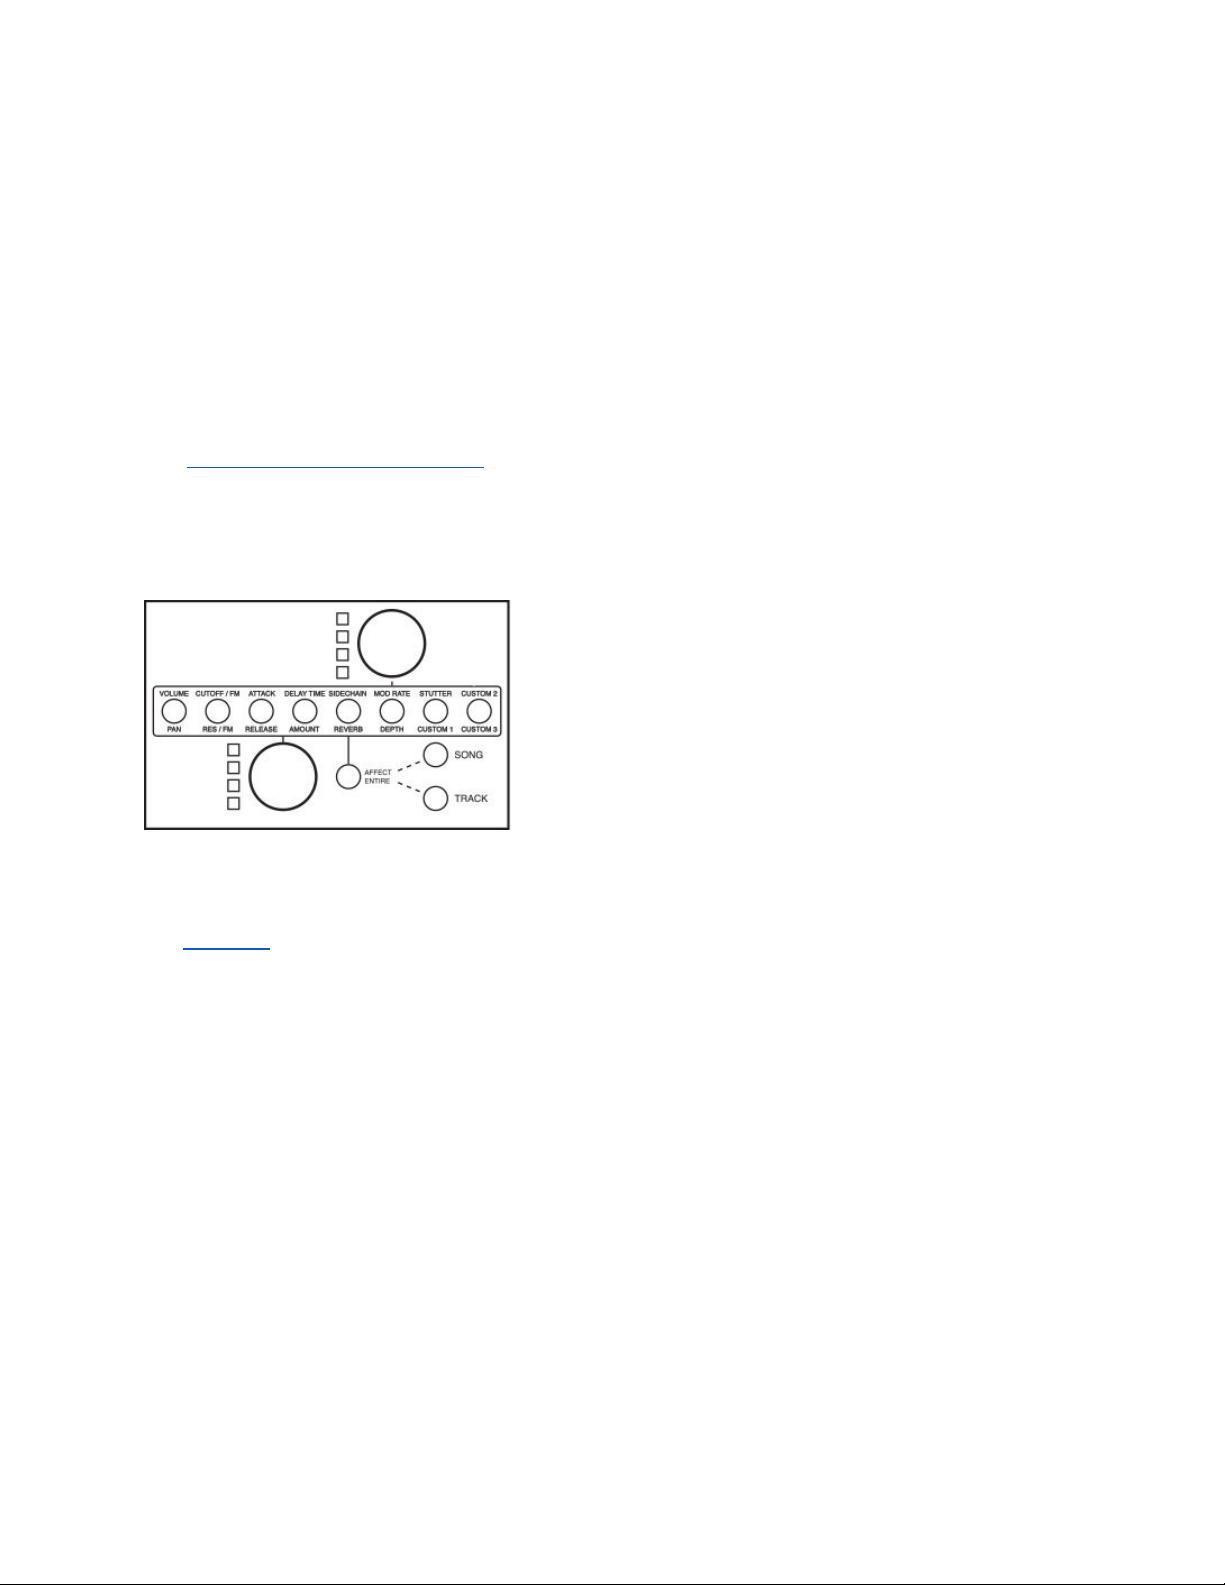
Sound parameters
The parameter knobs
(the two gold knobs) control
parameters of the synthesizer or sampler engine. Each
has a level-meter to its left, indicating the current value
of the parameter it controls. Which parameters the
knobs control (their function
) can be quickly switched
by the row of 8 buttons indicating options such as
volume/pan, attack/release, etc.
For synth tracks, the parameter knobs
affect the sound
of the synth.
For kit tracks, by default the parameter knobs
affect just the sound of the currently selected
sound. To select a sound, tap the audition pad (far-right) for that row. If you don’t wish for the
sound to in fact be sounded audibly while you do this, hold down the shift button first. The
currently selected sound is indicated with its audition pad dimly illuminated.

If you wish to instead affect the sound of the entire kit track, press the “affect entire” button so
that it is illuminated. The parameter knobs
will now affect the output of all sounds within the kit.
Three of the parameter functions are labeled “custom” (1, 2 and 3). The function of these
depends on the sound preset. Custom 1 typically controls pitch for sample-based sounds, or
portamento for synth sounds. Custom 2 and 3 control sample rate reduction and bitcrushing
respectively for kits or songs in “affect entire” mode, and for most sample-based sounds.
More parameters are available for editing than just the 16 that you
have access to with the parameter knobs. See the chapter on the
sound editor for instructions on editing further parameters or
remapping the parameter knobs
or external MIDI knobs to control
different parameters.

Several parameter knob
functions have an additional function which can be enacted by pressing
down on the knob. Most of these toggle related parameters, notifying the user of the new value
via the Deluge’s text display.
Parameter knob function /
label
Press-down function
Cutoff
Toggles the function of the “cutoff” and “res” function to affect
the LPF (default), HPF, or to become treble and bass controls
(“EQ”)
Res (resonance)
Toggles the dB/octave slope of the filter between 24dB and
12dB (LPF only)
Delay time
Toggles ping-pong delay (a stereo effect) on and off
Delay amount
Toggles analog simulation on and off for delay. Note that
analog simulation consumes a relatively high amount of CPU
power, lowering the number of voices that may sound at once
Sidechain
Toggles sidechain speed between fast (synced to
32nd-notes) and slow (synced to 8th-notes)
Reverb
Toggles reverb presets - “small”, “medium”, and “large”.
These apply to all reverb in the whole song - not just to the
current sound
Mod rate
(Only for “affect-entire” mode for songs and kit tracks.) Where
mod rate and depth are controlling a modulation effect
(chorus, flanger or phaser), the effect switches to the next in
that list
Mod depth
(Only for “affect-entire” mode for songs and kit tracks.) Where
mod rate and depth are controlling a modulation effect
(chorus, flanger or phaser), the “mod depth” function toggles
between controlling depth, feedback, and offset, depending
on the active effect
Stutter
Pressing down on the knob enacts the stutter effect.
Releasing it stops the effect. Turning the knob controls the
length and speed of stuttering. You can also turn it while held
down to speed the short stuttering loop up and down
The parameter knobs
may also control parameters on external equipment via MIDI CC
messages if your track is a MIDI track.

Scrolling and zooming
Being limited to a 16x8 working area would be quite constrictive. The
Deluge allows the user to scroll vertically to allow for more than eight
different notes’ sounds, and scroll and zoom horizontally to allow for
longer sequences and / or finer time divisions.
Turning the ▼▲ knob scrolls vertically. For synth, MIDI and CV
tracks, scrolling up will give you access to new “rows” of higher
pitches, and scrolling down will give you lower pitches. For kit tracks,
scrolling vertically will expose additional sounds. Any notes already created which fall offscreen
as a result of scrolling will still exist, will still sound when in play-mode, and will reappear when
their row is scrolled back to.
In the horizontal dimension, let’s first look at zooming. By default, each column of pads
represents a 16th-note. Pressing down on the ◄► knob will cause the Deluge to indicate this
“zoom-level” on its numeric display: “16th”. Suppose you wish to instead edit “finer” detail in our
sequence - 32nd-notes. By holding down the ◄► knob and turning it clockwise at the same
time, you zoom in: the notes which had previously occupied the lefthand half of the 16x8 pad
grid now expand to take up the whole grid. And the notes which had occupied the righthand half
of the grid are now “offscreen” to the right.
If you wish to see those notes, offscreen to the right, you may scroll horizontally to them.
Horizontal scrolling is achieved by turning the ◄► knob, but without
pressing down on it as with
zooming. Whenever you scroll horizontally, your scroll position is shown momentarily on the
Deluge’s numeric display. Two numbers will blink, with a “.” between them. The first number is
the number of the screen you are currently on, at your current zoom level, starting from screen 1
at the track’s beginning. The second number is the total number of screens that exist at your
current zoom level.
You may zoom in multiple times in order to access finer and finer detail, all the way to
64th-notes. And you may zoom back out by turning the ◄► knob anti-clockwise - remembering
to first press down on the knob.
After zooming back out, you will not be able to see all of the fine “detail” that you created while
zoomed in. Pads which “contain” detail which is too fine to see will appear an almost-white
colour. Simply zoom back in to expose the detail. Tapping such a pad will delete everything it
“contains”.

Editing track length
The length of a track may also be altered. If made longer than the default 1 bar, then the track
will extend beyond the length of the “display” even at 16th-notes zoom level, meaning that you
will now be able to scroll horizontally at this zoom level too, or even zoom out
another zoom
level (8th-notes would be next), to see the entirety of the track.
Editing track length is achieved by holding the shift button and turning the ◄► knob. This
process is easiest to visualise when shortening a track, for which you would turn the ◄► knob
anticlockwise. One by one, you will see the right-most columns of pads will turn grey as you turn
the knob, indicating that they are now beyond the track’s end, which is now further left than
before. Tracks may be any length, including unusual ones - e.g. 7 beats long.
If you extend a track’s length beyond the right-hand side of the current grid, you will be scrolled
right automatically to see the new “space” you have created. Or if you reduce a track’s length to
half or less of the grid, the Deluge will automatically zoom in to display the remaining area in
more detail.
Sometimes, you may wish to “multiply” an existing track - that is, to make a copy of the track’s
existing sequence of notes, and place that copy after the original. To do this, hold down the shift
button and press down on the ◄► knob. The Deluge will then automatically zoom out to reveal
the entirety of the multiplied track.
Shifting track contents horizontally
If you wish to shift all notes and automation in a track sideways (in the “time” dimension), hold
down the ▼▲ knob and turn the ◄► knob. Your track’s contents will be moved sideways in
steps of one square at your current zoom level. If the contents move past either end of the track,
they will wrap around and appear at the other end.
Scales
By default, all new synth, MIDI and CV tracks are put into scale
mode - locked to a major scale. There are many other options,
however.
The first alternative worth mentioning is to exit scale
mode entirely,
by pressing the “scale” button so that it is no longer illuminated.
Neighbouring rows of pads will now be only a semitone apart, giving
you access to a chromatic scale. Any notes that you previously created, while in scale
mode,
will still exist, but you will likely see some of them move to a different pad-row as you exit scale
mode to make room for a newly-accessible semitone’s row. Remember that you can scroll up

and down - this may be even more necessary now that the “working area” has expanded
vertically. You can press the “scale” button again at any time to re-enter scale
mode.
To change to a different scale, press shift+scale. The Deluge will cycle through the 7
Western-music “modes”, displaying the name of each on the text display: major, minor (aeolian),
dorian, phrygian, lydian, mixolydian, and locrian. If the Deluge instead displays the error
message “CAN’T”, this is because the current scale has more than 7 notes. See below for how
to create a custom scale - perhaps you did so accidentally.
When re-entering scale
mode (pressing the “scale” button when it was not previously
illuminated), the Deluge will examine the notes that are present, and make an educated guess
as to their scale and the scale’s root note. For instance, if the Deluge detects the presence of a
minor third note relative to the root note, it will be likely to conclude that the scale is minor.
Scales on the Deluge will usually contain seven different notes (eight if you count the octave -
the same as most Western scales). However, sometimes there will be more notes - for instance,
if both a major 3rd and a minor 3rd are present when entering scale
mode, both will be added to
the scale.
The rote note (at every octave) is indicated, anytime that a track is in scale
mode, with its
audition pad permanently illuminated. If you wish to change the root note (e.g. if the Deluge
guessed incorrectly what root note you intended), simply hold down the “scale” button and press
the audition pad for the note that you intend. You may do this whether or not you were already
in scale
mode.
The other way that the scale may be altered and customized is by sharpening or flattening the
notes present in an existing scale. So long as you are already in scale
mode, you may do this
as follows: Hold down the audition pad for a given row / note. The note will sound, and the text
display will indicate the name of the note (a full-stop means “sharp”). While holding the audition
pad, additionally hold down the select knob and turn it to sharpen or flatten the note. Most times,
you can move a note just one semitone in either direction - any further and it would become the
same as the next note in the scale, which is not allowed. If you wish to perform this function
without the note sounding as you press the audition pad (e.g. because you’re in the middle of a
performance), this can be achieved by holding down the shift button before pressing the
audition pad.
For songs with multiple tracks, all tracks that are in scale
mode are always locked to the same
scale, for convenience. Any change that you make to the scale while editing one track will affect
all others that are also in scale
mode. Correspondingly, when the Deluge guesses the scale and
root note when re-entering scale
mode, the contents of all scale
tracks will be considered. So if
you’re wondering why the Deluge threw some extra notes into your scale that you didn’t expect,
it’s likely because you have a different track which contains those notes.

If you wish to transpose a track up or down, this can be achieved by holding down the ▼▲ knob
and turning it. Doing this alone will transpose a whole octave at a time. If you wish to transpose
just a semitone, then hold down the shift button additionally.
If you transpose by semitones while in scale
mode, then any other tracks that are also in scale
mode will also be transposed.
Notes of different length
At any zoom level, in most cases, a note created on a given pad lasts up until the “start” of the
next pad to the right. Or in other words, if you are zoomed such that you are looking at 16th
notes (press down on the ◄► knob to be reminded of your zoom level), then the pads are
spaced apart by 16th notes and
all notes created will be a 16th note long.
(It should be pointed out that for longer samples such as many of those provided in the Deluge’s
supplied kits, notes longer than one pad will automatically be created - see Kit tracks.)
To manually create a note which is longer, hold down on the note’s pad, and then press some
pad further to the right. The note will extend to occupy all pads in between. You will notice that
only the leftmost pad occupied by the note is brightly coloured - the other pads are dimmer. This
is to indicate that they are the extension of an existing note, rather than representing a new note
beginning on that pad.
A long note may be shortened by “deleting” the portion of if that falls beyond a certain pad which
it currently occupies, by simply pressing that pad.
Note that some sound presets do not allow notes’ length to be altered. Those consisting of
short, percussive sounds (e.g. drums), are intended to always sound the same, without
note-length as an option. In these cases, notes will always appear to occupy just one pad at all
zoom levels.
Since the track view
edits a sequence which will play repeatedly, it is foreseeable that you may
wish to create a note which begins toward the end of the sequence, and extends so that it
continues back into the beginning of the sequence - to continue sounding even after the
sequence has restarted. To do this, create the note at the point in time where you wish it to
begin, and then (even after scrolling or zooming if you wish) press down on the ◄► knob and
press the final pad that you wish the note to occupy (this will presumably be to the left of where
the note started).
If you wish to create a note which never stops or restarts once it has begun (e.g. for a constant
droning sound), simply create a note which occupies the entire length of the track. The Deluge
treats such notes as a special case, and will keep the note permanently sounding rather than
restarting it each time the track’s sequence loops.
Editing note velocity
The Deluge’s pads are not velocity-sensitive, but notes created as part of a sequence may have
their velocity manually edited. To do this, hold down the pad corresponding to a note and turn
the ◄► encoder. The velocity value will show on the Deluge’s numeric display. Velocity values
range between 1 and 127, with 64 as the default.
For those not familiar with the concept of note velocity, it is intended as an electronic
representation of the physical force with which a note is played (e.g. how hard a guitar string is
plucked). With electronic music equipment in general, the resulting effect is most commonly a
difference in volume. This is how most of the Deluge’s included synth and kit presets are set up
to respond to velocity. However, velocity can in fact be patched to almost any parameter in the
Deluge’s synthesis and sampling engine, making it simply a tool with which you can make
different notes sound different, in any way you care to configure. See the patching section in the
chapter on the sound editor.
You can hold multiple notes simultaneously to edit their velocity together.
Any notes recorded via MIDI will have their velocity recorded.
Triplets view
Triplets view
is activated by pressing the “triplets view” button, and
basically changes the pad grid’s function to divide time into threes rather
than fours, allowing you to create triplets.
Your zoom level when you enter triplets view
makes a difference. Let’s
say you were zoomed to be viewing 16th notes (press down on the ◄►
knob to be reminded of your zoom level). After entering triplets view
,
rather than each quarter of the 16x8 pad grid giving you 4 columns of
16th-notes, each quarter is instead divided into 3, with the fourth column
greyed out and not used in this view. These 3 divisions will total the same
amount of time that the 4 divisions previously did, despite looking slightly
different.
Or, if you had been zoomed to be viewing 8th notes, the same effect would have been applied
to them. Once in triplets view
, even if you change your zoom level, same time-division which
had previously been divided into 4 remains now divided into 3. If you wish to create triplets for a
different time-division (e.g. 8th-notes if you’d previously created triplets for 16th-notes), you may
exit and then re-enter triplets view
.
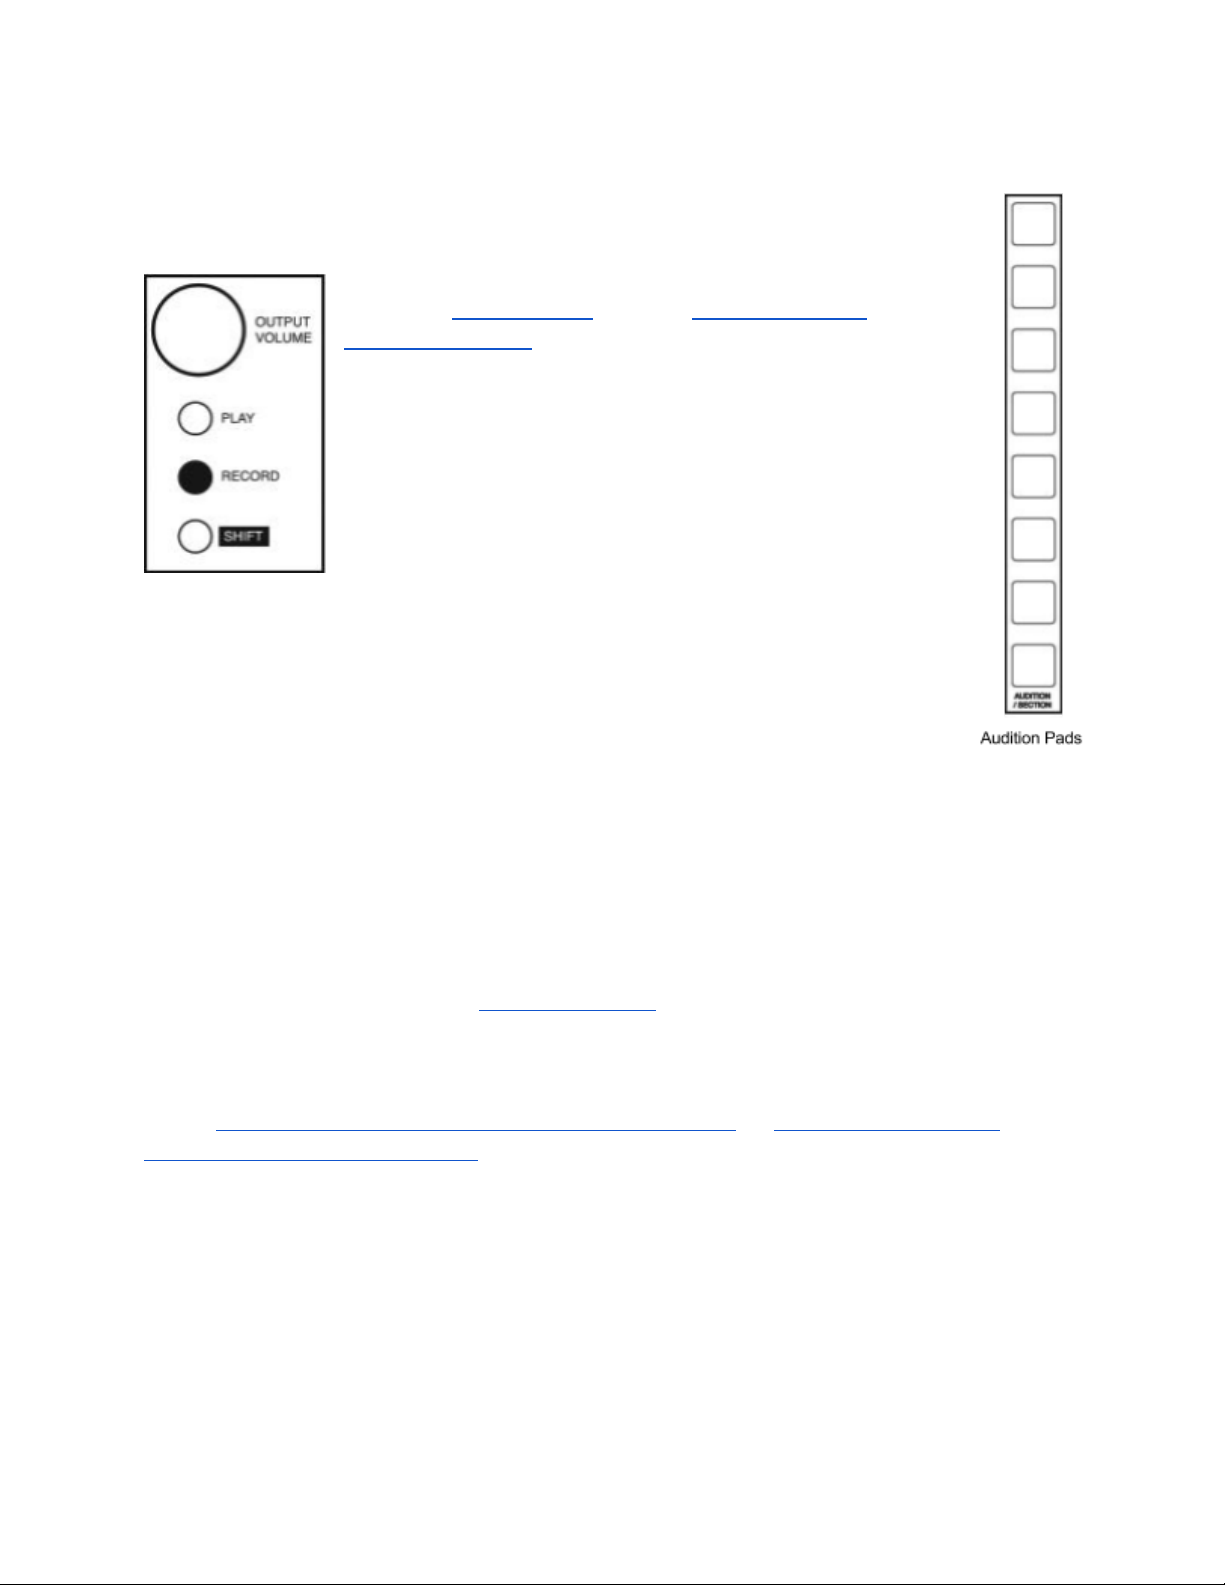
Recording notes
As well as manually entering notes into the pad grid, the
Deluge allows you to record notes played on the audition
pads
, or in keyboard view, or on an external keyboard
connected via MIDI.
Pressing the record button begins recording and playback
simultaneously. Now, every time you press a row’s audition
pad, a note will also be recorded into the current sequence -
meaning it will appear in the 16x8 pad grid, unless you are
scrolled so that you can’t see it.
Notes played in keyboard view or on a connected MIDI
keyboard will be recorded also.
Notes are quantised to your current zoom level. E.g. if you are zoomed to
16th-notes (press down on the ◄► knob to be reminded of your zoom level),
then you will only be able to create notes that begin and end at 16th-note
intervals.
If you are recording and your song doesn’t contain a beat or anything to help you keep time, you
may wish to enable the Deluge’s metronome, which can be done by holding the shift button and
pressing the tap tempo button.
Parameter automation and recording
Above, we looked at how to affect sound parameters using the gold parameter knobs
. These
are useful to play with live, to achieve effects like sweeping a filter's frequency up and down. But
you can also automate changes to any parameters (within tracks) that the parameter knobs
may
control, so that their values change automatically. (And the parameter knobs
can be set to
control almost any of the Deluge's internal sound parameters, or parameters on external
equipment via MIDI CC messages.)
The simplest way to automate a parameter is to "record" knob movement. While the Deluge is in
record
mode (press the "record" button), any movement of a parameter knob
is recorded for that
parameter. Recording begins when you begin to turn the knob, and ceases when the knob has
been left alone for a second or so (a smooth transition back to the original value is then
applied).

When the track is then played back (or when it loops back to its start - potentially very soon),
you will hear the automated parameter movement play back and see the level-meter for the
corresponding parameter knob
move automatically.
You can overwrite the automation by simply turning the parameter knob some more while still in
record mode.
Once out of record
mode (press the "record" button so that it is no longer illuminated), the
parameter will continue to be automated while play
mode is active. You may still take manual
control of the parameter at any time by turning the corresponding parameter knob
. Then, after
leaving the knob alone for a second or so, the parameter value will smoothly transition back to
follow its automated movement.
Automation can also be manually set "per step". Simply hold down a note's pad in track view
,
and turn a parameter knob
. The parameter value will be set just for the region of time beginning
at that note and ending at the start of the next note.
Automation can also be recorded and manually set using an external MIDI controller, if a
parameter is set up to be controlled in this way.
To delete all automation for a given parameter, hold down the "shift" button and press down on
the parameter knob
for that parameter. Or, if the parameter was instead controlled via a knob on
an external MIDI controller, automation may be deleted by putting the Deluge into record
mode,
holding down "shift", and turning the knob on the MIDI controller.
Undo / redo
In track view
and keyboard view, you can undo and redo most editing steps and recording of
notes and automation.
To undo, press the back button. You may step backward through as many steps as you like,
subject to the Deluge’s RAM capacity. You may also redo by pressing shift+back.
If you exit track view
or keyboard view
, or if you perform an action which can’t be undone (e.g.
changing preset), your undo history will be deleted.
Clear track
A track may have all its notes and automation cleared by holding down the ◄► knob and
pressing the back button.
Table of contents


