DELUXE LIVING M04-INSV1 User manual

M04-INSV1
Note: Before installation, please spread a soft mat on the ground to prevent damage to product and flooring.
01
LED MIRROR ASSEMBLY INSTRUCTIONS
INSTALLATION GUIDE

PRECAUTIONS1
IMPORTANT INFORMATION
When using an electrical product, basic precautions should always be followed, including the
following:
Read and follow all instructions before using this mirror.
To reduce the risks of burns, fire, electric shock or injury to persons:
Use this product only for its intended use as described in this manual.
Do not use attachments not recommended by the manufacturer.
Never drop or insert any object into any opening.
Do not use outdoors.
Warning risk of electric shock.
Connect this product to a properly grounded circuit only.
Grounding instructions:
This product must be connected to a grounded metal, permanent wiring system, or an equip-
ment-grounding conductor to the equipment-ground terminal or lead on the product. An electrical
option cabinet must be wired to a 20 amp GFI (Ground Fault Interrupter) protected circuit when
used in bathrooms and all other locations required by the National Electric Code.
Electric connections:
All wiring should be done by a qualified licensed electrician.
Warning: Shut off power before wiring the mirror.
Require 110V AC 12V DC GFI protected circuit.
INSTALLATION SAFETY
• Inspect the product immediately upon receipt and check for damage or missing parts.
• Handle the product with care and protect the product on all sides and edges of the glass.
• Ensure there are no hidden pipes or cables in the wall before drilling.
• Wear suitable eye protection when drilling. Take care if drilling on tile surfaces in case the drill
slips.
Before starting your installation, please make sure:
- The wall surface must be of suitable strength and construction.
- The main electrical supply has been powered off.
02

PRODUCT LIST2
03
Mirror
Installation manual
Z-bar
Wall mounting screws
Wall anchor
1pc
1pc
1pc
3pcs
3pcs
Tools you may need (Not included)
CHECK PRODUCT LIST AFTER
OPENING THE PACKAGE
Safety Glasses Tape Measure
Phillips Head
Screwdriver
Power Drill Hammer
Level

MIRROR INSTALLATION3
04
a) Locate the studs.
b) Install the mounting bracket by
measuring and marking holes on the
wall. Make sure they are level. See
diagram.
(Before drilling, ensure that there are
no hidden cables or pipes behind
the mounting points.)
c) Drill the holes (diameter of 0.32in)
and install the plastic anchors.
Screw the mounting bar into the
anchors with the screws provided.
1. Select the desired position for the mirror. Level and mark the
location.
2. Support location

MIRROR INSTALLATION3
05
The electrical wire comes through the access hole in the back of the mirror.
Electrical wiring: Be sure to provide enough wire to make the proper and safe
connection to the field/ power.
3. Connecting electrical wiring
Note:It always takes two or
more people when hanging
mirrors.
4. Hang the mirror on the
mounting bracket

06
MIRROR INSTALLATION3
Turn on/off lighting
The light button will turn blue when the mirror is connected to power. Tap light button
to switch the LED light on/off.
Defogger:
Press the Anti-fog button and the defogger sign will light up on the display and will
start the defogging process.
Energy Saving:
The mirror will be automatically powered off after 3 hours of being idle.
5. Operation
Light Switch Anti-fog

MAINTENANCE4
CARE AND MAINTENANCE
The mirror and mirror's body are constructed of mirror glass and aluminum alloy. Use a damp cloth
to clean your mirror. Do not use any abrasive material as it may damage the surface and finish of
the mirror. A mild detergent may be used to clean the surfaces of the mirror. When cleaning, spray
on the cloth, not on the mirror or the surrounding surfaces.
ONE-YEAR LIMITED WARRANTY
This product is warranted to the original purchaser. If there is a failure in this unit due to defects in
materials or workmanship, the manufacturer will repair or replace this item at our discretion without
charge. Warranty is void if product has been assembled incorrectly, misused, abused by overload-
ing, altered in any way or damaged due to accident. This warranty is not transferable and does not
cover chipping, flaking, scratches, rust, dents, or other damages to the surfaces of this product.
Responsibility of the manufacturer is limited to repair or replacement of this product. The manufac-
turer is not responsible for consequential, incidental, or other damages or losses resulting from
product failure.
07
DELUXE LIVING:
If you have any questions or concerns, please stop and contact us immediately.
After Sales Customer Service:
CustomerSer[email protected]
1-866-358-9584 (1-866-DLUX-LVG)
Visit our website for more information: www.deluxelivinghome.com

M04-INSV1
Nota: Antes de la instalación, extienda un tapete suave en el suelo para evitar daños al producto y al piso.
01
INSTRUCCIONES DE MONTAJE DEL ESPEJO LED
GUÍA DE INSTALACIÓN

PRECAUCIONES1
IFORMACIÓN IMPORTANTE
Cuando se utilice un producto eléctrico, deben seguirse siempre unas precauciones básicas,
entre las que se incluyen las siguientes:
Lea y siga todas las instrucciones antes de utilizar este espejo.
Para reducir el riesgo de quemaduras, incendios, descargas eléctricas o lesiones personales:
Utilice este producto únicamente para el uso previsto, tal y como se describe en este manual.
No utilice accesorios no recomendados por el fabricante.
Nunca deje caer ni inserte ningún objeto en ninguna abertura. No utilizar al aire libre.
Advertencia riesgo de descarga eléctrica.
Conecte este producto únicamente a un circuito con toma de tierra adecuada.
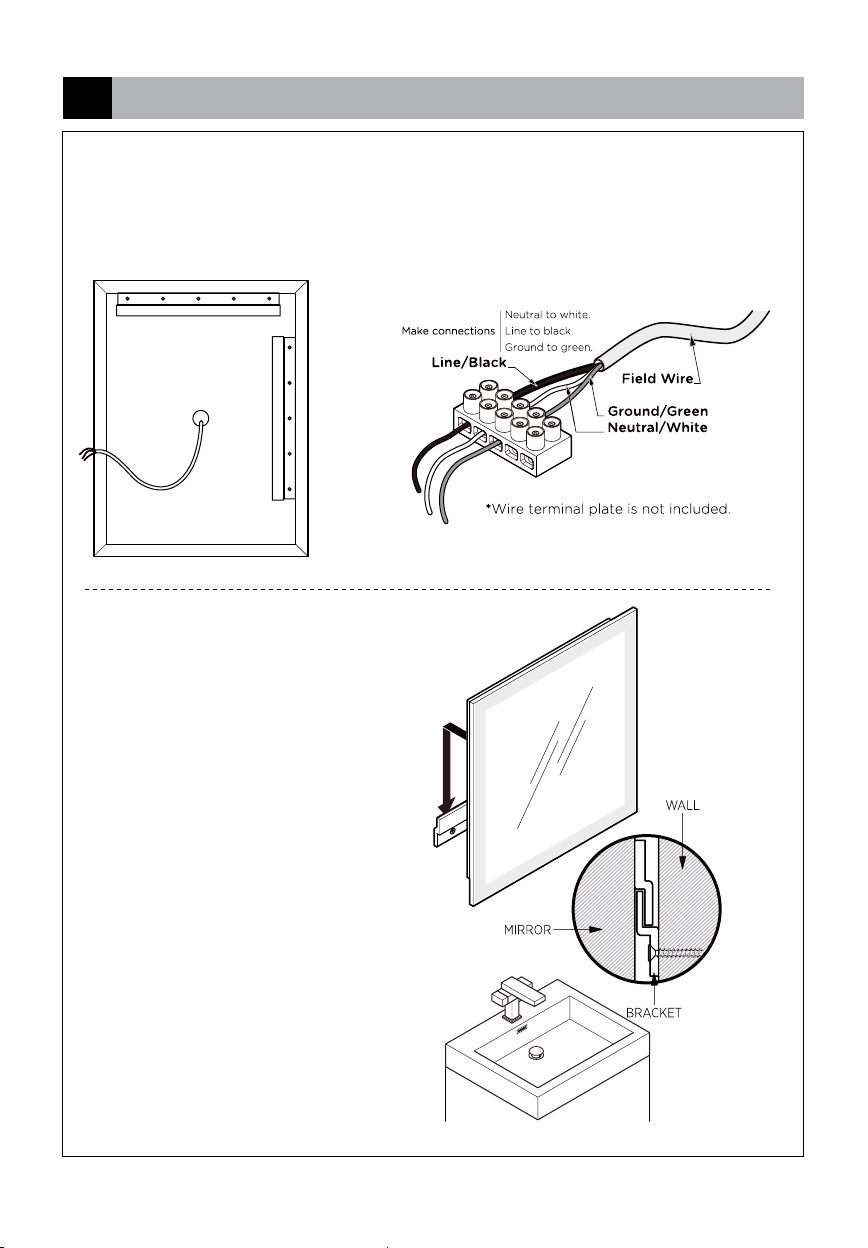
Instrucciones de puesta a tierra:
Este producto debe conectarse a un sistema de cableado permanente metálico conectado a
tierra, o a un conductor de conexión a tierra del equipo al terminal o cable de conexión a tierra del
equipo en el producto. Los armarios eléctricos opcionales deben estar conectados a un circuito
protegido por un interruptor de fallo a tierra (GFI) de 20 amperios cuando se utilicen en cuartos de
baño y en todos los demás lugares exigidos por el Código Eléctrico Nacional.
Conexiones eléctricas:
Todo el cableado debe ser realizado por un electricista cualificado con licencia.
Advertencia: Desconecte la corriente antes de cablear el espejo.
Requiere 110V AC 12V DC circuito protegido GFI.
SEGURIDAD DE LA INSTALACIÓN
• Inspeccione el producto inmediatamente después de recibirlo y compruebe si presenta daños o
faltan piezas.
• Manipule el producto con cuidado y protéjalo por todos los lados y bordes del cristal.
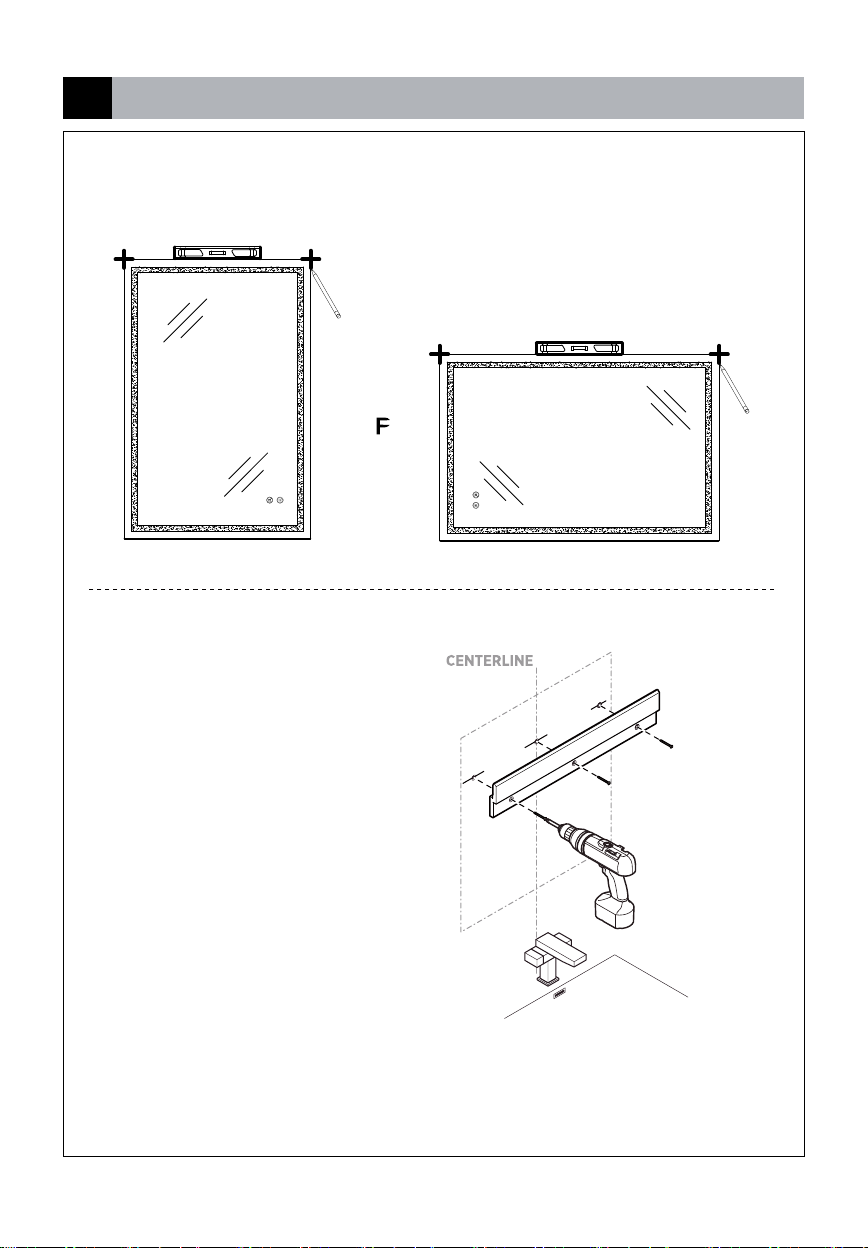
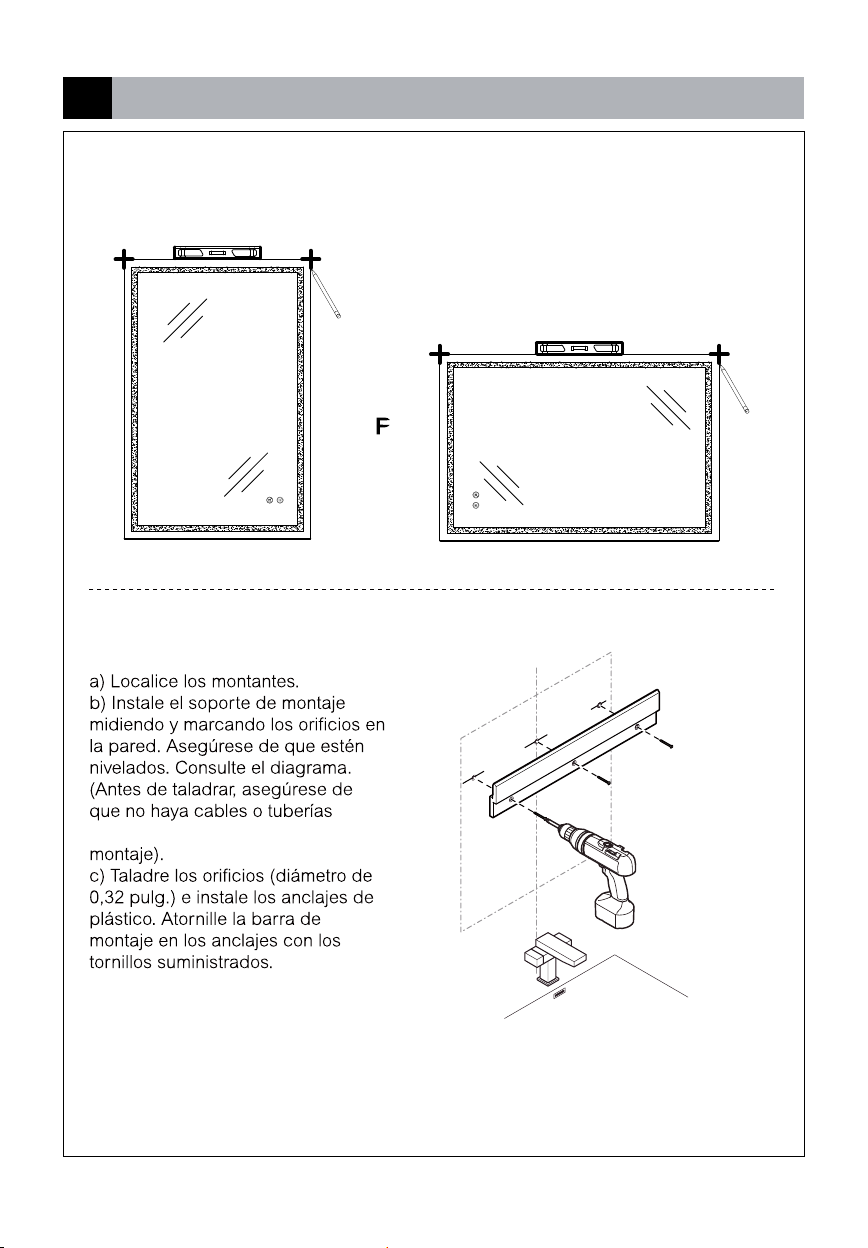
• Asegúrate de que no haya tuberías o cables ocultos en la pared antes de taladrar.
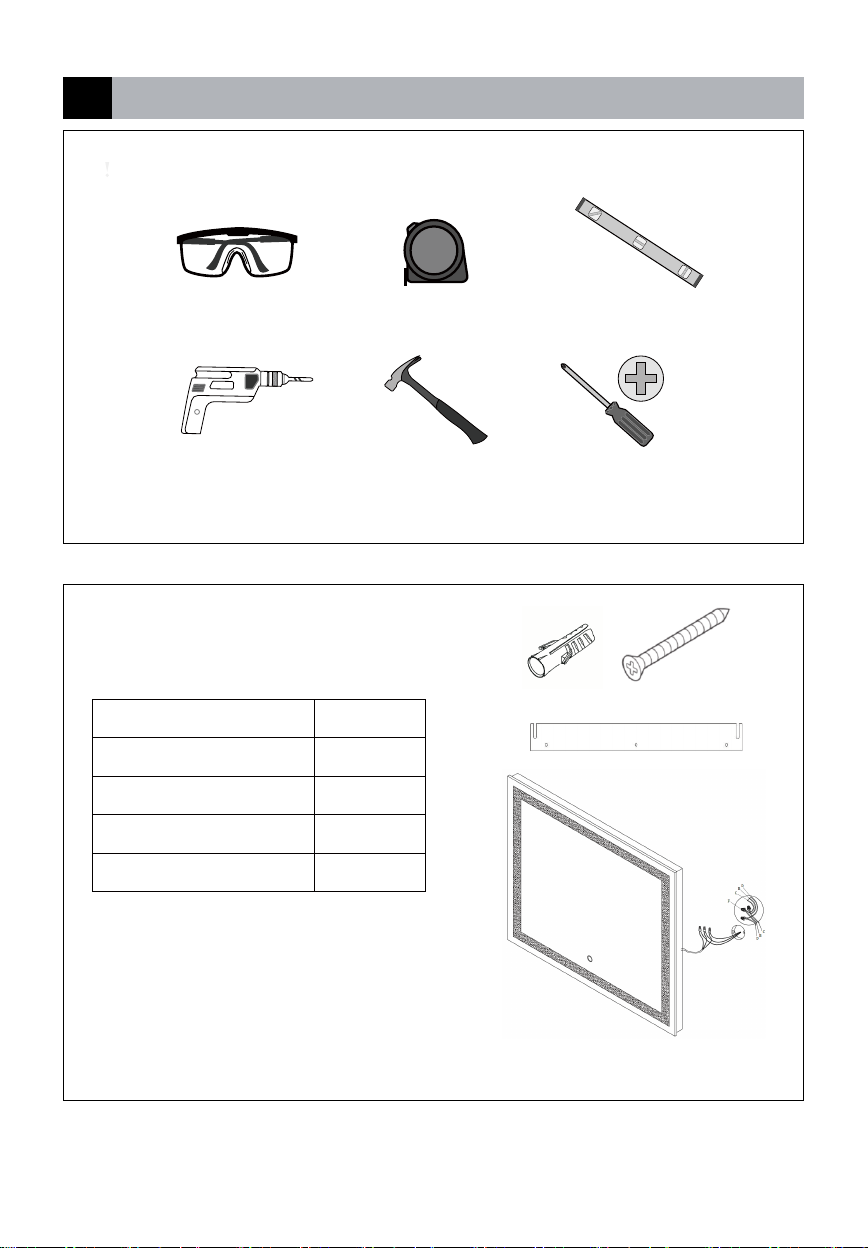
• Utilice protección ocular adecuada al taladrar. Tenga cuidado al taladrar en superficies de
baldosas por si resbala el taladro.
Antes de comenzar la instalación, asegúrese:
- La superficie de la pared debe ser de resistencia y construcción adecuadas.
- Se ha desconectado la alimentación eléctrica principal.
02

LISTA DE PRODUCTOS2
03
Herramientas que puede necesitar (No incluidas)
COMPRUEBE LA LISTA DE
PRODUCTOS DESPUÉS DE
ABRIR EL PAQUETE
Gafas de seguridad Cinta métrica
Cabeza Phillips
Destornillador
Taladro Martillo
Nivel
Espejo
Manual de instalación
Barra en Z
Tornillos de montaje en pared
Anclaje de pared
1 pieza
1 pieza
1 pieza
3piezas
3piezas

INSTALACIÓN DE ESPEJOS3
04
ocultos detrás de los puntos de
1. Seleccionar la posición deseada para el espejo. Nivele y
marque la ubicación.
2. Soporte de Ubicación
LÍNEA CENTRAL

INSTALACIÓN DE ESPEJOS3
05
3. Conexionar el cableado eléctrico
Nota Siempre se necesitan dos
o más personas para colgar
4. Colgar el espejo en el
soporte de montaje
conectar
* Placa de terminales para cables no está incluida
Cable/negro
Cable de campo
Tierra/verde
Neutro/blanco
Neutro al blanco
Cable al negro
Toma a tierra al verde
ESPEJO
SOPORTE

Encender y apagar la iluminación
El botón de la luz se volverá azul cuando el espejo esté conectado a la corriente.
Toca el botón de luz para encender o apagar la luz LED.
Desempañar:
Pulse el botón Anti-niebla y la señal del desempañador se encenderá en la pantalla
e iniciará el proceso de desempañado.
Ahorro de energía:
El espejo se apagará automáticamente después de 3 horas de inactividad.
Interruptor de luz Antivaho
06
INSTALACIÓN DE ESPEJOS3
5. Operaciones

MANTENIMIENTO4
07
CUIDADO Y MANTENIMIENTO
El espejo y el cuerpo del espejo están fabricados con cristal de espejo y aleación de aluminio.
Utilice un paño húmedo para limpiar el espejo. No utilice ningún material abrasivo, ya que podría
dañar la superficie y el acabado del espejo. Puede utilizar un detergente suave para limpiar las
superficies del espejo. Cuando lo limpie, rocíe el paño, no el espejo ni las superficies circundantes.
GARANTÍA LIMITADA DE UN AÑO
Este producto está garantizado para el comprador original. Si se produce un fallo en esta unidad
debido a defectos en los materiales o en la mano de obra, el fabricante reparará o sustituirá este
artículo a nuestra discreción sin cargo alguno. La garantía quedará anulada si el producto se ha
montado incorrectamente, se ha utilizado de forma indebida, se ha abusado de él por sobrecarga,
se ha alterado de cualquier forma o se ha dañado debido a un accidente. Esta garantía no es
transferible y no cubre astillamientos, flaking, arañazos, óxido, abolladuras u otros daños en las
superficies de este producto. La responsabilidad del fabricante se limita a la reparación o
sustitución de este producto. El fabricante no se hace responsable de los daños o pérdidas conse-
cuentes, incidentales o de otro tipo que resulten del fallo del producto.
DELUXE LIVING:
Si tiene alguna pregunta o inquietud, pare y póngase en contacto con nosotros de inmediato.
Nuestro centro de servicio de posventa:
CustomerSer[email protected]
1-866-358-9584(1-866-DLUX-LVG)
Visite nuestro sitio web para más información: www.deluxelivinghome.com
Table of contents
Languages:
Other DELUXE LIVING Indoor Furnishing manuals
Popular Indoor Furnishing manuals by other brands

VECELO
VECELO KHD-XF-CCS01 Assembly instructions

Sauder
Sauder Embassy Point 414192 manual

Next
Next MALVERN 284262 Assembly instructions

Office Star Products
Office Star Products Pro-Line II ProGrid 511342AL operating instructions

Rauch
Rauch M2696 Assembly instructions

Geberit
Geberit ONE 500.493.00.1 user manual

World Market
World Market 589815 Assembly instructions

Learniture
Learniture LITTLE RETREAT Accessories assembly instructions

Otto
Otto 323494 Assembly instructions

Walker Edison
Walker Edison BR3DSLDR Assembly instructions

Office Star Products
Office Star Products work smart OPH61601 operating instructions

Yaasa
Yaasa Desk Basic S troubleshooting guide