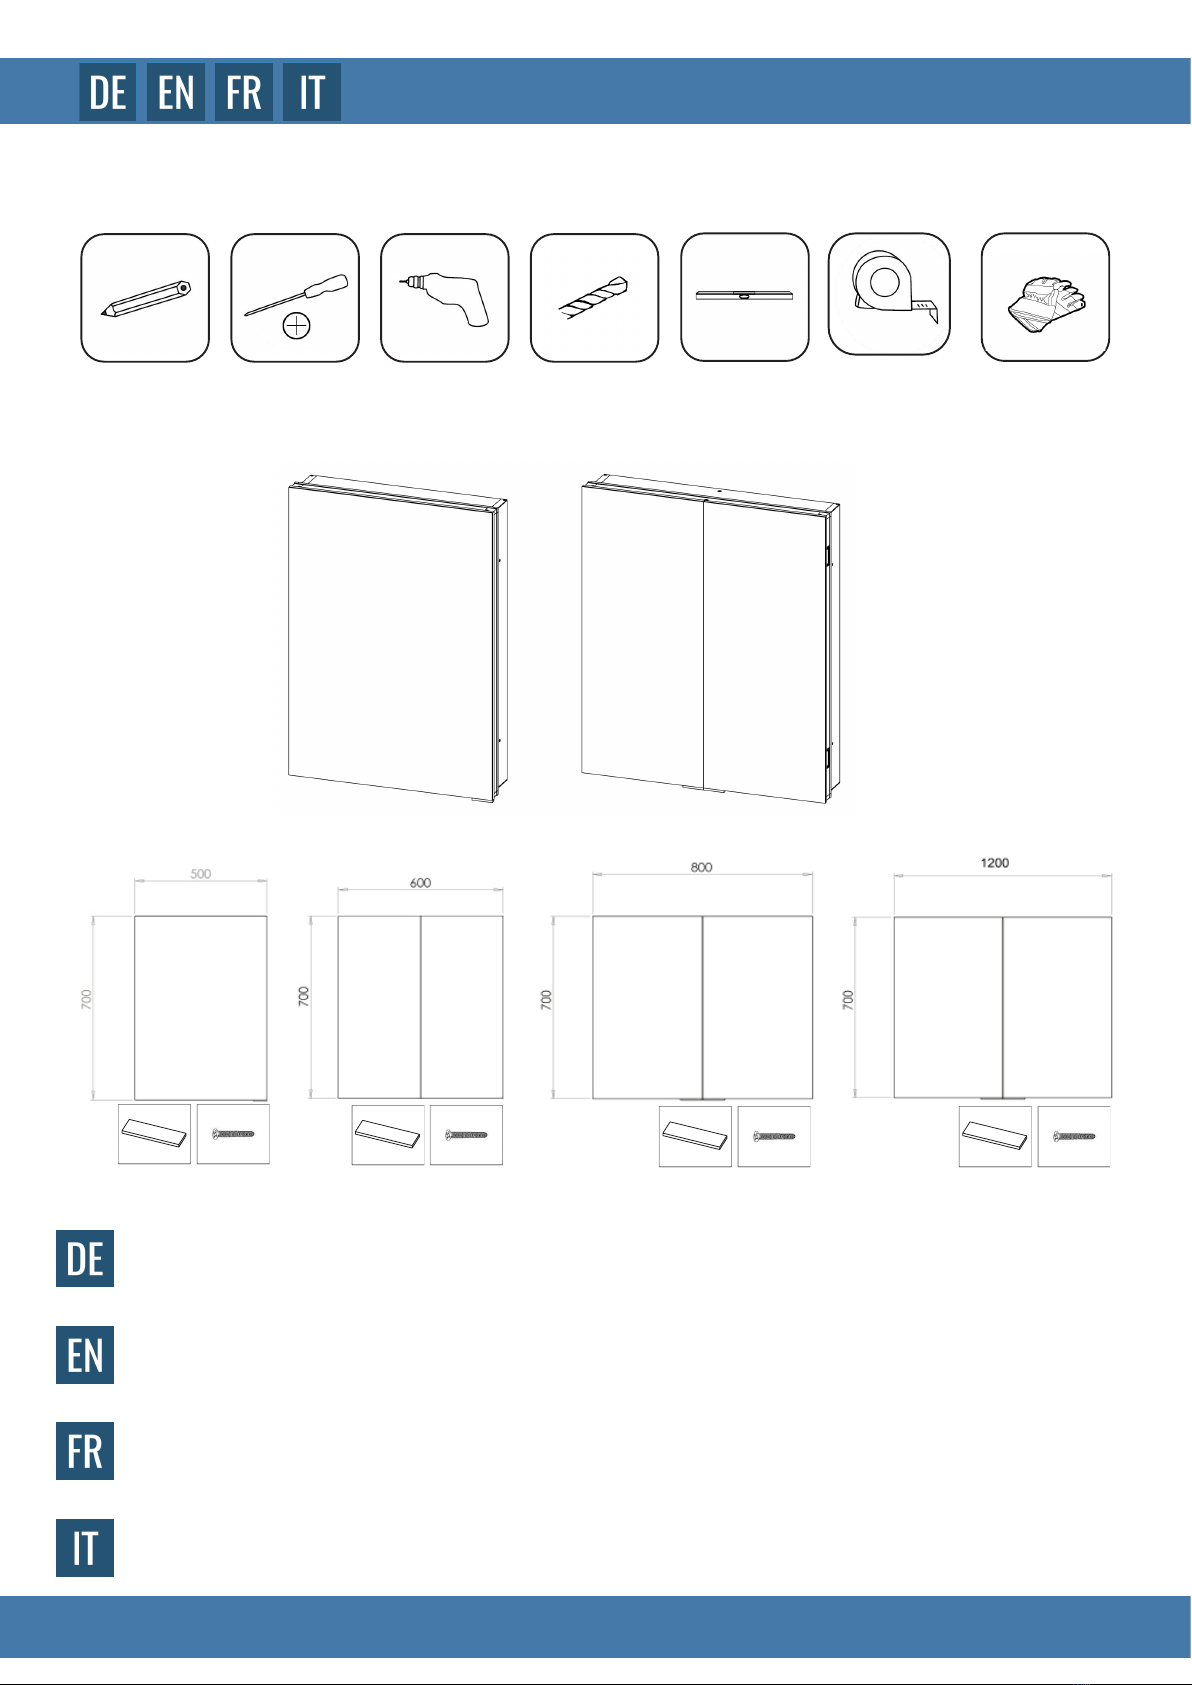
BERNSTEIN UP7012-50 User manual

MONTAGEANLEITUNG - IIII / 2021
ASSEMBLY INSTRUCTIONS / NOTICE DE MONTAGE / ISTRUZIONI DI MONTAGGIO
LED-SPIEGELSCHRANK UNTERPUTZ
LED MIRROR CABINET RECESSED
ARMOIRE DE TOILETTE À LED ENCASTRÉE
ARMADIETTO A SPECCHIO A LED INCASSO

2
UP7012 - 50 / 60 / 80 / 120
50 60 80 120
4x
BENÖTIGTES WERKZEUG
TOOLS REQUIRED / OUTILS NÉCESSAIRES / STRUMENTI NECESSARI
LIEFERUMFANG
DELIVERY / CONTENU DE LA LIVRAISON / CONTENUTO DELLA CONSEGNA
Die LED-Spiegelschränke sind in den Aufgeführten Breiten erhältlich und unterscheiden sich somit in der Anzahl der Einlegeböden.
Die Ausführung der Steckdosen und USB Anschlüsse variiert je nach Modell.
Le armadietti a specchio LED sono disponibili nelle larghezze elencate e quindi differiscono per il numero di ripiani.
Il design delle prese e delle connessioni USB varia a seconda del modello.
Les armoires de toilette LED sont disponibles dans les largeurs indiquées et diffèrent donc par le nombre d‘étagères.
La conception des prises et des connexions USB varie selon le modèle.
The LED mirror cabinets are available in the widths listed and therefore differ in the number of shelves.
The design of the sockets and USB connections varies depending on the model.
50cm 60/80/120cm
3x 4x6x 4x6x 4x6x

3
UP7012 - 50 / 60 / 80 / 120
Bitte lesen Sie diese Anweisungen sorgfältig durch, bevor Sie mit der Installation beginnen. Eine fehlerhafte Montage kann Folgen haben, die
nicht unter die Garantie fallen. Überprüfen Sie die Lieferung auf Vollständigkeit und stellen Sie sicher, dass Sie die nötigen Werkzeuge zur Hand
haben. Es wird empfohlen, dass ein Fachmann die Montage unterstützt. Das mitgelieferte Zubehör ist nur für feste Wände geeignet. Gipskarton-
oder Ständerwände erfordern möglicherweise spezielle Befestigungen und eine geeignete Unterkonstruktion. Behandeln Sie alle Komponenten
mit äußerster Sorgfalt und vermeiden Sie Beschädigungen. Beachten Sie die Vorschriften Ihres Landes und lassen Sie die elektrischen
Anschlüsse und Installation von einer Elektro-Fachrma durchführen.
ACHTUNG: BEVOR SIE MIT DER INSTALLATION BEGINNEN
Please read these instructions carefully before starting the installation. Incorrect installation may have consequences that are not covered by
the warranty. Check the delivery for completeness and make sure you have the necessary tools to hand. It is recommended that a professional
assists with the assembly. The accessories supplied are only suitable for solid walls. Plasterboard or stud walls may require special xings and
a suitable substructure. Handle all components with extreme care and avoid damage. Observe the regulations of your country and have the
electrical connections and installation carried out by a specialist electrical company.
ATTENTION:BEFORE YOU START THE INSTALLATION
Veuillez lire attentivement ces instructions avant de commencer l‘installation. Une installation incorrecte peut avoir des conséquences qui ne sont
pas couvertes par la garantie. Vériez que la livraison est complète et que vous avez les outils nécessaires à portée de main. Il est recommandé
de faire appel à un professionnel pour l‘assemblage. Les accessoires fournis ne conviennent qu‘aux murs massifs. Les murs en plaques de
plâtre ou à montants peuvent nécessiter des xations spéciales et une sous-structure appropriée. Manipulez tous les composants avec une
extrême prudence et évitez de les endommager. Respectez les réglementations de votre pays et faites effectuer les raccordements électriques et
l‘installation par une entreprise spécialisée en électricité.
ATTENTION:AVANT DE COMMENCER L‘INSTALLATION
Leggete attentamente queste istruzioni prima di iniziare l‘installazione. Un‘installazione errata può avere conseguenze che non sono coperte
dalla garanzia. Controlla la completezza della consegna e assicurati di avere a portata di mano gli strumenti necessari. Si raccomanda che
un professionista assista al montaggio. Gli accessori forniti sono adatti solo per pareti solide. Le pareti di cartongesso o di borchie possono
richiedere ssaggi speciali e una sottostruttura adatta. Maneggiare tutti i componenti con estrema cura ed evitare danni. Rispettate le norme del
vostro paese e fate eseguire i collegamenti elettrici e l‘installazione da un‘azienda elettrica specializzata.
ATTENZIONE:PRIMA DI INIZIARE L‘INSTALLAZIONE

4
UP7012 - 50 / 60 / 80 / 120
w
u
v
v
u
v v
vu v
v
v

5
UP7012 - 50 / 60 / 80 / 120
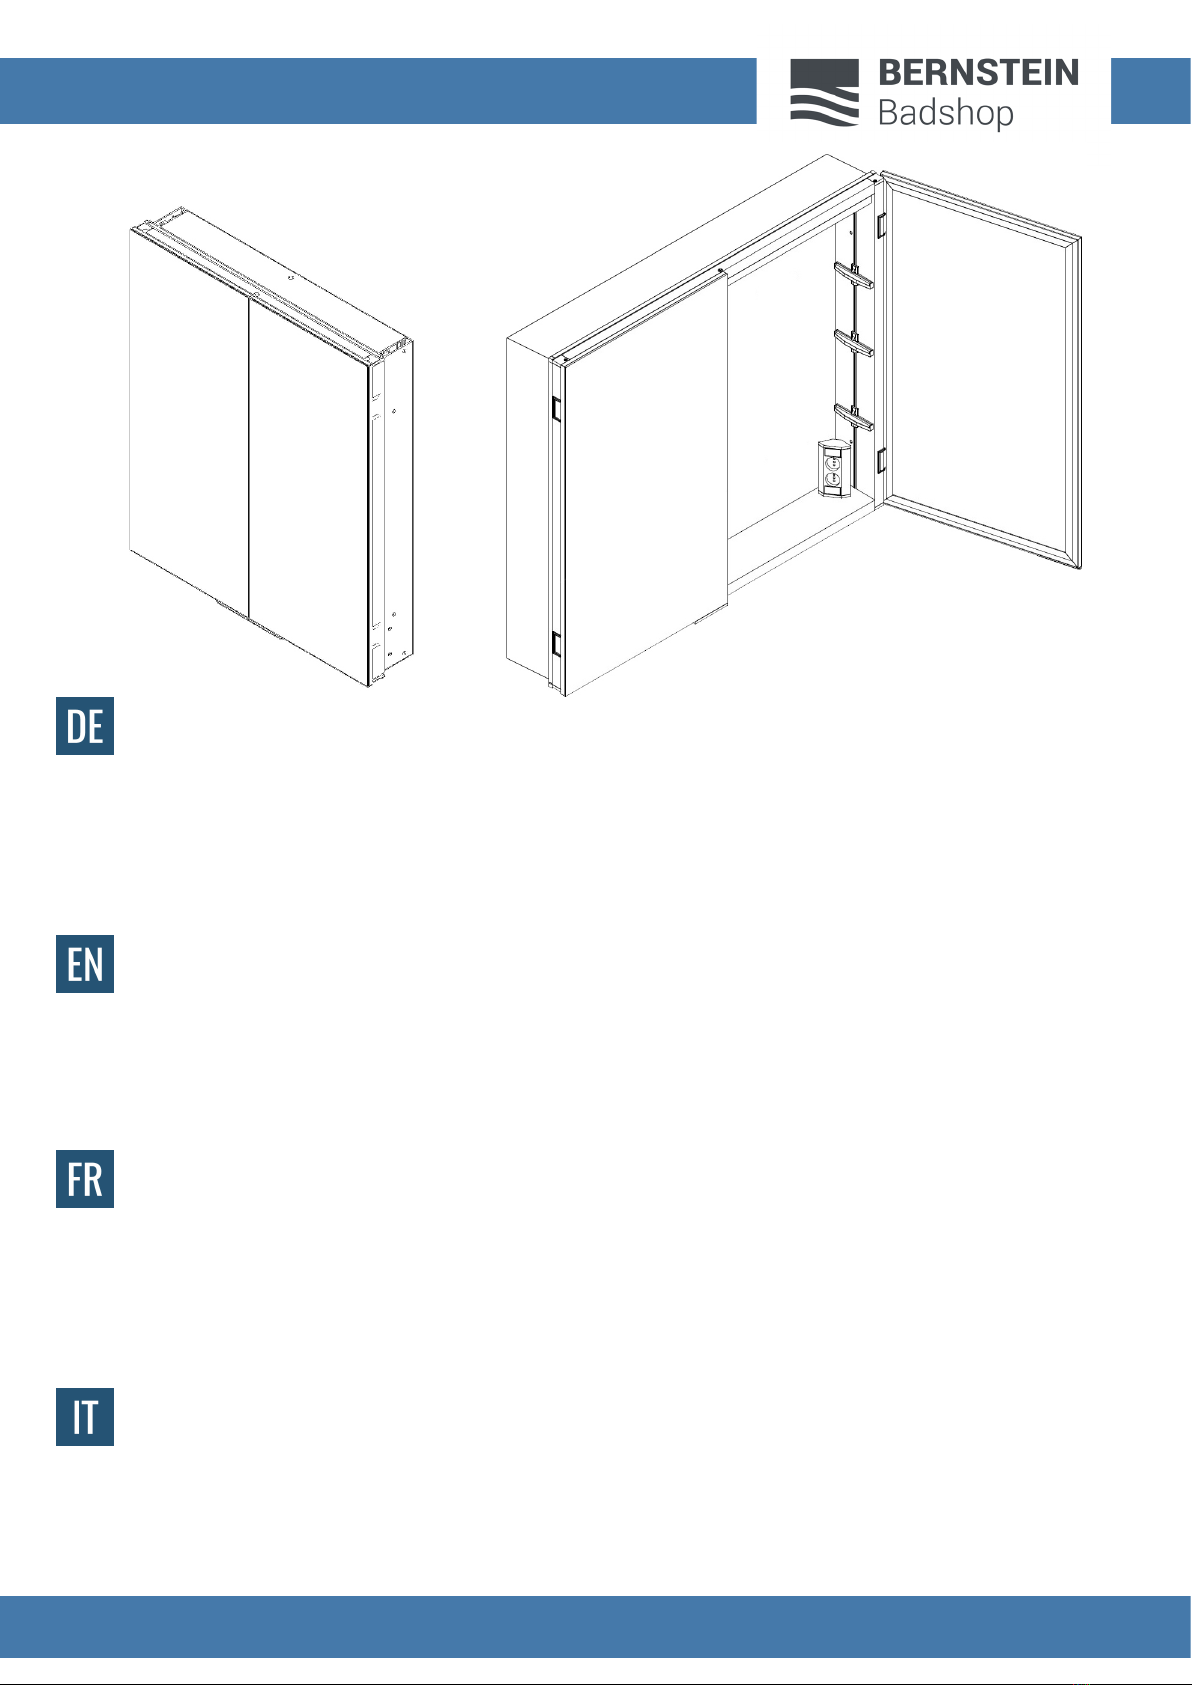
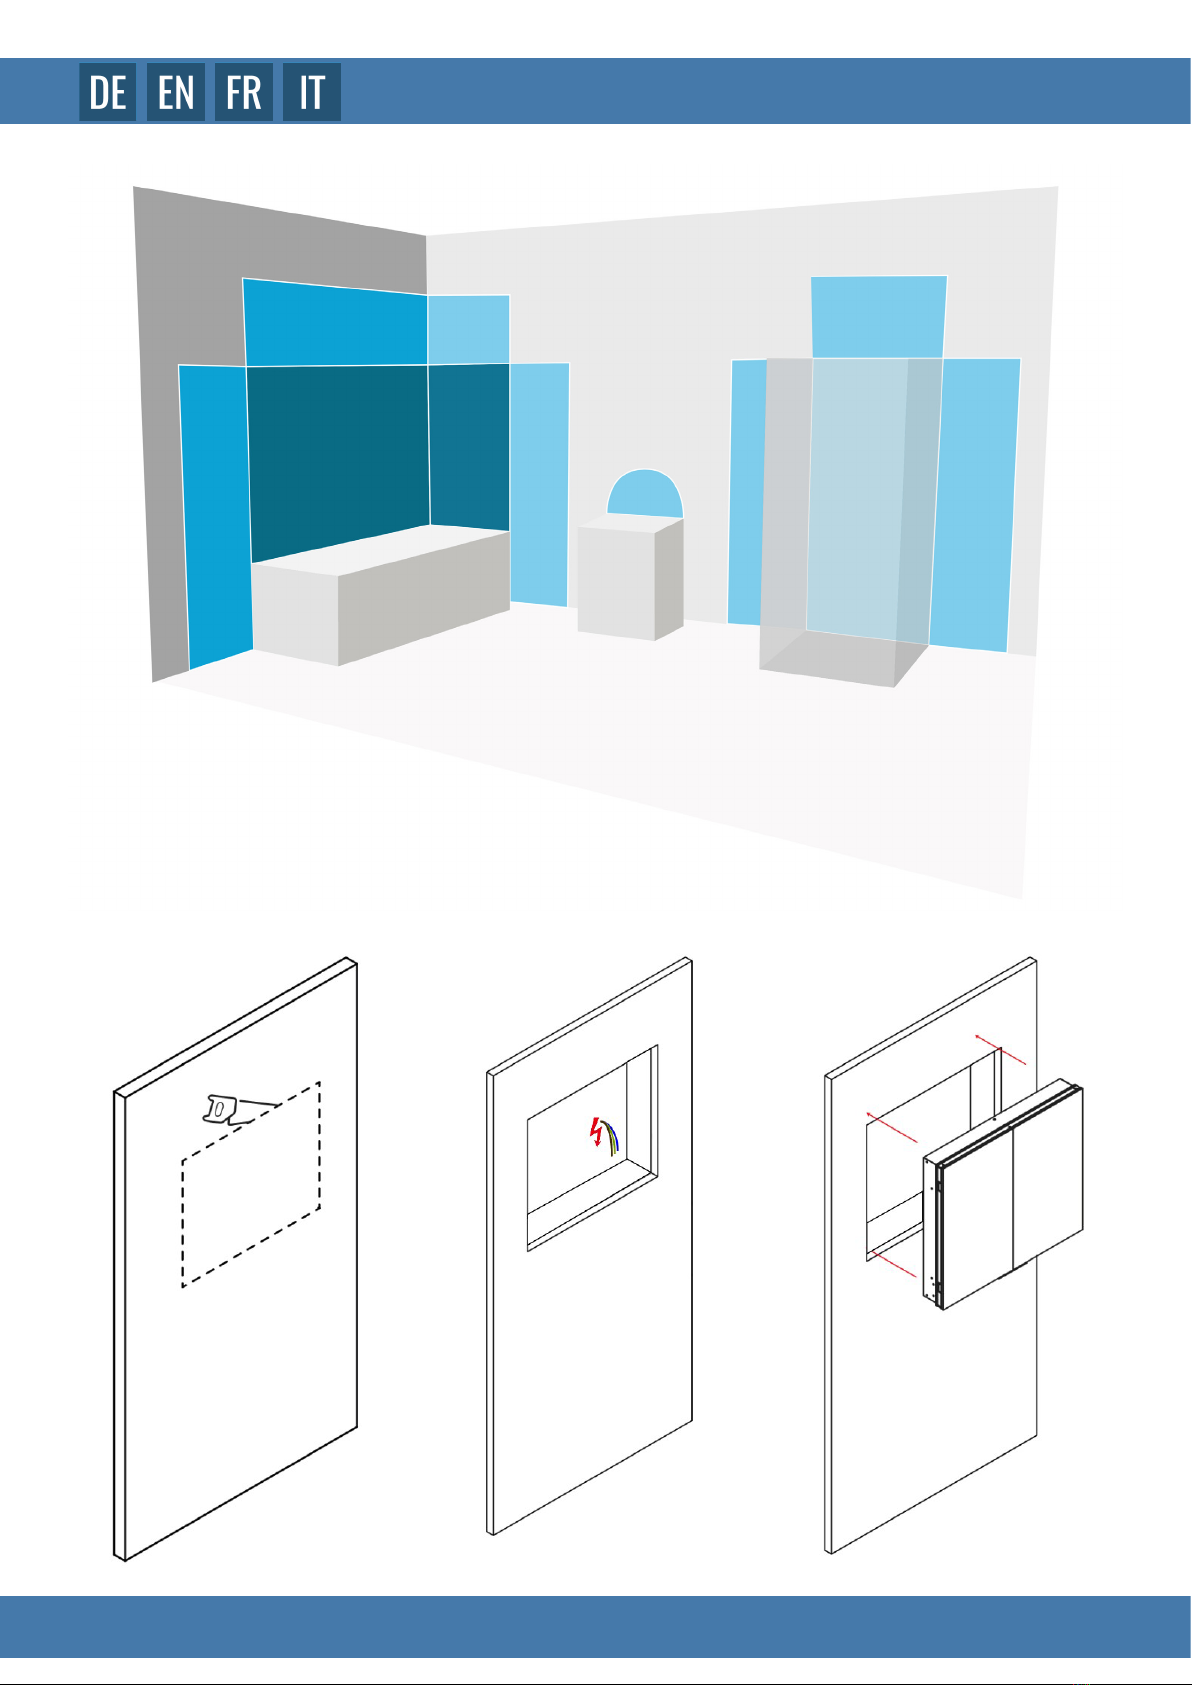
Prima dell‘installazione, assicuratevi che la costruzione della parete sia adatta alle dimensioni e al peso del mobile da incasso. Questo
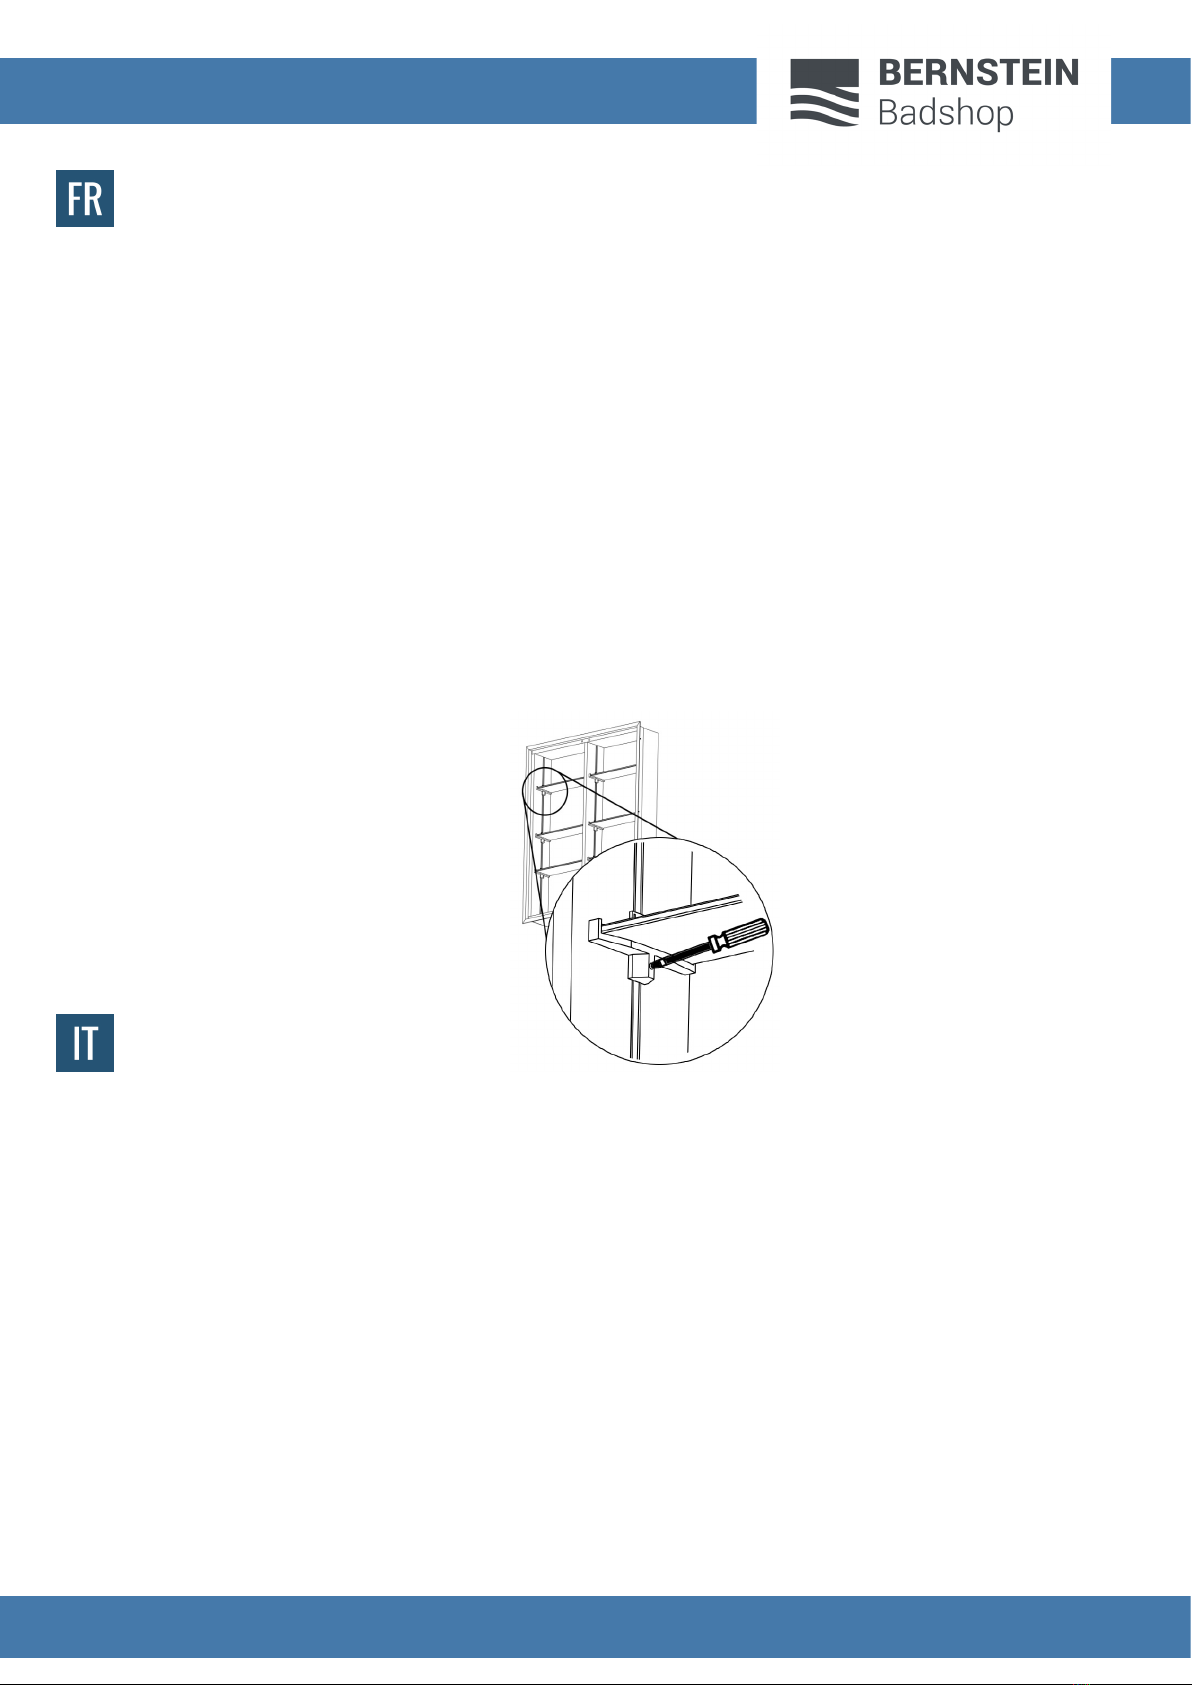
prodotto può essere installato solo in una parete con una profondità minima di 80 mm. Si ssa avvitandolo nel muro da un lato. Prima
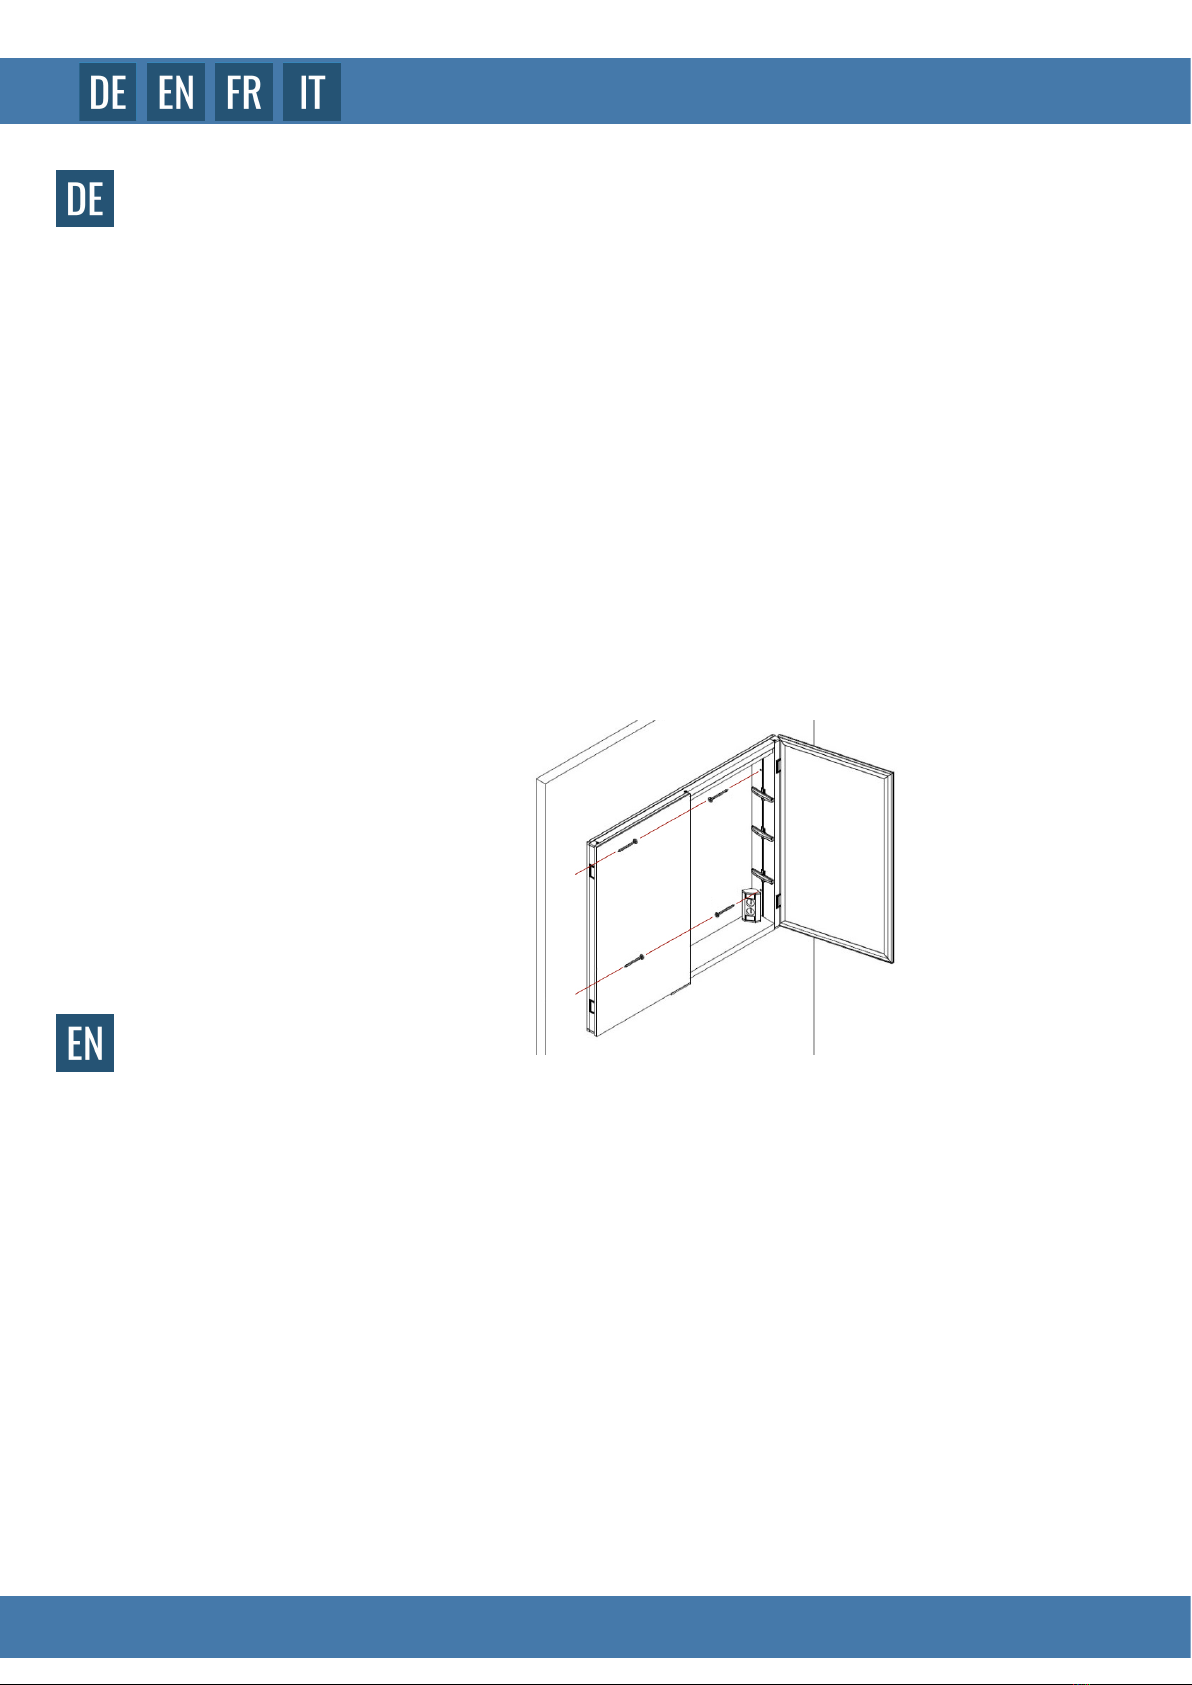
dell‘installazione, prendere nota delle dimensioni della zona del mobile che sarà incassata nel muro e dei punti di ssaggio laterali. Fate
preparare l‘elettricazione dell‘armadio da un elettricista qualicato.
Questo prodotto è classicato IP44 e adatto all‘installazione in zone: 2 & 3.
Quando si posiziona l‘armadio, osservare le norme del proprio paese o consultare un‘azienda elettrica specializzata. L‘armadio deve essere
installato con una distanza minima di 150 mm tra l‘interruttore del sensore a infrarossi e un oggetto adiacente per garantire il corretto
funzionamento del sensore. NON installare i ripiani no a quando l‘armadio non è denitivamente installato e ssato.
Vergewissern Sie sich vor der Installation, dass die Wandkonstruktion für die Größe und das Gewicht des Einbauschranks geeignet ist.
Dieses Produkt kann nur in eine Wand mit eine Mindesttiefe von 80 mm eingebaut werden. Die Fixierung erfolgt durch seitliches verschrauben
in der Wand. Notieren Sie sich vor der Installation die Maße für den Bereich des Schranks, der in die Wand eingelassen wird sowie die
seitlichen Befestigungspunkte. Lassen Sie die Elektrizierung des Schrankes qualiziert vorbereiten.
Dieses Produkt entspricht der Schutzart IP44 und eignet sich für die Installation in den Zonen: 2 & 3.
Beachten Sie bei der Schrankpositionierung die Vorschriften Ihres Landes oder informieren Sie sich bei einer Elektro-Fachrma. Der Schrank
muss mit einem Mindestabstand von 150 mm zwischen dem Schalter des Infrarotsensors und einem angrenzenden Objekt installiert werden,
um den korrekten Betrieb des Sensors zu gewährleisten. Montieren Sie die Einlegeböden NICHT, bevor der Schrank endgültig eingebaut und
xiert ist.
Before installation, make sure that the wall construction is suitable for the size and weight of the built-in cabinet. This product can only be
installed in a wall with a minimum depth of 80 mm. It is xed by screwing it into the wall from the side. Before installation, note the dimensions
of the area of the cabinet that will be recessed into the wall and the lateral xing points. Have the electrication of the cabinet prepared by a
qualied electrician.
This product is IP44 rated and suitable for installation in zones: 2 & 3.
When positioning the cabinet, observe the regulations of your country or consult a specialist electrical company. The cabinet must be installed
with a minimum distance of 150 mm between the infrared sensor switch and an adjacent object to ensure correct operation of the sensor. DO
NOT install the shelves until the cabinet is nally installed and xed.
Avant l‘installation, assurez-vous que la construction du mur est adaptée à la taille et au poids de l‘armoire encastrée. Ce produit ne peut
être installé que dans un mur d‘une profondeur minimale de 80 mm. On le xe en le vissant au mur par le côté. Avant l‘installation, notez les
dimensions de la zone de l‘armoire qui sera encastrée dans le mur et les points de xation latéraux. Faites préparer l‘électrication de l‘armoire
par un électricien qualié.
Ce produit est classé IP44 et peut être installé dans les zones 2 et 3.
Lors du positionnement de l‘armoire, respectez les réglementations de votre pays ou consultez une entreprise spécialisée en électricité.
L‘armoire doit être installée avec une distance minimale de 150 mm entre le commutateur du capteur infrarouge et un objet adjacent an de
garantir le bon fonctionnement du capteur. NE PAS installer les étagères avant que l‘armoire ne soit dénitivement installée et xée.
BITTE BEACHTEN
PLEASE NOTE
VEUILLEZ NOTER
PER FAVORE NOTA

6
UP7012 - 50 / 60 / 80 / 120
UP7012 - 50
Einbaumaße, Installation dimensions, Dimensions d‘installation, Dimensioni di installazione

7
UP7012 - 50 / 60 / 80 / 120
UP7012 - 60
Einbaumaße, Installation dimensions, Dimensions d‘installation, Dimensioni di installazione

8
UP7012 - 50 / 60 / 80 / 120
UP7012 - 80
Einbaumaße, Installation dimensions, Dimensions d‘installation, Dimensioni di installazione

9
UP7012 - 50 / 60 / 80 / 120
UP7012 - 120
Einbaumaße, Installation dimensions, Dimensions d‘installation, Dimensioni di installazione

10
UP7012 - 50 / 60 / 80 / 120
1. Messen Sie die Rückseite des Schranks und notieren Sie die Außenmaße für den erforderlichen Wandausschnitt zur Installation und Montage.
2. Nehmen Sie einen weichen Bleistift und zeichnen Sie den Umriss der gewünschten Öffnung auf die Wand. Achten Sie darauf, dass die
Markierungen genau, gerade und waagerecht sind.
3. Schneiden Sie mit einem geeigneten Werkzeug die Öffnung in der Wand aus, in die der Schrank eingebaut werden soll.
4. Falls erforderlich, bringen Sie um die Aussparung herum einen oder mehrere senkrechte Träger an um eine seitliche xierung zu gewährleisten.
Arbeiten Sie sorgfältig, damit sich der Schrank beim Einbau nicht verdreht.
5. Vergewissern Sie sich, dass die Tiefe der Einbaunische die Befestigung des Schranks an der inneren Stützstruktur der Wand ermöglicht.
6. Entnehmen Sie den Schrank aus der Öffnung und bringen Sie Ihre endgültige Wandoberäche an. (z.B. Kacheln, Duschwand)
7. Schließen Sie bei ausgeschaltetem Stromnetz den LED-Schrank an das Netz an und setzen ihn in die Wandöffnung ein.
8. Fixieren Sie den Schrank seitlich durch die vorgebohrten Löcher mit den beigelegten Schrauben per Schraubenzieher oder Akkuschrauber.
9. Stellen Sie die Regalhalterungen auf die gewünschte Höhe ein und achten Sie darauf, dass die passenden Halterungen waagerecht sind.
Lösen Sie dazu die Schraube leicht, entfernen Sie sie aber nicht vollständig. Ziehen Sie die Schraube an, um die Halterung zu sichern, und
setzen Sie den Glasboden ein.
10. Schalten Sie die Stromzufuhr wieder ein.
BEFESTIGUNG UND INSTALLATION
MOUNTING AND INSTALLATION
1. Measure the back of the cabinet and note the outside dimensions for the required wall cutout for installation and mounting.
2. Take a soft pencil and draw the outline of the desired opening on the wall. Make sure the marks are accurate, straight and level.
3. Using a suitable tool, cut out the opening in the wall where the cabinet will be installed.
4. If necessary, place one or more vertical supports around the opening to ensure lateral xation.
Work carefully so that the cabinet does not twist during installation.
5. Make sure that the depth of the recess allows the cabinet to be xed to the internal support structure of the wall.
6. Remove the cabinet from the opening and apply your nal wall nish. (e.g. tiles, shower wall).
7. With the power off, connect the LED cabinet to the power and insert it into the wall opening.
8. Fix the cabinet laterally through the pre-drilled holes with the enclosed screws using a screwdriver or cordless screwdriver.
9. Adjust the shelf brackets to the desired height, making sure that the matching brackets are horizontal.
To do this, loosen the screw slightly, but do not remove it completely. Tighten the screw to secure the bracket, and insert the glass shelf.
10. Turn the power back on.

11
UP7012 - 50 / 60 / 80 / 120
1. Mesurez l‘arrière de l‘armoire et notez les dimensions extérieures de la découpe murale requise pour l‘installation et le montage.
2. Prenez un crayon doux et dessinez le contour de l‘ouverture souhaitée sur le mur.
Assurez-vous que les marques sont précises, droites et de niveau.
3. À l‘aide d‘un outil approprié, découpez l‘ouverture dans le mur où l‘armoire doit être installée.
4. Si nécessaire, installez un ou plusieurs supports verticaux autour de l‘ouverture pour assurer une xation latérale.
Travaillez avec soin pour que l‘armoire ne se torde pas pendant l‘installation.
5. Veillez à ce que la profondeur de l‘encastrement permette de xer l‘armoire à la structure porteuse interne du mur.
6. Retirez l‘armoire de l‘ouverture et appliquez votre surface murale nale. (par exemple, carrelage, paroi de douche).
7. Le secteur étant éteint, connectez l‘armoire LED au secteur et insérez-la dans l‘ouverture du mur.
8. Fixez l‘armoire latéralement à travers les trous pré-percés avec les vis fournies à l‘aide d‘un tournevis ou d‘une visseuse sans l.
9. Ajustez les supports d‘étagères à la hauteur souhaitée et assurez-vous que les supports correspondants sont horizontaux. Pour ce faire,
desserrez légèrement la vis, mais ne la retirez pas complètement. Serrez la vis pour xer le support et insérez la tablette en verre.
10. Remettez l‘appareil sous tension.
MONTAGE ET INSTALLATION
MONTAGGIO E INSTALLAZIONE
1. Misurate la parte posteriore dell‘armadio e annotate le dimensioni esterne per il taglio a muro necessario per l‘installazione e il montaggio.
2. Prendete una matita morbida e disegnate il contorno dell‘apertura richiesta sul muro. Assicuratevi che i segni siano precisi, dritti e livellati.
3. Con un attrezzo adatto, ritagliare l‘apertura nel muro dove verrà installato l‘armadio.
4. Se necessario, montare uno o più supporti verticali intorno all‘apertura per assicurare il ssaggio laterale.
Lavorare con attenzione in modo che il mobile non si attorcigli durante l‘installazione.
5. Assicurarsi che la profondità dell‘incavo permetta di ssare il mobile alla struttura interna di supporto del muro.
6. Rimuovete l‘armadio dall‘apertura e applicate la vostra supercie nale della parete. (es. piastrelle, parete della doccia).
7. Con la rete spenta, collegare il mobile a LED alla rete e inserirlo nell‘apertura della parete.
8. Fissare il mobile lateralmente attraverso i fori preforati con le viti allegate usando un cacciavite o un avvitatore a batteria.
9. Regolare le staffe dello scaffale all‘altezza desiderata e assicurarsi che le staffe corrispondenti siano orizzontali. Per farlo, allenta
leggermente la vite, ma non rimuoverla completamente. Stringere la vite per ssare la staffa e inserire il ripiano di vetro.
10. Accendere di nuovo la corrente.

12
UP7012 - 50 / 60 / 80 / 120
BETRIEBSANLEITUNG
OPERATING INSTRUCTIONS
INSTRUCTIONS D‘UTILISATION
ISTRUZIONI PER L‘USO
Einschalten/Ausschalten
Bewegen Sie Ihre Hand langsam am Sensor vorbei.
So ändern Sie die Farbtemperatur:
1. Um die Farbtemperatur des Gehäuses zu ändern, halten Sie Ihre Hand unter den Sensor (außen, unten rechts),
die Farbtemperatur beginnt sich zu ändern.
2. Bewegen Sie Ihre Hand einfach vom Sensor weg, wenn die gewünschte Farbtemperatur erreicht ist, und bedienen Sie
das Gerät wie gewohnt weiter - die gewählte Farbtemperatur bleibt auch nach dem Aus- und Einschalten erhalten.
Switching on/off
Move your hand slowly past the sensor.
To change the colour temperature:
1. To change the colour temperature of the housing, hold your hand under the sensor (outside, bottom right),
the colour temperature will start to change.
2. Simply move your hand away from the sensor when the desired colour temperature is reached and continue
to operate the unit as usual - the selected colour temperature is retained even after switching off and on.
Mise en marche/arrêt
Passez lentement votre main devant le capteur.
Pour modier la température de la couleur :
1. Pour modier la température de couleur du boîtier, placez votre main sous le capteur (à l‘extérieur, en bas à droite),
la température de couleur commencera à changer.
2. Il suft d‘éloigner la main du capteur lorsque la température de couleur souhaitée est atteinte et de continuer à faire fonctionner
l‘appareil comme d‘habitude - la température de couleur sélectionnée est conservée même après avoir été éteinte et rallumée.
Accensione e spegnimento
Muovi lentamente la tua mano oltre il sensore.
Per cambiare la temperatura del colore:
1. Per cambiare la temperatura del colore della custodia, tenete la mano sotto il sensore (all‘esterno, in basso a destra),
la temperatura del colore inizierà a cambiare.
2. Basta allontanare la mano dal sensore quando si raggiunge la temperatura di colore desiderata e continuare a far funzionare l‘unità
come al solito - la temperatura di colore selezionata viene mantenuta anche dopo lo spegnimento e l‘accensione.
This manual suits for next models
4
Table of contents
Other BERNSTEIN Indoor Furnishing manuals

BERNSTEIN
BERNSTEIN LAVOA Manual

BERNSTEIN
BERNSTEIN ARCTIC 800 User manual

BERNSTEIN
BERNSTEIN NEO 40cm Manual

BERNSTEIN
BERNSTEIN TIM 165395 Manual

BERNSTEIN
BERNSTEIN VARO 40cm Manual

BERNSTEIN
BERNSTEIN ARCTIC 900 User manual

BERNSTEIN
BERNSTEIN 8144 2.0 C User manual

BERNSTEIN
BERNSTEIN LAVOA Manual

BERNSTEIN
BERNSTEIN ARCTIC Spiegel 60 User manual

BERNSTEIN
BERNSTEIN BS153010 User manual