Dension GWP-9203-1 User manual
Gateway Pro
iPod, USB, Bluetooth
User Manual
BMW (BM4)
v.1.0
GWP-9203-1
1. INTRODUCTION
The Dension Gateway Pro lets you connect
your iPod or USB storage (stick, hard drive or
mass storage capable mp3 player) to your
original car radio, providing music playback,
menu based control and charging.
The Gateway Pro also offers Bluetooth
connectivity for music streaming (via A2DP) and
handsfree mobile call handling via the original
buttons and screens of your vehicle.
Supported USB devices
USB: Flash Memory and Hard Disk Drive
(UBS1.1 and higher)
File System: FAT16 or FAT32
Storage capacity: up to 320 GB music content
Music Format: MP3, WMA and WAV, OGG
Supported iPod / iPhone devices
iPod (4th generation)
iPod nano (1st, 2nd, 3rd, 4th, 5th and 6th generation)
iPod mini
iPod Photo 4G
iPod Video 5G
iPod Classic
iPod Touch (1st, 2nd, 3rd and 4th generation)
iPhone, iPhone 3G / 3Gs, iPhone 4 / 4S
Aux: 3.5mm stereo aux input (optional)
2. GETTING STARTED
Switch on your car radio and select CDC mode
by pressing the ‘MODE’ function button on the
radio.
Connect your iPod or USB storage to the
Gateway. It will start playing the first song on the
device. If the Gateway has been in use earlier,
music will play from your iPod or USB from
where it stopped previously.
When switching off the radio the playback will
stop and the source devices will go to standby if
the ignition key is removed.
You can pair the Gateway Pro with a Bluetooth
capable mobile phone for music streaming
(requires an A2DP capable phone) or handsfree
use (if that option is active in the Gateway).
Pairing is controlled from the mobile phone the
same way as connecting to other Bluetooth
accessories. The pin code to the Gateway Pro is
0000 (for further details read the Handsfree
section).
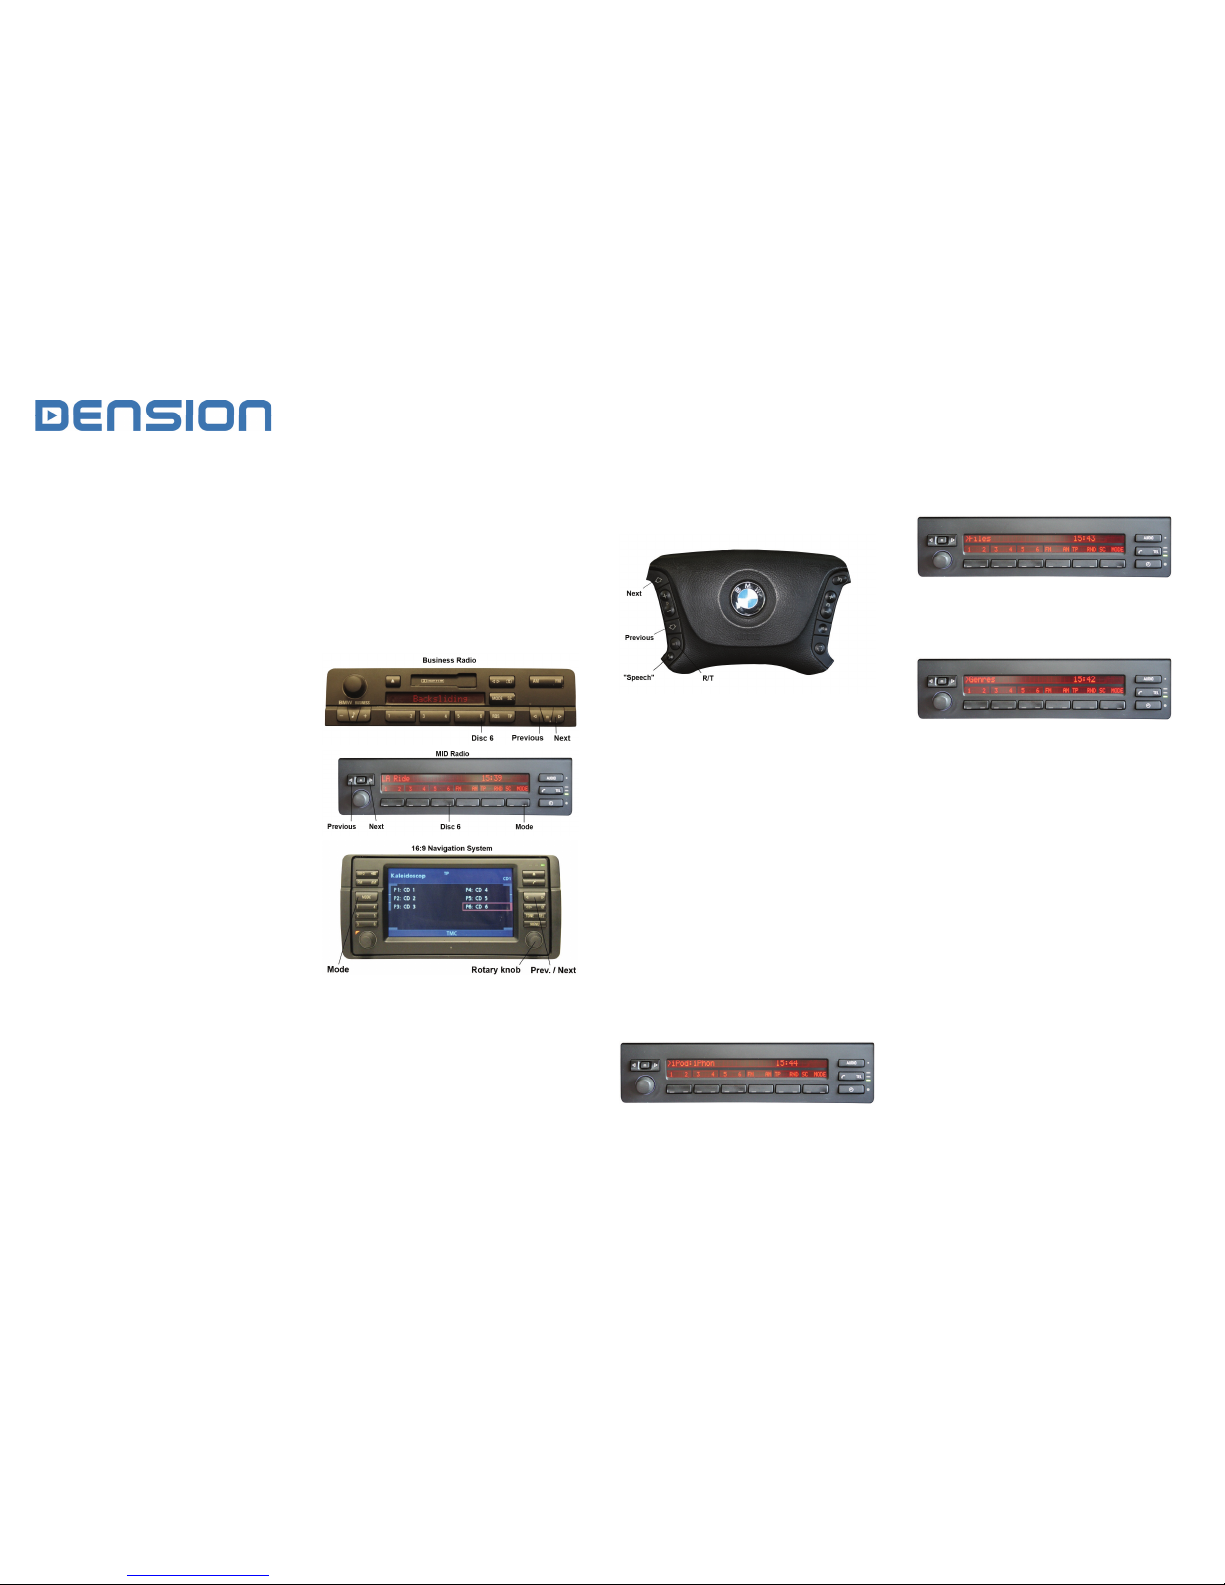
How to control
The menu of the Gateway Pro is displayed on
the main screen, which is located in the radio,
MID or the Navigation display (depending on the
Head Unit type and the car specification).
The music playback and settings are controlled
from the radio but next and previous track
selection is also possible from the steering
wheel controls (if available).
3. OPERATION
You can enter the Gateway Pro’s main menu by
pressing / selecting the ‘Disc 6’ button on the
Radio. Use the next, previous track buttons (on
Business radio you need to press them twice) or
the rotary knob (press shortly to enter a submenu
or press and hold longer to return to the previous
level) for browsing on the radio or on the steering
wheel.
In order to select a menu item press and hold the
next track button (like for the FFW function) on
the radio or press and hold the previous track
button (FRW function) to return to the previous
level.
Please note: Depending on your Head Unit
type, you may need to press the ‘m’ button in
order to get the Fast Forward / Rewind function.
If a song is selected the currently played song’s
title is visible on the display.
Selecting the Music Source
You can select the music source for playback in
the Source menu. This can be:
GW AUX*: the analogue Aux input of the
Gateway. No control function is available.
AUX can be used if Connector Port
(EXT1CP2) or AUX cable (CABL-AUX) is
connected
BT Audio: from a paired A2DP streaming
capable phone. The playback is controlled
from the phone or with the Next and Back
buttons of your car (phone dependent).
Please note: This feature is disabled by
default. It can be enabled from the Settings
menu
iPod UI: the playback is controlled from the
iPod
iPod GW: the playback is controlled from
the Gateway (the iPod controls get
disabled).
USB: the playback is controlled from the
Gateway
* Additional accessory is required
Browsing and selecting music (iPod or USB)
You can use the sub menus to browse the
content of the iPod / iPhone or USB device.
Files, Artists, Albums, Titles, Bookmarks
(for USB only): Provides browsing and
selecting the music files on your USB
device
Music (for iPod only): has a further sub
menu which allows browsing and selection
of music in the sub-menus: Playlist,
Artists, Albums, Titles, Genres,
Composers, Audiobooks, PodCasts.
When an artist is selected the PLAY menu item
plays all the songs from the given artist, the ALL
menu lists all the songs from the given artists.
The albums from the artist are listed as separate
items afterwards.
When an album is selected, all the songs from
the given album are listed as separate items
afterwards.
The following items in the main menu provide
special functions for music playback:
Play All: plays all the music from the
selected source. The playback starts from
the first song on the device.
Album play: Plays the full album of the
song being played, typically used when in
random play mode.
Settings menu
Hotkey function
You can assign the CD selector buttons
(between 2-5) to a desired folder, album, song or
menu position.
Select the Set CD option in the Hotkey
menu.
Navigate to the desired menu or music item.
Press the hotkey you want to assign from
CD buttons 2-5 on the car radio. You will
see the ‘Stored’ message on your display.

Volume
The volume menu allows you to set the different
volumes in the system:
iPod, USB, Aux, Bluetooth volumes for
music playback
Phone and microphone volume for
handsfree calls
Phonebook
In the phonebook menu you can switch off the
automatic download of the phone book, which is
required to work with certain phone models.
Paired phone
Last four paired phone name (ID) will be listed
here. You can force pairing from this menu too if
you click select the phone from the list
BT Audio
You can turn the BT Audio option ON if you want
to play music from mobile phone via A2DP
About
Provides information on the gateway product
(SW versions, serial number, etc.).
4. HANDSFREE OPTION
Connecting a Phone
Pair the phone to the Gateway from your phone’s
Bluetooth menu. Select the Bluetooth option on
your phone (usually in tools or settings) search
for available devices, select Gateway Pro and
enter 0000 for connection. When a phone is
connected you can see the connection status on
the phone screen. Your device is now paired and
will automatically connect each time you return to
the car.
Using the Phone Menu
On Business Radio press the ‘R/T’ and then the
‘Speech’ button on the steering wheel in order to
reach the phone Menu. The phone Menu can be
selected on Radios with MID display by pressing
the “TEL” button on the radio, then pressing the
‘Menu’ button. If you have Navigation system,
you need to press the ‘Menu’ button then select
the Phone option. Use the next or previous track
buttons on the steering wheel or the up and
down navigation buttons on the radio for
browsing.
In order to select a menu item press the ‘OK’
button (make a short press of the “Speech”
button on Business) or press the ‘Back’ button
(long press of the “Speech” button on Business)
on the Head Unit to return to the previous level.
In the phone menu you will see the following
menu items. (On Navigation system you must
select ‘Register” option to have these options).
Phonebook: you can select a phone
number from your address book to
initiate a call. Contacts are shown in
alphabetical groups, followed by all
contacts in alphabetical order
Received / Missed / Dialled Call:
provides access to the respective call
logs
DISCONNECT: Disconnects the
connected phone.
Please note that for consistency reasons the
Gateway Pro does not store the phone numbers
therefore your phone is synchronized every time
it connects to the gateway (this only takes a few
seconds). Synchronization is possible for up
to 1000 phone numbers only from the
phone’s memory (entries with multiple phone
numbers synchronize as multiple entries)
Receiving, Making Phone calls and dialing
When receiving an incoming call, the caller
number (if provided) or the corresponding
contact name in your phone book are shown on
the display. You can answer the call by a short
press of the ‘Phone’ button on the radio or the
“Speech” button on the steering wheel if you
have Business system. The music or radio gets
muted and the audio of the call is directed to the
speakers.
You can reject an incoming call by a long press
of the “Phone’ button or the “Speech” button on
the steering wheel in case of a Business System.
To initiate a call, please select the phone number
or contact from the Phonebook or call logs in the
Phone menu and press the ‘Phone’ button” or
“Speech” on Business system.
You can hang up an ongoing call if you press the
‘Phone’ button or the “Speech” button
(Business).
Dialing a phone number is only possible if you
have Navigation system. Use your Rotary knob
for dialing a number and press the ‘Phone’ button
for initiate the phone call.
5. CONFIGURATION SWITCHES (DIP)
You can find DIP switches on the bottom of the
Gateway Pro. You can activate / deactivate
options with DIP switches like Bluetooth. Turn
DIP switch #5 ON in order to disable the phone
option of the Gateway Pro (e.g. if you want to
use the factory fitted phone). For further details,
please read the installation guide.
6. CONNECTOR PORT
Connector port (EXT1CP2) is an accessory for
Gateway Pro. This device gives the following
specific functions:
Aux-input
USB extension
Bypass selector
Status LED
Reset switch
6. DISCLAIMER AND WARRANTY
Disclaimer
If your car’s electrical system begins to behave
erratically, please disconnect the Gateway
interface physically immediately and have it
checked by your installer. Dension and its
authorized distributors and retailers are not liable
for any incidental consequential or indirect
damages or loss and do not assume liability for
any diagnostic fees.
The use of handheld devices while driving may
be subject to government legislation. Please
ensure that your use of the Dension device
complies with applicable traffic laws. Dension
does not assume liability for any events resulting
from the illegal or irresponsible use of handheld
devices while driving.
Dension reserves the right to modify its products
or specifications without prior notice.
Warranty
Dension devices carry a one-year limited
warranty that protects you from defects in
material and workmanship of products sold by
Dension or its authorized distributors and
retailers. Dension does not warrant any
installation work or assume liability for any
damage caused due to negligence, improper
installation or operation. For warranty claims,
proof of purchase is required.
Further assistance
If you need further assistance in using your
Dension product, please contact your local
supplier or visit www.dension.com and click
on ‘Support’.
Please check the download section for the latest
firmware version and product documentation, as
these may provide additional features or easier
use of the product.
Other Dension Car Stereo System manuals


