GU Electronic FORD SYNC3 TDC2 User manual

1
Instruction Manual
FORD SYNC3 TDC2 for F-150(2015years), FX4, Mustang

GU Electronic
INDEX
Specifications
1. Main Spec. --------------------------------------
2. Diagram -----------------------------------------
3. Components ------------------------------------
4. Exterior ------------------------------------------
Settings
1. Dip Switch --------------------------------------
2. Original button ---------------------------------
3. Touch calibration--------------------------------
4. Key board ---------------------------------------
5. OSD Menu --------------------------------------
Installation
1. Diagram------------------------------------------
2. Caution ------------------------------------------
2
3
4
5
6
7
9
10
12
12
20
21

GU Electronic
Specification
1. Main spec.
1-1 Input Spec. (MULTI VIDEO INTERFACE)
- 1 x Analog RGB Input (Navigation System source)
- 1 x Digital RGB Input (Navigation System source)
- 1 x CVBS(REAR CAMERA) Input. (Rear camera source)
- 1 x CVBS(FRONT CAMERA) Input. (Front camera source)
- 1 x LVDS Input. (Car Command System)
1-2 Output Spec.
- 1 x LCD Output (LCD Operation)
1-3 Power Spec.
- Input Power : 8VDC ~ 24VDC
- Consumption Power : 12Watt, Max
1-4 Switch Input mode
- Possible to switch input mode through original button
2. Features
- Possible to register IR code of DVD/DTV
- Display dynamic PAS(Parking assistance system)
- Easy installation by Jack by jack
- Possible to switch from external screen to OEM Phone mode screen
automatically when phone rings
- Possible to switch from external screen to OEM climate mode screen
automatically when changing climate value
- Possible to switch from external screen to OEM Audio mode screen
automatically when adjusting audio volume level
3

GU Electronic
Specification
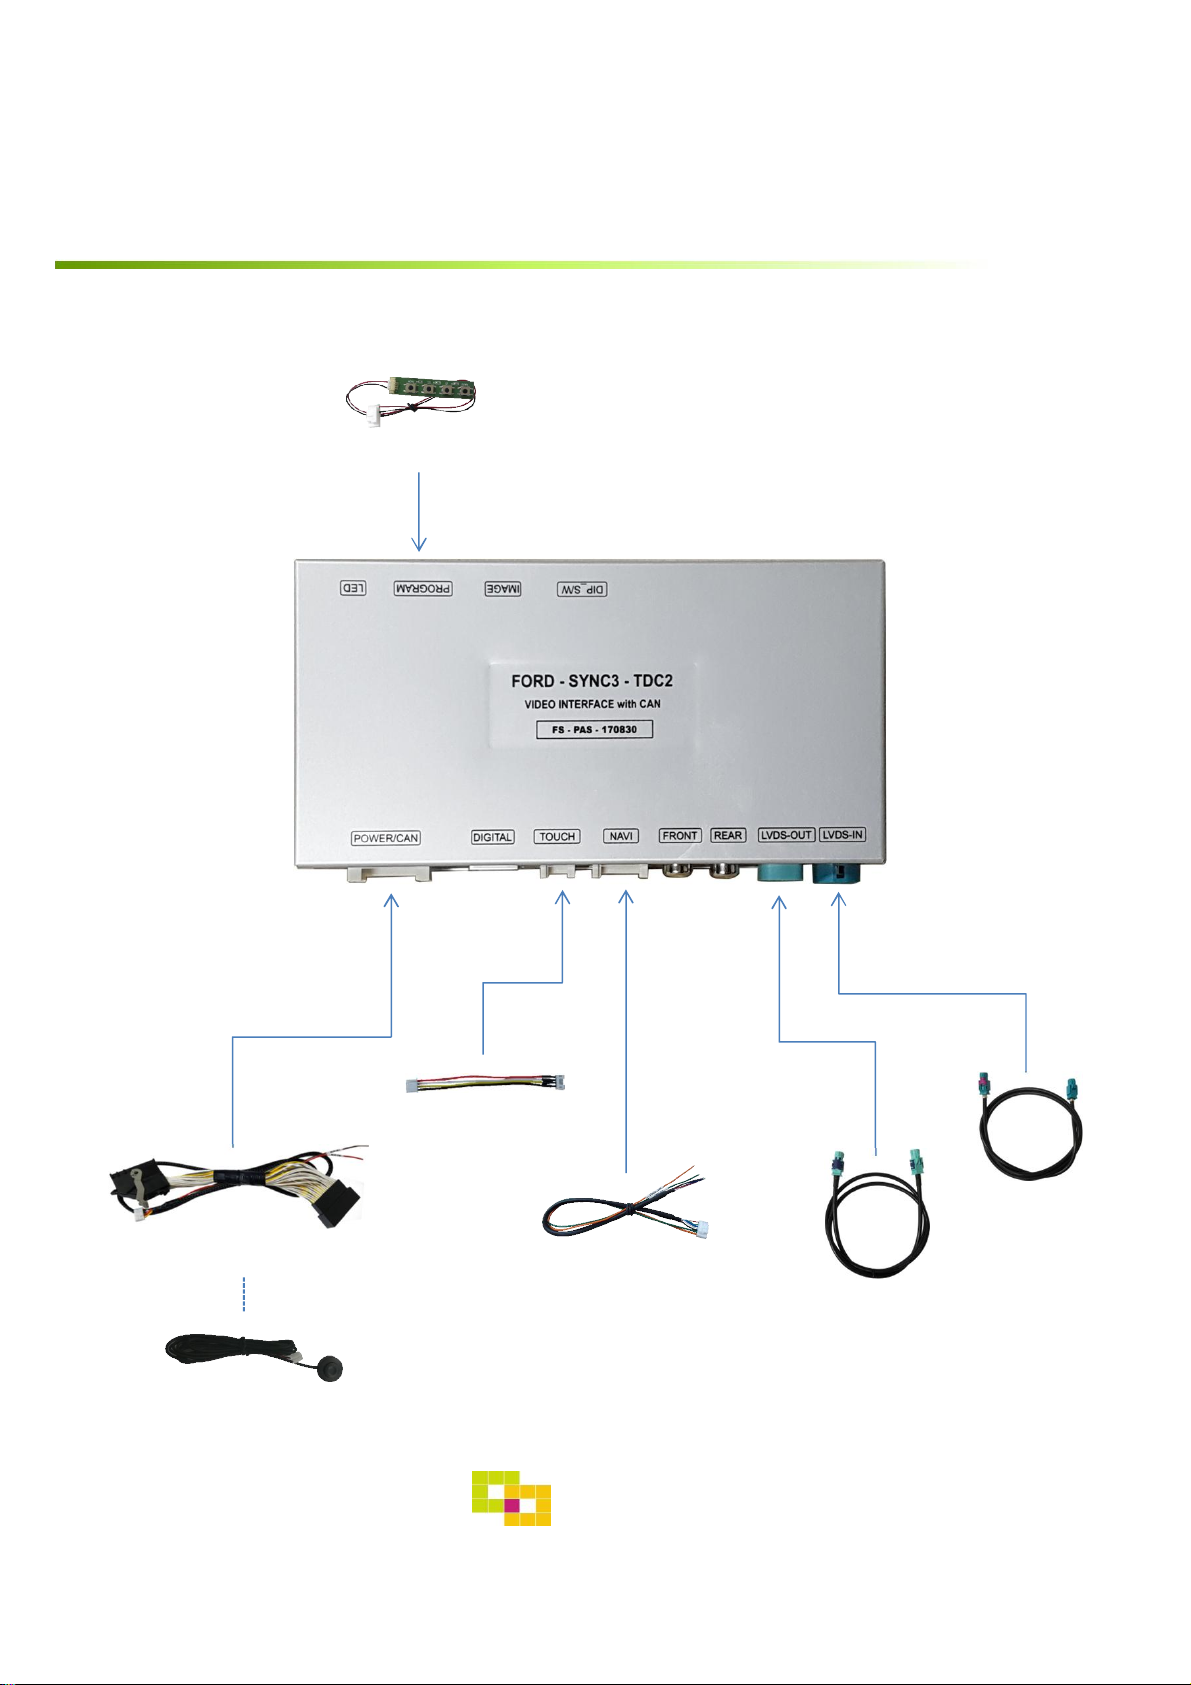
2. Diagram
4
INTERFACE
Scaler
(PIP)
MCU
CAR
COMMAND
SYSTEM CAN
EEPROM
CAN
RECEIVER
CAR
TFT-LCD
REAR CAMERA
RGB+Sync
DIGITAL RGB LVDS
FRONT CAMERA
COMPOSITE
COMPOSITE
LVDS
TX RELAY
LVDS
RX
LVDS
TX LVDS
REAR CAMERA
POWER
GU Electronic
Specification
3. Components
5
Power Cable 1EA
OSD Board 1EA
RGB NAVI Cable(7pin) 1EA LVDS In Cable
LVDS Out Cable
Touch Cable(KD-900) 1EA
Mode S/W 1 EA

*Touch Connect
① Y-
②X
③Y+
④X+
Specification
4. Exterior
164mm
25mm
6
83mm
GU Electronic
*NAVI Connect
① R DATA (Red)
②G DATA (Green)
③B DATA (Blue)
④SYNC (White)
⑤GND (Black)
⑥DVB-T IR (Green)
⑦DVD IR (Orange)
①②③④⑤⑥⑦
① ② ③ ④
*POWER Connect
1. Battery (Yellow)
2. Battery (Yellow)
3. Rear-DET (Brown)
4. Front-DET (Blue)
5. CAN1-L (Green)
6. CAN1-H (Orange)
7. CAN2-L (White)
8. CAN2-H (Purple)
1 15
2 16
9. N.C
10. N.C
11. ACC (Red)
12. Rear-VCC (Red)
13. Front-VCC (Red)
14. Mode (Green)
15. GND (Black)
16. GND (Black)
Settings
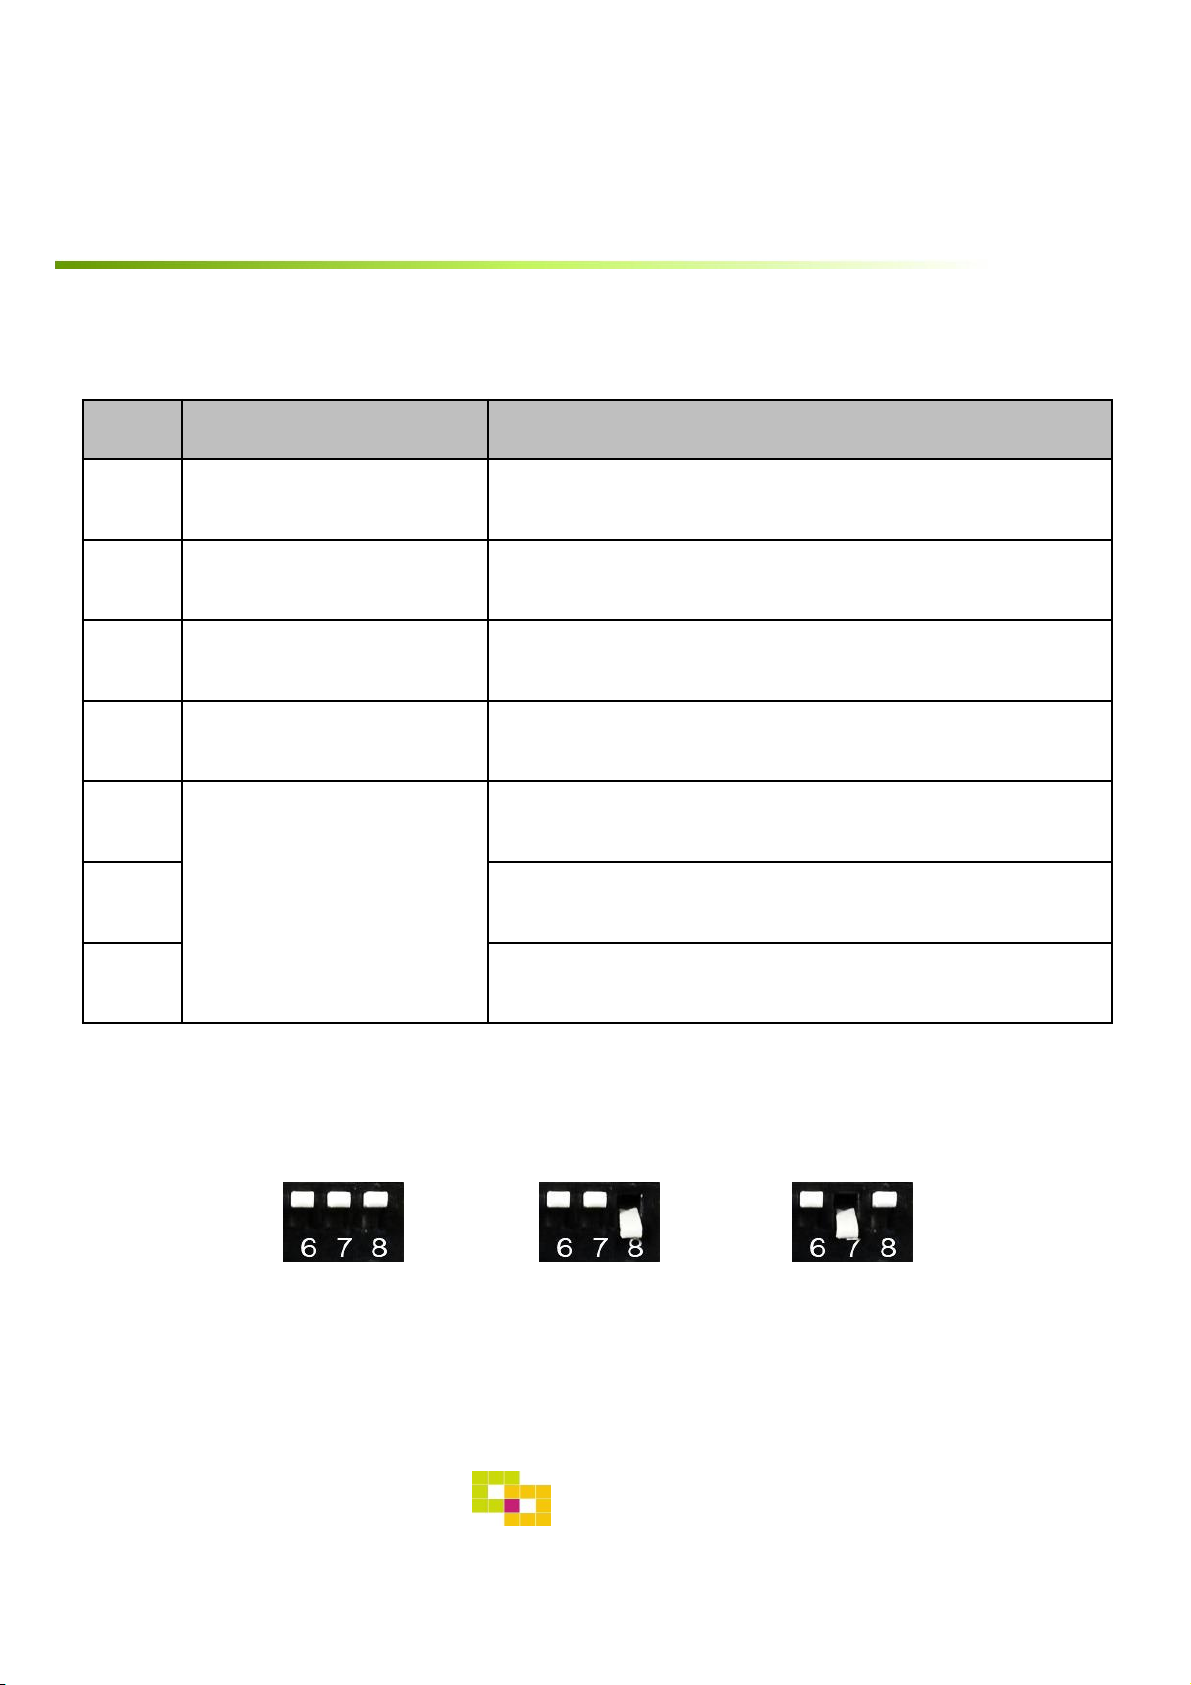
1. Dip Switch
* ON : DOWN , OFF : UP
NO. Function Selection
1 NAVI ON : Skipping NAVI
OFF : Display
2 AV1 (DVB-T) ON : Skipping AV1 (DVB-T)
OFF : Display
3 AV2 (DVD) ON : Skipping AV2 (DVD)
OFF : Display
4,5 N.C
6
Car Model
ON :-
7 ON : Mustang
8 ON : F-150(2015years), FX4
* Example
7
GU Electronic
SYNC3 7”
(Press No.8
in “ON” position
If not working )
F-150(2015years) FX4 Mustang
8
GU Electronic
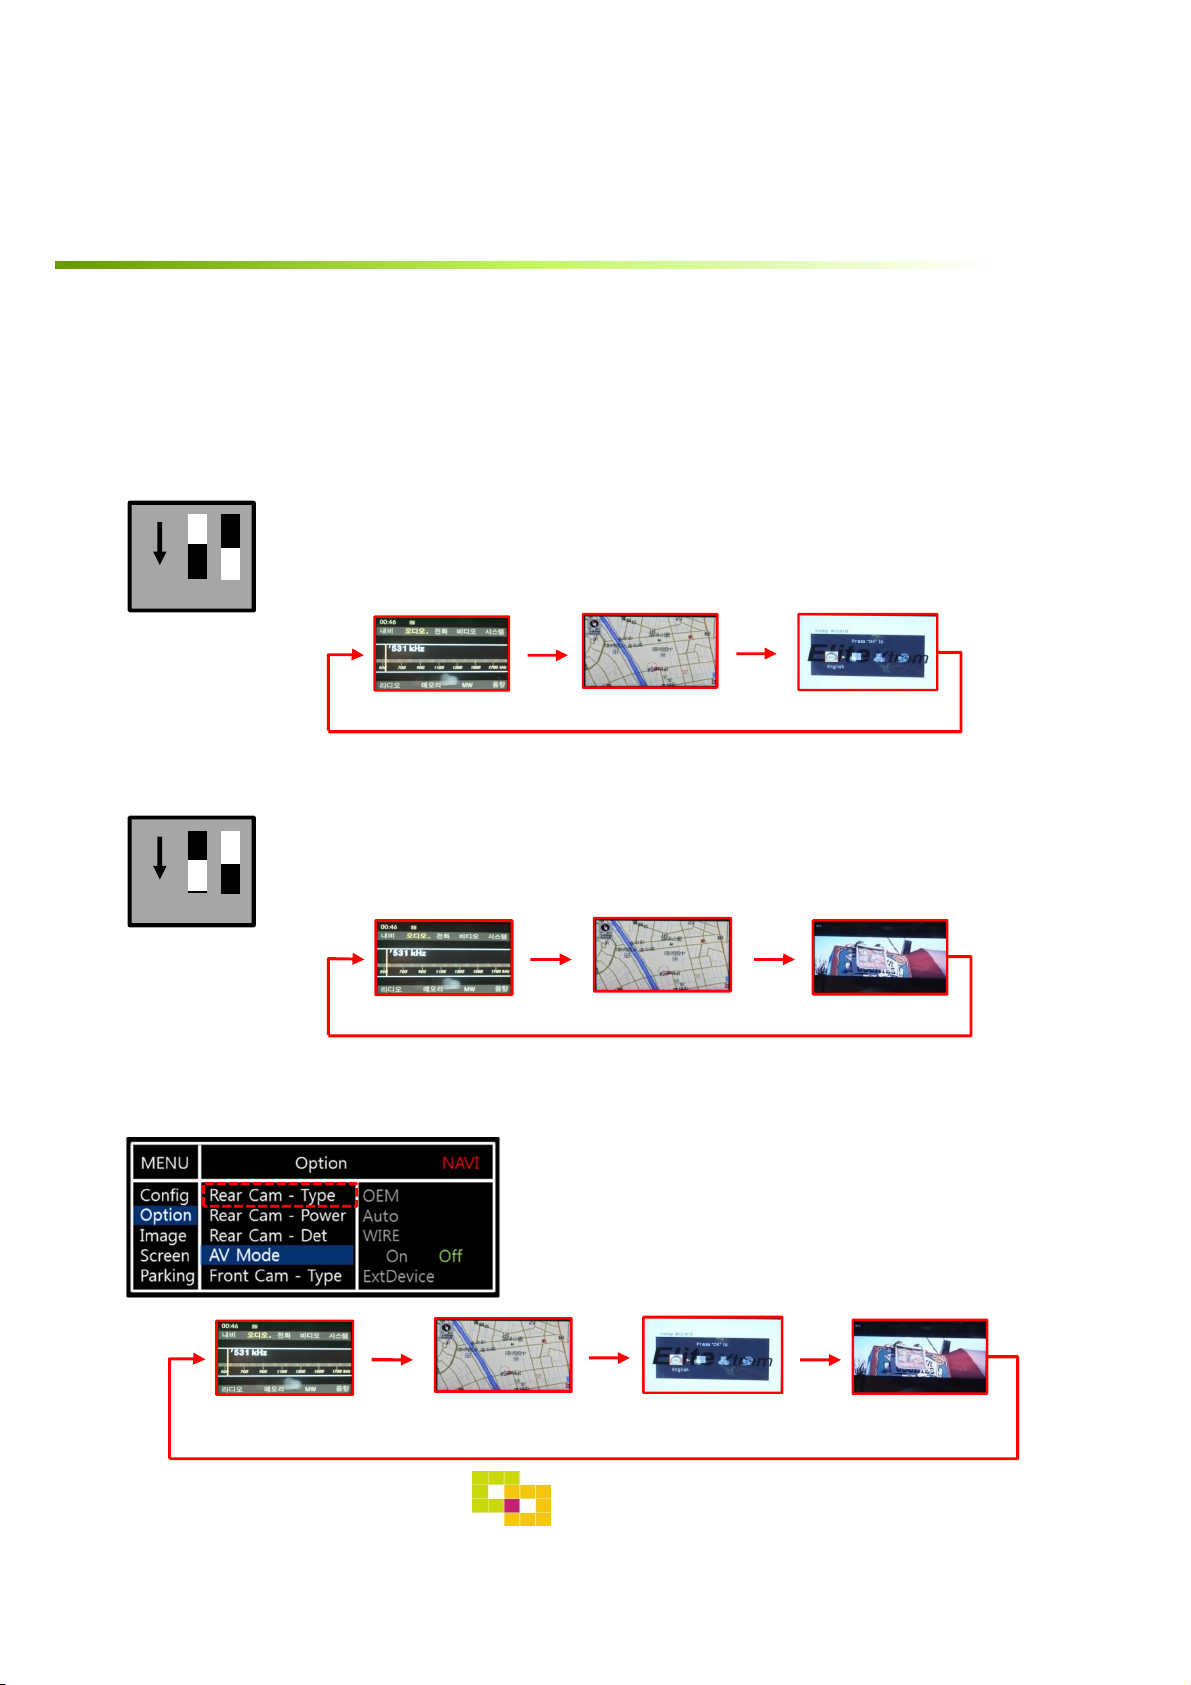
※ Possible to use “Front, Rear” input as video input for DTV, DVD (DTV, DVD UI ICON
appears only in Front input)
ON 2 3
NAVI
OEM DTV(AV1)
ON 2 3
NAVI
OEM DVD(AV2)
•FRONT
•REAR
“RearCam-Type” should be set as “OEM” and
“AV Mode” should be set as “ON” in OSD Menu
when video device is connected to Rear input
No.2: Off / No.3: On
DVB-T UI On/Off (Refer to P15)
(Dip no.3 should be ON (Skip) Otherwise AV2 screen will appear)
No.2: On / No.3: Off
DVD UI On/Off (Refer to P16)
((Dip no.2 should be ON (Skip) Otherwise AV1 screen will appear.)
- AV1 Setting – For DTV
- AV2 Setting – For DVD
- AV Setting – For DTV or DVD
Settings
NAVI
OEM DTV(AV1)
or DVD(AV2)
AV
(DTV or DVD)
1. Dip Switch- DVB-T, DVD Setting

9
Settings
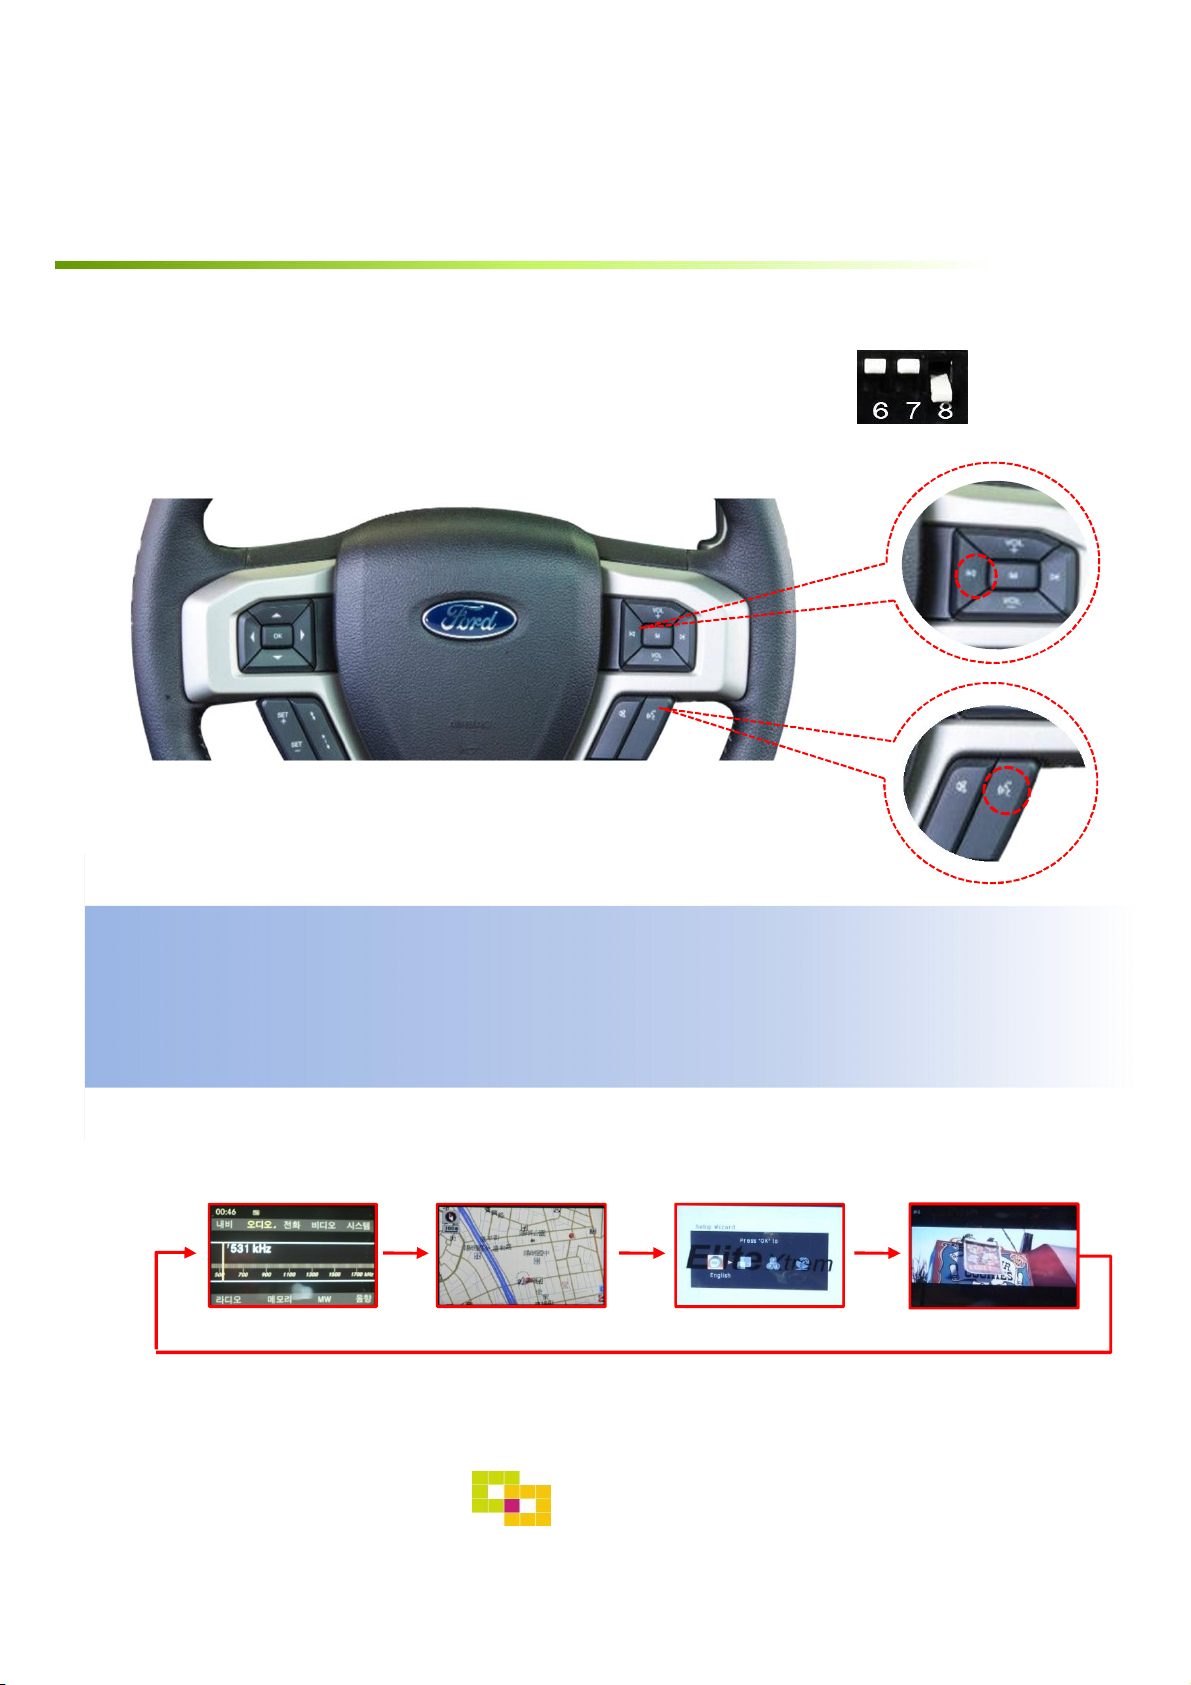
2. Original button – Steering Wheel (Switching Mode)
GU Electronic
※ The screen is switched in order as the pictures below
※ Possible to set the use of Steering Wheel button in OSD menu (P.15)
NAVI
OEM AV1(DTV) AV2(DVD)
Long Press “LEFT button” or “Voice button” : switching mode
Short Press “LEFT button” or “Voice button” : switching to OEM screen directly
※ If it does not work, Please see the following page.
10
Settings
2. Original button – Steering Wheel (Switching Mode)
GU Electronic
※ Possible to set the use of Steering Wheel button in OSD menu (P.15)
Long Press “LEFT button” or “Voice button” : switching mode
Short Press “LEFT button” or “Voice button” : switching to OEM screen directly
※ The screen is switched in order as the pictures below
NAVI
OEM AV1(DTV) AV2(DVD)
※ If it does not work, Please press Dip sw no.8 down
Other manuals for FORD SYNC3 TDC2
1
Table of contents
Other GU Electronic Car Stereo System manuals


