manuals.online logo
Brands
  1. Home
  2. •
  3. Brands
  4. •
  5. Denver
  6. •
  7. LED TV
  8. •
  9. Denver LED-1030DVBT User manual

Denver LED-1030DVBT User manual

MINI DVB-T TV
INSTRUCTION MANUAL
LED-1030DVBT
Use of controls or adjustments or performance of procedures other than
those specified herein may result in hazardous radiation exposure.
1. Do not damage the mains lead.
When not in use, disconnect the mains lead from the outlet. Grasp the plug, not the main lead,
when disconnecting the unit.
2. If water should enter the unit, electrical shock or a malfunction may result. Use in an area where
there is low humidity and little dust.
3. Do not disassemble or alter the unit in any way.
4. Do not use the unit in areas where extremes in temperature occur (below 5℃or exceeding 35℃),
or where it may be exposed to direct sunlight.
5. This unit must be operated in a horizontal position.
To prevent fire or shock hazard, do not expose this appliance to dripping or splashing.
No objects filled with liquids, such as vases, shall be placed on the apparatus.
THIS UNIT SHOULD NOT BE ADJUSTED OR REPAIRED BY ANYONE EXCEPT
PROPERLY QUALIFIED SERVICE PERSONNEL.
TO R E D UC E T H E R I S K O F F IRE O R E L E CTR I C S H O CK,
DO N O T EXP O S E TH I S A P P L IA N C E TO R A I N OR M O I S T U RE
GB-1
1 Platform and IR remote introduce
1.1 The function parts of the unit
24
5
6
7
3
1
8
9 10 11 12 13 14
15 16 17 18 19 20 21 22 23 24 25
GB-2
Names of the parts
1.
2. CH+/UP Button
3.
4.
6. VOL-/LEFT Button
7
8.
9.
10.
11.
12.
SOURCE/EXIT Button
CH-/DOWN Button
TFT SCREEN
USB SOLT
CARD SOLT
VIDEO INPUT
AUDIO_L INPUT
MENU/ENTER Button
VOL+ /RIGHT Button
IR/ LED POWER ON/OFFButton
5.
..
13.
14.
15.
16.
17.
18.
19.
20.
21.
22.
23
24.
25.
AUDIO_R INPUT
CI CARD SOLT
DC IN(12V) INPUT
HDMI INPUT
VGA INPUT
Y INPUT
Pb INPUT
Pr INPUT
S-VIDEO INPUT
SCART INPUT
.VGA AUDIO INPUT
PHONE OUTPUT
ANT INPUT
1.2 Remote control
1. POWER ON/OFF
2.
3. NICAM/A2
4.DVB
5.TV/AV
6.CYAN
7. DISPLAY
8. MENU
9.
10.
11. EXIT
12.
13. EPG
14.
15.
16.
17.
18.
19. SUBTITLE
20.
21.
SLEEP
CH
VOL
PAGE+
PAGE-
Pause
SUBPAGE
SIZE
REVEAL
NUMBER 0~9
MUTE
22.Channel Swap
23.
GREEN
YELLOW
-/--
24. RED
25.
26.
27. 16:9
28. TXT/CC
29. PICTURE
30. VOL
31. SOUND
32. CH
33. DVB/MEUN
34. FAV
35. LIST
36. RADIO
37. INDEX
38. LUCIDITY
39. CANCEL
40. HOLD
41. ENTER
MUTE POWER
1 2 3
456
78 9
0
SLEEP
NICAM/A2
DVB
TV/AV
CYAN
DISPLAY
MENU
RED GREEN
16:9 TXT/CC
PICTURE
SOUND EXIT
YELLOW
DVB/MENU EPG PAGE+
LIST RADIO PAUSE PAGE-
INDEX LUCIDITY SIZE SUBPAGE
CANCEL HOLD SUBTITLE REVEAL
FAV
CH
VOL
CH
OV L
1
2
3
4
5
6
7
8
9
10
11
12
13
14
15
16
17
18
19
20
21
22
23
24
25
26
27
28
29
30
31
32
33
34
35
36
37
38
39
40
41
GB-3
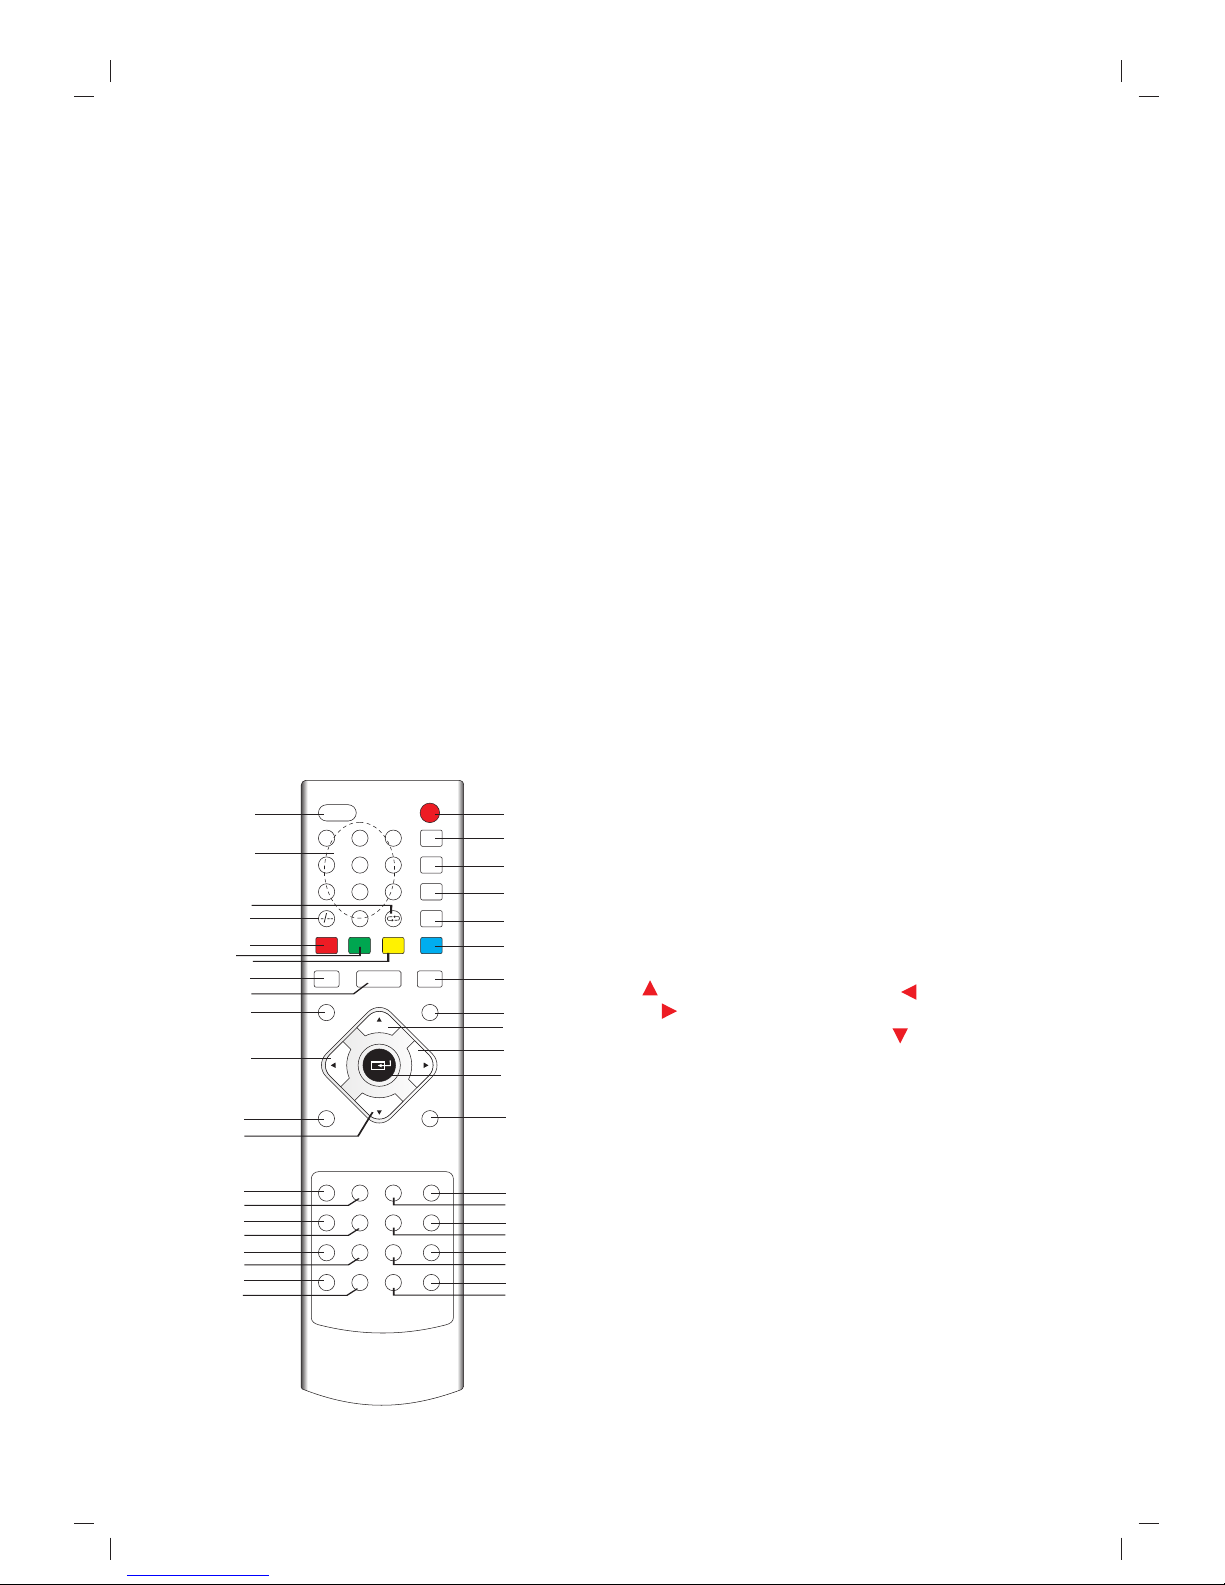
Instruction to keystrokes of remote controlle
18.REVEAL:when in ATV mode, can hide teltext .
19. SUBTITLE :enter into title and display.
20.MUTE: mute control.
21. NUMBER 0~9 :elect number input
22. Channel Swap: return to first channel.
23. -/-- press this keys to select one-digit
27. ASPECT : Select inverse proportion of screen
28.TXT/CC:TXT,CC function setting.
29. PICTURE: picture mode setting
31. SOUND: sound mode setting
33.DVB/MEUN
34. FAV: Go to favorites programmers.
35.LIST:Go to program list.
36. RADIO: Switch to Radio
37. INDEX: (Channel List)program list
38. LUCIDITY:in teltext mode,adjust definition
and brightness.
39. CANCEL:in teltext ,press it, Return to upper
menu and played.
40. HOLD :in ATV mode,select one page
41. ENTER Button : Press to enter an item in the
menu or to confirm and execute a selection
1).Adjust the channel in TV mode
2).Control high light up or down to select option in
2. Functions introduce
2.1 Basic functions
Please check up whether it is good connection with power, whether the voltage is stable,
whether the antennae is connected, and whether there is any physical damage to the circuit board.
Power on/off :
When the power cord plugged in outlet, press “power on/off” key on the unit to power on.
When it is running, press “power on/off” key on the unit into “standby” mode.
Source input:
Use the source key to choose which input you needed then press “Enter”.
(ATV、 、AV 、S-VIDED、SCART、YPbPr、HDMI、VGA、USB/CARD)
DTV
1.POWER: power ON/OFF
2. SLEEP:TV sleep time setting.
3. NICAM/A2: NICAM /DUAL setting
4. DVB : DTV mode setting.
5.TV/AV: Switch between TV and AV mode.
6/ /25/26:CYAN/ RED/GREEN/YELLO
1).Adjust teletext in ATV.
2).Adjust EPG in DTV
3).Adjust FF/FR/PREV/NEXT in USB/SD
CARD Media play.
7. DISPLAY: display the source information.
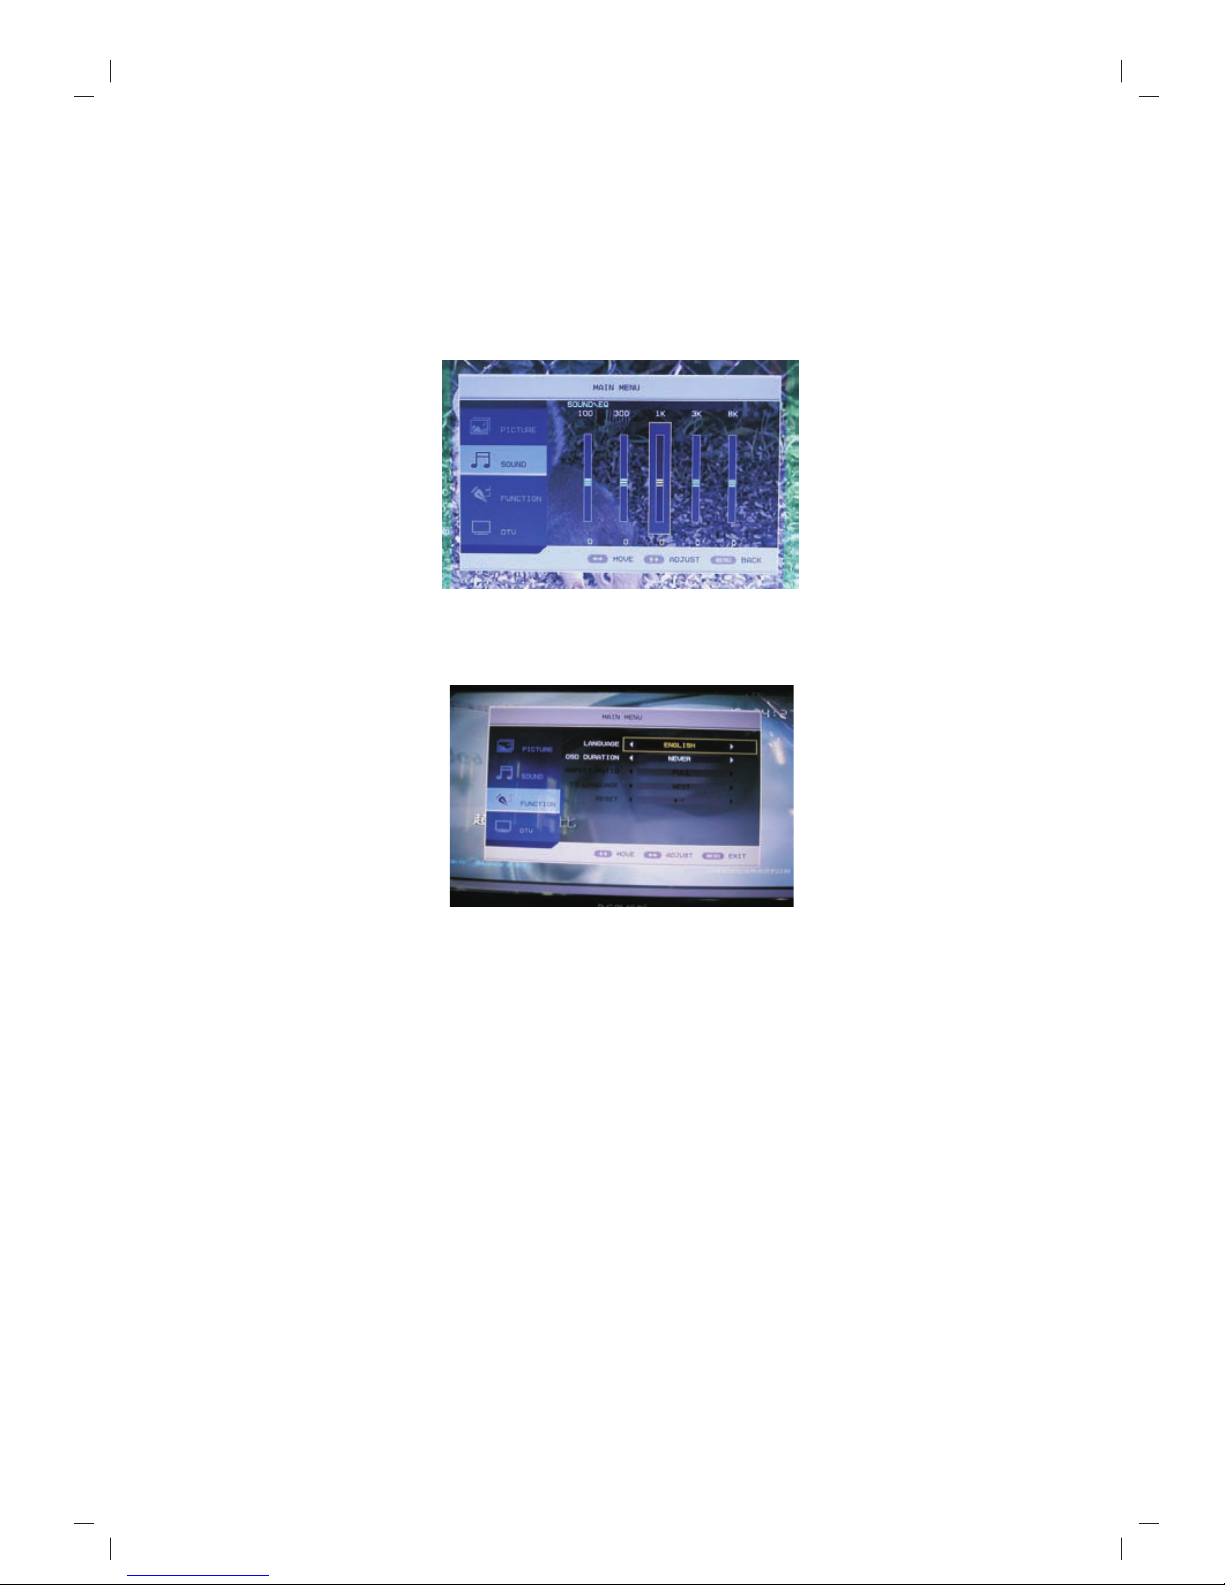
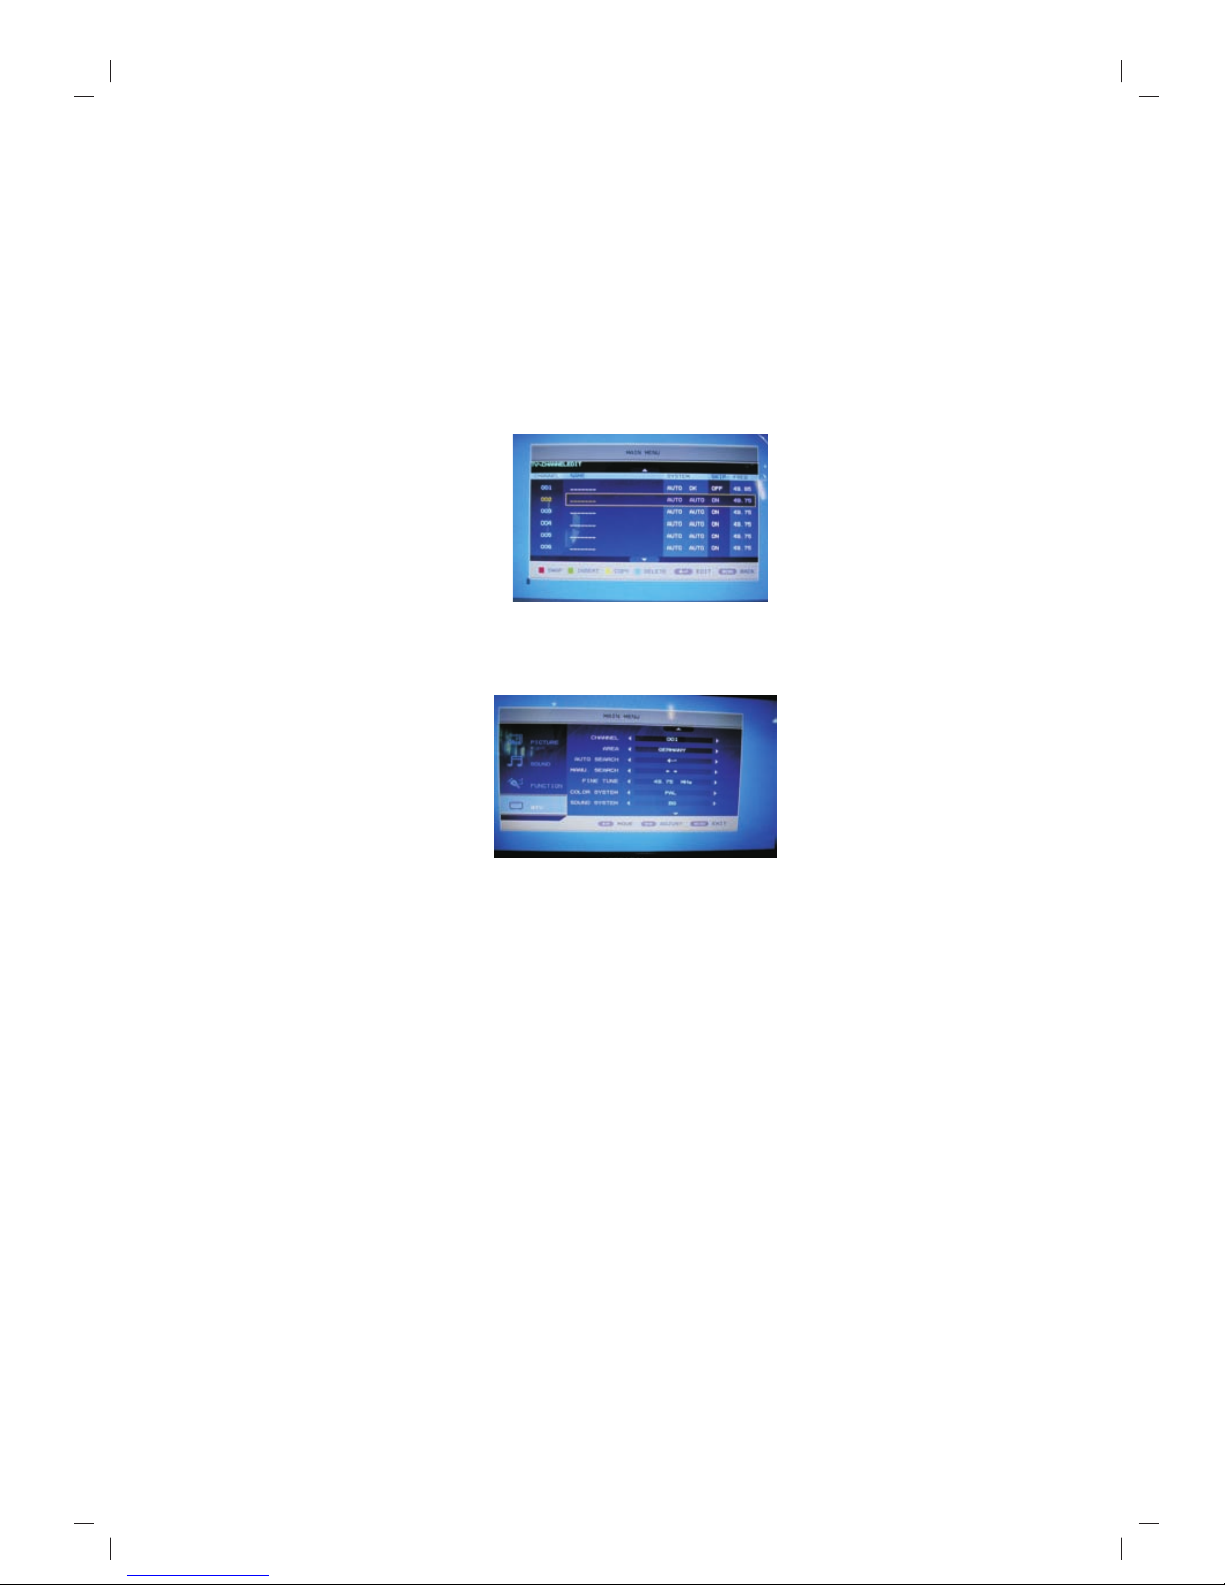
8. MENU :Enter/exit into main menu.
9/32. CH+/ CH-
1).Adjust the channel in TV mode
2).Control high light up or down to select
option in menu setup mode.
10/30. VOL+/ VOL-:
1)adjust up/down the volume
2).Control high left or right to select option in
menu setup mode.
11.EXIT Button :return to the previous
program played.
12/14.PAGE+/ PAGE- :Select upward /
downward page.
13. EPG Go to electron program guide.
15.Pause: when playing DTV、MMC/SD card
media , Switch between Play and
Pause.
16. SUBPAGE. search the next page and
display
17. SIZE Press this key to select different
image sizes
24
and USB
GB-4
Sleep function:
you can use sleep key to set the TV sleep setting, such as : ,30Mins, 45Mins, 60Mins,
90Mins, 120Mins,180Mins,
Display setting:
Enter the display key to show the source information .
Mute function:
Enter the mute key to mute or the sound.
Picture mode setting:
Any source ,enter picture key to change the brightness, contrast,saturation,sharpness, color
temp setting.
Sound mode setting:
Enter sound key to change sound setting.
( )
Nicam setting:
When TV source use nicam/a2 key change nicam/a2 setting.
Numeric key:
Enter this key can turn the channel you want.
Volume adjustment:
Press “Vol / ”key to adjust volume when system is in normal playing mode; and it will show
volume bar on the image.
Channel adjustment:
Press “CH / ”key to adjust Channel up and down.
2.2 Mainly menu setting:
Enter menu key you can see the picture:AV/S-video/Scart/YPbPr/HDMI mainly menu like 2-0,
ATV source like 2-1, DTV source like 2-2, source like 2-3。
OFF
240Mins
have
BASS/TREBLE/BALANCE/AVL/EQ
VGA
Fig. 2-0 AV mainly men
Fig. 2-1 ATV mainly menu
GB-5
.
2.2.1 Picture mode setting
Fig. 2-2 DTV mainly menu
Fig. 2-3 VGA mainly menu
Fig. 2-4 Picture setting
A: enter the menu ,then use up or down key to choose the Picture setting Fig. 2-4。
B: enter ►key choose PICTURE MODE menu,then enter▲▼key choose which you want
change,then enter►◄key change this value setting。
C:PICTURE menu can change action such as blow:
PICTURE MODE: Standard / /Soft /Optimal/ user. choose PICTURE Mode to USER Mode,
you can change current mode value such as: Brightness, Contrast, Saturation,Sharpness
D:COLOR TEMP: Standard/Warm /Cool
Vivid
.
2.2.2 Sound mode setting
Fig. 2-5 Sound setting
GB-6
A: enter the menu ,then use up or down key to choose the sound setting Fig. 2-5。
B: enter ►key choose SOUND MODE menu,then enter▲▼key choose which you want change,
then enter►◄key change this value setting。
C: Sound menu can change action such as blow:
SOUND MODE: Standard/ Music / Speech/ Movie / user. choose Sound Mode to USER Mode,
you can change current mode value such as: bass,treble,balance,
ALV: ON/OFF
EQ:Enter “EQ” setting,you can see the picture as 2-6
EQ.
Fig. 2-6 EQ setting
2.2.3 System setting
Fig. 2-7 System setting
A: Press the MENU key to enter OSD menu. “▲▼” keys to select the menu setting as
Fig. 2-7
B: Press “►”,and use “▲▼” to highlight the selection, and then use “►◄” to change the setting.
C: In this page, the following can be adjusted:
Language: set the language menu, the system supports English / Deutsch / Spanish / French
/ Portuguese /
OSD DURATION :the OSD duration after menu and signal operation,( NEVER/5 SECONDS/
10SECONDS/30 SECONDS/60SECONDS.)
ASPECT RATIO : FULL, 4:3 ,AUTO
Reset: This operation will delete all the user settings and every parameter will go back to
default;
D: Press MENU or EXIT key to exit OSD menu.
Dansk/Italian/Suomi.
mainly
A: ATV setting in ATV mode as Fig. 2-8
B: Press MENU key, and ▲▼to highlight ATV the channel mode.
C: Press ► to enter channel mode menu, use ▲▼ to highlight the item(page up and page down
enable), then use ►◄ to change the setting.
2.2.4 ATV setting
GB-7
D: In this page, the following can be adjusted:
CHANNEL: use” ►◄ “to change the setting
AREA: now it supports:Germany,England,Italy,France,Spain,Holland,Norway,Sweden,
,Greece,Australia,Russia,Ireland,Denmark,Portugal,Poland,Turkey.
ATUO SEARCH: please refer to ATV signal detail introduction!
MANU.SEARCH: please refer to ATV signal detail introduction!
FINE TUNE: please refer to ATV signal detail introduction!
COLOR SYSTEM: please refer to ATV signal detail introduction!
SOUND SYSTEM: please refer to ATV signal detail introduction!
SKIP:ON , OFF
E: Press MENU or EXIT key to exit OSD menu.
Finland
CHANNEL EDIT: edit title.
2.2.5 DTV setting
A: DTV setting as Fig. 2-9.
B: Press MENU key, and ▲▼to highlight the DTV channel mode.
C: Press ► to enter DTV channel mode menu, use ▲▼ to highlight the item(page up and page
down enable), then use ►◄ to change the setting. Press ENTER key to enter the current set.
The details will be introduced in the following.
D: In this page, the following can be adjusted:
CH.MANAGE: please refer to DTV signal detail introduction!
AREA: now it supports: ,Germany,England,Italy,France,Spain,Holland,Norway,Sweden,
, Greece, Australia, Russia, Ireland, Denmark, Portugal, Poland.
ATUO SEARCH: please refer to DTV signal detail introduction!
MANU.SEARCH: please refer to DTV signal detail introduction!
TIME: please refer to DTV signal detail introduction!
ADV SETTING: please refer to DTV signal detail introduction!
E: Press MENU or EXIT key to exit OSD menu.
Turkey
Finland
Fig. 2 -9 ATV S et ting
Fig. 2-8 channel edit
GB-8
Fig. 2 -10 D TV Se tti ng
3.1.1 Auto-search
When the input is TV, press MENU key to enter ATV setting, select Auto Search, as Fig. 3-1,
TV system will search the entire exits program from the whole channel scope and conserve
automatically. After done, it will enter to channel 1 automatically.
3.1 ATV signal introduction
3. Functions
Fig. 3 -1 ATV AUTO - SEARCH
3.1.2 Manual search
In mode, press MENU to start ATV setting. Select Manual Search press ►, the TV system will
search upward the nearest channel until to the maximum and exit, and press ◄, the TV system
will search downward the nearest channel until to the minimum and exit, no matter upward or
downward, once a program is searched, it will stop searching and play
3.1.3 Fine-tuning
In ATV mode, press MENU key to set the ATV, select FINE TUNE to adjust the frequency of
current channel, press ► to increase and ◄ to decrease. After finished, the system will hold the
frequency.
3.1.4 System standard setting
In ATV model, press MENU to set ATV color standard and sound standard. Now the color system
support PAL/SECAM/AUTO. If select AUTO, the system will AUTO identification the current
standard. The sound system supports DK/BG/I/L'/Auto.
ATV
GB-9
3.2 DTV signal introduction
3.2.1 Auto-search
A: When the input source is DTV, press MENU key to set the DTV menu. Select AUTO SEARCH,
it will search program automatically as Fig. 3-3.
Fig. 3-3 DTV AUTO-SEARCH
B: Before search, you need to set the AREA based on your location. Area search is an intelligent
mode; it will search all the channel of potential marketing. Current system supports areas
including /Germany/ England/ Italy/ France/ Spain/Holland/Norway/Sweden/Finland/
C: After enter to search menu, the system will search all the program of the whole frequency point
in the selected countries and areas, in the process of auto-search, press Exit to stop searching
and exit, after finished and any channel has been searched, the system will exit searching
programs automatically and preserve the information searched and play the program.
Turkey
Greece/ Australia/ Russia/ Ireland/Denmark/Portugal/Poland;
Fig. 3-2 ATV Teletext
GB-10
3.1.5 Teletext
A: If you want to watch teletext, please press “ ” on the remote controller to enter into EPG
page. As shown in the figure below:
B: Press “HOLD” key : Switch Text lock.
C: Press “LUCIDITY” key : The switch of mix the Text and current TV.
D: Press “INDEX” key : Text search, show Main Page.
E: Press “SIZE” key : change Text TV aspect ratio;
F: Press “REVEAL” key : switch of hide the characters
G: Press “SUBPAGE” key :8268;
H: RED/GREEN/YELLOW/ : the function as the display on the bottom of screen
TXT/CC
CYAN
3.2.3 Favorite list
A: In DTV mode, press FAV to select the favorite list as the Fig 3-5.
B: Press up or down key to the channel which you want to watch, press Enter, press FAV again
or press Exit to exit quick select mode.
3.2.4 Information
In DTV mode, presses “DISPLAY” twice, it will display the details of the program as Fig. 3-6
Fig. 3-4 QUICK SELECT
Fig. 3-5 FAVOURITE LIST
Fig. 3-6 PROGRAM INFORMATION
GB-11
3.2.2 Quick select
A: In normal play mode and DTV input, press LIST key to enter QUICK SELECT menu as Fig. 3-4:
B: Quick select menu: The left and right keys are to highlight the program group. The groups are
classified news, science, sports, movie, kids, , music, fashion and favorite .press up or down
key to the channel which you want to watch, press Enter, press Channel List again or press
Exit to exit quick select mode.
3.2.5 Multi audio
In DTV mode, press”NICAM/A2” key to do Multi audio setting. LEFT and RIGHT keys is to select
Stereo-->Left-->Right sequentially,in the panel center, there are audio languages, press UP
and DOWN to select the language you need and press ENTER. Press MTS/DUAL again or press
Exit to exit the program as Fig. 3-7
3.2.6 Electronic programs guide (EPG)
A: If you want to know the program information soon, press EPG to come to read the electronic
program guide. The date and time will be shown in the top left corner of the menu; the left is
the list of current programs and the right are the programs in different time. The right and left
key are to select the list focus and the up and down keys are to select the different programs
or EPG information.
B: Four types of EPG:
(1)Daily mode: press the red key to enter into Daily mode, according to the daily form to show
the program.
(2)Weekly mode: press green key to enter into weekly mode;
Fig. 3-7 MUlTI AUDio
Fig. 3.8 EPG Daily menu
Fig. 3.9 EPG Weekly MENU
GB-12
(3)Extended mode: press the yellow key to enter into extended mode, press EPG again or
press Exit to go to previous menu.
Fig. 3.10 EPG Extended Menu
C: In EPG mode, press “EPG” or “EXIT” to exit EPG mode
3.2.7 Switchover between TV and Radio
In normal, press “RADIO”, to switch TV and RADIO
3.2.8 Subtitle
A: Press “subtitle” to enter Subtitle menu, as below.
B: In subtitle menu, press the LEFT or RIGHT key to open or close the subtitle. In the open model,
you can choose the language and number of the subtitle on bottom of the menu.
Fig. 3.12 Subtitle menu
GB-13
3.2.9 Teletext
A: If you want to watch teletext, please press “ ” on the remote controller to enter into EPG
page. As shown in the figure below:
TXT/CC
Figure 3.13 Teletext page
B: Input three digits to go to corresponding page you want;
C: Press “CH ” to go to the previous page, while press “CH ” to go to the next page;
D: Press “VOL ” to back for 100pages, while press “VOL ” to advance for 100 pages.
E: Press “TEXT” to exit from teletext.
▼
3.2.10 Program Edit
In this system, you can edit the program, skip, knock, delete, sequence or group.Press “MENU”
to enter DTV mode, select “CH.MANAGE” and press “ENTER” to go into the channel edit as below
Fig. 3.14 DTV MENU
3.2.10.1 CH. ORGN.
A: In channel edit mode, press “▲▼” to select the item and press “ENTER”.
B: Channel Organizer When the property of Fav/move/Lock/Del was modified, press “Exit” to
cancel, or press “Enter” to conserve. At the same time, there will be a reminder “Successfully
updated…” If setting two or more properties at once, the system will deal with it as the
sequence of delete, lock, skip, favorite
Fig. 3.15 CHANNEL ORGANIZER
GB-14
3.2.10.2 H. SORT.
A: Press “▲▼” in channel edit mode to sort the program.
The first item is sort by area,the supporting areas including: Germany,England,Italy,France ,
Holland,Norway,Sweden,Finlang,Greece,Australia,Russia,Ireland,Denmark,Portugal,Poland,
Turkey,All Area, and the default is
B: The second item is sort by whether encrypted, included all/Free/Scramble, the default is all
C: There are five options in the third item: All/From A to Z/From Z to A/LCN-/LCN+, press the left
or right key to select and “ENTER” to conserve
England
Fig. 3.16 Channel Sorting
3.2.10.3 CH. GROUP.
In Channel group, press “▲▼” to set the channel group. In the left is the channel number and
name, the third column tells us whether the channel is favorite or not, and from the last column,
we will know the channel belong to which group.
Now there are eight groups: 1 None; 2 News; 3 Science; 4 Sports; 5 ; 6 ; 7 Music;
8
movies kids
Fashion.
Fig. 3.17 Channel Group
3.2.10.4 DEL TV CH. & DEL RADIO CH
A: Press “▲▼” , select delete function.
B: Delete all TV Channels: press “ENTER” , there will pop-up a dialog box for sure, press “YES”
and all the TV channels will be deleted.
C: Delete all Radio Channels:press “ENTER” , there will pop-up a dialog box for sure, press
“YES” and all the radio channels will be deleted.
GB-15
3.2.11 TIME
A: In DTV mode, press “MENU” and go into DTV setting, select “TIME”, press “ENTER” again.
Use “▲▼” to select the item which need to modify, and “Right” or “Left” key to modify the
setting.
B: Setting items include: Two modes to time: AUTO and MANUAL:
(1)In manual mode, we can set the date and the time. If select the date, press the right or left
key to enter calendar setting.
Time: Select the time item, press the right or left key to the number location, and press the
numeric keys to set the time.
Fig.3.18 TIME
(2)In auto mode, we can set Time Area and Daylight Saving Time
Time area: select the area item, press the right key to time area option, and press the up or
down key
to select the time area and then press “ENTER”
Daylight Saving Time: can be set to open or close
3.2.12 ADV SETTING
There is an “ADV SETTING” in ATV menu, press “▲▼” to select this option and press “ENTER”
for sure. It is to set audio language and the subtitle language (that needs the supplier's support.).
Also, it can be used to set the CI, CA, parent lock and the channel rate and so on.
AUDIO: in current program, if there is multi-language audio, have a certain one as the priority.
SUBTITEL: in current program, if there is multi-language subtitle, have a certain one as the
priority.
CI: to set the CI operation.
CA: to conserve the Encrypt channel or not.
PARENT LOCK: In DTV mode, press “MENU” , select “ADV SETTING” and press “ENTER” to go
into the “ADV SETTING”, and select “PARENT LOCK” to change the password as the following:
①The default password is 8268,
②Firstly, you have to input the old password correctly, and then input the new password, at last
input the new one again for sure.
③Press “EXIT” to cancel the current setting. Or “ENTER” to conserve. If set successfully,
conserve the setting, it works at once
GB-16
Fig. 3.19 Adv setting
Fig. 3.20 Change password
RATING: In DTV mode, highlight “ADV SETTING”, select “RATING” as below
Fig. 3.21 SYSTEM SETUP
After press the password, press “►” to go into set the channel rate, and press “▲▼” to select
the rate. The larger of the number, the higher of the rate.
3.3 Introduction of USB/CARD Multi-media function
In this system, there is a powerful USB/CARD interface function. Through the interface, we can
connect the external USB/CARD device and browse multimedia files. It supports and .
avi video file, .jpg format picture and mp3 audio file.
We can enjoy the music, picture and film through the external USB/CARD device. If no file or no
USB device, it will give the reminder of “No device” and return to previous menu. It supports four
modes: fast forward, fast backward, pause and play.
DAT
3.3.1 Film
A: When the input source is USB/CARD, press “►◄” key to select Movie
Fig. 3.22 film
GB-17
B: Enter to the sub menu and select the file you want to play, as below
Fig. 3.23 film
C: It will show the name, format and play state of the film. Press►◄ key ,“Fast Forward”,
“Fast Backward”, “Next song” and “ previous song” can be selected.
File Type Encoding Format
*MPG * DAT MPEG-1/2
*AVI * Divx (1)ISO MPEG4
(2)Xvid
supports media play format as below: (Video)
Fig. 3.24 muise
B: Enter to the sub menu and select the file you want to play, as below:
3.3.2 Music
A: When the input source is USB/CARD, press “►◄” key to select Music. as below:
Fig. 3.25 MUSIC
GB-18
C: In Music mode, it will display the name of music, play progress, artist, and record collecting
and so on. press the" " key enter Fast Forward; Long press " "key enter Fast Backward;
Once press " " botton is next song ;once press " " botton is previous song.
GREEN RED
CYNA YELLOW
supports media play format as below: (audio)
File Type
*mp3
*wav
*wma
format
Support
Support
Support
3.3.3 Picture
When the input source is USB/CARD, press “►◄” key to select Photo and press “ENTER” to
enjoy the picture. In the file list mode, press the green key to preview the pictures six in one .
Fig. 3.26 PREVIEW PICURE
supports media play format: JPEG,BMP.
3.4 signalVGA
Fig. 3.27 PC SETTIN
GB-19

Other Denver LED TV manuals

Denver LED-2453MC User manual

Denver

Denver LED-2453MC User manual

Denver LDD-2469 User manual

Denver

Denver LDD-2469 User manual

Denver LED-3275NL User manual

Denver

Denver LED-3275NL User manual

Denver LED-1953DVBT User manual

Denver

Denver LED-1953DVBT User manual

Denver LED-3268 User manual

Denver

Denver LED-3268 User manual

Denver LED-1953MC User manual

Denver

Denver LED-1953MC User manual

Denver LED-3266T2CS User manual

Denver

Denver LED-3266T2CS User manual

Denver TFD-3249MC User manual

Denver

Denver TFD-3249MC User manual

Denver LED-3274 User manual

Denver

Denver LED-3274 User manual

Denver LDD-3273 User manual

Denver

Denver LDD-3273 User manual

Denver LED-2253DVBT User manual

Denver

Denver LED-2253DVBT User manual

Denver LED-2456DVBTS User manual

Denver

Denver LED-2456DVBTS User manual

Denver LED-6570 User manual

Denver

Denver LED-6570 User manual

Denver LED-1033 User manual

Denver

Denver LED-1033 User manual

Denver LDD-2468 User manual

Denver

Denver LDD-2468 User manual

Denver LED-5571 User manual

Denver

Denver LED-5571 User manual

Denver LED-2468 User manual

Denver

Denver LED-2468 User manual

Denver LDD-2253 User manual

Denver

Denver LDD-2253 User manual

Denver LDD-2260 User manual

Denver

Denver LDD-2260 User manual

Denver LDD-1954MC User manual

Denver

Denver LDD-1954MC User manual

Denver LED-2259TC User manual

Denver

Denver LED-2259TC User manual

Denver LDD-2468 User manual

Denver

Denver LDD-2468 User manual

Denver LED-3259TC User manual

Denver

Denver LED-3259TC User manual

Denver LDD-3273 User manual

Denver

Denver LDD-3273 User manual

Popular LED TV manuals by other brands

Samsung 7 Series user manual

Samsung

Samsung 7 Series user manual

Philips OLED865 Series quick start guide

Philips

Philips OLED865 Series quick start guide

Allview 32ATC5000-H-SB user manual

Allview

Allview 32ATC5000-H-SB user manual

Logik L19LDIB11 instruction manual

Logik

Logik L19LDIB11 instruction manual

Sony BRAVIA KDL-55W900A Specifications

Sony

Sony BRAVIA KDL-55W900A Specifications

Sharp LC-43LBU591U user guide

Sharp

Sharp LC-43LBU591U user guide

LG 65UM6900PUA Service manual

LG

LG 65UM6900PUA Service manual

LG 47LS5600 user guide

LG

LG 47LS5600 user guide

Toshiba QA7D63DG operating instructions

Toshiba

Toshiba QA7D63DG operating instructions

LG UB85 Series owner's manual

LG

LG UB85 Series owner's manual

LG LB56 owner's manual

LG

LG LB56 owner's manual

Philips 32PFL3509 quick start

Philips

Philips 32PFL3509 quick start

LG 55LA9700 owner's manual

LG

LG 55LA9700 owner's manual

Samsung UN60ES7150F E-manual

Samsung

Samsung UN60ES7150F E-manual

Hyundai H-LED19V6 instruction manual

Hyundai

Hyundai H-LED19V6 instruction manual

LG 55UF7707 owner's manual

LG

LG 55UF7707 owner's manual

Panasonic Viera TH-L32B6M operating instructions

Panasonic

Panasonic Viera TH-L32B6M operating instructions

Philips 46PFL3507/56 Specifications

Philips

Philips 46PFL3507/56 Specifications

manuals.online logo
manuals.online logoBrands
  • About & Mission
  • Contact us
  • Privacy Policy
  • Terms and Conditions

Copyright 2025 Manuals.Online. All Rights Reserved.