Design Brilliant suncast BMS6284 User manual
BMS6284
Storage
Shed
ASSEMBLY
INSTRUCTIONS
BMS6284
Remises
de
jardin
INSTRUCTIONS
D'ASSEMBLAGE
BMS6284
Casetas
de
almacenamiento
INSTRUCCIONES
DE
ARMADO
Tools
Required
Outil
requis
Herramientas
necesarias
INCLUDED
IN
KIT
INCLUS
DANS
LA
TROUSSE
INCLUIDO
EN
EL
KIT
Easy
Bolt
Easy
Driver
Tournevis
pour
boulon
facile
Herramienta
de
fácil
uso
para
perno
de
fácil
inserción
010210410
El
Scan
OR
Code
for
product
assembly
video.
1
Balayez
le
code
OR
pour
la
vidéo
d'assemblage
du
produit.
Escanee
el
código
OR
para
ver
el
video
de
montaje
del
producto.
Brilliant
by
Design'
ui
English
Français
Espanol
3
19
35
0361673A
©
2022
Suncast
Corporation,
Batavia,
IL

Register
your
product
for
Limited
Warranty!
Must
register
product
within
90
days
of
purchase
for
limited
warranty
Enregistrez
votre
produit
au
programme
de
garantie
limitée
Vous
devez
enregistrer
votre
produit
au
programme
de
garantie
limitée
dans
les
90
jours
suivant
votre
achat.
iRegistre
su
producto
para
obtener
una
garantía
limitada!
Debe
registrar
el
producto
dentro
de
los
90
días
posteriores
a
la
compra
para
obtener
una
garantie
limitada
Scan
for
updated
Limited
Warranty
Scanner
pour
obtenir
la
grantie
limitée
à
jour
Escanear
para
obtener
garantía
limitada
actualizada
www.suncast.com/warranty
or
call
US
1 (
800)
846-2345
www.suncast.com/warranty
ou
appelez-nous
1 (
800)
846-2345
www.suncast.com/warranty
o
Ilamenos
1 (
800)
846-2345
Have
Questions?
We
are
here
to
help.
Check
out
our
resource
library
along
with
helpful
tips,
videos
and
FAQ's.
You
may
call
the
Contact
Center
directly
at:
1 (
800)
846-2345
or
write
Suncast
Corporation,
Contact
Center,
701
N.
Kirk
Road,
Batavia,
IL
60510 (
USA)
Des
questions?
Nous
pouvons
vous
aider.
Consultez
notre
bibliothèque
de
ressources
où vous
trouverez
des
conseils
utiles,
des
vidéos
et
une
FAQ.
Vous
pouvez
communiquer
directement
avec
le
centre
d'appels
au:
1-800-846-2345
ou
écrire
à
Suncast
Corporation,
Contact
Center,
701
N.
Kirk
Road,
Batavia,
IL
60510 (
États-Unis)
¿Alguna
pregunta?
Estamos
aquí
para
ayudarle.
Consulte
nuestra
biblioteca
de
recurses
junto
con
sugerencias
útiles,
videos
y
preguntas
frecuentes.
Puede
llamar
al
Centro
de
atención
directamente
al:
1 (
800)
846-2345
o
escribir
a
Suncast
Corporation,
Contact
Center,
701
N.
Kirk
Road,
Batavia,
IL
60510 (
EE.UU.)
To
purchase
Suncast
replacement
parts
and
learn
about
other
Suncast
products
visit
us
online
or
call.
Pour
acheter
des
pièces
de
rechange
Suncast
et
pour
plus
d'informations
sur
d'autres
articles
Suncast,
rendez-vous
sur
notre
site
Internet
ou
appelez-nous.
Para
comprar
piezas
de
repuesto
Suncast
y
obtener
más
información
acerca
de
otros
productos
Suncast,
visítenos
en
línea
o
llámenos
por
teléfono.
www.suncast.com
1-800-846-2345
or
1-630-381-6309.
1-800-846-2345
ou
le
1-630-381-6309.
1-800-846-2345
o
al
1-630-381-6309.
2

A
Before
You
Begin...
•
Consult
your
local
authorities
for
any
permits
required
to
construct
shed.
Prior
to
the
construction
of
your
shed,
check
with
the
local
building
code
official
to
review
any
required
permits
or
building
limitations.
• A
level
and
sturdy
foundation
is
required
before
shed
construction
can
begin.
Review
the
site
preparation
information
within
the
manual
before
beginning
assembly.
•
Read
instructions
thoroughly
prior
to
assembly.
This
kit
contains
parts
that
can
be
damaged
if
assembled
incorrectly
or
in
the
wrong
sequence.
•
Please
follow
instructions.
Suncast
is
not
responsible
for
replacing
parts
lost
or
damaged
due
to
incorrect
assembly.
•
Assistance
is
required
during
entire
assembly.
hmi
IMPORTANT
IF
FOUNDATION
IS
REQUIRED,
COMPLETE
SITE
PREPARATION
AND
FOUNDATION
CONSTRUCTION
BEFORE
UNPACKING
ALL
PARTS.
OPEN
ALL
BOXES
FIRST
AND
NEATLY
LAYOUT
PARTS.
SMALL
PARTS
MAY
BE
CONTAINED
IN
EACH
BOX.
PLEASE
REFERENCE
THE
PARTS
LIST
WITHIN
THIS
MANUAL
TO
VERIFY
ALL
PARTS
ARE
PRESENT.
A
Caution
•
Proper
site
preparation
required.
•
Shed
not
intended
for
use
in
extreme weather
conditions.
•
Shed
not
intended
for
storage
of
flammable
or
caustic
chemicals.
•
Store
heavy
items
near
the
bottom
of
shed.
•
Shed
not
intended
for
use
by
children.
•
DO
NOT
stand,
sit,
or
store
items
on
storage
shed
roof.
•
Treat
carefully
in
extreme
temperatures.
•
Repair
or
replace
broken
parts
immediately.
•
Suncast
is
not
responsible
for
damage
caused
by
weather
or
misuse.
•
At
regular
intervals
inspect
your
shed
to
make
sure
that
assembly
integrity
has
been
maintained.
•
Periodically
check
that
the
location
you
have
chosen
to
set
your
shed
is
still
level.
•
This
kit
contains
parts
with
metal
edges.
Please
be
careful
when
handling.
3

A
Care
Instructions
•
Hot
items,
such
as
recently
used
grills,
blowtorches,
etc.,
must
not
be
stored
in
the
shed.
•
Heavy
articles
should
not
be
leaned
against
the
walls,
as
this
may
cause
panel
distortion
and
permanent
damage.
•
Keep
roof
clean
of
snow
and
leaves.
•
The
shed
walls
and
roof
sections
have
a
textured
exterior,
much
like
vinyl
home
siding.
Over
time,
dust
may
accumulate
in
the
texture.
When
combined
with
moisture,
this
could
encourage
the
growth
of
moss
or
mold
on
the
shed.
To
maintain the
look
of
your
shed,
we
recommend
cleaning
it
each
year
with mild
soap
and
water.
DO
NOT
use
bleach,
ammonia,
or
other
caustic
cleaners,
and
DO
NOT
use
stiff
bristle
brushes.
Failure
to
perform
annual
cleaning
could
re-
sult
in
permanent
staining
of
the
plastic.
This
is
not
a
manufacturing
defect
and
is
not
covered
under
warranty.
Assembly
Day
Tips
•
Complete
site
preparation
and
foundation
construction
before
unpacking
parts
and
beginning
assembly.
•
DO
NOT
attempt
to
assemble
on
a
day
with
strong
winds.
•
DO
NOT
attempt
to
assemble
on
days
when
temperature
is
below
32
degrees.
•
Set
aside
appropriate
amount
of
time
to
completely
assemble
shed.
•
Make
sure
you
have
assistance
nearby
to
lift
and
secure
parts
in
place.
•
Wear
light
duty
work
gloves
while
assembling
shed.
•
Once
roof
is
assembled,
a
flashlight
may
be
of
use
when
assembling
smaller
components
inside
shed.
•
DO
NOT
use
a
power
drill
to
tighten
provided
Easy
Bolts.
Use
010210410
Easy
Bolt
Easy
Driver
tool (
provided)
ONLY.
•
Suncast
provides
extra
hardware
for
small
fasteners
for
customer
convenience.
In
some
cases,
there
will
be
extra
small
fasteners
once
the
assembly
is
complete.
Note:
This
product
contains
parts
that
are
used
in
different
orientations
to
construct
the
shed.
Please
take
note
of
the
orientation
of
the
parts
shown
throughout
this
instruction
manual.
Failure
to
follow
instructions
could
result
in
damage
to parts.
Suncast
is
not
responsible
for
replacing
parts
lost
or
damaged
due
to
incorrect
assembly.
Note:
Texture
or
design
of
shed
panels
may
differ
in
manual
from
the
actual
unit
purchased.
4
IMPORTANT
OPEN
ALL
BOXES
FIRST
AND
NEATLY
LAY
OUT
PARTS.
SMALL
PARTS
MAY
BE
CONTAINED
IN
EACH
BOX.
PLEASE
REFERENCE
THE
PARTS
LIST
WITHIN
THIS
MANUAL
TO
VERIFY
ALL
PARTS
ARE
PRESENT.
COMPLETE
SITE
PREPARATION
AND
FOUNDATION
CONSTRUCTION
BEFORE
UNPACKING
ALL
PARTS.
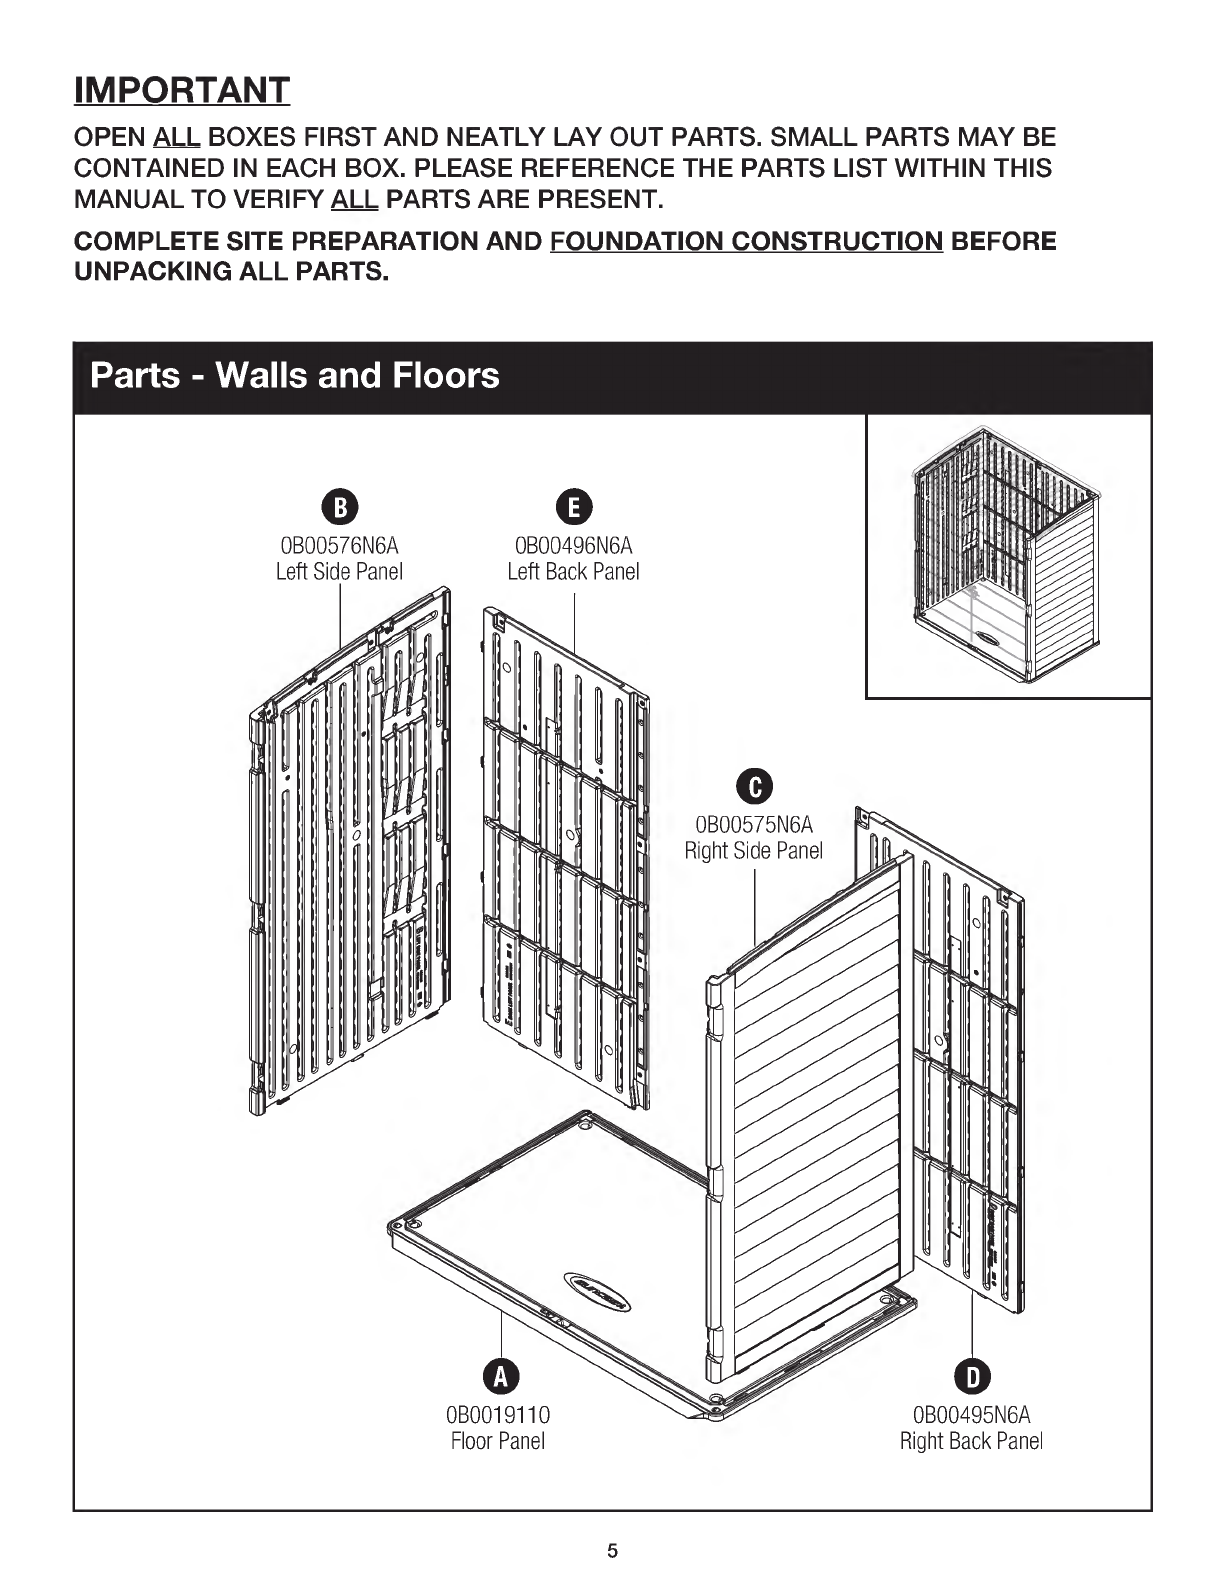
Parts -
Walls
and
Floors
o
OB00576N6A
Left
Side
Panel
o
OB00496N6A
Left
Back
Panel
O
OB00575N6A
Right
Side
Panel
OB0019110
OB00495N6A
Floor
Panel
Right
Back
Panel
5
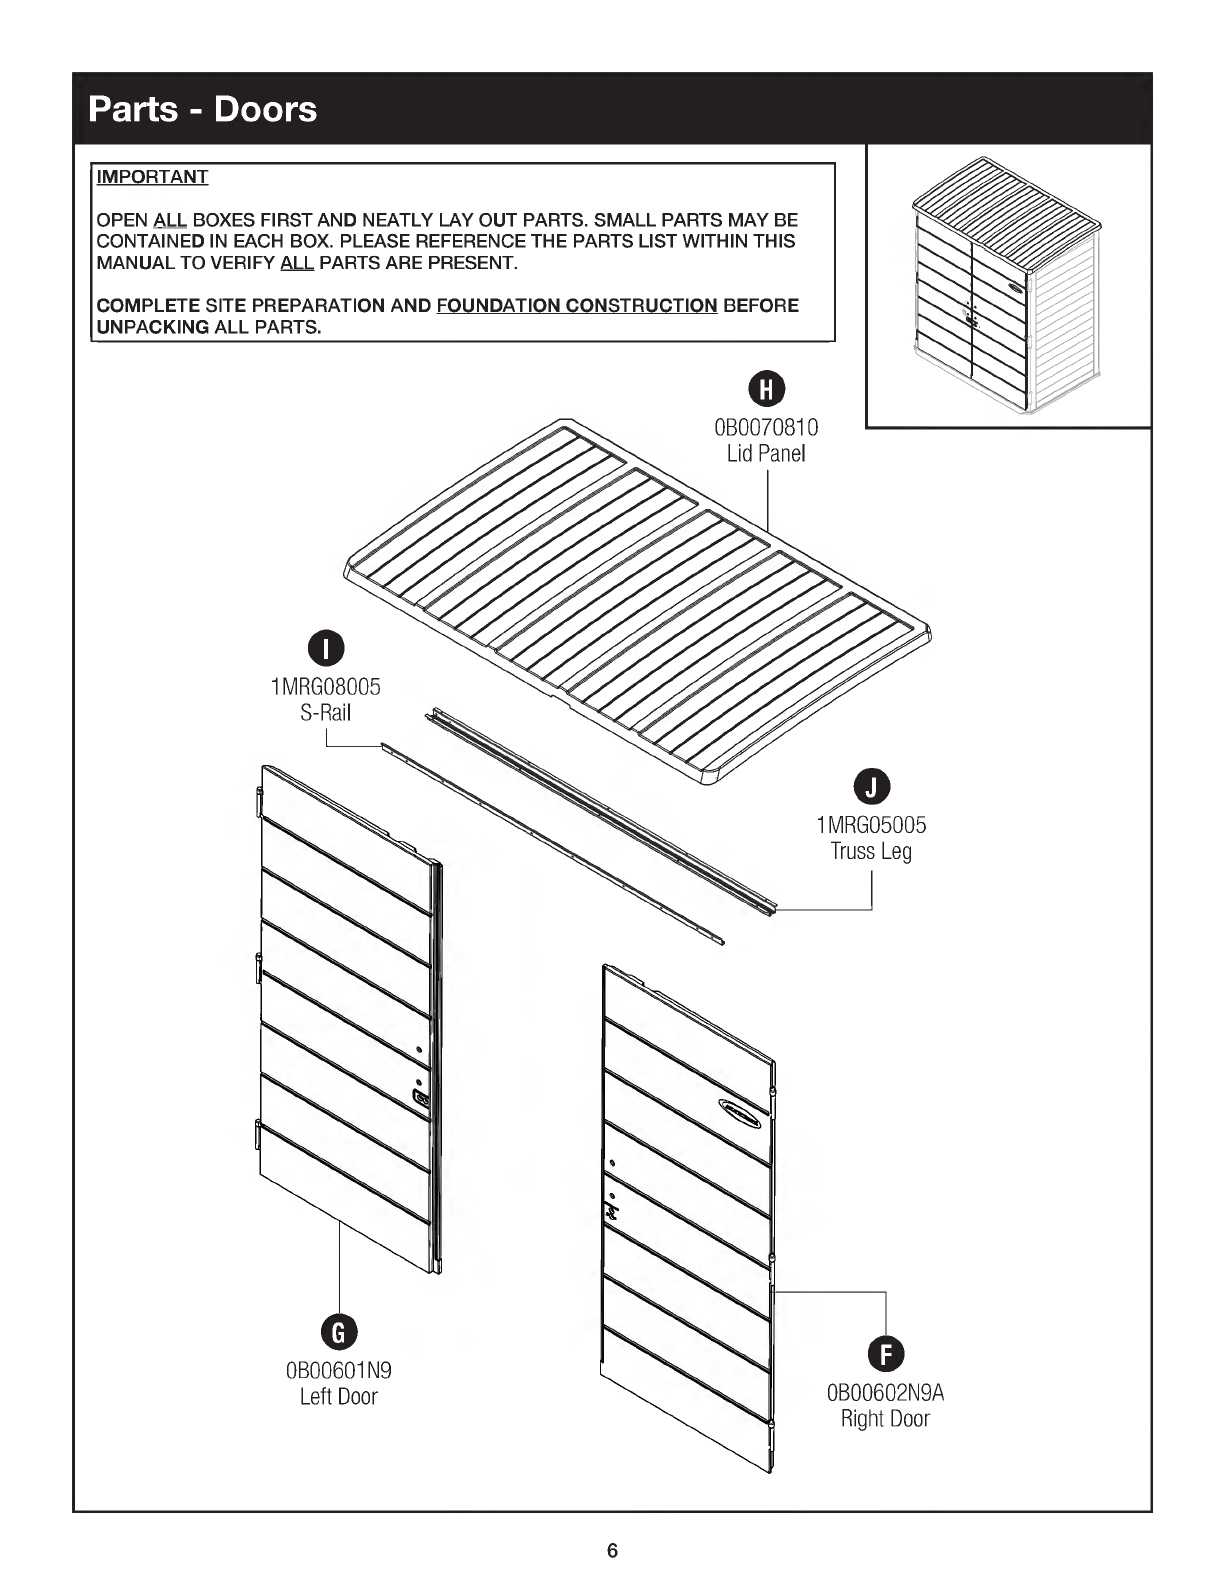
Parts -
Doors
IMPORTANT
OPEN
ALL
BOXES
FIRST
AND
NEATLY
LAY
OUT
PARTS.
SMALL
PARTS
MAY
BE
CONTAINED
IN
EACH
BOX.
PLEASE
REFERENCE
THE
PARTS
LIST
WITHIN
THIS
MANUAL
TO
VERIFY
ALL
PARTS
ARE
PRESENT.
COMPLETE
SITE
PREPARATION
AND
FOUNDATION
CONSTRUCTION
BEFORE
UNPACKING
ALL
PARTS.
o
1MRG08005
S-
Rail
e
OB00601N9
Left
Door
o
OB0070810
Lid
Panel
1MRG05005
Truss
Leg
o
OB00602N9A
Right
Door
6

Hardware
0860108 -
Hinge
Kit
OMP000022
Metal
Hinge
Plate
x6
0480452 -
Hardware
Bag
0210180
#8
x
5/8"
Screw
x9
0480540 -
Hardware
Bag
0102197N6
Roof
Retainer
x7
a
0102188N6
Easy
Bolt
7/8"
x17
010210410
Easy
Bolt
Driver
0102721
Roof
Bracket
x2
0480524 -
Hardware
Bag
0631017
1/4 -
20
x
1-1/2"
Machine
Screw
x7
0631149
#10
x
3/4"
Pan
Head
Screw
x28
0440631 -
Hardware
Bag
0280384
D-
Ring
Slide
Bolt
x2
Extra
hardware
provided.
Not
all
is
used.
7
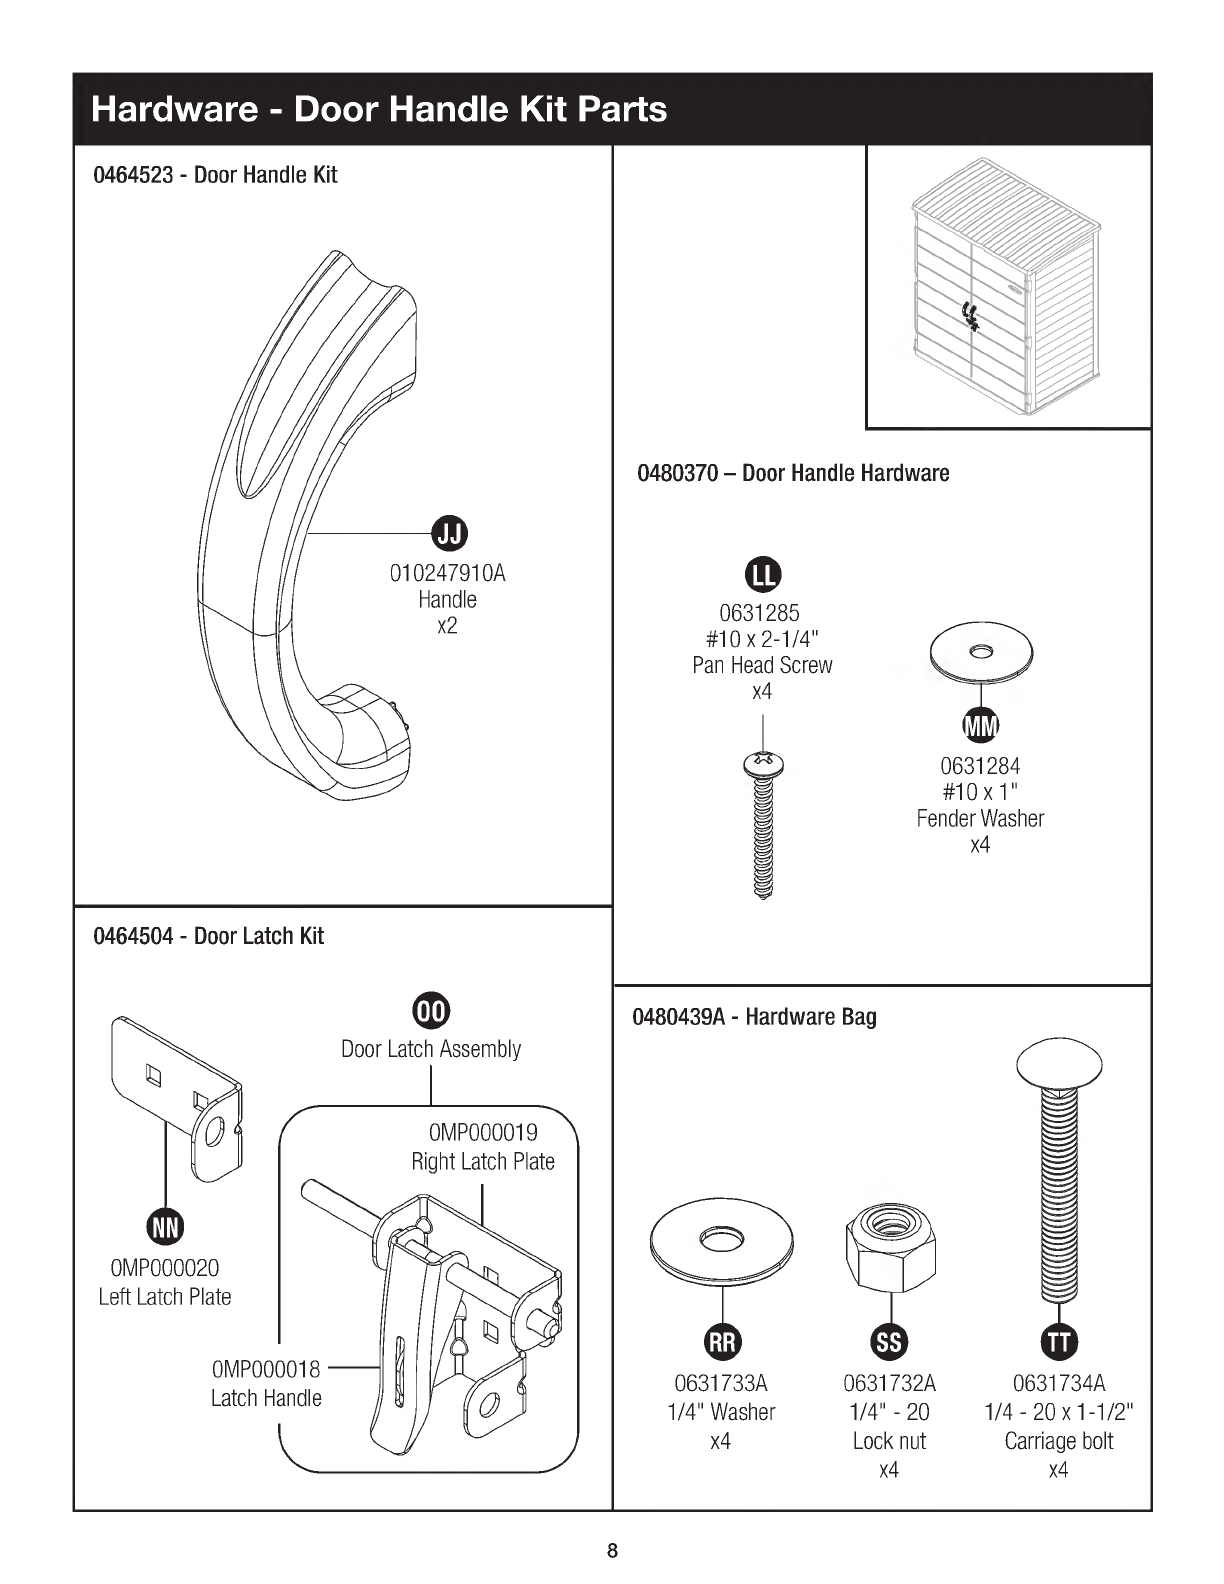
Hardware -
Door
Handle
Kit
Pads
0464523 -
Door
Handle
Kit
e
010247910A
Handle
x2
0464504 -
Door
Latch
Kit
cr)
Door
Latch
Assembly
1
0M
P000019
Right
Latch
Plate
OMP000020
Left
Latch
Plate
0M
P000018
Latch
Handle
0480370 —
Door
Handle
Hardware
o
0631285
#10
x
2-1/4"
Pan
Head
Screw
x4
0631284
#10
x
1"
Fender
Washer
x4
0480439A -
Hardware
Bag
<( )
o
0631733A 0631732A 0631734A
1/4"
Washer
1/4" -
20
1/4 -
20
x
1-1/2"
x4
Lock
nut
Carriage
bolt
x4 x4
8

Site
Preparation
and
Platform
Construction
Materials
NOT
supplied
with
Shed
Kit
Important:
•
Site
preparation
is
required
for
this
shed.
Placing
the
shed
on
a
properly
constructed,
square,
flat
and
level
foundation,
as described
below,
is
required.
Without
a
properly
constructed,
square,
flat
and
level
foundation,
settling
will
eventually
occur,
causing
distortion
and
damage
to
the
shed.
Suncast
is
not
responsible
for
replacing
parts
damaged
or
property
lost
due
to
incorrect
foundation
construction.
Warranty
requires
a
properly
constructed
foundation
as
described
below.
•
Complete
the
site
preparation
and
foundation
construction
before
unpacking
parts
and
beginning
assembly.
For
tips
on
site
preparation,
go
to
www.suncast.com,
consult
retailer,
or
local
codes.
Site
Preparation
1.
Consult
your
local
authorities
for
building
codes
and
covenants
before
beginning
foundation
or
erecting
shed.
2.
Before
any
digging,
check
with
local
utilities
to
determine
location
of
buried
cables,
pipes,
etc.
3.
Decide
which
type
of
foundation
is
most
suitable
for
your
installation.
The
foundation
surface
must
be
square,
flat
and
level.
Follow
the
below
guidelines
for
foundation
options:
Concrete
Slab
•
Construct
a
slab
of
at least
4"
thickness.
•
The
use
of
reinforcement
bar
is
recommended.
Wood
Platform
•
Use
exterior
grade
wood.
•
Set
the
wood
platform
on
pier
blocks
or
footing.
4.
Complete
the
foundation
preparations
as
follows:
• A
vapor
barrier
may
be
applied
over
the
foundation
to
prevent
excessive
condensation
in
the
shed.
Follow
local
building
codes
for
a
proper
vapor
barrier.
•
The
ground
should
slope
away
from
the
foundation
area
to
provide
drainage.
Anchoring
the
Floor
Panels
to
the
Foundation
•
Shed
floor
panels
include
flattened
areas
where
anchors
or
lag
screws
are
to
be
secured.
These
flat
areas
must
be
drilled
through
prior
to
securing
the
floor
panels
to
the
foundation.
Concrete
Slab
•
Secure
shed
to
concrete
slab
using
3/8"
masonry
anchors
with
1"
washers.
Masonry
anchors
and
1"
washers
are
available
at
most
local
hardware
retailers.
4
masonry
anchors
are
required
for
the
Suncast
BMS6284
Storage
Shed.
Wood
Platform
•
Secure
shed
to
wood
platform
using
1/4" -
3/8"
x
3"
lag
screws
with
1"
washers.
Lag
screws
and
1"
washers
are
available
at
most
local
hardware
retailers.
4
lag
screws
are
required
for
the
Suncast
BMS6284
Storage
Shed.
Note:
Shed
floor
fastening
locations
are
designed
to
align
with
the
under-
structure
layout.
Be
sure
the
front
of
the
base
panels
are
oriented
correctly
on
the
platform
to
ensure
lag
bolts
engage
with
the
under-
structure.
Wood
"
Dimensions
allow
for
shed
to
fit
within
the
nearest
1"
on
each
side.
9
Site
Preparation
and
Platform
Construction (
continued)
Materials
NOT
supplied
with
Shed
Kit
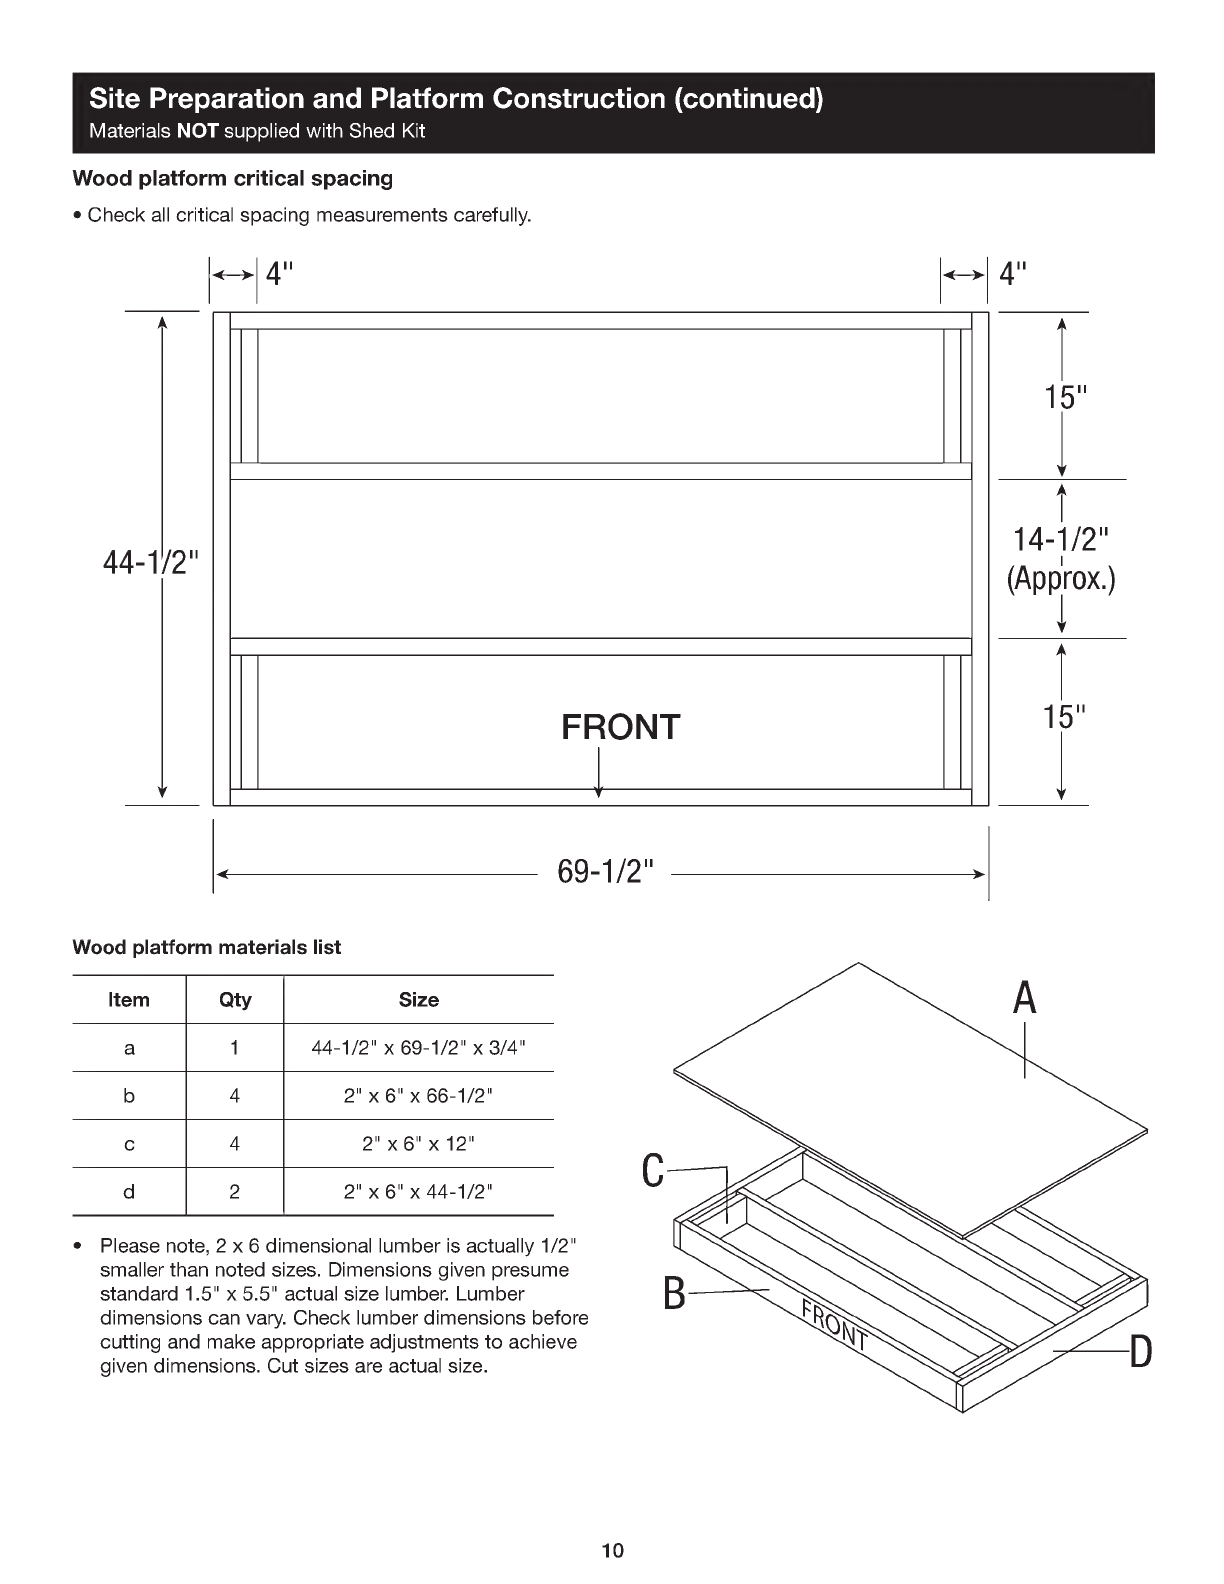
Wood
platform
critical
spacing
•
Check
all
critical
spacing
measurements
carefully.
À
44-1/2"
y
<--->
4" H
FRONT
1
Wood
platform
materials
list
Item
Qty
Size
a 1
44-1/2"
x
69-1/2"
x
3/4"
b 4
2"
x
6"
x
66-1/2"
c 4
2"
x
6"
x
12"
d 2
2"
x
6"
x
44-1/2"
69-1/2"
•
Please
note,
2 x 6
dimensional
lumber
is
actually
1/2"
smaller
than
noted
sizes.
Dimensions
given
presume
standard
1.5"
x
5.5"
actual
size
lumber.
Lumber
dimensions
can
vary.
Check
lumber
dimensions
before
cutting
and
make
appropriate
adjustments
to
achieve
given
dimensions.
Cut
sizes
are
actual
size.
4"
i
15"
it
14-y2"
(Approx.)
It
15"
1
10

Assembly/Walls
Align
tabs
on
bottom
left
side
panel (
B)
with
slots
on
floor (A).
Lower
panel
into slots.
Lock
side
panel ( B)
by
sliding
panel
toward
rear of
floor
panel (
front
corner
tab
will
slide
into position).
Lower
the
back
left
panel (
E)
tabs
into
the
slots
of
floor (
A).
The
back
left
panel
tabs
will '
snap'
into
place
when
in
correct
position.
Align
tabs
on
side
of
left
back
panel (
E)
with
slots
on
the
left
side
panel (
B).
Slide
back
left
panel
down
to
lock
tabs
into
left
side
panel.
7
Note:
Use
a
rubber
mallet
to '
push'
left
side
panel
(B)
into
locked
position.
11
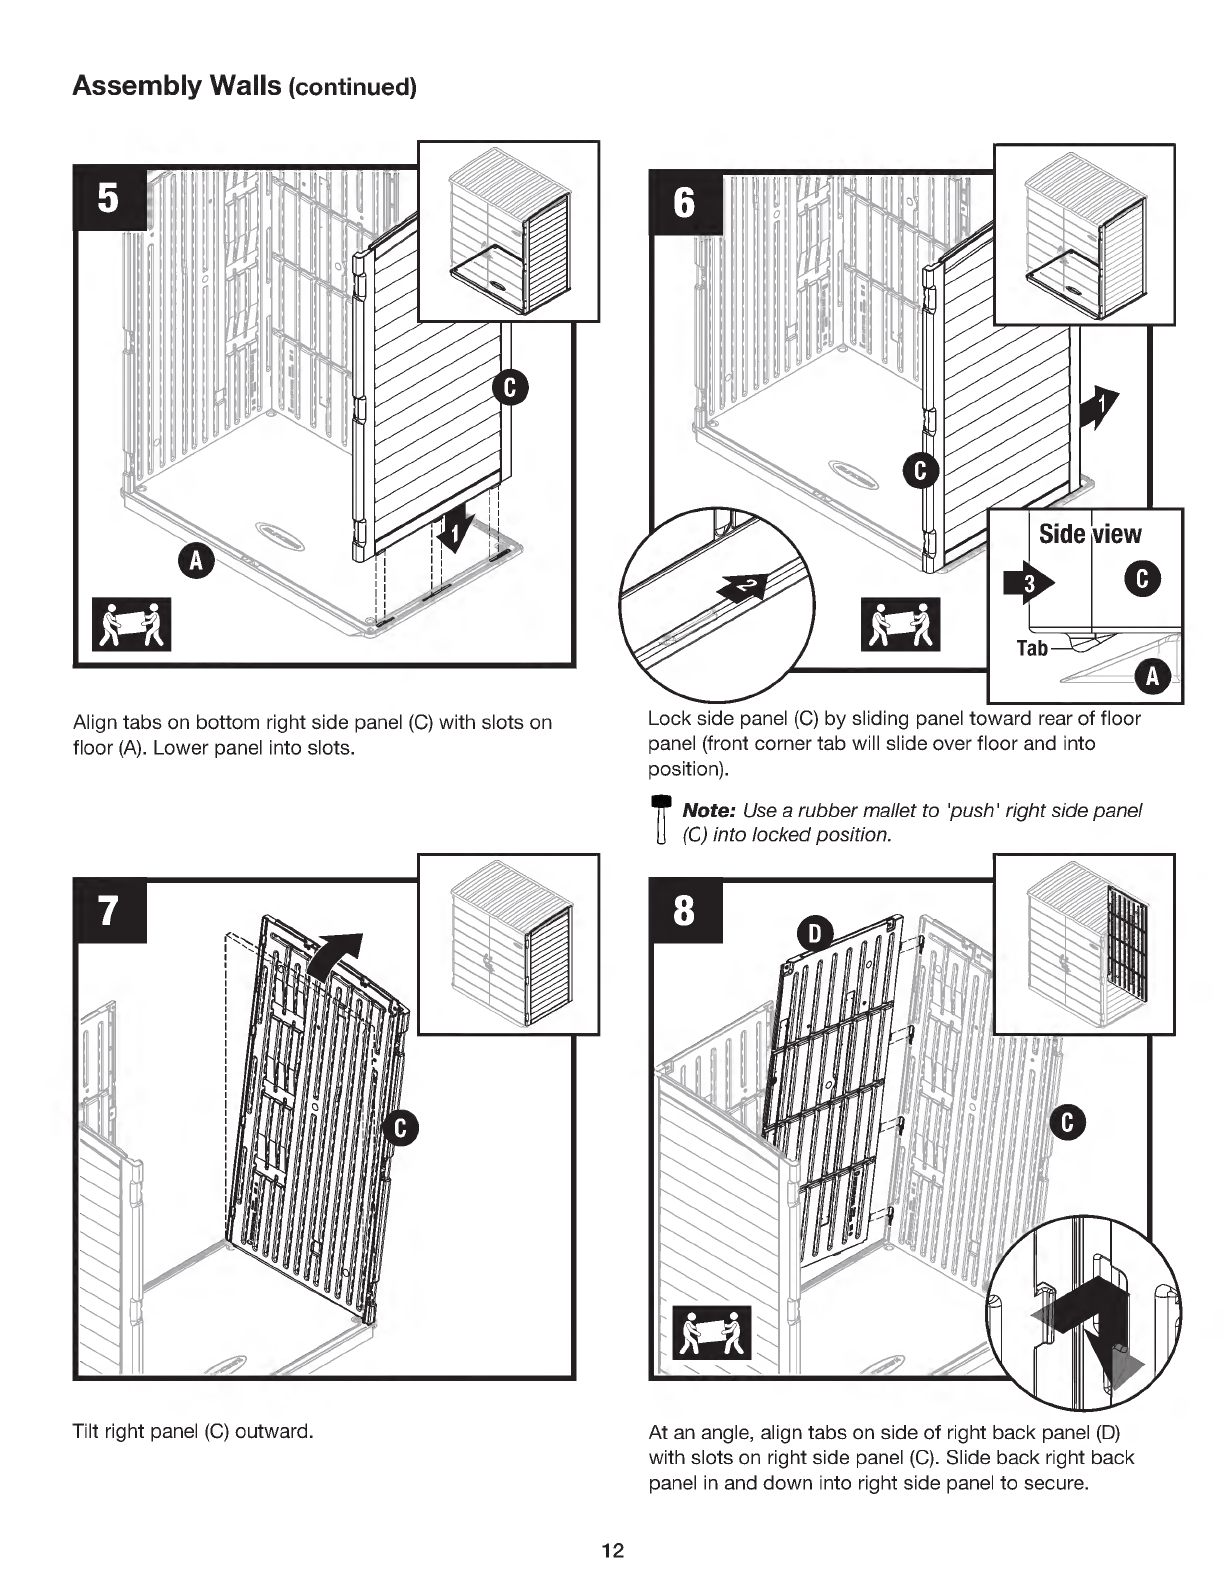
Assembly
Walls
(
continued)
Lock
side
panel (
C)
by
sliding
panel
toward
rear
of
floor
panel (
front
corner
tab
will
slide
over
floor
and
into
position).
Align
tabs
on
bottom
right
side
panel (
C) with
slots
on
floor (
A).
Lower
panel
into
slots.
Tilt
right
panel (
C)
outward.
7
Note:
Use
a
rubber
mallet
to '
push'
right
side
panel
(C)
into
locked
position.
At
an
angle,
align
tabs
on
side
of
right
back
panel (
D)
with
slots
on
right
side
panel (
C).
Slide
back
right
back
panel
in
and
down
into
right
side
panel
to
secure.
12

Assembly
Walls
(
continued)
Tilt
right
back
panel (
D)
and
right
side
panel (
C)
back
into
the
upright
position
(lowering
the
back
right
panel
tabs
into
the
slots
of
floor (
A)).
The
back
right
panel
tabs
will '
snap'
into
place
when
in
correct
position.
Note:
Left
side
panel
not
shown
for
clarity.
Secure
back
panels (
E,
D)
together
using
three
easy
bolts (
EE)
and
working
from
bottom
to
top.
Use
easy
bolt
easy
driver
(
FF)
to
hand
tighten.
Easy
bolt
head
will
be
flush
when
fully
seated.
Do
Not
over
tighten
easy
bolts.
Note:
Top
easy
bolt location
will
be
installed
in
a
later
step.
Note:
Right
side
panel
not
shown
for
clarity.
You
may
hear
a '
click'
when
easy
bolt
has
been
tightened
completely.
13
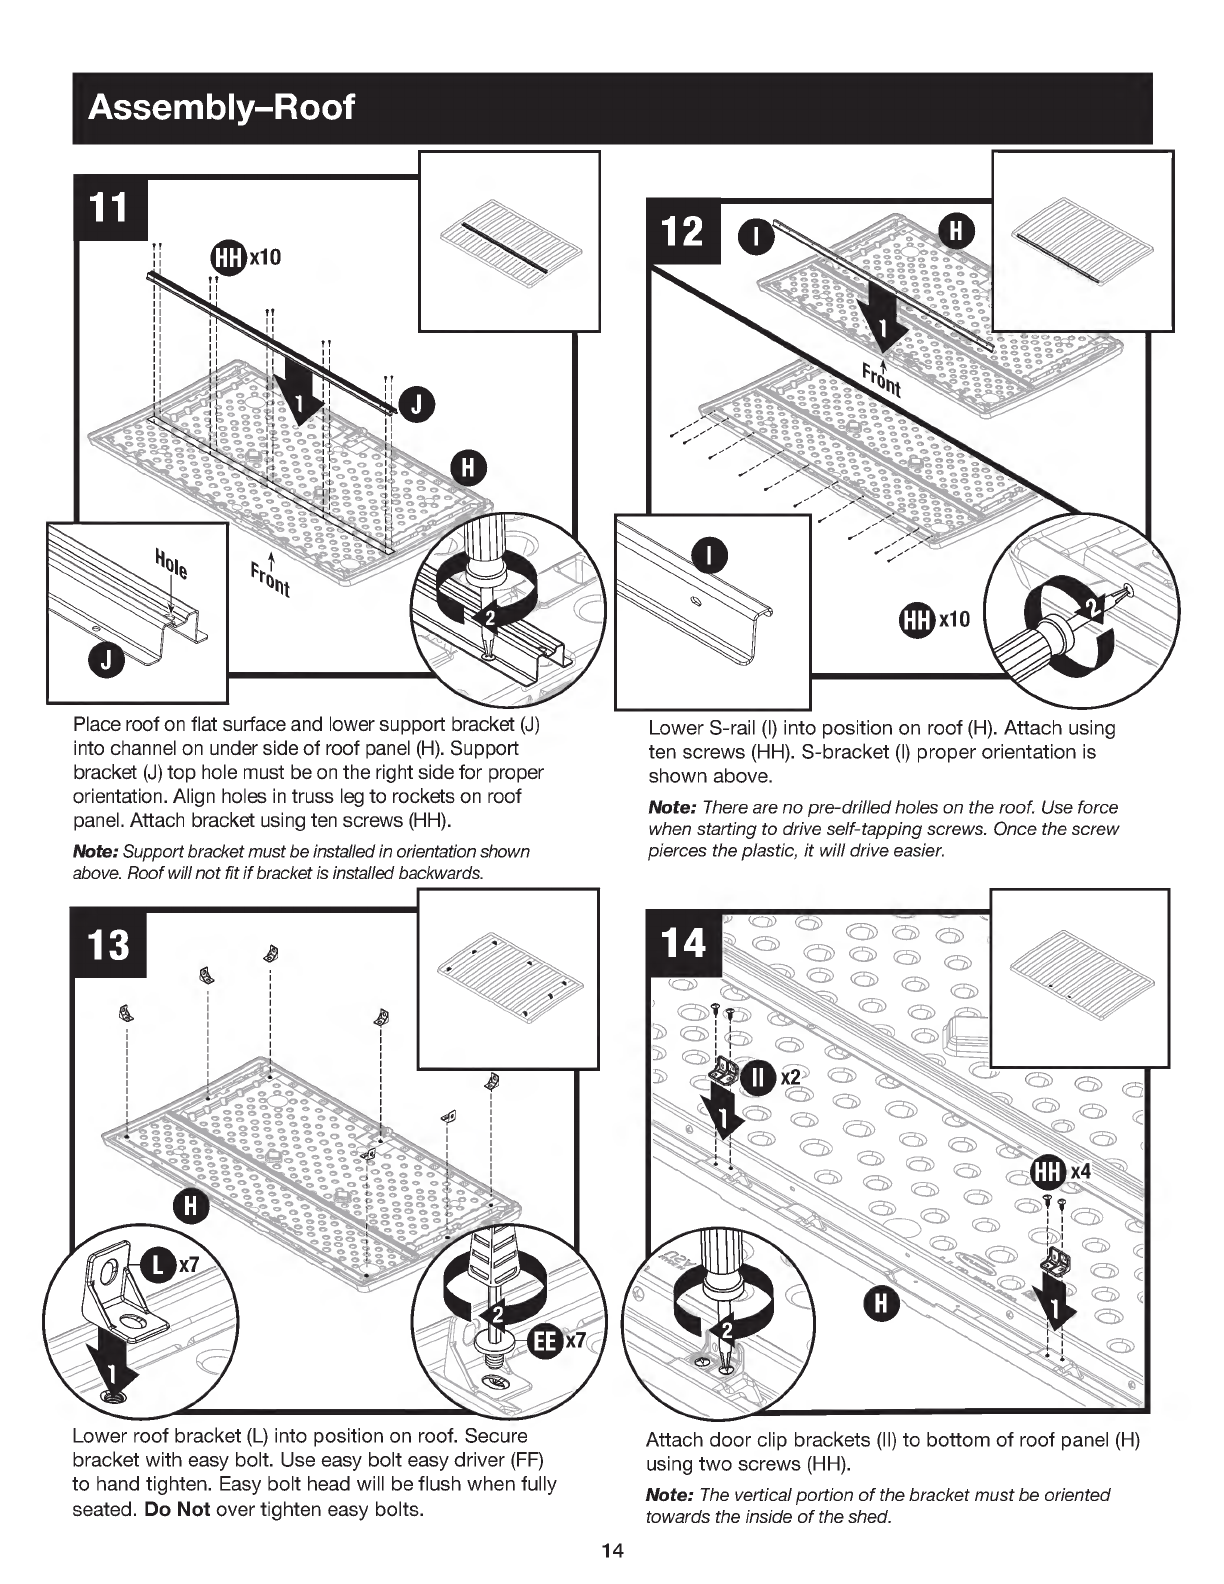
Assembly-
Roof
Place
roof
on
flat
surface
and
lower
support
bracket (
J)
into
channel
on
under
side
of
roof
panel
(
H).
Support
bracket (
J)
top
hole
must
be on
the
right
side
for
proper
orientation.
Align
holes
in
truss
leg
to
rockets
on
roof
panel.
Attach
bracket
using
ten
screws
(
HH).
Note:
Support
bracket
must be
installed
in
orientation
shown
above.
Roof
will
not
fit
if
bracket
is
installed
backwards.
0 0
0 0
0 '
0 0
gee
... `
e. g
"
Ce?,
*eh
e.
%
.0
e
e
P e
tz.
ie e
c.
e
ea.
e e
Lower
roof
bracket (
L)
into
position
on
roof.
Secure
bracket
with
easy
bolt.
Use
easy
bolt
easy
driver
(
FF)
to
hand
tighten.
Easy
bolt
head
will
be
flush
when
fully
seated.
Do
Not
over
tighten
easy
bolts.
Lower
S-
rail
(
I)
into
position
on
roof
(
H).
Attach
using
ten
screws
(
HH).
S-
bracket
(
I)
proper
orientation
is
shown
above.
Note:
There
are
no
pre-
drilled
holes
on
the
roof.
Use
force
when
starting
to
drive
self-
tapping
screws.
Once
the
screw
pierces
the
plastic,
it
will
drive
easier.
14
Attach
door
clip
brackets
(
II)
to
bottom
of
roof
panel
(
H)
using
two
screws
(
HH).
Note:
The
vertical
portion
of
the
bracket
must
be
oriented
towards
the
inside
of
the
shed.
14

Assembly-Roof/Doors
15
...
o ó o
o
... %
o
o o o 0 o 0 0
.....
o o
. .
o
...
o
o
ill
o
-,
o
o •
0 O O O p
rp
...
..
0 2
..
...
...
"P
i:
O
0 o o
O ......
0 0 O
00 '
o
0
hui
Lower
roof
panel
(
H)
and
line
up
roof
brackets (
L)
with
holes
on
walls.
The
truss
legs
and
S-
rail (
pre-
assembled
to
roof)
will
fit
into
notches
in
side
panels (
this
helps
to
properly
align
roof
properly).
Secure
bracket
with
seven
easy
bolts
(
EE).
Use
easy
bolt
easy
driver
(
FF)
to
hand
tighten.
Do
Not
over-
tighten
easy
bolts.
Slide
one
metal
hinge
plate
over
each
of
the
six
hinge
receptacles
on
inside of
side
panels
(
B)
and (
C).
Stand
right
door
(
F)
upright
with
hinge
mounts
facing
right.
Slide
one
metal
hinge
plate (
AA)
onto
each
hinge
mount.
Rotate
metal
hinge
plates
to
open
position.
Repeat
for
left
door (
G).
15
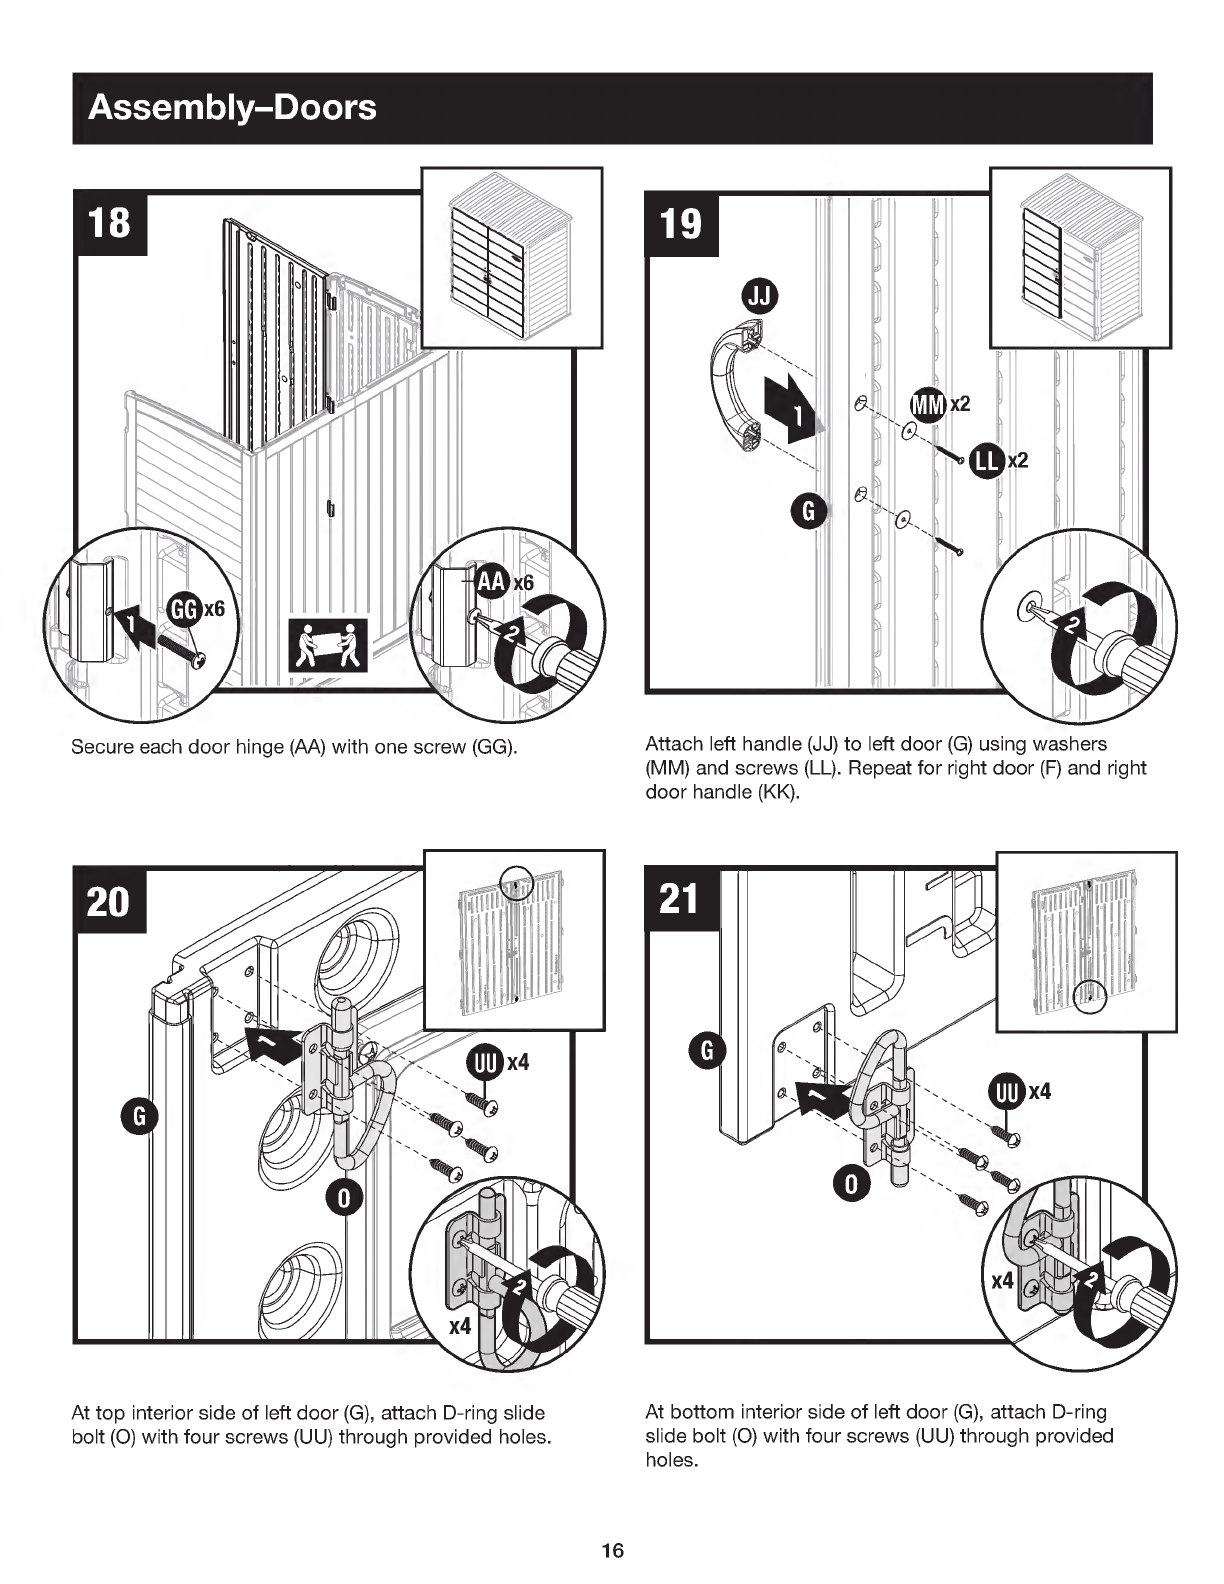
At
top
interior
side
of
left
door (
G),
attach
D-
ring
slide
bolt (
0)
with
four
screws (
UU)
through
provided
holes.
Attach
left
handle (
JJ)
to
left
door (
G)
using
washers
(MM)
and
screws (
LL).
Repeat
for
right
door (
F)
and
right
door
handle ( KK).
At
bottom
interior
side
of
left
door (
G),
attach
D-
ring
slide
bolt (
0)
with
four
screws (
UU)
through
provided
holes.

Assembly
Doors
(
continued)
Lift
upper
D-
ring (
0)
up
to
engage
in
front
of
Roof (
H).
Turn
D-
ring
to
right
for
locked
position.
Insert
two
screws (
TT)
into
door
latch
assembly (
00)
and
through
right
door.
The
screws
will
need
to
puncture
through
a
thin
layer
of
plastic
to
get
through
the
door.
While
holding
plate
in
place
on
exterior
of
door,
secure
each
screw
with
two
washers (
RR)
and
two
locking
nuts (
SS).
Push
lower
D-
ring (
0)
down
to
engage
with hole
in
floor.
Turn
D-
ring
to
right
for
locked
position.
Insert
screws (
TT)
into
left
latch
plate (
NN) and
through
left
door.
The
screws
will
need
to
puncture
through
a
thin
layer
of
plastic
to
get
through
the
door.
While
holding
plate
in
place
on
exterior
of
door,
secure
each
screw
with
two
washers (
RR)
and
two
locking
nuts (
SS).
17
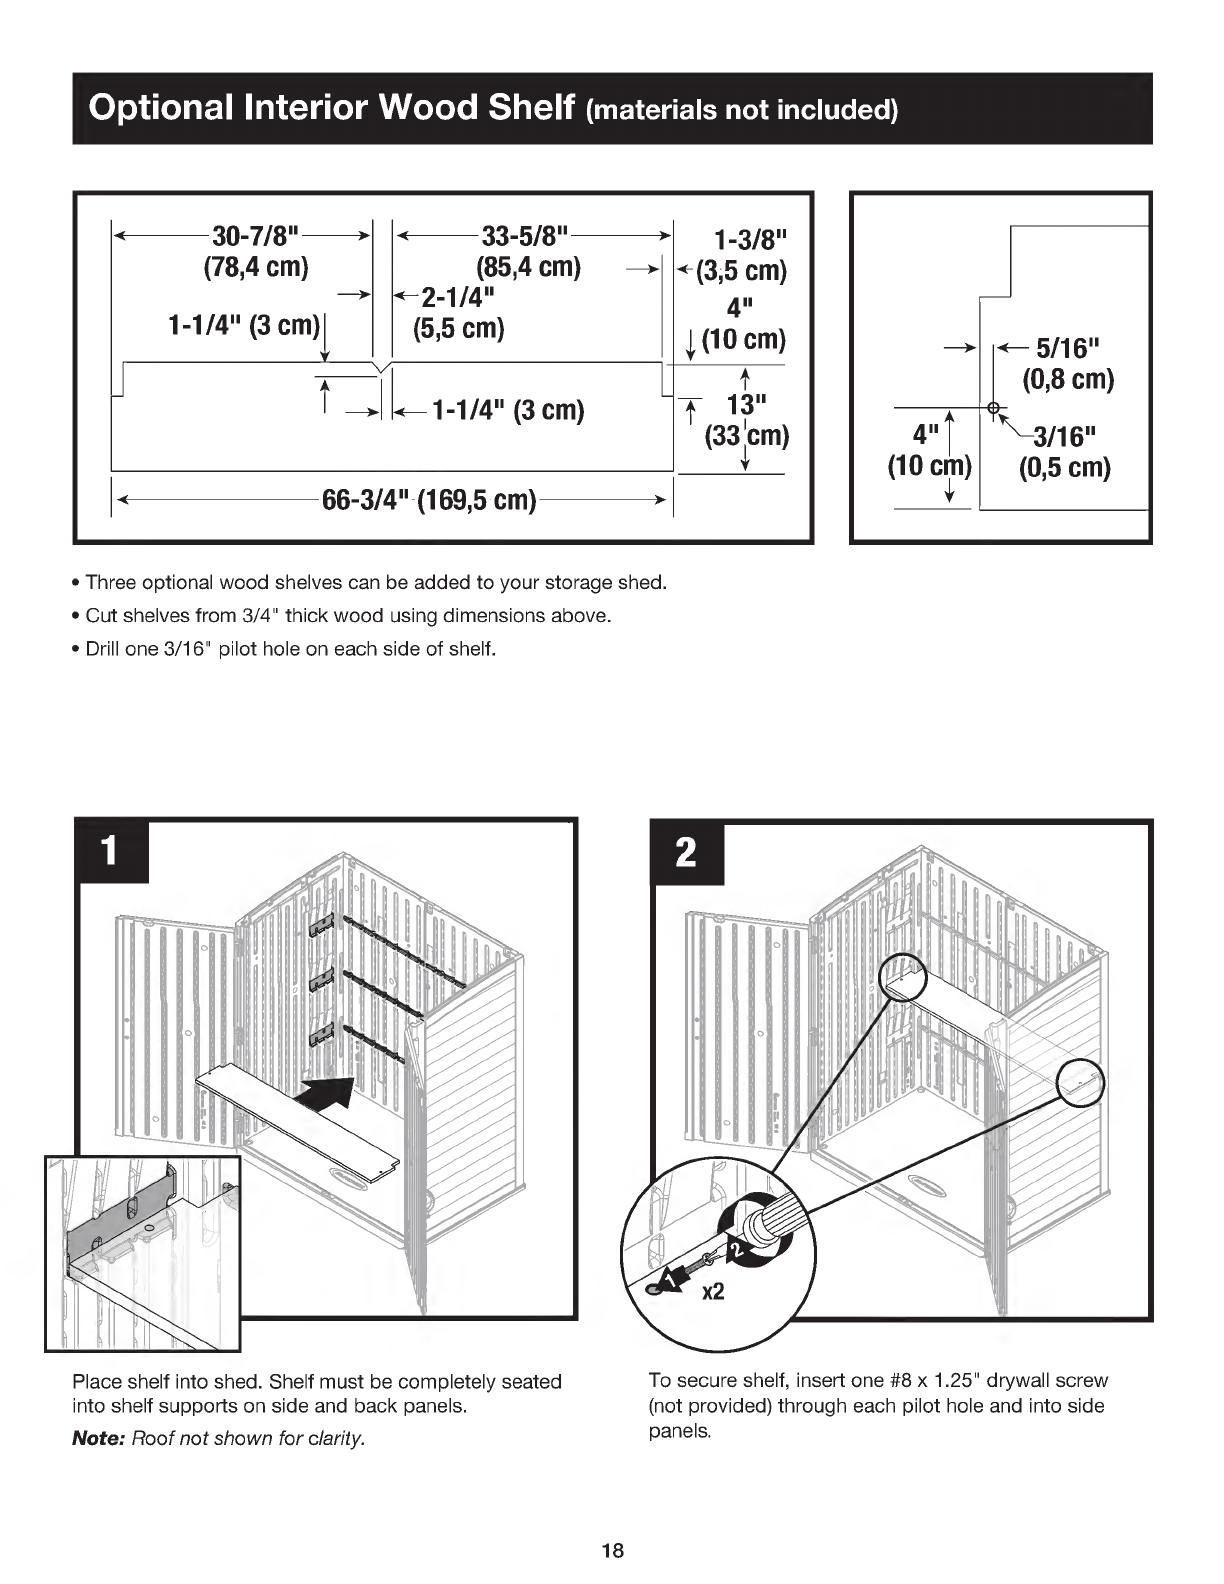
Optional
Interior
Wood
Shelf
(
materials
not
included)
30-7/8"—>
(78,4
cm)
—'
<
33-5/8"
(85,4
cm) —>
'
1-3/8"
<-(3,5
cm)
1-1/4" (
3
cm)1
<
2-1/4"
(5,5
cm)
4"
,1, (
10
cm)
t
1-1/4" (
3
cm)
t
Tk
13"
—>
<
(33,'cm)
4,
66-314"(169,5
cm) >
•
Three
optional
wood
shelves
can
be
added
to
your
storage
shed.
•
Cut
shelves
from
3/4"
thick
wood
using
dimensions
above.
•
Drill
one
3/16"
pilot
hole
on
each
side
of
shelf.
Place
shelf
into
shed.
Shelf
must
be
completely
seated
into
shelf
supports
on
side
and
back
panels.
Note:
Roof
not
shown
for
clarity.
To
secure
shelf,
insert
one #
8 x
1.25"
drywall
screw
(not
provided)
through
each
pilot
hole
and
into
side
panels.
4"
(10
cm
<—
5/16"
(0,8
cm)
\-
3/16
11
(0,5
cm)
18
A
Avant
de
commencer...
•
Consultez
les
autorités
locales
pour
tout
permis
nécessaire
à
la
construction
de
la
remise.
Avant
de
construire
votre
remise,
vérifiez
avec
l'autorité
locale
en
charge
du
respect
du
code
du
bâtiment
s'il
est
nécessaire
d'obtenir
un permis
ou
s'il
existe
des
restrictions
de
construction.
•
Des
fondations
à
niveau
et
solides
sont
nécessaires
avant
que
la
construction
de
la
remise
ne
puisse
commencer.
Vous
retrouverez
les
renseignements
sur
la
préparation
du
site
aux
pages
9-10.
Une
fondation
différente
de
ce
qui
est
suggéré
dans
ce
manuel
pourrait
avoir
pour
résultat
un
assemblage
inadéquat
et
des
pièces
endommagées.
•
Lisez
entièrement
les
instructions
avant
l'assemblage.
Cette
trousse
contient
des
pièces
qui
peuvent
être
endommagées
si
elles
sont
assemblées
de
manière
incorrecte
ou
dans
le
mauvais
ordre.
•
Veuillez
suivre
les
instructions.
Suncast
ne
peut
être
tenu
responsable
du
remplacement des
pièces
endommagées
ou
perdues
en
raison
d'un
assemblage
incorrect.
•
Vous
aurez
besoin
d'aide
pendant
toute
la
durée
de
l'assemblage.
km*
IMPORTANT
OUVRIR
TOUTES
LES
BO
Î
TES
EN
PREMIER
ET
É
TALER
LES
PI
È
CES
DE
MANI
È
RE
ORDONN
É
E.
LES
BO
Î
TES
PEUVENT
CONTENIR
DES
PETITES
PI
È
CES.
CONSULTER
LA
LISTE
DES
PI
È
CES
COMPRISE
AVEC
LE
MANUEL
POUR
S'ASSURER
QU'IL
NE
MANQUE
AUCUNE
PI
È
CE.
TERMINEZ
LA
PR
É
PARATION
DU
TERRAIN
ET
LA
CONSTRUCTION
DES
FONDATIONS
AVANT DE
DÉ
BALLER
LES
PI
È
CES.
A
ATTENTION
•
Il
est
nécessaire
que
le
terrain
soit
correctement
préparé.
•
La remise
n'est
pas
prévue
pour
une
utilisation
dans
des
conditions
climatiques
extrêmes.
•
La remise
n'est
pas
prévue pour
l'entreposage
de
produits
chimiques
inflammables
ou
corrosifs.
•
Les
produits
lourds
doivent
être
entreposés
dans
le
fond
de
la
remise.
•
La remise
n'est
pas
prévue pour
être
utilisée
par
des
enfants.
•
NE
PAS
se
mettre
debout,
s'assoir
ou
entreposer
des
produits
sur
le
toit
de
la
remise.
•
Prendre
les
précautions
nécessaires
dans
des
températures
extrêmes.
•
Réparer
ou
remplacer
les
pièces
cassées
immédiatement.
•
Suncast
ne
peut
être
tenu
responsable
des
dommages
causés
par
les
conditions
climatiques
ou
une
mauvaise
utilisation.
•
Inspecter
la
remise
à
intervalles
réguliers
pour
vérifier
que
l'intégrité
de
l'assemblage
a
été
maintenue.
•
Vérifier
périodiquement
que
l'emplacement
choisi
pour
installer
la
remise
est
toujours
à
niveau.
•
Cette
trousse
contient
des
pièces
avec
des
bords
métalliques.
Faites
attention
lorsque
vous
les
manip-
ulez.
19

A
Sécurité
et
entretien
de
la
remise
•
Les
éléments
chauds
récemment
utilisés,
tels
que
les
grils,
les
chalumeaux,
etc.,
ne
doivent
pas
être
entreposés
dans
la
remise.
•
Les
produits
lourds
ne
doivent
pas
être
posés
contre
les
parois,
car
ils
peuvent
déformer
et
endommager
définitivement
les
panneaux.
•
Enlevez
la
neige
et les
feuilles
du
toit.
•
La
partie
extérieure
des
parois
et
des
panneaux
du
toit
de
la
remise
est
texturée,
tel
un
bardage
en
vinyle.
Au
fil
du
temps,
la
poussière
peut
s'accumuler
dans
la
texture.
Associée
à
l'humidité,
elle
peut
favoriser
la
prolifération
de
mousse
ou
de
moisissure
dans
la
remise.
Pour
préserver
l'aspect
de
votre
remise,
nous
vous
recommandons
de
la
nettoyer
chaque
année
avec
du
savon
doux
et
de
l'eau.
N'UTILISEZ
PAS
de
javel,
d'ammoniaque
ou
d'autres produits
nettoyants
corrosifs
et
N'UTILISEZ
PAS
de
brosses
à
poils
durs.
Le non-
respect
du
nettoyage
annuel
peut
entraîner
des
taches
perma-nentes
dans
le
plastique.
Il
ne
s'agit
pas
d'un
défaut
de
fabrication,
cela
n'est
donc
pas
couvert
par
la
garantie.
Conseils
pour
le
jour
de
l'assemblage
•
Terminez
la
préparation
du
terrain
et
la
construction
des
fondations
avant
de
déballer
les
pièces
et
de
commencer
l'assemblage.
•
NE
TENTEZ
PAS
l'assemblage
par
un
jour
de
grand
vent.
•
NE
TENTEZ
PAS
l'assemblage
les
jours
où
la
température
est
en
dessous
de
32
degrés.
•
Prévoyez suffisamment
de
temps
pour
assembler
entièrement
la
remise.
•
Assurez-vous
d'avoir
de
l'aide
à
portée
de
main
pour
soulever
et
fixer
les
pièces.
•
Portez
des
gants
de
travail
légers
pendant
l'assemblage
de
la
remise.
•
Une
fois
le
toit
assemblé,
une
lampe
torche
peut
être
utile
pour
assembler
les
composants
plus
petits
à
l'intérieur
de
la
remise.
•
N'UTILISEZ
PAS
de
perceuse
à
main
pour
serrer
les
boulons
Easy.
Utilisez
l'outil
Easy
Bolt
Driver
(fourni)
UNIQUEMENT.
•
Suncast
fournit
des
petites
attaches
supplémentaires
pour
le
confort
du
client.
Dans
certains
cas,
il
en
restera
une
fois
l'assemblage
terminé.
Remarque :
ce
produit
contient
des
pièces
qui
sont
utilisées
dans
différents
sens
lors
de
la
construction
de
la
remise.
Veuillez
faire
attention
à
l'orientation
des
pièces
indiquées
dans
ce
manuel
d'instructions.
Vous
pouvez
endommager
les
pièces
si
vous
ne
suivez
pas
ces
instructions.
Suncast
ne
peut
être
tenu
responsable
du
rempla-
cement
des
pièces
endommagées
ou
perdues
en
raison
d'un
assemblage
incorrect.
20
Table of contents
Languages:
Other Design Storage manuals

Popular Storage manuals by other brands

Versalift
Versalift 24 installation guide

Seagate
Seagate Lyrion Series IDE Drive ST730212DE-30GB product manual

Toshiba
Toshiba MK2552GSX Features and specifications

Dell
Dell PowerVault ML6000 supplementary guide

Carrier
Carrier 19XR04027401 Installation, operating and maintenance instructions

SimpliVity
SimpliVity OmniCube CN-2000 Installation and maintenance guide


