Devon 5401-Li-20RH User manual

专业电动工具
PROFESSIONAL TOOLS
中国
GB
锂电电锤
Lithium-ion Cordless
Rotary Hammer
5401-Li-20RH
5401-Li-20RH/N
型 号:
各产品外观之间存在差异,请以实物为准

page 1 Manual_Revised_V1.1
5401-Li-20RH
5401-Li-20RH/N
工具简介
该工具可在混凝土、砖墙及石材上进行振动作业。同样也可使用本工具在木材、金属、陶质材
料及塑料上钻孔(无振动功能的正常钻)。不可将本工具及其充电器用于其它功能。本工具不支
持除说明书中介绍的以外的功能。
1、操作控制
1、 外套
2、 照明/指示灯
3、 功能选换旋钮
4、 蓄电池
5、 蓄电池释放按钮
6、 正反转按钮
7、 起停开关
注意:
1) 当电池由于电流过大或者温度过高而被系统保护后,需要将电池插到充电器上进行短时间充电后,
电池才可恢复功能;
2) 当长时间使用的时候,机器可能会过热,需要将机器冷却到合适的温度再使用,以免损坏机器。
1
2
5
3 6 7
4

page 2Manual_Revised_V1.1
2. 工具规格
型号 5401-Li-20RH/N
额定电压 ( 伏 ) 20
空载转速 (/ 分钟 ) 0-1400
最大钻孔直径
木头(毫米) 28
金属(毫米) 13
混凝土 ( 毫米 ) 22
蓄电池类型 锂电池
充电电压 ( 伏 ) 220-240 ~
电池电压 ( 伏 ) 20
可充电温度范围 ( 摄氏度 ) 5-40
注:
1、为求改进,本说明书所载规格可能不预先通告而给予更改。
2、本说明书提供的参数是以 220V 为依据,若有低于或高于此电压的地区,数据有可能不同。
3、5401-Li-20RH 是组套,出货带电池包和充电器;5401-Li-20RH/N 是裸机,出货不带电池包和充电器。

page 3 Manual_Revised_V1.1
电 动 工 具 通 用 安 全 警 告
警告! 阅读所有警告和所有说明。不遵照
以下警告和说明会导致电击、着火和 / 或严重
伤害。保存所有警告和说明书已备查阅。
在所有下列的警告中术语“电动工具”指市电驱
动(有线)电动工具或电池驱动(无线)电动工
具。
1. 工作场地的安全
1) 保持工作场地清洁和明亮。混乱和黑暗的场
地会引发事故。
2) 不要在易爆环境,如有易燃液体、气体或粉
尘的环境下操作电动工具。电动工具产生的
火花会点燃粉尘或气体。
3) 让儿童和旁观者离开后操作电动工具。注意
力不集中会使操作者失去对工具的控制。
2. 电气安全
1) 电动工具插头必须与插座相配。绝不能以任
何方式改装插头。需接地的电动工具不能使
用任何转换插头。未经改装的插头和相配的
插座将减少电击危险。
2) 避免人体接触接地表面,如管道、散热片和
冰箱。如果你身体接地会增加电击危险
3) 不得将电动工具暴露在雨中或潮湿环境中。
水进入电动工具将增加电击危险。
4) 不得滥用电线。绝不能用电线搬运、拉动电
动工具或拔出其插头。使电线远离热源、
油、锐边或运动部件。受损或缠绕的软线会
增加触电危险。
5) 当在户外使用电动工具时,使用适合户外使
用的外接软线。适合户外使用的软线将减少
电击危险。
6) 如果在潮湿环境下操作电动工具是不可避免
时,应使用剩余电流动作保护器(RCD)。使
用RCD可减小电击危险。
3. 人身安全
1) 保持警觉,当操作电动工具时关注所从事的
操作并保持清醒。当你感到疲倦,或在有药
物、酒精或治疗反应时,不要操作电动工
具。在操作电动工具时瞬间的疏忽会导致严
重人身伤害。
2) 使用个人防护装置。始终配戴护目镜。安全
装置,诸如适当条件下使用防尘面具、防滑
安全鞋、安全帽、听力防护等装置能减少人
身伤害。
3) 防止意外启动。确保开关在连接电源和/或电
池盒、拿起或搬运工具时处于关断位置。手
指放在已接通电源的开关上或开关处于接通
时插入插头可能会导致危险。
4) 在电动工具接通之前,拿掉所有调节钥匙或
扳手。遗留在电动工具旋转零件上的扳手或
钥匙会导致人身伤害。
5) 手不要伸展得太长。时刻注意立足点和身体
平衡。这样在意外情况下能很好地控制电动
工具。
6) 着装适当。不要穿宽松衣服或佩带饰品。让
衣服、手套和头发远离运动部件。宽松衣
服、佩饰或长发可能会卷入运动部件中。
7) 如果提供了与排屑、集尘设备连接用的装
置,则确保他们连接完好且使用得当。使用
这些装置可减少尘屑引起的危险。
4. 电动工具使用和注意事项
1) 不要滥用电动工具,根据用途使用适当的电
动工具。选用适当设计的电动工具会使你工
作更有效、更安全。
2) 如果开关不能接通或关断工具电源,则不能
使用该电动工具。不能用开关来控制的电动
工具是危险的且必须进行修理。
3) 在进行任何调节、更换附件或贮存电动工具
之前,必须从电源上拔掉插头和/ 或使电池
盒与工具脱开。这种防护性措施将减少工具
意外起动的危险。
4) 将闲置不用的电动工具贮存在儿童所及范围
之外,并且不要让不熟悉电动工具或对这些
说明不了解的人操作电动工具。电动工具在
未经训练的用户手中是危险的。
5) 保养电动工具。检查运动件是否调整到位或
卡住、检查零件破损情况和影响电动工具运
行的其他状况。如有损坏,电动工具必须在
使用前修理好。许多事故由维护不良的电动
工具引发。
6) 保持切削刀具锋利和清洁。保养良好的有锋
利切削刃的刀具不易卡住而且容易控制。
7) 按照使用说明书,考虑作业条件和进行的作
业来使用电动工具、附件和工具的刀头等。
将电动工具用于那些与其用途不符的操作可
能会导致危险。

page 4Manual_Revised_V1.1
5. 电池工具使用和注意事项
1) 只用制造商规定的充电器充电。将适用于某
种电池盒的充电器用到其他电池盒时会发生
着火的危险。
2) 只使在配有专用电池盒的情况下才使用电动工
具。
使用其他电池盒会发生损坏和着火危险。
3) 当电池盒不用时,将它远离其他金属物体,
例如回形针、硬币、钉子、螺钉或其他小金
属物体,以防一端与另一端连接。电池端部
短路会引起燃烧或火灾。
4) 在滥用条件下,液体会从电池中溅出;避免
接触。如果意外碰到了,用水冲洗。如果液
体碰到了眼睛,还要寻求医疗帮助。从电池
中溅出的液体会发生腐蚀或燃烧。
6. 维修
1) 让专业维修人员使用相同的备件维修电动工具。
这样将确保所维修的电动工具的安全性。
蓄 电 池 使 用 注 意 事 项
1. 安装蓄电池前,先确定开关是否位在关闭的
位置,正逆转开关是否位于中间位置,以预
防意外地开动电动工具。提携电动工具时如
果把手指按在起停开关上,或者安装蓄电池
时未关闭电动工具,都可能造成工作意外。
2. 切勿打开蓄电池。可能造成短路。
3. 蓄电池必须远离高温,例如长期的日晒和火
焰等。有爆炸的危险。过度使用或高温情况
下,蓄电池可能有渗漏出现。
4. 如果蓄电池坏了,或者未按照规定使用蓄电
池,蓄电池中会散发有毒蒸汽。工作场所必须
保持空气流通,如果身体有任何不适必须马上就
医 。蓄 电 池 散 发 的 蒸 汽 会 刺 激 呼 吸 道 。
5. 损坏的蓄电池会渗出液体,并且污染其它的
零件。检查被污染的零件。清洁这些零件,
必要时得换新零件。
6. 如果从蓄电池渗出的液体碰触到皮肤,立即
用肥皂水冲洗。然后用柠檬汁涂抹。
7. 如果从蓄电池渗出的液体进入眼睛里,立即
用清水冲洗至少10分钟,并就医。按照此规
定可减少严重的身体伤害。
8. 本蓄电池只能配合 的电动工具一起
使用。这样才能保证蓄电池不会过载。
9. 仅与所提供的配套的充电器一起使用(见下表),
使用其它型号的充电器可能会导致火灾。
机器型号 蓄电池型号 充电器型号
5401-Li-20RH/N 5150系列 5339/5340
10. 不要撞击或损坏电池,不要使用被撞过或者
损坏的电池。使用损坏的电池会导致爆炸。
迅速处理损坏的电池。
11. 不要在潮湿或者雨中充电。按此做法可减少
触电的危险。
充 电 器 使 用 注 意 事 项
警告! 为减少触电的危险及充电器、蓄电池的
损坏,使用充电器铭牌上所列的蓄电池充电。使用其
它型号的蓄电池可导致爆炸引起伤害。
1. 使用该充电器前,仔细阅读该操作说明书及贴在
说 明 书 上 充 电 器 的 警 告 ,以 防 止 错 用 导 致 伤 害 的
危险。
2. 充电器不要在室外使用,必须远离雨水或湿气。
如果让水渗入机器中,会提高产生电击的危
险。
3. 不可以使用本充电器为其它厂牌的电池充电。
如
未按照规定使用机器可能引起火灾甚至有爆
炸的危险。
4. 不要滥用充电器和电线。
不要通过拎电线来
提取充电器。从电源上拔除充电器时不应拖
拽电线。否则可损坏充电器及电线,引起触
电。立即更换电线。
5. 确保电线放置在合适的位置,不会与锋利的边
缘及移动的部位碰触,否则将会被损坏。
这将减
少电线被损坏,从而导致触电的危险。
6. 将电线和充电器远离高温,防止损坏充电器外壳
及内部零件。
7. 不要让汽油,石油等物质与塑料部分接触。
这些
物质含有的化学成分可损坏,削弱,或毁坏
塑料。
8. 没有特殊需求不需要使用延长线。
使用了不适
合的延长线可导致火灾及触电。如果必须使
用延长线,确保:延长线插座的插针数量,
尺寸,形状与充电器的插座一致。该延长线
有完好的布线条件。
9. 不要使用电线或插座损坏的充电器,它可能导
致 短 路 ,触 电 。若损坏了,将该充电器送至
授权的维修中心进行维修。

page 5 Manual_Revised_V1.1
10. 充电器被撞击或其它任何方式受损后,不要使
用。
将该充电器送至 授权的维修
中心进行检查确认充电器是否完好。
11. 不 可 擅 自 拆 开 充 电 器 。充电器只能交给
合格的专业电工修理。错误的重
组可导致触电及火灾的危险。
12. 维护或清洁充电器时,务必将其从插座上拔下
来 ,按 照 这 种 做 法 可 以 减 少 触 电 的 危 险 。
13. 将不在使用的充电器从电源上拔除,这样可减
少 触 电 的 危 险 ,或 防 止 金 属 物 质 掉 进 插 孔 内 ,
损坏充电器。
14. 防止触电。
不要碰触插座不绝缘部位。
锂电电锤使用注意事项
1. 使用合适的侦测器,以便找出隐藏着的电源
线的位置。或者向当地供电单位索取相关资
料。钻穿电线会造成火灾并遭受电击。损坏
瓦斯管会引起爆炸。如果水管被刺穿了会导
致财务损失。
2. 如果安装在机器上的工具被夹住了,必须马上关
闭电动工具并保持镇静。此时机器会产生极高的
反应力矩,并进而造成回击。
当 以 下 情 况 时 ,安 装
在机器上的工具容易被夹住:
--电动工具超荷了
--安装在机器上的工具在工件中歪斜了。
3. 安装在机器上的工具可能割断隐藏的电线,
一定要握住绝缘手柄操作电动工具。电动工
具如果割断了带电的电线,机器上的金属部
件会导电,并进而导致操作者触电。
4. 务必握紧电动工具。在拧紧和放松螺钉时,
可能出现短暂的强大的反击。
5. 固定好工件。使用固定装置或老虎钳固定工
作,会比用手持握工件更牢固。
6. 工作场所必须保持清洁。不同的工作尘经过
混合后容易产生化学反应,十分危险。轻金
属尘容易着火或引起爆炸。
7. 等待电动工具完全静止后才能够放下机器。
机器上的工具可能在工作中被夹住,而令您
无法控制电动工具。
8. 本电动工具只能与5150系列锂电池一起使用。
9. 勿将电池包当作榔头使用,敲击电池包会导
致意外的短路,起火或爆炸。
器具工作时产生的粉尘可能含有致癌或
对人体有害的化学物质。例如:
■ 油漆中含的铅。
■ 砷和铬与木材起反应后也会产生有毒
物质。
为了减少这些有毒的化学物质对人体的伤
害,要尽量保证在通风的环境下工作,并且工作
时配戴合格的安全保护装置。
配备
锂电电锤
充电器
锂电池
副把手
在某些国家或某些特殊的机型,其所提供的
配备,可能与以上所给的资料稍有出入。
操作说明
1. 检查供电电压 须与铭牌数据相符!
2. 蓄电池充电
蓄电池在交货时只完成部分充电。首度使用电动
工具之前,必须先充足蓄电池的电以确保蓄电池
的功率。
- 完全耗尽的蓄电池在 0-40 摄氏度的温度下
重新充满电需要 45 分钟左右。(使用 5339
充电器 )
- 完全耗尽的蓄电池在 0-40 摄氏度的温度
下重新充满电需要 100 分钟左右。(使用
5340 充电器 )
1) 只能使用该蓄电池配套的充电器。
2) 将充电器插头插入电源插座。
3) 将蓄电池上突出的肋与充电器的插槽对齐。
4) 将蓄电池插在充电器上。
5) 充电器与蓄电池交流,评估蓄电池的充电情况。
6) 充电过程中,充电器显示屏上 LED 灯从左闪
到右,这是正常操作。(5339 充电器 )
充电过程中,仅充电器绿色指示灯闪烁。
(5340 充电器 )
7) 充电完成后,充电器显示屏显示“OK”字样。
(5339 充电器 )
充电完成后,充电器绿色指示灯常亮。(5340
充电器 )

page 6Manual_Revised_V1.1
指示灯 蓄电池 红色指示灯 绿色指示灯 方法
高/低温度
(见说明书) 高/低温度电池 常亮 不亮 当电池冷却到5oC-40oC之间开始充
电
电池有故障 有故障 闪烁 不亮 电池或充电器故障
正在充电 正在充电 不亮 闪烁 正在充电
充电完成 充电完成 不亮 常亮 充电完成
80% - 100% charge
60% - 79% charge
40% - 59% charge
20% - 39% charge
Under 20% charge
Completely discharged
or overloaded
High/low temperature
80-100% 电量
60-79% 电量
40-59% 电量
20-39% 电量
低于 20% 电量
需要充电
高/低温提醒
注:以上提及的充电器出货时二选一
8) 若蓄电池遗留在充电器上可以满充,但不会
过度充电。
5340-Li-20R
5339-Li-20F
5340充电器指示灯:
3. 电量指示
该锂电池带有电量指示灯,该电量指示灯用于显
示蓄电池的剩余电量。按下电量指示键使LED灯
亮。该电量指示灯大概持续亮4秒钟。
注意:当蓄电池装在机器上时或从机器上移出
后,该电量指示灯均能显示。
4. 低电量指示
当按下起停开关,其中的四只电量指示灯开
始持续迅速闪烁,蓄电池电量耗尽,蓄电池
需要充电。
与其他类型的电池不同,工作中该蓄电池的
电量不会逐渐衰退。显示电池耗尽需要充
电,机器的电力会迅速下跌。当电池完全耗
尽,电量指示灯的4只LED开始闪烁,停止工
作,给蓄电池充电。
注意:当温度过高或过载时,电量指示灯的4只
LED灯也会出现闪烁。

page 7 Manual_Revised_V1.1
5. 何时充电
当电池保护的时候,需要将电池插回到充电器
上进行恢复;可以随时给该锂电池充电,充电
前不需要预先放电。
使用电量指示灯决定什么时候给蓄电池充电。
进行大量工作或长时间工作前,给蓄电池充电。
6. 安装蓄电池
注意:只能使用 原厂的锂离子蓄电
池,电池的电压和机器铭牌上提供的电压一
致。使用其它厂牌的蓄电池,可能导致意外伤
害并造成火灾。
指示:使用了不适合本电动工具的蓄电池,不仅无
法发挥电动工具的功能,甚至会损坏电动工具。
1) 把正/逆转开关调整到中央位置,以防止无
意开动机器。
2) 将蓄电池上突出的肋与机器底部的凹槽对
齐,再将蓄电池插在机器上。
注意:确保蓄电池上的闭锁“咯嗒”锁定位并
在操作前确认蓄电池安全地装置在机器上。
7. 安装SDS钻头
警告:手持或安装钻头时,需要佩戴坚硬
的手套,因为这些钻头非常锋利。
1) 先清洁钻头然后再安装,须在钻头柄的末端
涂抹少许油脂;
2) 旋转钻头将其插入外套夹头直至能够清楚地
听到卡牢声响为止;
3) 此时钻头已经自动锁定。但仍要抽拉钻头检
查其是否已经正确套紧。
拆卸钻头时,握住外套往回拉,移去钻头,
松开外套。
8. 改变转向
将机器面对工作面:
把正反转按钮向左推到底正转。
把正反转按钮向右推到底反转。
防止损坏齿轮,改变转向前,使机器完全停止转动。
把正反转按钮正调整到中央位置,不能启动机器。
9. 照明/指示灯

page 8Manual_Revised_V1.1
照明/指示灯在按下开关点亮.在照明状况不佳的
环境中可以借此照亮操作位置。
按下起停开关后,照明/指示灯快速连续的闪
烁,表明蓄电池电量即将耗尽,需要给蓄电池充
电。
10. 启动充电电锤
按起停开关启动该机器。机器达到全速后开始钻孔。
钻孔结束,松开起停开关,待钻头完全停止转动
后放下机器。
该机器有一调速开关,按压调速开关越用力,转速越
快,扭矩越大。转速取决于按压起停开关的力度。
该调速功能用于拧螺钉。它使用户可以根据特殊
的应用需求选择最适合的转速。
注意:建议只在短时间内使用该调速功能。不要
连续变速操作机器,这样会损坏开关。
警告:当周围温度低于0摄氏度且启动机器
后没有冲击功能时,使用前,启动机器空载运转
2-3分钟。
11. 设定操作功能
警告:必须先关闭机器之后才能够选换功
能!否则会损坏机器,甚至给操作者带来伤害。
转动功能选换旋钮至需要的功能图标位置,选择
需要的功能。
12. 拧螺钉
1) 安装正确的螺丝批头。
2) 确保功能选换旋钮被设定在钻模式上。
3) 根据实际操作,使用适当的转速,开始轻轻
按压起停开关。
4) 握紧机器并完全控制机器后,增加转速。
5) 施加适当的压力以防批头在旋转中脱离螺帽。
螺帽很容易受损,导致很难移出或拧紧。
13. 钻孔
若要钻大直径孔,最好是用小点的钻头先钻个小
孔,然后逐步扩大孔径至需要的尺寸。这样做,
可防止机器过载。
若钻头被堵住,立即关闭机器,否则会损坏机
器。可以通过反转拆卸钻头。
将机器与孔对齐,理想情况下,钻头应该是垂直
钻入工件。在钻孔过程中,如果角度发生改变,
可能导致钻头损坏孔并且造成伤害。
当钻头快要穿透工件时,减少施压。
不可强行按压机器,让机器自行工作。
保持钻头锋利。
14. 钻木料
为了达到最佳的作业效果,在钻木料时请使用麻
花钻头或木工钻头。
将机器设定在钻模式。
以一个较慢的速度开始钻孔作业以免钻头从起始
点滑脱。当钻头钻进材料中时再增加速度。当要
钻通的时候,在工件的后面放置一段垫板以防止
钻通的孔炸裂。
15. 钻金属
为了达到最佳的作业效果,钻金属时请使用高速
钢钻头。
1) 将机器设定在钻模式。
2) 使用中心冲在工件上标出圆孔的中心。
3) 在钻头上涂些油脂以防止钻头过热。涂上的
油脂会延长钻头的寿命并提升钻孔效果。
4) 以一个非常慢的速度开始钻孔以防止钻头从
page 9 Manual_Revised_V1.1
起始点滑脱。
5) 夹紧钢板。
6) 用一块木块垫在薄钢板上以防钢板在钻的
过程中变形。
16. 钻石材
为了达到最佳的作业效果,在砖块、瓷砖、水
泥等材料上钻孔时请使用硬质合金钻头。
起初先用钻模式先钻孔,一旦孔钻好了切换到
锤击模式。
在瓷砖上钻孔时,先在一废弃的瓷砖上试一
下,从而决定最佳的转速和施加的力度。
注意:锤钻工作时切换转向可能损坏机器和钻
头。
实际应用
确定电动工具已经关闭了,才可以把电动
工具顶在螺丝头上。转动中的钻头容易从螺丝
头上滑开。
检查正逆转开关6被调整在正确的位置(左或右),
握紧机器,并将钻头放在需要加工的物件上,
施加适当的压力,确保钻头的钻削功能。不要
按压电锤,不要从旁边用力压电锤。
注意:一旦发现钻头卡在加工件里面,立即关
闭开关,停止机器转动,取出钻头,检查原因
并维修完好后继续工作。
工具维护保养
警告:对器具进行维修检查之前,必须
把蓄电池从机器中拔除或将插头拔离电
源插座。
1. 检查安装螺钉。经常检查安装螺钉是否紧
固稳妥。螺钉松开极易引起严重事故。
2. 定期检查线缆。电源线是特殊制备的,如
发现损伤应立即委托 授权的维
修中心处理。此工具所用电源线为特殊结
构,且勿擅自更换电源线,如需更换,请
到 授权的维修中心处理。
3. 保持通风槽清洁顺畅。经常清除尘埃、油污,
严防杂物入内。
4. 更换碳刷(仅针对使用有刷电机工具)。
当碳刷磨损到一定长度器具将会停止,一旦
发生此情况,应及时更换碳刷,为了保证产
品的安全性和可靠性,由经 授权
的维修中心检查和更换碳刷,以防止触电和
保证工具长期安全使用。
5. 必须 由 授权的维修中心进行维
修。只能使用 的配件、零件。
6. 清洁。避免使用造成塑料龟裂损坏的溶剂擦
拭塑料零件。建议使用稍微沾湿了肥皂水的
柔布。
7. 避免工具受到震荡、撞击或油脂影响。
请勿让马达淋到水,禁止将整个机身投入水
中,以免引起马达故障及触电事故!
环境保护
1、 的包装可以百分之百进行回收再
生处理。
2、 报废的电动工具和附件中含有大量有价值
的原材料及合成材料,同样可以进行再生回
收。
3、 磨屑或切割时所产生的粉尘中会包含有害
物质因而不应作为普通垃圾倾倒,而应交给
特殊垃圾回收站处理。
服务
1、 工具需要保修时,请自行送至当地特约维修
中心,并提供有效保修卡及购机发票原件,
遗失保修卡恕不补发。
2、 由于正常磨耗、过载或不当使用而导致的损
坏,不在保证范围内。

附:一般故障及排除方法
故障 原因 排除方法
工具不运转 电池包没电 给电池包充电
没有锤击动作或工具抖动 功能选换旋钮放在钻档 把功能选换旋钮转到锤档
工具无法产生全部动力 控制开关没有完全按下 尽可能按下控制开关
page 11 Manual_Revised_V1.1
DESCRIPTION OF THE TOOL
OPERATING CONTROL
The power tool is intended for hammer drilling in concrete, brick and stone. It is likewise
suitable for drilling without hammer in wood, metal, ceramic, plastic and chiseling. Do not use
machine, tools and chargers for works other than those for which they are designed for! All
other applications are expressly ruled out.
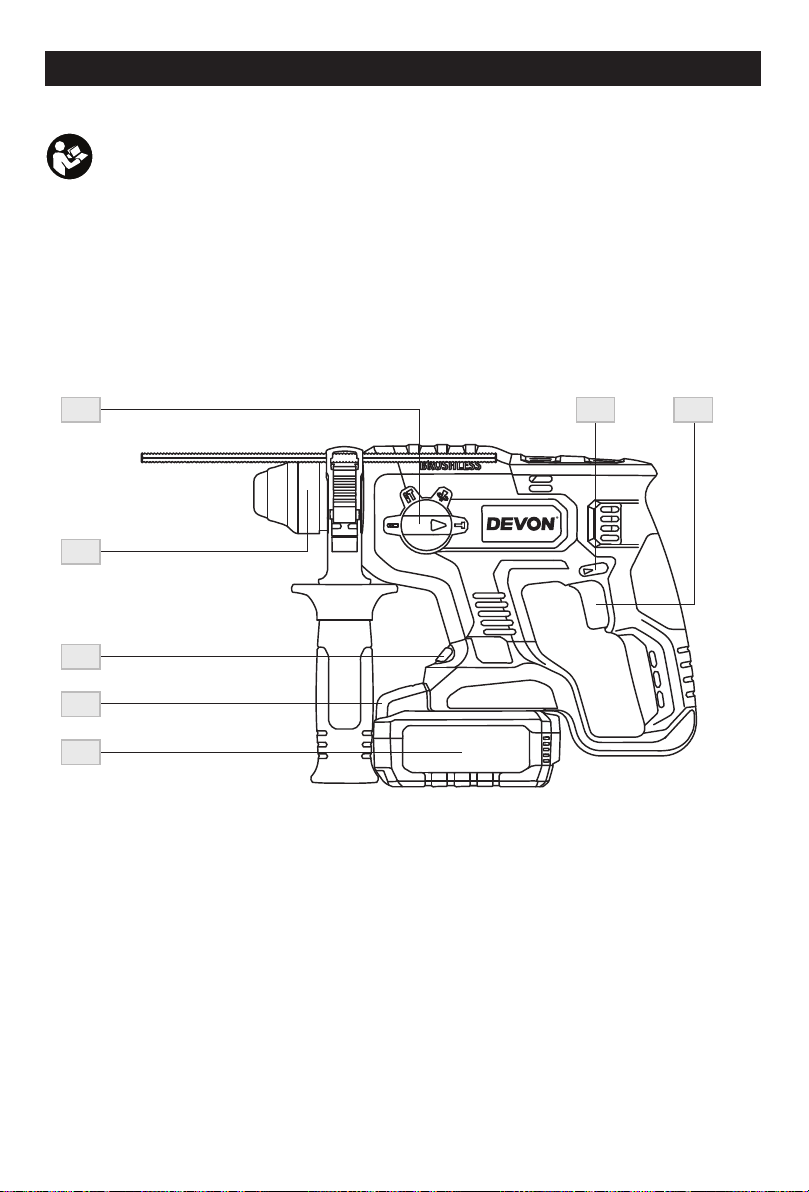
1. MAIN PARTS
1. Locking sleeve
2. LED worklight
3. Function selector
4. Battery pack
5. Battery release button
6. Forward/reverse switch
7. On/off trigger switch
NOTE
1 Attach the battery pack on the charger for short charging to resume the battery, when the battery
pack is protected as the redundant current and high temperature.
2 For continuous long operation, the tool may be hot; cool it down to appropriate temperature before
reuse, otherwise, may damage the tool.
5401-Li-20RH
5401-Li-20RH/N
1
2
5
3 6 7
4

page 12Manual_Revised_V1.1
2. TOOL SPECIFICATIONS
Model 5401-Li-20RH/N
Motor(V) 20
No-load speed(/min) 0-1400
Drilling capacity
in wood(mm) 28
in metal(mm) 13
in concrete(mm) 22
Battery type Lithium-Ion
Charger input (V) 220-240~
Battery voltage (V) 20
Allowable temperature range(℃) 5-40
NOTE
1. Due to ’s continuing program of development, the specications herein are subject of
change without prior notice.
2. The values given are valid for nominal voltages [U] of 220 V. For lower or higher voltages and
models for specic countries, these values can vary.
3. 5401-Li-20RH is set, with battery and charger; 5401-Li-20RH/N is bare tool,without battery and charger.

page 13 Manual_Revised_V1.1
Use of an RCD reduces the risk of electric
shock.
3. PERSONAL SAFETY
1) Stay alert, watch what you are doing and
use common sense when operating a
power tool. Do not use a power tool while
tired or under the inuence of drugs, alcohol,
or medication. A moment of inattention while
operating power tools may result in serious
personal injury.
2) Use safety equipment. Always wear eye
protection. Safety equipment, such as
dust mask, non-skid safety shoes, hard
hat, and hearing protection, when used for
appropriate conditions, will reduce personal
injuries.
3) Avoid accidental starting. Make sure that
the switch is in the “OFF” position before
plugging the tool into an electrical outlet.
Carrying power tools with your nger on the
switch or plugging in power tools that have
the power switch “ON” invites accidents.
4) Remove any adjusting key or wrench before
turning the power tool on. A wrench or key
left attached to a rotating part of the power
tool may result in personal injury.
5) Do not overreach. Keep proper footing and
balance at all times. This enables better
control of the power tool in unexpected
situations.
6) Dress properly. Do not wear loose clothing
or jewelry. Keep your clothing, gloves,
and hairs away from moving parts. Loose
clothes, jewelry, or long hair can be caught
in moving parts.
7) If devices are provided for the
connection of dust extraction and
collection facilities, make sure that these
are connected and properly used. Use
of these devices can reduce dust-related
hazards.
4. POWER TOOL USE AND CARE
1) Do not force the power tool. Use the
correct power tool for your application.
The correct power tool will do the job better
and more safely at the rate for which it was
designated.
2) Do not use the power tool if the switch
does not turn it ON and OFF. Any power
GENERAL SAFETY RULES
WARNING: Read all instructions. Failure
to follow all instructions listed below may result
in electric shock, re and/or serious personal
injury. Save these instructions.
The term “power tool” in all of the warnings
listed below refers to your mains operated
(corded) power tool or battery operated
(cordless) power tool.
1. WORK AREA SAFETY
1) Keep your work area clean and well lit.
Cluttered or dark areas invite accidents
2) Do not operate power tools in explosive
environments, such as in the presence of
ammable liquids, gases, or dust. Power
tools create sparks, which may ignite the
dust or fumes.
3) Keep children and bystanders away
while operating a power tool. Distractions
may cause you to lose control.
2. ELECTRICAL SAFETY
1) Power tool plugs must match the outlet.
Never modify the plug in any way. Do not
use any adapter plugs with grounded power
tools. Unmodied plugs and matching
outlets will reduce the risk of electric shock.
2) Avoid body contact with grounded
surfaces, such as pipes, radiators,
ranges, and refrigerators. There is an
increased risk of electric shock if your body
is grounded.
3) Do not expose power tools to rain or wet
conditions. Water entering a power tool will
increase the risk of electric shock.
4) Do not abuse the cord. Never use the
cord for carrying, pulling, or unplugging
the power tool. Keep the cord away from
heat, oil, sharp edge, or moving parts.
Damaged or entangled cords increase the
risk of electric shock.
5) When operating a power tool outdoors,
use an extension cord suitable for outdoor
use. Use of a cord suitable for outdoor use
reduces the risk of electric shock.
6) If operating a power tool in a damp
location is unavoidable, use a residual
current device (RCD) protected supply.

page 14Manual_Revised_V1.1
cause burns or a re.
4) Under abusive conditions, liquid may be
ejected from the battery; avoid contact. If
contact accidentally occurs, ush with water.
If liquid contacts eyes, additionally seek
medical help. Liquid ejected from the battery
may cause irritation or burns
6. SERVICE
1) Have your power tool serviced by a
qualied repair person.
SAFETY RULES FOR BATTERY
PACK
1. Avoid unintentional switching on, ensure
the on/off switch is in the off position
before inserting battery pack. Carrying
the power tool with your nger on the on/
off switch or inserting the battery pack into
power tools that have the switch on invites
accidents.
2. Do not open the battery. Danger of short
circuiting.
3. Protect the battery against heat, e.g.,
also against continuous sun irradiation
and re. There is danger of explosion.
4. In case of damage and improper use
of the battery, vapors may be emitted.
Provide for fresh air and seek medical
help in case of complaints. The vapors can
irritate the respiratory system.
5. When the battery is defective, liquid
can escape and come into contact with
adjacent components. Check any parts
concerned. Clean such parts or replace
them, if required.
6. If liquid comes in contact with your
skin, wash immediately with soap and
water, then neutralize with lemon juice or
vinegar.
7. If liquid from the battery gets in your
eyes, ush them with clean water for
at least 10 minutes, and then seek
immediate medical attention. Following
this rule will reduce the risk of serious
personal injury.
8. Use the battery only in conjunction with
your power tool. This measure alone
tool that cannot be controlled with the switch
is dangerous and must be repaired.
3) Disconnect the plug from the power
source and/or the battery pack from
the power tool before making any
adjustments, changing accessories,
or storing power tools. Such preventive
safety measures reduce the risk of starting
the power tool accidentally.
4) Store idle power tools out of the reach
of children and do not allow persons
unfamiliar with the power tool or these
instructions to operate the power tool.
Power tools are dangerous in the hands of
untrained users.
5) Maintain power tools. Check for
misalignment or binding of moving
parts, breakage of parts and any other
condition that may affect the power tool’s
operation. If damaged, have the power tool
repaired before use. Many accidents are
caused by poorly maintained power tools.
6) Keep cutting tools sharp and clean.
Properly maintained cutting tools with sharp
cutting edges are less likely to bind and are
easier to control.
7) Use the power toolin accordance with
these instructions and in the manner
intended for the particular type of power
tool, taking into account the working
conditions and the work to be performed.
Use of the power tool for operations
different from those intended could result in
a hazardous situation.
5. BATTERY TOOL USE AND CARE
1) Recharge only with the charger specied
by the manufacturer. A charger that is
suitable for one type of battery pack may
create a risk of re when used with another
battery pack.
2) Use power tools only with specically
designated battery packs. Use of any
other battery packs may create a risk of
injury and re.
3) When battery pack is not in use, keep it
away from other metal objects, like paper
clips, coins, keys, nails, screws or other
small metal objects that can make a
connection from one terminal to another.
Shorting the battery terminals together may
page 15 Manual_Revised_V1.1
protects the battery against dangerous
overload.
9. Use the battery only with the charger
list., use with other chargers could result
in re hazard.
SERIES No. BATTERY PACK
No.
CHARGER
No.
5401-Li-20RH/N 5150 Series 5339/5340
10.Do not crush, drop or damage the
battery pack. Do not use a battery pack
or charger that has been dropped or
received a sharp blow. A damaged battery
is subject to explosion. Properly dispose of
a dropped or damaged battery immediately.
11. Do not charger a battery tool in a damp
or wet location. Following this rule will
reduce the risk of electric shock.
SAFETY RULES FOR CHARGER
WARNING:To reduce the risk of electric
shock or damage to the charger and battery,
charge only those lithium-ion rechargeable
batteries as specically designated on your
charger’s label. Other types of batteries may
burst, causing personal injury or damage.
1. Before using battery charger, read all
instructions and cautionary markings in
this manual and on the battery charger, the
battery and the product using the battery to
prevent misuse of the products and possible
injury or damage.
2. Do not use the charger outdoors or expose
it to wet or damp conditions. Water entering
the charger will increase the risk of electric
shock.
3. Use of an attachment not recommended or
sold by the battery-charger manufacturer
may result in a risk of re, electric shock or
injury to persons.
4. Do not abuse the cord or charger. Never
use the cord to carry the charger. Do not
pull the charger cord to disconnect the plug
from receptacle. Damage to the cord or
charger could occur and create an electric
shock hazard. Replace damaged cords
immediately.
5. Make sure that the cord is located so that it
will not be stepped on, tripped over, come in
contact with sharp edges or moving parts,
or otherwise subjected to damage or stress.
This will reduce the risk of accidental falls,
which could cause injury and damage to the
cord, which could then result in electric shock.
6. Keep cord and charger from heat to prevent
damage to housing or internal parts.
7. Do not allow gasoline, oils, petroleum-based
products, etc. to come in contact with plastic
parts. These materials contain chemicals that
can damage, weaken, or destroy plastic.
8. An extension cord should not be used
unless absolutely necessary. Use of an
improper extension cord could result in a
risk of re and electric shock. If an extension
cord must be used, make sure that:
The pins on plug of extension cord are the
same number, size and shape as those of
the plug on charger.
The cord is properly wired and in good
electrical condition
9. Do not operate the charger with a damaged
cord or plug, which could cause shorting and
electric shock. If damaged, have the charger
repaired or replaced by an authorized
service technician at a Service
Center.
10.Do not operate the charger if it has
been damaged in any way. Take it to
an authorized service technician at a
Service Center for an electrical
check to determine if the charger is in good
working order.
11.Do not disassemble the charger. Take it
to an authorized service technician at a
Service Center when service or
repair is required. Incorrect reassembly may
result in a risk of electric shock or re.
12.Unplug the charger from the electrical outlet
before attempting any maintenance or
cleaning to reduce the risk of electric shock.
13.Disconnect charger from the power supply
when not in use. This will reduce the risk of
electric shock or damage to the charger if
metal items should fall into the opening. It
will also help prevent damage to the charger
during a power surge.

page 16Manual_Revised_V1.1
14.Risk of electric shock. Do not touch the
uninsulated portion of output connector or
uninsulated battery terminal.
ADDITIONAL SAFETY RULES
FOR TOOL
1. Use suitable detectors to determine if
utility lines are hidden in the work area
or call the local utility company for
assistance. Contact with electric lines can
lead to re and electric shock. Damaging a
gas line can lead to explosion. Penetrating a
water line causes property damage.
2. Switch off the power tool immediately
when the tool inserts jams. Be prepared
for high reaction torque that can cause
kickback. The tool insert jams when:
--the power tool is subject to overload or
--it becomes wedged in the workpiece.
3. Hold the power tool only by the insulated
grpping surfaces, when performing an
operation where the cutting tool may run
into hidden wiring. Contact with a “live”
wire will make exposed metal parts of the
tool “live” and shock the operator.
4. Hold the power tool with a rm grip. High
reaction torque can briey occur while driving
in and loosening screws.
5. Secure the workpiece. A workpiece
clamped with clamping devices or in a vice is
held more secure than by hand.
6. Keep your workplace clean. Blends of
materials are particularly dangerous. Dust
from light alloys can burn or explode.
7. Always wait until the power tool has come to
a complete stop before placing it down. The
tool insert can jam and lead to loss of control
over the power tool.
8. The tool can only be used with battery
No.5150 together.
9. Never use the battery pack as a hammer,
beat the battery pack could result in accident
short,re or explode.
WARNING: Some dust created by
power Cutting contains chemicals known
to cause cancer, birth defects or other
reproductive harm. Some examples of these
chemicals are:
■ lead from lead-based paints
■ Arsenics and chromium from chemically
reacted lumber.
Your risk from these exposures varies,
depending on how often you do this type
of work. To reduce your exposure to these
chemicals: work in a well ventilated area, and
work with approved safety equipment.
ACCESSORIES
● Rotary Hammer
● Charger
● Lithium-Ion Battery pack
● Auxiliary handle
Be sure to check the accessories as it is
subject to change by areas and models.
OPERATION
1. Check the power voltage must be
consistent with the nameplate data!
2.BATTERY CHARGING
The battery is supplied partially charged. To
ensure full capacity of the battery, completely
charge the battery in the battery charger before
using your power tool for the rst time.
-A fully discharged battery pack will charge
in about 45 minutes in a surrounding
temperature between 32° F (0° C) and 104° F
(40° C).(With 5339 Charger)
-A fully discharged battery pack will charge
in about 100 minutes in a surrounding
temperature between 32° F (0° C) and 104° F
(40° C).(With 5340 Charger)
1) Charge the Lithium-Ion battery pack with the
correct charger.
2) Connect the charger to a power supply.

page 17 Manual_Revised_V1.1
LED FUNCTIONS OF CHARGER 5340
3) Align the raised ribs of the battery pack with
the slot in the charger.
4) Slide the battery pack onto the charger .
5) The charger will communicate with the
battery pack to evaluate the condition of the
battery pack.
6) The POWER BAR LED lights will cycle from
left to right during charging. This is part of
the normal charging operation. (With 5339
Charger) During the charging,the green
LED on the charger will frash. (With 5340
Charger)
7) After charging is completed, the power bar
LED on the charger will show OK.(With 5339
Charger) After charging is completed, the
green LED on the charger will be ON.(With
5340 Charger)
8) The battery pack will fully charge if left on
the charger, but it will not overcharge.
LED INDICATOR BATTERY PACK RED LED GREEN LED ACTION
HI/LO TEMP.
(SEE MANUAL) Hot/Cold battery On Off Charging will begin when
battery returns to 5oC-40oC
DEFECTIVE
BATTERY Defective Flashing Off Battery pack or Charger is
defective
BATTERY
CHARGING Charging Off Flashing Charging
BATTERY
FULL Fully charged Off On Charging is complete
Maintenance charging
80% - 100% charge
60% - 79% charge
40% - 59% charge
20% - 39% charge
Under 20% charge
Completely discharged
or overloaded
High/low temperature
5339-Li-20F
5340-Li-20R
Remarks: chargers choose one from two

page 18Manual_Revised_V1.1
3. CAPACITY DISPLAY
This Lithium-Ion battery pack is equipped with
a POWER BAR, which is used to display the
battery pack’s remaining run time. Press the
POWER BAR button to display the LED lights.
The LED lights will stay lit for approximately 4
seconds.
NOTE: The POWER BAR can be used
whether the battery is attached or removed
from tool.
4. LOW-BATTERY CAPACITY INDICATOR
· If LED worklights on the POWER BAR
begins to rapidly and continuously ash
when the trigger switch on the tool is
depressed, the battery pack’s power has
run out, and the battery pack should be
recharged.
· Unlike other battery pack types, Lithium-Ion
battery packs deliver fade-free power for their
entire run time. The tool will not experience a
slow, gradual loss of power as you work. To
signal that the battery pack is at the end of its
run time and needs to be charged, the power to
the tool will drop quickly. The POWER BAR will
begin to display four ashing LED lights when
the battery is completely discharged. When this
happens, remove the tool from the workpiece,
and charge the battery pack as needed.
NOTE: The POWER BAR may also display
four ashing LED lights due to an overload or
high temperature situation.
5. WHEN TO CHARGE THE BATTERY PACK
Attach the battery pack on the charger to
resume the battery when the battery pack
is protected.The Lithium-Ion battery can be
charged at any time and will not develop a
“memory” when charged after only a partial
discharge. It is not necessary to run down
the battery pack charge before recharging.
Remove the battery pack from the tool when
convenient for you and your job.
· Use the POWER BAR to determine when
you need to recharge the battery pack.
· You can “top-off” your battery pack’s charge
before starting a big job or long period of use.
6. TO ATTACH BATTERY PACK
WARNING: Use only DEVON lithium-ion
batteries with the voltage listed on the nameplate
of your power tool. Using other batteries can lead
to injuries and pose a re hazard.
NOTE: Use of batteries not suitable for the
machine can lead to malfunctions of or cause
damage to the power tool.
1. Lock the trigger switch on the tool by placing
the direction of rotation (forward/reverse/
center lock) selector in the center position.
2. Align the raised rib on the battery pack with
the grooves on the bottom of the tool, and
then attach the battery pack to the tool.
NOTE: Make sure that the latch on the battery
pack snaps into place and the battery pack is
secured to the tool before beginning operation.
To remove the battery pack from the tool,
depress the battery release button located on
either side of the battery pack, and pull the
battery pack out and remove it from the tool.
7. For SDS drill bit
WARNING: Always wear sturdy gloves
when handling or changing drill and chisel bits as
they can be very sharp.
1) Clean the shank end of the bit and apply a
light coat of grease;

page 19 Manual_Revised_V1.1
2) Insert the SDS drill bit into the tool holder with
a turning motion until it automatically locks;
3) Check the locking effect by pulling the SDS
drill bit.
To remove the SDS drill bit, Push the locking
sleeve toward the rear and pull out the bit.
8. Forward/reverse adjustment
For forward (clockwise) rotation, push the
forward /reverse switch to the left position.
For reverse (counterclockwise) rotation, push
the forward/reverse switch to the right position
as shown. Although an interlock prevents
reversing the tool while the motor is running,
allow it to come to a full stop before reversing.
If forward/reverse switch is on the central position,
the tool cannot be switched on.
9. LED worklight
The tool has an LED light to illuminate the work
area and improve vision when working in areas
with insufcient light. The LED light will switch
on automatically while the trigger switch is
depressed.
If the LED worklight begins to rapidly and
continuously ash when the switch on the tool is
depressed, the battery-pack power has run out,
and the battery pack should be recharged.
10. Start cordless hammer
Squeeze the trigger switch to start the tool. And
allow the tool reaches full speed before beginning
drilling.
After completing your drilling, release the trigger
switch, allow the bit to come to a complete stop
before setting the tool down.
This tool has a variable speed switch that delivers
higher speed and torque with increased trigger
pressure. Speed is controlled by the amount of
switch trigger depression.
The variable speed feature is particularly useful
when driving screws. It also enables you to select
the best speed for a particular application.
NOTE: It is recommended to use the variable
speed feature for a short time only. Do not
continuously operate the tool at different speeds.
It may damage the switch.
WARNING: Please start the tool for 2-3
minutes rst before use, while the temperature is
below zero and there is no impact phenomenon
after you turn on the tool.
This manual suits for next models
1
Table of contents
Other Devon Rotary Hammer manuals


