Devon 1107-26E User manual

专业电动工具
PROFESSIONAL TOOLS
中国
GB
电 锤
Rotary Hammer
各产品外观之间存在差异,请以实物为准
1107-26E
1107-26RE
1107-26DE
1107-26DRE
型号:

Page 1 Manual_Revised_V1.0
电锤简介
该工具为专业用户而设计,可在混凝土、砖墙及石材上进行振动作业,也可做简单的轻凿击工
作。另外使用本工具还可在木材、金属、陶质材料及塑料上钻孔(无震动功能的正常钻)。
1. 操作控制
2、工具规格
型号 1107-26E 1107-26RE 1107-26DE 1107-26DRE
转速控制 ●●●●
正/反转功能 -●-●
凿削功能 - - ● ●
输入功率(瓦) 800 800 800 800
空载转速( /分钟) 0-1150 0-1150 0-1150 0-1150
敲击次数( /分钟) 0-4000 0-4000 0-4000 0-4000
冲击能量( 焦耳 ) 0-3.0 0-3.0 0-3.0 0-3.0
最大
钻孔
直径
混凝土 (毫米) 26 26 26 26
木材(毫米) 30 30 30 30
钢(毫米) 13 13 13 13
砖墙(空心钻头)(毫米) 68 68 68 68
重量(不含配件) 2.6kg 2.6kg 2.65kg 2.65kg
夹头 SDS-plus SDS-plus SDS-plus SDS-plus
主轴径直径(毫米) 48 48 48 48
保护等级
绝缘等级 EEEE
注:1.为求改进,本说明书所载规格可能不预先通告而给予更改。
2.本说明书提供的参数是以220V为依据,若有低于或高于此电压的地区,数据有可能不同。
1
2
3
5
6
4
1. 防尘帽
2. 外套
3. 功能选换旋钮
4. 导尺
5. 起停开关
6. 辅助手柄

Manual_Revised_V1.0 Page 2
电 动 工 具 通 用 安 全 警 告
警告!阅读所有警告和所有说明。不遵照以
下警告和说明会导致电击、着火和/或严重伤害。
保存所有警告和说明书以备阅读。
在所有下列的警告中术语“电动工具”指市电驱动
(有线)电动工具或电池驱动(无线)电动工具。
1. 工作场地的安全
1) 保持工作场地清洁和明亮。混乱和黑暗的场
地会引发事故。
2) 不要在易爆环境,如有易燃液体、气体或粉
尘的环境下操作电动工具。电动工具产生的
火花会点燃粉尘或气体。
3) 让儿童和旁观者离开后操纵电动工具。注意
力不集中会使操作者失去对工具的控制。
2. 电气安全
1) 电动工具插头必须与插座相配。绝不能以任
何方式改装插头。需接地的电动工具不能使
用任何转换插头。未经改装的插头和相配的
插座将减少电击危险。
2) 避免人体接触接地表面,如管道、散热片和
冰箱。如果你身体接地会增加触电危险。
3) 不得将电动工具暴露在雨中或潮湿环境中。
水进入电动工具将增加触电危险。
4) 不得滥用电线。绝不能用电线搬运、拉动电
动工具或拔出其插头。使电线远离热源、
油、锐边或运动部件。受损或缠绕的软线会
增加电击危险。
5) 当在户外使用电动工具时,使用适合户外使
用的外接软线。适合户外使用的软线将减少
电击危险。
6) 如果在潮湿环境下操作电动工具是不可避免
的,应使用剩余电流动作保护器(RCD)。使
用RCD可减少电击危险。
3. 人身安全
1) 保持警觉,当操作电动工具时关注所从事的操
作并保持清醒。当你感到疲倦,或在有药物、
酒精或治疗时,不要操作电动工具。在操作电
动工具时瞬间的疏忽会导致严重人身伤害。
2) 使用个人防护装置。始终佩戴护目镜。安全
装置,诸如适当条件下使用防尘面具、防滑
安全鞋、安全帽、听力防护等装置能减少人
身伤害。
3) 防止意外起动。确保开关在连接电源和/或电
池盒、拿起或搬运工具时处于关断位置。手
指放在已接通电源的开关上或开关处于接通
时插入插头可能会导致危险。
4) 在电动工具接通之前,拿掉所有调节钥匙或
扳手。遗留在电动工具旋转零件上的扳手或
钥匙会导致人身伤害。
5) 手不要伸得太长。时刻注意脚下和身体平衡。
这样在意外情况下能很好地控制电动工具。
6) 着装适当。不要穿宽松衣服或佩带。让你的
头发、衣服和袖子远离运动部件。宽松衣
服、佩饰或长发可能会卷入运动部件。
7) 如果提供了与排屑装置、集尘设备连接用的
装置,则确保他们连接完好且使用得当。使
用这些装置可减少碎屑引起的危险。
4. 电动工具使用和注意事项
1) 不要滥用电动工具,根据用途使用适当的电
动工具。选用适当的设计额定值的电动工具
会使你工作更有效、更安全。
2) 如果开关不能接通或关断工具电源,则不能
使用该电动工具。不能用开关来控制的电动
工具是危险的且必须进行修理。
3) 在进行任何调节、更换附件或贮存电动工具
之前,必须从电源上拔掉插头和/或将电池
盒脱开电源。这种防护性措施将减少电动工
具突然起动的危险。
4) 将闲置不用的电动工具贮存在儿童所及范围
之外,并且不要让不熟悉电动工具或对这些
说明不了解的人操作电动工具。电动工具在
未经训练的用户手中是危险的。
5) 保养电动工具。检查运动件是否调整到位或
卡住、检查零件破损情况和影响电动工具运
行的其他条件。如有损坏,电动工具必须在
使用前修理好。许多事故由维护不良的电动
工具引发。
6) 保持切削刀具锋利和清洁。保养良好的有锋
利切削刃的刀具不易卡住而且容易控制。
7) 按照使用说明书,考虑作业条件和进行的作
业来使用电动工具、附件和工具的刀头等。
将电动工具用作那些与要求不符的操作可能
会导致危险情况。
5. 维修
将你的电动工具送交专业维修人员,使用同样的
备件进行修理。这样将确保所维修的电动工具的
安全性。

Page 3 Manual_Revised_V1.0
锤类工具的安全警告:
—
戴好耳罩。暴露在噪声中会引起听力损伤。
—
使用随工具提供的辅助手柄。操作失手会引
起人身伤害。
—
在切削附件可能触及暗线或其自身软线之处
进行操作时,要通过绝缘握持面来握持工
具。切削附件碰到带电导线会使工具外露的
金属零件带电从而使操作者受到电击。
电锤使用注意事项
1. 确保电源线放在机身后面,远离钻头。
2. 工件请用夹具或台钳卡紧。
3. 戴好耳罩。暴露在噪声中会引起听力损伤。
4. 操作机器时务必使用随工具提供的辅助手
柄。操作失手会引起人身伤害。
5. 如果工具启动后,出现明显颤动或其它异
常,请立即停机,排除故障后方可继续操
作。握住绝缘手柄表面。
6. 以双手紧握电锤,勿以单手操作。
7. 切勿强施蛮力,本电锤以其自身转速运行会
有更佳及更安全的表现。
8. 使用电动工具时,应拿着其绝缘表面,因机
具可能会直接接触到隐藏的电源或自身电
线。
9. 配戴上手套才接触电锤配件,当操作时钻头
及配件会变热,配戴手套及中间小休会减少
振动对手及手臂的伤害。
10. 借助金属探测仪等检查钻孔位置有无隐蔽的
电线,气体、供水管道。
11. 工具在操作中,请勿清除铁屑、木屑。
12. 请勿随意在机壳任何位置钻孔,以防漏电。
13. 在粉尘过多的环境下,应缩短电动工具的清
洁周期。
14. 不要长时间操作工具。以免对手或手臂造成
疲劳损伤。
电锤工作时产生的粉尘可能含有致癌
或对人体有害的化学物质。例如:
油漆中含的铅。
砷和铬与木材起反应后也会产生有毒物质。
为了减少这些有毒的化妆物质对人体的伤害,
要尽量保证在通风的环境下工作,并且工作时配
戴合格的安全保护装置。
配备
导尺 1个
辅助手柄 1个
在某些国家或某些特殊的机型,其所提供的
配备,可能与以上所给的资料稍有出入。
操作说明
1.
检查供电电压 须与铭牌数据相符!
2.
自动安全离合器装置 当工具突然被卡住
时,能保护使用者和机器,以减少受到反向
扭力的伤害。
3.
辅助手柄的安装 首先请将电源线路插头拔
离总插座。然后,利用旋转握把,可打开辅
助手柄的夹固定位。移推辅助手柄经由工具
夹头在机具前端的握轴处稍稍旋紧一点,再
沿着脖颈360°的范围内转至理想的定位位
置,至此旋紧辅助手柄,以防使用中的意外
移动。
使用随工具提供的辅助手柄。操作失手会引
起人身伤害。
4.
选用工具
进行振动锤钻时一定要使用SDS-plus工具,
因为此时必须把工具安装到SDS夹头上(参考
“SDS-plus”工具)。
在钢材或木材上钻孔时,要使用无SDS-plus的
钻头(例如带圆柱柄的钻头),此类钻头必须和特
殊的夹头配合使用(参考“实际应用”)。

Manual_Revised_V1.0 Page 4
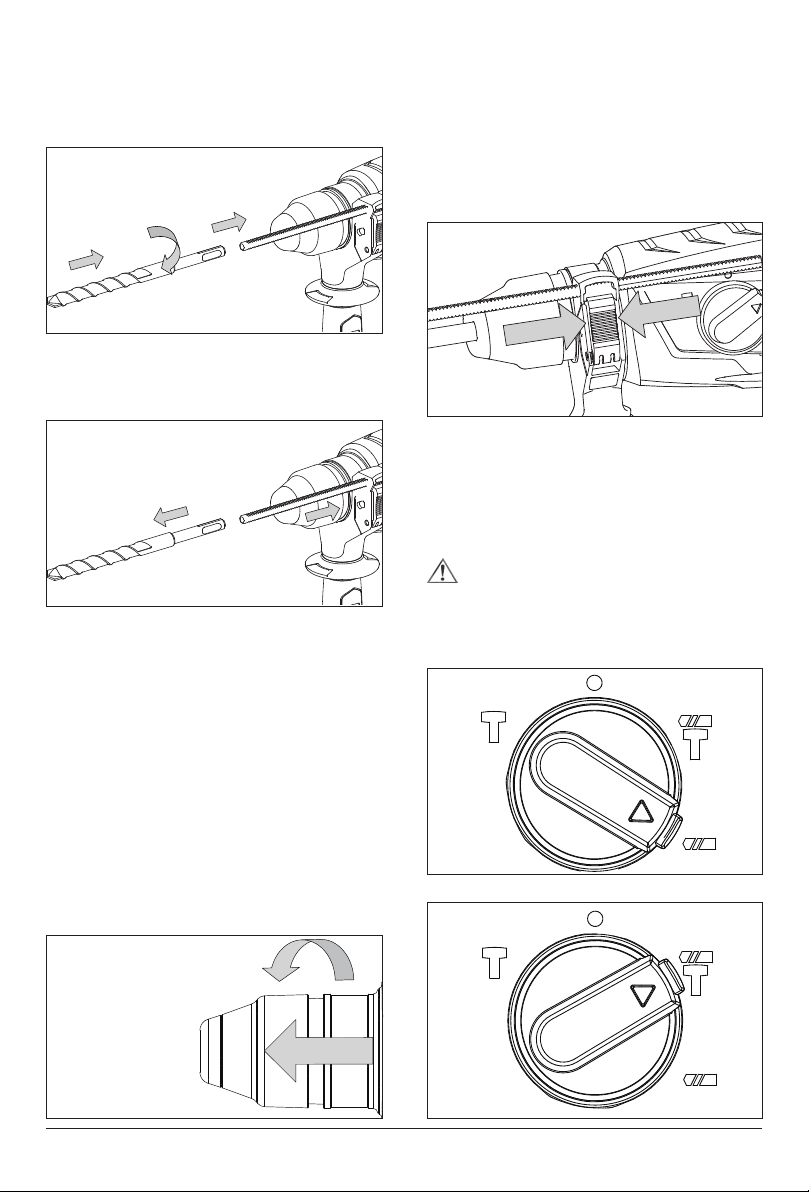
5.
安装拆卸SDS-plus工具
由于系统设计上的特点,SDS-plus工具可以自
由转动,因此在非负载状态下,工具会作偏心旋
转。只要一开始钻孔,工具即会自动定心。因此
上述现象并不会影响钻孔的准确度。
更换工具时要小心,不要损伤防尘帽。如防
尘帽损坏必须立即更换。
1) 安装:
必须定期在工具柄端面涂油脂。
(1) 安装工具前必须先清洁工具,而且要在插柄
上抹少许润滑油脂。
(2) 把工具轻轻转入工具夹头至听到轻响,然后
将其推入。
(3) 检查工具是否正确锁入锁紧。
2) 拆卸:向后拉外套,握紧外套并同时从工具
夹头中取出工具。
6.
安装拆卸快换夹头
(1) 拆卸
暂时把功能选换旋钮设定在凿削功能上(芯轴会
被锁定)。
朝着逆时针转向用力地把外套转到尽头,接着再
拉出快换夹头。
(2) 安装
把快换夹头安装在芯轴上。
朝着逆时针转向转动外套,并同时用力向后压至
快换夹头卡入而且自动锁定为止。检查快换夹头
是否已经装牢了。
7.
调整导尺
使用导尺可以设定需要的钻深。
按下调整导尺的按键,再把导尺装入辅助手柄
中。(导尺上的肋纹必须朝下)。把SDS-plus
工具插入接头并把工具推到底。如未安装工具会
影响设定深度的准确性。适当调整导尺深度,从
钻最尖端到导尺尖端的距离必须和需要的钻深一
致。
8.
设定操作功能
使用功能选换旋钮,可以选择不同的操作功能。
变换功能即转动功能选换旋钮(转动功能时必须
能够清楚地听到开关的咬合声响)以选择适合的
操作功能。

Page 5 Manual_Revised_V1.0
必须先关闭机器之后才能够选换功能!否则
会损坏机器。
在钢材或木材上钻孔,旋紧螺丝。
在混凝土或石头上进行振动钻。
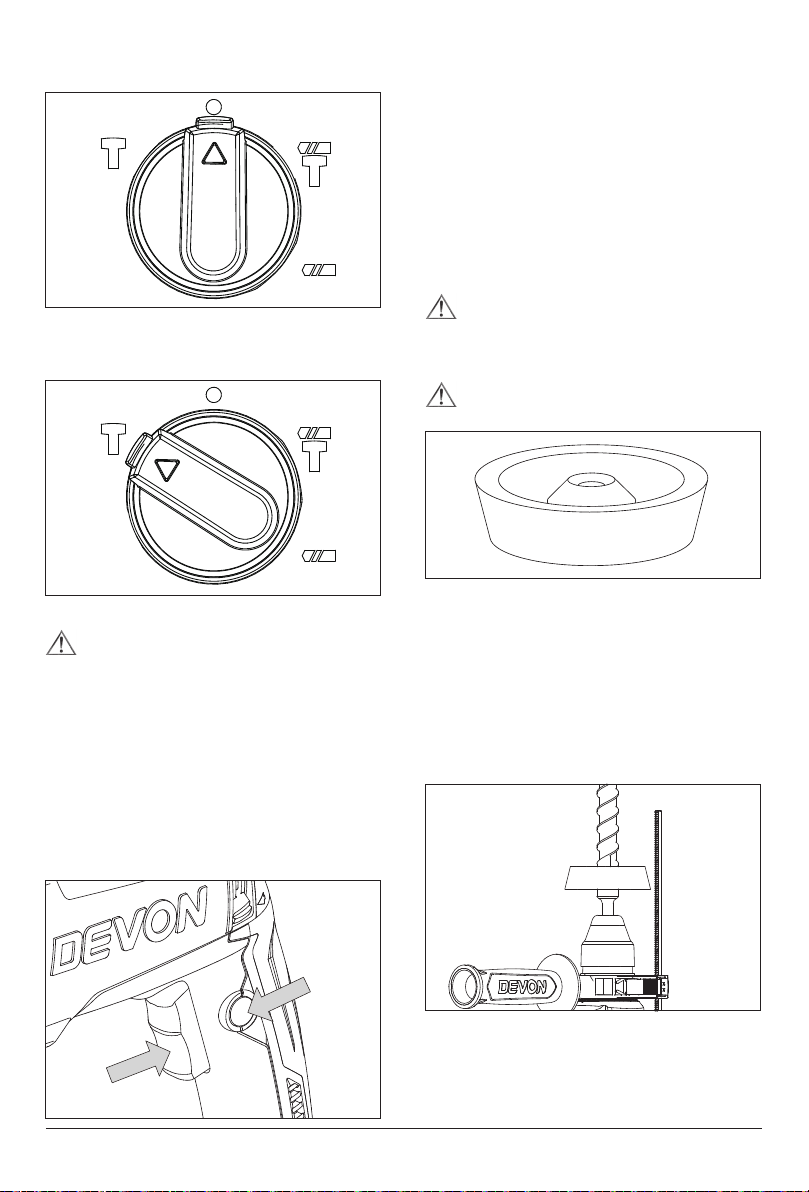
这是一种非工作模式,仅用于转动平凿,使
之装入到所需要的位置。
用于轻度凿削用途。此种工作模式下,工具
也可用作杠杆以清理卡住的钻头。
9.
调整机器转向
使用正反转按钮可以改变钻头的旋转方向。
正向:把正反转按钮调整到符号 侧。
反向:把正反转按钮调整到符号 侧。
10.
开关操作
检查工具的开关操作是否自如,确保插电前
开关处于关停状态!
1) 间歇性作业:
启动:按下起停开关
关停:放开起停开关
2) 调速操作
在起停开关上施力越大,转速就越快,转速可无
段式增加至所需转速。

Manual_Revised_V1.0 Page 6
低段转速可以帮助机器起钻(例如在瓷砖等平滑
的表面上起钻),不仅可以防止钻头走滑,也可
以防止钻孔破裂。
建议性设定:
高转速:适用于在混凝土或石头上进行振动
钻以及进行凿击时;
中转速:适用于在钢材上钻孔时
低转速:适用于旋紧螺丝时
11. 防尘碗(选购附件)
防尘碗是专门用于混凝土的钻孔,请勿用于
金属、木材的钻孔!
每钻2-3个孔后,请将粉尘丢掉!
使用电动锤钻进行头上工作时,请装上防尘碗,
以减少灰尘的掉下,便于操作。
防尘碗的安装
将防尘碗装在钻头上使用。使用粗径钻头时,请
用本电动锤钻将防尘碗的中心孔开大。
实际应用
为减少爆炸、电击等危险和伤害,作业前必
须检查工件有无隐蔽的电线、气体、供水管道!
在较低温度下工作时:
机器只允许达到最低设定操作温度,才可启动工作。
在机器启动的状态下,将锤头尖部对准需要钻孔
处压下。必要时可重复执行此程序,使机器达到
最低设定操作温度。
1.
振动钻
进行振动钻时不可以使用无SDS-plus的钻头!
如果使用无SDS-plus的钻头进行振动钻会损坏
钻头和机器夹头。
使用无SDS-plus的钻头作业时,必须把功能选
换开关旋钮到此 符号上。
2.
钻孔
必须先在机器上安装合适的钻夹头之后,才
能使用无SDS-plus(例如有圆柱柄的钻头)作业。
把SDS-plus四沟接杆(配件)转入钻夹头。安装
之前必须先清洁四沟接杆,而且要在插入端抹少
许润滑油脂。
把已经装上四沟接杆的钻夹头转入工具夹头中至
正确卡牢为止。
此时四沟接杆会被锁定,但是仍要抽拉钻夹头,
检查是否已经锁牢。
使用时,必须把功能选换开关调整到此符号
上。
拆卸钻夹头时,要先把外套向后抽拉并将它握
紧,然后再从工具夹头上取出钻夹头。
千万不要在冲击钻模式下使用钻夹头。
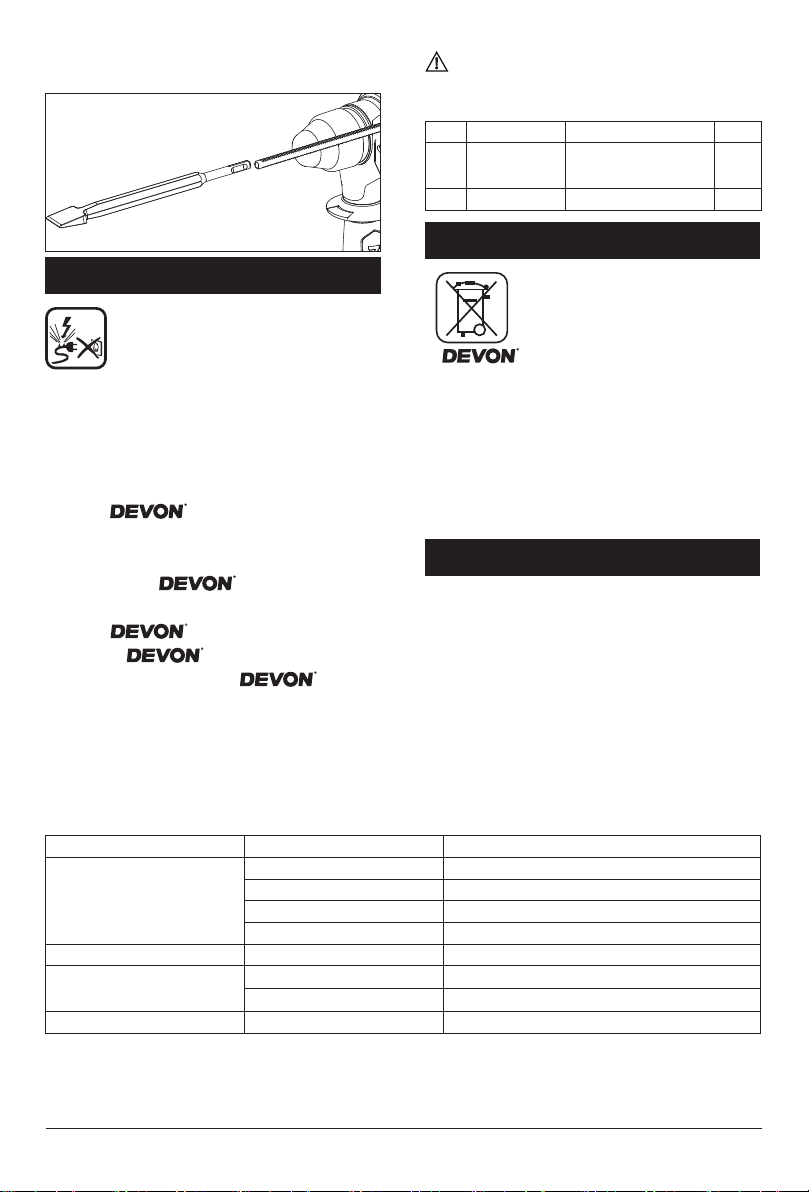
3.
轻型凿削
装上凿子前先要设定工作模式,将功能选换旋钮
调至 位置。
插入适当的凿子。要把凿子转动至所需位置,把
功能选换旋钮调至 位置,然后用手转动凿
子,最后把功能选换旋钮调回 位置。
按需要调整辅助手柄的位置。
按下起停开关并开始凿削。
双手紧握工具。启动工具并轻轻按压,这样工具
Page 7 Manual_Revised_V1.0
不会失控往四周弹跳。用力按压工具并不会提高
效率。
工具维护保养
注意:进行维修检查之前,必须把插
头拔离电源插座!
1.
避免工具受到震荡、撞击或油脂影响。
2.
检查安装螺钉。经常检查安装螺钉是否紧固
稳妥。螺钉松开极易引起严重事故。
3.
定期检查线缆。电源线必须用型号为
245IEC66(YCW)橡套电缆。如发现损伤应立
即委托 授权的维修中心处理。
4.
保持通风槽清洁顺畅。经常清除尘埃、油
污,严防杂物入内。
5.
更换碳刷。经授权的维修中心检查
和更换碳刷,以保证工具长期安全使用。
6.
必须由 授权的维修中心进行维修。
只能使用 的配件、零件。本说明书
中未提及的零件,请在经 授权的维
修中心更换!
7.
清洁。避免使用造成塑料龟裂损坏的溶剂擦
拭塑料零件。建议使用稍微沾湿了肥皂水的
柔布。
请勿让马达淋到水,禁止将整个机身投入水
中,以免引起马达故障及触电事故!
用户可更换零件表
序号 编码 名称 数量
1 4810002000 Power Cord &Plug
电源线 1
2 4960256000 Carbon Brush碳刷 2
环 境 保 护
1. 的包装可以百分之百进行回收再生
处理。
2. 报废的电动工具和附件中含有大量有价值的
原材料及合成材料,同样可以进行再生回
收。
3. 工作时所产生的粉尘中会包含有害物质,因
而不应作为普通垃圾倾倒,而应交给特殊垃
圾回收站处理。
服 务
1. 工具需要保修时,请自行送至当地特约维修中
心,并提供有效保修卡及购机发票原件,遗
失保修卡恕不补发。
2. 由于正常磨耗、过载或不当使用而导致的损
坏,不在保修范围内。
附:一般故障及排除方法
故障 原因 排除方法
接电后电机不运转
1.电源断了 1.修复电源
2.接头松落 2.检查所有接头
3.开关接触不良或不动作 3.修理或更换开关
4.电刷与换向器表面不接触 4.更换碳刷
2.钻头无法旋转 1.功能选换旋钮未接合 1.在旋转停止后,将功能选换旋钮确实打开
3.没有锤击动作或工具抖动 1.工具太冷 1.让工具达到最低温度
2.功能选换旋钮放在钻档 2.把功能选换旋钮转到锤档
4.工具无法产生全部动力 1.控制开关没有完全按下 1.尽可能按下控制开关

Manual_Revised_V1.0 Page 8
DESCRIPTION OF THE TOOL
1. MAIN PARTS
The machine is professional tool. It is intended for hammer drilling in concrete, brick and stone
as well as for light chiseling work. It is likewise suitable for drilling without impact in wood, metal,
ceramic and plastic.
2、TOOL SPECIFICATIONS
Model 1107-26E 1107-26RE 1107-26DE 1107-26DRE
Speed Control ●●●●
Forward/reverse function - ●-●
Chipping and chiseling - - ● ●
Input power( W ) 800 800 800 800
No-load speed( min-1 ) 0-1150 0-1150 0-1150 0-1150
Impact rate( per min ) 0-4000 0-4000 0-4000 0-4000
Impact energy( J ) 0-3.0 0-3.0 0-3.0 0-3.0
Max. drill
diameter
Concrete
(twist drill bit)( mm ) 26 26 26 26
Wood( mm ) 30 30 30 30
Steel ( mm ) 13 13 13 13
Brickwork
(core bit)( mm ) 68 68 68 68
Weight
(without accessories )approx. 2.6kg 2.6kg 2.65kg 2.65kg
Tool holder SDS-plus SDS-plus SDS-plus SDS-plus
Spindle collar diameter(mm) 48 48 48 48
Protect grade
Insulated grade E E E E
NOTE: Due to
continuing program of development, the specications herein are subject
of change without prior notice.
NOTE2:The values given are valid for nominal voltages [U] of 220 V. For lower or higher voltages
and models for specic countries, these values can vary.
1
2
3
5
6
4
1. Dust Cap
2. Plastic sleeve
3. Operating mode selector knob
4. Guide ruler
5. Trigger
6. Auxiliary handle

Page 9 Manual_Revised_V1.0
GENERAL SAFETY RULES
WARNING: Read all warnings and
instructions. Failure to follow all instructions
listed below may result in electric shock, re
and/or serious personal injury.
The term “power tool” in all of the warnings
listed below refers to your mains operated
(corded) power tool or battery operated
(cordless) power tool.
SAVE THESE INSTRUCTIONS
1. WORK AREA SAFETY
1) Keep work area clean and well lit. Cluttered
and dark areas invite accidents.
2) Do not operate power tools in explosive
atmospheres, such as in the presence of
ammable liquids, gases, or dust. Power
tools create sparks which may ignite the dust
or fumes.
3) Keep children and bystanders away while
operating a power tool. Distractions can
cause you to lose control.
2. ELECTRICAL SAFETY
1) Power tool plugs must match the outlet.
Never modify the plug in any way. Do not use
any adapter plugs with earthed (grounded)
power tools. Unmodied plugs and matching
outlets will reduce risk of electric shock.
2) Avoid body contact with earthed or grounded
surfaces such as pipes, radiators, ranges
and refrigerators. There is an increased risk
of electric shock if your body is earthed or
grounded.
3) Do not expose power tools to rain or wet
conditions. Water entering a power tool will
increase the risk of electric shock.
4) Do not abuse the cord. Never use the cord for
carrying, pulling or unplugging the power tool.
Keep cord away from heat, oil, sharp edges
or moving parts. Damaged or entangled cords
increase the risk of electric shock.
5) When operating a power tool outdoors,
use an extension cord suitable for outdoor
use. Use of a cord suitable for outdoor use
reduces the risk of electric shock.
6) If operating a power tool in a damp location
is unavoidable, use residual current device
(RCD). Use of RCD reduces the risk of
electric shock.
3. PERSONAL SAFETY
1) Stay alert, watch what you are doing and
use common sense when operating a power
tool. Do not use a power tool while you are
tired or under the inuence of drugs, alcohol,
or medication. A moment of inattention while
operating power tools may result in serious
personal injury.
2) Use safety equipment. Always wear eye
protection. Safety equipment such as a
dust mask, non-skid safety shoes, hard hat,
or hearing protection used for appropriate
conditions will reduce personal injuries.
3) Avoid accidental starting. Ensure the switch
is in the off-position before connecting to
power source and/or battery pack, pick up or
carrying power tools. With your nger on the
switch or plugging in power tools that have
the switch on invites accidents.
4) Remove any adjusting key or wrench before
turning the tool on. A wrench or a key that is
left attached to a rotating part of the power
tool may result in personal injury.
5) Do not overreach. Keep proper footing and
balance at all times. This enables better control
of the power tool in unexpected situations.
6) Dress properly. Do not wear loose clothing
or jewellery. Keep your clothing, gloves, and
hair away from moving parts. Loose clothes,
jewellery or long hair can be caught in
moving parts.
7) If devices are provided for the connection
of dust extraction and collection facilities,
ensure that these are connected and
properly used. Use of these devices can
reduce dust-related hazards.
8) Use clamps or another practical way to
support and secure the workpiece to a
stable platform. Holding the work by hand
or against your body leaves it unstable and
may lead to loss of control.
9) Do not use on a ladder or unstable support.
Stable footing on a solid surface enables
better control of the power tool in unexpected
situations.
10)Keep handles dry, clean, and free from oil
and grease. Slippery hands cannot safely

Manual_Revised_V1.0 Page 10
control the power tool.
11)Always wear safety glasses with side
shields. Everyday glasses may have impact
resistant lenses, but they are not safety
glasses. Following this rule will reduce the
risk of eye injury.
12)Protect your lungs. Wear a face or dust
mask if the operation is dusty. Following this
rule will reduce the risk of serious personal
injury.
13)Protect your hearing. Wear hearing
protection during extended periods of
operation. Following this rule will reduce the
risk of serious person injury.
4. POWER TOOL USE AND CARE
1) Do not force the power tool. Use the correct
power tool for your application. The correct
power tool will do the job better and safer at
the rate for which it was designed.
2) Do not use the power tool if the switch
does not turn it on and off. Any power tool
that cannot be controlled with the switch is
dangerous and must be repaired.
3) Disconnect the plug from the power source
and/or the battery pack from the power tool
before making any adjustments, changing
accessories, or storing power tools. Such
preventive safety measures reduce the risk
of starting the power tool accidentally.
4) Store idle power tools out of the reach of
children and do not allow persons unfamiliar
with the power tool or these instructions
to operate the power tool. Power tools are
dangerous in the hands of untrained users.
5) Maintain power tools. Check for
misalignment or binding of moving parts,
breakage of parts, and any other condition
that may affect the power tools operation.
If damaged, have the power tool repaired
before use. Many accidents are caused by
poorly maintained power tools.
6) Keep cutting tools sharp and clean. Properly
maintained cutting tools with sharp cutting
edges are less likely to bind and are easier
to control.
7) Use the power tool, accessories and tool bits
etc., in accordance with these instructions
and in the manner intended for the particular
type of power tool, taking into account
the working conditions and the work to
be performed. Use of the power tool for
operations different form intended could
result in a hazardous situation.
8) Save these instructions. Refer to them
frequently and use them to instruct others
who may use this tool. If you lend this tool
to someone else, also lend them these
instructions.
5.Service
1) Have your power tool serviced by a qualied
repair person.
2) When servicing a power tool, use only
identical replacement parts.
3) Follow instructions in the Maintenance
section of this manual. Use of unauthorized
parts or failure to follow Maintenance
instructions may create a risk of shock or
injury.
ADDITIONAL SAFETY RULES
FOR ROTARY HAMMER
1Place the cord in rear of the tool, and keep it
far from the saw piece.
2Clamp work piece securely with clamping
devices or a vise.
3 Swear hearing protection. Exposure to noise
will cause hearing damage.
4 Operate the machine only with the auxiliary
handle supplied. Missed operation will cause
bodily harm.
5If there is considerable vibration or other
defects are detected in operation, stop the
machine immediately and check the machine
to determine the cause. Hold the insulated
handle surface.
6Hold your hammer drill rmly in both hands.
7Do not force your hammer drill, it will do a
better and safer job at the speed for which it
was designed.
8Hold tool by insulated gripping surfaces when
performing an operation where the hammer
drill may contact hidden wiring or its own cord.
9Wear gloves when handling hammer bits and
tool. Hammer bits and tools get hot during
operation. Gloves and frequent rest periods
will reduce risk of vibration damage to hands

Page 11 Manual_Revised_V1.0
and arms.
10 Use suitable detectors to nd hidden electric
cables or gas and water pipes.
11 Sawdust and splinters must not be removed
while the machine is running.
12 Do not pierce the motor housing as this
could damage the double insulation
13 Ensure that ventilation openings are kept
clear when working in dusty conditions.
14 Do not operate the tool for long time, or the
quiver of the machine will hurt hands or arms.
WARNING: Some dust created by
power Cutting contains chemicals
known to cause cancer, birth defects or other
reproductive harm. Some examples of these
chemicals are:
■ lead from lead-based paints
■ Arsenics and chromium from chemically
reacted lumber.
Your risk from these exposures varies,
depending on how often you do this type
of work. To reduce your exposure to these
chemicals: work in a well ventilated area, and
work with approved safety equipment.
STANDERD ACCESSORIES
● Guide ruler: a set
● Auxiliary handle: a set
Be sure to check the accessories as it is
subject to change by areas and models.
OPERATION
1 POWER SUPPLY
The power tool supply must match the
nameplate date.
2. AUTOMATIC SAFETY CLUTCH.
Protects the operator and machine from the
high reverse torque, which develops if the tool
jams all of a sudden.
3. INSTALLING THE AUXILIARY HANDLE
Unplug the tool from the mains socket, rstly.
Release the auxiliary handle clamping band
by turning the handle in a counter-clockwise
direction. Then t the handle band over the chuck
and onto the cylindrical section at the front end of
the tool. Pivot the auxiliary handle into the desired
position. Finally, tighten the handle securely to
prevent inadvertent movement.
WARNING: Use the auxiliary handle
supplied. Missed operation will cause bodily
harm.
4. SELECTION OF TOOLS
For hammer drilling, SDS-plus tools are
necessary that are inserted into the SDS
drill chuck of the machine.
For drilling in steel or wood, tools without
SDS-plus (e.g., drills with cylindrical shafts)
are used. For these tools, a special drill
chuck is required (see APPLICATIONS).
5. INSERTING/REMOVING SDS-PLUS TOOL
The SDS-plus tool is designed to be freely
movable. This causes eccentricity when the
machine is not loaded. However the drill
automatically centers itself during operation.
This does not affect drilling precision.
WARNING: Take care when changing
tools that the dust cap is not damaged.
1) Inserting:
WARNING: Grease the shank end of the
tool regularly.
(1) Clean the tool before inserting and lightly
grease the insertion end.
Manual_Revised_V1.0 Page 12
(2) Insert the tool with a twisting motion into the
tool holder until it locks.
(3) The tool locks itself. Check the locking by
pulling on the tool.
2) Removing:
Pull the plastic sleeve to the rear, hold it in this
position and remove the tool from the tool holder.
6. INSERTING/REMOVING TOOL HOLDER
(1) Removal
Set the operating mode selector knob
temporarily to the “Chiseling” position (drill
spindle locked).
Turn the plastic sleeve rmly counterclockwise to
the stop and pull off the tool holder.
(2) Mounting
Place the tool holder on the drill spindle.
Turn the plastic sleeve counterclockwise (to the
left) and simultaneously press back rmly until
the tool holder latches and locks. Ensure that
the tool holder sits tightly.
7. SETING THE GUIDE RULER
Release the auxiliary handle clamping
mechanism by turning the handle in a
counterclockwise direction. Pivot the auxiliary
handle into the desired position. Adjust the
guide ruler to the desired drilling depth” X “.
Tighten the auxiliary handle securely by turning
the handle in a clockwise direction.
8. SET THE OPERATING MODE
With the operating mode selector knob, select
the operating mode of the machine. To change
the operating mode,turning the operating mode
selector knob to the desired position until you
hear “click” to latch.
WARNING: Change the operating mode
only when the machine is switched off!
Otherwise, the machine can be damaged.
●
For drilling in steel or wood, for tighten the
screws.
● For hammer drilling in concrete or stone.
Page 13 Manual_Revised_V1.0
●
Non-working position used only to rotate a
at chisel into the desired position.
●
For light chipping and chiseling applications.
In this mode the tool can also be used as a
lever to free a jammed drill bit.
9. TRIGGER CONTROLS
WARNING: To make sure you can
control the switch freely and keep it off
before plugging drill.
1) Intermittence work:
Start :Press the trigger (5)
Stop :Release the trigger (5)
2) To vary the drilling speed:
Simply increase or decrease pressure on the
trigger (5). The further the trigger is pressed,
the greater the drilling speed.
Reduced speed of the machine facilitates the
starting of holes (e.g., on smooth surfaces such
as tiles), prevents the slipping of drill and the
splintering of the drilled hole.
Recommended Speed Ranges:
●
High speed for hammer drilling and
chiseling in concrete or stone.
● Medium speed for drilling in metal
● Low speed for tighten the screws.
11. DUST BOWL(Optional accessories)
WARNING: The dust bowl is for
exclusive use of concrete drilling work.
Do not use them for wood or metal drilling
work.
WARNING: Dump particles after every
two or three holes when drilling.
When using a rotary hammer for upward drilling
operations attach a dust cup or dust bowl to
collect dust or particles for easy operation.
Installing the dust bowl
Use the dust cup by attaching to the drill bit.
When using dust bowl, insert dust bowl from
the tip of the bit by aligning it to the groove on
the grip.

Manual_Revised_V1.0 Page 14
APPLICATION
WARNING: To reduce the risk of
explosion, before any work check the utility
lines electricity , gas or water supply line
are hidden in the work area.
WARNING: When working at low
temperatures:
The hammering mechanism begins to operate
only when the tool has reached a minimum
operating temperature.
Press the tip of the hammer bit briey against
the work surface while the tool is running.
Repeat this procedure if necessary until the
hammering reaches the minimum operating
temperature.
1. Hammer drilling
WARNING: Do not use tools without SDS-
plus for hammer drilling!
Tools without SDS-plus and their holder and
drill chuck would be damaged by hammer
drilling.
When working with tool without SDS-plus, set
the operating mode selector knob to position
“”.
2. Drilling
WARNING: To work with tools without
SDS-plus (e.g., drill with cylindrical shafts),
a suitable drill chuck must be used.
Screw the SDS-plus adapter shaft (accessory)
into a ring-gear or quick clamping drill chuck.
Clean the adapter shaft and lightly grease the
insertion end before inserting.
Insert the shaft of the assembled drill chuck
with a twisting motion into the tool holder until it
can be heard to lock.
The adapter shaft locks itself. Check the
locking by pulling on drill chuck.
To remove the drill chuck, pull the plastic
sleever to the rear, hold in this position and
remove the drill chuck from the tool holder.
WARNING: Never use standard chucks
in the Drilling mode.
3. Chipping and chiseling
Before inserting the chisel, set the operating
mode selector knob to the “hammering only”
position.
Insert the appropriate chisel. To adjust the
head of the chisel to the desired angle, set
the operating mode selector knob to the “bit
rotation” position and rotate the chisel
by hand. Return the mode selector to the
“hammering only” position.
Adjust the auxiliary handle as required.
Start on the trigger of tool and start working.
Hold the tool rmly with both hands, Turn
the tool on and apply slight pressure on the
tool so that the tool will not bounce around,
uncontrolled. Pressing very hard on the tool will
not increase the efciency.

Page 15 Manual_Revised_V1.0
TOOL MAINTENANCE
WARNING: Before any work on the
machine itself, pull the power plug.
1.
Inspect bolts periodically. If the bolts loosen,
tighten them immediately, or will result in
serious accident.
2. Inspect tool cords periodically. The cord is
special prepared, if damaged, have repaired at
your nearest Authorized Service
Center. This tool was used with the power cord
as a particular structure, don’t replace the
power cord without authorization, such as
replacement, please go to the Authorized
Service Center.
3.
Keep the vents clean. Clean all parts of
the tool, clean dust periodically. To prevent
debris from entry.
4.
Replace the carbon brush when the carbon
brush is worn out in certain length and motor
stops running. All maintenance should be
carried Out by Authorized Service
Center.
5.
All service MUST only be performed by
Authorized Service Center.
ALWAYS use only accessories
that are recommended for this tool.
6.
Cleaning. Avoid the use of plastic cracks
caused by damage to the solvent. Use clean
cloths and mild soap to remove dirt, dust,
etc.
7.
Avoid the tool vibration or impact, and keep
it from oil and grease.
WARNING: Do not allow the water
enter the motor and the tool full immersed
in the ware, which will result in motor
malfunction and electric shock.
Replaceable parts list :
No Part No Part Name QTY
1 4810002000 Power Cord &Plug 1
2 4960256000 Carbon Brush 2
ENVIRONMENT PROTECTION
1.
Tool, accessories and packaging should be
sorted for environment-friendly recycling.
2.
Power tools and accessories at the end of
their service life still contain large amounts of
valuable raw materials and plastics which can
likewise be fed back into a recycling process.
3.
Some dust created by working contains
harmful chemicals must be collected by
special garbage recycle site.
SERVICE
1.
In case of guarantee, repair or purchase
of replacement parts, always contact the
qualied service center. And supplied with
the efcient service card and invoice.
2.
It is without the scope of guarantee when
the tool was normal wear, overload or
improper use of damage.
Trouble Shooting
Trouble Possible cause Possible solution
1. Motor stops running
1. Unconnected to power source 1. Connect to power source
2. Plugs not fully connect 2. Check all plugs
3. Switch out of work 3. Replace or repair the switch
4. Brushes not touch the commutator 4. Replace the brush with a new one
2. Drill bit doesn’t rotate. 1. Operating mode selector knob not
engaged.
1. After rotation has stopped, move
the operating mode selector knob
until it engages.
3. No hammering action
and the tool wobbles.
1. The tools is too cold 1. Allow tool to reach the minimum
operating temperature
2. Operating mode selector knob set
to rotary drilling
2. Set operating mode selector knob
to hammer drilling
4. Tool doesn’t produce
full power 1. Control switch is not pressed fully 1. Press the control switch as far as
it will go

Manual_Revised_V1.0 Page 16
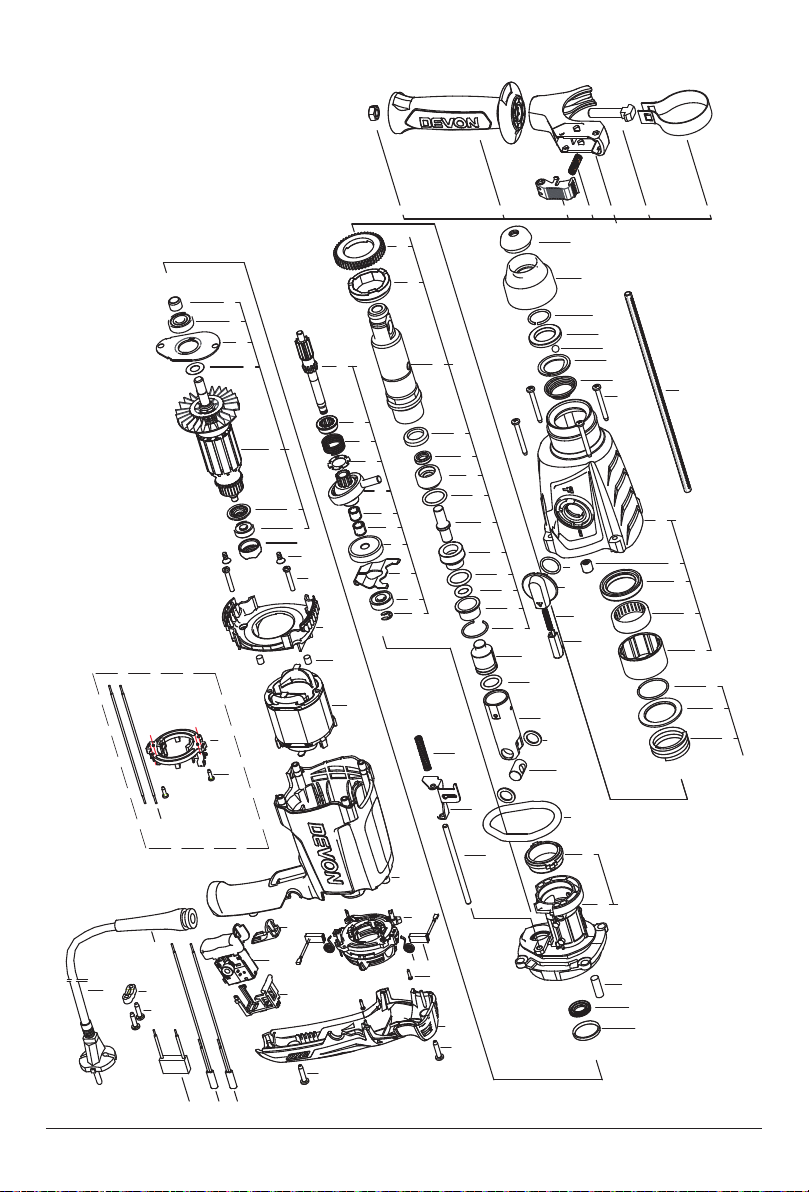
1107-26DRE /1107-26DE爆炸图
21
22
23
29
31 32
35
36 37 38
203
201
98
99
100
101
102
103
104
678
45
3
1
2
9
202 10 11 12
13
18 19
105
14 15
16
17
25 26 27 28
30
33 34
39
40
41
42 43
204
54 55
50
205
4545 46 47 48 49
62 63 61
61
65
66
49 48 53
55 57 58 59 60
67
70
69
71
72 73 74
68
44
75 76
77 78
79
80
206
81
82 84
83
88 90
89
85 86
86
95 94
91
91
96
97
93
20
24
81 84
87
Page 17 Manual_Revised_V1.0
1107-26RE /1107-26E爆炸图
14 15 16
54 55
48
205
63
65
66
49 50 53
55 57 58 59 60
17
21
22
23
29
31 32
35
36 37 38
203
201
98
99
100
101
102
103
104
67
45
3
1
2
9
202 10 11 12
13
18 19
105
25 26 27 28
30
33 34
39
40
41
42 43
204
67
70
69
71
72 73 74
68
44
75 76
77 78
79
80
206
81
82 84
83
88 90
89
85 86
86
95 94
91
91
96
97
93
20
24
8
81 84
87

Manual_Revised_V1.0 Page 18
序号 零配件编号 零配件名称 数量 备注
1 3123110000 防尘帽 Dust Cap 1
2 3125890000 外套 Plastic Sleever 1
3 3660280000 轴用钢丝挡圈21 C Ring 1
4 3550802000 钢环 Steel Ring 1
5 5700172000 钢球7 Steel Ball 1
6 3703710000 卡圈 Clip 1
7 3660290000 弹簧 Spring 1
8 5610234000 十字槽盘头自攻螺钉 Tapping Screw 4
202 2823063000 齿轮箱总成 Gear Case Assy 1The Part comprise 9, 10,……13
9 3125626000 齿轮箱 Gear case 1
10 5700023000 滚针轴承 Needle Bearing 1
11 5690229000 骨架油封 Frame Seal 1
12 5700240000 滚针轴承 Needle Bearing 1
13 3520574000 轴套 Bush 1
14 5690195000 O型圈 O Ring 1
15 3402480000 旋钮 Knob 1
16 3660279000 弹簧 Spring 1
17 3123318000 止动钮 Lock Botton 1
203 2823061000 转动套总成 Spindle Bush Assy 1The Part comprise 18,19,……33
18 5660179000 轴用钢丝挡圈30 C Ring 1
19 5650386000 垫片 Washer 1
20 3660476000 压缩弹簧 Compression Spring 1
21 3520573000 离合齿轮 Clutch Gear 1
22 3520575000 离合圈 Clutch Ring 1
23 3551617000 转动套 Spindle Bush 1
24 5690269000 橡胶圈 Rubber Ring 1
25 5690236000 骨架油封 Frame Seal 1
26 3551649000 压圈Ⅰ Pressing Ring 1
27 5690239000 O型圈 O Ring 1
28 3551650000 冲击杆 Anvil 1
29 3551651000 压圈Ⅱ Pressing Ring 1
30 5690234000 O型圈 O Ring 1
31 5690235000 O型圈 O Ring 1
32 3551652000 压圈Ⅲ Pressing Ring 1
33 5660180000 孔用钢丝挡圈 C Ring 1

Page 19 Manual_Revised_V1.0
序号 零配件编号 零配件名称 数量 备注
34 3551653000 冲击锤 Percussion Hammer 1
35 5690238000 O型圈 O Ring 1
36 3551654000 气缸 Cylinder 1
37 5650385000 垫片 Washer 2
38 3551655000 摆杆套 Rod Bush 1
39 5690233000 O型圈 O Ring 1
204 2823059000 中间盖总成 Middle Cover Assy 1The Part comprise 40,41
40 5700171000 含油轴 Oil Impreging Bearing 1
41 3421208000 中间盖 Middle Cover 1
42 3704931000 毛毡 Felt Block 1
43 5690240000 骨架油封 Frame Seal 1
44 5690265000 橡胶圈 Rubber Ring 1
45 5650290000 垫片 Washer 21107-26DRE /1107-26DE
46 3551659000 齿轮 Pinion 11107-26DRE /1107-26DE
47 3551661000 挡套 Bush 21107-26DRE /1107-26DE
48 3660477000 压缩弹簧 Compression Spring 21107-26DRE /1107-26DE
3551678000 中间轴 Shaft 11107-26RE /1107-26E
49 3520572000 离合器 Clutch 2
205
2823062000
中间轴总成 Middle Shaft Assy 1
The Part comprise 49、50、53、
54、55、57、58、59、60。
用于1107-26DRE /1107-26DE
2823078000
The Part comprise 48、49、53、
54、55、57、58、59、60。
用于1107-26RE /1107-26E
50 3551656000 中间轴 Shaft 11107-26DRE /1107-26DE
3660477000 压缩弹簧 Compression Spring 11107-26RE /1107-26E
51
52
53 3704920000 弹簧座 Spring Support 1
54 5700238000 摆杆轴承 Oscillating Rod Bearing 1
55 5700241000 滚针轴承 Needle Bearing 2
56
57 3551657000 一级齿轮 Gear 1
58 3704098000 轴承压板 Bearing Clamping Plate 1
59 5700005000 轴承 Ball Bearing 1
60 5660139000 开口挡圈 E Ring 1
61 3660481000 压缩弹簧 Compression Spring 21107-26DRE /1107-26DE
62 3704916000 拨板Ⅱ Push Plate 11107-26DRE /1107-26DE
This manual suits for next models
3
Table of contents
Other Devon Rotary Hammer manuals

Popular Rotary Hammer manuals by other brands


Bosch
Bosch GBH 220 Original instructions

Hitachi
Hitachi DH24PB3 Handling instructions

Milwaukee
Milwaukee FUEL SDS-MAX M18 FHM Original instructions

Makita
Makita HR166DWMX1 instruction manual

Würth
Würth H 18-MA Compact Translation of the original operating instructions

Makita
Makita HR160D instruction manual