Dewekon Barbekon User manual
BARBEKON MANUAL
Blog: http://barbekon.blogspot.be/
Website: http://bbq-barbekon.be/

Blog: http://barbekon.blogspot.be/ Website: http://bbq-barbekon.be/

Blog: http://barbekon.blogspot.be/ Website: http://bbq-barbekon.be/
1. LIGHTING THE BBK:
1.1 Slide the ash tray all the way down to the lock at the end of the vertical shaft.
1.2 Pour some lighting gel or place some firelights in the square gutter standing in the ash tray (a combination of
gel and blocks works fine as well).
ØMaking a fire always contains a certain risk ! Go about is wisely. We cannot be held responsible for the
consequences of excessive use of lighting gel or other fire accelerants.
1.3 Place the grid and the charcoal tray at the desired heights. Turn the grid sideways and fill the coal tray with the
desired amount of charcoal. Ideally, you start with charcoal as a base and build up using briquettes.

Blog: http://barbekon.blogspot.be/ Website: http://bbq-barbekon.be/
1.4 Bring up the ash tray with the lighting fire to 2 cm (almost an inch) from the coal tray This is the quickstart
function.
ØDo not maintain this position for longer than necessary to give the coal a good start (else, you’ll end up with a
forge fire which is far too excessive for barbecuing.)
ØIn case of poor quality of charcoal (e.g. last year’s or slightly damp coal) you can save the day by initiating the
quickstart function with only a gap of about 0.5 cm instead of 2.
2. GRILLING WITH THE BBK:
Drop the coal tray onto the ash tray once the coal has turned grey.
ØThe coal tray slides into the gutter in the ash tray, which fills with burnt ashes. This will create a hermetic seal
guaranteeing a nice steady fire.
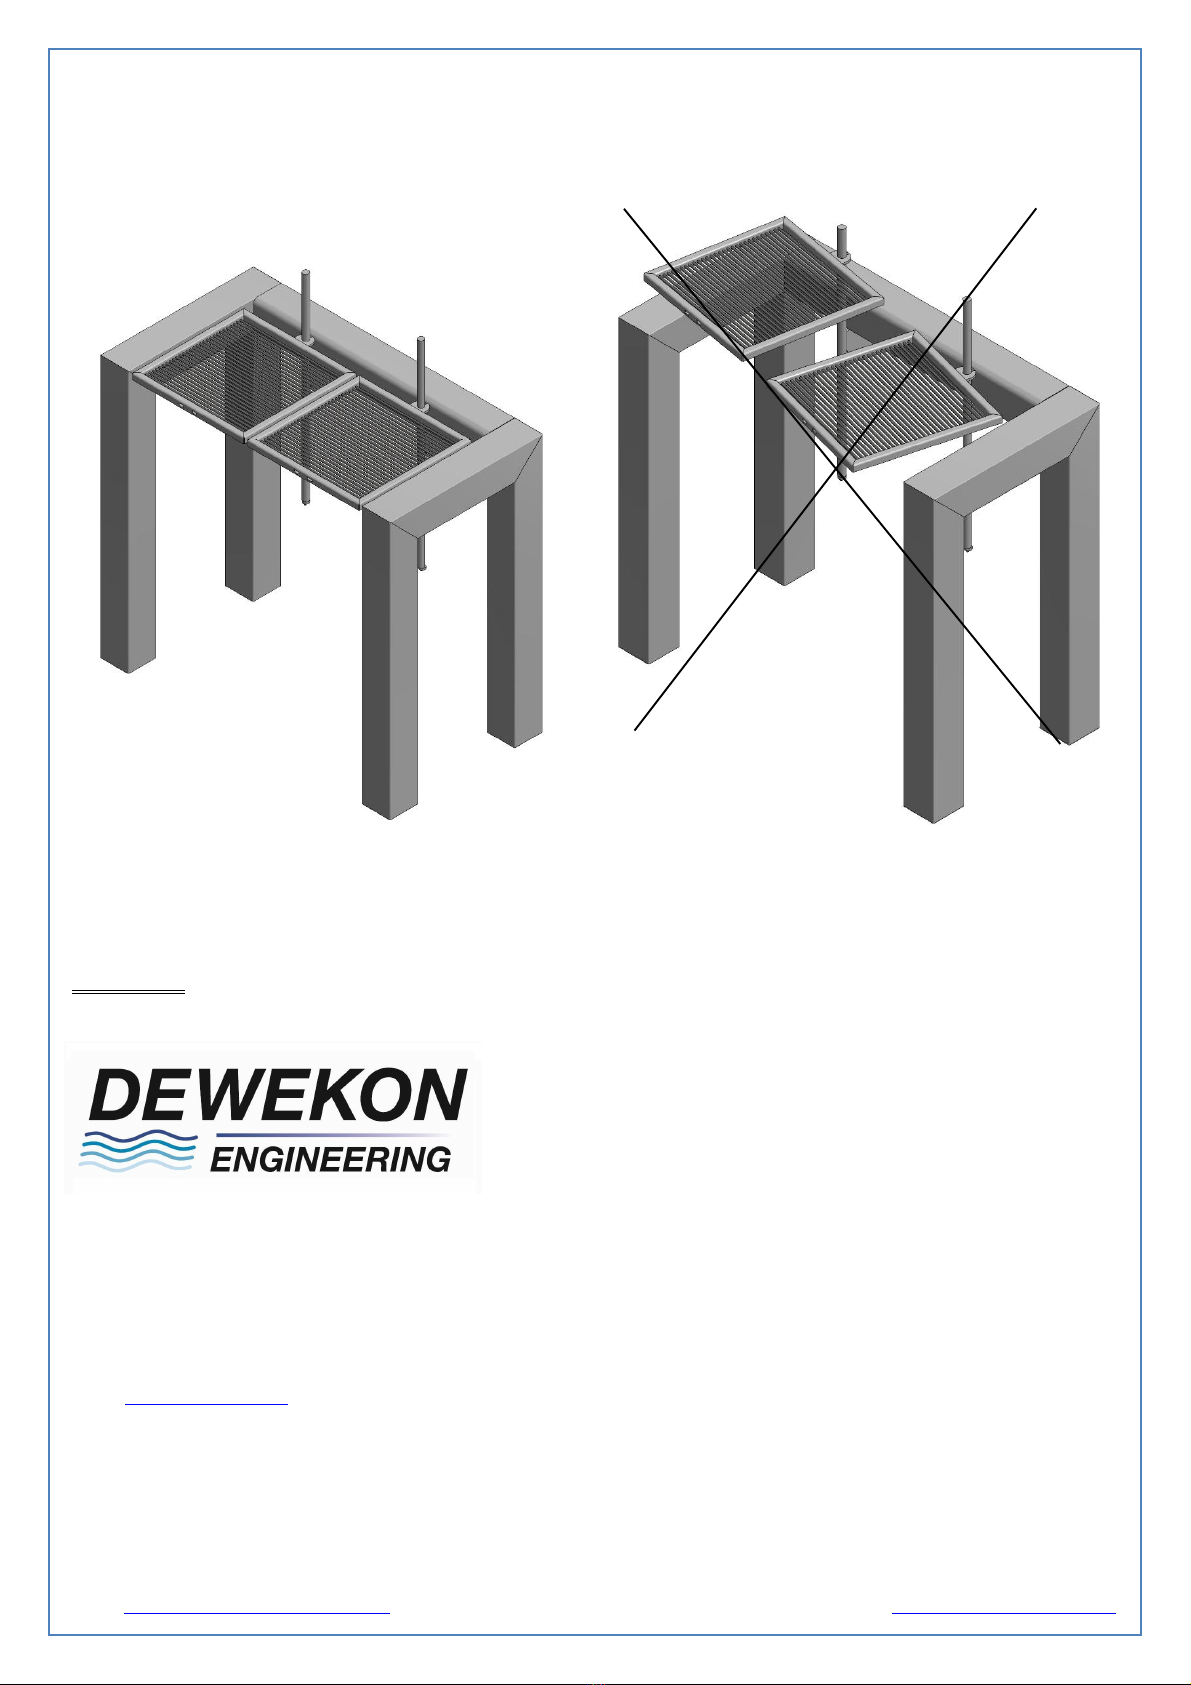
The Barbekon is especially designed to allow a precise temperature for every product. The coal tray and grid height
can be adjusted indefinitely over quite some distance.
This gives you the following advantages:
ØIt prevents you from having to stay near the BBK almost permanently in order to turn your food before it gets
charred.
ØYou can grill over the full 100% of your grid (no need for a zone “at the side of the fire”).
ØIt prevents from having to extinguish when the coals get too hot.
ØIn offers you the possibility to place two grids on top of each other, where the top grid serves as a perfect
warming plate.
ØIn case of too much wind, you can adjust the height in order to work between the frame, or you can add a
windscreen.
ØSlow-cooking is made very easy.
ØWith the optional smoking lid (comes with a thermometer), you can obtain a continuous and exact cooking
temperature.

Blog: http://barbekon.blogspot.be/ Website: http://bbq-barbekon.be/
Additional important information:
1. GRID MAINTENANCE:
ØThe grid was especially designed so that it can never warp from the heat.
ØWrong use of the quickstart function (which can attain temperatures equal to those of a forge fire) will tarnish
the grid, which will make cleaning it more difficult.
ØTemperatures higher than needed for grilling will inevitably carbonize grease onto the grid, which is very hard to
clean.
ØOptionally, a soaking bin can be added which significantly helps keeping your grids clean. The bin can contain as
many grids as needed and is simply filled with water and a few dissolved dishwasher tablets, or Biotex.
ØLeaving the grids in the soaking bin overnight will dissolve all the hardened dirt. The next day, simply use a
stainless steel brush or shavings.
ØAlways clean the bottom of the grid first. This will prevent any remains from the bottom to set on the top side of
the grid.
2. EMPTYING THE ASH TRAY:
The ash tray can be emptied while grilling, which is quite unique. In order to empty the ash tray, simply turn the
locking pin at the end of the shaft so that is fully aligned with axis.
There is no need to clean the ash tray all the way. The remaining ashes create a perfect heat insulator.
There is a tiny hole in the ash tray which serves as a water drain. If the tray has not been emptied, there is a
possibility that this drain gets clogged. Make sure you clear away any blockage (e.g. a toothpick will do the trick).
3. GENERAL:
ØLighting gel contains a burn retardant which can make some brands rather hard to start. You solve this by placing
some bits of coal in the gutter which stick out above the gel (serving as a temporary wick).
ØPut only a few mm of gel in the gutter in order to get familiar with the burning characteristics of the gel you are
using. Some brands are slower but burn longer, other brands are burning faster and hence shorter.
ØWhen you have no lighting gel or firelighters, the BBK can also be lighted by filling the ash tray with balled-up
newspaper pages.
ØCharcoal is a natural product. Hence, the heat they produce depends on the their quality, humidity and
composition.
ØIdeally, you start with charcoal as a base and build up using briquettes.
ØThanks to the quickstart function, the coal will be burning within 15 minutes.
ØBriquettes will burn much longer than charcoal and will not shed their ashes so fast. This will cause less
flames from fat dropping from your products.
ØWhen using briquettes, add a few briquettes from time to time, and you can keep on grilling.
4. WANT MORE ?:
The Barbekon BBQ is entirely handmade. We can expand or adapt it according to your wishes.
We already supply a number of nifty options (e.g. windscreens, side tables, electrolytic polish, smoking lid, etc.) and
offer you the possibility to make your ideas or wishes come true.
Blog: http://barbekon.blogspot.be/ Website: http://bbq-barbekon.be/
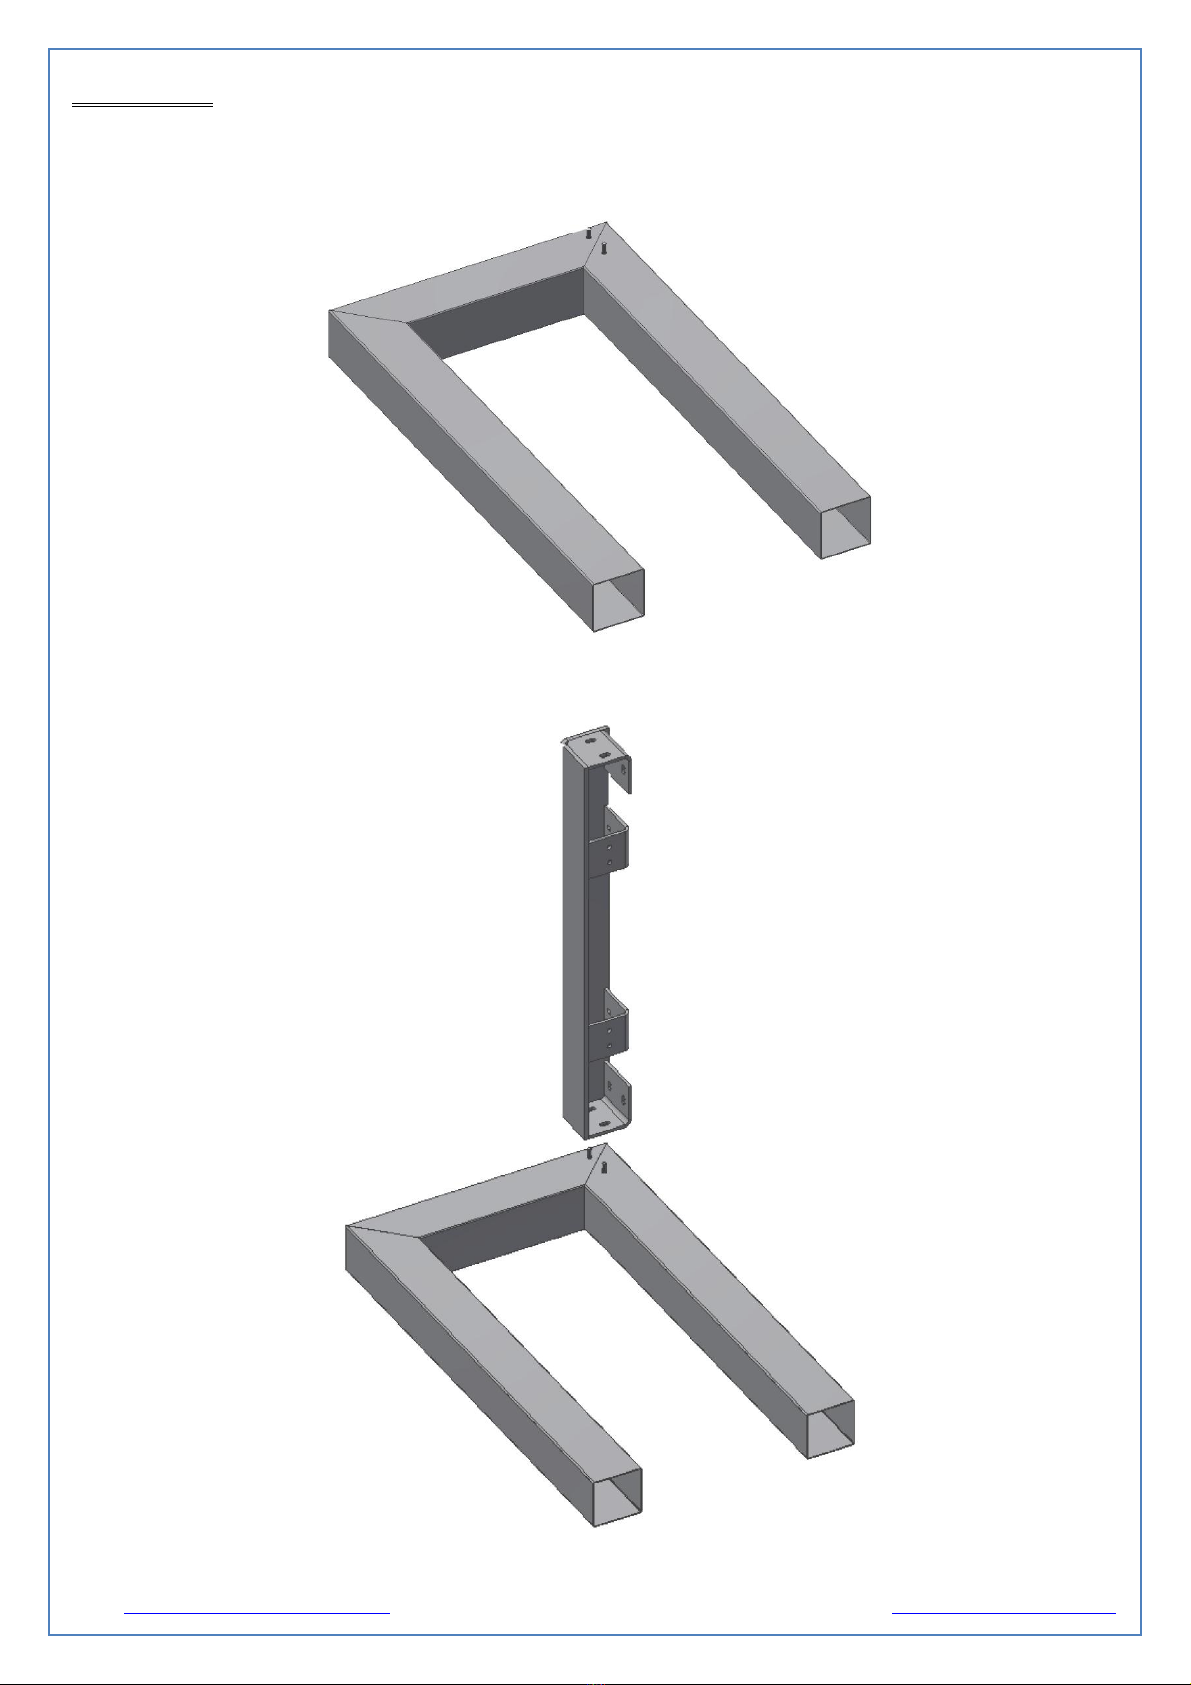
Assembly:
ØPut the side leg of the table (no wheels attached) on the floor with the bolts facing up.
ØTake the L-profile and slide the mounting plate to the side onto the bolts of the leg. Make sure the open side is
facing back.

Blog: http://barbekon.blogspot.be/ Website: http://bbq-barbekon.be/
ØTake 2 washers and nuts and tighten the L-profile by hand against the leg. Try aligning the parts as good as
possible by aligning the L-profile with the edges of the leg, before tightening the nuts with the included wrench.
ØKeep the leg with the wheels upright and slide the L-profile over the bolts as shown.

Blog: http://barbekon.blogspot.be/ Website: http://bbq-barbekon.be/
ØOnce again, tighten the washers and nuts first by hand. Apply the cover plate to the L-profile and align all the
parts before tightening with the wrench. Should the table wobble a bit, this can be solved by loosening the nuts
a little, allowing the table to set before finally tightening all the nuts.
ØTake the full shaft and attach it by hand to the bottom of the L-profile (where a mounting plate has been
provided). Make sure the locking pin is at the bottom.
Blog: http://barbekon.blogspot.be/ Website: http://bbq-barbekon.be/
ØSlide the grid onto the shaft and lower it so you can align it with the table. The position of the vertical plate
(left/right) determines the position of the unit vs. the table. It is essential that this is at a square angle to the L-
profile. Aligning it with the grid lets you do this by sight. Once aligned, tighten the nuts and bolts with the
included wrench.
ØRepeat the same procedure for the other shafts in case your BBK has several units.
Contact:
Ondernemingenstraat 11
8630 VEURNE
BELGIË
Tel.: (32)(0)58/29.80.06
Fax.: (32)(0)58/31.32.85
E-
mail: info@dewekon.be
Web: www.dewekon.be
VAT BE0823.383.312
Popular Grill manuals by other brands


Kenmore
Kenmore Liquid propane gas grill use and care manual

Lacor
Lacor 69166 Instructions for use and maintenance

Char-Broil
Char-Broil American Gourmet 10201595 Product guide

Weber
Weber 54636 owner's guide

Gaggenau
Gaggenau VR230120 User manual and installation instructions

Team Kalorik
Team Kalorik TKG RAC 1003 manual