dewert okin OKINAP System User manual

OKINAP System Quick Guide
04.12.2017 xxxxx 1 / 6
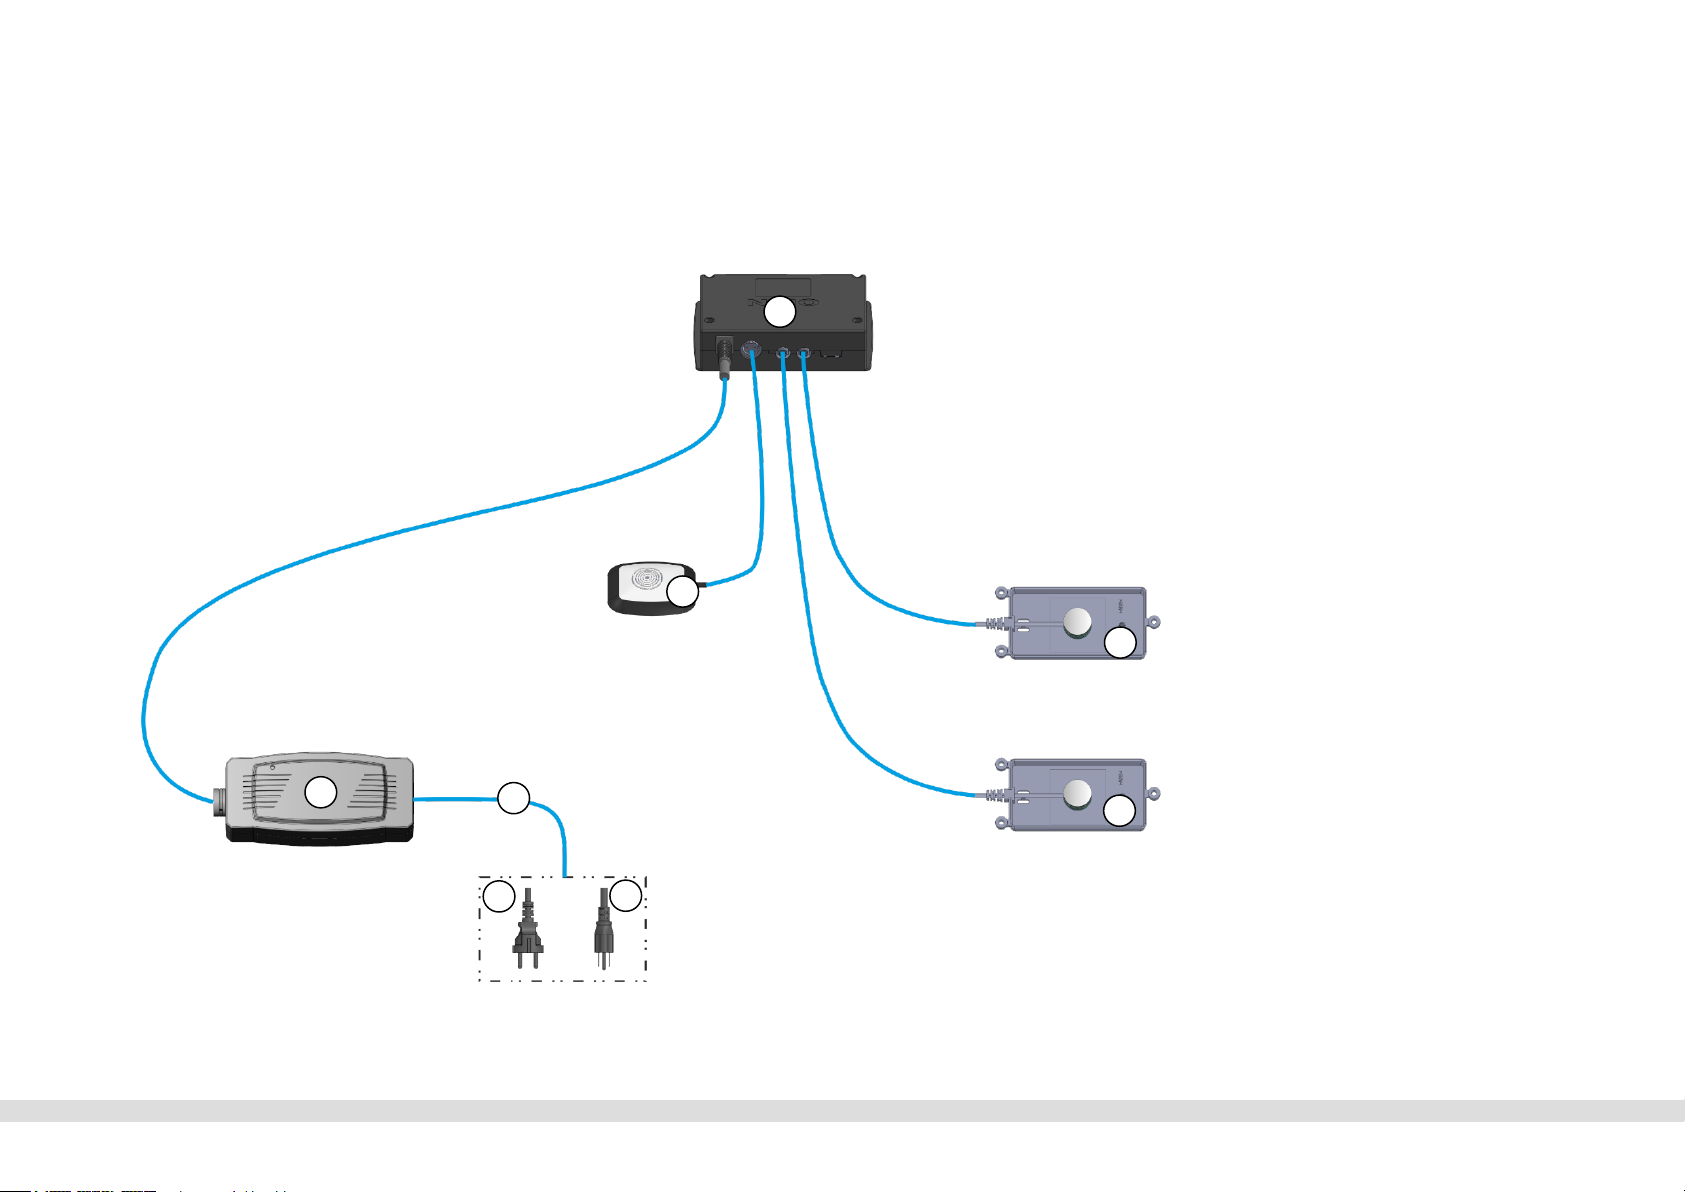
System overview: OKINAP
CAUTION! Electrical components should be connected or disconnected only when the power supply cord is unplugged.
CAUTION! There is a delay after the supply voltage is applied before the device actually turns on. Wait at least two seconds before beginning the commissioning.
Components that can be connected:
1. Furniture Sensor left
2. Furniture Sensor right
3. Sensor Box
4. Optional: Ambient Box
5. e.g. POWER SUPPLY PD12
6. Power cable with optional mains plug
7. EU-Version
8. US-Version
2
1
5
3
4
8
6
7
Option
DewertOkin GmbH
OKINAP System Quick Guide
04.12.2017 xxxxx 2 / 6
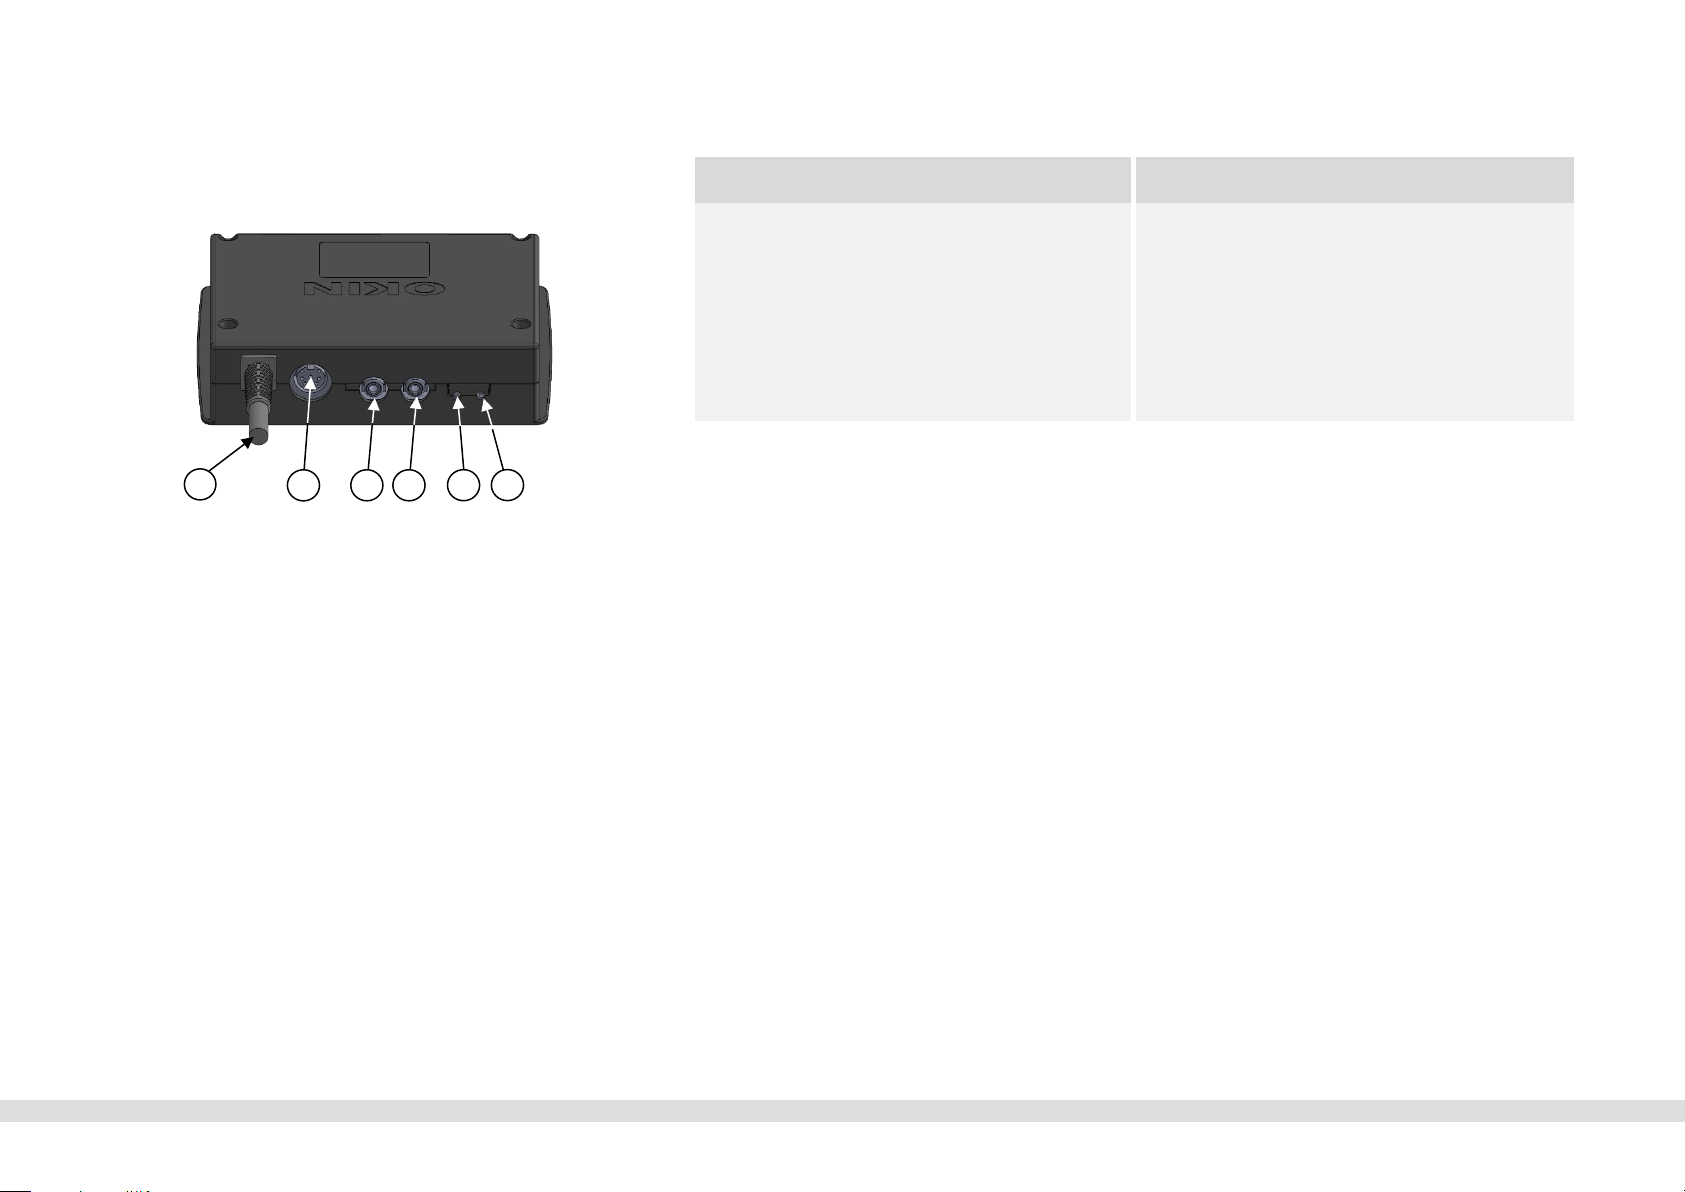
SENSOR BOX
Connection ports and functions
Technical specifications
1. Cable connection for Multi-funtion port
2. Cable connection for optional Ambient Box
3. Cable connection for Furniture Sensor left
4. Cable connection for Furniture Sensor right
5. Reset button / Pairing button
6. Function LED
Input voltage 29 V DC
Protection class III
Protection degree IP20
Length x width x height 148 x 114 x 39 mm
Automatic teach-in
Connect the Sensor Box to the control unit and put the power plug into
the socket.
The system will be in pairing mode for 120sec to pair a Bluetooth®
device. A successful completion is signaled by the blinking of the LED.
Open the Sensor Box app on your mobile device and follow the
instructions to pair with the system.
The LED switches off when the Bluetooth®pairing process has timed
out or when no device is connected.
If the device is successfully connected to the system, the LED
permanently lights.
Repeat the automatic teach-in process. First, remove the plug from the
power supply. Then wait 60sec and insert the plug back into the power
supply. You can now start the new teach-in process.
Manuel teach-in
The system must be connected to the power supply.
Quickly press the button (6) twice on the Sensor Box, the LED will
blink. The system is now in pairing mode for 120 seconds to pair the
Bluetooth® device.
Open the Sensor Box app on your mobile device and follow the
instructions to pair with the system.
The LED switches off when the Bluetooth®pairing process has timed
out or when no device is connected.
If the device is successfully connected to the system, the LED
permanently lights.
3
1 2 4
5
6

OKINAP System Quick Guide
04.12.2017 xxxxx 3 / 6
Reset the pairing list
Press and hold the button (6) while connecting the system to the
power supply.
Blinking twice of the LED signals the successful deleting of the pairing
list.
Reset to factory settings
The system can reset to factory settings. All data in the Sensor Box will
delete (e.g. sleep data).
For reset to factory default, perform the following steps.
Give the button (6) 4x short press in succession. The LED lights on.
Now actuate the button (6) one times, the system is reset to factory
settings.
The reset to factory settings is successful if the LED extinguishes.
Cleaning and care
The system was designed so that it would be easy to clean.
Be sure to unplug the power cord on the power supply before you
begin cleaning it!
Clean the system using a dry antistatic cloth.
Be sure that you do not damage the connecting cables during the cleaning.
Disposal
The system consists of electronic components, cables and metal and
plastic parts. You should observe all corresponding national and regional
environmental regulations when disposing of the system.
The disposal of the product is regulated in Germany by Elektro-G,
internationally by the EU Directive 2011/65/EC (RoHS), or by any
applicable national laws and regulations. (The product is not regulated by
the EU Directive 2012/19/EC (WEEE).)
The system should not be disposed of with
normal household waste!
DewertOkin GmbH
Weststraße 1
32278 Kirchlengern
Phone: +49 (0)5223/979-0
Fax: +49 (0)5223/75182
http://www.dewertokin.de
Kurzanleitung System OKINAP
04.12.2017 Id-Nr. xxxxx 4 / 6
Systemübersicht OKINAP
Achtung! Sie dürfen elektrische Komponenten nur bei gezogenem Netzstecker anschließen oder trennen.
Achtung! Nach dem Herstellen der Spannungsversorgung schaltet das Gerät verzögert ein. Warten Sie vor der Inbetriebnahme min. 2 Sekunden.
Anschließbare Komponenten
1. Furniture Sensor links
2. Furniture Sensor rechts
3. Sensor Box
4. Optional: Ambient Box
5. z.B. POWER SUPPLY PD12
6. Netzkabel mit optionalen Stecker
7. EU-Version
8. US-Version
2
1
5
3
4
8
6
7
Optional

Kurzanleitung System OKINAP
04.12.2017 Id-Nr. xxxxx 5/ 6
SENSOR BOX
Anschlüsse und Funktionen
Technische Daten
1. Anschluss an Multifunktionsport
2. Anschluss für optionale Ambient Box
3. Anschluss für Furniture Sensor links
4. Anschluss für Furniture Sensor rechts
5. Reset-Taste / Pairing-Taste
6. Funktions-LED
Eingangsspannung 29 V DC
Schutzklasse III
Schutzart IP20
Länge x Breite x Höhe 148 x 114 x 39 mm
Automatisch anlernen
Verbinden Sie den Sensor Box mit der Steuerung und stecken Sie
anschließend den Netzstecker in die Steckdose.
Das System befindet sich für 120 sec im Pairing Modus für ein
Bluetooth®Gerät. Dies wird durch das blinken der LED signalisiert.
Öffnen Sie die Sensor Box App auf ihrem Mobilgerät und folgen Sie
den Anweisungen zur Durchführung des Pairings mit dem System.
Ist das Anlernen für Bluetooth®Geräte abgelaufen und es wurde kein
Gerät verbunden, erlischt die LED.
Ist ein Gerät erfolgreich mit dem System verbunden leuchtet die LED
dauerhaft.
Wiederholung vom automatischen Anlernen: Zuerst ziehen Sie den
Stecker von der Spannungsversorgung, warten Sie 60sec, und
stecken Sie anschließend den Stecker wieder in die Spannungs-
versorgung. Sie können jetzt mit dem neuen Anlernvorgang beginnen.
Manuell anlernen
Das System muss an die Spannungsversorgung angeschlossen sein.
Betätigen Sie 2x kurz hintereinander die Taste (6) an der Sensor Box,
die LED blinkt. Das System befindet sich für 120 sec im Pairing Modus
für ein Bluetooth®Gerät.
Öffnen Sie die Sensor Box App auf ihrem Mobilgerät und folgen Sie
den Anweisungen zur Durchführung des Pairings mit dem System.
Ist das Anlernen für Bluetooth®Geräte abgelaufen und es wurde kein
Gerät verbunden, erlischt die LED.
Ist ein Gerät erfolgreich mit dem System verbunden leuchtet die LED
dauerhaft.
3
1 2 4
5
6

Kurzanleitung System OKINAP
04.12.2017 Id-Nr. xxxxx 6/ 6
Pairing-Liste zurücksetzen
Drücken Sie die Taste (6) und halten diese gedrückt, schließen Sie
dabei das System an die Spannungsversorgung an.
Zweimaliges blinken der LED signalisiert das erfolgreiche Löschen der
Pairing-Liste.
Rücksetzen auf Werkseinstellungen
Das System kann auf die Werkseinstellung zurückgesetzt werden.
Dabei werden alle in der Sensor Box gespeicherten Daten (z.B.
Schlafdaten) gelöscht.
Zur Rückstellung auf Werkseinstellung führen Sie folgende Schritte
durch.
Betätigen Sie 4x kurz hintereinander die Taste (6). Die LED schaltet
sich ein. Betätigen Sie jetzt 1x die Taste (6), das System ist auf
Werkseinstellung zurückgesetzt.
Das Zurücksetzen auf Werkseinstellung ist erfolgreich wenn die LED
erlischt.
Pflege und Reinigung
Das System wurde so entworfen, dass dieses einfach zu reinigen ist.
Ziehen Sie vor Beginn der Reinigung den Netzstecker der
Spannungsversorgung aus der Steckdose!
Reinigen Sie das System mit einem trockenen antistatischen Tuch.
Achten Sie darauf, bei der Reinigung die Anschlussleitungen nicht zu
beschädigen.
Entsorgung
Das System enthält Elektronikbauteile, Kabel, Metalle, Kunststoffe usw.
Das System ist gemäß den geltenden Umweltvorschriften des jeweiligen
Landes zu entsorgen.
Die Entsorgung des Produkts unterliegt in Deutschland dem Elektro-G,
international der EU-Richtlinie 2011/65/EU (RoHS) oder den jeweiligen
nationalen Gesetzgebungen. (Das Produkt unterliegt nicht der EU-Richtlinie
2012/19/EU (WEEE)).
Das System darf nicht in den Hausmüll gelangen!
DewertOkin GmbH
Weststraße 1
32278 Kirchlengern
Tel: +49 (0)5223/979-0
Fax: +49 (0)5223/75182
http://www.dewertokin.de
Company Name:ETAhand2mind
Address:500 Greenview, Vernon Hills, IL 60061, USA
Telephne:(847) 968-5057
Leeanne Joyce, Sourcing Specialist

NOTE: This equipment has been tested and found to comply with the limits for
a Class B digital device, pursuant to part 15 of the FCC Rules. These limits are
designed to provide reasonable protection against harmful interference in a
residential installation. This equipment generates uses and can radiate radio
frequency energy and, if not installed and used in accordance with the
instructions, may cause harmful interference to radio communications.
However, there is no guarantee that interference will not occur in a particular
installation. If this equipment does cause harmful interference to radio or
television reception, which can be determined by turning the equipment off and
on, the user is encouraged to try to correct the interference by one or more of
the following measures:
- Reorient or relocate the receiving antenna.
- Increase the separation between the equipment and receiver.
-Connect the equipment into an outlet on a circuit different from that to which
the receiver is connected.
-Consult the dealer or an experienced radio/TV technician for help
Changes or modifications not expressly approved by the party responsible for
compliance could void the user's authority to operate the equipment.
This device complies with Part 15 of the FCC Rules. Operation is subject to the
following two conditions:
(1) this device may not cause harmful interference, and (2) this device must
accept any interference received, including interference that may cause
undesired operation.

This device contains licence-exempt transmitter(s)/receiver(s) that comply
with Innovation, Science and Economic Development Canada’s
licence-exempt RSS(s). Operation is subject to the following two conditions:
(1) This device may not cause interference.
(2) This device must accept any interference, including interference that may
cause undesired operation of the device.
L’émetteur/récepteur exempt de licence contenu dans le présent appareil est
conforme aux CNR d’Innovation, Sciences et Développement économique
Canada applicables aux appareils radio exempts de licence. L’exploitation est
autorisée aux deux conditions suivantes :
(1) L' appareil ne doit pas produire de brouillage;
(2) L' appareil doit accepter tout brouillage radioélectrique subi, même si le
brouillage est susceptible d' en compromettre le fonctionnement.
Table of contents
Languages:


