DGL EVA Assembly instructions

EVA
Montage- und Pflegehinweise
Instructions for assembly and care
Istruzioni di montaggio e manutenzione
Montageanleitung Assembly instructions Istruzioni di montaggio
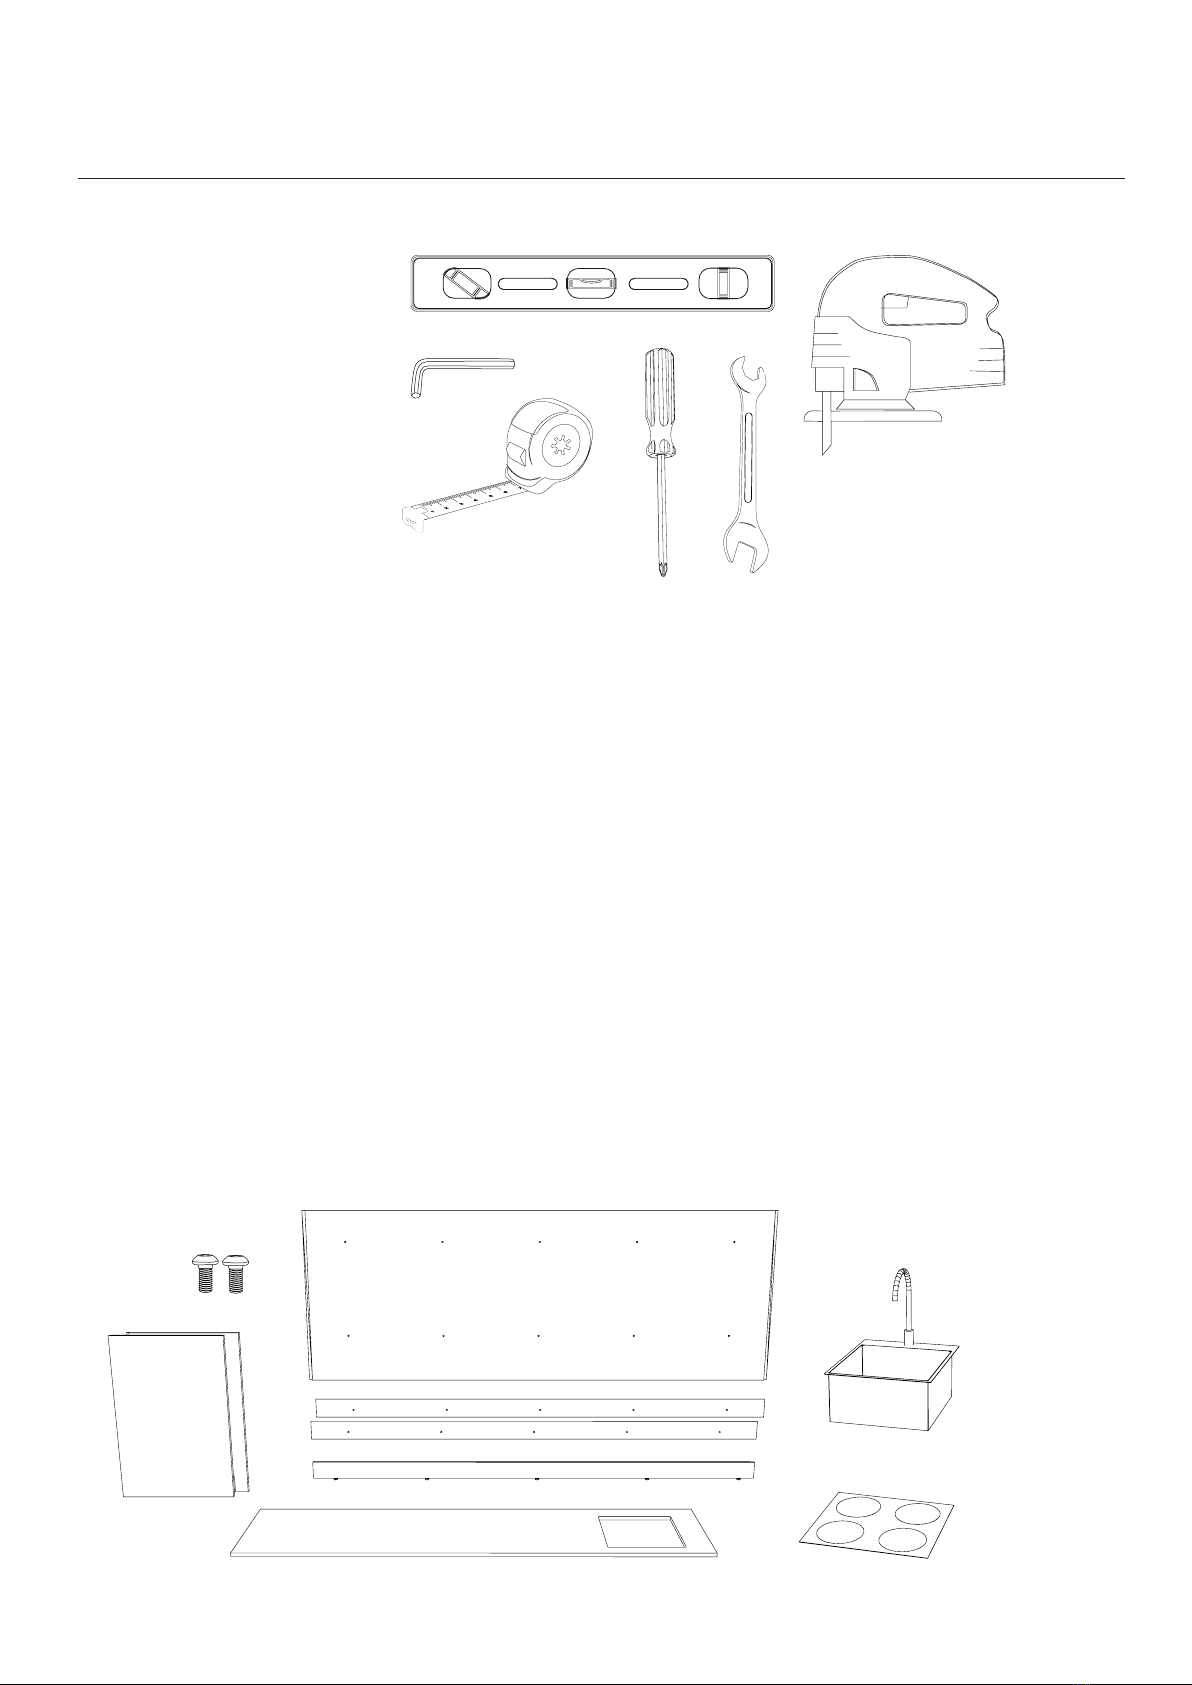
Zum Aufbau Ihrer EVA benötigen Sie:
To build your EVA you will need:
Per il montaggio di EVA servono:
Wasserwaage
Kreuz Schraubenzieher oder
Akkubohrer mit Kreuz-Einsatz
Stichsäge
Maßband oder Zollstock
Inbusschlüssel
Maulschlüssel (9mm)
Level
Cross Screwdriver or cordless drill
with cross bit
Jigsaw
Measuring Tape
Hex / allen key
Open-end wrench (9mm)
Livella
Avvitatore a croce o trapano a batteria
con inserto a croce
Seghetto
Nastro di misura o metro pieghevole
Chiave a brugola
Chiave aperta (9mm)
Folgendes Montagematerial ist in Ihrer Lieferung enthalten:
The following materials are included in your order:
Il seguente materiale di montaggio è incluso nella vostra consegna:
• Rückwand, Seitenwände, Sockel
und Modul-Leisten
• Arbeitsplatte
• Spüle und Geräte (sofern bestellt)
• Gewindeschrauben M8
• Die von Ihnen gewählten EVA
Module und Podeste für integrierte
Geräte (sofern vorhanden)
• Back panel, side panels, base and
module panels
• Worktop
• Sink and appliances (if applicable)
• M8 threaded screws
• Your chosen EVA modules and if
applicable, platforms for built-in
appliances
• Pannello posteriore, pannelli laterali,
zoccolo e doghe modulari
• Piano di lavoro
• Lavello e apparecchi (se ordinati)
• Viti filettate M8
• I moduli EVA scelti e i piedistalli
per gli apparecchi integrati (se
disponibili)

2Positionieren Sie die Rückwand an der Stelle, an der die aufgebaute Küche final stehen soll,
messen Sie alle Anschlüsse (Wasser/Strom) sorgfältig aus und schneiden Sie die notwendigen
Önungen mit einer Stichsäge aus.
Brechen Sie die Schnittkanten mit einem Schleifpapier.
Place the back panel where you want your kitchen to be, carefully measure all the water and
electricity hookups and then cut out the necessary openings with a jigsaw.
Smooth the edges with sandpaper.
Posizionare la parete posteriore dove alla fine starà la cucina assemblata, misurare attentamente
tutti i collegamenti (acqua/elettricità) e tagliare le aperture necessarie con un seghetto.
1Befestigen Sie die Modul-Leisten mit den mitgelieferten Schrauben (Gewindeschrauben M8)
an den dafür vorgesehenen und vorgebohrten Gewinden der Rückwand.
Fasten the module panels to the back panel using the supplied M8 threaded screws, making
sure to line up the pre-drilled holes.
Fissare le strisce del modulo con le viti fornite (viti filettate M8) alle filettature preforate
previste a questo scopo sulla parete posteriore.
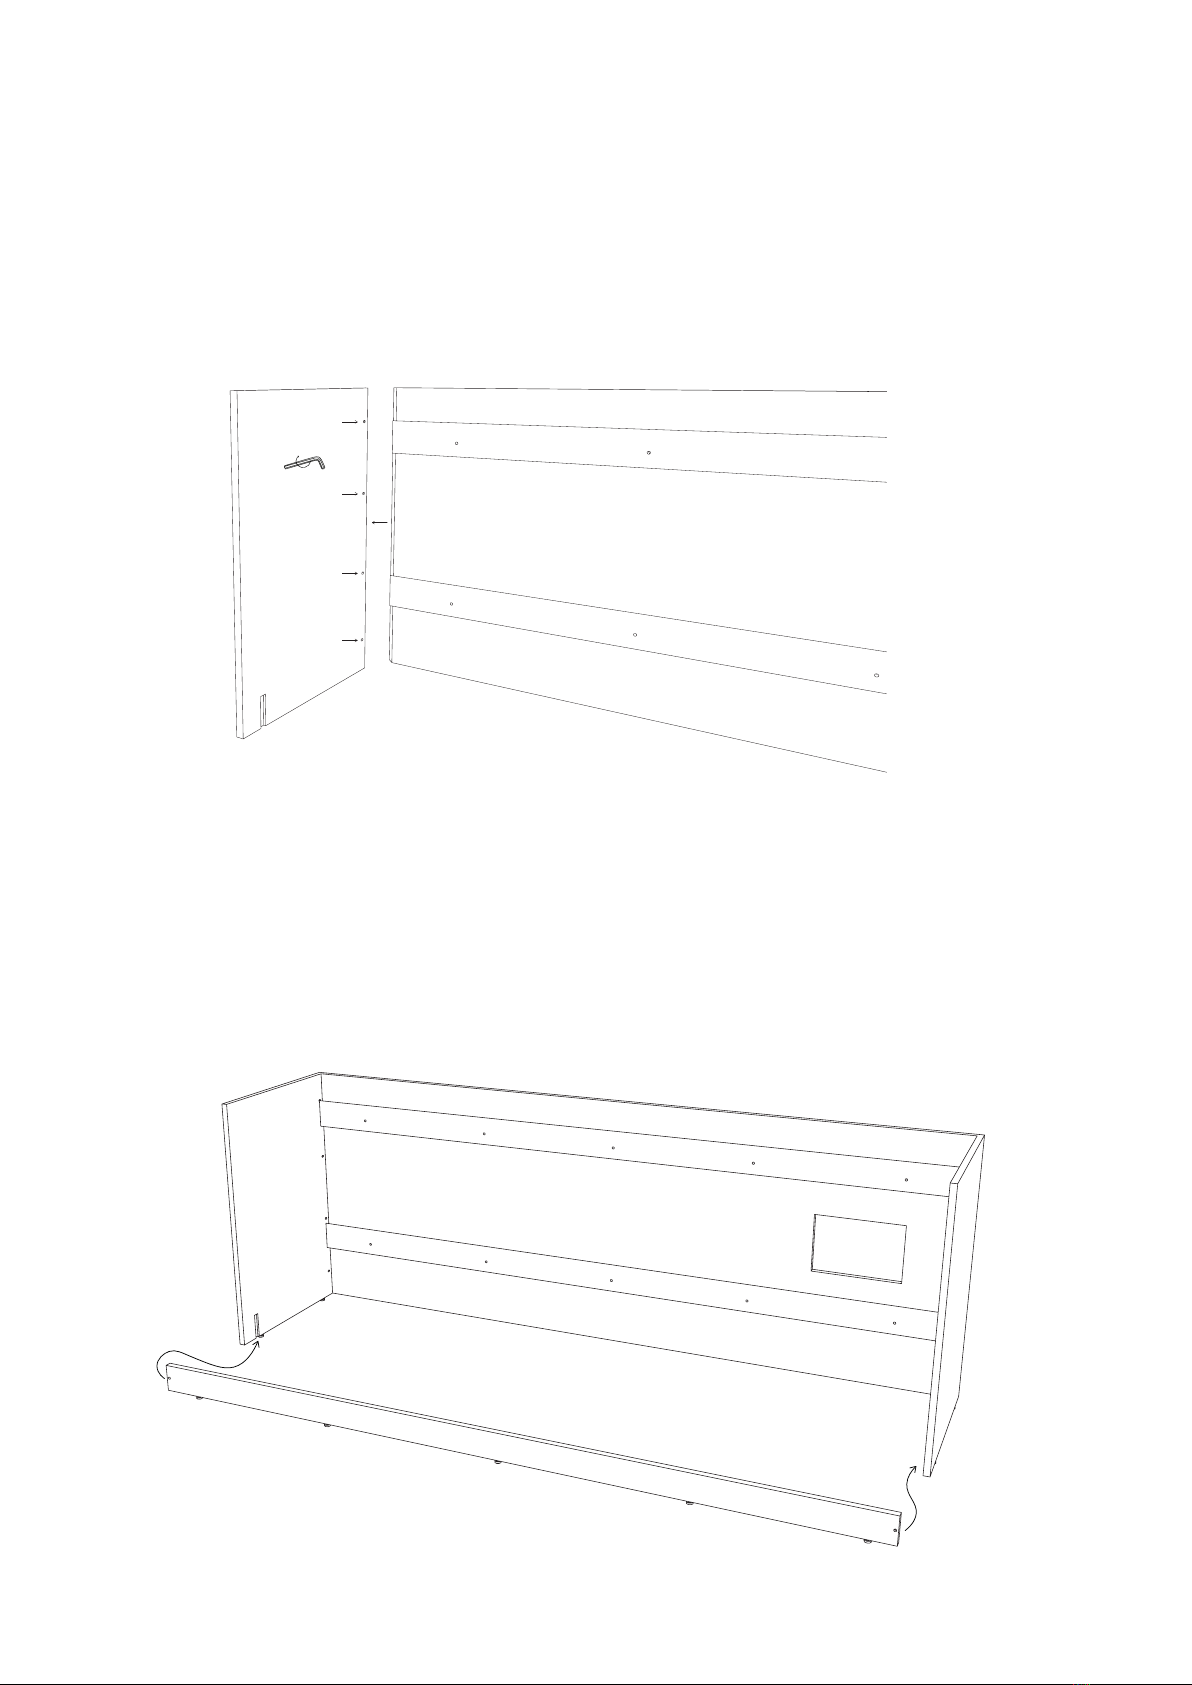
4Verbinden Sie mit dem gleichen Vorgehen wie in Schritt 3 den Sockel mit den zwei Seitenwänden.
Using the same approach as in Step 3, connect the base panel to the side panels.
Usando la stessa procedura del punto 3, collegare la base alle due pareti laterali.che sia in posizione
orizzontale.
3Verbinden Sie die Seitenwände mit der Rückwand mittels bereits eingefräster Clamex. Stellen
Sie sicher, dass die Gehrungen an den Außenseiten bündig schließen, erst dann fixieren Sie die
Verbindung mit einem Inbusschlüssel, indem Sie fest nach rechts drehen (ca. 180° Drehung).
Connect the side panels with the back panel using the pre-milled Clamex fasteners. Make sure that
the miters on the outer sides line up and then secure the connection with the allen key by turning it
to the right (approx. 180°).
Collegare le pareti laterali alla parete posteriore usando il clamex già fresato. Assicurarsi che gli
angoli si chiudano a filo sui lati esterni, solo allora fissare la connessione con una chiave a
brugola girando saldamente verso destra (circa 180° di rotazione).
1
2
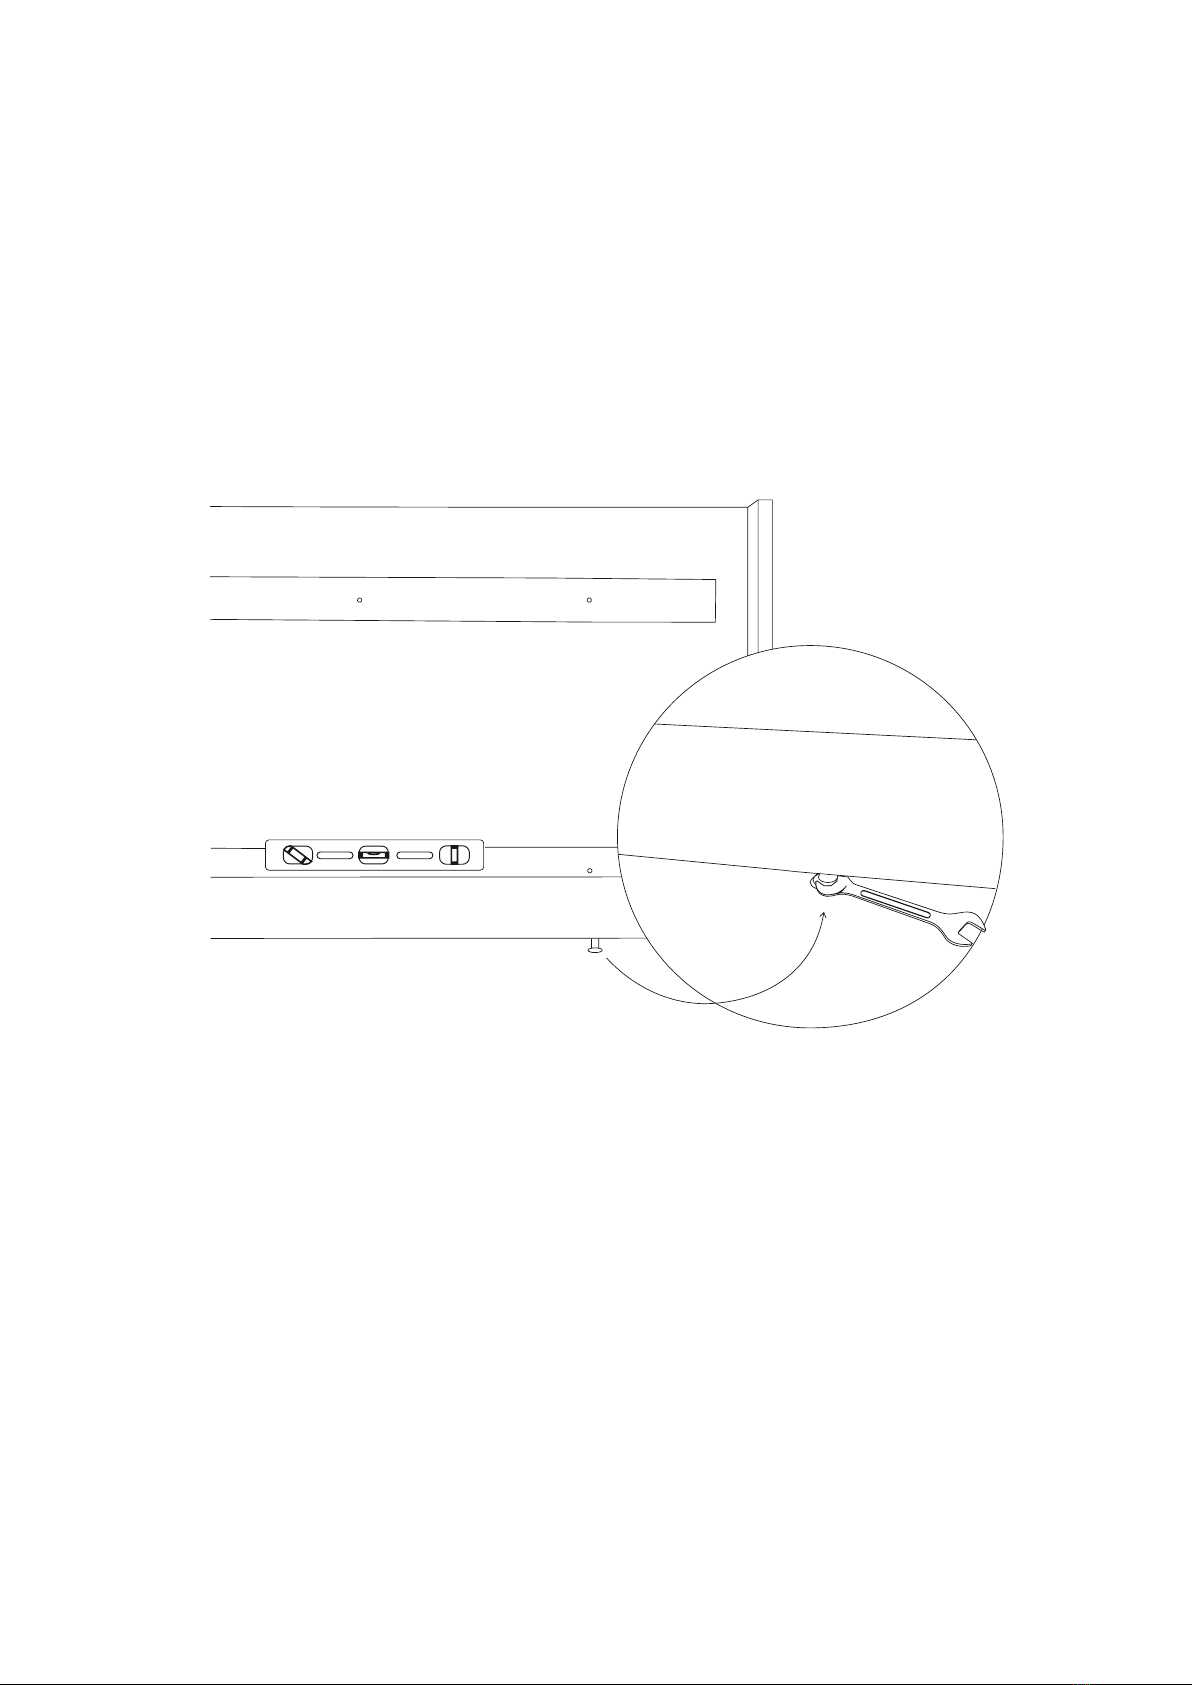
5Nutzen Sie eine Wasserwage und den Maulschlüssel (9mm), um die aufgebaute Struktur in-
klusive Sockel in die Waage zu bringen. Mit Hilfe des Maulschlüssels können die verstellbaren
Füßchen nach links oder rechts gedreht werden, um die Höhe anzupassen. Es ist wichtig, dass
die komplette Struktur in der Waage steht. Prüfen Sie deshalb sorgfältig, dass alle Füßchen fest
auf dem Boden stehen.
Make sure that the structure is level by using an open-end wrench (9 mm) to adjust the height of the
feet. For the unit to be properly balanced, all feet must sit firmly on the ground.
Usare una livella e la chiave aperta (9mm) per livellare la struttura assemblata compresa la base.
Usare la chiave per girare i piedini regolabili a sinistra o a destra per regolare l‘altezza. È import-
ante che la struttura completa sia in equilibrio. Quindi, controllate attentamente che tutti i piedi
siano saldamente sul pavimento.
Other DGL Indoor Furnishing manuals


Popular Indoor Furnishing manuals by other brands

Regency
Regency LWMS3015 Assembly instructions

Furniture of America
Furniture of America CM7751C Assembly instructions

Safavieh Furniture
Safavieh Furniture Estella CNS5731 manual

PLACES OF STYLE
PLACES OF STYLE Ovalfuss Assembly instruction

Trasman
Trasman 1138 Bo1 Assembly manual

Costway
Costway JV10856 manual


