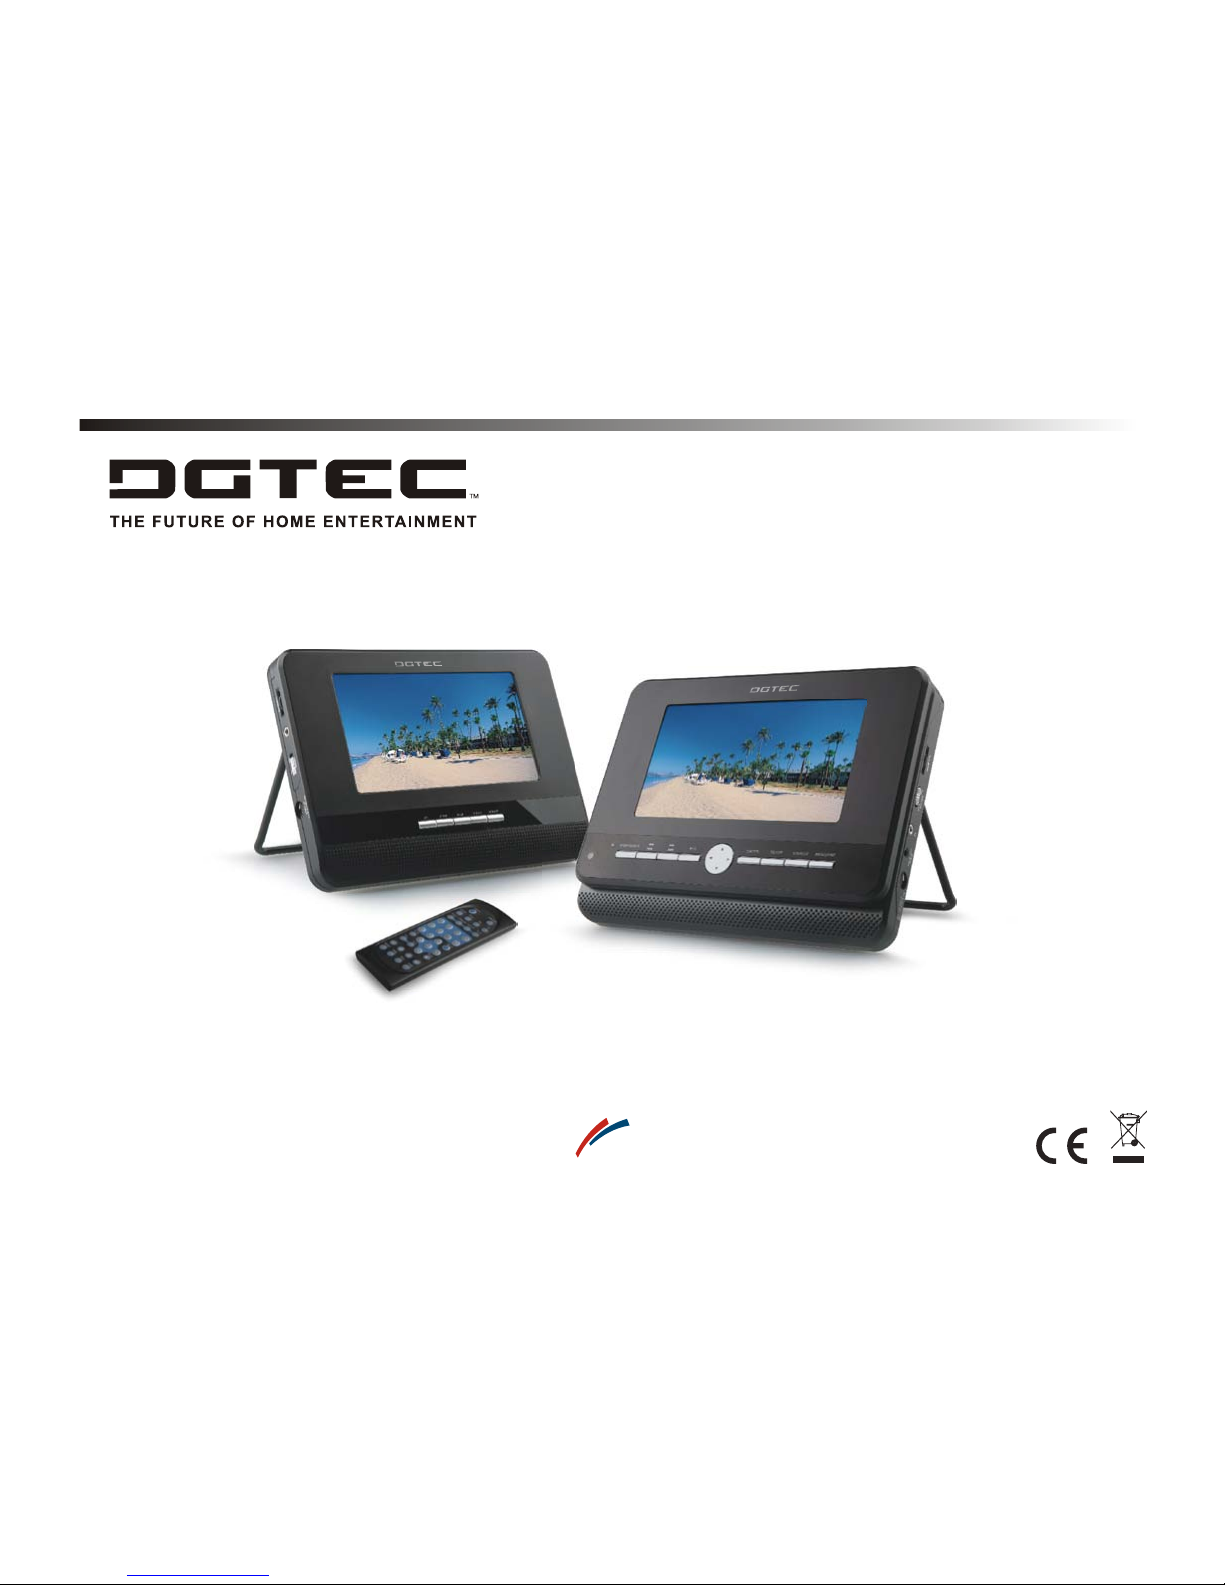
DGTEC DG-350DSDVD User manual
Please read this manual before operating
DG-350DSDVD
BC75419
A
clever
Hills.
product
OWNER`S MANUAL
DUAL SCREEN PORTABLE DVD PLAYER

NEED HELP?
1800 189 941 ( Free Call)
8:00am-6:00pm
Australian EST
Monday to Friday
*

Table of Contents
~ 1 ~
Tableof Contents....................................................................................................................................................................1
Safety Information..................................................................................................................................................................2
Remote Control......................................................................................................................................................................3
Description of theDVD Player..................................................................................................................................................4
Description of theSecond Screen.............................................................................................................................................5
Placing the DVDPlayer and SecondScreen..............................................................................................................................6
Using the RemoteControl........................................................................................................................................................7
Connecting the SecondScreen to theDVD Player......................................................................................................................8
Connecting Earphones to theDVD Player orSecond Screen ......................................................................................................9
Using USB Port.....................................................................................................................................................................10
Using the AC Adaptor.............................................................................................................................................................11
Using the Battery...................................................................................................................................................................12
Cautions in UsingBattery.......................................................................................................................................................13
Mounting the DVDPlayer / SecondScreen for In-Car Use.........................................................................................................14
Playing a Disc.................................................................................................................................................................15~17
Playing MP3 andRegular Audio CD........................................................................................................................................18
Playing Picture CD................................................................................................................................................................19
Changing Settings............................................................................................................................................................20-21
Adjusting the SecondScreen.................................................................................................................................................22
Troubleshooting...................................................................................................................................................................23
Specifications......................................................................................................................................................................24

~ 2 ~
Safety Information
CLASS 1 LASERPRODUCT / KLASSE 1 LASERPRODUKT / LUOKAN 1 LASERLAITE / KLASS1 LASERAPPARAT / PRODUCTO
LASER CLASE.
INVISIBLE LASER RADIATION WHEN OPENAND INTERLOCKS DEFEATED. AVOID EXPOSURE TO BEAM.
1.Toprevent fire orelectrical shock, donot expose thisPlayer to rainor moisture.
2.Toavoid electrical shock,do not openthe cabinet, nouser-serviceable parts inside,refer servicing toqualified personnel only.
3.Certain countries mayregulate the disposalof the batteryused to powerthis product. Pleaseconsult with yourlocal authority.
4.Listening with earphones for many hoursat maximum volumemay damage yourhearing.
5.The Player shouldbe connected toa power supplyonly of thetype described inthe operating instructionsor as markedon the Player
6.The A.Cplug is usedas the disconnectingdevice for power, unplugging the plug disconnects the Player from the power supply, make
the disconnecting devicereadily operable allthe time.
Please read allof the safetyand operating instructionsbefore operating thisPlayer, followall warnings placed on the Player
and in theowner's manual. Thesesafety and operatinginstructions should beretained for future reference.
WARNING
SAFETY WARNING
Safety Information
Do not exposethe system toexcessive moisture, rain,sand, or heatsources.
Place the DVDPlayer on afirm and flatsurface.
Keep the DVDPlayer away fromdomestic heating equipmentand direct sunlight.
When placing theDVD Player ina cabinet, allowabout one inchof space allaround the DVDPlayer for ventilation.
Attention:
Remove the protectioncard inside thedisc compartment beforeusing this Player.
~ 3 ~
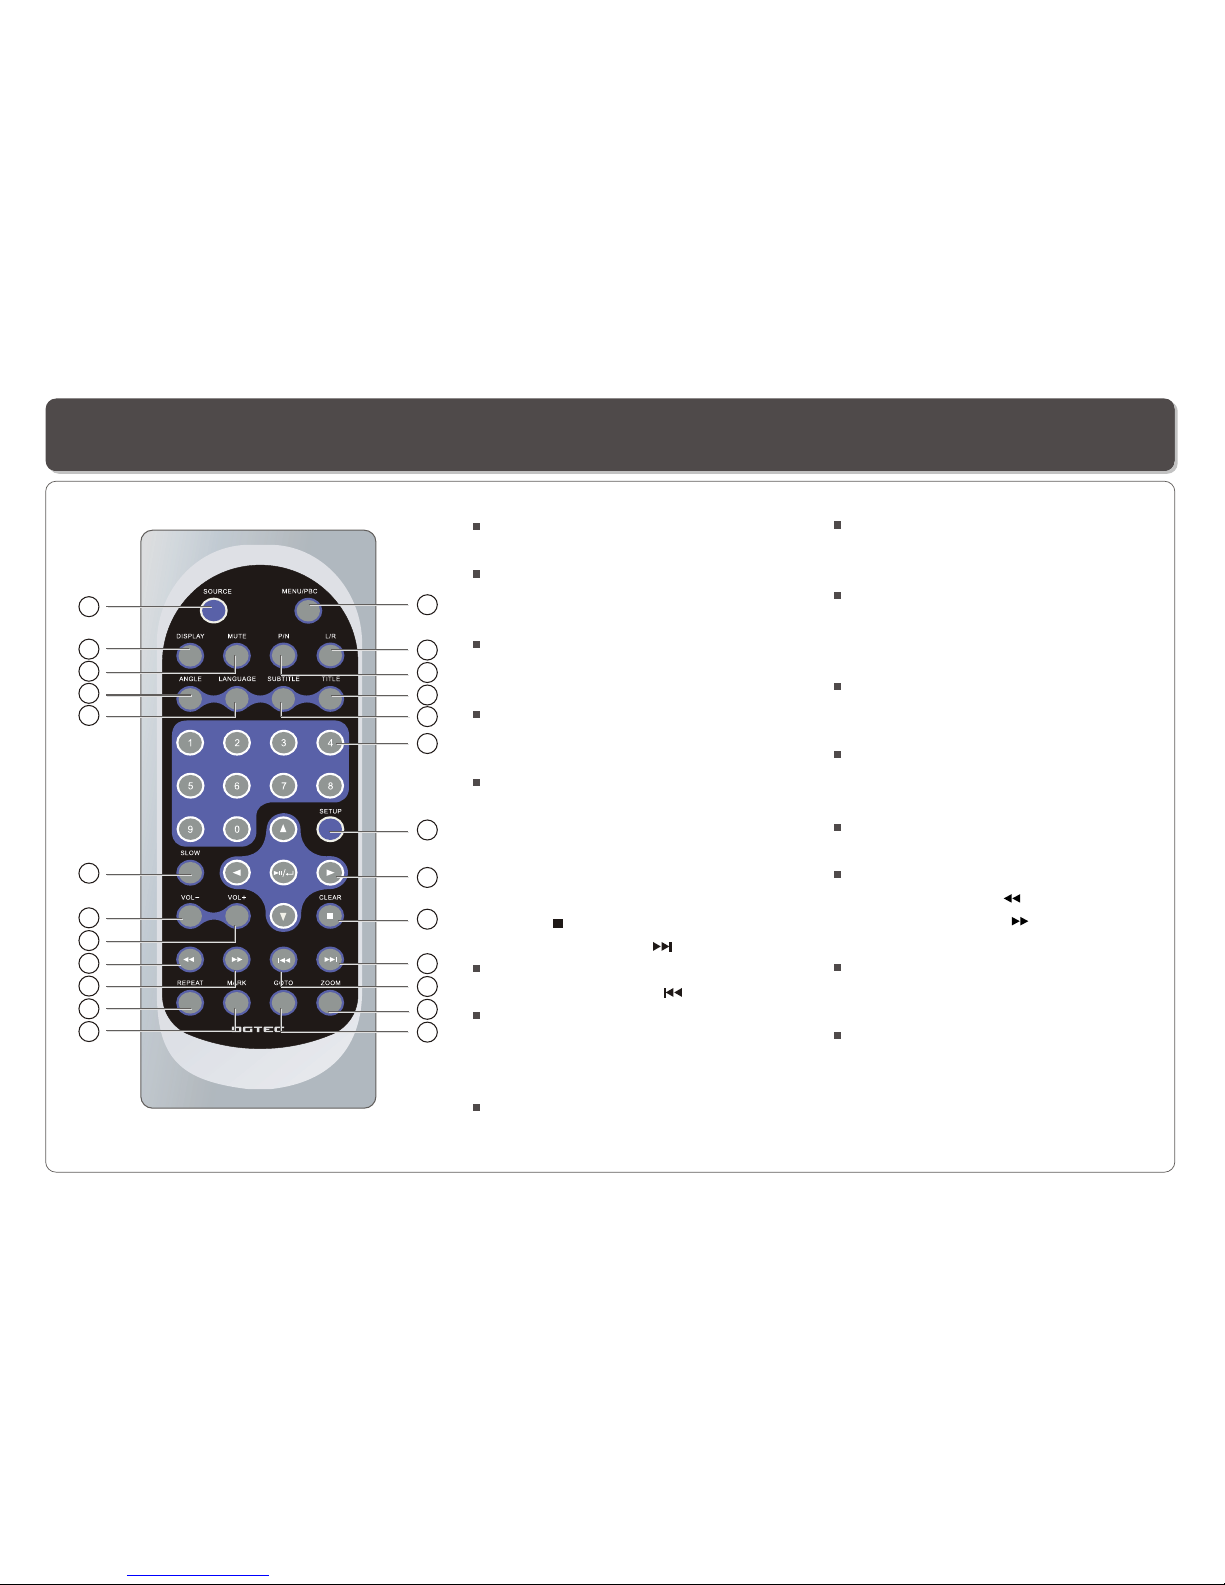
Remote Control 14.
Switches between DVDand USB
mode.
15. DISPLAY Button
Displays the currentdisc playback
information.
16. MUTE Button
17. ANGLE Button
Use to accessvarious
camera angles ona DVD.
18. LANGUAGE Button
Selects the voicelanguage in aDVD.
19. SLOW Button
20. VOL- Button
Use to decreasethe volume.
21. VOL+ Button
Use to increasethe volume.
22. FASTREVERSE ( )Button
23. FASTFORWARD ( ) Button
24. REPEAT Button
Allows you torepeat play
a title, chapter, track, ordisc.
25. MARK Button
Use to marka point wherethe
playback starts eachtime when
the MARK buttonis pressed
later on.
SOURCE
1. MENU/PBC Button
Brings up thedisc menu.
2. L/R Button
Selects left, rightand stereo
sound tracks.
3. P/N Button
Selects PAL/NTSC/AUTO TV systems.
4. TITLE Button
5. SUBTITLE Button
Selects the subtitle'slanguage.
6. Number Buttons(0,1,...,9)
7. SETUP Button
Brings up thesetup MENU
to set upthe system's
language, video, display,
password etc.
8. (PLAY/PAUSE/ENTER)/DIRECTION
Buttons
9. STOP ( )/CLEAR Button
10. SKIP FORWARD ( )Button
Use to skipto next title,chapter or track.
11. SKIPBACKWARD ( ) Button
Use to skipto previous title,
chapter or track.
12. ZOOM Button
13. GOTO Button
Use to enterthe specific chapter, track
or time toplayback.
2
3
4
5
6
7
8
9
10
11
12
15
16
17
18
19
20
21
22
23
24
14
13
25
1
Remote Control
Remote Control

~ 4 ~
2
1
6 7 8 9 10 11 12 13 144 5 15
3
21
22
1. DISC COVER
2. USB Port
3. LCD
4. REMOTE CONTROLSENSOR
5
. LED
6. STOP/CLEAR Button
7. FASTREVERSE/SKIP BACKWARD( / ) Button
8. FASTFORWARD/SKIP FORWARD( / )Button
9. PLAY/PAUSE( / )Button
10. CURSOR UP/DOWN/LEFT/RIGHT
11. ENTER Button
12. SETUP Button
13. SOURCE Button
14. MENU/PBC Button
15. SPEAKER
16. EARPHONE/SPEAKER VOLUME
17. POWER ON/OFF
18. EARPHONE Jack
19. DC IN12V
20. DC 12V, 0.7A.AV Output jack:
connection to the 2nd screen
21. Stand
22. LCD on/offswitch
Description of the DVD Player
DC IN 12V
18
19
20
17
16
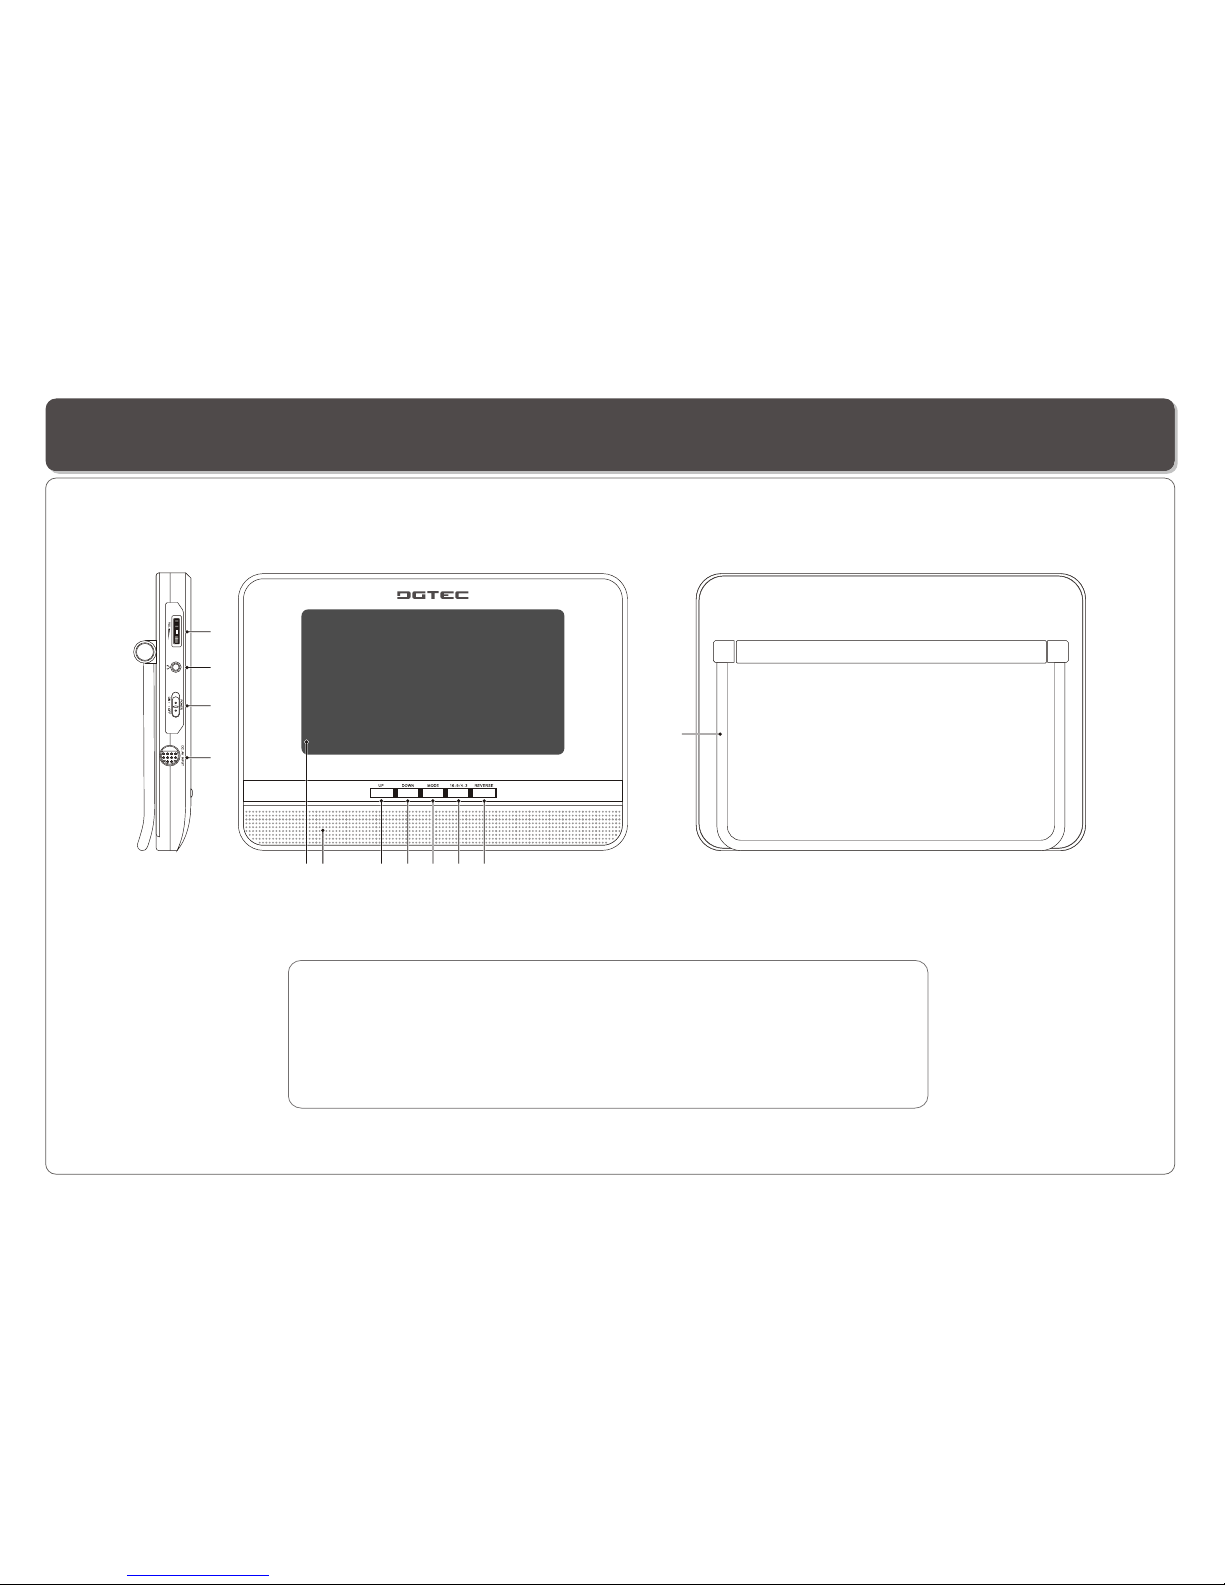
~ 5 ~
Description of the Second Screen
23467
5
1
12
8
9
10
11
1 LCD
2 SPEAKER
3 UP button
4 DOWN button
5 MODE button
6 16:9/4:3 button
.
.
.
.
.
.
7. REVERSE button: flip the image 180 degrees
8. Speaker volume dial.
9. EARPHONE JACK
10. Power On/Off switch
11. DC 12V, 0.7A. AV Input jack
12. Stand
~ 6 ~
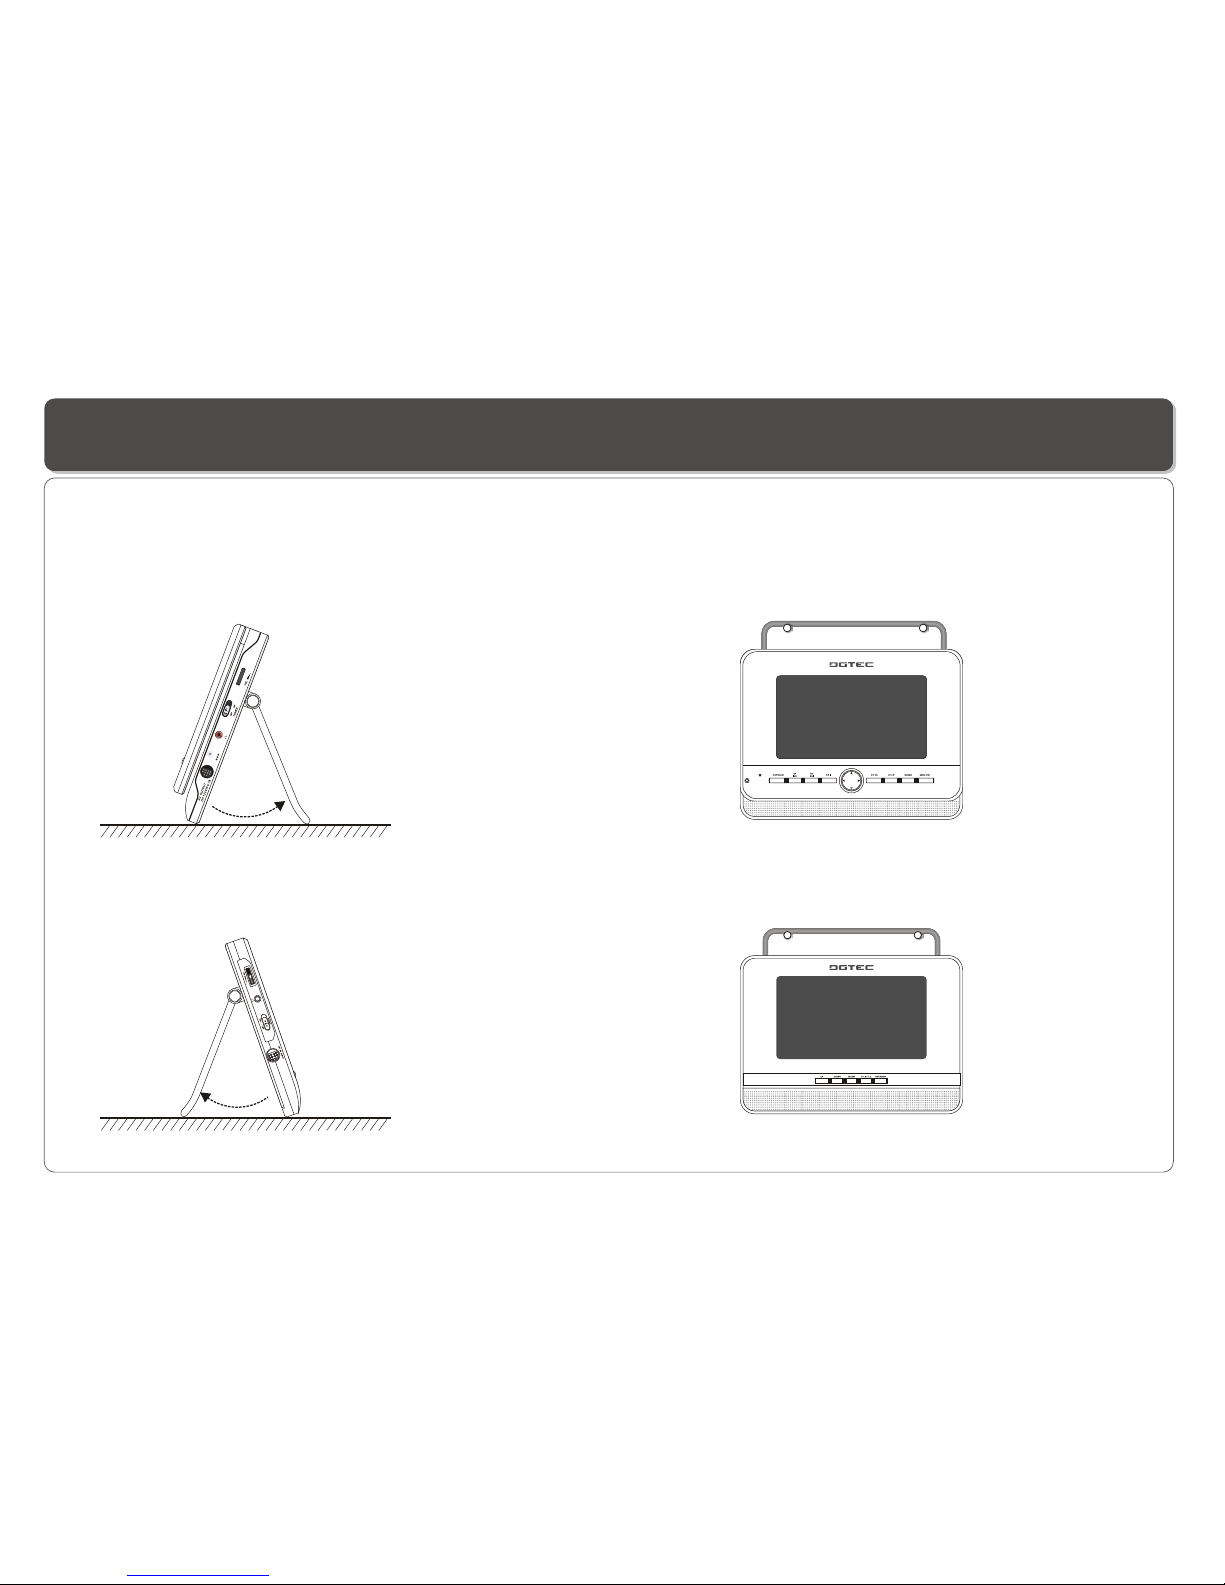
The Stand/Hanger allowsyou to place this DVD Player on table top or hang it on the wall.
On the Wall
On the Surface
Placing the DVD Player and Second Screen
DC IN 12V
~ 7 ~
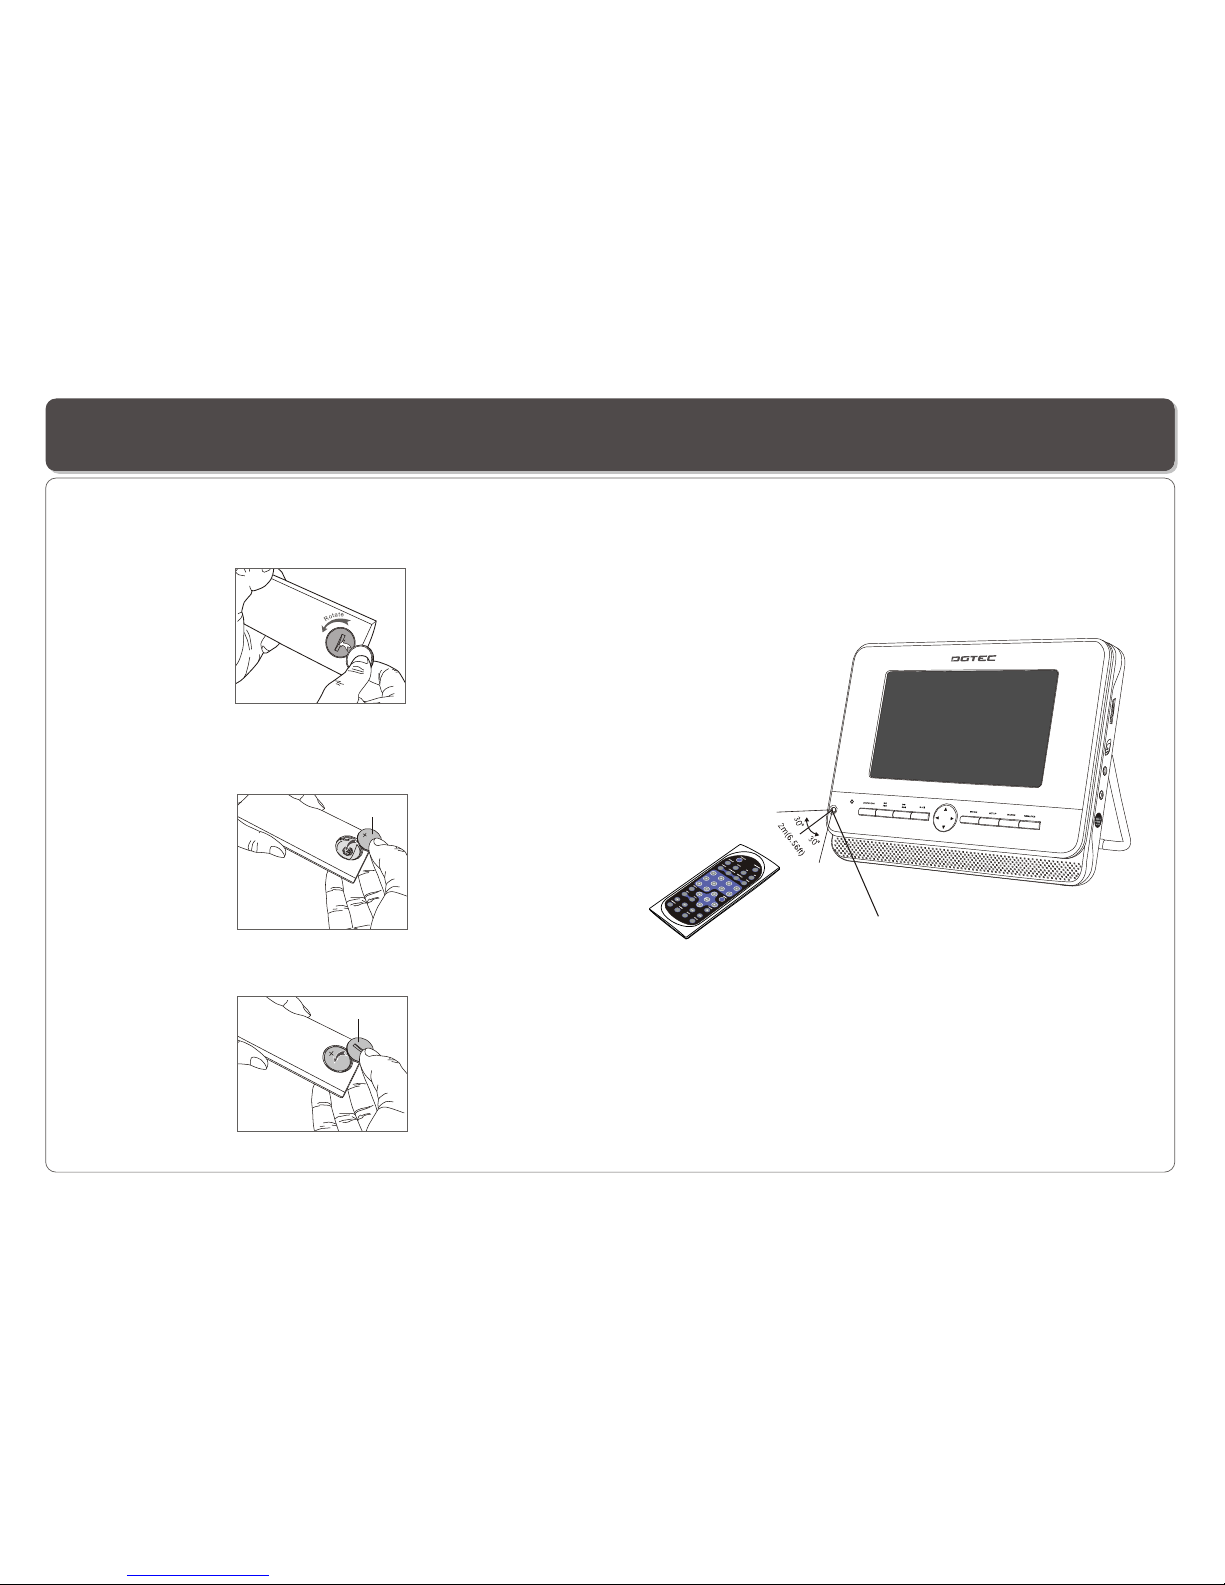
Using the Remote Control
Using the remote control
Point the remotecontrol directly atthe remote sensor
on the frontof the DVDPlayer.
Installing the battery
1. Open thebattery compartment coverusing a coin.
3. Replace thebattery compartment coverand turn clockwise
until it stops.
2. Insert a3V lithium batteryinto the batterycompartment with
the polarity (+ ) facingup as marked.
Battery
battery compartment
cover
Remote Control Sensor

DC IN 12V
~ 8 ~
Connecting the Second Screen to the DVD Player
The power forthe second screensis provided bythe DVD playerthrough the providedcables which alsoprovide the audio/video signal
from the Playerto the secondscreen. Follow thesesteps to makethe connection.
Warning!
1. Do notturn on theDVD player poweruntil the connectionof Power/AV cable between the Player and the screen is done.
2. Alwaysturn off the DVD playerpower before disconnectingthe Power/AV cable between the Player and the screen.
3. Connect thescreen to theplayer using onlythe cable providedin this product,or you mayrisk damaging orcausing fire ifother cable
is used.
DVD Player
LCD Screen
Power/AV Cable(provided)
2. Care mustbe taken tomake sure thatthe arrow mark( ) onthe connector ofthe cable alignswith the arrowmark ( )on the
Player.
Do not forcein when makingthe connection, oryou may riskdamaging the pinson the connectors.
1. Connect oneend of thePower/AV cable (mini DIN) to the OUT on the Playerand the otherend to theDC. AV INPUT on the screen.

Connecting Earphones to the DVD Player and Second screen
You can attach an earphone with a stereo mini-jack plug to the AUDIO OUT jack on theDVD Player orEarphone Jack onthe LCD
screen for privatelistening. The volume can beadjusted using VOL + and VOL - on the remotecontrol or usingthe speaker VOLUME
knob on thePlayer and screento adjust thevolume .
NOTE: When the earphoneis connected tothe AUDIO OUT jack on theDVD Player orEarphone Jack onthe LCD screen,the speaker
will be disconnected.
1. Connecting Earphonesto the DVDPlayer 2. Connecting Earphonesto Second Screen
~ 9 ~
DC IN 12V

~ 10 ~
Using USB Port
Connecting a USB device
Plug in theUSB device tothe USB porton the Player.
Removing a USB device
You can remove the USB device anytime even when it is playing. To remove the USB device, simply graspthe end ofthe USB and
remove it fromthe slot.
Playing a USB device
The Player accepts mostUSB devices such asMP3, DSC, USB- drive, Digital Camcorder etc. The USB in this Player supports
version 1.1/2.0.
,,
USB slot
1. Repeatedly pressSOURCE to select USB,and the Playerwill start playingthe first filein the firstdirectory if there is more than
one directory.
2. To play other files, press MENU/PBC to bring upthe file directory, then use direction key ( and ) toselect and press
to play.
~ 11 ~
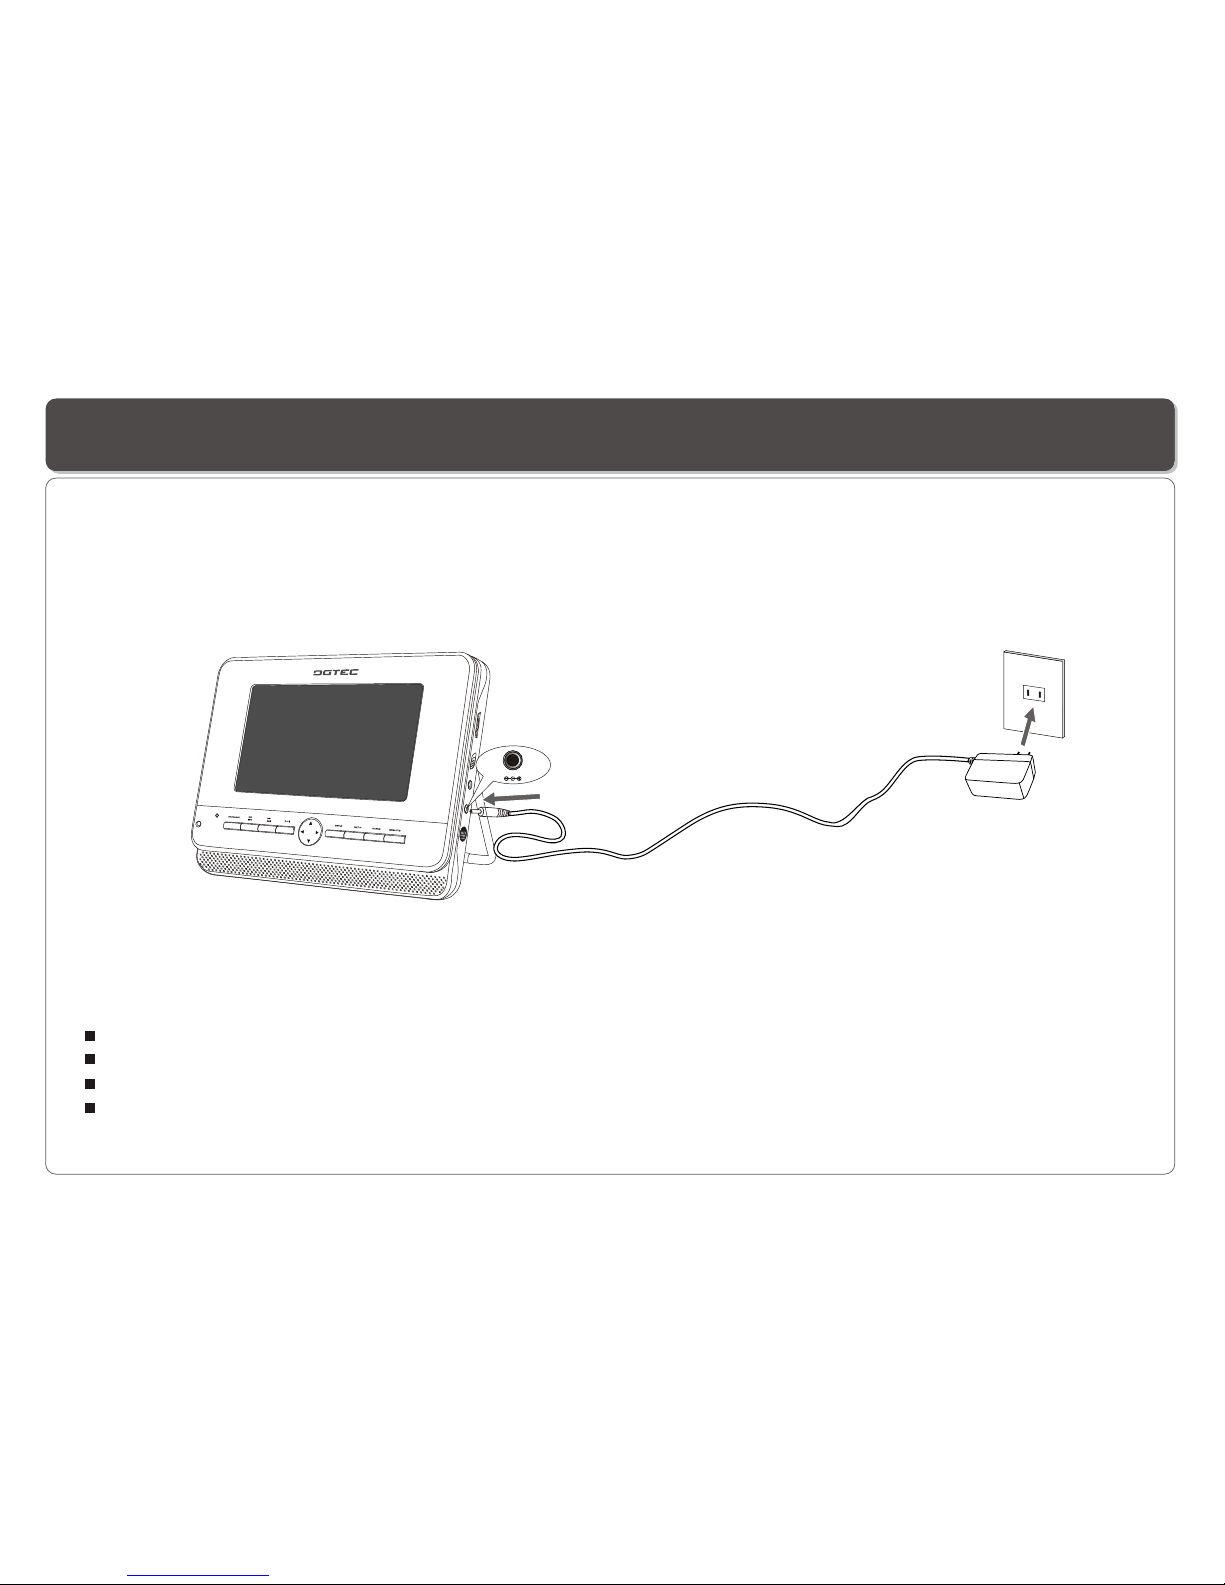
This portable DVDplayer can bepowered byAC through thesupplied switching powerAC adaptor.
Using the AC Adaptor
Important !
Always turn off the DVDPlayer before connectingor disconnecting theAC cord.
. Using adifferent type of adaptor maycause malfunction ordamage to theproduct.Only use theAC adaptorsupplied with thisplayer
When theAC adaptor isused for aprolonged period oftime, the adaptormay heat up,this is normaland is nota cause for concern.
When not usingthe adaptor,unplug it fromthe outlet.
To homepower outlet
DC IN 12V
To DC12VIN on the DVD player

~ 12 ~
LED Indicator
Using the Battery
During charging, thered and greenLEDs blink alternatively.
When the batteryis fully charged,the green LEDstays lit .
When the Playeruses battery forpower, thesteady green LEDlights.
If the batterypower is low, the greenLED blinks.
LED Indicator
This player hasa built-in rechargeablebattery, follow these steps to recharge.
1. Connect theA.C adaptoras illustrated.
2. Slide POWER to OFF. ( The Player must be turned off to chargethe battery).
3. The charging starts,and when itis fully charged,the charging stopsautomatically.
To home power outlet
DC IN 12V
To DC12V IN on the DVD player

x
Cautions in Using Battery
~ 13 ~
This Player hasa built-in battery, strictly follow these safety information when using thebattery for power, Otherwise, a
short circuit, overheating,smoke, fire, ordamage to theproduct may result.
Never disassemble ormodify the battery in any way. Do not touch the terminal of the battery with a metalobject.
Do not placethe Player indirect sunlight, dashboardof a vehicle,or high temperatureplace. It cancause battery explosionor fire.
Do not exposethe Player towater, fire,or heat.
Always usethe includedAC adaptor whencharging the battery.
This battery is designed exclusivelyfor your portableDVD player.Do not useit with otherdevices.
Warning!
1. Do notdrop the Playeror subject tostrong vibration.
2. The battery may leakfluid that isharmful to youreyes.
If this fluidgets in youreyes, wash eyesimmediately with largeamounts of runningwater and getmedical attention immediately.
If the fluidgets on yourskin or clothing,wash immediately withwater.
Caution!
1. Keep thePlayer free fromsmoke, steam, moisture,and dust.
oo o o
2. Using thePlayer under 0 C (32 F) or over40 C(104 F) cause reduced battery life
and player malfunction.
Danger!

~ 14 ~
You can mount the Player / Screen to the head rest of yourcar using the straps provided.
1. Use hoopand loop fastenerto fix elasticstraps on thestands
of main unitas below.
2. Mount themain unit tothe head restand tighten theelastic
straps.
3. Connect theCar Adaptorbetween your carcigarette lighter
and the Player.
Mounting the DVD Player / Second Screen for In-Car Use

There are two ways to resume your playback when interrupted.
Method 1. -- for short time interruption
1. Press STOP ( ), the Player remembers where you stopped.
2. To resume, press , the Player will play from where you
stopped.
Method 2. -- for longer time interruption
1. Enable the last memory in the setup menu.
2. Press OPEN to open the disc compartment door during playing.
3. You can turn off the power, and even remove the disc from the
Player, when you turn on the power and replace the disc, the
Player will play from where you stopped.
~ 15 ~
Playing a Disc
Play
Adjusting volume
Press VOL+ or VOL- (on the remotecontrol or theVolume
control dial onthe Player) tochange volume.
Skip
Press (on theremote control) or (on the player)to
start play.
1. Press onthe remote totemporarily stop theplayback, " "
appears on thescreen.
2. Press againto stop theplayback.
Stop
Preparation for Playback
1. Make surethe unit hasthe power from the ACadaptor.
2. Loading adisc, follow thesesteps:
Lift the screen(disc compartment cover)on the Playerto
Access thedisc compartment.
Place a discinto the traywith the labelside facing up.
Close the disccover.
3. Slide POWER to ON to turn onthe power.
Resume
PAUSE
1. During playback,press (on theremote) or (onthe
player) to pause.
2. Press (onthe remote) or (on the player)to resume
playback.
Fast Forward and Reverse
You can skip chapters on DVD-Video, tracks onCDs, and Video
Cds.
1. To skip forward, press and hold / (on the player) or
simply press (on the remote control) duringplay ,it skips to
the next chapter or track. thenrepeatedly press / or
increases the numbers of skips.
2. To skip to the previous chapteror track, press and hold /
(on the player) or simply press (on the remote control) .
1. During playback, to fast forward, repeatedly press / (on
the player) or (on the remote control) to increase the
fast forward speed 2x, 4x, 8x, 16x, 32x.
2. During playback, to fast rewind, repeatedly press / (on
the player) or (on the remote control) to increase the fast
reverse speed 2x, 4x, 8x, 16x, 32x.
3. To resume normal playback, press .

~ 16 ~
1. During playback,repeatedly press SLOW to play at 1/2, 1/4,
1/8, 1/16 speeds.
2. To resume normal playback, press .
You can only perform slow motion play in forward playback.
Slow Motion
Repeat Playback
Mark (Bookmark)
GOTO
You can go directly to a desired chapter and play, or playat a
desired point oftime. Follow thesesteps:
(A)Toplay a specificchapter
1. Press GOTO, use to select title (TT) and chapter (CH)and
enter the desirednumber.
2. Press ENTER to confirm andstart play.
The Mark functionlets you "bookmark"points on thedisc for
playback at alater time. You can store up to 12 bookmark
locations.
Follow these stepsto set upmarker playback:
1. During playback,press MARK onthe remote control.
2. Use and to select abookmark location.
3. When youreach the sceneyou want tomark, press to
confirm.
4. Repeat theabove procedure fora new scene.Youcan have
up to 12bookmarks.
5. To clear the bookmark already set up, find it first, then press
CLEAR.
You can perform marker playback at any time by pressing MARK,
and using toselect one ofthe bookmarks, thenpressing
(B)Toplay from aspecific point oftime.
1. Press GOTO twice to moveto the timedisplay and it
changes 0:00:00.
2. Fill inthe time (hour:minute: second).
3. Press ENTER to confirm andstart play.
ZOOM
ZOOM lets you enlargethe video imageduring playback and
pan through theenlarged image.
1. Press ZOOM repeatedly during video playback to enlarge
the image tox 2, x3,x 4,x1/2, x1/3,x1/4 times ofthe normal
size.
2. Press ZOOM and repeatedly press or while
displaying JPEG fileand Picture CDdisc to zoomin the
picture at 125%,150% or 200%and zoom outthe picture
at 50% or75%.
Use direction keys( and )to move around(pan and
scan) the enlargedvideo or picture.
You can play a chapter, a track, a title, a file or the entire disc
repeatedly.
1. During playback,repeatedly press REPEAT to choose a
Repeat option. Dependingon the typeof disc, theRepeat
options may bedifferent.
2. To cancel repeat playback, repeatedly press REPEAT until
no message appearsat the upperleft corner ofthe display.
to start playingthe bookmarked scene.The playback
continues until theend of thedisc. Repeat the above to play the
other marked scenes.
Playing a Disc
~ 17 ~
Playing a Disc
Mute
Press MUTE to silence the audio, press MUTE again to restore it.
Displaying disc's MENU/PBC
During DVD playback,press MENU/PBC to return tothe disc's
Start Menu. Ifthe disc doesnot have theStart Menu, ordiscs
that refuse MENUfunction, appears.
For VCD playback,press MENU/PBC to turn on/off PBC
(Playback Control). IfPBC is enabled,a menu ofscene's
thumbnails will appear, you canmake selection forplayback.
Repeatedly press LANGUAGE during DVD playback to change
the language ofthe voice ifthe disc hasmultiple languages.
This function isonly valid forDVDs.
LANGUAGE
Repeatedly press SUBTITLE during DVD playback to change
the subtitle's languageIf the dischas multiple subtitle's
languages.This function isonly valid forDVDs.
Subtitle
TITLE
Press TITLE, it takesyou to thevery beginning ofthe title and
play, or to theMENU if it hasa title menu.
DISPLAY
Repeatedly press DISPLAY during playback to display various
playback information suchas current title,chapter, track
elapsed time, languagesetc.
L/R
This function ismostly used forkaraoke (sing along)discs, by
repeatedly pressing L/R,you can selectSTEREO, MONO
(Left), MONO (Right),MIX MONO etc.
P/N
This is usedwhen you connectthe Player toa TV and watch
video on theTV. Repeatedly press P/Nto select NTSC,PAL
and AUTO to matchthe system ofyour TV.
The LCD screendoes not haveNTSC or PAL, so if you watch
video on thePlayer's screen, itis recommended toset it to
NTSC which willgive a bettervideo quality. The player will
play both PAL or NTSC DVD's titles even when the Player is
set to NTSC.
Repeatedly press ANGLE during DVD playback to change the
camera angle ifthe disc hasdifferent camera angles.
This function isonly valid forDVDs.
Angle
1. On theremote control: pressSETUP at any timeto enter
Setup menu.
2. On thePlayer: remove USBflash drive anddisc from the
Player, thenpress SETUP to enter Setupmenu.
Displaying the OSD Setup Menu

~ 18 ~
Playing MP3 and Regular Audio CD
Your MP3 files should be ISO 9660 or JOLIET format.
Valid MP3 CD
Play
In most cases,when an MP3or audio discis placed intothe
player, thefirst song fileof the firstfolder plays.
In other cases,the file managerappears. Use directionkeys
( and ) to select the song file andpress to play.
Table of contents
Other DGTEC Portable DVD Player manuals


