DHK Storage PopDrive User manual

POPDRIVE
USER’S GUIDE
VERSION 0.91
FEBRUARY 4, 2011

ii
Copyright © 2010-11, DHK Storage, LLC
All rights reserved. No part of this publication may be reproduced, transmitted, transcribed, or translated into any
language or computer format, in any form or by any means without prior written permission of:
DHK Storage, LLC
21010 Southbank St #100
Sterling, VA 20165
The DHK logo is the registered trademarks of DHK Enterprises, Inc. ("DHK Enterprises") in the United States and other
countries. The DHK logo is provided to DHK Storage, LLC via a licensing agreement. The popdrive logo is a trademark of DHK
Storage, LLC
The information contained in this document is provided by DHK Storage, LLC merely as a courtesy and is, to the knowledge of
DHK Storage, accurate. However, DHK Storage is under no obligation to update and/or keep current the information contained
in the document. DHK Storage disclaims any and all liability resulting from the use of the information contained in this
document and any reliance on such information shall be at the sole risk of the relying party. DHK Storage expressly reserves the
right to change the information contained herein without notice.
The Silicon Image name and logo and SteelVinename and logo are trademarks ofSilicon Image.
Windows is a registered trademark of Microsoft Corporation in the United States and other countries.
Apple, Mac, Time Machine and MacOS are trademarks of Apple Computer, Inc., registered in the United States and other
countries.
Roxio and Retrospect are trademarks of Roxio in the United States and other countries.
Linux is a trademark of Linus Torvalds.

iii
Please check the popdrive.com website
to see if there is an updated version of
this document prior to reading further.

iv
Table of Contents
I. PopDrive Features ................................................................................................................. 1
A. Notes for non-Computer Gurus ........................................................................................... 1
B. Notes for Computer Gurus................................................................................................... 2
C. Known Issues / Future Software Releases........................................................................... 3
II. Quick Start Guide.................................................................................................................. 4
A. Installation Overview......................................................................................................... 4
B. Software Installation............................................................................................................ 4
C. Inserting the Hard Drives..................................................................................................... 4
D. Connecting the Data Cable –USB or eSATA?................................................................... 5
E. Create the Hard Drive Array................................................................................................ 6
F. Verify the Hard Drive Array.............................................................................................. 10
G. Create and Format the Drive Partition............................................................................... 12
III. Using the SteelVine Manager............................................................................................... 21
A. Running the SteelVine Manager........................................................................................ 21
B. The SteelVine Interface ..................................................................................................... 24
C. Basic Configuration........................................................................................................... 26
Configure Volumes............................................................................................................... 29
D. Advanced Configuration.................................................................................................... 33
E. View Policy Settings.......................................................................................................... 34
F. Rebuilding Drives.............................................................................................................. 35
Start Rebuild ......................................................................................................................... 36
Abort Rebuild........................................................................................................................ 36
G. Manual Verification........................................................................................................... 36
H. Scheduled Verification....................................................................................................... 38
Create a New Schedule......................................................................................................... 38
Modify/Delete Verification Schedule................................................................................... 39
I. E-Mail Notifications .......................................................................................................... 39
J. Pop-Up Error Notification ................................................................................................. 43
K. SteelVine Administration................................................................................................... 44
Changing the Administrative Password................................................................................ 44

v
Manage Configuration Files ................................................................................................. 45
Manage the Client Connection to the Daemon..................................................................... 47
Install New Firmware ........................................................................................................... 48
Install New SteelVine Manager Software............................................................................. 50
L. Monitoring ......................................................................................................................... 51
M. Event Log....................................................................................................................... 53
N. Features not implemented.................................................................................................. 54
IV. Safely Removing the PopDrive from your Computer .......................................................... 55
When using the USB port ......................................................................................................... 55
When using the eSata port......................................................................................................... 56
V. In Case of Emergency –Don’t Panic.................................................................................... 57
How to recover from a Hard Drive crash.............................................................................. 57
Appendix A –Technical Specifications ....................................................................................... 58
Appendix B –Warranty Information............................................................................................ 59

1
I. PopDrive Features
Thank you for purchasing the PopDrive. We created the PopDrive to give you a small, fast, and
portable external hard drive that you can safely save your data on. Many people are expanding
the data storage on their computers by buying external hard drives. The only problem with that
strategy is that 99% of all of the external hard drives out there have the same problem as internal
hard drives. Sometimes they crash and the user loses all of their data.
While the PopDrive has a number of great features, the main feature that we believe that you are
going to use it for is the safety function of having dual hard drives. When configured and
operated correctly, you should never lose your data, even if a single hard drive fails.
Here is the short list of features of the PopDrive:
1. The PopDrive holds two Sata hard drives.
2. While the PopDrive is currently sold with either 500Gb or 750Gb hard drives, it is
upgradable with any 2.5” Sata hard drive that is no more than 10.5mm high.
3. When configured in RAID1 mode, all data is copied to both hard drives at the same time.
The drives will be mirror images of each other.
4. Supports RAID0 and JBOD mode as well.
5. When loaded with two hard drives, it weighs about 21 ounces.
6. The PopDrive has a USB2.0 and eSata port.
7. When operated via eSata, the hard drives are hot-swappable.
8. The PopDrive includes the SteelVine management software package.
9. The SteelVine software is used to configure the PopDrive.
10. The SteelVine software is configured to inform the user of a number of events on the
PopDrive including: hard drive failure, connection and removal from the computer,
device temperature, and more.
11. When set up, the SteelVine software can send e-mail notices of the events listed above.
A. Notes for non-Computer Gurus
Most non-Computer people will appreciate the fact that the PopDrive will appear as a single hard
drive on your computer. This makes it very easy to use. It is important to note that it also
operates like any other hard drive as well. If you delete a file from the PopDrive, it will be
deleted from both hard drives. Please keep this in mind.
If your goal is to prevent data loss from accidental deletion, we strongly recommend that you
implement a backup software program with the PopDrive or consult a computer professional.
The safety features of the PopDrive are designed to keep you from losing data in the event of a

2
hardware failure, not user error. Backup software like Apple’s Time Machine or Roxio’s
Retrospect are designed to protect from the loss of data due to user error. These backup software
programs as well as many others are fully compatible with the PopDrive. DHK Storage has
chosen to not include backup software with the PopDrive for the following reasons:
Doing so would unnecessarily raise the cost of the PopDrive. If you already have a
backup software package that you like to use, you would be paying for something that
you don’t need.
We do not want to limit you to a software package that is bundled with the device. At the
popdrive.com store, we offer a number of backup software packages that work well with
the PopDrive.
Backup software is not necessary to take advantage of the hard drive mirroring function
of the PopDrive. Please note, backup software is only necessary if you are looking to
protect yourself from the accidental deletion of data.
The first time setup of the PopDrive can run as long as 10 –15 hours depending on the size of
your hard drives. Most of this time is spent on the mirroring of the hard drives for the first time.
We suggest that you begin the process at night so that you can use the PopDrive the following
morning. The first time setup does require a little patience, but the safety that the device provides
is worth it.
Last, many non-computer users are not familiar with setting up a mirrored hard drive system.
Please read through the Quick Start guide carefully. If you have any questions or are unsure of
what you are doing, please go to the popdrive.com website. There are a number of support
guides and venues available there.
B. Notes for Computer Gurus
If you are reading this section you are probably very familiar with RAID1 array setups. The
quick start guide below should be easy for you to follow. There is nothing out of the ordinary in
our process versus any other RAID1 setup you have performed.
The best features of this device that you should implement are the e-mail alerts. If setup
correctly, you should be able to receive notices from all of your customer’s PopDrives. This will
allow you to be informed when the correct PopDrive is attached to the customer computer, when
it is removed from the computer, and let you know when a hard drive fails. If you point all of
your customer’s PopDrives to a single e-mail account, you will be able to manage your customer
backups and hard drive arrays better than 99% of your competitors.
In addition, the PopDrive keeps an internal event log. Please see the section, “Event Log” later in
this manual for details.

3
Last, it is important to note the SteelVine management software installs itself both as a system
tray program and as a Windows service (daemon).
If you have any questions about the PopDrive, please see the support offerings at the
popdrive.com website. We do offer different levels of support for PopDrive resellers. Please see
the website for details.
C. Known Issues / Future Software Releases
DHK Storage is aware that the SteelVine manager for the PopDrive is somewhat complicated for
the general computer user. We are in the process of developing an easier version of the software
that should be released in the summer of 2011. If there is a feature that you would like to see in
the future program, please let us know. Our goal is to make the management software as
functional and easy to use as possible. Please send your suggestions to features@popdrive.com.
4
II. Quick Start Guide
A. Installation Overview
In order to get up and running with your PopDrive, here is an overview of the first-time
installation of the device:
1. Install the PopDrive Management software onto your computer.
2. Insert the hard drives into the PopDrive.
3. Connect the PopDrive to your computer.
4. Insert the power connector into the PopDrive
5. Build the hard drive array
6. Verify the hard drive array
7. Create the drive partition
8. Format the partition
When the partition has been formatted, the PopDrive will appear like any other hard drive on
your system. Please remember that once this is done, even though it will appear as one hard
drive, your data will always be copied onto both hard drives at the same time if you set it in
RAID1 (SAFE) Mode.
You can always check the status of the hard drive configuration of the PopDrive by running the
SteelVine management software.
B. Software Installation
Once you have inserted the CD into your computer, please navigate to the folder matching the
operating system of your computer. Inside each folder is an appropriate program to execute that
will install all software drivers and management software for the PopDrive.
After installing the software, you must restart your
computer before moving on to the next step!
C. Inserting the Hard Drives
In order to open the hard drive doors, use your fingernail to slide the silver latch downwards
(towards the opposite side of the door or the hinge).
Once the door is open, slide the hard drive in until it rests on its own. Do not force or push the
hard drive into place. Tilt the PopDrive drive vertically so that the hard drives fall to their natural
resting point. When the hard drive is resting in place, close the door. As you close the door, the
hard drive will automatically slide into the proper location and attach to the internal connector.

5
When the door is nearly closed, you should encounter a small amount of resistance and then
click when complete.
Please use the following picture to make sure that you have put the hard drives in correctly.
When the door hinge is on the right, the hard drive label side should be facing up. If you attempt
to install the drives upside down, the PopDrive doors will not close.
D. Connecting the Data Cable –USB or eSATA?
On the back of the PopDrive, there are two data ports, one is USB2.0 and the other is eSata.
There are a number of differences between the two. The USB port runs at 480Mb/s and is one of
the most common data ports available on computers today. If you don’t have an eSata port on
your computer, you should plug the PopDrive into the USB port.
WARNING - It is very important that you do not disconnect the PopDrive from your
computer without safely removing it from your computer when using the USB cable. Not
following this step can potentially cause damage to the data on your PopDrive. There are a few
ways to safely remove the PopDrive. Please see the section in this manual titled “Safely
Removing the PopDrive from your Computer”.
There are some big advantages for using the eSata port if you have one on your computer. If you
don’t have one, please go to the popdrive.com website to find a compatible eSata card for your
computer.
The best feature of eSata is speed. An eSata port runs at 3Gb/s. In addition, when using the eSata
cable, the hard drives are hot-swappable. This means that you can remove an unused or bad hard
drive while the PopDrive is connected to the computer. You can also add a new hard drive while

6
the PopDrive is connected as well. Please remember, this only applies when you have connected
the PopDrive to your computer with an eSata Cable.
WARNING –DO NOT CONNECT AN ESATA AND USB CABLE TO THE POPDRIVE
AND YOUR COMPUTER AT THE SAME TIME. DOING SO RISKS DAMMAGING
THE DATA ON THE POPDRIVE AND YOUR COMPUTER.
E. Create the Hard Drive Array
1. Select Configure Box from the Edit menu or click the Configure Box toolbar button to
open the Basic Configuration Wizard.
2. When prompted, enter the administrator password. The default password is admin.

7
3. Select a storage policy in the Storage Policy frame.
Even though the picture shows the BIG policy, we strongly recommend using the SAFE (RAID
1) policy.
Policy
Description
SAFE (RAID 1) RECOMMENDED
Creates one volume. One hard drive mirrors
the other. The system automatically restores
data redundancy to a SAFE volume when an
offline drive comes back online.
JBOD (bypass)
Creates a logical volume for each physical
hard drive. Available only for SATA host
controllers that provide Port Multiplier
support, and only available for the top-level
node of a cascaded configuration.

8
BIG
Concatenates all hard drives into a single
volume.
SAFE33
Not recommended for the PopDrive.
SAFE50
Not recommended for the PopDrive.
FAST (RAID 0)
Not recommended for the PopDrive.
4. When prompted to acknowledge that the configuration change may result in data
loss, click Yes to accept the configuration.
9
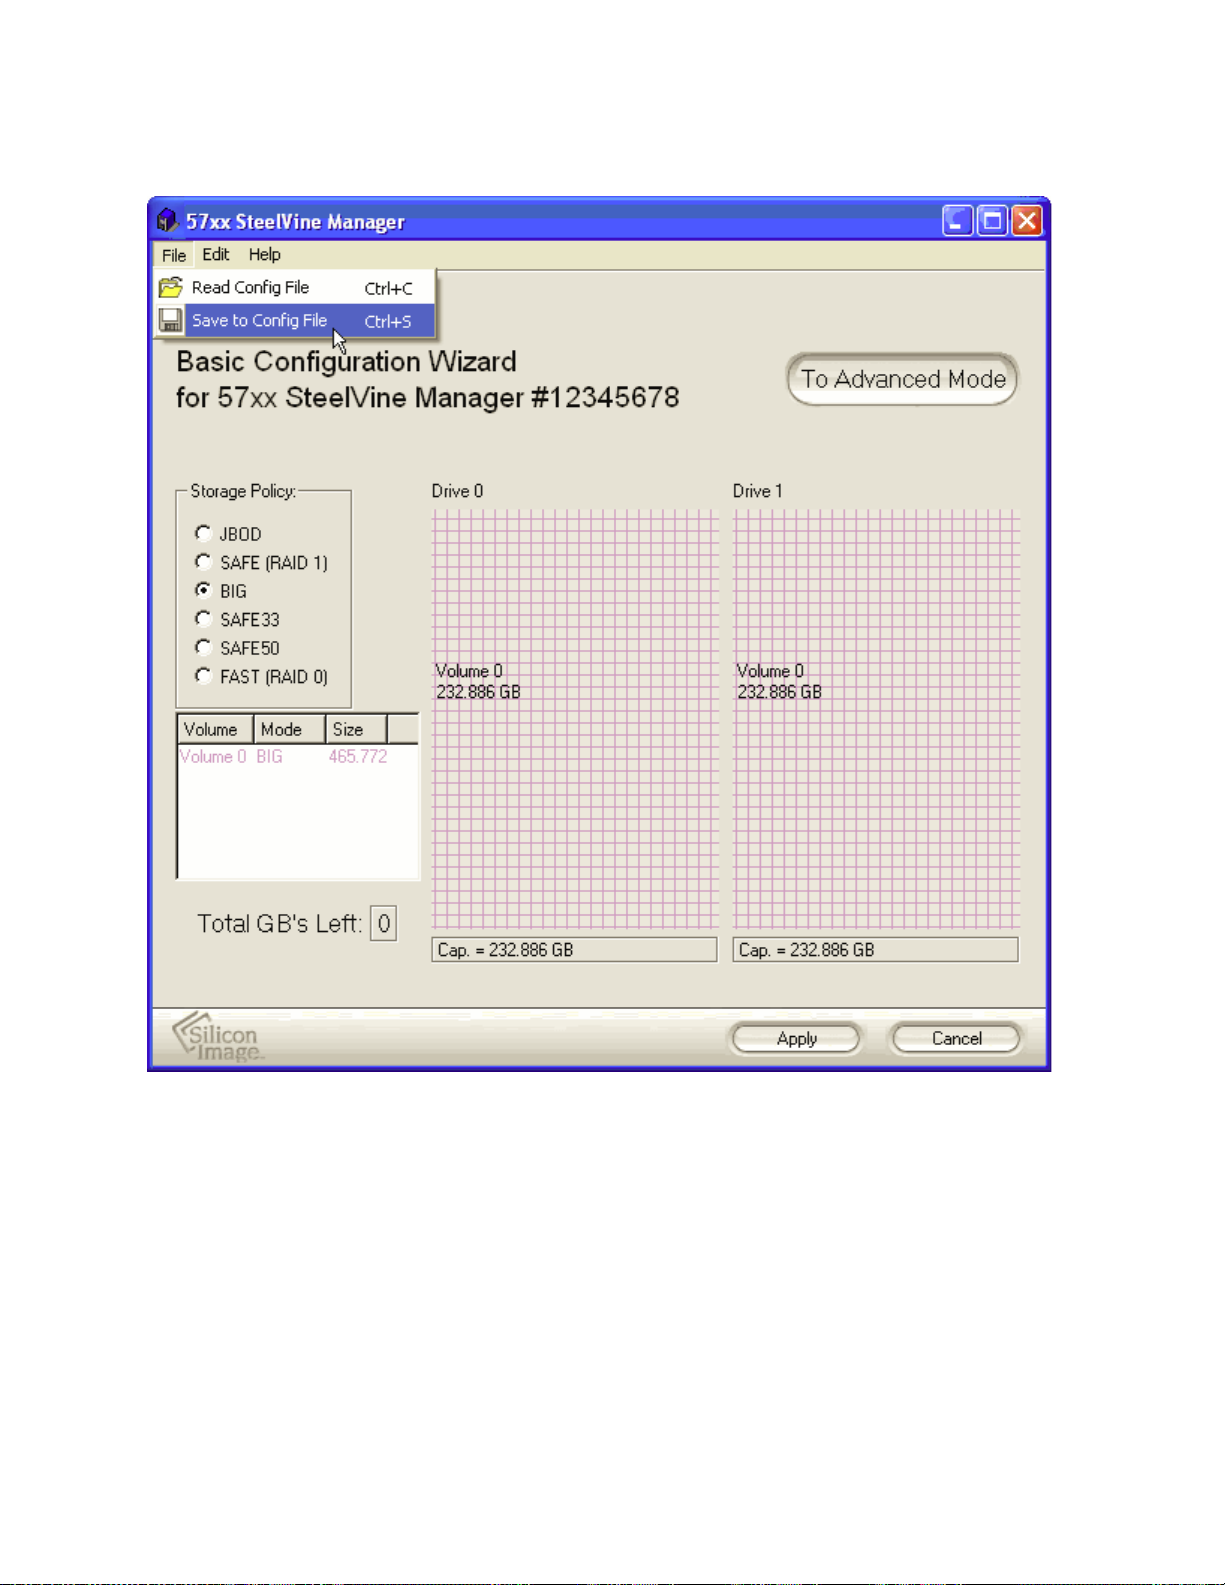
5. Select Save to Config File from the File menu or click the Write configuration
for system to a file toolbar button to save the configuration.
Even though the picture shows the BIG policy, we strongly recommend using the SAFE (RAID
1) policy.

10
6. Click Apply to create the selected configuration, close the Wizard, and display the
volumes in the Status Window (may take up to one minute to display).
Even though the picture shows the BIG policy, we strongly recommend using the SAFE (RAID
1) policy.
7. Partition the configured volumes to complete the implementation. Refer to section
II-G Create and Format the Drive Partition for details.
F. Verify the Hard Drive Array
To confirm that the two hard disks that comprise a single SAFE (RAID1) volume are exact
copies, you can execute a Verify Disk task manually.

11
When the SteelVine manager is open and you select “Start Verify”, there is a 60 second delay.
The “Start Verify” selection will be disabled during this time. Otherwise, if the drive is in
normal or verify abort mode, you can manually start the verify operation.
A pop-up will inform you of the action taking place.

12
G. Create and Format the Drive Partition
You must partition volumes for the host computer’s operating system before you can store data
on the volumes. Refer to the operating system’s documentation for further guidance.
On Windows
1. Right-click the My Computer icon on your desktop and select Manage from the
pop-up window.
13
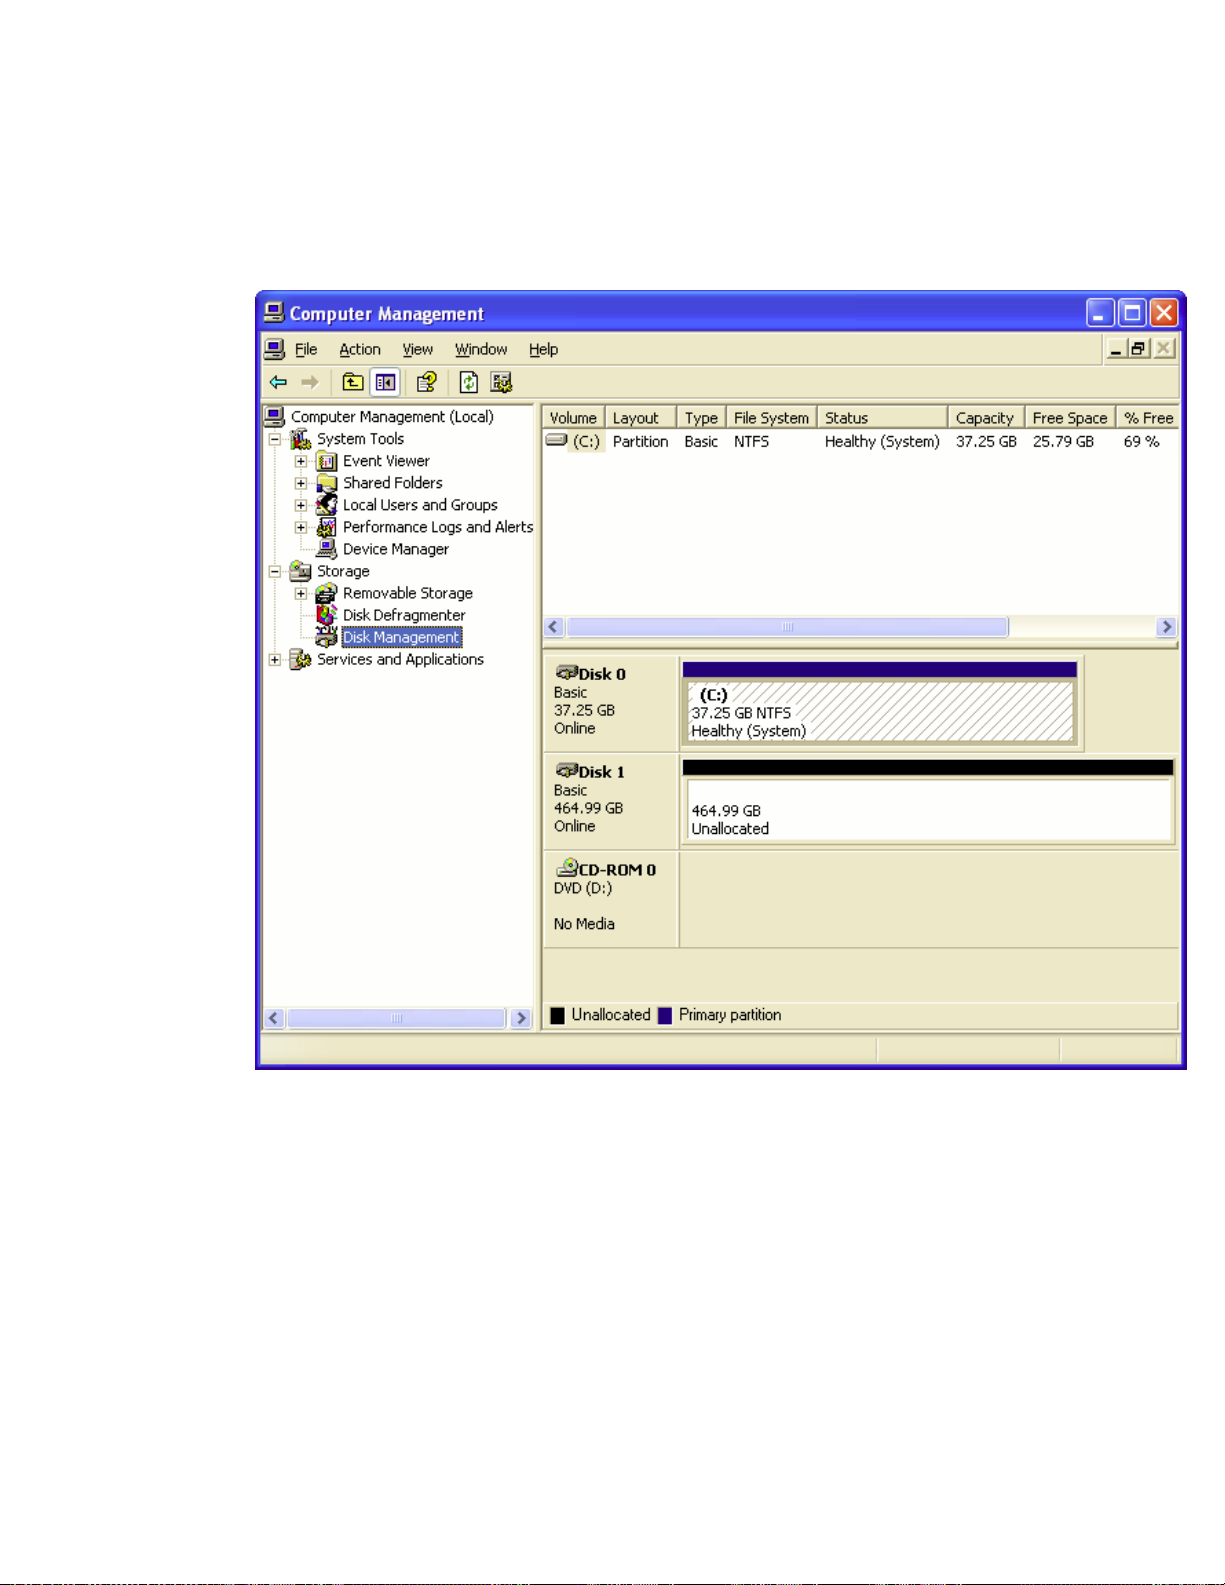
2. Select Disk Management under Storage to open the Windows Disk Manager.
This example illustrates the SAFE storage policy, which duplicates the data on
both hard drives connected to the PopDrive. Every disk should appear with the
word “Basic”, a size value that shows the available storage capacity, and a
status of “Online”. Instead of Basic, a disk could appear Unknown, Dynamic, or
Not Initialized.
If the disk appears as “Unknown”, right-click the disk icon and select Write
Signature. A window opens with the selected disk (all Unknown disks may
appear in this window). Make sure the box next to each disk is checked and click
OK. The disk should now be marked as a Basic disk.
If a disk appears as “Dynamic”, right-click the disk icon, and select Revert to
Basic Disk. Within a few seconds, the disk should be marked as a Basic disk.
If a disk is marked “Not Initialized”, right-click the disk icon and select Initialize
Disk. An additional dialog box appears allowing you to select which disks to
initialize. Uncheck the SteelVine Processor Disk item and click OK. Within a few
seconds, the selected disk(s) should be marked as a Basic disk.
14
Note: The disk numbers in the Windows Disk Manager may be different from the Volume
numbers shown in the SteelVine Manager Status Window, Basic Configuration Wizard, or
Advanced Configuration Wizard. Be sure that you select the correct disk based on the
expected disk capacity to create a partition.
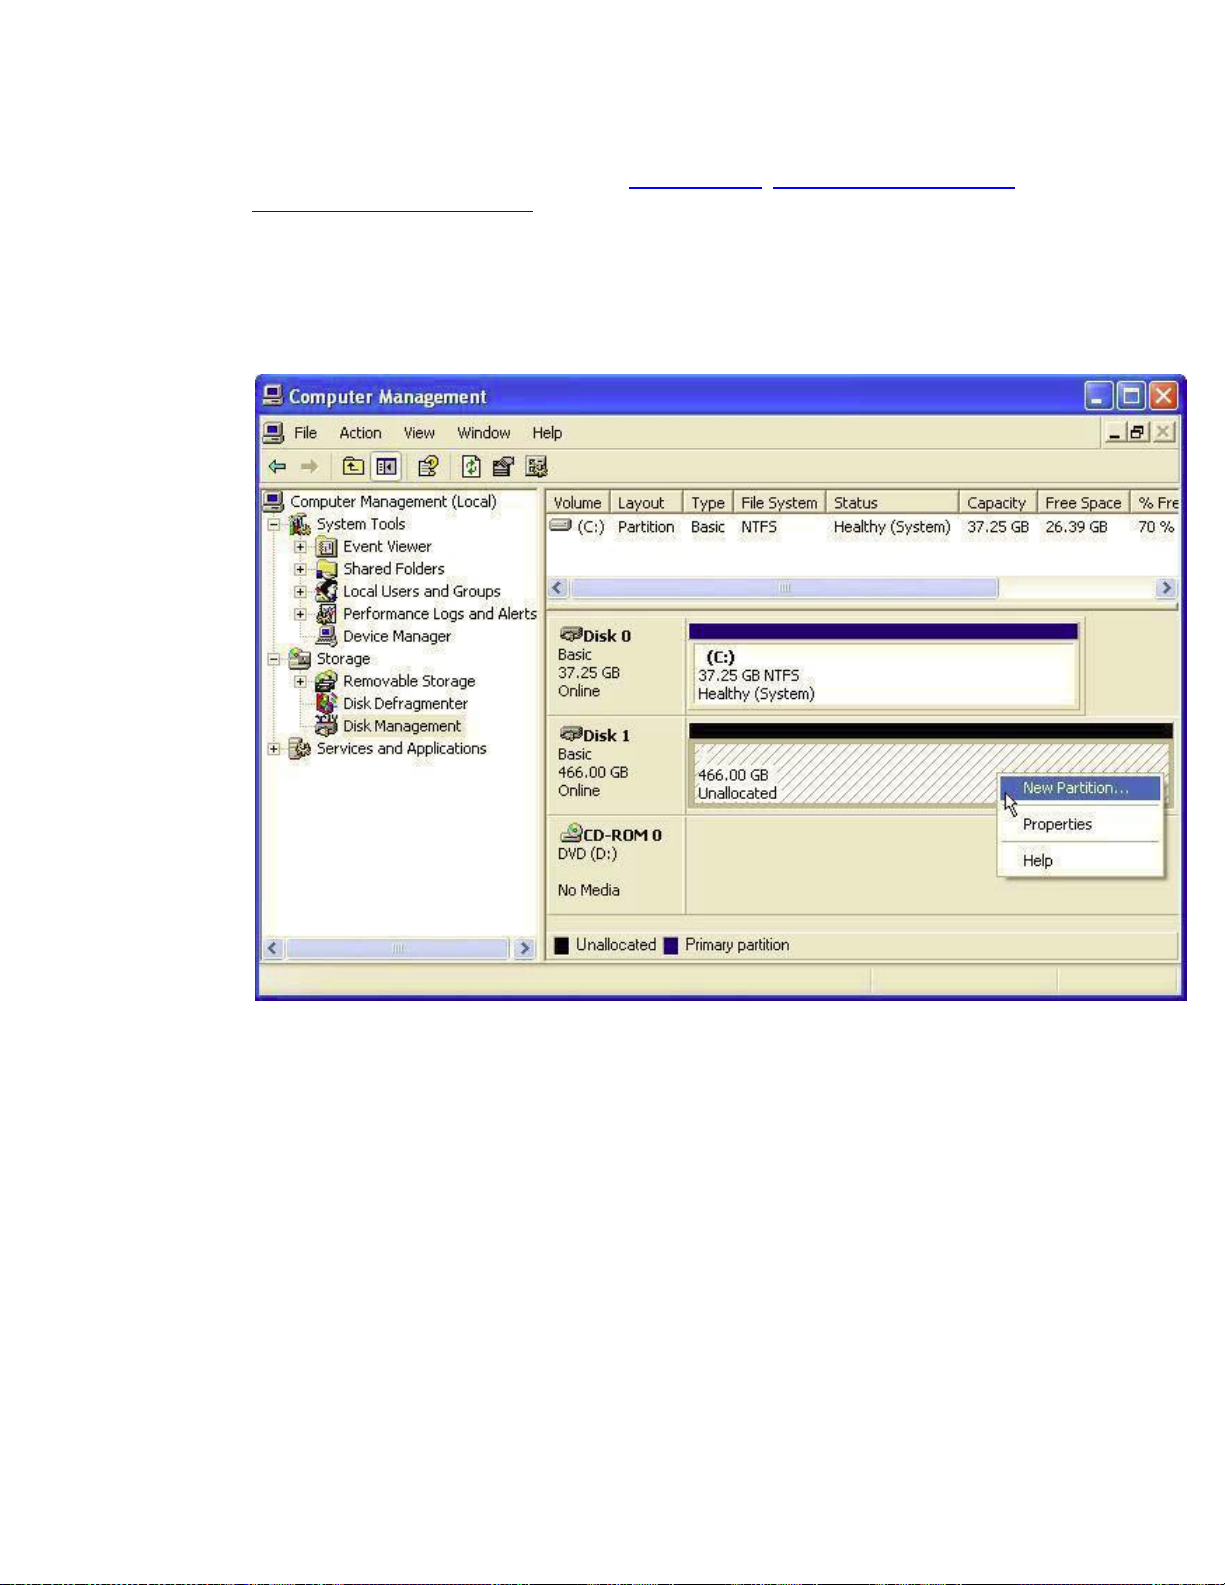
3. Right-click the configured disk’s unallocated space and select New Partition. If
the New Partition option is not available, select the disk and initialize it first. To do
this, right-click on the disk item and select "Initialize Disk".

15
4. Click Next to start the Partition Wizard.
5. Select the Primary or Extended option and click Next.
Table of contents
Popular Storage manuals by other brands


Verbatim
Verbatim Vi3000 How to install

welland
welland NetShare GX ME-752GNS Quick install guide

ASROCK
ASROCK 4Core1600P35-WiFi Installation and configuration guide

Spectra Logic
Spectra Logic T-Series Spectra T120 Power Supply Replacement Instructions

Fujitsu
Fujitsu ETERNUS SF Express V16.6 Migration guide

AMS
AMS Venus T5c DS-2350C user manual