manuals.online logo
Brands
  1. Home
  2. •
  3. Brands
  4. •
  5. Di-soric
  6. •
  7. Switch
  8. •
  9. Di-soric KDCT 08 V 03 G3-T3 User manual

Di-soric KDCT 08 V 03 G3-T3 User manual

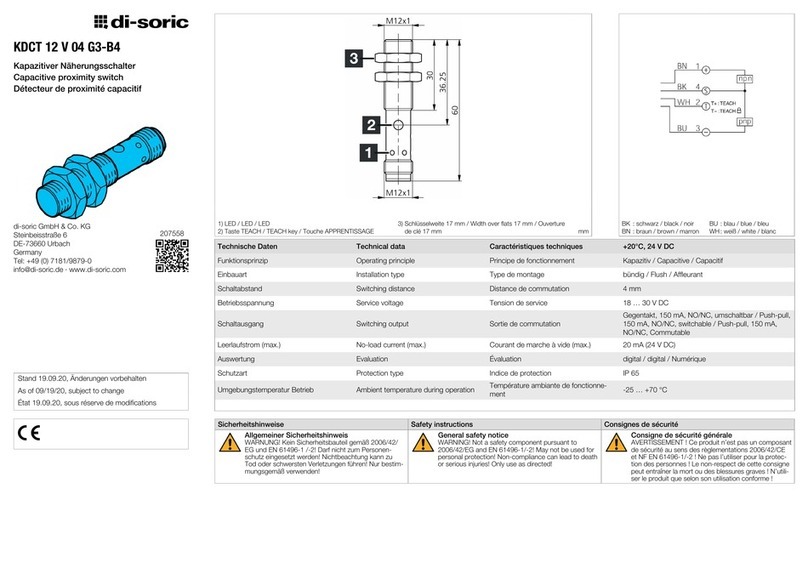
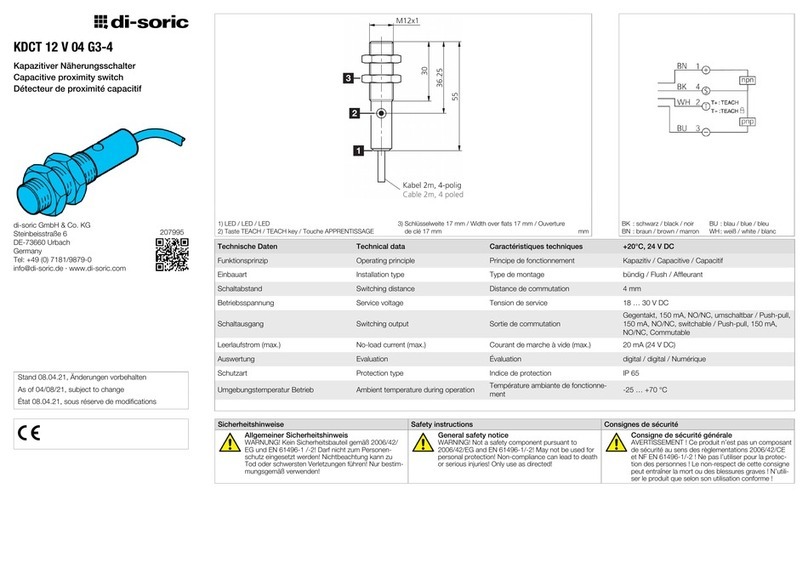
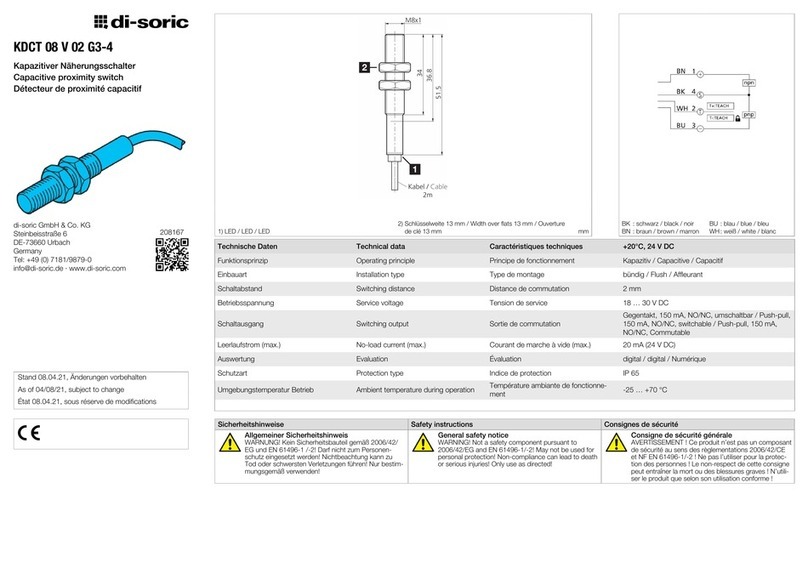
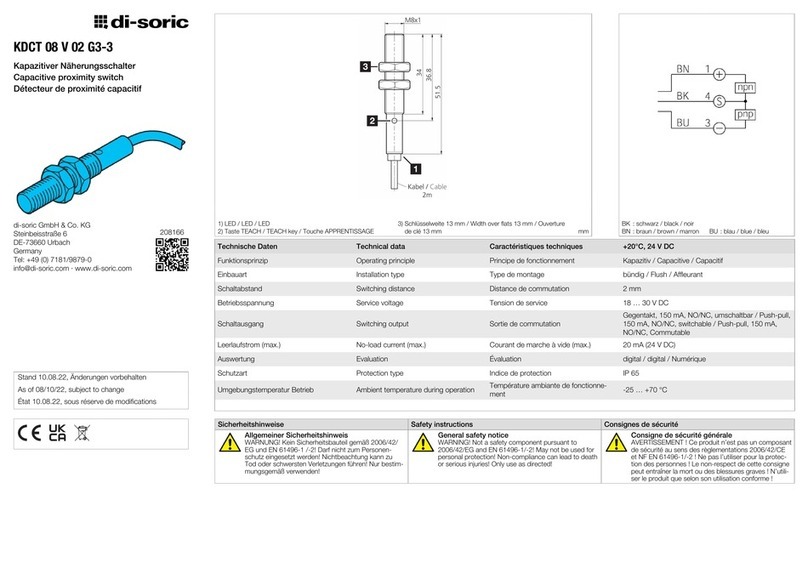
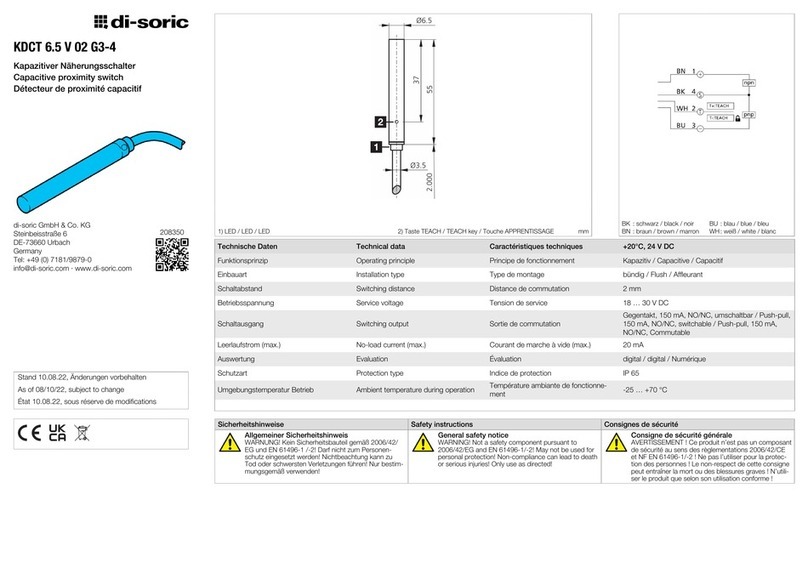
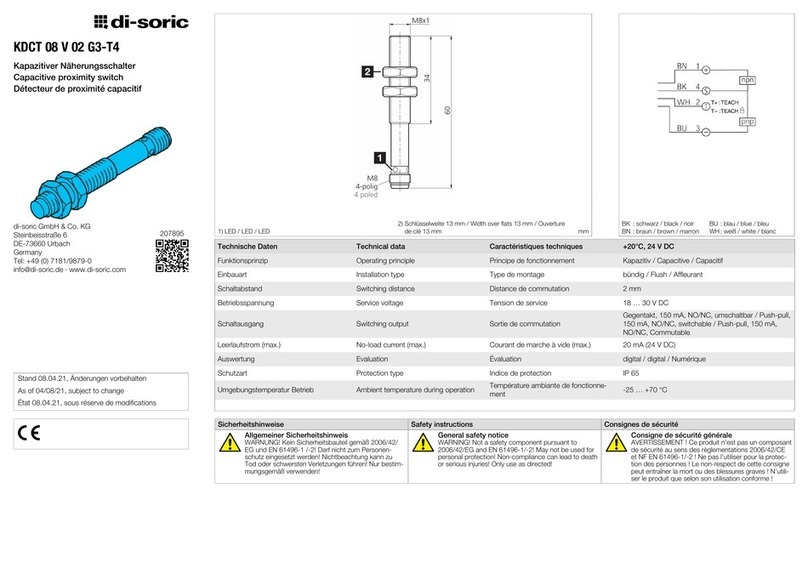
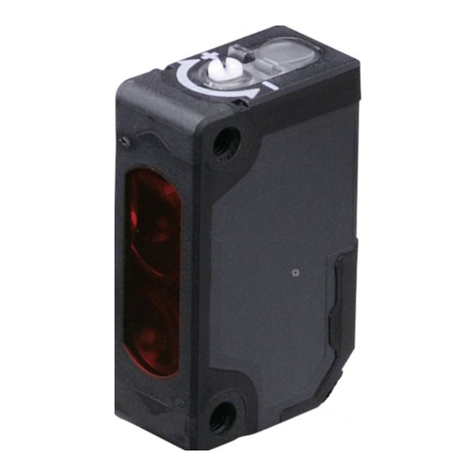
KDCT 08 V 03 G3-T3
Kapazitiver Näherungsschalter
Capacitive proximity switch
Détecteur de proximité capacitif
di-soric GmbH & Co. KG
Steinbeisstraße 6
DE-73660 Urbach
Germany
Tel: +49 (0) 7181/9879-0
[email protected] ∙ www.di-soric.com
209387
Stand 19.09.20, Änderungen vorbehalten
As of 09/19/20, subject to change
État 19.09.20, sous réserve de modifications
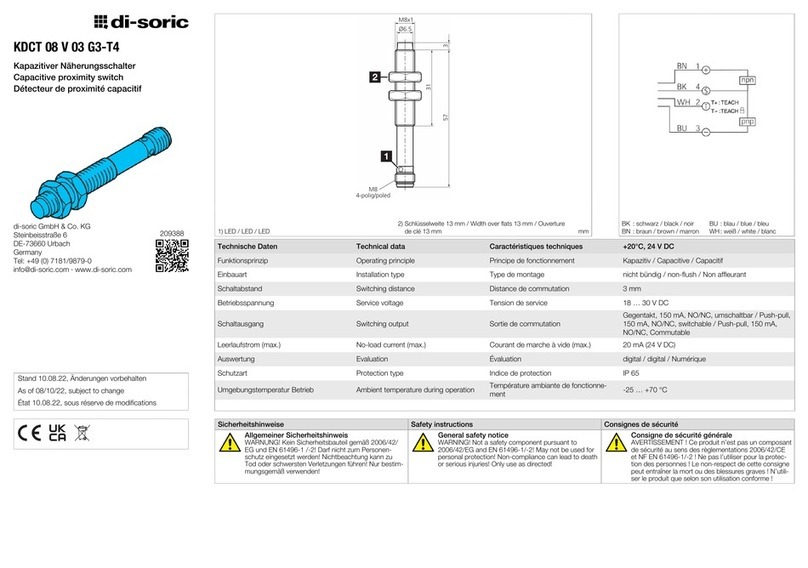
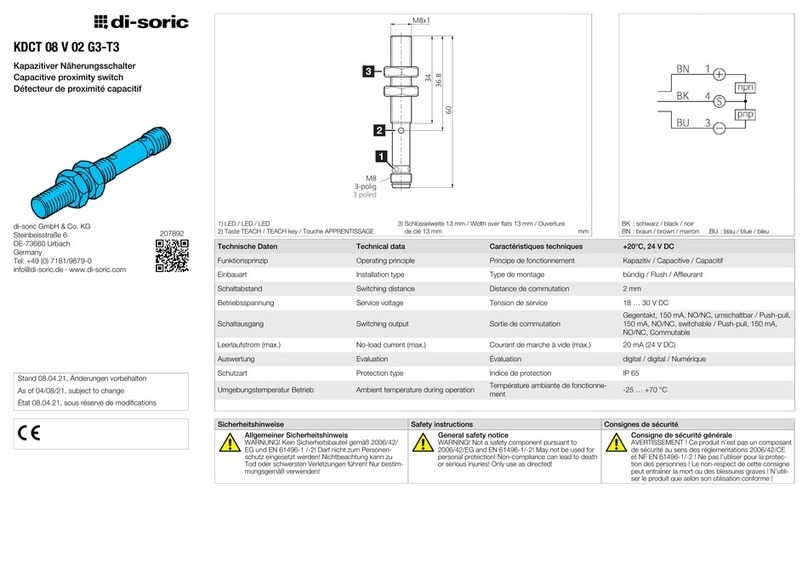
1) LED / LED / LED
2) Taste TEACH / TEACH key / Touche APPRENTISSAGE
3) Schlüsselweite 13 mm / Width over flats 13 mm / Ouverture
de clé 13 mm mm
BK : schwarz / black / noir
BN : braun / brown / marron BU : blau / blue / bleu
Technische Daten Technical data Caractéristiques techniques +20°C, 24 V DC
Funktionsprinzip Operating principle Principe de fonctionnement Kapazitiv / Capacitive / Capacitif
Einbauart Installation type Type de montage nicht bündig / non-flush / Non affleurant
Schaltabstand Switching distance Distance de commutation 3mm
Betriebsspannung Service voltage Tension de service 18 … 30V DC
Schaltausgang Switching output Sortie de commutation
Gegentakt, 150mA, NO/NC, umschaltbar / Push-pull,
150mA, NO/NC, switchable / Push-pull, 150mA,
NO/NC, Commutable
Leerlaufstrom (max.) No-load current (max.) Courant de marche à vide (max.) 20mA (24V DC)
Auswertung Evaluation Évaluation digital / digital / Numérique
Schutzart Protection type Indice de protection IP 65
Umgebungstemperatur Betrieb Ambient temperature during operation Température ambiante de fonctionne-
ment -25 … +70°C
Sicherheitshinweise Safety instructions Consignes de sécurité
Allgemeiner Sicherheitshinweis
WARNUNG! Kein Sicherheitsbauteil gemäß 2006/42/
EG und EN 61496-1 /-2! Darf nicht zum Personen-
schutz eingesetzt werden! Nichtbeachtung kann zu
Tod oder schwersten Verletzungen führen! Nur bestim-
mungsgemäß verwenden!
General safety notice
WARNING! Not a safety component pursuant to
2006/42/EG and EN 61496-1/-2! May not be used for
personal protection! Non-compliance can lead to death
or serious injuries! Only use as directed!
Consigne de sécurité générale
AVERTISSEMENT! Ce produit n’est pas un composant
de sécurité au sens des règlementations 2006/42/CE
et NFEN61496-1/-2! Ne pas l’utiliser pour la protec-
tion des personnes! Le non-respect de cette consigne
peut entraîner la mort ou des blessures graves! N’utili-
ser le produit que selon son utilisation conforme!
KDCT 08 V 03 G3-T3
电容式接近开关
di-soric GmbH & Co. KG
Steinbeisstraße 6
DE-73660 Urbach
Germany
Tel: +49 (0) 7181/9879-0
[email protected] ∙ www.di-soric.com
209387
版本 20.09.19,保留变更权
1) LED
2) 示教按钮 3) 开口度 13 mm mm
BK : 黑色
BN : 棕色 BU : 蓝色
技术数据 +20°C, 24 V DC
工作原理 电容式
内装方式 非齐平
感应距离 3mm
工作电压 18 … 30V DC
开关输出端 推挽式, 150mA, NO/NC, 可切换
空载电流(最大) 20mA (24V DC)
评估 数字量
防护等级 IP 65
工作环境温度 -25 … +70°C
安全提示
一般安全提示
警告!没有符合 2006/42/EU 和 EN 61496-1 /-2 标准
的安全结构件!不得用于人身安全保护!不遵守规定
会导致死亡或重伤危险!仅按规定使用!
Kapazitiver Näherungsschalter Capacitive Proximity Switch Détecteur capacitif de proximité
KDCT 6.5 … KDCT 08 …
Näherungsschalter montieren und die Versorgungsspannung
anlegen.
Mount the proximity switch and connect to power. Monter et raccorder le capteur.
Definition Zustand 1 und 2 Definition state 1 and 2 Définition de la position 1 et 2 :
Schaltpunkt definieren, 2-Punkt-Teach: Set switching point, 2 point teach: Avec la fonction Teach externe :
Zustand 1 herstellen
Teach-Taste mit dem beigelegten Werkzeug für
min. 2 Sek. drücken.
Nach Ablauf von 2 Sek. leuchtet die LED.
Nach Lösen der Teach-Taste wird Zustand 1 gespeichert.
Die LED blinkt schnell und fordert zur Eingabe für
Zustand 2 auf.
Zustand 2 herstellen
Teach-Taste innerhalb 20 Sek. erneut < 1 Sek. drücken.
Nach Lösen der Teach-Taste wird Zustand 2 eingelernt.
Create state 1
Press teach key with the tool with for at least 2 seconds.
After a period of 2 sec. the LED flashes.
Release the teach button and state 1 will be stored.
The LED quickly flashes and the command for state 2 is
requested.
Create state 2
Press the teach-in button again within 20 sec. for < 1 sec.
After releasing the teach button state 2 is stored
Création de la position 1 :
Maintenir le bouton Teach avec l’outil pendant au moins 2
sec.
Attendre que les LED clignotent après env. 2 sec.
Relâcher le bouton Teach et la position 1 sera enregistrée.
Les LED clignotent et la position 2 est à définir.
Création de la position 2 :
Presser le bouton Teach pendant quelques sec.
Après relâchement, la position 2 sera enregistrée.
Erfolgt innerhalb 20 Sek. kein zweiter Tastendruck so wird
der Schaltpunkt im Bereich von Zustand 1 abgespeichert.
If the button will not be pushed one more time within
another 20 sec. the switching point will be stored in the field
of state 1.
Si le bouton Teach n‘est pas préssé (ou une tension appli-
quée à la borne 2) une fois de plus pendant 20 secondes, le
point de commutation sera enregistré dans le champ de la
position 1.
LED-Anzeige: LED-Display: Indications LED :
2x Blinken: Der Teach-Vorgang ist abgeschlossen, der
Sensor nimmt seinen normalen Betrieb auf.
2 x flashing: The teach procedure is finished, the sensor
runs in regular operation
Clignotement
2x
La procédure d‘apprentissage est terminée,
le capteur retourne en mode de fonction-
nement.
Der Schaltpunkt (SP) liegt zwischen Zustand 1 und 2.
Die Größe der Hysterese ist abhängig von der Differenz
zwischen Zustand 1 und Zustand 2.
Größerer Unterschied --> größere Hysterese
The switching point (SP) is between state 1 and 2.
The size of the hysteresis depends on the difference between
state 1 and state 2.
Larger difference –> larger hysteresis
Le point de commutation (SP) se situe entre la position 1 et 2.
L‘hystérésis dépend de la différence entre la postion 1 et la
position 2.
Large différence –> large hystérésis
NO oder / or NC
Alle Zustände gelten für den Betrieb „NO“ (Auslieferungs-
zustand); bei Betrieb „NC“ verhält sich der Schaltausgang
umgekehrt.
All states are valid for „NO“ (condition of supply) when
running on “NC” the switching output is vice versa.
Par défaut, le fonctionnement de la sortie est NO, il est
possible d‘inverser son fonctionnement.
Betriebsart NO/NC-Umschaltung:
Teach-Taste länger als 6 Sek. betätigen, die LED blinkt 3x.
Der Sensor wechselt nach Lösen der Taste in die andere
Betriebsart.
Change of mode NO/NC:
Press the teach button for longer than 6 sec. and the LED will
flash three times. After releasing the teach button the sensor
will change the operation mode.
Fonctionnement NO/NC :
Connecter Ub (alimentation) à la borne Teach pendant au
moins 6 sec. Les LED clignoteront 3 fois.
Après déconnexion, le capteur changera le mode de fonc-
tion.
This manual suits for next models

1

Other Di-soric Switch manuals

Di-soric KDCT 08 V 02 G3-T3 User manual

Di-soric

Di-soric KDCT 08 V 02 G3-T3 User manual

Di-soric KDCT 12 V 04 G3-B4 User manual

Di-soric

Di-soric KDCT 12 V 04 G3-B4 User manual

Di-soric KDCT 08 V 02 G3-3 User manual

Di-soric

Di-soric KDCT 08 V 02 G3-3 User manual

Di-soric KDCT 08 V 03 G3-T4 User manual

Di-soric

Di-soric KDCT 08 V 03 G3-T4 User manual

Di-soric KDCT 6.5 V 02 G3-4 User manual

Di-soric

Di-soric KDCT 6.5 V 02 G3-4 User manual

Di-soric KDC 12 M 04 PSK-IBSL User manual

Di-soric

Di-soric KDC 12 M 04 PSK-IBSL User manual

Di-soric KDCT 12 V 04 G3-4 User manual

Di-soric

Di-soric KDCT 12 V 04 G3-4 User manual

Di-soric KDCT 08 V 02 G3-T4 User manual

Di-soric

Di-soric KDCT 08 V 02 G3-T4 User manual

Di-soric KDCT 6.5 V 02 G3-3 User manual

Di-soric

Di-soric KDCT 6.5 V 02 G3-3 User manual

Di-soric KDCT 08 V 02 G3-4 User manual

Di-soric

Di-soric KDCT 08 V 02 G3-4 User manual

Popular Switch manuals by other brands

EUCHNER NM VZ Series operating instructions

EUCHNER

EUCHNER NM VZ Series operating instructions

Targus PAUH210U user guide

Targus

Targus PAUH210U user guide

B&B Electronics 232BSS4 manual

B&B Electronics

B&B Electronics 232BSS4 manual

FSR DV-MFMV-74 manual

FSR

FSR DV-MFMV-74 manual

Crest Audio NDP-JTH NEXSYS HUB Specifications

Crest Audio

Crest Audio NDP-JTH NEXSYS HUB Specifications

TRENDnet TE100-S16D Quick installation guide

TRENDnet

TRENDnet TE100-S16D Quick installation guide

Gefen SW-4007 user manual

Gefen

Gefen SW-4007 user manual

AV TOOL AVT-6544 instruction manual

AV TOOL

AV TOOL AVT-6544 instruction manual

D-Link DGS-1210/ME series reference guide

D-Link

D-Link DGS-1210/ME series reference guide

HPE Aruba Instant On 1830 48G 4SFP Product End-of-Life Disassembly Instructions

HPE

HPE Aruba Instant On 1830 48G 4SFP Product End-of-Life Disassembly Instructions

Fujitsu FBR12 Specification sheet

Fujitsu

Fujitsu FBR12 Specification sheet

Agilent Technologies U2121A-101 RF operating guide

Agilent Technologies

Agilent Technologies U2121A-101 RF operating guide

Cisco SFE1000P - Small Business Managed Switch Administration guide

Cisco

Cisco SFE1000P - Small Business Managed Switch Administration guide

Planet IFB-244-SLC user manual

Planet

Planet IFB-244-SLC user manual

Siemens Pointek CLS300 Application guide

Siemens

Siemens Pointek CLS300 Application guide

Key Digital Phantom KD-HDSW2X1 operating instructions

Key Digital

Key Digital Phantom KD-HDSW2X1 operating instructions

ADDER AdderView Omega user guide

ADDER

ADDER AdderView Omega user guide

NETGEAR EN308TC - 8 Port 10 Base-T Hub installation guide

NETGEAR

NETGEAR EN308TC - 8 Port 10 Base-T Hub installation guide

manuals.online logo
manuals.online logoBrands
  • About & Mission
  • Contact us
  • Privacy Policy
  • Terms and Conditions

Copyright 2025 Manuals.Online. All Rights Reserved.