DIALOC Sapphire 24/7 BookDrop User manual

S
Sa
ap
pp
ph
hi
ir
re
e
2
24
4/
/7
7
B
Bo
oo
ok
kD
Dr
ro
op
p
I
In
ns
si
id
de
e
/
/
O
Ou
ut
ts
si
id
de
e
Installation Manual
Version 1.01

Sapphire 24/7 BookDrop Installation Manual Version 1.02
Page 2 of 29
©2016 Dialoc ID. All rights reserved.
Dialoc ID makes no warranty of any kind with regard to this material, including, but not limited to,
the implied warranties of merchantability and fitness for a particular purpose.
Dialoc ID shall not be liable for errors contained herein or for incidental or consequential damages
in connection with the furnishing, performance, or use of this material.
Dialoc ID assumes no responsibility for the use or reliability of its equipment on equipment that is
not furnished by Dialoc ID.
Dialoc ID reserves the right to modify the software and hardware described in this manual at any
time without notice.
Scope of Document: This document provides the use of:
Sapphire 24/7 book drop
This manual covers the following items:
Sapphire 24/7 book drop number 90700001
Sapphire 24/7 book drop number 90700002
Last version date: October, 2017
Manual Versions:
Version 1.01: uploading pictures
Version 1.02: add configuration chapter

Sapphire 24/7 BookDrop Installation Manual Version 1.02
Page 3 of 29
Table of Contents
1Safety and precautions --------------------------------------------------------------------------- 4
Do not touch internal parts ------------------------------------------------------------------------------------------------------ 4
Grounding ---------------------------------------------------------------------------------------------------------------------------- 4
Keep away from water ------------------------------------------------------------------------------------------------------------ 4
Children ------------------------------------------------------------------------------------------------------------------------------- 4
Power cord/supply protection -------------------------------------------------------------------------------------------------- 4
Environmental conditions -------------------------------------------------------------------------------------------------------- 5
Cleaning ------------------------------------------------------------------------------------------------------------------------------- 5
Installation---------------------------------------------------------------------------------------------------------------------------- 5
2System Description -------------------------------------------------------------------------------- 6
System Overview ------------------------------------------------------------------------------------------------------------------- 6
3Guarantee-------------------------------------------------------------------------------------------- 7
Liability -------------------------------------------------------------------------------------------------------------------------------- 7
4The Sapphire 24/7 BookDrop user interface ------------------------------------------------ 8
5Configuring the Sapphire 24/7 Bookdrop---------------------------------------------------11
5.1.1 Connection to the configuration window ---------------------------------------------------------------------11
5.1.2 Understanding the overview window --------------------------------------------------------------------------12
5.1.3 Transaction history--------------------------------------------------------------------------------------------------13
5.1.4 The My Library tab --------------------------------------------------------------------------------------------------14
5.1.5 Device tab -------------------------------------------------------------------------------------------------------------15
5.1.6 SIP2 connection tab-------------------------------------------------------------------------------------------------16
5.1.7 System tab-------------------------------------------------------------------------------------------------------------17
6Sapphire 24/7 BookDrop technical layout --------------------------------------------------18
The main parts of the Sapphire BookDrop----------------------------------------------------------------------------------18
7Specifications Sapphire 24/7 book drop ----------------------------------------------------26
8Wall mounting drawings ------------------------------------------------------------------------27

Sapphire 24/7 BookDrop Installation Manual Version 1.02
Page 4 of 29
1Safety and precautions
We strongly recommend that you carefully study and follow the operating instructions before
attempting to operate the unit and make notice of the listed precautions. Always keep the
instructions and the packaging so that if you relocate, sell, or give away this product, you can give
them to the new operator and/or owner.
Do not touch internal parts
Authorized and qualified technicians should do installation and tuning only. Should a repair be
necessary, please contact Dialoc ID, or contact one of Dialoc ID’s authorized service partners.
Grounding
Ensure this device is properly grounded. Electric shock could occur on an improperly grounded
device.
Keep away from water
Keep the system away from flower vases, tubs, sinks, etc. If liquids are spilled into this unit, serious
damage and even personal injury could occur.
Children
Do not allow children to play unattended with electrical equipment. Children may not always
correctly recognise danger.
Power cord/supply protection
To avoid any malfunctions and to protect yourself against electric shock, fire or personal injury
please observe the following:
Please check the rated voltage on the Sapphire 24/7 book drop and compare this with the
mains voltage in your country.
When the product is not used for long times please disconnect the mains power.
Use only the power connection cable provided. Using a different power supply will void your
warranty and may cause serious damage.
Do not stretch the power cables tightly to reach a power outlet.
Arrange any cables attached to this equipment so that no one can trip over or step on them.
Hold the plug firmly when connecting or disconnecting the AC power cord.
Do not connect or disconnect the AC power cord when your hands are wet.
Keep the AC power cord and the power supply away from heating appliances..
Never put any heavy object on the AC power cord.
Do not attempt to repair or reconstruct the AC power cord in any way.
Remove dust, dirt, etc. on the plug at regular intervals.
If the unit has been dropped or otherwise damaged, turn off the power and disconnect the
power supply.
If smoke, odours or unusual noises are emitted from the unit, turn off the power and
disconnect the power supply.

Sapphire 24/7 BookDrop Installation Manual Version 1.02
Page 5 of 29
Environmental conditions
Avoid excessive dust, heat and direct sunlight.
Place and operate all units on a stable, flat and vibration-free surface.
Make sure this device and the power supply are subject to normal free air ventilation.
Do not block the ventilation slits of the device, as this will cause heat to build up inside the unit
and may cause fire.
This device can be operated most reliable at ambient temperatures between +41°F and 95°F
(+5°C to +35°C) and at a relative humidity up to 85% (not condensing). After transporting the
device from a cold to a warm environment please wait for 1-2 hours for allowing the
equipment to assume ambient temperature before connecting and switching it on.
Cleaning
The cover should be cleaned by wiping with a dry cloth or slightly dampened with a mild detergent
solution. Never use thinner or any other volatile solvent on the plastic covers.
Installation
Installation of the system should only be performed by an authorized Dialoc ID partner. Protecting
yourself from injury and harm is absolutely imperative. We strongly suggest that before you begin
to maintain or service any of your appliances that you strictly adhere to each of the following:
The delivered mounting base should be used in any situation to provide sufficient ventilation.
Always wear gloves. A sharp edge on an appliance can hurt and/or cut your hands.
Be sure to wear safety shoes. You can cause serious injury to unprotected feet by dropping any
heavy appliances or tools.
Remember to remove any jewelry when servicing an appliance.
Make sure you use the correct tools and that they are clean and in good condition.
Abstain from putting your hands into any section of the appliance that you have not visually
inspected for jagged edges or sharp screws.
Inspect your work area to make sure it is clean and free of water or oil spills.
Ask for help if you need to move a heavy object.

Sapphire 24/7 BookDrop Installation Manual Version 1.02
Page 6 of 29
2System Description
System Overview
Sapphire 24/7 BookDrop is a self-service device for patrons to return library materials such as
books, printed media and other media.
The Sapphire 24/7 BookDrop communicates via SIP 2 protocol with the library management
system (LMS).
This manual will explain the installation and the use of the Sapphire 24/7 BookDrop. Carefully
review this manual before you take the Sapphire 24/7 BookDrop in operation. Keep this manual
nearby the unit for easy access on behalf of the service staff.

Sapphire 24/7 BookDrop Installation Manual Version 1.02
Page 7 of 29
3Guarantee
Dialoc ID warrants this device for 12 months on parts and repair costs*. This warranty only applies
when the device is used according to the specifications and when the user- and maintenance
instructions are followed.
The warranty of this device is void in case of:
Improper handling
Inadequate maintenance
Improper maintenance
Changes without prior permission of Dialoc ID
The warranty does not apply to parts that need to be replaced periodically.
* At the discretion of Dialoc ID
Liability
Dialoc ID is not liable for any dangerous situations, accidents and damage that result from:
Ignoring warnings or regulations as given in the user manual
The use of the Sapphire 24/7 BookDrop for other applications or in circumstances other
than indicated in this user instruction
Applying changes to the Sapphire 24/7 BookDrop of any description. This includes the use
of other replacement parts
Inadequate maintenance
Dialoc ID is not liable for consequential damage, such as damage to the device malfunctions due to
business interruption.

Sapphire 24/7 BookDrop Installation Manual Version 1.02
Page 8 of 29
4The Sapphire 24/7 BookDrop user interface
In the Process Information Window you can follow the process of returning your book.
The following Icon Indicators are for:
1. Scan your book
2. Drop your book
3. Wait until the process has finished
4. Fail or Success Indicator
Process Information Window
with icon screens
Book Entry Chute
RFID scanner to open the Book
Entry Chute

Sapphire 24/7 BookDrop Installation Manual Version 1.02
Page 9 of 29
Step 1. Scan your media.
Icon #1 on the Process Information Window and the RFID Reader #1 will be illuminated in
green to indicate that the unit is ready to receive media. Hold your media, in this case a
book in front of the RFID Reader to open the Book Entry Chute. In case the book is not
recognized or cannot be returned, the Book Entry Chute will not open and you will not get
access to drop your book. The Icon Indicator #4 will light up and the red X-mark indicates
that the book cannot be returned. After a while the Icon Indicator #1 will light green again
to indicate the unit is ready to process further offered materials .
If the book is recognized the Book Entry Chute will open and gives you access to drop your
book.
Step 2. Drop you media.
Icon Indicator #2 corresponds with the green LED indicators in front of the Book Entry
Chute. Drop one item at a time!
The internal scanner of the unit will recognize the book and will lock the Book Entry Chute
to further process the return. Icon Indicator #3 will illuminate green to indicate the process
time.

Sapphire 24/7 BookDrop Installation Manual Version 1.02
Page 10 of 29
Step 3. Wait until the process has finished.
When Icon Indicator #3 is on, your book will be returned and registered in the Library
Management System (LMS).
Step 4. Successful return or not.
When the Icon Indicator #4 is showing a green V, it means the book has been successfully
registered. If not you will get a book symbol with a red X(red light). The book will not be
ejected, it will be returned, but the patron needs to contact the library.

Sapphire 24/7 BookDrop Installation Manual Version 1.02
Page 11 of 29
5Configuring the Sapphire 24/7 Bookdrop
5.1.1 Connection to the configuration window
There are 2 ways to get into the configuration window:
a) Click on the shortcut icon on the desktop
b) Open a webbrowser on a PC which is on the same network as the bookdrop and put in
the following URL: http://<IPADDRESS_OF_BOOKDROP>:8080
You will see this screen:
Login with: username: admin
password: dialocid
Sapphire 24/7 BookDrop Installation Manual Version 1.02
Page 12 of 29
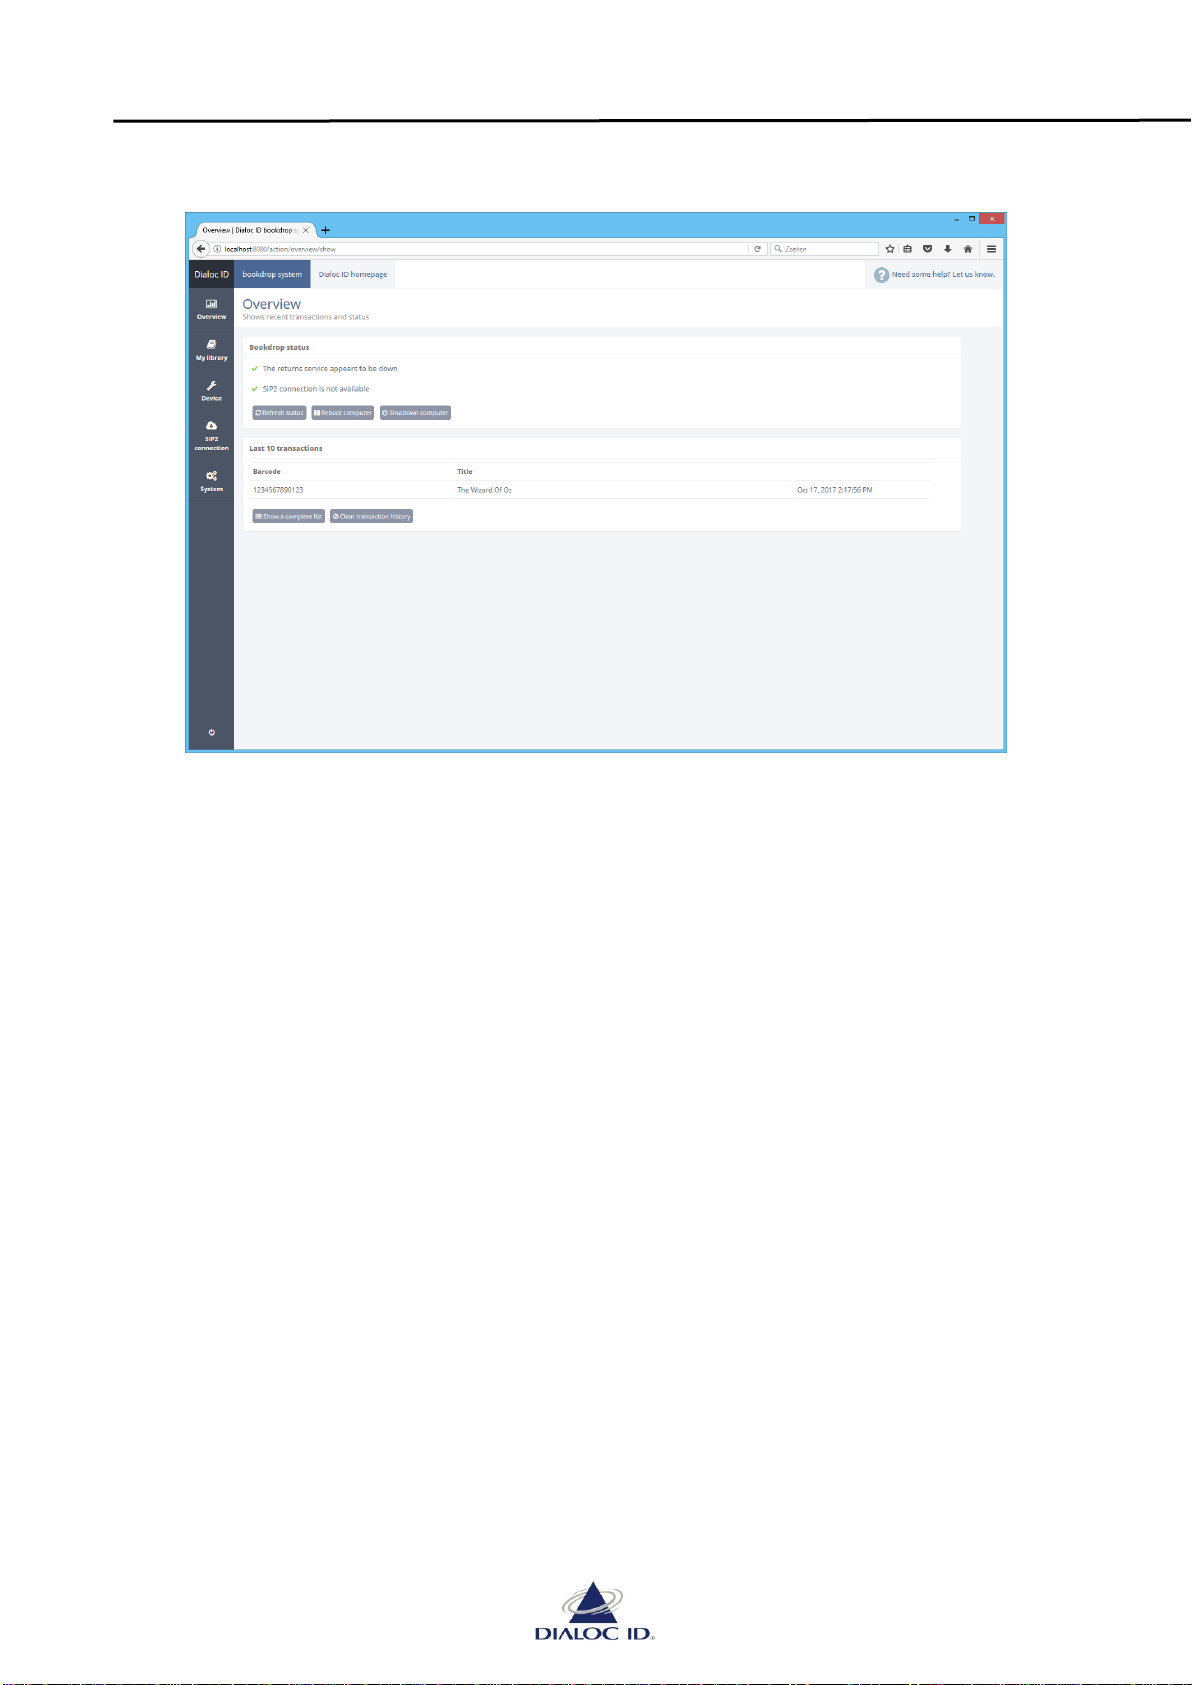
5.1.2 Understanding the overview window
After Login you will get this screen:
Bookdrop status: this will show the status of:
* Return Service (hardware control driver)
* SIP2 connection status
green V means all up and running, red X means something is wrong
There are 3 buttons in the Bookdrop Status window:
Refresh Status; will refresh the present status
Reboot Computer; will restart the PC down after acknowledgement
Shutdown Computer; will shut the PC down after acknowledgement
Last 10 transactions: this window will show all recent transactions, you will see the
barcode, the title of the book and the check-in date/time stamp
There are 2 buttons in the Last 10 transactions window:
Show a complete list; will show all recent transactions, even more
than 10
Clear transaction history; will clear the history after
acknowledgement

Sapphire 24/7 BookDrop Installation Manual Version 1.02
Page 13 of 29
5.1.3 Transaction history
By pushing the “Show a complete list” button you will get to the following screen:
In the pull down menu you can chose the period -> you need to update your choice
with the button next to the period selector.
The overview will show for each transaction:
T - Transaction succeeded
C - Material complete
A - Indicator of warning, for instance if books are reserved
O - Offline handling yes or no, when the system is off line.
Title
Barcode
Location of Origin where the material came from
Sorting Bin
Time/Date stamp
With the print button you can print these overviews. The webportal will resize the
overviews automatically to a handy format which is easy to read.
1
2
3
1
2
3

Sapphire 24/7 BookDrop Installation Manual Version 1.02
Page 14 of 29
5.1.4 The My Library tab
When you click on the “My Library” tab of the left menu bar you will see this screen:
Here you can adjust your personal preferences. The fields are:
Basic Settings: Name: Library name
ISIL code: Library ISIL code
Delivery: Check-in incomplete materials: check the tick box to accept check-in
of incomplete materials.
Always sensitize materials: check the tick box to activate the
materials security, even when check-in
has failed.
Time before dropping materials: indicates the waiting time for the
Bookdrop to the finish registration of
Materials. Some LMS software and-or
LAN speed requires more time to accept
the next material.
Sorting bin for alerts: Name of the sorting bin used for
materials needing special attention, f.i.
reserved materials. You can use the
transaction history screen (see 5.2.2.) to
read the contents of that bin.
Item security: AFI check in value for security “on”
AFI check out value for security “off”
Set AFI security to enable AFI setting
Set EAS security to enable EAS setting

Sapphire 24/7 BookDrop Installation Manual Version 1.02
Page 15 of 29
5.1.5 Device tab
When you click on the “Device” tab of the left menu bar you will see this screen:
Device: fill in the device type, default standard dialoc_returns
Connection String: fill in the parameters which are valid to configure the connection.
Always put in the connection string and port number, f.i.
Dev:Com7;baud:115200

Sapphire 24/7 BookDrop Installation Manual Version 1.02
Page 16 of 29
5.1.6 SIP2 connection tab
When you click on the “SIP2 connection” tab of the left menu bar you will see this screen:
Here you can adjust the SIP2 connection. The fields are:
Connection Settings: Host name or IP address: Location of the server
Port: Port number of the server
User name: SIP2 user name
Password: SIP2 password
Location: SIP2 location specification
Character set: Character set in use, mostly
ISO-8859-1 or UTF-8.
Telnet Settings: Telnet username prompt: Telnet response prior to input of
a username
Telnet password prompt: Telnet response prior to input of
a password
Telnet username: Telnet username
Telnet password: Telnet password
Connection response: Telnet response after successful
Login
Enable Telnet: Check this tick box to enable
telnet
Timing: Timeout: Waiting time for SIP2 answer
Keepalive interval: Waiting time to send a test
message to check if server is still
online
Retry Interval: Waiting time to reconnect after
system was down
Initial Pauze: Waiting time for first Login
Implementation Receipt width Not for Bookdrop
details: Terminal Password: Not for Bookdrop
Enable Error detection: Check this tick box to enable
error detection

Sapphire 24/7 BookDrop Installation Manual Version 1.02
Page 17 of 29
5.1.7 System tab
When you click on the “System” tab of the left menu bar you will see this screen:
By clicking on the appropriate log files you can download them. The system will make max. 10 log files of 10MB/file. A log contains
approx.. 1 ½ day of data.
PRECAUTION: As the Sapphire Bookdrop™ is equipped with 3 optical safety sensors, the unit cannot operate when
the back door is open. You must close the unit to get it to work.
Sapphire 24/7 BookDrop Installation Manual Version 1.02
Page 18 of 29
6Sapphire 24/7 BookDrop technical layout
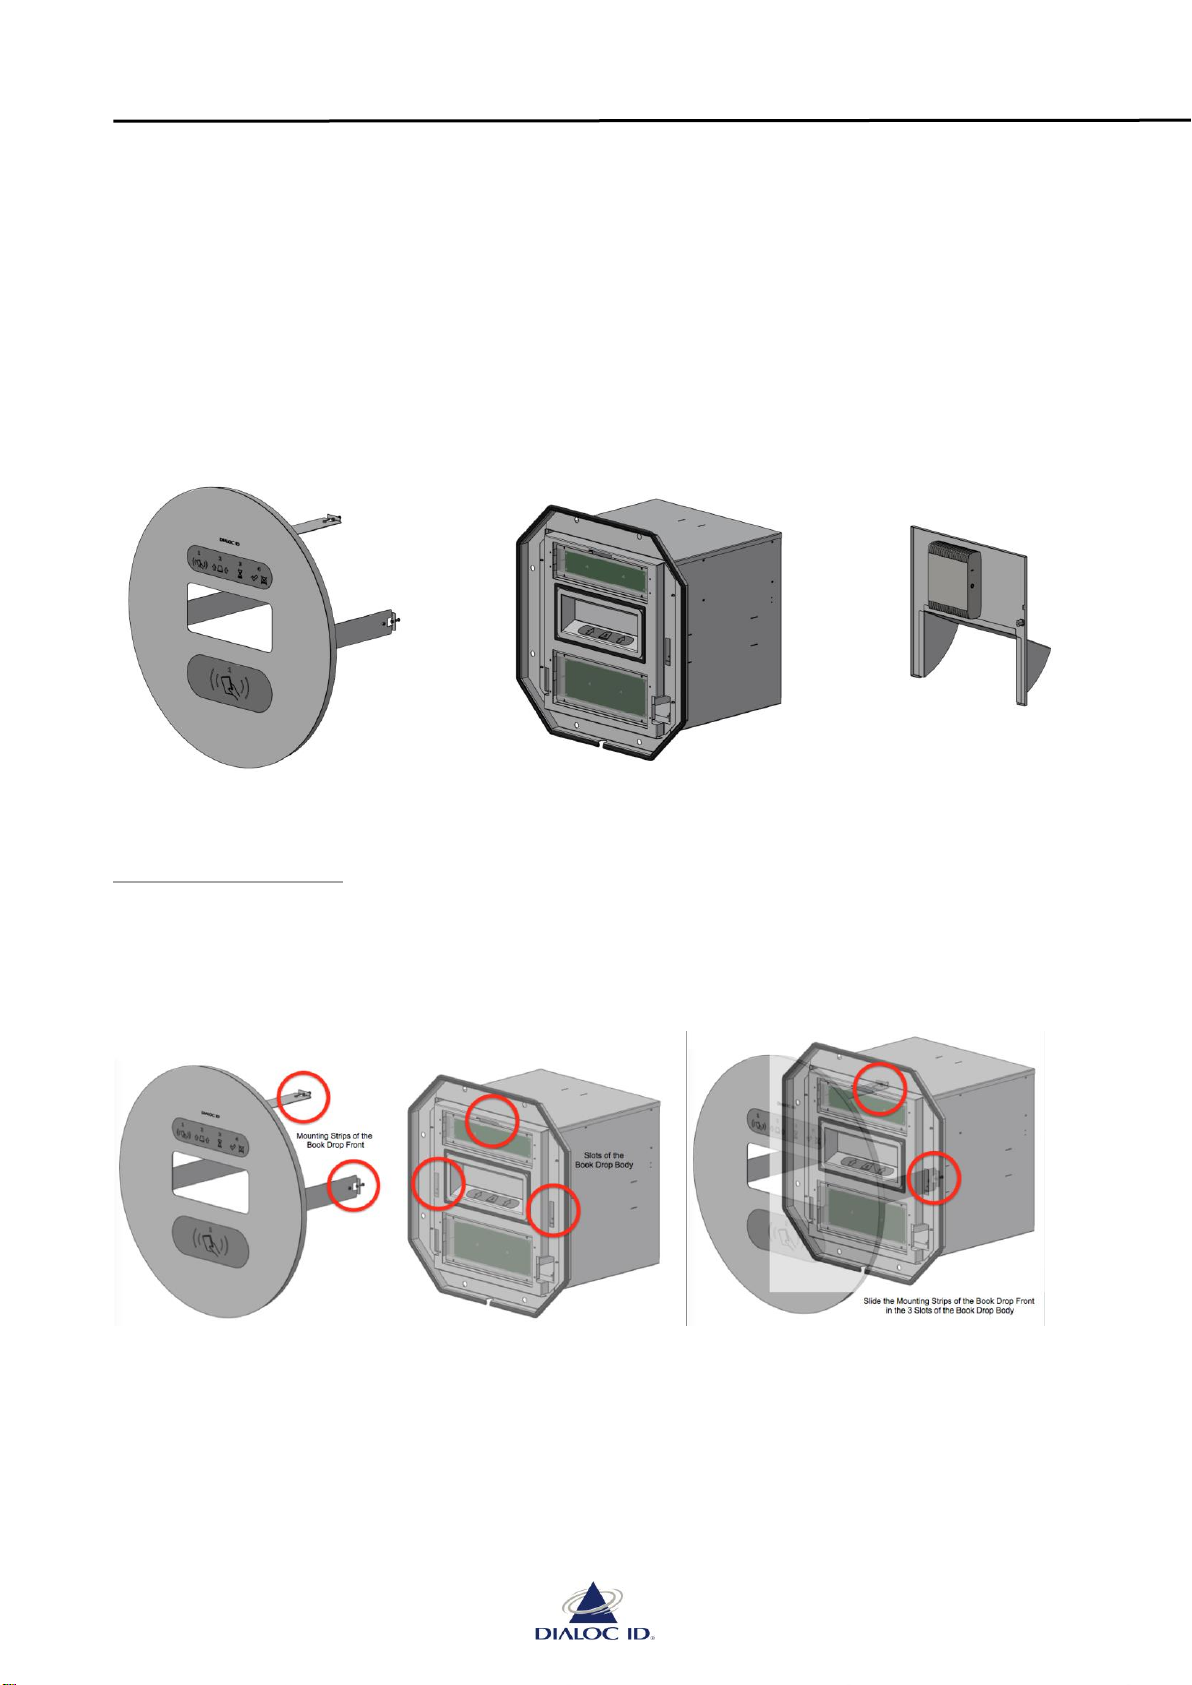
The main parts of the Sapphire BookDrop
The BookDrop will be sub-assembled delivered in three parts.
A. BookDrop Front with Icon Information Window and the Book Entry Chute
B. BookDrop Body with all control components and LED PCB’s
C. BookDrop Backdoor equipped with the PC.
A. BookDrop Front B. BookDrop Body C. BookDrop Backdoor
A) The BookDrop Front
1. In the BookDrop Front are two display windows and the Book Entry Chute. On the backside
are three mounting strips, positioned on the left, right and at the top. These mounting
strips must be inserted in the corresponding slots at the front of the BookDrop Body.
Mounting Strips 3 Slots Book Drop Body Slide the 3 Strips in the 3 slots

Sapphire 24/7 BookDrop Installation Manual Version 1.02
Page 19 of 29
2. After mounting the BookDrop Front on the BookDrop Body the display windows will
indicate the following functions:
a. The bottom window asks the user through as a 1st step to offer a book to start the
return process.
b . The middle window is the Book Entry Chute with left and right two arrows and in the
middle a book Icon. The 2nd step is to drop a book in the Book Entry Chute.
c . The top window shows via icons 1 to 4, the four process steps of return, in
which phase of the return process you are and its status.
Sapphire 24/7 BookDrop Installation Manual Version 1.02
Page 20 of 29
The Book Entry Chute is normally closed and locked. It unlocks once you offer a book with a
RFID tag to the bottom window (1). Once the right data of the book is scanned, the arrows
in the Book Entry Chute indicate that you can drop the book after which the Chute locks
immediately. During the return process an hourglass Icon lights up in the top window. After
a successful transition a green V lights up in the top window.
Immediately afterwards the user can offer another book and the cycle is repeated.
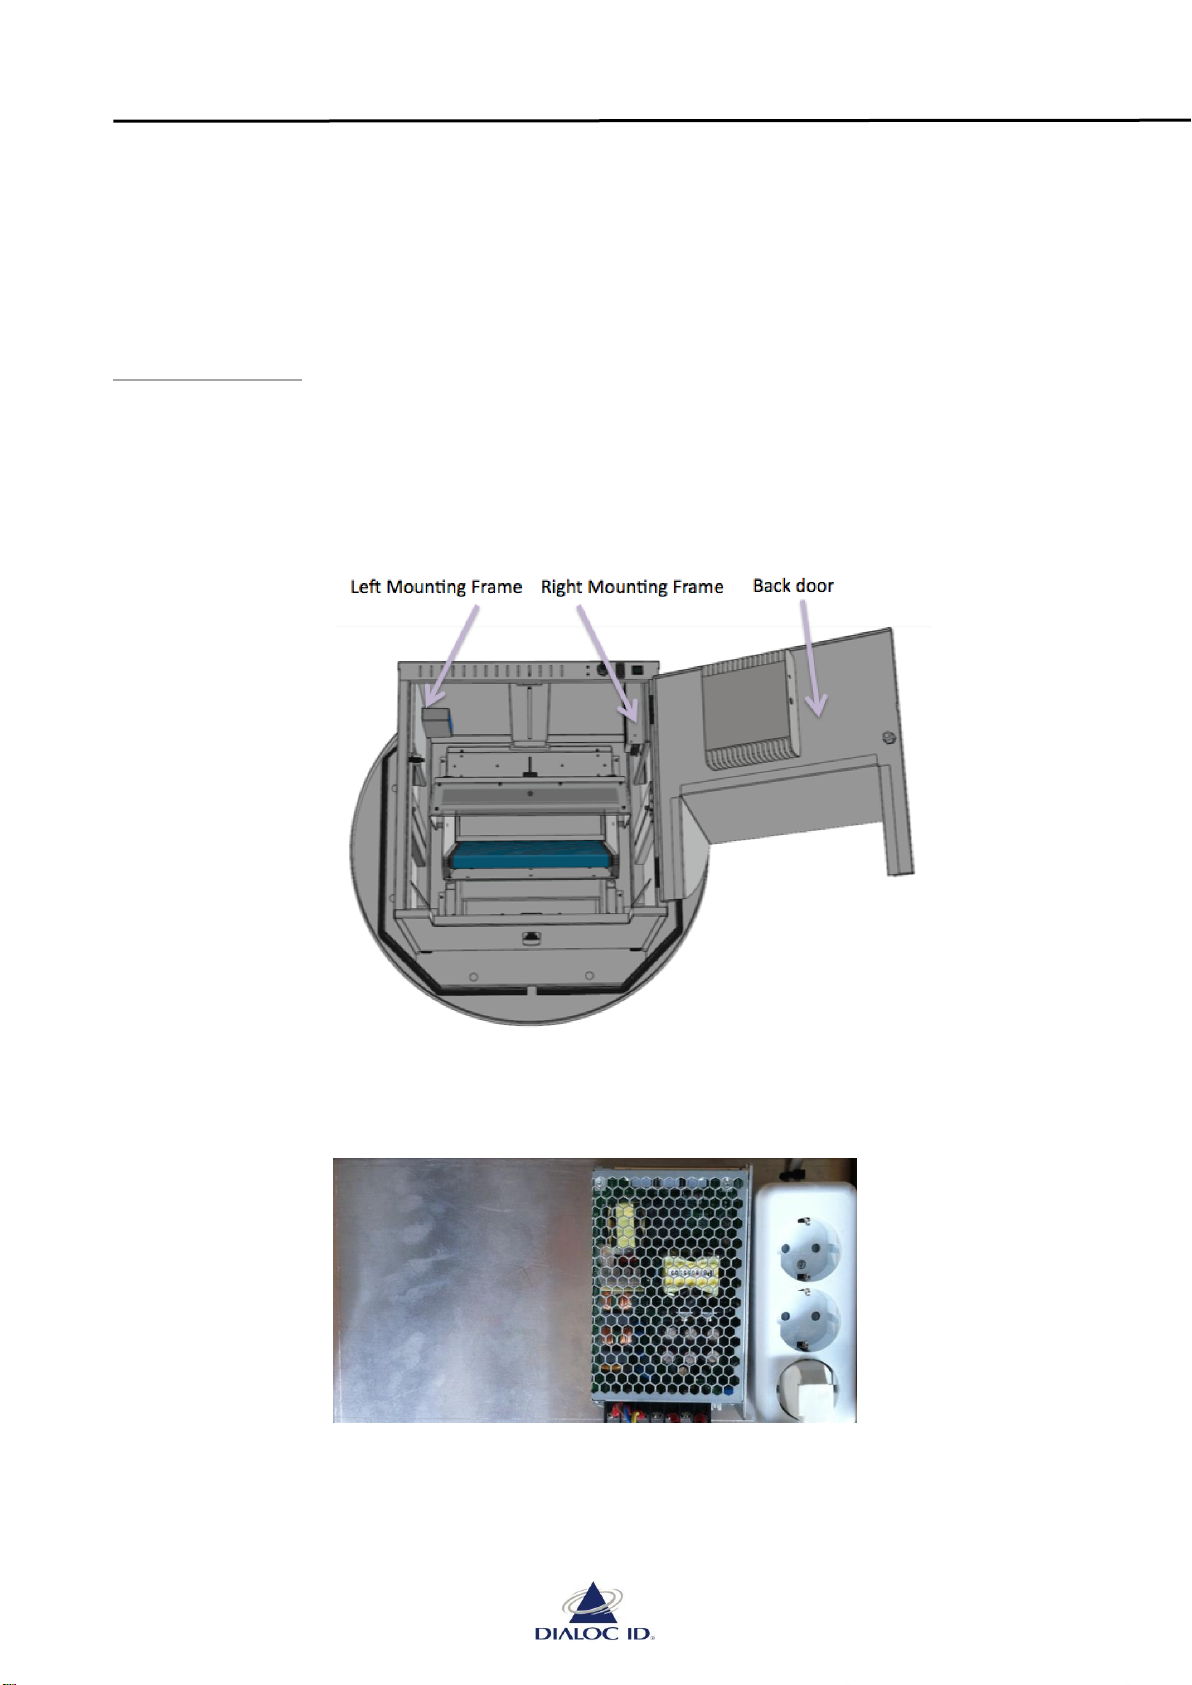
B). BookDrop body
The BookDrop body is a compact pre-assembled enclosure with:
1. On the top left inside of the mounting frame you will find the Book Drop controller PCB.
This controller includes all software for controlling the LED-PCBs, all control functions for
the actuator and communication via the PC with the Host LMS. The Book Drop controller
PCB also carries the RFID reader. (See Wiring Diagram –page 16)
2. On the top right of the mounting frame are the AC/DC 12 volt Power Supply and the PC
power supply and the AC Mains distribution block
3. In the centre over the passage frame for the books the actuator is placed. The controller of
this actuator is mounted on the left-hand mounting frame.
This manual suits for next models
2
Table of contents
Popular RFID System manuals by other brands

Feig Electronic
Feig Electronic ID ISC.ANT1710/690 Crystal Gate Excellence... Installation

iDTRONIC
iDTRONIC R-DT-EVO-TEMIC-USB quick start guide

TAGSYS RFID
TAGSYS RFID HHU500 user guide

Motorline professional
Motorline professional MA115 installer and user manual

iDTRONIC
iDTRONIC ID LOCK 6000 manual

Balluff
Balluff BF-IDM13 operating guide


