DiamaPro Systems DP-PUMP10GAL User manual

OWNER’S MANUAL
DUAL PUMP
DUAL COMPONENT POLYMER PUMP
INSTRUCTION MANUAL
SAVE THESE INSTRUCTIONS FOR FUTURE REFERENCE
INTRODUCTION
This manual outlines the maintenance and
operation of the Dual Component Polymer
Pump.
This is a professional tool and is intended
for use by trained and experienced opera-
tors.
To get maximum benefi t from your tool and
to ensure maximum safety, be sure to read
this manualthoroughly. You should also
periodically review safety instructions.
Operators and maintenance personnel
must always comply with the following
safety precautions. These precautions are
given here for your safety. Review them
carefully before operating the tool and
before performing general maintenance
repairs on the tool. Supervising personnel
should develop additional precautions
relating to the specifi c work area and local
safety regulations.
SAFETY PRECAUTIONS
• Read, understand, and follow all safety,
transportation, and storage recom-
mendations on the Material Safety and
Data Sheets of the material that will be
dispensed.
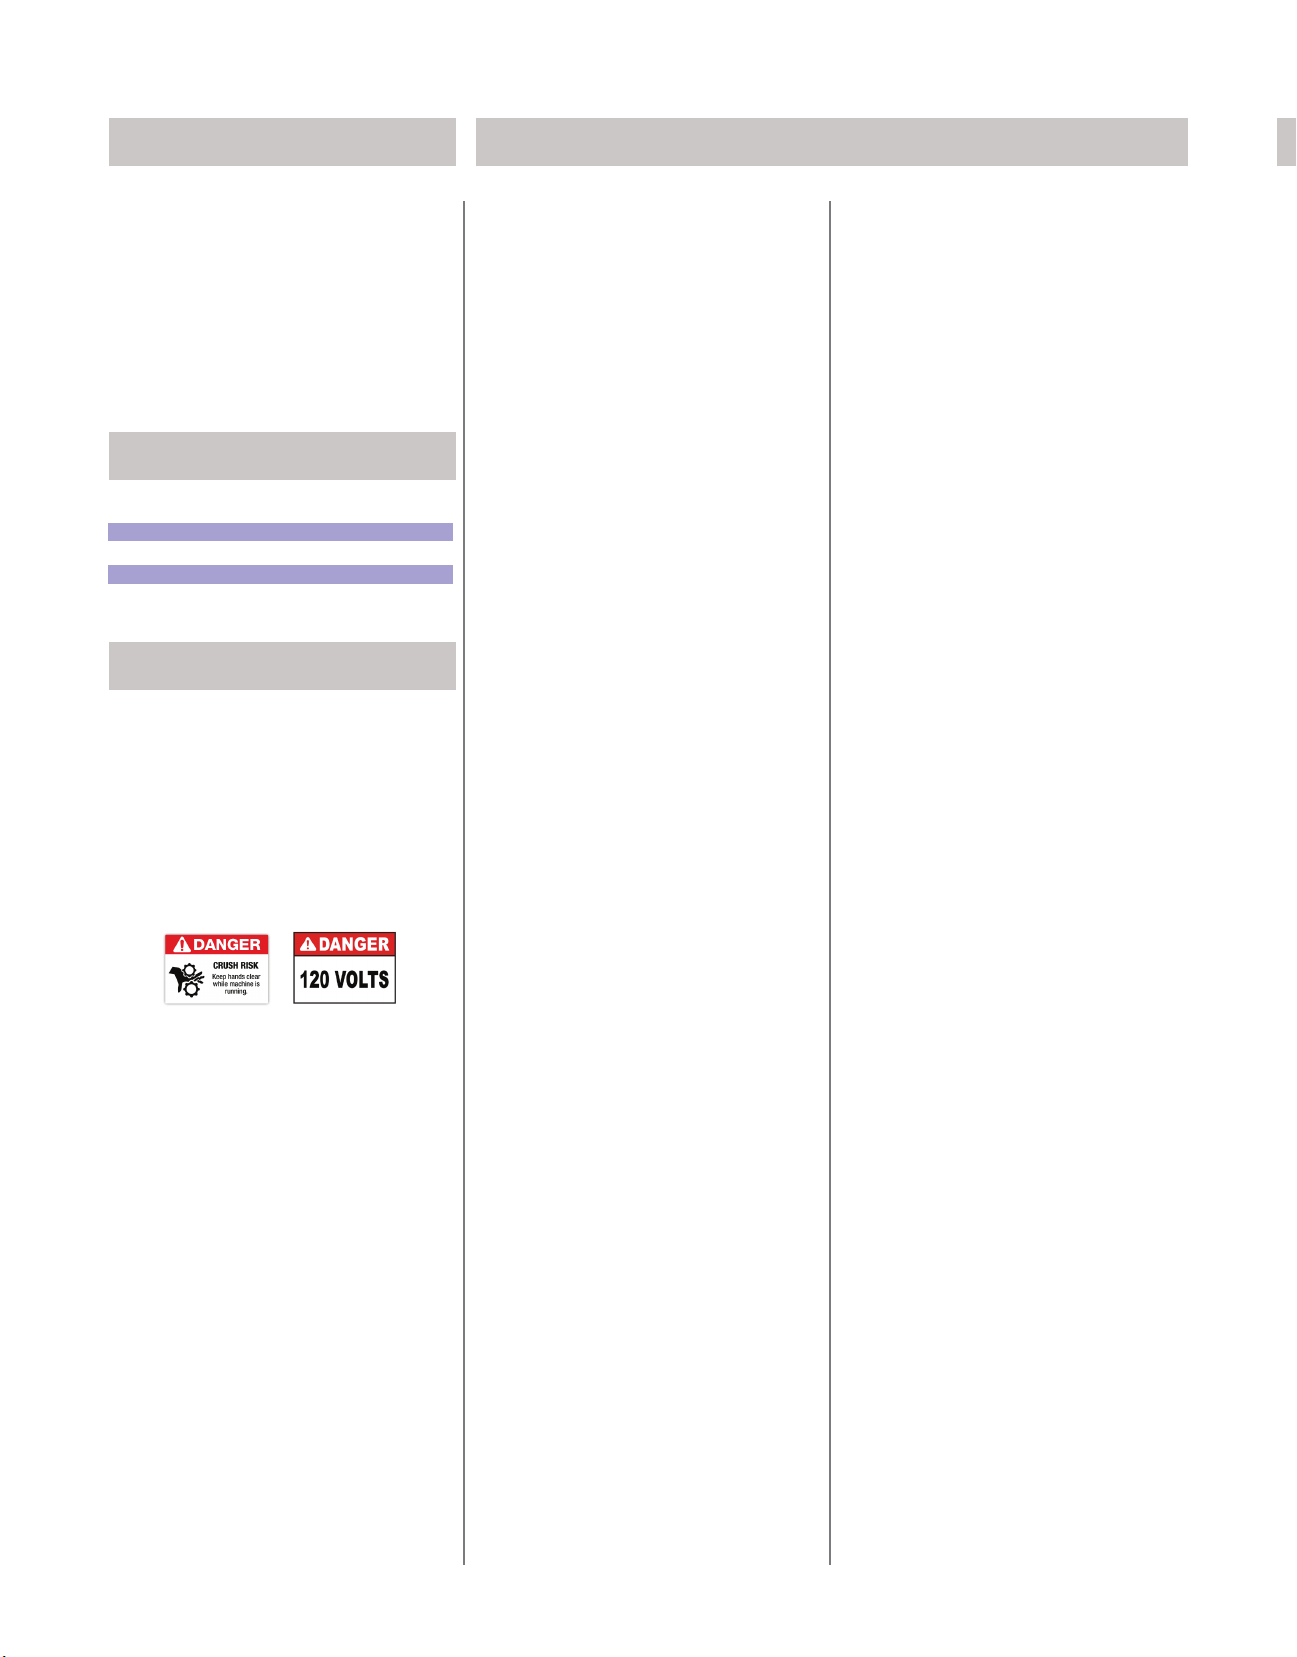
• Keep hands, fi ngers, and clothing free
from all moving parts including gears,
chains, and other moving parts while
operating the pump.
• Never run the pump without the gear/
chain guard in place.
• Disconnect power supply before servicing
the gear/chain or changing gears.
• Disconnect power supply before opening
or servicing the electrical components.
• Make sure there is adequate ventilation if
a gas powered generator is being used
to supply power.
• Secure the pump before transporting.
• Always use the same tanks (A or B) for
the same material to minimize risk of ma-
terial hardening inside of the tank, pump,
hoses, and other parts.
Key Elements:
1. Clean tanks, pumps, lines, and manifold
2. No cross contamination
3. Proper mixing ratio = proper material
cure
Prior to use:
1. Inspect tanks for evidence of loose parti-
cles or debris.
2. Inspect manifold (located at the end of
the dispensing wand where both hoses
attach. The static mixing element attach-
es to the manifold with a 7/8” static mixer
nut) - Inspection should be performed at
the start of each day’s work and consists
of the following:
a. Remove hoses connected to manifold
and remove 90 degree fi tting.
b. Inspect for and remove any debris or
contamination that might clog the exit
hole. A 1/4” drill bit can generally be used
to clean the exit hole.
c. Reconnect lines to manifold.
3. If hydraulic fl uid remains in the tank
(used for fl ushing and pump storage and
should be left at least a couple inches
deep in the tanks when not in use) plug
in power supply and trigger applicator
gun to dispense fl uid.
a. Watch fl uid fl ow out of manifold and
inspect for clog or uneven fl ow.
b. Using graduated measuring cups, dis-
pense fl uid into containers to check for
proper ratio.
4. After confi rming ratio is correct and that
no contamination remains in the lines
or in the manifold, dispense remaining
hydraulic fl uid to empty the tanks.
5. The unit is now ready for use.
Dispensing Filler:
1. Prior to fi ling tanks, premix the Part A
Polyol (gray component).
2. Ensure that Part A material is placed in
Part A tank and Part B material is placed
in Part B tank. DO NOT CROSS CON-
TAMINATE. It is advised to keep the lid
on the tank that is not being fi lled.
3. After fi lling tanks, dispense polyurea
through manifold assembly watching
fl ow. An errant stream out of one or
both sides of the manifold will generally
indicate that there is a restriction in the
manifold and disassembly and cleaning
should be performed.
4. If fl ow is even and equal, attach static
mixing tip to end of manifold.
5. Dispense a small amount of material
through the tip into waste container to
ensure thorough mixing in the tip. Then
dispense small amount of material onto
cardboard or other disposable sheet
to monitor cure. Allow to set for 10-15
minutes or until signifi cant cure has been
achieved prior to commencing. This will
ensure proper ratio and cure of future
material.
6. While waiting on test material to cure,
remove static mixing tip and discard.
7. Pump grease (white lithium supplied with
pump) into fi ttings on manifold to prevent
cross contamination.
8. Upon confi rmation of test sample cure,
install new static mixing tip.
9. Install fi ller into joint of crack per product
installation guidelines.
Work Interruption:
1. If work is stopped for short term (5 min-
utes or so, to move pump, etc.) periodi-
cally trigger applicator wand to dispense
material every 30-45 seconds to ensure
material in static mixing tip does not set.
2. If dispensing is stopped for longer term
(lunch break, etc.) remove static mixing
tip and discard. Pump Grease into fi ttings
on the manifold as described above.
Upon commencement, re-install a new
static mixing tip.
End of Day:
1. If possible, stop material placement
when tanks are “nearly” empty (material
is down to within a couple of inches of
the tank bottom). DO NOT RUN tanks
dry of polyurea or improper ratio and
cure may result if one tank empties
slightly ahead of the other.
2. In case material is run to the bottom of
the tank, remove static mixing tip and
dispense remaining material into a waste
container until tanks are empty and line
sputters at the static tip.
a. Fill both tanks with hydraulic fl uid to ap-
proximately 3 inches from the bottom.
b. Dispense hydraulic fl uid to purge the
pumps and lines. Ensure some fl uid
remains in the tanks once complete.
c. Grease the fi ttings on the manifold and
secure for next use.
3. In case several inches of polyurea
remains in the tank at day’s end AND,
pump will be used to place additional
joint fi ller the following day, it can be pos-
sible to leave the material in the machine
overnight using the following procedure.
NOTE: Do not leave polyurea in the
tanks or within the system (tanks, pumps,
lines, manifold) if material placement will
not be performed the following day.
SET-UP AND OPERATION
SPECIFICATIONS
SAFETY
Part No. DP-PUMP10GAL
Capacity: 2-6.5 Gallon Tanks
Electrical Requirements: 120V
Motor: 1/2 HP
Weight: 220 lbs
SET-UP (cont.)

a. Remove static mixing tip.
b. Grease the fi ttings on the manifold and-
secure for next use.
c. Fill Iso side tank (Part B for Metzger/
McGuire joint fi llers, amber colored side)
with Iso product to within a couple inches
of the top of the tank.
d. Press a new clean plastic bag, or similar
plastic sheeting, over tank and into top
of product lapping excess plastic over
the top sides of the tank. By doing this,
excess air potentially containing moisture
or humidity is forced away from the top of
the polyurea Iso component.
e. Place tank lid over plastic sheeting and
secure.
f. At next use, a thorough evaluation must
be done as indicated in the “Prior to Use”
section to ensure no cross contamination
exists in the manifold.
Next Day Use:
1. It is always advisable to re-check the
manifold fi rst by removing the check ball
assembly and inspecting for clogs and
also re-checking ratio by dispensing a
small amount of material into graduated
plastic containers.
2. Before use, cure test should be per-
formed by dispensing through the static
mixer onto a cardboard or plastic sheet
and monitored for 10-15 minutes to con-
fi rm cure prior to commencement of fi ller
placement.
3. Follow instructions outlined above under
“Prior to Use” and “Dispensing Filler”.
End of Project:
1. Dispense all remaining polyurea into
waste container.
2. Once polyurea has been dispensed,
partially fi ll each tank with hydraulic fl uid
and run through the machine to ensure
pumps and lines have been purged.
3. Grease fi ttings on the manifold.
4. Wrap mixing manifold with plastic or
shrink wrap tightly sealing end and pre-
venting moisture exposure and absorp-
tion into manifold.
5. Package up for storage.
Problems During Dispensing
Polyurea Joint Filler:
1. Material fl owing slowly:
A. May occur when material temperature
is cool and in the case of cooler/freezer
environments. Preheat material and/
or store outside of cooler/freezer area.
For freezer installations, tank heaters
should be used to maintain a “pump-
able” viscosity.
B. May occur if static mixing manifold has
buildup or restriction in the outlet orifi ce.
Remove pump lines from the manifold,
remove fi ttings,
plastic washer, check ball, and spring
and ensure no buildup or restriction is
present. Inspect outlet orifi ce for restric-
tion and drill out if buildup is present.
C. May occur if mixed material begins to
“gel” inside of the static mixing element
(tip). This typically will occur when
jumping from joint to joint allowing
mixed product to set inside the plastic
mixer without purging. Purging the
static mixing element should be done
approximately every 45 seconds with
most M/M products.
2. Material STOPS fl owing:
A. Check main power supply to ensure
voltage is entering the speed con-
trol unit. Inside the control box cover
located on the face of the circuit board
a GREEN LED light should be illumi-
nated when proper voltage is present. If
indicator light is off (switch is on), check
main power supply cord to ensure
power is being supplied to the control
box. Correct if necessary. If control box
is receiving power and the light on the
front is OFF, check 12A ceramic fuse
behind the control box cover (left side of
electrical panel). Replace if necessary.
B. If control box is receiving power and the
LED light on the circuit board is ON,
check 8A MDL (slow burn) fuse behind
the control box cover (right side of
electrical panel). DISCONNECT POW-
ER before removing or testing fuses!
Replace if necessary. Burnt 8A MDL
fuses will be the primary cause for NO
FLOW situations and will typically occur
when the motor is being placed under
excess strain. Most common to occur
when dispensing in cold environments
or freezer/cooler installations.
C. If control box fuses are not “blown”,
check trigger switch mechanism on dis-
pensing wand. A trigger switch malfunc-
tion is not common, but does occur from
time to time. In this instance, the green
LED light will be illuminated indicating
the circuit board is receiving power.
3. Material does not cure or cures “soft”:
A. Always test cure of previously placed
materials as you move from section to
section. Most M/M polyurea products,
even in freezer environments, should
reach signifi cant cure within 1 hour.
B. ALWAYS confi rm that the proper pump
pulleys or sprockets are being used.
Equal sized pulleys/sprockets for 1:1
ratio.
C. If uncured or soft cure is found, an off
ratio mixture is most always caused
by a restriction or buildup inside of
the mixing manifold. Disconnect lines,
inspect and clean mixing manifold. Prior
to reassembly, test material fl ow and
ratio check directly from the pump lines.
After confi rming proper ratio from the
lines, connect mixing manifold, attach
static mixing element and dispense test
material to monitor for full cure.
D. If OFF ratio dispensing is found when
testing directly from the pump lines
(without the manifold attached), check
each hose line for contamination or
restriction. Ultimately, it will be VERY
diffi cult to visually fi nd a restriction
inside the hose line. Generally, hose
lines should be replaced before starting
a project.
E. If hose lines are clear, buildup or re-
striction will likely be within one or both
pump units. Disassemble, clean thor-
oughly, and reassemble. Attach hose
lines and test fl ow ratio.
TROUBLESHOOTING
SET-UP (cont.)

www.diamaprosystems.com | (404) 834-1162
Popular Water Pump manuals by other brands


Lincoln industrial
Lincoln industrial 84960 owner's manual

DigiCare
DigiCare IP41 Series Operator's manual

TOHATSU
TOHATSU VE 1500 owner's manual

Xylem
Xylem GOULDS NPO instruction manual

Gude
Gude GS 4002 P Translation of the original instructions

Grundfos
Grundfos SmartFlo Installation and operating instructions


