Diamond Needle White Diamond CG-750AJ User manual

1
MODEL No. CG-750AJ
Introduction
·This spray cleaning gun works on the principle that air pressure is created by
the reciprocating motion of an air cylinder piston and under this pressure the
fluid is sprayed onto objects at very high speed.
·This spray cleaning gun has been expertly engineered using a streamlined
nylon housing. It is relatively lightweight, durable, and produces a strong spray.
·This spray cleaning gun is designed for industrial use with clothing, screen
printing, and embroidery. It also can be used for screen cutting, machine oiling,
flower watering, laundering and kitchen cleaning.
Specification
Rated voltage: 110V / 60Hz or 220V / 50Hz (See the label)
Power: 50W (110V / 60Hz) or 65W (220V / 50Hz)
Flow rate: 100CC/min
Container Volume: 1000CC
Diameter of spray nozzle: Adjustable range 0.25 – 0.3mm
Selection of spray fluid
Do not use impure fluids. TCE cleaners, pure water and other neutral solutions
are highly recommended. The use of inferior cleaners could result in damage
to both the spray gun and fabrics.
Spray nozzle
- Adjustable Nozzle: for high pressure straight spraying and for radial mist
spraying.

2
Operation
1. Fill the reservoir container with spray liquid. Plug into the power supply and
trigger on. The spray gun starts up with a blast of vibration. Initially only a small
amount of liquid sprays out. After 2-3 seconds the spray gun reaches optimal
performance and noise level subsides.
2. Spray distance and pattern:
The effective working distance is 20-25cm (3/4”-1”). The distance and the
pressure need to be adjusted properly according to the thickness and density
of objects. The thinner the object, the farther the distance is required in order
not to damage the fabric. Please refer to Fig. 3 for suggested spray pattern.
Gently move the spray gun at a constant speed until all the stain is eliminated.
(For straight nozzle position, spraying at a 45 degree angle is recommended).
3. Adjustment of spray dispersion: The spray dispersion can be adjusted by
turning the nozzle cap. As seen in Fig.4, turn the small handle on the nozzle
cap clockwise. The spray dispersion becomes linear. Turn the small handle
counterclockwise, spray becomes a mist.
Fig. 4 Fig. 5
4. Adjustment of spraying force: The spray force is determined by rotation of
the knob on the rear of the spray gun. As Fig.5 shows, turn the knob clockwise
to increase spraying force so the liquid sprays out faster and stronger. Turn the
knob counterclockwise to decrease the spraying force so the liquid sprays out
slower and weaker. This adjustment determines the working distance of the
3
spray gun.
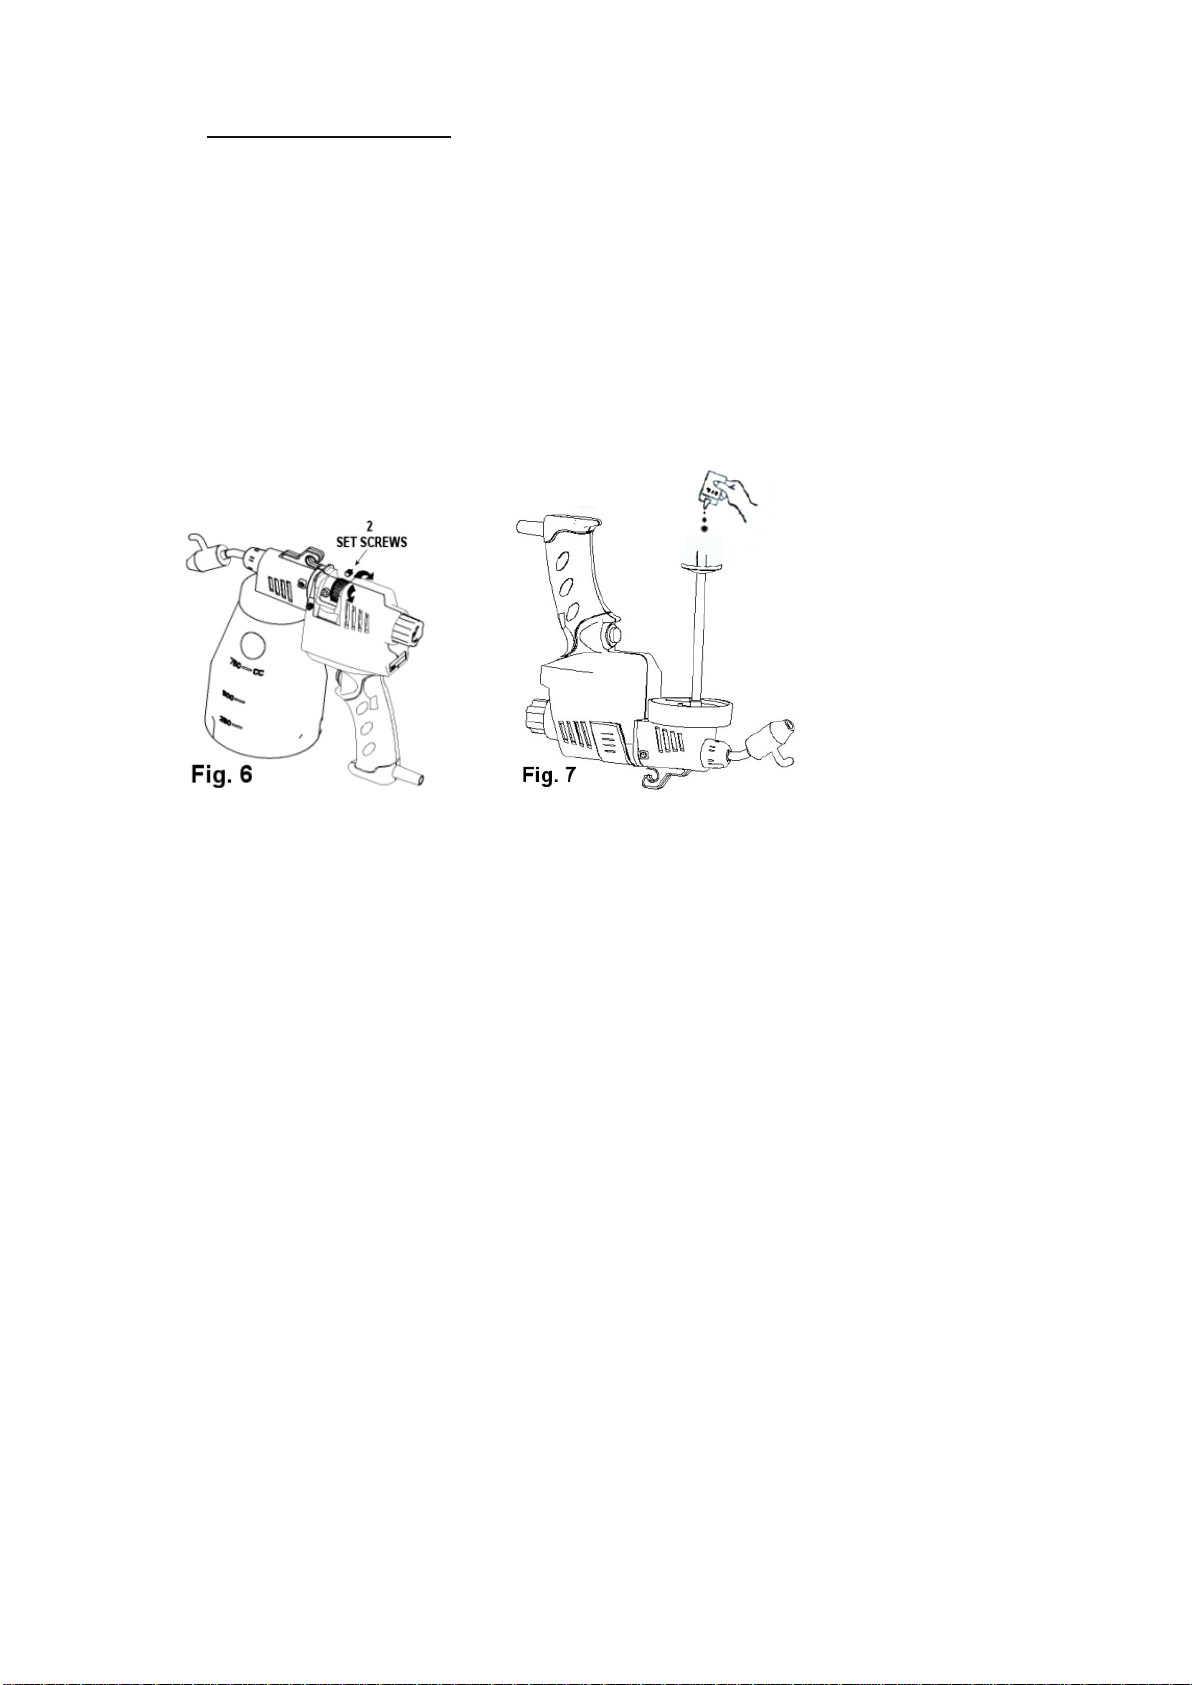
5. Knurled Adjusting Ring:The knurled adjusting ring is used for positioning
the front part of gun body. When the push rod is in the right position for the
pump cylinder, the air pressure created by its reciprocating motion will reach
the most appropriate spraying force for cleaning. (Note: The factory settings
are ready for optimal performance). If any adjustment needs to be made,
loosen the two set screws on the front body. Turn the knurled adjusting ring
clockwise or counterclockwise. Tighten the two set screws when the desired
spray condition is achieved. See Fig.6.
After completion of work, unplug from the power source and keep the gun in a
safe place.
Maintenance
To keep the spray gun in good condition and extend its life, please empty the
reservoir container after use. Trigger some shots for a few seconds until all the
liquid in the air cylinder is evacuated. As Fig.7 shows, unscrew the reservoir
container and then pull off the suction base. Put 3-5 drops of light clear oil into
the suction pipe. Trigger on and let the oil be sucked back into the pump
cylinder.
Repair
This spray cleaning gun has been expertly constructed and carefully calibrated.
It has been completely tested before it leaves the factory. Disassembly and
major repairs should be left to professionally trained technicians.
Problems that may occur include: power supply failure, motor failure, nozzle
failure, air cylinder failure, as well as the failure of cylinder spring.
Trouble shooting:
1. Remove from power source before disassembly.

4
2. when power failure occurs check the power cord, trigger switch and motor.
3. When the spray dispersion is forked, it means the nozzle is blocked or
clogged. Take off the nozzle and remove debris using a thin sharp, needle-like
tool.
4. When pump cylinder jamming occurs, no liquid will be sprayed out. If the
motor rumbles, replace the entire pump cylinder.
5. When the spray gun is buzzing and only some liquid spurts out, it usually is
a failure of the motor coil. Change the motor.
6. When the spray pattern is not continuous and the flow reduces to 1/3 of
normal output, it is the failure of the cylinder spring. Change the cylinder
spring.
Notes
Use only specified rated voltage and cycles.
Must be properly grounded to avoid electric shock.
Always keep the top side up when in use.
Do not spray onto any part of human or animal body.
Do not use in a wet environment.
Do not spray onto flammable objects.
Keep out of reach of children.
Keep the spray gun in a safe place.
Do not substitute any components except with those of the original
manufacturer.
Table of contents


