DIAMOND PACIFIC Genie User manual
Genie
Manual

Assembly Instructions for the Genie
1. Remove strapping from around motor. Remove wooden board
under machine baseboard. (Do not leave this board underneath
your baseboard as it can cause machine to be unlevel.)
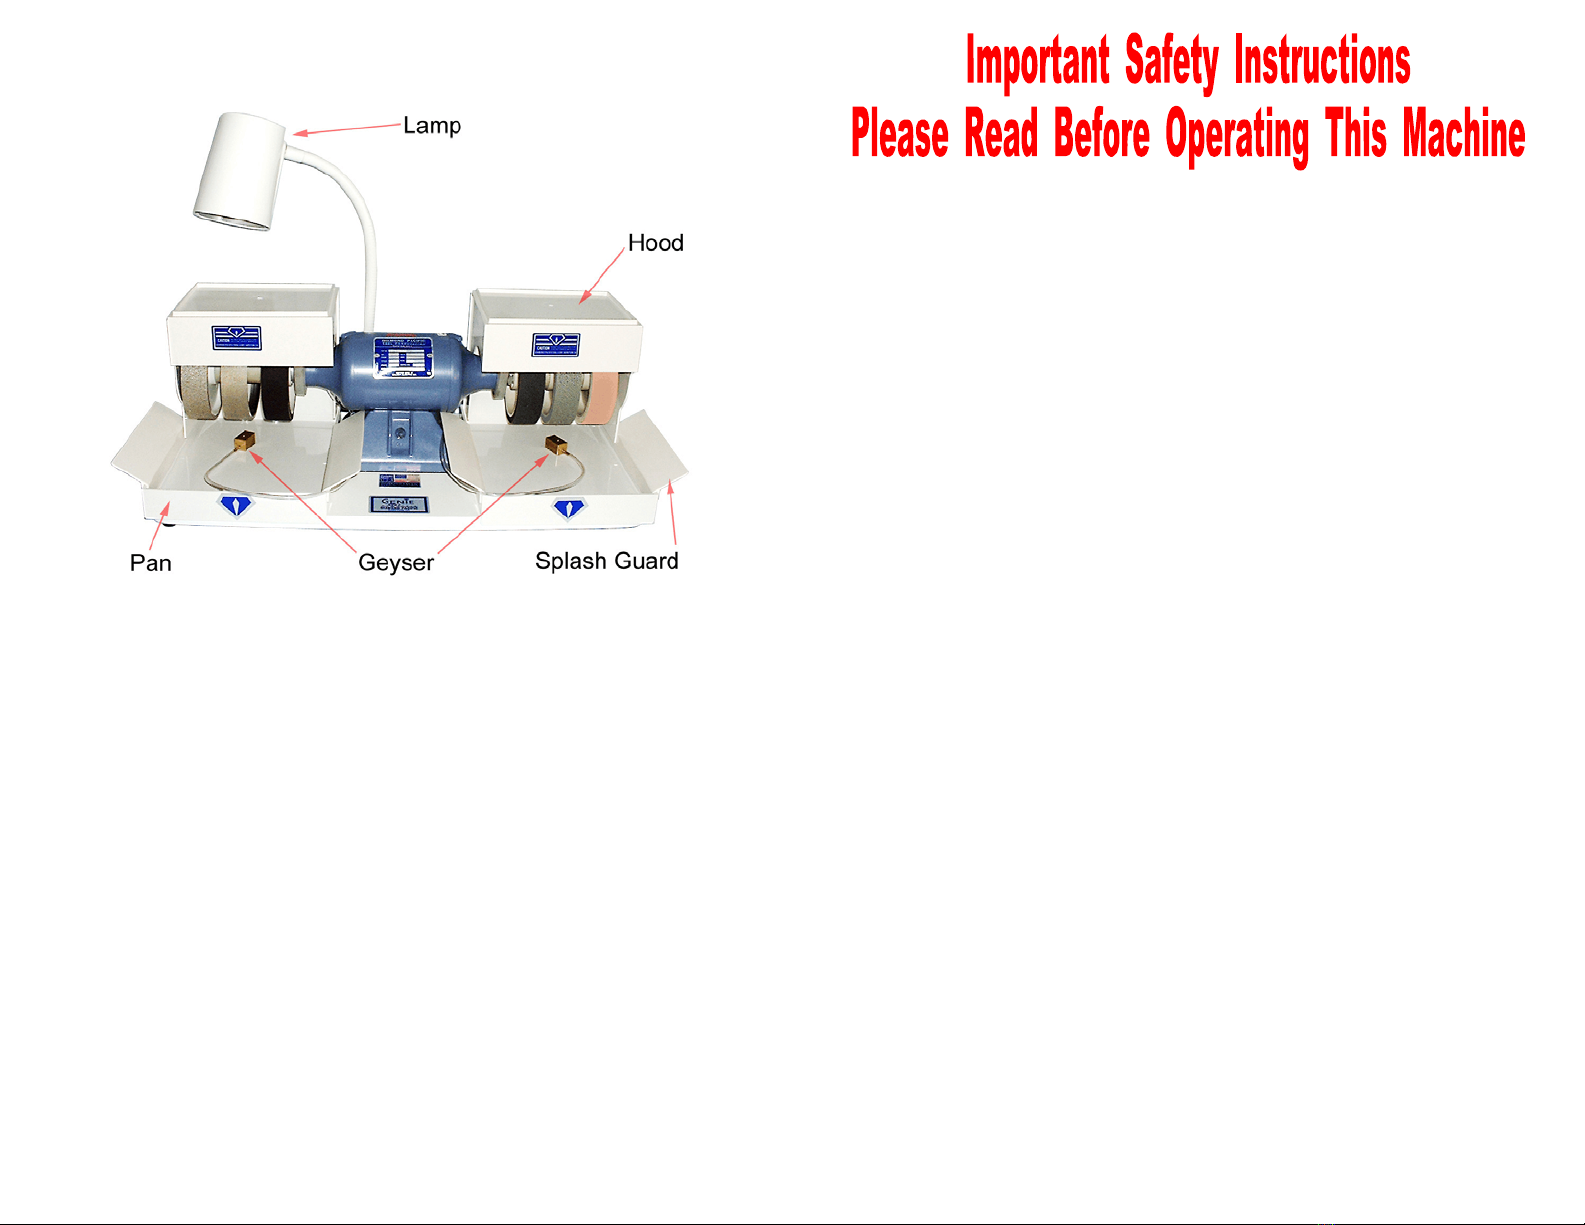
2. Set pans in place. Ease each hood over its aluminum bracket.
It will fit snug. Make certain back edge of hood is inside pan to
prevent water from running outside pan.
3. Two sets of splash guards are included. They slip down over the
outside and inside edges of each pan. They fit tight, and you
may have to trim inside groove of guard with a sharp knife if it is
too snug for you.
4. Lamp can fit on either button screwed onto the rear of the
baseboard. Pull up the quick-connect fitting on stem of lamp and
it will slip over the base button and attach.
5. Please read safety instructions and entire operating instructions
in the manual before using machine.
1
Before plugging in this machine, make certain the electrical
outlet is properly grounded and of the proper voltage. Since
the Genie uses water as a coolant your electrical circuit
should also be protected by a Ground Fault Circuit
Interrupter (GFCI) to prevent the possibility of electrical
shock. If a GFCI protected circuit is not available you may
purchase a portable unit from Diamond Pacific or your local
hardware store. Also make certain that the machine switch
is off and that your hands and the electrical connections are
dry.
Do not use silicon carbide or aluminum oxide wheels on this
unit. Such wheels require metal guards as they may break
and fly apart while in use. The hood and pan on this unit are
designed for use with diamond grinding wheels only, and
should not be used with silicon carbide or aluminum oxide
wheels.
Rock dust can be hazardous to one’s health. Use sufficient
water at all times while grinding and polishing stones so that
rock dust does not form.
Before grinding and polishing any material, make certain that
it will not produce toxic fumes or dust. Sea shells are one of
the known hazardous materials of this type. If you should
ever have occasion to grind metallic ores or other mineral
specimens, be aware of the possibility that they may contain
toxic quantities of such substances as uranium, lead,
mercury, arsenic, asbestos, copper sulfate, etc.
Use safety glasses to protect your eyes from flakes of stone
or other objects that might be thrown by the wheels.
It is possible for a stone to become wedged between
adjacent wheels or between wheels and the pan which could
result in injury to yourself and/or damage to the machine,
such as a bent shaft. Be alert while working to prevent this
from occurring.
The motor of this unit is sealed to prevent grit contamination
and normally runs hot to the touch. Avoid contact with the
motor while in use to prevent possible burns.
2

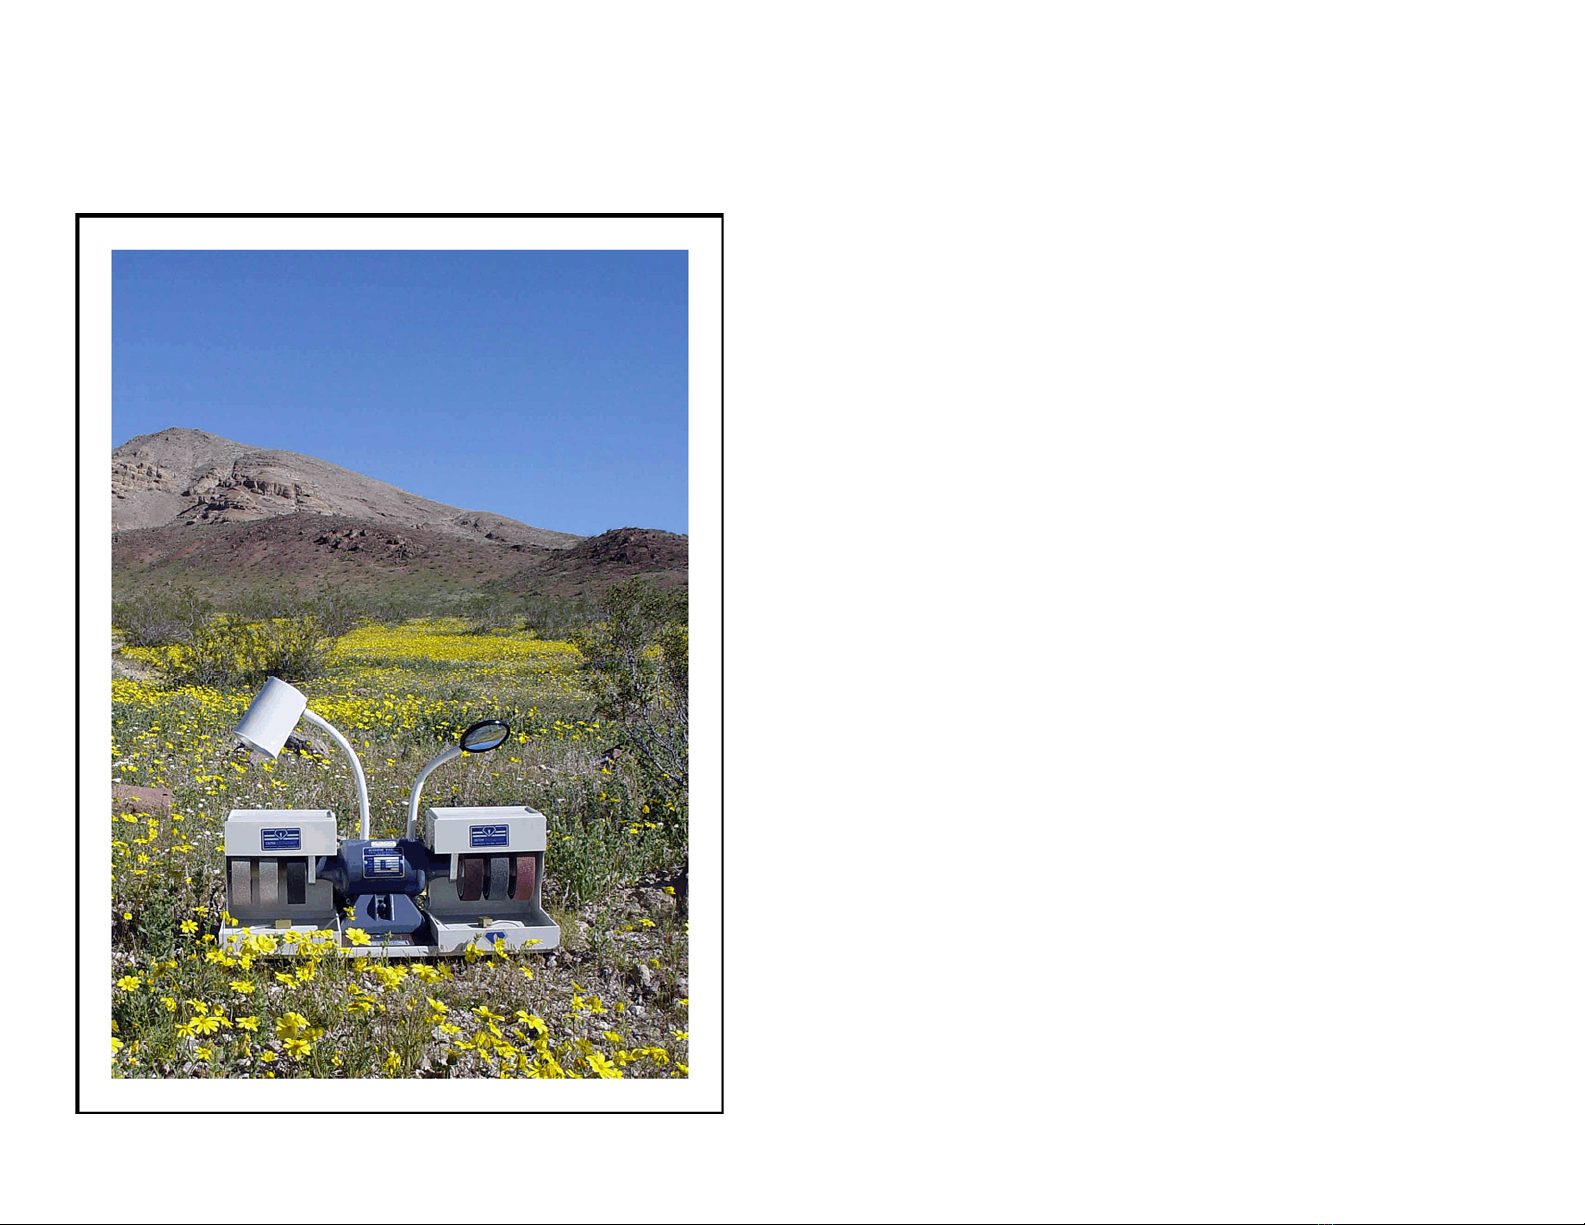
Introduction
The Genie is a compact cabochon grinding and polishing unit
complete with motor, diamond wheels, and coolant system. It requires
no attachment or hookups other than a standard 115 volt electrical
outlet, (230 volt for export model) making it portable and light weight.
Since the grinding and polishing wheels do not require large amounts
of water, the Genie is also a clean operating unit, and can be used in
any convenient place such as the kitchen.
The Genie comes with two Galaxy metal-bond diamond grinding
wheels: one 80 grit for coarse grinding, and one 220 grit for fine
grinding. The set of four Nova resin-bond diamond sanding and
polishing wheels (grit sizes 280, 600, 1200, and 3000) is an excellent
all-around combination that will produce a high polish on most stones.
For those stones that may benefit from an additional polishing step, a
14000 grit Nova Disc is included and can be attached to the right hand
shaft. With the six wheels mounted at once, the lapidary can quickly and
efficiently grind and polish most stones in a matter of minutes, without
having to stop to change or charge attachments and wheels.
Flex Stem Lamp and Magnifier
The lamp has a flexible stem for easy adjustability, and a quick-
coupler at the base for easy detachment. The extra coupler base on the
unit may be used for an extra lamp or optional magnifier (see page 24).
When adjusting the lamp or magnifier, use both hands so you can
grasp the base of the flexible stem and bend it from there in order to
prevent excessive strain on the base attachment, use care not to cause
excessive strain on the lamp shade or magnifier lens rim.
The lamp and magnifier are interchangeable on the metal buttons.
To remove either one, raise the plastic ring near the base of the flexible
stem, and the unit will lift off. Use maximum 100 watt bulb.
Motor
The Genie motor is a heavy-duty, industrially rated, sealed, capacitor
start motor made especially for Diamond Pacific Tool Corp. by the
Baldor Electric Company. It is unconditionally guaranteed by the
manufacturer against defects in workmanship or components for one
year from date of purchase.
3
The domestic motor is 1/4 HP, single phase, 1800 RPM operating
on 115 volt, 60 cycle (Hz) AC current.
The export motor is 1/4 HP, single phase, 1450 RPM operating on
230 volt, 50 cycle (Hz) AC current.
Since the motor is totally enclosed to prevent grit contamination of
the bearings, it has high temperature insulation which allows it to
operate at higher temperatures than fan cooled motors. The motor
never needs oiling.
The Genie can be operated with any small generator producing a
minimum of 400 watts power. With a generator, you can use your Genie
out in the field as well as in your home or shop.
USE CAUTION:
The motor normally runs very hot to the touch. Care should be taken to
avoid touching the motor while it is in use in order to avoid possible
burns.
Hoods and Pans
The Genie comes equipped with a hood and pan for each side of the
unit. Both hood and pan are molded of rigid plastic that is durable,
lightweight and easy to clean. A ridge around the top edge of the hood
makes it a convenient tray for stones.
To remove either hood from its bracket, grasp it with both hands and
rotate it towards you (in same direction that wheels rotate) rather than
attempting to lift it straight up and off the bracket. Once the hood has
been removed, the pan can be slipped out for cleaning.
To use flat laps on either end of the motor shaft, first remove the
hood from its bracket, then unscrew the end plate from the hood. Turn
the pan 90 degrees and parallel lengthwise to the shaft. Replace the
hood. This arrangement allows easy access to the lap or pad and
provides ample drip pan space.
Some flat laps may require more room on the left end of the Genie. This
additional room may be acquired by cutting out the special thin section
on the right side of the left hood as follows:
1. Use a strong, sharp knife, and be careful not to cut yourself.
4

2. Cut down each side of the section, then score across the bottom of
the inside. Work the piece back and forth to break it across the
bottom.
3. You may want to dress the new edges with the knife, and the plastic
cuts easily for this.
4. Once this portion has been removed, the hood will slide further from
the motor, allowing more room for laps on the end of the motor shaft.
CAUTION: The plastic hoods and pans are designed for use ONLY with
diamond grinding wheels. Do not ever use silicon carbide or aluminum
oxide wheels on the Genie.
Cab Rest
The odd shaped plastic cab rest has two main purposes, to act as
a steady rest for the hands while grinding and polishing a stone, and to
provide an easy, accurate way to grind the bezel on cabochons.
The cab rest can be set in the pan in any position that enables you
to steady your hands while grinding and polishing. Usually it will be laid
flat in the pan.
To grind a uniform bezel on your stones, set the cab rest upright,
with the down slope towards you and the upper end close to the
grinding wheel. Turn your cab topside down, place on top of cab rest,
and proceed to grind the edge. The slope of the cab rest is at an angle
that will give you a uniform 12-½degree bezel.
Spra-Mist Cooling System
Description:
The Spra-Mist coolant system utilizes a piston type air pump to
operate two geysers that provide a fine mist to the underside of the
grinding and polishing wheels. The pump is located on the left hand
side of the machine, under the hood. Air from the pump is supplied
through plastic tubing to the two geysers.
The Spra-Mist pump is relatively trouble free because of its unique
design. No water flows through the pump itself, so it cannot be
damaged or clogged by rock dust or grit. Regular oiling of the leathers
and bearings will generally keep the pump operating at maximum
5
efficiency.
Operation:
1. The pump automatically begins to operate when the motor is turned
on. It will not operate if the left hand wheel adaptor is not mounted
on the shaft as the wheel adaptor holds the motor shaft pulley in
place
2. The geysers should be placed in the water pan with the large hole
down, and set towards the rear of the wheels to avoid excess water
splash. Remember to move the geyser from wheel to wheel as you
work.
3. About two cupfuls of water should be placed in each pan, or
enough to reach approximately one third the way up the side of the
geyser.
4. By attaching the white plastic base to the brass geyser, the geyser
sits at an angle that will provide a spray of water to either “No-Hole”
metal laps or Nova discs attached to the right hand side of your
Genie, or laps having a ½" center hole attached to the left hand
side of your Genie. The plastic base should be removed after the
lapping process is complete. If left on, it may not properly spray the
underside of the wheels. The outside plate of the hood, on the side
to be used, must be removed by unscrewing the attaching screws.
Turn the water pan 90 degrees so that its long dimension is parallel
to the shaft so that the geyser with base can be set to provide water
to the lap or Nova Disc. (The geyser spray should not be used on
canvas polishing pads with diamond compound as it will wash away
the compound. Use a silicon lubricant such as Gem-Lube instead.)
5. Occasionally a geyser will become plugged from the mineral
content in the water. This usually can be corrected by boiling the
geyser in a solution of vinegar and water. Or if plugged by a small
piece of grit, use a needle or paper clip to remove the obstruction.
6. A few drops of Water Aid in the pan will improve the cutting ability
of the Galaxy metal-bond diamond grinding wheels. Avoid excess
Water Aid as it can cause excessive foam in the pan.
Galaxy Metal Bond Diamond
Grinding Wheels
6

Description:
Galaxy metal-bond diamond grinding wheels are designed to
provide the gem-cutter with a smooth, fast cutting, true-running grinding
surface ideal for working stones. The diamonds in a Galaxy Wheel are
held on a heavy steel ring by an extremely hard nickel alloy plating. The
ring is mounted on a tough, glass-filled polyester core, making a
smooth, quiet running wheel.
Use and Maintenance:
Galaxy Wheels never need dressing. Do not attempt to do so as
you may damage or ruin the wheel.
For longer wheel life and to prevent wheel damage, the following
practices should be followed when using your Galaxy Wheels:
1. Use a light to medium pressure when grinding stones. Although
diamonds are extremely hard, they are also quite brittle and can be
easily shattered by excessive pressure or the bumping of a heavy
rock. The wheels cut most effectively with a light to medium
pressure and will last longer as well.
2. Use a steady rest to avoid uneven wear patterns. Steadying your
hand while grinding will help prevent bumping and chattering that
causes uneven wear of wheels. It will also help prevent damage to
stones.
3. Use a coolant while grinding. Water is best and a small amount will
normally do to keep the wheels wet. This prevents the formation of
rock dust, keeps your stone cool, and stops the buildup of rock
residue on the wheel surface which can slow down cutting action.
When grinding soft materials such as onyx or turquoise you can
place both geysers under the same wheel as more water is needed
in order to keep the wheel clean.
4. Use the entire surface of the wheel as you grind your stone. Avoid
using just the center or edge or any one area of the wheel surface
as this will cause excessive wear in that area and shorten the
effective life of the wheel. When grinding crosses, hearts, fire
agate, etc. be certain you grind with the diamond covered surface,
not on the bare metal side of the wheel, as this will undermine the
diamonds and cause excessive wear of the wheel edge.
7
5. A few drops of Water Aid in the pan will improve the cutting ability
of the Galaxy Wheels.
6. Reverse the wheels occasionally so that the diamonds cut from the
opposite direction. The edges of the diamonds will wear with use,
and the cutting speed will decrease. By reversing the wheel, the
cutting edges of the diamonds are renewed. (The 80 and 220 grit
wheels will be interchanged when you reverse the direction of the
two wheels.) See instructions for “Remounting and balancing
Galaxy Wheels” when reversing them.
Nova Resin-Bond Diamond
Sanding and Polishing Wheels
Description:
Nova Wheels are specially designed to produce an excellent finish
on stones with a minimum of time and effort. The diamonds in Novas
are embedded within a tough, flexible, plastic resin backed by an extra
soft, thick, sponge rubber backing. This soft, flexible construction
enables the surface of the Nova Wheel to conform to the stone,
eliminating flat spots and scratches.
Use and Maintenance:
1. Nova wheels must be used with a water lubricant. This fact cannot
be stressed too strongly, for if the wheels are run dry for more than
a few moments, rapid wear and damage can result. Make certain
that the geyser is supplying sufficient water to the Nova Wheel
before using it, and remember to move the geyser to the next wheel
as you progress through the sanding and polishing procedure.
2. Nova Wheels should be broken in by sanding and polishing a large
agate cab prior to working on others. This is necessary in order to
remove excess resin coating surfaces of the diamonds. Spend from
two to five minutes on each wheel with the first cab, working it over
the entire surface of the wheel. The finer grit wheels, especially the
3000 grit wheel and 14000 grit disc, will take longer to remove the
excess resin, and will continue to improve in speed and finish as
more stones are worked.
3. Use sufficient pressure to cause the surface of the wheel to
8

depress slightly to conform to your stone. This eliminates the flat
spots left by the grinding wheels and will cause fewer scratches
than would be produced by pressure that is too light.
4. It is important to hold your stone so that you do not allow the upper
or leading edge to act as a plow and dislodge diamonds from the
surface of the wheel. The diamonds in Nova Wheels are firmly
embedded in the resin and with proper use cannot be dislodged to
cause contamination in proceeding from one wheel to the next. But
they can be dislodged with the sharp edge of a stone.
5. To prolong the life of your Nova Wheels, be certain to prepare your
stone properly on the grinding wheels prior to sanding. Use the
metal bond wheels to grind your stone to its final size and shape,
and to remove all sharp edges and corners. This leaves only the
final sanding and polishing to the Nova Wheels. Similarly, it is
important to do a good job of sanding at each stage before going
to the next as the finer grit wheels will take much longer to remove
scratches than do the coarser wheels.
6. If your stone still has scratches after the final polish, check the
following procedures:
A. Make certain all deep scratches left by the coarse (80
grit) grinding wheel are removed by the fine (220 grit)
grinding wheel.
B. Make certain you are using enough pressure on the
Nova Wheels. Too light a pressure can cause scratches.
C. Make certain your Nova Wheels have been broken in
properly, especially the 3000 grit wheel and 14000 grit
disc. If any one wheel seems to be causing the
scratching, take a large agate cab and work it across the
entire surface of the wheel.
D. Almost all problems with scratches are caused by
improper procedure in the above three areas.
Procedure for Grinding and
Polishing Cabochons
Pre-Forming – Preparing Stone for Grinding Wheels:
9
Since most gem material comes in sizes and shapes larger than
desired for a single cabochon, it must be pre-formed. This is usually
done by cutting the rock into slabs about 1/4 inch thick with a lapidary
or rock saw. The best areas of the slab are then selected and marked
with a template for shape and size of desired stones. Excess material
is removed with a trim saw or one of the other tools available for this
purpose. The more material that can be removed from a pre-formed
stone at this step, reducing it to as near its finished size as possible, the
less time will be taken in the grinding process. Just as important, the life
of the grinding wheels will be increased.
Grinding on the Galaxy Grinding Wheels:
The basic procedure is to grind your stone to proper size and shape
on the Galaxy Grinding Wheels. If the stone is properly prepared on the
grinding wheels, it is only a matter of minutes more to polish it on the
Nova Polishing Wheels.
First grind your cabochon to the approximate size of the template
outline using the left hand or coarse (80 grit) Galaxy Wheel. Use light
to medium pressure and work the stone over the entire surface of the
wheel. Check the stones size as you work, either with the template or
the mounting in which it will be set. Leave a small amount of material
outside the outline so that the stone is slightly larger than the template
or mounting. The balance of the excess material will be removed in fine
grinding and some in the sanding process. Using the Cab Rest during
the above procedure will make it easy to grind a uniform 12-½degree
bezel angle all around your stone.
Proceed to the fine (220 grit) Galaxy Wheel, making certain that
you move the geyser to the wheel you are using. Again, a light to
medium pressure is all that is necessary. Finish grinding the bezel of
the stone, leaving only a small amount of material that makes the stone
just a fraction too large.
Now move back to the coarse grinding wheel to grind the face or
dome of the cab to shape. For best results, the stone should be dopped
(glued to the end of a dowel with dop wax or other adhesive) to enable
you to hold it more easily.
Grind from the edge towards the center of the stone, and then back
to the edge using a circular and oscillating motion as you work. The
circular component of this motion is accomplished by continually
rotating the base of the dop stick using your right hand. At the same
time, your left hand is used to move the stone back and forth in an
10

oscillatory manner so that its point of contact with the wheel spirals from
the edge of the stone to the center and back without stopping, since
stopping produces a flat spot.
This circular, oscillating motion is the key to well shaped stones and
the prevention of flat spots. Check the curvature of your stone
frequently to achieve symmetry. The outline should form a smooth arc
when viewed in any direction, with no high spots or flats, especially at
the top of the dome.
Once you have achieved a uniform shape, move to the finer grit
wheel and remove all the scratches left by the coarse wheel. It is
important to remove all scratches possible before proceeding to the
Nova Wheels.
Sanding and Polishing with the Nova Wheels:
Before using any Nova Wheel, make certain that the geyser is
supplying water to that wheel. NOVA WHEELS MUST NOT BE USED
DRY.
1. Start with the 280 grit Nova Wheel, making certain that the geyser
is supplying water to that wheel. Use a firm pressure, depressing
the rubber backing so that it conforms to the surface of the cab, and
keep moving your stone with a circular and oscillating motion at all
times. This firm pressure (in contrast to the light to medium
pressure used on the grinding wheels) and the circular and
oscillating motion are important procedures in eliminating flat spots
and scratches. Using too light a pressure, or allowing the stone to
remain in one position, can result in more scratches and flat spots.
2. Spend enough time on the 280 grit Nova Wheel to completely sand
away the scratches and facets left by the grinding wheels. This
should only take a minute or two, leaving the stone with a uniform
finish over its entire surface and reduced to very near its final size.
3. Proceed to the 600 grit Nova Wheel, making certain that you move
the geyser first. Continue using firm pressure and the circular and
oscillating motion. You should only need to spend a minute or two
on each of the 600, 1200, and 3000 grit Nova Wheels to achieve a
fine polish on your stone.
4. It is important to do as good a job of sanding and polishing as
11
possible at each stage before going on to the next, as the finer grit
wheels take longer to remove scratches than do the coarser grit
wheels
5. Some hard to polish materials, such as Jade, may require a finer
grit polish than the 3000 grit Nova Wheel. A 14,000 grit Nova Disc
is provided with the machine and will generally give an excellent
polish. Other polishes such as cerium and tin oxide can also be
used with canvas or leather pads to provide the final polish.
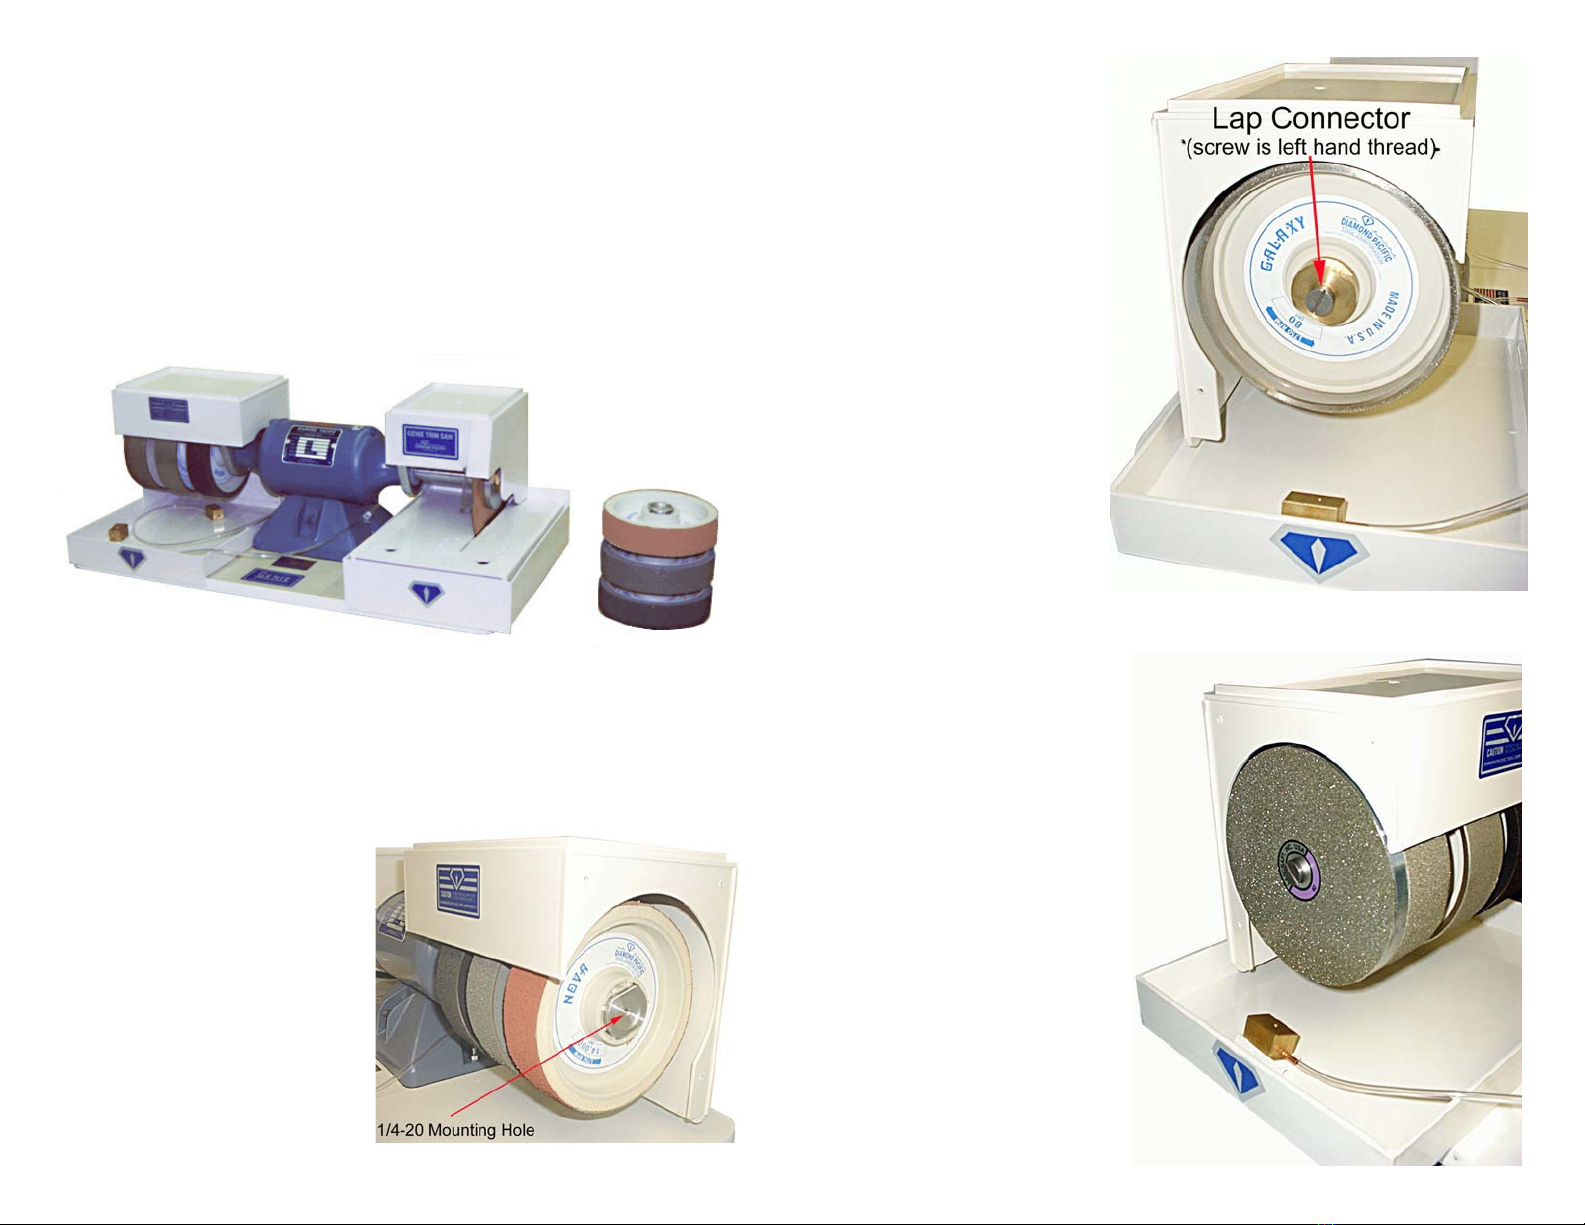
Using Nova Discs:
For stones requiring an additional step to achieve a satisfactory
polish (jade and some soft stones, for instance), we recommend using
the 14,000 grit Nova Disc that comes with the machine. Other types of
fine polishing compound such as cerium and tin oxides also produce
excellent results, and canvas and leather pads are available for use with
these compounds.
1. Remove the end panel from the right side hood and thread the
Nova Disc into the 1/4-20 mounting hole in the right end of the
machine (see page 13).
2. Snap the small, white plastic, geyser base that came with your
machine onto the bottom of the brass geyser to angle it to spray on
the Nova Disc. NOVA DISCS MUST NOT BE USED DRY.
3. To allow for working room when using the Nova Disc or other right
end attachment rotate the pan so that the front of the pan is on the
right end of the machine .
4. Additional Nova Discs are available in seven grits ranging from 280
to 50,000.
12
Optional Accessories
Although the Genie comes complete and ready to operate there are
a number of optional accessories available that make it more versatile
to better suit your personal needs.
A trim saw attachment is available that can be mounted on the right
hand side of the Genie. The saw comes with an eight inch blade and
uses water as a coolant, so that it can be used wherever your Genie is
set up.
Quickly converts your Genie into an eight inch trim saw.
Just spin off the right hand wheel adaptor with the wheels still attached
and spin on the saw adaptor with blade. The whole process takes only
a minute and changing back is just as easy!
Right Hand Laps, Pads
6 inch diameter Nova Pads or
Magnetic Laps, leather and
canvas pads, “No-Hole” metal
bond laps or other discs that use
a 1/4-20 attachment can be
easily attached to the right end
of your Genie.
13
Left Hand Laps, Discs
6 inch diameter laps with
a ½" arbor hole can be
fastened on the left hand
side with the special lap
connector that comes
installed on the Genie.
Use these laps for
grinding and polishing flat
surfaces.
When using laps on either
end of the Genie the outside
plate of either hood is easily
removed by removing the
screws which hold it in place.
The lap connector on the left
hand side has left hand
threads. Turn clockwise to
remove screw to attach lap,
counter-clockwise to tighten.
Note that the pans can be
rotated to allow more
working room on the ends of
the machine as shown here.
14
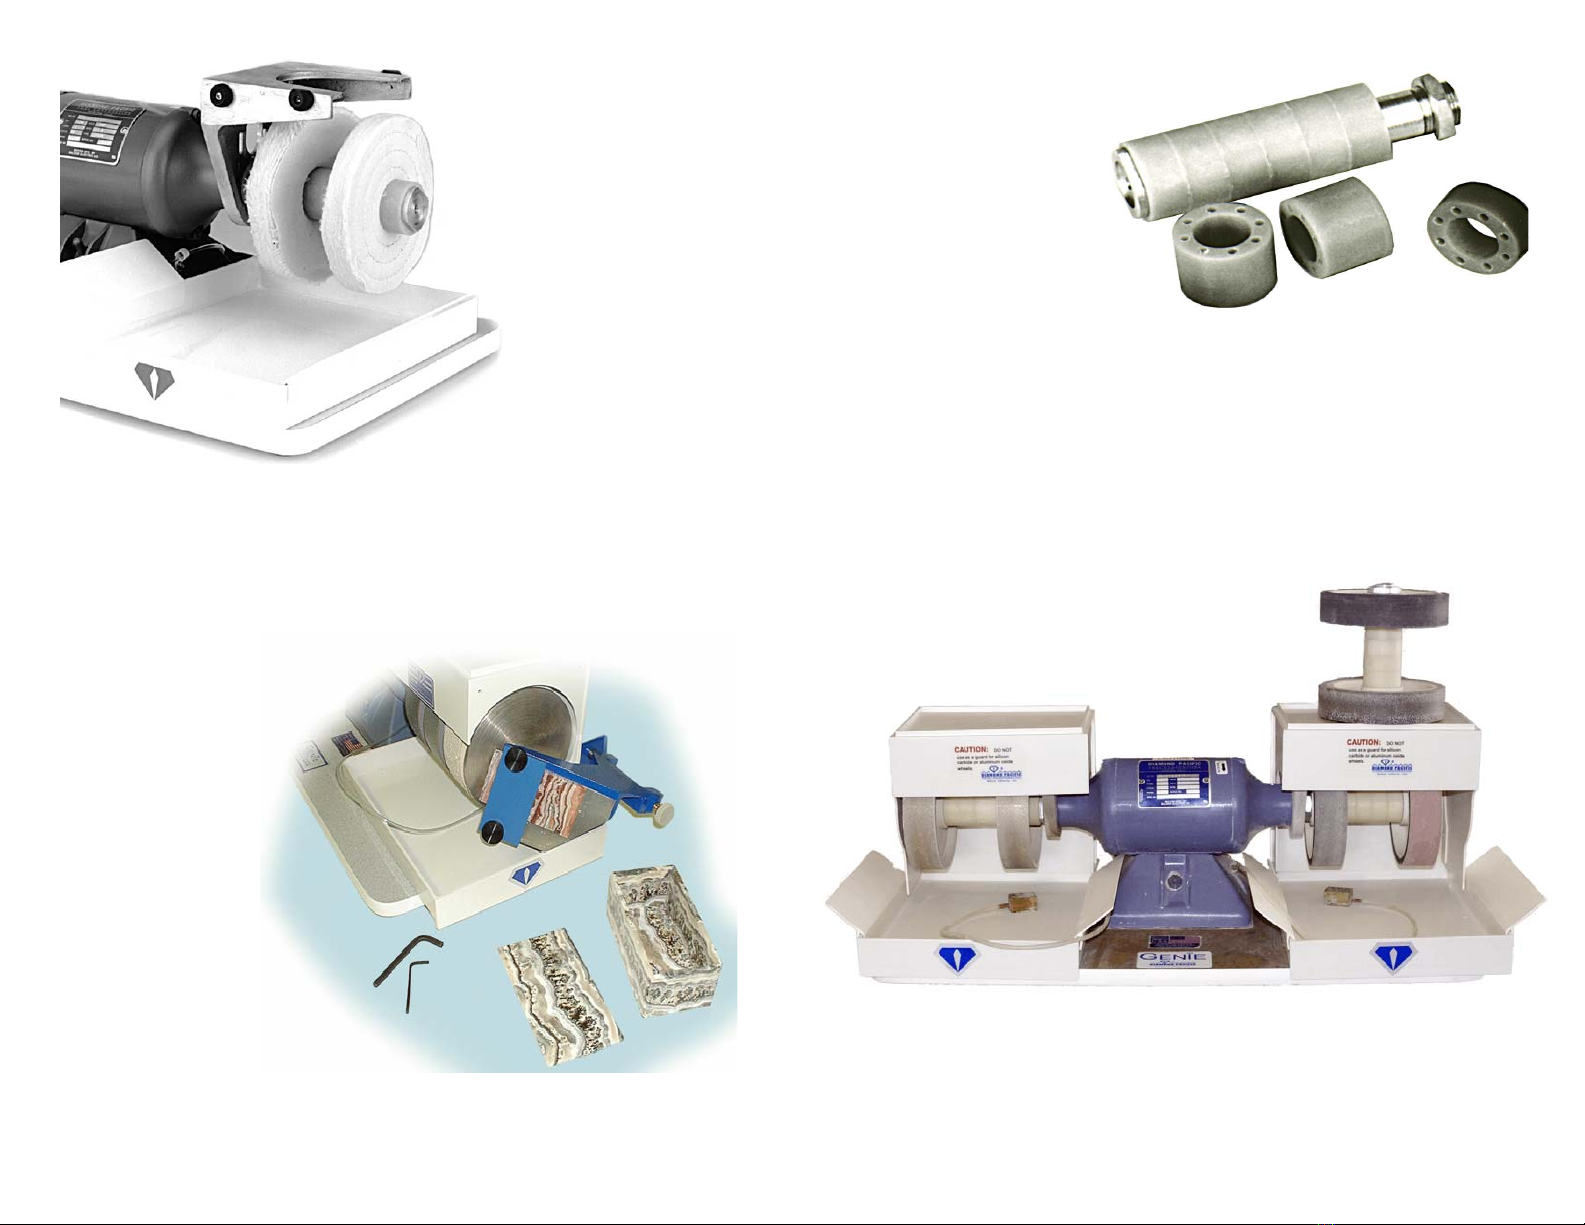
Jewelers Buff Kit
This kit contains buffs
and jewelers rouge for
finishing metals. The
wheel adaptor and
spacers included allow
the buffs to be
mounted on the right
side of the Genie.
The Boxer
Attachment
Holds your slabs at
a 45 degree angle
to make perfect
miter joints for
fabulous looking
boxes. Mounts on
the left side of your
Genie for use with
standard flat laps
(½" center hole), or
on the right side for
use with “no hole”
laps (1/4-20 thread)
Extra right hand
adaptors and spacers
15
Using an extra right hand adaptor and spacers allows the gem carver
to mount the wheels just four at a time as shown below. The two sets
of Novas can be interchanged on the right side of the machine in about
20 seconds and the space between wheels will be 3" rather than the
usual 3/4" allowing room to carve fancy shapes such as hearts and
crosses.
(Adaptor and spacers sold separately or in a kit)
16
Extra right hand adaptors are also used for mounting extra grits in Nova
or Galaxy wheels or special shaped wheels such as our Convex
Carving wheels. Wheels can even be mounted one at a time for even
more working room.
See our current catalog or call us for more information regarding
these accessories.
17
Pump Maintenance
Oiling Pump Leathers and Bearings:
To maintain maximum output, the leathers and bearings in the
pump should be lubricated about every forty hours of machine use. Use
the following procedure:
1. UNPLUG THE MACHINE.
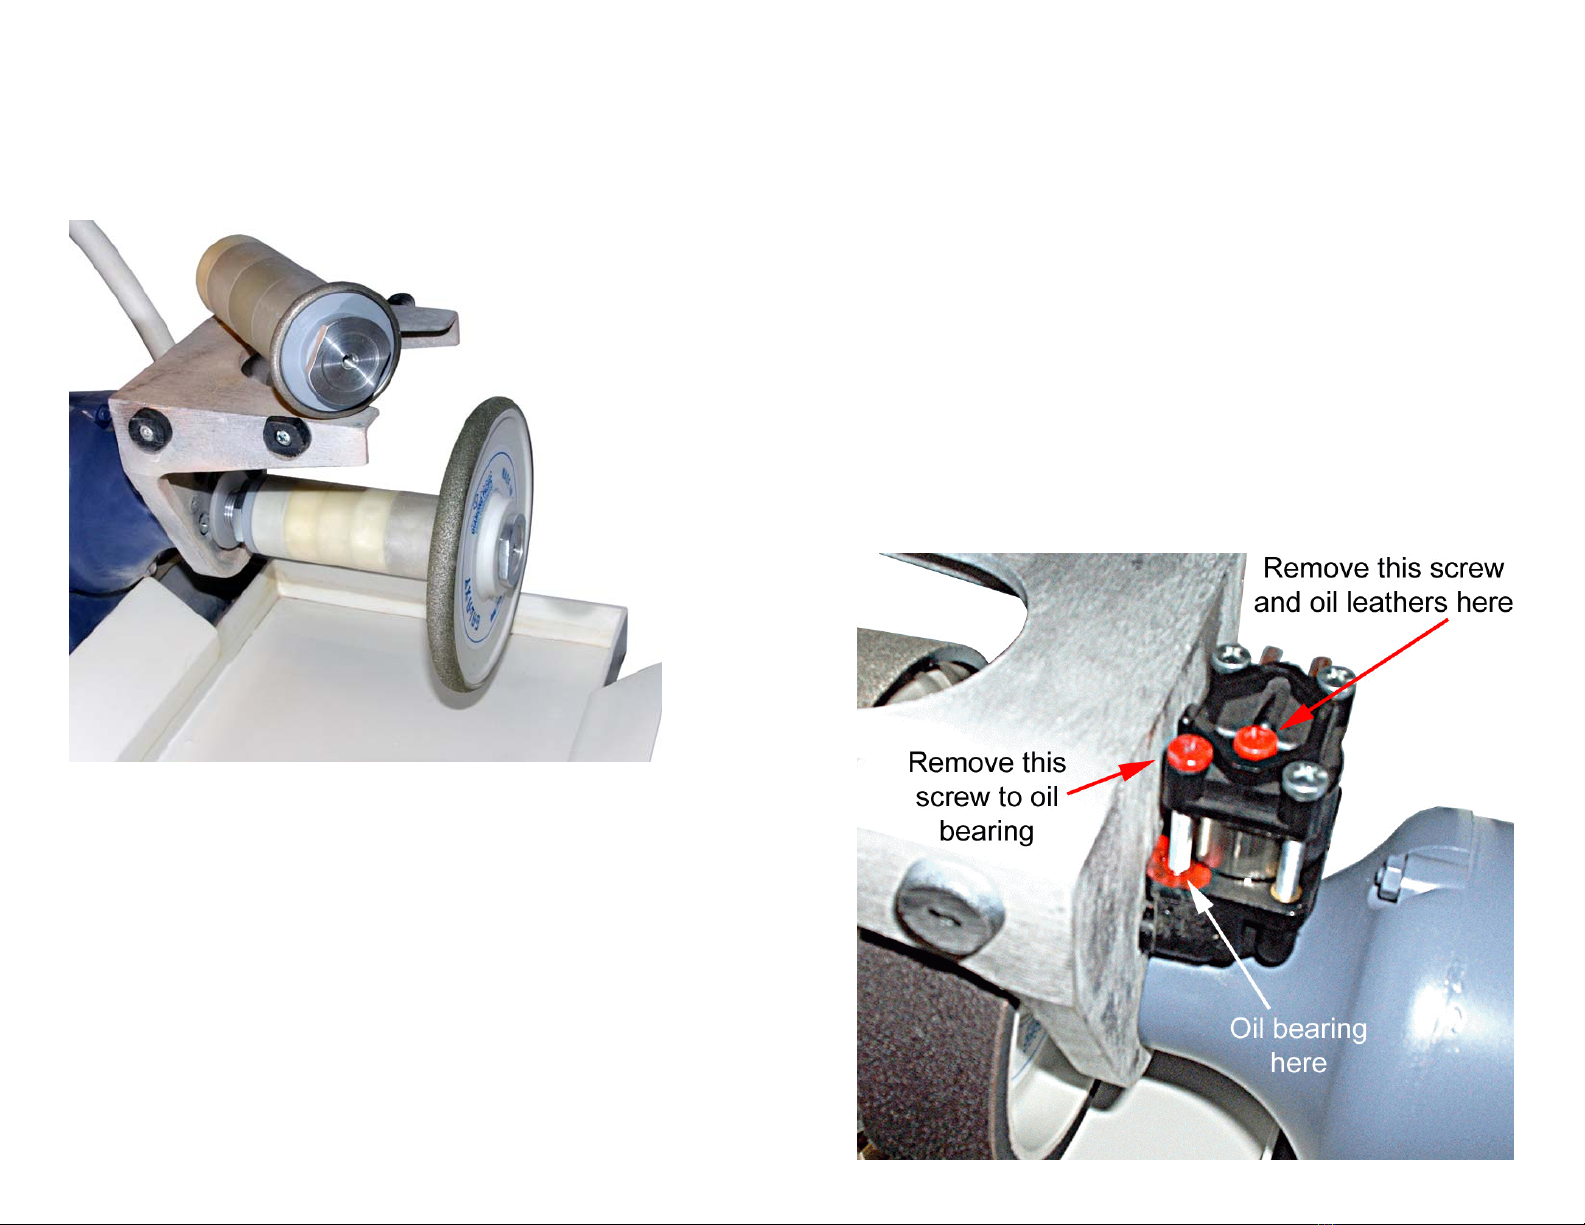
2. To oil the leathers, remove the left hand hood. The pump will then
be exposed. Remove the middle screw (see picture) that is painted
red. Place one drop of 30 weight motor oil in the hole and replace
the screw. This hole oils the leathers, and any excess oil will
eventually come out the air outlet tubing and into the water pan.
3. To oil the bearings, remove the corner screw that is painted red (see
picture on preceding page) Place one drop of 30 weight motor oil in
the screw hole that is painted in the bottom pump block, not in the
18
top where the screw was removed. Do not use too much oil or allow it
to run out of the hole, as excess oil can leak onto the pump belt and
cause belt slippage. Replace the screw and hood.
4. Regularly oiling as explained above will normally keep the pump
operating properly, but the two usual causes of decreased air
output, dried out pump leathers and belt slippage, are easily
corrected.
Dried Out Pump Leathers:
Decreased air flow with the pump still operating is usually caused by
dried out pump leathers. The leathers should be removed and
thoroughly oiled, or replaced.
This can be done by
disassembling the pump with a
phillips screwdriver as follows:
1. UNPLUG THE MACHINE.
2. Remove the four head
screws on the top of the air
pump. One is painted red
and the other three are
unpainted. Once the
screws are out, remove the
cylinder head and cylinder.
The piston will then be
exposed.
3. Remove the leathers and
felt from the piston by
unscrewing the screw in
the top of the piston.
Stretch the leathers and
felt with the fingers, and oil
them generously with 30
weight oil.
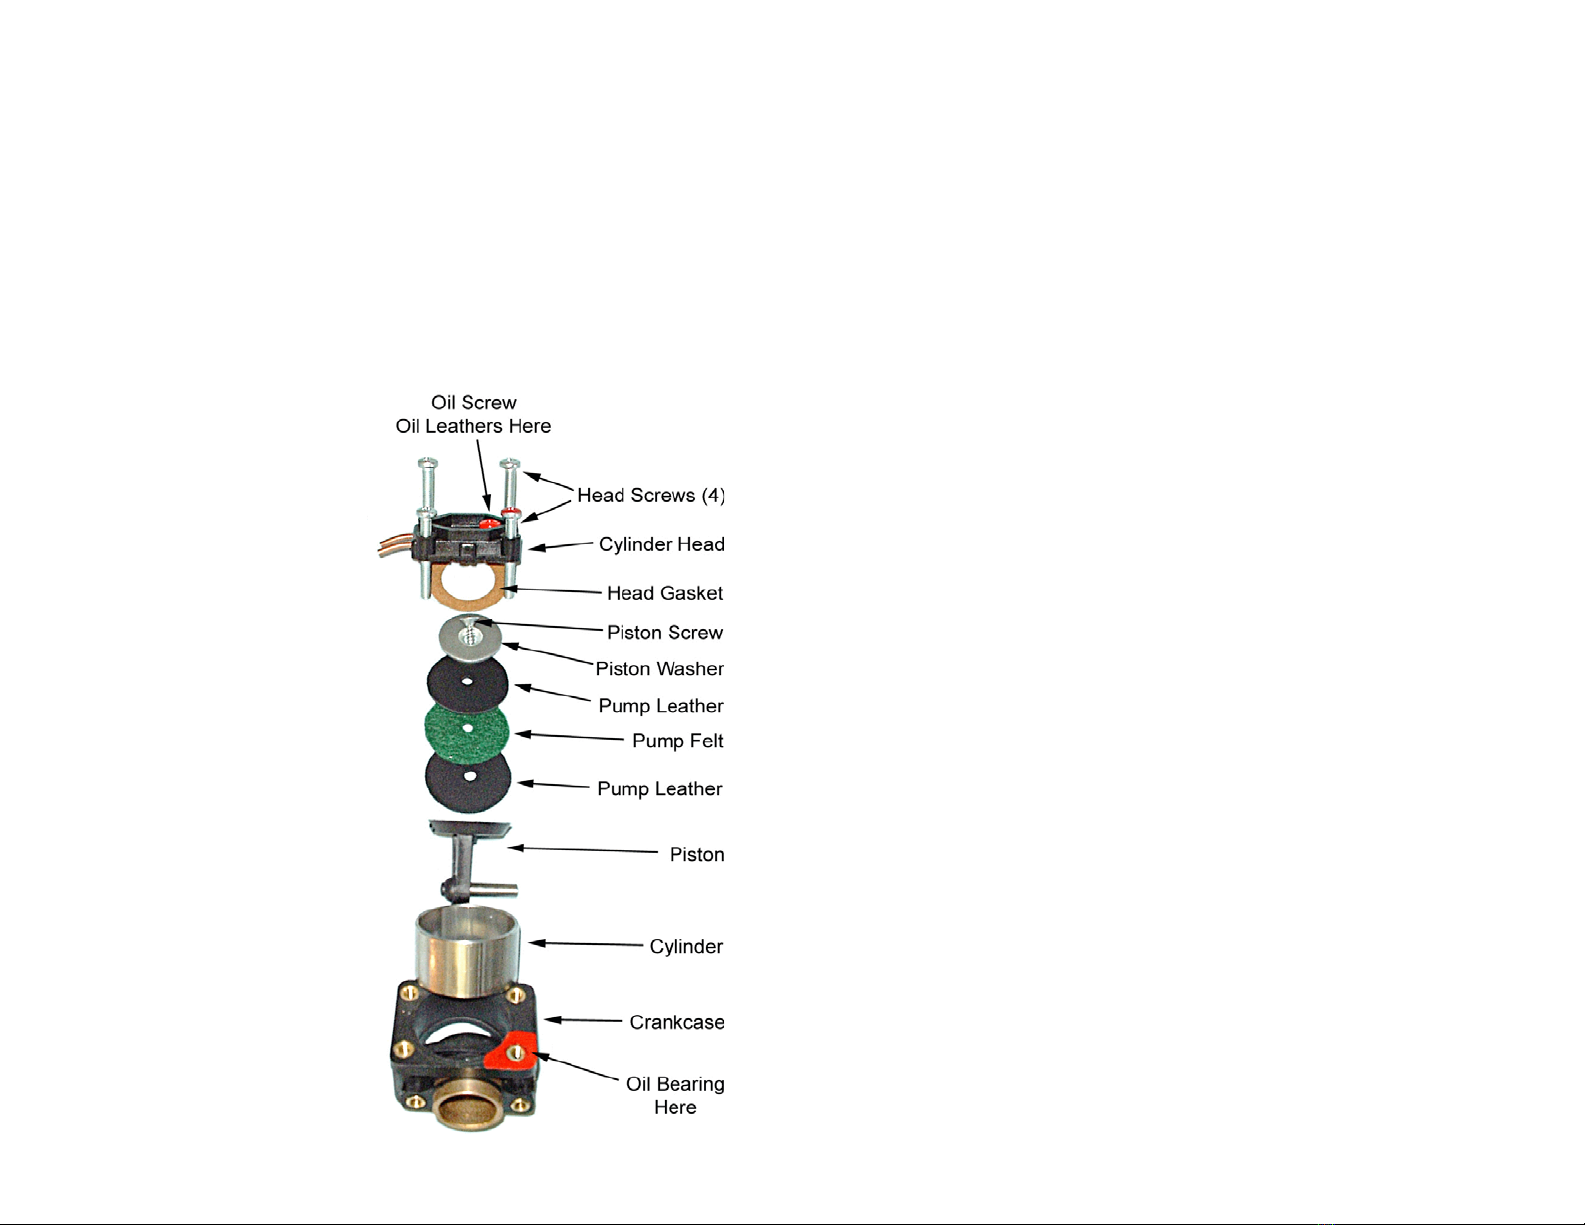
4. When ready to reassemble
the piston, it is important
that it be done in the
following order: (see photo)
19
A. Place the felt between the two leathers. The smooth or shiny
side of the leathers should be away from the felt.
B. Place the piston washer on top of the leathers, countersink side
of the washer hole facing up. Center the washer so that the
edge of the leathers shows evenly around it.
C. Slip the screw through the washer and leathers and into the
hole of piston top. Tighten the screw securely so that it cannot
loosen.
D. Slip cylinder and head back over the piston with the air outlet
tubing to rear of machine
E. Start the red screw back into the front left hole, then start the
other three corner screws before tightening all four evenly and
securely. Avoid excessive tightening of these screws as this
may distort the main bearing of the pump, causing hard turning
and overheating.
Belt Slippage:
Intermittent air output or no air output is caused by a slipping belt.
This problem indicates that excess oil from the pump has leaked onto
the pulley and belt, and can be corrected by cleaning and tightening (or
replacing) the belt as follows:
1. UNPLUG THE MACHINE.
2. Remove the left hand hood and wheels. IMPORTANT: See
sections on removing and replacing wheels on the left hand side of
the machine, and on balancing Galaxy Wheels when you replace
the wheels.
3. When the left hand wheels are removed, the pump pulley will be
exposed. Rotate the pump pulley by hand until the two holes in the
pulley are in a horizontal position and you can see two phillips head
pump mounting screws in the pump base behind the pulley. (See
picture on following page). Line up one of the holes with one of the
screws and loosen the screw with a phillips screwdriver. Do not
remove the screw. Then line up the other hole in the pulley with the
other screw and loosen it slightly.
20

4. The pump will
now slide down
and the belt can
be removed for
inspection.
Remove all oil
from the belt and
pulley grooves.
Replace the belt,
making certain it
fits in the grooves
in both the pump
and shaft pulleys.
5. The belt can be
tightened by
raising the pump,
either by holding
it by hand or by
using a screwdriver to hold it up from beneath the pump base.
Either way, raise the pump until the belt is taut, and tighten the two
screws behind the pulley. When the belt is the proper tautness, you
will be able to depress it slightly. If it is too tight, the motor may not
start or may run slow. If this happens, simply lower the pump base
a little using the same procedure.
6. Replace the wheels and hood.
Procedure for Replacing Wheels on the Genie
Removing and Replacing Wheels on the Right Side:
Nova resin-bond wheels are normally used on the right hand side
of the machine. Because of their soft construction, Novas generally do
not need balancing. If you wish to try balancing the Novas, or wish to
use a Galaxy metal-bond wheel on the right side, see the instructions
for balancing Galaxy Wheels on the left hand side of the machine. The
procedures will be similar. To remove or replace wheels on the right
hand side, proceed as follows:
1. UNPLUG THE MACHINE. Remove the right hand hood.
2. Hold the left hand wheels with your left hand, and turn the right
hand wheels in the same direction they spin while running. The
21
wheels will come off in a unit on the right hand adaptor.
3. Use an adjustable wrench to remove the nut on the adaptor. (This
nut has left hand threads.) Once the nut is removed, the wheels
and spacers will slide off the adaptor.
4. Clean the adaptor with fine sand paper, and oil with a very small
amount of light weight oil.
5. Replace wheels and spacers on the adaptor, replace the nut, and
tighten. Slide the adaptor over the shaft. Hold the left hand wheels
and spin the right hand unit of wheels onto the shaft until the
adaptor is tight. Hand tighten only.
Removing and Replacing Wheels on the Left Side:
The standard wheels on the left hand side of the Genie are two
Galaxy metal-bond wheels (80 and 220 grits) and one 280 grit Nova
resin-bond wheel. These three wheels are mounted on an adaptor that
slides over the motor shaft. This left hand adaptor is balanced and
tightened onto the shaft at the factory, and normally should not be
removed to replace or exchange wheels. Follow the procedures below.
1. UNPLUG THE MACHINE. Remove the left hand hood.
2. Use an adjustable wrench to remove the brass lap connector (not
just the slotted bolt) on the left end of the adaptor. The lap
connector has left hand threads. You will have to hold the left hand
wheels while turning the lap connector in the same direction that
the wheels spin while running.
3. Once the lap connector is removed, the wheels and spacers will
slide off the adaptor. Note the sequence of wheels and spacers
before removing so that you can replace them properly. (If
reversing the cutting direction of the 80 and 220 grit wheels, it is
necessary to interchange them so that the 220 will be the first
wheel and the 80 the second wheel.)
4. Clean the adaptor with fine sand paper, and oil with a very small
amount of light weight oil before replacing wheels and spacers.
5. The Galaxy wheels should be balanced again following the
procedures under “Balancing Galaxy Wheels”.
22

The left hand set of wheels can also be removed as a unit while still
mounted on the adaptor if necessary. This can be done as follows:
1. Remove the right hand wheels first. Hold the right hand shaft with
a pair of visegrips or channel-lock pliers to prevent the motor shaft
from turning. Use a piece of leather or thick cloth to protect the
shaft from the pliers.
2. While holding the right hand shaft with the pliers, turn the left hand
wheels in the same direction that they turn while running, as the
adaptor has left hand threads.
3. If the shaft is marred by the pliers, clean it with a fine file or
sandpaper, removing any burrs. Be careful not to create uneven
spots in the shaft. Oil each shaft lightly with lightweight oil. Excess
oil will cause belt slippage.
Remounting and Balancing Galaxy Wheels:
Galaxy Wheels are machined to run true, but must be adjusted to
the individual adaptor and arbor. This is especially important when
wheels are reversed or a new wheel is mounted.
When mounting a wheel, its position should be adjusted so the
imperfections tend to cancel rather than add. For example, a high spot
on a wheel should not be positioned over a high spot on an arbor shaft.
Also, when two wheels are mounted side by side, the heaviest points on
their rims should be positioned opposite each other rather than
together. Since the imperfections referred to would be measured in
thousandths of an inch, or tiny fractions of an ounce, you might think
that precision instruments are needed for aligning wheels. Actually,
proper adjustment can be simply accomplished by the following
procedure:
1. First make certain the spacers, adaptor, and wheel hubs are clean
and smooth. Mount the wheels and spacers on the adaptor and
thread it onto the shaft.
2. Turn the motor on just long enough to rotate the wheels and
observe whether they are running true. If there is a “wobble” or
“bounce”, you will need to balance all three wheels.
23
3. Start with the inside wheel which is usually the 280 Nova. Loosen
the brass lap connector and rotate the inside wheel about one
eighth of a turn. Tighten the lap connector, turn on the motor for a
moment and check to see if the wheels are running true. If not,
repeat the process. These random displacements of the wheel
should eventually place it in a position where it performs
satisfactorily. And remember, the Nova Wheels will not necessarily
run as true as the Galaxy Wheels, and it is not necessary that they
do because of their soft construction.
4. Once the inside wheel is balanced, hold it in place while you loosen
the lap connector to rotate and balance the middle wheel. Make
certain that any time you loosen the lap connector to turn a wheel,
that you hold your balanced wheels in place; otherwise, they may
slip and become out of balance again.
5. The first wheel (usually the 80 grit) should be balanced last using
the procedure in #3.
6. When all three wheels are balanced, it is very important that all
three be held securely in place while the lap connector is tightened.
7. A Galaxy Wheel that is not balanced properly will begin to wear
prematurely at the “high spot”. If such a spot should begin to
appear on your wheel, check it once again to make certain it is
properly balanced.
24

Parts and Accessories
Genie Trim Saw Attachment 100-TSG-105
Replacement Trim Saw Blade 100-TSB-106
Jewelers Buff Kit 100-JBK-G
The Boxer 100-BOXER
Right Hand Adaptor Kit (includes 7 spacers) 101-ADP-GRK
Extra Right Hand Adaptor (spacers not included) 101-ADP-GR
Wheel Spacer, 1/4" 101-GSP-1/4
Wheel Spacer, ½" 101-GSP-1/2
Wheel Spacer, 5/8" 101-GSP-5/8
Wheel Spacer, 3/4" 101-GSP-3/4
Wheel Spacer, 1" 101-GSP-1
Wheel Spacer, 1-3/8" 101-GSP-1-3/8
Extra Flex Stem Lamp (18") 117-0618-G
Flex Stem Magnifier (15") 117-MV15
Water Aid, 8 oz bottle (call for other sizes) 410-WA-108
Replacement Brass Geyser 101-GSG-25
Splash Guard (set) 101-GUO-105
Pump Leathers (set) 101-GPL-145
Pump Belt 101-GPB-150
Pump Maintenance Kit 101-GMK
Complete Pump Assembly 101-G-PUMP
Replacement Motor Bearings (each) 101-GBE-148
Replacement Pan 101-GPA-130
Replacement Hood (left hand) 101-GHO-128-L
Replacement Hood (right hand) 101-GHO-128-R
10/13
25
Orders/Technical Support:
Toll Free: (800)253-2954
Outside US: (760)255-1030
Fax: (760)255-1077
E-mail: [email protected]
Website: www.diamondpacific.com
2620 W Main St, Barstow CA USA, 92311
26
Table of contents
Popular Grinder manuals by other brands


Metabo HPT
Metabo HPT G 12SQ Safety instructions and instruction manual

Parkside
Parkside PDOS 200 A1 - 3 Operation and safety notes

Rubi
Rubi A230 PRO Original instructions

Alpha tools
Alpha tools ES 125 E Original operating instructions

Worx
Worx Brushless WX813 Original instructions

HOLZMANN MASCHINEN
HOLZMANN MASCHINEN UWS 320 user manual


