Diamond Traffic Products Omega X3 User manual


Version 1.05 01/23/2018
Omega X3: USER GUIDE
Diamond Traffic Products, Inc.
Copyright © 1991-2019 All Rights Reserved
Page 2
Table of Contents
1. Introduction ........................................................................................................................................................ 4
1.a Keypad & Display .......................................................................................................................................... 4
1.b Road Tubes.................................................................................................................................................... 6
1.b.1 Connecting Road Tubes ......................................................................................................................... 7
1.c Basic Setup .................................................................................................................................................... 9
1.d GPS Reception............................................................................................................................................... 9
1.e Date and Time Verification ........................................................................................................................... 9
1.f Road Tube Layout ........................................................................................................................................ 10
1.g Monitor Vehicles......................................................................................................................................... 10
1.h Completing Setup........................................................................................................................................ 10
2. Viewing Traffic .................................................................................................................................................. 11
2.a Waiting for Vehicle...................................................................................................................................... 11
2.b Waiting for Sensor ...................................................................................................................................... 11
2.c Volume ........................................................................................................................................................ 11
3. Show Status....................................................................................................................................................... 12
4. Files ................................................................................................................................................................... 13
4.a File List......................................................................................................................................................... 13
5. Data Study......................................................................................................................................................... 14
6. Stopping Data Recording .................................................................................................................................. 14
7. Data Retrieval.................................................................................................................................................... 15
7.1 Retrieving Data Via Thumb Drive................................................................................................................ 15
7.2 Retrieving Data via USB Cable..................................................................................................................... 15
7.2.1 Driver Installation ................................................................................................................................ 16
8. Iris Cellular Modem........................................................................................................................................... 16
8.1 Settings........................................................................................................................................................ 17
8.2 Enter Listen Mode....................................................................................................................................... 18
8.3 Send Files to DDS ........................................................................................................................................ 18
8.4 Files (DDS) ................................................................................................................................................... 18
8.5 Re-initialize Modem.................................................................................................................................... 18

Version 1.05 01/23/2018
Omega X3: USER GUIDE
Diamond Traffic Products, Inc.
Copyright © 1991-2019 All Rights Reserved
Page 3
8.6 Iris Configuration Via Centurion ................................................................................................................. 19
9. Data Processing................................................................................................................................................. 20
9.1 Initial import screen.................................................................................................................................... 20
9.2 Advanced Processing .................................................................................................................................. 21
9.3 Process Data................................................................................................................................................ 22
10. Bluetooth ........................................................................................................................................................ 24
10.1 Microsoft Bluetooth Stack ........................................................................................................................ 24
10.2 3rd Party Bluetooth stacks......................................................................................................................... 24
10.3 Bluetooth Pairing Code............................................................................................................................. 24
10.4 Bluetooth Address Recording ................................................................................................................... 25
11. Bicycle Data Collection.................................................................................................................................... 26
Appendix A. Specifications.................................................................................................................................... 30
Appendix B. Data port pin outs............................................................................................................................. 31
Appendix C. Menu Structure................................................................................................................................. 32

Version 1.05 01/23/2018
Omega X3: USER GUIDE
Diamond Traffic Products, Inc.
Copyright © 1991-2019 All Rights Reserved
Page 4
1. Introduction
The Omega X3 is a highly accurate timestamp data recorder. Each tube activation is stored at a resolution of
.0000305us (micro seconds). At this resolution, the Omega X3 can store over 150 million unique timestamp
entries.
A new feature that sets the Omega X3 apart from other data collection devices is its ability to store MAC
addresses of active Bluetooth devices. This affords the possibility of determining Destination/Origin
calculations. Using multiple Omega X3 units along with our Centurion CC (City/County) or Centurion Gold
software allows for the reporting of Destination/Origin times along a known path.
1.a Keypad & Display
The Omega has a build in Keypad & Display that allows you the user to interact with the counter for basic
programming and vehicle monitoring.
There are several sections to be aware of:

Version 1.05 01/23/2018
Omega X3: USER GUIDE
Diamond Traffic Products, Inc.
Copyright © 1991-2019 All Rights Reserved
Page 5
Keypad: these 12 buttons, located directly below the display, provide primary input. With the keypad, you
can program and operate the Omega X3. When the ALT key is held down while you are pressing another key,
an alternate set of keys is available to the user. The table below shows a sample of the alternate keys.
1
2
3
4
5
6
7
8
9
0
ALT
!”#$%
ABC
DEF
GHI
JKL
MNO
PQRS
TUV
WXYZ
SPACE
Table 1 –Alternate Keypad Entry
Note that if the ALT key is continuously held and the number is pressed, again, the key will scroll through the
following possibilities of letters from the repeating key starting point (i.e. Pressing the 6 key 4 times would
show a ‘P’):
!”#$%&’()*+,-./0123456789:;<=>?@ABCDEFGHIJKLMNOPQRSTUVWXYZ[\]^_`abcdefghijklmnopqrstuvwxyz{|}→←
For example, if you wanted the letter “X” you would press and hold the “ALT” key and press the “9” key. Note that “W”
appears in the space, as shown in Table 1. While still holding the “ALT” key, press the “9” key again, and the letter “X”
will appear. Release the “ALT” key and the letter remains while the cursor is advanced to the next position.
The rest of the keys are explained below:
Enter
Used as a means of indicating to the Omega X3 that an option is complete and to advance
to the next menu item.
Clear
Used as a means of backing up one configuration option or menu item. When using this
key on a text field, it will act like a backspace key and erase the previous character.
Space
The <Space> key inserts a space at the cursor location and will also allow scrolling through
options in ascending order. Requires the use of the ALT key, (see below).
Left Arrow
This key allows for the changing of a cursor position while on a text field. Other locations it
will allow you to step through editable fields. While monitoring traffic, you can cycle
through the available screens to view data in various formats. When verifying date and
time, use the left arrow to begin changing these values.
Right Arrow
This key allows for the changing of a cursor position while on a text filed. Other locations it
will allow you to step through editable fields. While monitoring traffic, you can cycle
through the available screens to view the activations in different formats.
ALT
Used only in conjunction with other keys; ALT allows existing keys to perform alternate
functions. Use of the ALT key is similar to the SHIFT key on a keyboard, in that the ALT key
must be pressed and held for the duration of the associated key press.
Display: directly above the keypad, this will be the primary way for the Omega X3 to provide information to
the user. When the counter is collecting data, the display is put into a sleep mode allowing the counter to
conserve power. Pressing any key, except ALT, will wake up the unit and active the display.
Tube Indicators: Directly to the LEFT of the display will indicate tube activations. These will light-up, providing
a quick indication of which input has been activated. This can also be a visual aid to indicate if the tube is
plugged into the correct input.

Version 1.05 01/23/2018
Omega X3: USER GUIDE
Diamond Traffic Products, Inc.
Copyright © 1991-2019 All Rights Reserved
Page 6
USB: Directly to the RIGHT of the display, these ports provide communication to and from the Omega X3. The
top port allows for insertion of a USB thumb drive for data retrieval. The bottom port provides
communication to and from a computer. The USB button (grey) just to the right of these ports, will activate
the transfer sequence of data to a provided USB thumb drive. Follow the on-screen instructions to complete
the process.
Arrow keys: Directly to the RIGHT of the keypad. The arrow keys provide a method of moving between menu
options as well as selecting menu options.
Cancel key: Red, this option cancels the current menu item, generally stepping backwards a single step to the
previous option or screen.
Enter key: Green, this option accepts the current menu item and generally steps forward to the next step or
screen.
1.b Road Tubes
Road tubes, or “Tubes”, refer to hollow rubber tubes usually ranging from 30 to 60 feet in length. These Tubes
are stretched across the roadway so that oncoming vehicle traffic drives over them. This generates a
sound/pressure wave (or an “air pulse”), which travels down the inside of the tube and allows the electronics
of the Omega X3 to determine that an axle strike has occurred. We recommend a spacing of 4 feet between
Road Tubes used for data collection in the same lane.
Tubes offer the advantage of being easily movable, quick to install, inexpensive, and are capable of being used
to detecting individual axles of a vehicle. Their disadvantages include rapid wear, hard to secure for prolonged
periods of time, and drivers notice the tubes and can change their speed, lane, etc.
Follow these guidelines when using tubes with the Omega X3:
•The Omega X3 will work with road tubes between 30’ and 60’ long. Be sure that the tubes are of the same
overall physical length (as measured when not stretched). When stretching the tubes, try to stretch them the
same amount when securing them to the roadway (i.e. not too tight that they vibrate like a guitar string & not
too loose that the tread of a tire can grip them and tear them down the road.
•Make sure the tubes are placed as squarely as possible to the oncoming traffic (so that both sides of the axle will
strike the tube simultaneously).
•After each use, check the tubes for punctures or other damage that may have occurred.
•Plug the far end of the tube with a suitable device such as an end plug to keep dirt and other debris out,
including water.
NOTE: There will be some loss of count if road tubes longer than 60’ are used.
NOTE: Tubes shorter than 30’ are NOT recommended as the signal they
produce will cause damage to the internal air switch over time.
Tubes longer than 60’ may not register activations, causing missed counts.

Version 1.05 01/23/2018
Omega X3: USER GUIDE
Diamond Traffic Products, Inc.
Copyright © 1991-2019 All Rights Reserved
Page 7
1.b.1 Connecting Road Tubes
As the Omega X3 records a timestamp for each axle strike, it is highly important that the tubes be of similar
overall length. This will provide an equal distance for the sound/pressure wave to travel inside of the tube.
Having different lengths will cause the sound to travel a different distance and will skew the recorded data. A
vehicle’s recorded speed and or length can be affected when using tubes of a different overall length.
For Per Vehicle type data:
Use 2 tubes of equal length for sites with an expected ADT of less than 4500, use 4 tubes for those sites that
are expected to have an ADT higher than 4500, deploying the tubes in a short, long, short, long configuration.
2 tubes
•Install one road tube perpendicular to the direction of traffic across both lanes of traffic, one if
you only want to collect data on a single lane.
•Install a second tube 4 feet from the first tube. (We do NOT recommend spacing closer than 4
feet when classifying due to potential loss of accuracy). Connect the road tube, which will be
struck first by oncoming traffic (near lane) into the ‘A’ port.
•Connect the other road tube, which will be hit second by oncoming traffic into the ‘B’ port.
4 tubes
•Install one road tube perpendicular to the direction of traffic across a single lane of traffic (short
tube).
•Install a second tube 1 foot away from the first, crossing both lanes of traffic (long).
•Install a third tube 3 feet away from the second, crossing only one lane of traffic (short).
•Install a fourth tube 1 foot away from the third, crossing both lanes of traffic (long).
Tube connection is vitally important with this setup and will be dependent on vehicle traffic in
reference to the lane nearest the counter location.
If Opposite direction
The first tube (short) will be plugged into port ‘A’
The second tube (long) will be plugged into port ‘D’
The third tube (short) will be plugged into port ‘B’
The fourth tube (long) will be plugged into port ‘C’
If Same direction
The first tube (short) will be plugged into port ‘A’
The second tube (long) will be plugged into port ‘C’
The third tube (short) will be plugged into port ‘B’
The fourth tube (long) will be plugged into port ‘D’

Version 1.05 01/23/2018
Omega X3: USER GUIDE
Diamond Traffic Products, Inc.
Copyright © 1991-2019 All Rights Reserved
Page 8
For Volume type data:
There are three possible tube layouts:
Normal
This sensor configuration will be used when the counter can be located in a center
median of a roadway. Road tube can be stretched across each lane of travel on either
side of the median.
Lane
Subtraction
This road tube configuration is used when you want to get individual lane counts from
two different lanes of traffic from one side of the road. The long tube that crosses both
lanes of traffic will be connected to port ‘A’. While the short tube will be cross only the
near lane will be connected to port ‘B’. Both tubes will be of the same overall length.
Directional
This road tube configuration is used for counting two-way traffic on a narrow road. Two
road tubes are used with a 1-foot spacing. The tube that is struck first in the lane
nearest to the counter will be plugged onto port ‘A’ while the second tube will be
plugged onto port ‘B’.
For ease of setup and data recording (as well as for safety) it is recommended that a minimum of two (2) tubes
be deployed at a four (4) foot spacing. This will allow the operator or data processor to create and import per-
vehicle data which will result in an accurate vehicle volume being stored in the internal database. This will
also allow the operator to reduce the amount of time working in an active lane of travel.

Version 1.05 01/23/2018
Omega X3: USER GUIDE
Diamond Traffic Products, Inc.
Copyright © 1991-2019 All Rights Reserved
Page 9
1.c Basic Setup
Basic setup will include the following:
•Select Axle Collection Mode
•Entering in the Station or Site ID
•Acquiring GPS coordinates for the study site
•Verifying the correct Date and Time
•Selecting a road tube layout
•Verification of displayed vehicle information to the traffic seen crossing the collection site
•Followed by completing the study setup.
Should the display be blank, press the ENTER key to wake up the unit. If needed, use the left or right arrow to
the icon ‘Start Recording’and press ENTER to begin.
Using the keypad, enter in your Site ID, use the ALT & key combination to select letters. After entry of the Site
ID is complete, press ENTER. Although the Omega X3 does not require a Site or Station ID to begin data
collection, including it here will make processing data files much smoother at the end of the day.
1.d GPS Reception
The Omega X3 has an internal GPS sensor that will be activated as a part of the setup process, and then again,
every 6 hours after data collection has begun. After receiving a good GPS signal and position, the Omega X3
will power down the GPS module to reduce power draw. For best results, place the Omega X3 in an area with
a clear view of the sky. Tall buildings and or trees can block the GPS signal from reaching the Omega X3.
During GPS acquisition, the counter will display a series of dots. The dots will continue to cycle until the GPS
has locked onto satellite information. Once a GPS lock has been made, the Omega X3 will change the screen
to show additional information. As the GPS chip locks onto additional satellites, the display will update the
‘STATS’ (line) to indicate how many satellites signals are currently locked on. When a quality position has been
obtained, the Omega X3 will automatically advance to the next screen. If you elect to skip acquiring a GPS
position, simply press the ENTER button to manually advance to the next screen.
When you are satisfied that a good GPS coordinate has been achieved, press ENTER.
1.e Date and Time Verification
During this step, the user can verify that the date, time and time zone are correct. Note that Time is in
Military format, 3pm would be displayed as 15:00. During GPS acquisition, the counter should have updated
the Date and Time to the correct values. If that step was skipped over, or you have moved across time zone
boundaries you may need to set these manually. If they are incorrect, press the Left Arrow to advance to the
Hours block. Use the Left & Right arrows to move the cursor about the screen and type over the incorrect
data using the keypad, you may also use the keypad to key in a new value. When you have changed all
needed values, press ENTER to step through the remaining entries and to advance to the next screen.

Version 1.05 01/23/2018
Omega X3: USER GUIDE
Diamond Traffic Products, Inc.
Copyright © 1991-2019 All Rights Reserved
Page 10
1.f Road Tube Layout
The next screen will allow you to specify a road tube layout. Use a tube layout that best matches your
installation type. The correct selection will inform the Omega X3 how to process vehicle data when displayed
using the On-the-fly classification. This will also help when importing data into the Centurion PC application.
Press the Left or Right arrows to scroll to the layout that best matches your needed layout, press ENTER to
indicate your selection and to advance to the next screen.
1.g Monitor Vehicles
This step allows the user to verify vehicles as they cross the data collection site to what is shown on the
display. The Omega X3 offers FHWA vehicle classification ‘On-The-Fly’so that the user can compare on-screen
data with the vehicle that has crossed the collection site. The display will indicate vehicle specifics such as
speed, lane, and axle pair spacing’s. The display will also provide a graphical representation of the detected
axles as a wheel and under carriage. Once you are satisfied that what you see on screen matches the vehicles
crossing the site, press ENTER. Please note that this information is based on a 4-foot tube spacing. If you use
a different tube spacing, you will need to provide the Centurion import tool the correct spacing at the end of
the study. Centurion will then calculate the correct speed and wheel spacing as well as overall vehicle length
(first axle to last axle).
It is important to note that the displayed on-the-fly classification/vehicle information is secondary to the
primary function of recording data to memory. This delay is to be expected and is normal.
1.h Completing Setup
When completing the data collection steps, it is necessary to press the green ‘Enter’ key until you see ‘Data
Recording Has Started!’. Shortly after this is displayed, the counter will change menu settings/structure to
allow the operator to then view traffic, or to use other available menu options.
To conserve battery life, the display can be turned off and put to sleep. To put the display to sleep is really
easy, press the ‘Cancel’ key until there is no information on the screen. This process does not stop data
collection. When the display is needed again, simply press any button; the only key that will not cause the
display to wake-up is the ‘ALT’ key. No matter how many times the ‘ALT’ key is pressed, it will NOT wake the
display up.

Version 1.05 01/23/2018
Omega X3: USER GUIDE
Diamond Traffic Products, Inc.
Copyright © 1991-2019 All Rights Reserved
Page 11
2. Viewing Traffic
Using the monitor lanes function, the field tech can return to the site and verify that the displayed vehicle
information matches that of vehicles crossing over the collection site.
Enabling the View Traffic option will allow the field tech to view data in several different formats. Those
formats:
Raw Vehicles (On-the-fly classification)
Sensor activation
Volume counts
Each mode offers distinct types of data that can be displayed. To start this process, you will need to activate
the Omega X3 display by pressing any key. The correct menu option is ‘View Traffic’, press ENTER to start
viewing traffic. As each vehicle crosses the collection site, the Omega X3 will display various information. To
change the type of data being displayed, use the Left or Right arrow keys. This is a circular menu and will
automatically wrap around and redisplay the various display types. When finished, press the CANCEL button
multiple times to return the display to a sleep mode (powered off).
2.a Waiting for Vehicle
This mode is unique in that the counter is actually storing each timestamp for each axle activation as well as
displaying vehicle information & graphics along with vehicle specific speed, length, and FHWA Classification
bin number. Note that this information is not being stored into the data file. When this data file is processed,
Centurion will generate this same type of information along with other details such as headway and gap type
data. An example of this display will be:
DC: 17:05:25
2ax 11mph 7.7’
This indicates that tube D was activated followed by tube C at 17:05:25 by a 2-axle vehicle traveling at 11mph
with an axle 1-2 pair spacing of 7.7’.
2.b Waiting for Sensor
Sensor activations allow the user to view the activation times in a second & sub-second format (SS.sssss). This
format will show each sensor activation after it has been saved into the internal data file. These activations
will be used later by Centurion to generate Raw Per-Vehicle or Count records that will be imported into
Centurion’s internal database.This display is formatted into two columns. Each line will include the sensor
that was activated and the second & sub-second time (i.e. D-15.14068 or B-15.23205).
2.c Volume
Volume simply display each sensor and the number of times it was activated by a passing vehicle. This screen
can be reset by using the zero (0) key. This does not affect the recorded data or quality of that data and will
not zero out the data file, it simply resets the displayed values to zero.

Version 1.05 01/23/2018
Omega X3: USER GUIDE
Diamond Traffic Products, Inc.
Copyright © 1991-2019 All Rights Reserved
Page 12
3. Show Status
The Show Status menu option allows the field tech to receive a quick overview of the Omega X3 unit. The
displayed data will contain such information as:
System Status
Amount of free memory and expected battery life. Note that since the Omega X3 uses
lithium batteries, that the value will be close to the same value for the life of the
batteries. Only when the batteries have depleted their energy will the value drop.
When the value drops, it will drop rapidly. This is common for all lithium batteries.
The will simply run at their full rated value and then they quit.
Temperature
The Omega X3 displays temperature in both Celsius and Fahrenheit. The Omega X3
will store the Celsius value and then compute the Fahrenheit value.
Battery Voltage(s)
Both the Primary and Secondary batteries are displayed down to a one-hundredth of a
volt (.01). The secondary batteries value will be that of the 8 D-cell battery pack. This
pack will be strictly used to power the Bluetooth radio when Bluetooth data collection
has been enabled. Note that the system can and will power the Bluetooth radio from
the primary batteries. Doing so will dramatically shorten the primary battery life.
Using the Primary batteries to power the Bluetooth radio is not covered in the
expected 5-year battery life of the counter.
If the Omega X3 is equipped with an Iris Cellular Modem, the external battery pack will
also power the modem. Depending upon modem usage the batteries will need to be
checked and changed at regular intervals.

Version 1.05 01/23/2018
Omega X3: USER GUIDE
Diamond Traffic Products, Inc.
Copyright © 1991-2019 All Rights Reserved
Page 13
4. Files
The Omega X3 can store up to 65k files in its internal memory. This should afford the field tech the option of
deploying the Omega X3 to several separate locations and then retrieving the data file(s) for processing at a
later time, or to retain those studies till end of season. It is not recommended to use the Omega X3 as a
backup device.
It is always recommended to retrieve and process any study file(s) as soon as possible, this ensures that you
have sufficient time to correct any errors or address issues that may have occurred during data collection.
It is not recommended to use the Omega X3’s memory as a backup of study files. Also, there is a direct
correlation between the number of files and the time it takes to read and return the file information when a
directory request has been issued. For backup purposes, it is recommended that a quality backup be made at
the computer level and to not rely on the counter to hold data files long term.
4.a File List
From the main menu, use the Left or Right arrows to locate ‘Files’. Once this option is in the middle of the
screen, press ENTER.
This screen will display a brief overview of the counters internal storage or memory. The top line indicates the
number of files that are presently stored in the counter and how many of those have yet to be retrieved as
noted by the number between the brackets (x) –where ‘x’ is number of new files.
The second line indicates how much memory is used by all files as well as the nearest full percentage of overall
memory.
The third line indicates the counters current state, whether it is actively recording data or in standby mode.
Pressing the Down arrow will allow for the displaying of specific file information, should there be more files
than can be listed on the screen multiple presses of the Down arrow may be necessary as you scroll through
the list. Some basic information will be displayed, including the Entered Site ID, the starting Date of the Study
and the duration of that study.
The other available option is ‘Erase’. This will erase *ALL* files within the Omega X3 including those files that
have not yet been retrieved.
Note: Once the erase function has started there is no stopping it and all erased data is completely lost.

Version 1.05 01/23/2018
Omega X3: USER GUIDE
Diamond Traffic Products, Inc.
Copyright © 1991-2019 All Rights Reserved
Page 14
5. Data Study
It may be necessary to check the status of the current study. Should the display be blank, press the Enter key
to activate the display and then right or left arrow to ‘Show Status’ and press Enter. Using the Right or left
arrow locate Data Study and press enter.
Using the data study function will allow the field tech to verify the current programmed Site ID along with
viewing the starting time and date in MM/YY HH:MM format. It will also display the current size of the file
along with the current duration of the study, rounded to the nearest whole value.
Cycling through the display will yield grand total of vehicles, breaking out passenger cars and trucks. Also
included is a calculated ADT (Average Daily Traffic, on-the-fly) for those studies longer than 2 days.
The next screen will also display the Average speed, Peak volume, Peak time and a percentage of classification.
Pressing Next will return you to the Status Menu.
6. Stopping Data Recording
When it comes time to wrap up a study, the field tech can use the Stop Recording function to finish the
current study; appending an end of study record to the data file. Selecting this menu option and answering a
verification question(s) will complete the study and afford the field tech to view the study specifics:
Starting Date and Time
Ending Date and Time
Study file size and duration
Grand Total of Vehicles
Total Cars
Total Trucks
ADT (# of days)
Average (Avg) Speed
Peak Volume
Peak time
Class percentage

Version 1.05 01/23/2018
Omega X3: USER GUIDE
Diamond Traffic Products, Inc.
Copyright © 1991-2019 All Rights Reserved
Page 15
7. Data Retrieval
Data retrieval can be accomplished by several methods. One method is via thumb drive; another would be via
a standard ‘USB A to B’ cable see appendix B for specifics (no driver needed for the cable). These files would
then be processed by a computer running Centurion software (1.42 build 16 or newer).
7.1 Retrieving Data Via Thumb Drive
This method is by far the easiest way to retrieve any previously un-retrieved data files from the counter.
Simply press the USB key on the counters faceplate and insert a thumb drive into the correctly sized slot.
This starts the creation of a date specific folder in which any copied data files will be stored. After retrieving
data files with the thumb drive, the field tech can simply email those raw data files to the office for processing.
In order to use a thumb drive with the Omega X3 it must conform to a known standard. The thumb drive must
have these specifications:
•Can only be formatted in FAT16 or FAT32
•Sector size must be 512 bytes
•Long names are not used (all file and directory names are in 8.3 format)
•No extensions to the USB Mass Storage Specification are allowed
To verify operation of a thumb drive:
Create a short data study, you can even leave the counter on an office desk over lunch.
Stop data collection and then press the USB button on the Omega X3, following the screen prompts.
When finished, remove the thumb drive from the Omega X3 and plug it into a Windows based computer that
has Centurion installed. Use the manual open option, navigating to the thumb drive and dated folder to select
the correct file.
You should see a new window appear with a yellow background (default color) with human readable text. If
you entered in a Site ID during the study setup, it should be clearly readable at the top of the window.
7.2 Retrieving Data via USB Cable
This method, while simple, require the Omega X3 counter be located within cables reach of a computer
running Diamond Traffic’s Centurion software. We recommend Centurion CC to make the most use of the
recorded data.
Simply plug in the USB cable into the computer, then into the Omega X3. There will be a slight delay while
Windows finds, configures, and makes the Omega X3 available for use. Should Windows not be able to locate
the newest drivers on Windows Update servers, a basic driver is included under the ‘USB\Diamond USB
Drivers’ folder.
After the drivers have been installed for the first time, start Centurion CC.

Version 1.05 01/23/2018
Omega X3: USER GUIDE
Diamond Traffic Products, Inc.
Copyright © 1991-2019 All Rights Reserved
Page 16
This affords your Windows computer to make the hardware available so that Centurion can then
communicate with it. Once Centurion is started, Centurion will begin looking for any connected counter or
device. When that counter or device has been found, Centurion will, by default, download new data files.
After those files have been downloaded, the Timestamp Data Processor (TSProcess) will open to begin the
import process.
For data processing steps, refer to the section 9.0 Data Processing.
7.2.1 Driver Installation
With the release of Centurion 1.48 build 8, the required drivers are automatically installed with the full
software installer. These drivers are also available for manual reinstallation should there be a need.
Driver installation files can be found in one of the folders:
32-bit - C:\Program Files\Diamond\USB\Diamond USB Drivers
64-bit - C:\Program Files (x86)\Diamond\USB\Diamond USB Drivers
For proper driver installation, administrative permissions will be needed. Should your account only have
standard permissions, please consult with your IT department.
8. Iris Cellular Modem
When the Omega X3 is equipped with an Iris Cellular Modem, data files can be uploaded to the Diamond Data
Server (DDS). This allows for quick retrieval of data files by Centurion in the office. The Iris Cellular Modem
can also be used to send SMS messages to a preprogrammed number to alert a field technician of any
potential problems, this could include not seeing an activation on an input for a predetermined amount of
time.
The Iris modem is designed to be a low power device, as such it will draw its power from the 8 D-cell battery
pack. Depending on modem usage, you may need to replace these batteries at regular intervals.
The information below is to give you an idea of what to expect with normal usage, should your usage vary
from these examples, expect your battery life to also vary.
NOTE: In order for Centurion to communicate with the Omega X3, it will need
to be plugged into the computer first, then start Centurion.

Version 1.05 01/23/2018
Omega X3: USER GUIDE
Diamond Traffic Products, Inc.
Copyright © 1991-2019 All Rights Reserved
Page 17
When the Iris Modem used to upload its collected data each night:
In this mode, the modem will be powered on and immediately connect to the Diamond Data Server (DDS),
uploadng any new file(s), and then turn off. It is assumed that the Iris modem will be actively transmitting
all the time it is on. With an average upload time of 15 minutes, the 8 D-cell battery pack will last
approximately 9 months.
When the Iris Modem is put into “Listen” mode and is on all the time:
In this situation, the modem is turned on and immediately links to the cellular network (Service). From
there, power draw depends on how much communication goes back and forth between it and the host
connecting computer.
1. Modem in “Listen” mode but never linked to: Power draw will average 35mA over the life of a fresh battery
pack, which gives a useful life for an 8 D-cell battery pack of about 8 days.
2. Modem in “Listen” mode, linked to, and constantly transmitting: Power draw will average about 100mA over
the life of a fresh battery pack, which gives a useful life for an 8 D-cell battery pack of about 2.9 days.
3. Modem in “Listen” mode, linked to, and transmitting 50% of the time: Power draw will average 67.5mA over
the life of a fresh battery pack, which gives a useful life for an 8 D-cell battery pack of about 4.3 days.
NOTE: The above assumes the batteries are operating in ideal conditions. Extreme cold, heat, age of
battery, and type of battery can all affect a batteries life. It is best to count on no more than 2/3 of the
estimated time, and to always use new high-quality batteries.
8.1 Settings
To configure the Iris settings, wake up the Omega X3 and use the Left or Right arrow and select Iris Modem
and press ENTER. Press ENTER on the menu item ‘Settings’. The Omega X3 will present the user 2 options to
select from for DDS Transfer Files:
At 1am Each Night
This option will upload files to the Diamond Data Server every night @ 1am.
When User Chooses
This option will disable the automatic uploading of data files. Instead it will
only upload data files to the DDS when a field technician activates this process.
Either options selected will then ask which files to transfer to the DDS
All files in Mem
This option will upload all files in memory at the time of upload.
Unsent Files Only
This option will upload only those files that have not been previously retrieved
or sent to the DDS.
The next question deals with what to do with those files after they have been sent to the DDS:
Erase After Transfer?
Yes (If all are sent)
If all files have been successfully uploaded to the DDS, then the Omega X3 will
erase all files on the unit.

Version 1.05 01/23/2018
Omega X3: USER GUIDE
Diamond Traffic Products, Inc.
Copyright © 1991-2019 All Rights Reserved
Page 18
No, Never Erase
This option will not allow the Omega X3 to automatically erase any data files.
Note these files still can be erased by the user at a later time.
The next question tells the Omega X3 what to do when the key combination ‘ALT+USB’ is used:
Send files to DDS
This option, when selected, will cause the Omega X3 to send files to the DDS at
the time the key combination is used.
Enter Listen Mode
This option will cause the Omega X3 to monitor the cellular connection for any
valid incoming commands or inquiries. This is typically initiated through our
Centurion Gold software.
Note you will need to select a file recording format of either Daily or Manually
Daily
When selected the Omega X3 will close and create a new file at midnight
proper. Each file will only have a single days’ worth of data. Normally the
current days’ data is not available till either the next day or after data collection
has stopped.
Manually
When selected the Omega X3 will only create or close files with the
8.2 Enter Listen Mode
Entering this specific mode will require that the external battery pack be populated with batteries. Should the
voltage of that battery pack be too low the Omega X3 will not allow this function to be activated.
It should be noted that this mode is power hungry and the batteries should be checked and replaced
frequently.
8.3 Send Files to DDS
Selecting this option will cause the Omega X3 to upload data files to the Diamond Data Server (DDS). If there
are no files to send to the DDS, the Omega X3 will display an error message ‘ERROR: There are no files in
memory!’
8.4 Files (DDS)
This option informs the field technician how many files are presently in the Omega X3’s memory that are New,
how much memory is currently be used by those files.
This function does not interact with the Diamond Data Server; it simply provides information about the
current file state of the Omega X3. Pressing any key will return you to the previous menu.
8.5 Re-initialize Modem
This option will cause the Iris modem to be re-initialized. This is a useful troubleshooting step should the unit
not be responding in an expected manor.
Version 1.05 01/23/2018
Omega X3: USER GUIDE
Diamond Traffic Products, Inc.
Copyright © 1991-2019 All Rights Reserved
Page 19
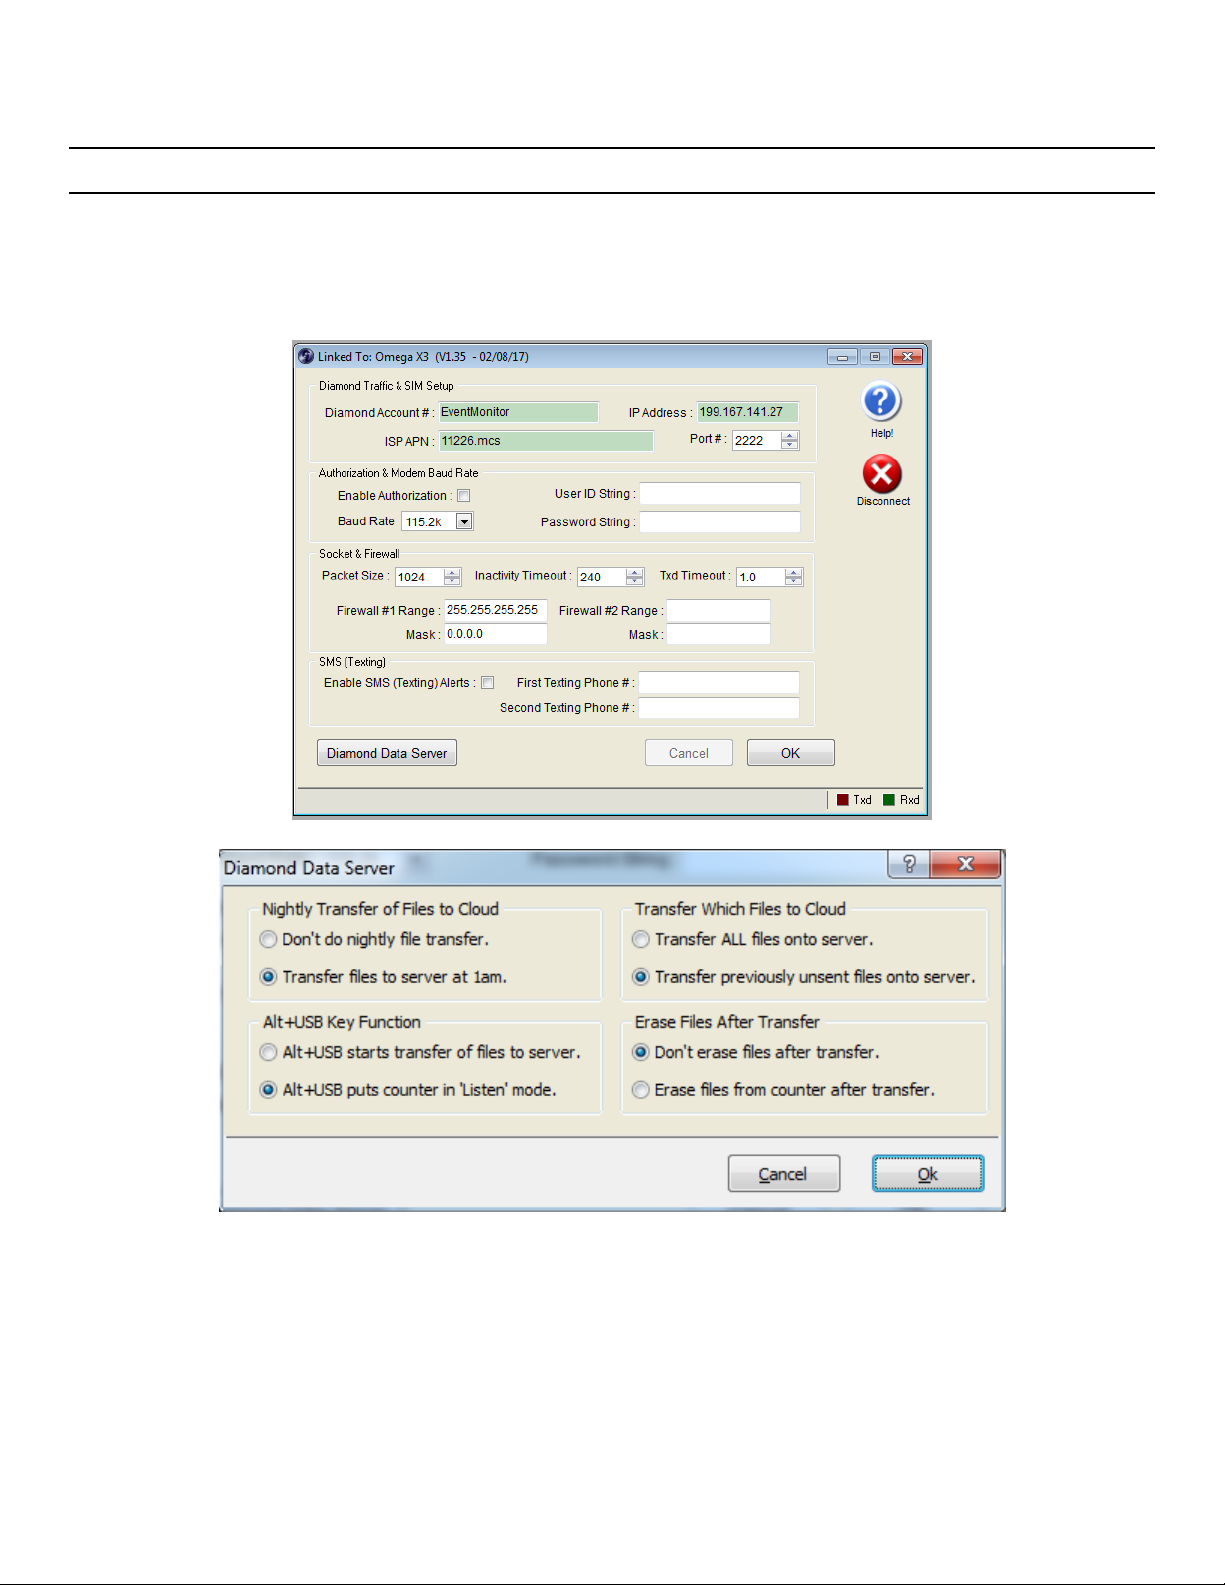
8.6 Iris Configuration Via Centurion
Centurion can also be used to configure the Iris modem. You will need to connect the Omega X3 to a
computer running the Centurion software (1.43 build 5 or newer).

Version 1.05 01/23/2018
Omega X3: USER GUIDE
Diamond Traffic Products, Inc.
Copyright © 1991-2019 All Rights Reserved
Page 20
9. Data Processing
In order to convert the Omega X3’s timestamp records (data file), the data must be processed through
Centurion’s Timestamp Data Processor (TSProcess). Using TSProcess is quick and easy, it will allow you to
verify or edit any of your site information and will allow you to select starting/ending Time & Date, select a
road tube layout, and then approve a data summary prior to importing the new data into Centurion’s internal
database.
Please note that while we cover the processing/importing of data, this section is not intended to be a
replacement of the Centurion Users Guide.
9.1 Initial import screen
The screen capture below is a typical screen:
Table of contents


