Diamond DSL602EU User manual

DSL602EU User’s Manual
Rev. 1.0
Dec. 2008
ADSL2+ USB Ethernet Combo Bridge Router
Freeway DSL DSL602EU User’s Manual

DSL602EU User’s Manual
Table of Contents
1. INTRODUCTION .............................................................................................................. 1
1.1 FEATURES.................................................................................................................. 1
1.2 SYSTEM REQUIREMENT .............................................................................................. 1
2. DSL602EU OVERVIEW ................................................................................................... 2
2.1 LED DESCRIPTION ..................................................................................................... 2
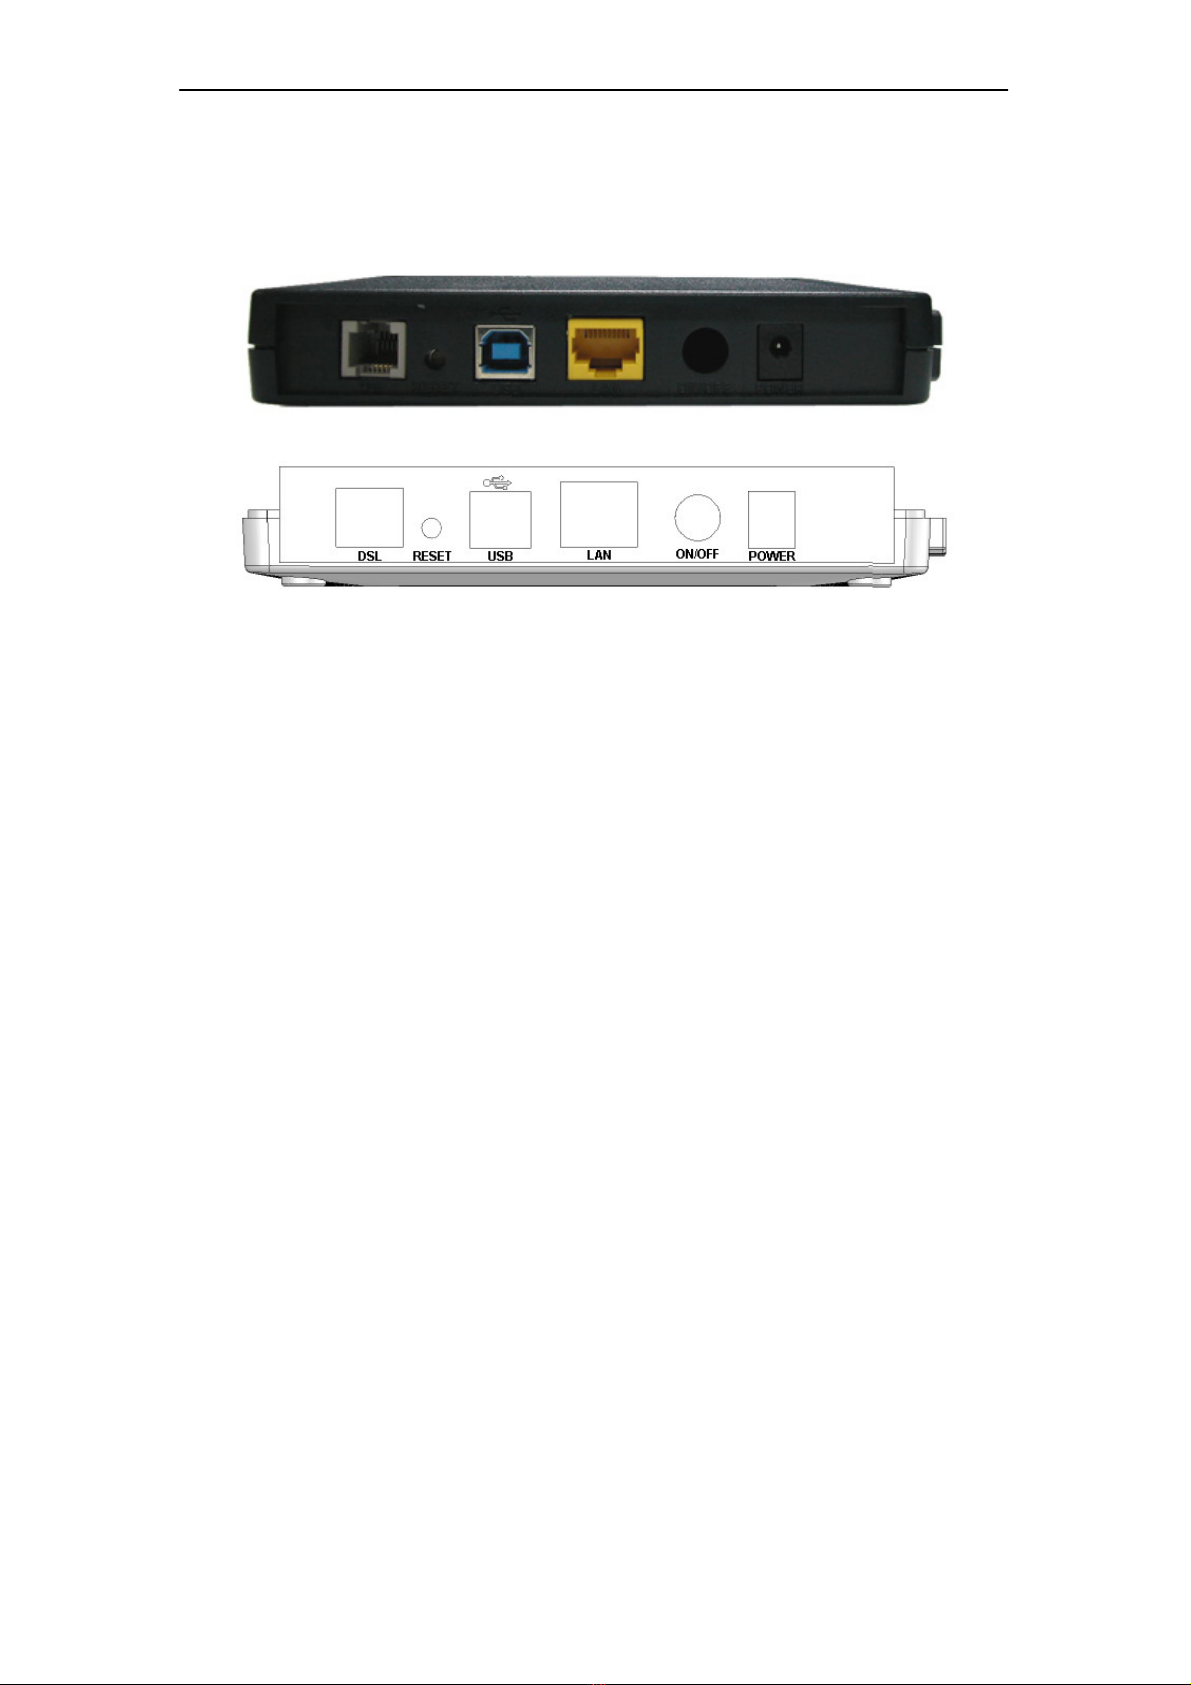
2.2 PORTS AND BUTTONS ................................................................................................. 3
2.3 INSTALLING YOUR DSL602EU .................................................................................... 3U
3. INSTALLING USB DRIVER (OPTIONAL)....................................................................... 4
4. CONFIGURING TCP/IP.................................................................................................... 5
5. SETTING UP YOUR DSL602EU...................................................................................... 6
5.1 LOGIN TO YOUR DSL602EU....................................................................................... 6U
6. WEB CONFIGURATION .................................................................................................. 7
6.1 OVERVIEW ................................................................................................................. 7
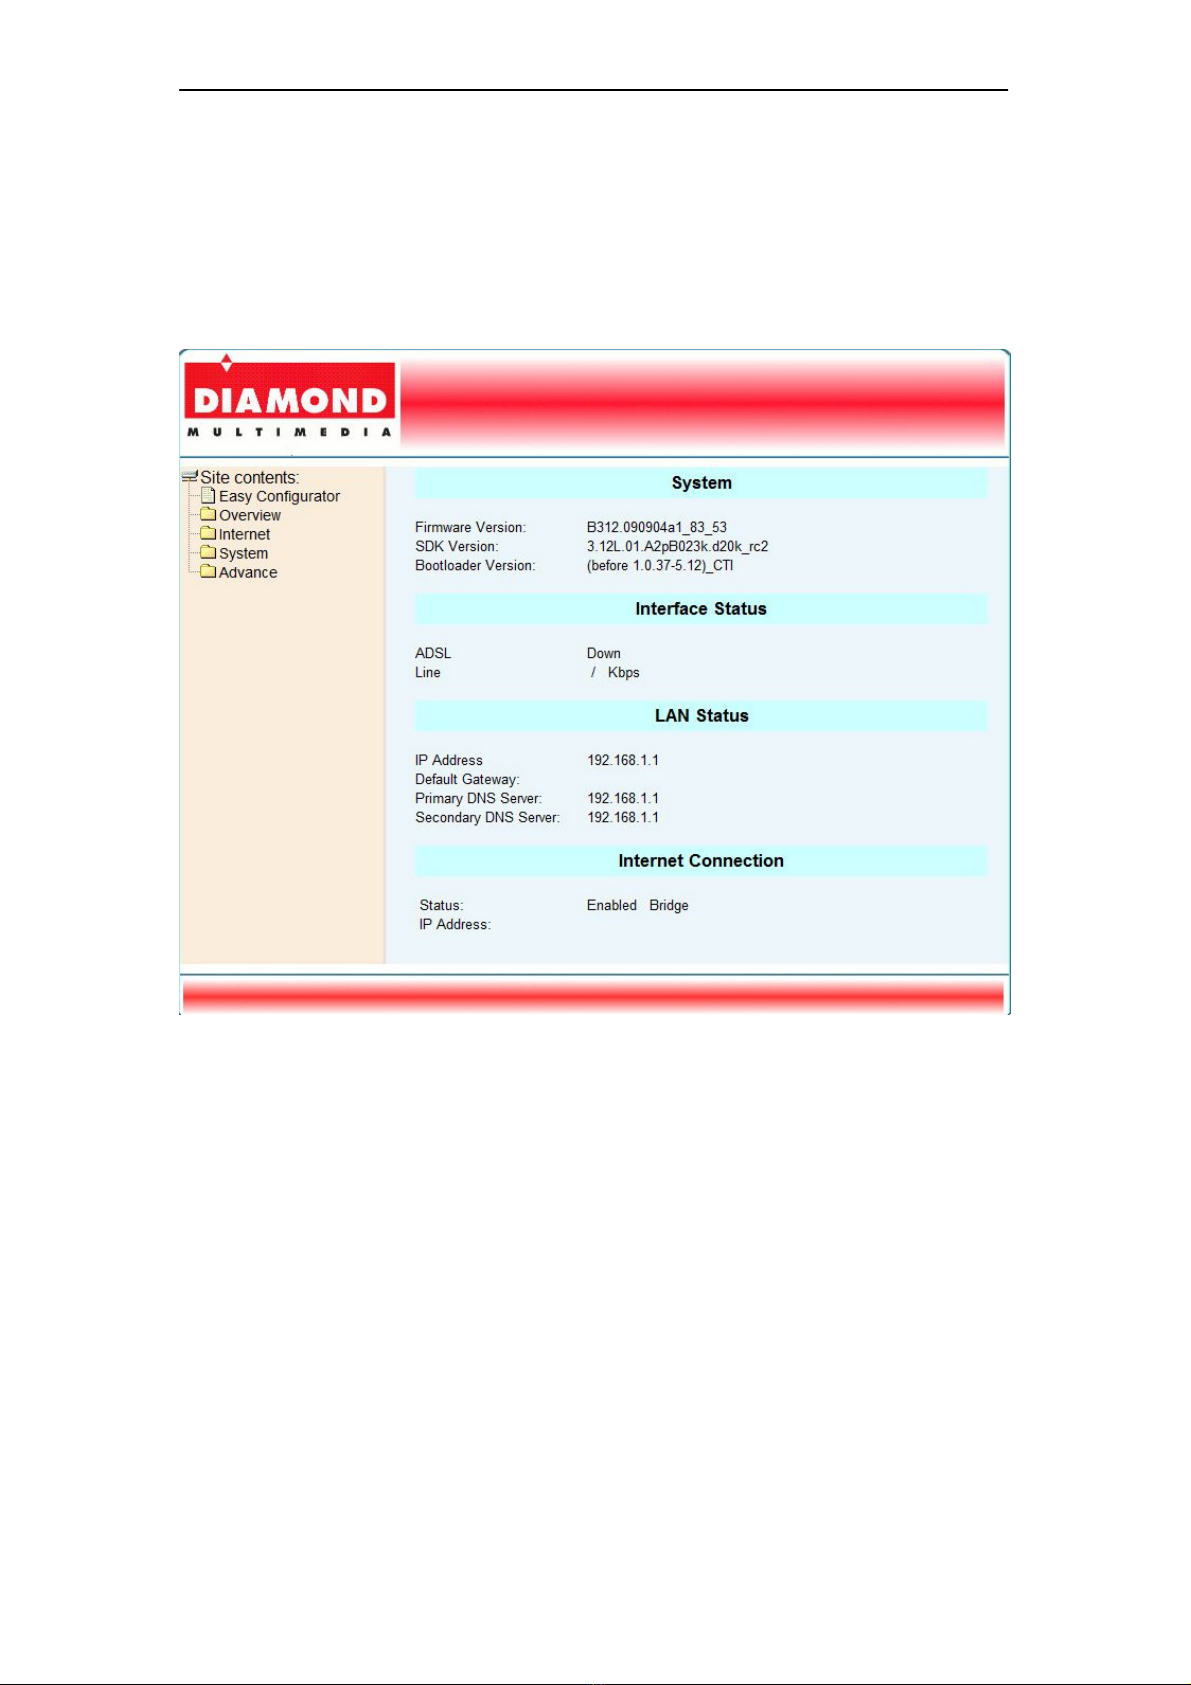
6.1.1 Overview .............................................................................................................. 7
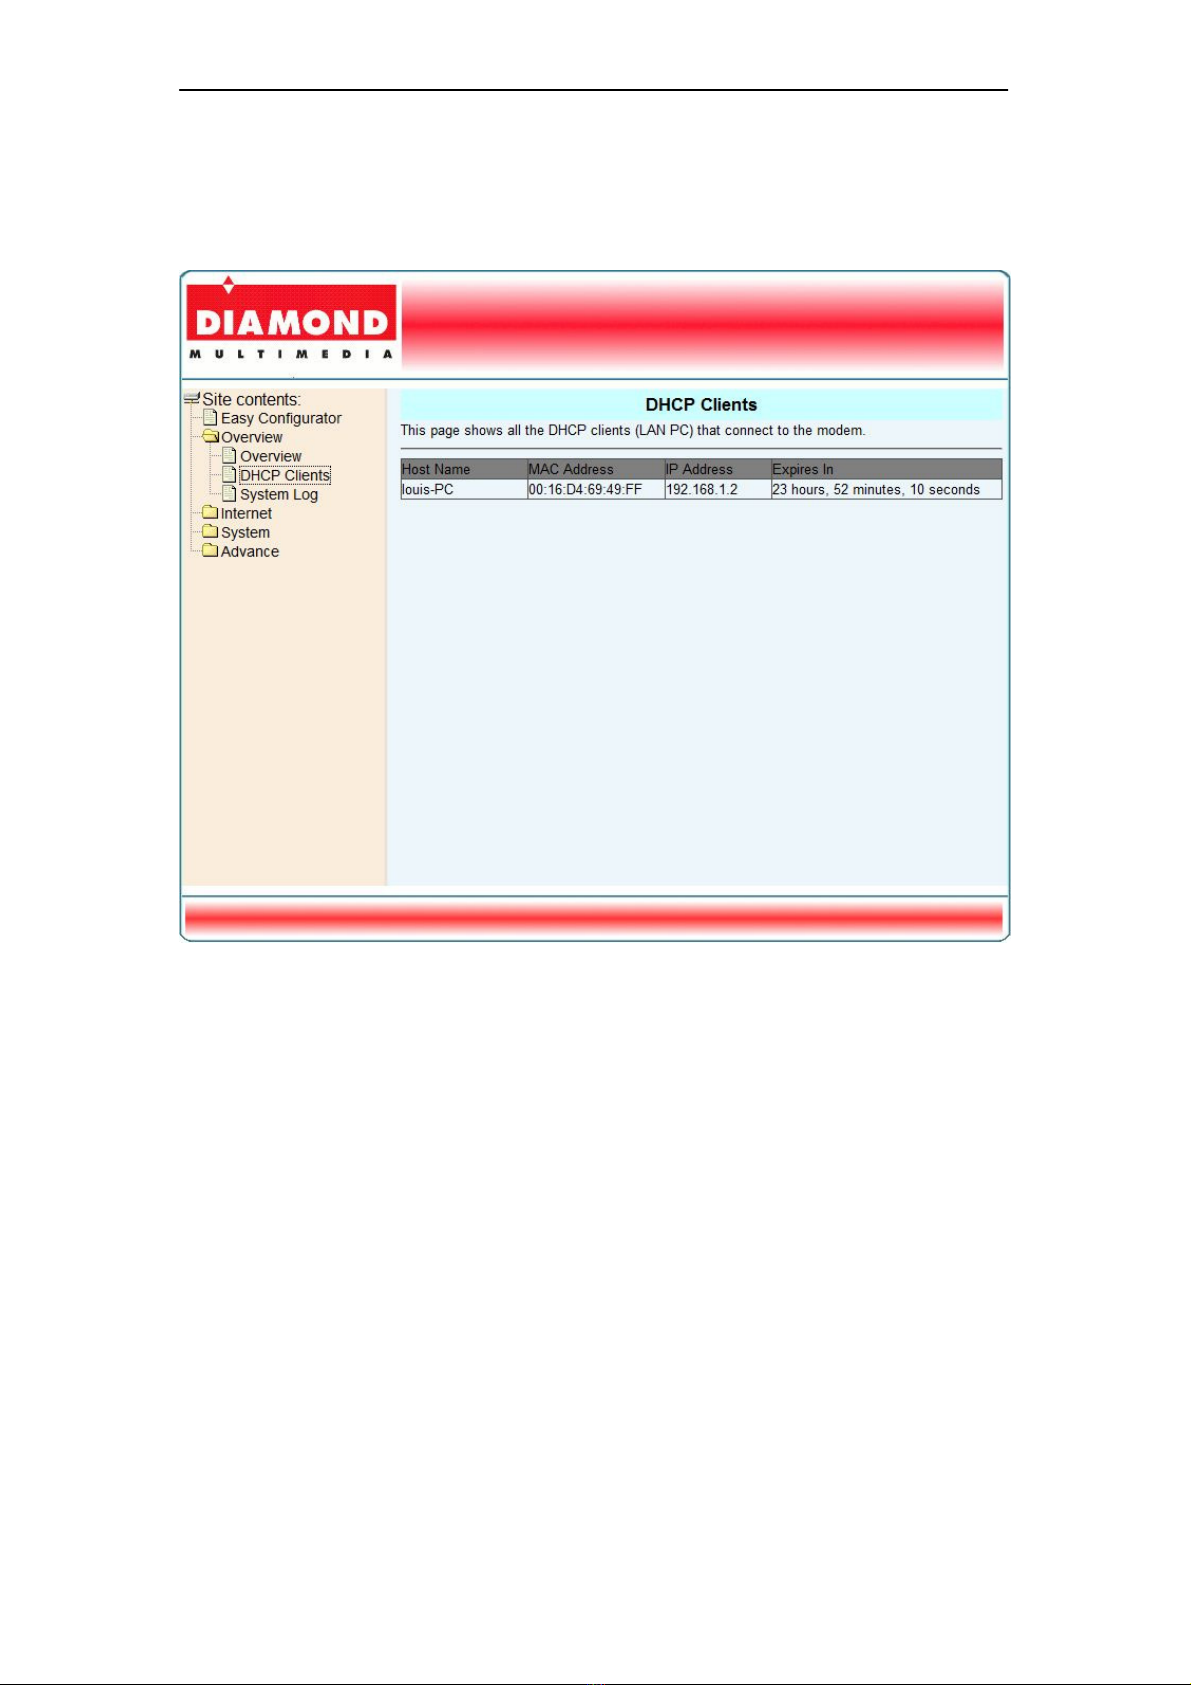
6.1.2 DHCP Clients....................................................................................................... 8
6.1.3 System Log .......................................................................................................... 9
6.2 INTERNET ................................................................................................................. 10
6.2.1 Internet Connection............................................................................................ 10
6.2.2 Statistics............................................................................................................. 13
6.2.3 WAN................................................................................................................... 13
6.2.4 ATM.................................................................................................................... 14
6.2.5 ADSL.................................................................................................................. 15
6.3 SYSTEM ................................................................................................................... 16
6.3.1 Password ........................................................................................................... 16
6.3.2 Network Time..................................................................................................... 17
6.3.3 Store/Restore Settings....................................................................................... 18
6.3.4 Firmware Update ............................................................................................... 19
6.3.5 Save Settings/Reboot ........................................................................................ 20
6.4 ADVANCED ............................................................................................................... 21
6.4.1 LAN .................................................................................................................... 21
6.4.1.1 LAN................................................................................................................ 21
6.4.1.2 Statistics ........................................................................................................ 23
6.4.2 DSL .................................................................................................................... 24
6.4.3 Network Information........................................................................................... 25
6.4.3.1 ARP Table ..................................................................................................... 25
6.4.3.2 Routing Table ................................................................................................ 26
6.4.4 Network Settings................................................................................................ 27
6.4.4.1 Default Gateway ............................................................................................ 27
6.4.4.2 Static Routing ................................................................................................ 28
6.4.4.3 IGMP.............................................................................................................. 29
6.4.5 System Log Configuration.................................................................................. 30
6.4.6 Device Management .......................................................................................... 32
6.4.6.1 Service........................................................................................................... 32
6.4.6.2 IP Address ..................................................................................................... 33
6.4.6.3 UPnP ............................................................................................................. 35
6.4.6.4 TR-069........................................................................................................... 36
6.4.7 Diagnostics ........................................................................................................ 38
7. WALL MOUNTING (OPTIONAL)................................................................................... 39
APPENDIX A. TROUBLESHOOTING .................................................................................... 40
APPENDIX B. SPECIFICATIONS .......................................................................................... 42

DSL602EU User’s Manual
1. Introduction
The DSL602EU supports the latest ADSL technology ADSL2 & ADSL2+,
which enables high-speed data to be carried over one copper line on the WAN
side and the LAN side. The device combines routing and bridging functions in
a single device for high-quality, and high-speed access to Internet. It connects
to PC or home network with 10 / 100Based-T Ethernet interface which
provides flexible and various applications
1.1 Features
yADSL/ADSL2/ADSL2+
yLEDs, connectors, and accessories conform to TR-068 standards
yConforms to DSL-Forum TR-067 ADSL Interoperability Test-Plan
yConforms to DSL-Forum TR-100 ADSL2 / ADSL2+ Performance Test-Plan
ySupport for bridge and router configurations
yNAT/NAPT for sharing of a single DSL connection
ySupport USB 1.1 device interface
yComprehensive Firewall & Security
yWeb-based interface for easy configuration
yConforms to TR-069 CPE WAN Management Protocol
1.2 System Requirement
In order to use the DSL602EU, you must have the following:
yADSL service up and running on your telephone line, with at least one
public Internet address for your LAN
yOne or more computers each containing an Ethernet network interface
card (NIC) and/or a single computer with a USB port
yAn Ethernet hub/switch, if you are connecting the device to more than one
computer on an Ethernet network
yFor system configuration using the supplied web-based program: a web
browser such as Internet Explorer v5.0 or later, Firefox v2.0 or later, or
Netscape v6.1 or later
1

DSL602EU User’s Manual
2. DSL602EU Overview
2.1 LED Description
The front panel contains lights called LEDs that indicate the status of the
modem.
LED Color Status Description
On The device is power on.
Green Off The device is power off.
POWER
Red On
The device is booting up.
On The LAN port is connected to an Ethernet
device.
Blinking LAN activity
LAN Green
Off The LAN port is not connected to any
Ethernet device.
On The device is successfully connected to a
USB equipped device.
Blinking The data is sending/receiving via USB port.
USB Green
Off The device is not connected to any USB
equipped device.
On The device is successfully linked with
ADSL head-end (Your DSL provider).
Slow
Blinking
The device is trying to link with ADSL head-
end (Your DSL provider).
Fast
Blinking
The device is handshaking with the ADSL
head-end (Your DSL provider).
DSL Green
Off The device is not linked with ADSL head-
end (Your DSL provider).
On The device is successfully connected to the
Internet.
Blinking The device is sending/receiving data via
the Internet.
Green
Off The device is not connected to the Internet.
Internet
Red On
The device is failed to authenticate with the
ISP due to username or password error.
2

DSL602EU User’s Manual
2.2 Ports and Buttons
The rear panel contains the ports for the DSL602EU's data and power
connections.
DSL: Connecter for accessing the Internet through ADSL line.
USB: Connector for USB equipped PC.
LAN: Connector for Ethernet network devices, such as a PC, hub, switch or
router.
ON/OFF: Power switch to power on/off the DSL602EU.
POWER: Connecter for a power adapter. Using a power supply with a
different voltage rating will damage this product. Make sure to observe the
proper power requirements. The requirement of adapter is 9V AC/ 1A.
RESET: Restore the default settings. You may need to restore the DSL602EU
to its factory defaults if your configuration is changed, or you loose the ability
to enter the DSL602EU via the web interface. To reset the DSL602EU, simply
press the reset button for more than 5 seconds. The DSL602EU will be reset
to its factory defaults and after about 30 seconds the DSL602EU will become
operational again.
2.3 Installing your DSL602EU
1. Locate an optimum location for the DSL602EU.
2. For connections to the Ethernet and DSL interfaces, refer to the Quick
Start Guide.
3. Connect the Power Adapter. Depending upon the type of network, you
may want to put the power supply on an uninterruptible supply. Use only
the power adapter supplied with the DSL602EU. A different adapter may
damage the product.
3

DSL602EU User’s Manual
3. Installing USB Driver (optional)
You must install the USB driver before you can use the DSL602EU via an
USB connection. Please follow the steps below (may vary for each computer)
to complete the USB driver installation on a Windows 2000/XP operating
system.
Note
DO NOT plug the USB cable into computer before DSL602EU
complete the boot-up process. (POWER LED lights up solid green).
1. After connecting the DSL602EU to
computer, the system will detect the
new hardware and show the Found
New Hardware Wizard window.
Select Yes, this time only and
then click Next.
2. Insert the USB driver CD-ROM into
computer’s CD-ROM drive. Select
Install the software automatically
(Recommended) and then click
Next.
3. Click Continue Anyway to continue the
installation.
4. Click Finish to complete the
installation.
4

DSL602EU User’s Manual
4. Configuring TCP/IP
This section will help you to establish a connection between a PC and the
DSL602EU. Each computer that will be part of your network needs to
communicate with the DSL602EU. To do this, you may need to configure
each PC’s network settings to automatically obtain an IP address.
This configuration assumes you have retained the default interface for
Windows XP. If you are running the ‘Classic’ interface, please follow the
instructions for Windows XP.
1. Select Start > Settings > Control Panel.
2. Double-click Network and Dial-Up
Connections.
3. Double-click the Local Area Connection
appropriate for your Ethernet adapter.
4. Click Properties.
The Local Area Properties window is displayed.
5. Ensure the box next to Internet Protocol
(TCP/IP) is selected.
6. Click to highlight Internet Protocol (TCP/IP)
and click Properties.
The Internet Protocol (TCP/IP) Properties
window is displayed.
Note: if you are using Vista or Win 7 choose
version 4 for the internet protocol
7. Select Obtain an IP address
automatically if you are connecting the
DSL602EU to the PC via Ethernet.
Otherwise, select Use the following IP
address and specify an IP address within
the subnet such as 192.168.1.5 (assuming
the IP address of the DSL602EU is
192.168.1.1) if you are connecting the
DSL602EU to the PC via USB.
8. Click OK twice to exit and save your
settings.
5

DSL602EU User’s Manual
5. Setting up Your DSL602EU
This section guides you through configuring your DSL602EU. You should
have your computers configured for DHCP mode and have proxies disabled
on your browser. If you do not get the page as shown below, you may need to
delete your temporary Internet files by flushing the cached web pages.
5.1 Login to Your DSL602EU
Follow the procedures below to login to your DSL602EU.
1. Open your web browser. Type the
default IP address of the DSL602EU
http://192.168.1.1 and press Enter.
The Log In page appears.
2. Enter user name as admin and
password as admin (case sensitive).
3. Click OK.
The main page appears.
Note
You can change the password in System->Password page at any
time.
The Web Application is displayed as shown below. This page displays the
DSL602EU’s current status.
6

DSL602EU User’s Manual
6. Web Configuration
6.1 Overview
6.1.1 Overview
This page displays the firmware version, SDK version, interfaces status and
Internet connection status.
7

DSL602EU User’s Manual
6.1.2 DHCP Clients
This page displays the client devices which are assigned IP addresses by the
DSL602EU.
8

DSL602EU User’s Manual
6.1.3 System Log
The page records various types of activity on the DSL602EU. You can view
data generated or acquired by routine system communication with other
devices, such as the results of negotiation with the ISP and so on. This
feature can be enabled or disabled under the Advance settings.
9

DSL602EU User’s Manual
6.2 Internet
6.2.1 Internet Connection
The DSL602EU supports multiple channel operation modes. It is bridge mode
enabled by factory default. There is a 1483-bridged mode with PVC 0/33 in
the system.
10

DSL602EU User’s Manual
You can click the Edit icon ( ) to edit the default configuration; click the
Remove icon ( ) to delete the current configuration, or click New
Connection button to create a new connection.
Bridge Mode
1. Click New Connection button.
2. Select the connection Mode to Bridge Mode (1483 Bridge). Set the
parameters VPI/VCI and Encapsulation mode according to the CO
DSLAM’s setting. Most providers use VPI=0 and VCI=35. Please Check
with your DSL Provider
3. Click Apply button to add this channel into connection table.
4. The new settings will take effect immediately.
PPPoE/PPPoA Mode
1. Click New Connection button.
2. Select the Operating Mode to be Router Mode (PPPoE, PPPoA MER,
1483 Routed).
3. Specify whether the Internet connection needs account information or not.
4. Set the parameters VPI/VCI and Encapsulation mode according to the
CO DSLAM’s setting.
5. Set User name and Password provided by the ISP if the Internet
connection needs account information.
6. Click Apply button to add this channel into connection table.
7. The new settings will take effect immediately.
11

DSL602EU User’s Manual
1483 MER (Mac Encapsulating Routing) Mode
1. Click New Connection button.
2. Select the Operating Mode to be Router Mode (PPPoE, PPPoA MER,
1483 Routed).
3. Select the Channel Mode to be MER.
4. Set the parameters VPI/VCI and Encapsulation mode according to the
CO DSLAM’s setting.
5. Set WAN IP address, subnet mask, default gateway and DNS server
provided by the ISP.
6. Click Apply button to add this channel into Connection table.
7. The new settings will take effect after reboot the system.
1483 Routed Mode
1. Click New Connection button.
2. Select the Operating Mode to be Router Mode (PPPoE, PPPoA MER,
1483 Routed).
3. Select the Channel Mode to be Routed.
4. Set the parameters VPI/VCI and Encapsulation mode according to the
CO DSLAM’s setting.
5. Set WAN IP address, subnet mask, default gateway and DNS server
provided by the ISP.
6. Click Apply button to add this channel into Connection table.
7. The new settings will take effect after reboot the system.
12

DSL602EU User’s Manual
6.2.2 Statistics
6.2.3 WAN
This page shows the WAN statistics information.
13

DSL602EU User’s Manual
6.2.4 ATM
This page shows the ATM interface statistics information.
14

DSL602EU User’s Manual
6.2.5 ADSL
This page shows the ADSL status and statistics.
15

DSL602EU User’s Manual
6.3 System
6.3.1 Password
The first time you log into the system with default password. This page allows
you to change the password for administrator.
Field Description
Old Password Enter the old password in this field.
New Password Enter the new password in this field.
Confirmed Password Enter the new password in this field to confirm the
password.
16

DSL602EU User’s Manual
6.3.2 Network Time
Simple Network Timing Protocol (SNTP) is a protocol used to synchronize the
system time to the public SNTP servers. This page allows you to manually
configure the time and select Time Zone. Also, you can enable SNTP client
update function and configure the SNTP server to let the DSL602EU
synchronize with the public SNTP servers.
Field Description
Automatically
synchronize with
Internet time server
Enable the DSL602EU to synchronize with
Internet time server to update the system clock.
First NTP time server Select the first Internet time server from drop-
down list or specify its IP address manually.
Second NTP time
server
Select the second Internet time server from drop-
down list or specify its IP address manually.
(optional)
Time Zone Offset Select The time zone in which the DSL602EU
resides.
17

DSL602EU User’s Manual
6.3.3 Store/Restore Settings
This page allows you to backup current settings to a file or restore the settings
from a previously saved file. Also, you can reset the DSL602EU to default
settings.
To save settings to a file, just click the Save button to save the file to a local
drive.
To load the settings from a file, please follow the instructions below:
1. Click the Browse button to select the saved file.
2. Confirm your selection.
3. Click the Upload button to start restoring.
To reset all the current settings, just click Reset button to reset all settings to
default value. This is the same as you press the Reset button on the rear
panel of DSL602EU.
IMPORTANT! DO NOT power off the DSL602EU or press the Reset button
while this procedure is in progress.
18
Table of contents
Other Diamond Network Router manuals