Diamond SupraMax DSL602E Instructions for use

SupraMax DSL602E
Easy Start Guide
VERSION 1.1 - UPDATED 08/28/2007

Easy Start Guide
Page 2 of 13
Contents
About the Modem.................................................. 3
Requirements.................................................................................................................3
Software.........................................................................................................................................................3
Hardware .......................................................................................................................................................3
Package Contents ...........................................................................................................4
P ysical Features ...........................................................................................................5
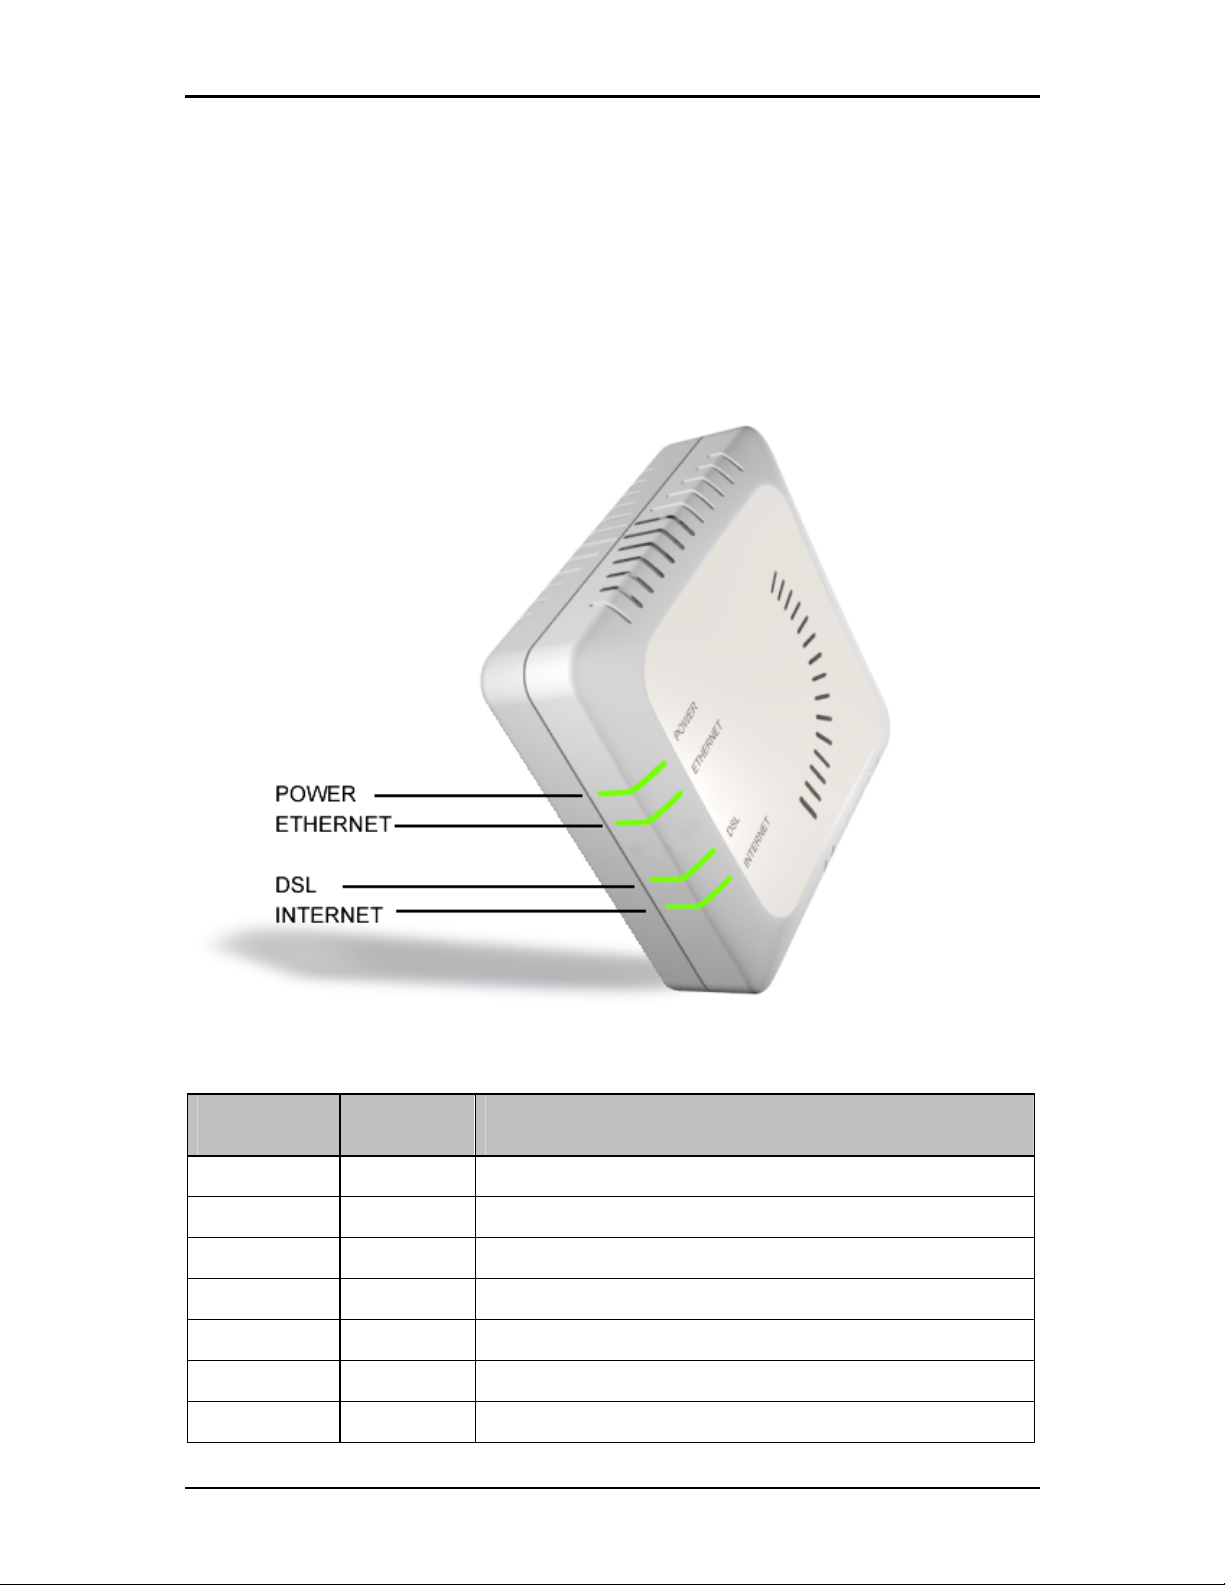
Front Panel ....................................................................................................................................................5
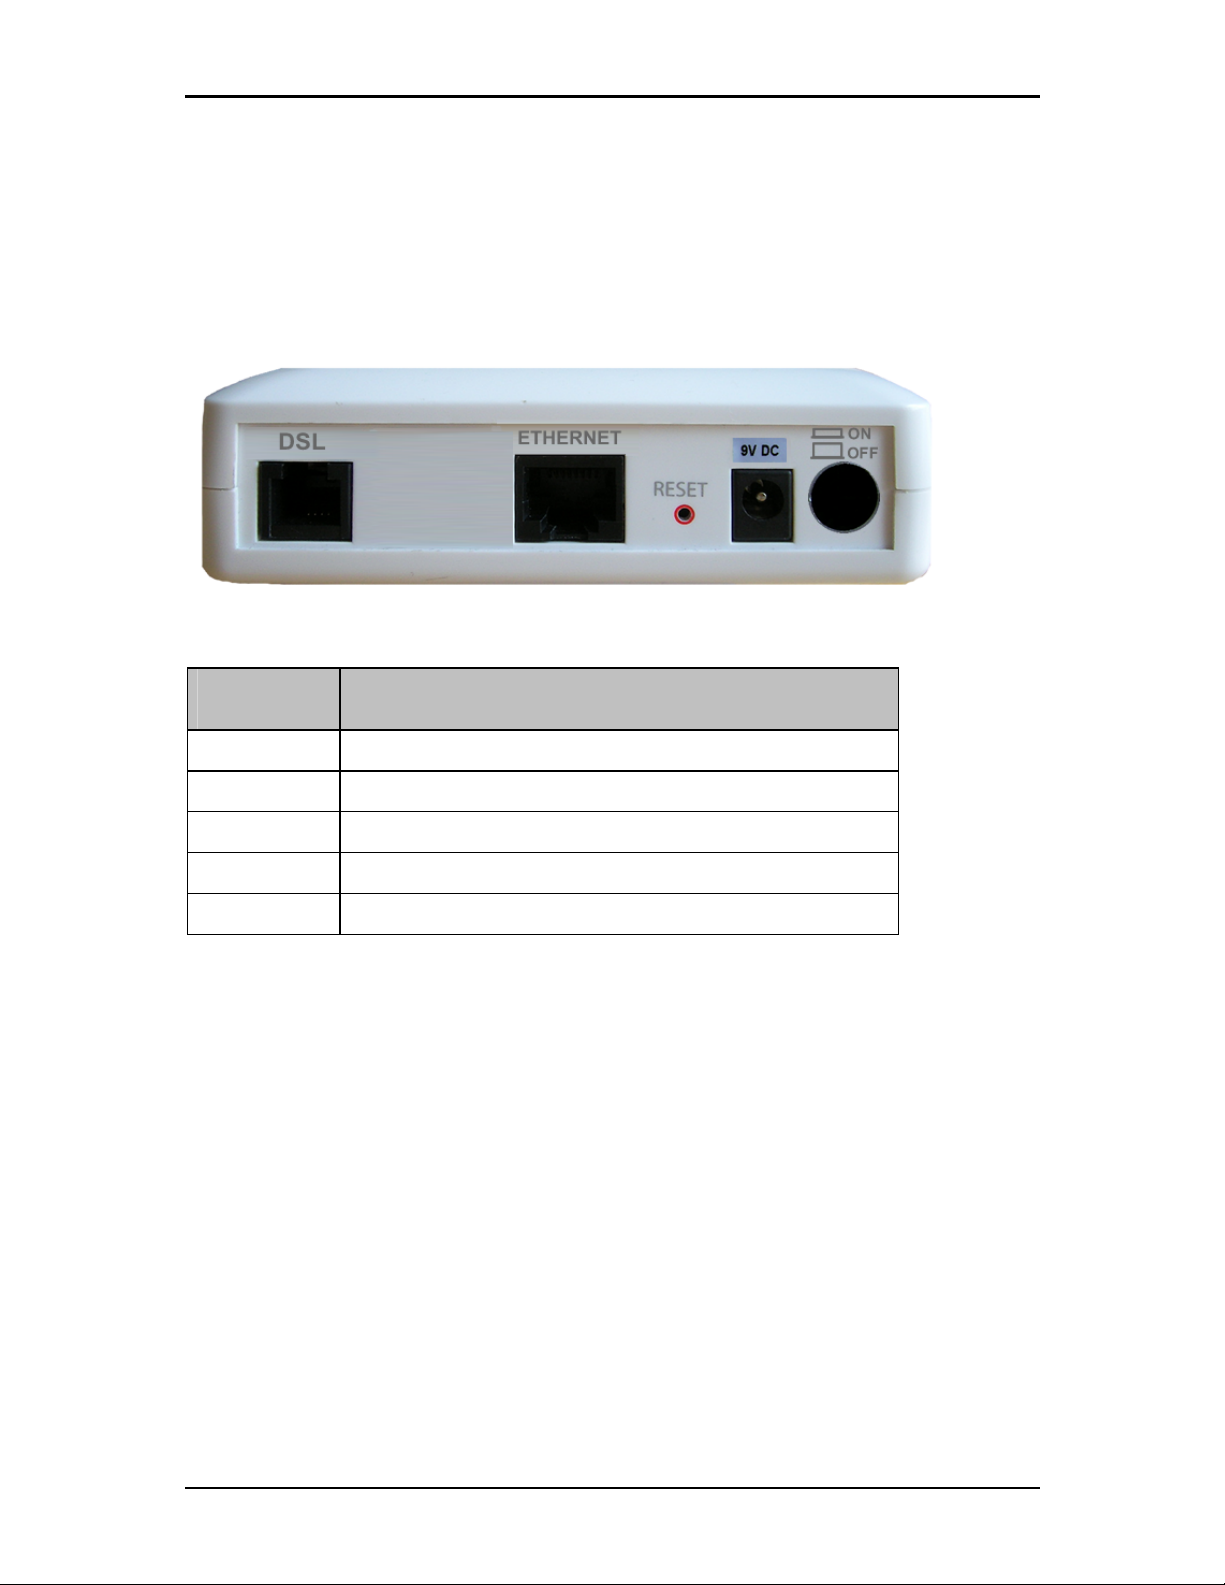
Back Panel .....................................................................................................................................................6
Getting Started ..................................................... 7
Configuring TCP/IP Settings ............................................................................................................................7
Configuring Internet Properties .......................................................................................................................7
Internet S aring, Proxy, and Security Applications.........................................................................................11
Removing Temporary Internet Files...............................................................................................................12
Trouble S ooting......................................................................................................... 11
Hardware Setup .............................................................................................................8
Et ernet Connection........................................................................................................................................8
Connecting to the Internet…………………………………….......9
Internet Login Account Setting………………………………………..10

Easy Start Guide
Page 3 of 13
About the Modem
Congratulations on t e purc ase of your router. T is router allows you to utilize your p one circuit to access broadband Internet
wit out restricting you to make telep one calls.
T is router is designed to connect to t e Internet and to your local area network (LAN) ig speed Et ernet. It as full Network
Address Translation (NAT) firewall, demilitarized zone (DMZ) services, and encryption security support to block unwanted users from
accessing your network. Quality of Service (QoS) and Policy routing (PR) are also supported. T is router is compatible wit personal
computers and Apple Macs.
Requirement
Your computer must meet t e following minimum requirements.
Software
Operating System:
Windows (98 SE, Me, 2000, XP, XP x64)
Macintos OS 10.2
Et ernet connections are operating system independent
Browser:
Internet Explorer 4.0
Netscape Navigator 3.02
Hardware
233MHz processor
CD-ROM Drive
Network adapter (Et ernet)

Easy Start Guide
Page 4 of 13
Package Content
Package contents are listed below. For any missing items, please contact your dealer immediately. Product contents vary for different
models.
Modem
Et ernet cable
Telep one cable
9V Power Adapter
Easy Start Guide
Resource CD

Easy Start Guide
Page 5 of 13
Phy ical Feature
Front Panel
T e LEDs on t e front panel gives you an idea about t e power and connection status.
Front Panel
Label A tion Des ription
POWER Off No power is supplied to t e device
Steady lig t Connected to an AC power supply
ETHERNET Off No Et ernet connection
Steady lig t Connected to an Et ernet port
Blinking lig t Transmitting/Receiving data
DSL Off No DSL signal
Blinking lig t Establis ing DSL signal

Easy Start Guide
Page 6 of 13
Back Panel
T e back panel provides ports to power up and connect t e router into t e network.
Ba k Panel
Label Used for…
DSL Connecting t e telep one cable
ETHERNET Connecting wit t e computer t roug Et ernet cable
RESET Resetting t e device. Press for 10 seconds to reset.
9 V DC Connecting wit t e 9V power adapter
ON/OFF Switc ing t e device on/off

Easy Start Guide
Page 7 of 13
Getting Started
Setting up t e device is easy. T e flowc art below provides an outline of t e steps you need to complete t e installation. T ere are
brief descriptions beside eac step to elp you along. Detailed instructions are provided in t e subsequent pages.
Configuring TCP/IP Settings
Use t e default TCP/IP settings to allow t e router to provide a network address to t e computer,
To et the TCP/IP propertie :
1. Select Start > Run. T is opens t e Run dialog box.
2. Enter ontrol n pa. pl and t en click OK. T is opens t e Network Conne tions in your computer.
3. Rig t-click LAN and t en select Properties. T is opens t e Lo al Area Conne tion Properties dialog box.
4. Select Internet Proto ol (TCP/IP) and t en click Properties. T is opens t e Internet Proto ol (TCP/IP) dialog
box.
5. Select Obtain an IP address automati ally.
6. Click OK to close t e Internet Proto ol (TCP/IP) dialog box.
7. Click OK to close t e Lo al Area Conne tion Properties dialog box.
Configuring Internet Properties
To et the Internet Propertie :
1. Select Start > Run. T is opens t e Run dialog box.
2. Enter ontrol inet pl. pl and t en click OK. T is opens t e Internet Properties dialog box.
3. Click Conne tions tab.
4. In t e Dial-up and Virtual Private Network settings pane, select Never dial a onne tion.
5. Click OK to close t e Internet Properties dialog box.

Easy Start Guide
Page 8 of 13
Hardware Setup
W en installing t e router, t e common practice is to ave t e router, t e main computer, and p one jack in t e same room. T e
room s ould also ave enoug electrical outlets to matc your needs.
Et ernet Connection
In terms of data transfer speed, t e Et ernet provides t e fastest mode of connection between t e router and t e computer.
To connect through Ethernet:
1. Plug one end of t e telep one cable from t e POTS Splitter’s ADSL port and t en plug t e ot er end into t e router’s DSL
port
POTS Splitter
A p one line can carry p one call and Internet signals. W en you enable t e p one line for ig speed Internet, t e connection
produces ig -pitc ed tones w en using t e p one. Installing a Plain Old Telep one Service (POTS) splitter separates t e two
signals and eliminates t e noise.
To setup the telephone POTS Splitter:
1. Locate t e p one jack in your ouse.
2. Insert t e POTS Splitter into t e p one jack.
3. Plug one end of t e telep one cable from t e POTS Splitter’s TEL port and t en plug t e ot er end into t e telep one.

Easy Start Guide
Page 9 of 13
2. Plug one end of t e Et ernet cable from t e router’s ETHERNET port and t en plug t e ot er end into t e Et ernet port in
your computer.
Connect t e power adapter from t e router’s 9V DC port into t e electrical outlet and t en press ON.
Connecting to the Internet
T ere are two ways to connect to t e Internet. You can eit er use t e Web Interface or t e Utility Wizard.
Connecting Via t e Web Interface
To connect to the Inter via the Web Interface:
1. Open your browser.
2. Enter 192.168.1.1 in t e address field and t en press Enter. T is opens t e Setup page of t e web interface.
Setup Page

Easy Start Guide
Page 10 of 13
3. Click Step 1: Internet Login A ount Setting. T is opens t e Internet Login A ount Setting page.
Internet Login A ount Setting page
4. Enter t e User ID, Password, Proto ol, VP1, and VCI for your account. T ese are t e account information from your
service provider. (ATT_SBC and Version ISPs use VPI = 0; VCI = 35; Protocol = PPPoE LLC; BellSouth ISP use VPI
= 8; VCI = 35; Protocol = PPPoE LLC; Qwest ISP use VPI = 0; VCI = 32; Protocol = PPPoA LLC)
5. Click Next. T is opens t e System Password page.
System Password page
6. Select Enable Authenti ation.
7. Enter User Name, Password, and Confirm Password.

Easy Start Guide
Page 11 of 13
8. Enter t e number of minutes for Idle Timeout.
9. Click Next. T is opens t e Summary page.
10. Click Finis .
Trouble Shooting
To make sure t e router installation moves on smoot ly, you may need to remove or disable conflicts t at may interfere t e
installation. Probable conflicts may include:
Internet s aring applications
Proxy software
Security software
TCP/IP settings
Internet properties
Temporary Internet files
Internet S aring, Proxy, and Security Applications
Internet s aring, proxy software, and firewall applications may interfere wit t e router installation. T ese s ould be removed or
disabled before you install and configure t e router.
If you ave any of t e following or similar applications installed on your computer, remove or disable t em according to t e
manufacturer’s instructions.
Internet Sharing Appli ations Proxy Software Se urity Software
Microsoft Internet S aring WinGate Symantec
WinProxy Zone Alarm

Easy Start Guide
Page 12 of 13
Removing Temporary Internet Files
Temporary Internet files are files from Web sites t at are stored in your computer. Delete t ese filed to purge t e Internet cac e and
remove footprints left by t e Web pages you visited.
To remove temporary Internet file :
1. Select Start > Run. T is opens t e Run dialog box.
2. Enter ontrol and t en click OK. T is opens t e Control Panel.
3. Double-click Internet Options. T is opens t e Internet Options dialog box.
4. In t e Temporary Internet Files pane, click Delete Cookies.
5. Click Delete Files.
6. Click OK to close t e Internet Properties dialog box.

Easy Start Guide
Page 13 of 13
Safety Precautions
Do not open, service, or c ange any component.
Only qualified tec nical specialists are allowed to service t e equipment.
Observe safety precautions to avoid electric s ock
C eck voltage before connecting to t e power supply. Connecting to t e wrong voltage will damage t e equipment.
Copyrig t © 2007. All rig ts reserved.
No part of t is document may be reproduced, republis ed, or retransmitted in any form or by any means w atsoever, w et er electronically or mec anically,
including, but not limited to, by way of p otocopying, recording, information recording, or t roug retrieval systems wit out t e express written permission of
t e owner. Product specifications contained in t is document are subject to c ange wit out notice. All ot er company or product names mentioned are used for
identification purposes only and may be trademarks of t eir respective owners.
Table of contents
Other Diamond Network Router manuals