Dictaphone PowerMic User manual

IInnssttaallllaattiioonnGGuuiiddee
PowerMic™Microphones
USB PowerMic™
PowerMic+Scanner
PowerScanner™
PowerMic™Microphones IInnssttaallllaattiioonnGGuuiiddee––PPoowweerrMMiicc™MMiiccrroopphhoonneess
HEALTHCARE SOLUTIONS
Dictaphone®, PowerMic™and PowerScanner™are trademarks
or registered trademarks of Dictaphone Corporation. All other
names and trademarks referenced herein are trademarks or
registered trademarks of their respective owners.
L-2770-002 02/2004
Giving
New Meaning
To Voice…
Dictaphone World Headquarters
3191 Broadbridge Avenue
Stratford, CT, USA
06614-2559
Tel: 1-888-350-4836
Web: www.dictaphone.com
Dictaphone Canada
2355 Skymark Avenue
Mississauga, Ontario, Canada
L4W 4Y6
Tel: 1-905-625-0300
Continental Europe:
Dictaphone Europe AG
Ifangstrasse 91
CH-8153 Rümlang
Switzerland
Tel: +41 (0)1 817 76 76
United Kingdom, Middle East, Africa,
Latin America, and Asia Pacific:
Dictaphone International
Commonwealth House
Chalk Hill Road, Hammersmith
London W6 8DW United Kingdom
Tel: +44 (0)20 7878 5000

Giving New Meaning to Voice...

Installation Guide
PowerMic™ Microphones
USB PowerMic™
PowerMic+Scanner
PowerScanner™

Trademarks
Dictaphone®, PowerMic™, USB PowerMic™, and PowerScanner™are
trademarks or registered trademarks of Dictaphone Corporation.
Other names and trademarks referenced herein are trademarks or registered
trademarks of their respective owners.
Copyright Notice
This manual is copyrighted and all rights are reserved by Dictaphone
Corporation. No part of this publication may be reproduced, transmitted,
transcribed, stored in a retrieval system, or translated into any language or
computer language, in any form or by any means, electronic, mechanical,
magnetic, optical, chemical, manual, or otherwise, without the prior written
permission of Dictaphone Corporation, 3191 Broadbridge Avenue,
Stratford, CT 06614-2559.
Copyright © 2003-2004 Dictaphone Corporation. All rights reserved.
Disclaimer
Dictaphone Corporation makes a sincere effort to ensure the accuracy of the
material described herein. However, except as set forth in any license
documentation applicable to each product of Dictaphone referred to herein,
Dictaphone makes no warranty, express or implied, with respect to the
quality, correctness, reliability, currentness, accuracy, or freedom from error
of this document or the product or products referred to herein and
specifically disclaims any implied warranties of merchantability and fitness
for any particular purpose. Dictaphone disclaims all liability for any direct,
indirect, incidental, consequential, special, or exemplary damages resulting
from the use of the information in this document. Mention of any product
not manufactured by Dictaphone does not constitute an endorsement by
Dictaphone of that product.
Visit Dictaphone Corporation on the Web at
www.dictaphone.com.
L-2770-002 02/2004

Revision History
Published by Dictaphone Corporation
Stratford, Connecticut, USA
The Customer Documentation Team strives to provide our customers with
high-quality printed and on-line documentation for all Dictaphone products.
If you have any comments or suggestions as to how we can improve our
documentation for your use, please contact us at:
DOCUMENT
NUMBER
SOFTWARE
VERSION DESCRIPTION DATE
L-2770-001 N/A Initial release 06/2003
L-2770-002 N/A Updated procedures 02/2004

Contents
Introduction ................................................................. 1
Using Your Microphone ......................................... 1
Prerequisites ................................................................ 2
Additional Requirements ........................................ 2
USB PowerMic™ Microphone .................................... 4
Installing the USB PowerMic .................................. 4
USB PowerMic+Scanner Microphone ........................ 5
Installing the Driver Files ........................................ 5
Installing the USB PowerMic+Scanner .................. 9
PowerScanner™ Microphone ................................... 10
Installing the PowerScanner ................................. 13
Installing the Microphone Wizard Program ............... 15
Testing Your PowerMic with the Microphone Wizard 19
Regulatory Notices .................................................... 22
Safety ................................................................... 22
EMC ...................................................................... 22
Index .......................................................................... 23

1
Introduction
This Installation Guide provides you with important
information about installing your PowerMic™
microphone for use with Dictaphone®dictation
software. It includes installation instructions for the
following models:
•USB PowerMic (Part #0331039-002)
This is the standard PowerMic microphone with a
USB connection to your computer. Installation
procedures begin on page 4.
•PowerMic+Scanner (Part #0331040-002)
This is the PowerMic microphone and barcode
scanner with a USB connection to your computer.
Installation procedures begin on page 5.
•PowerScanner (Part #0331005-007)
This is the PowerMic microphone and barcode
scanner with a serial connection to your computer.
Installation procedures begin on page 10.
Be sure to follow the installation instructions for the
model you have purchased.
Using Your Microphone
Refer to the user documentation and online help
provided with your Dictaphone dictation software for
information on how to use your microphone’s features
for recording dictation with your particular application.

2
PowerMic™ Microphones Installation Guide
Prerequisites
USB PowerMic and PowerMic+Scanner:
Windows®XP or Windows®2000 operating system.
PowerScanner: Windows NT®, Windows®XP, or
Windows®2000
operating system. The Turtle Beach™
Santa Cruz™sound card, which is the sound card
approved and supported by Dictaphone for use with
the PowerScanner, must be installed on your
computer.
Note: The prerequisites below are for the
microphone only. Your dictation software has its
own set of minimum hardware and software
requirements. Check your dictation software’s
user documentation to be sure the software can
run on your computer.
Additional Requirements
USB PowerMic
• This model of the PowerMic does not require
the installation of any files.
• It is recommended that you install and run
the Microphone Wizard (MicWiz) program
to test your microphone.
PowerMic+Scanner
• This model of the PowerMic requires the
installation of a set of scanner driver files.
• It is recommended that you install and run
the Microphone Wizard (MicWiz) program
to test your microphone.

3
Prerequisites
PowerScanner
• This model of the PowerMic requires the use
of a Turtle Beach Santa Cruz sound card and
its drivers installed on your computer.
• It is also required that you install and run the
Microphone Wizard (MicWiz) program to
test your microphone.
The drivers for the PowerMic+Scanner and the
MicWiz program are available on the USB
Microphone Driver CD that is included with your
microphone. These same files, as well as the drivers for
the Turtle Beach Santa Cruz sound card, are also
available for download from the Dictaphone Web site
at www.dictaphone.com. Refer to subsequent sections
of this Installation Guide for information on how to
download and install these files.

4
PowerMic™ Microphones Installation Guide
USB PowerMic™Microphone
Installing the USB PowerMic
To install the USB PowerMic:
Connect the USB PowerMic’s USB cable to an
available USB port on the front or back of your
computer.
You can begin using the USB PowerMic immediately.
However, it is recommended that you follow the
procedures to install the Microphone Wizard program
and test your USB PowerMic as indicated in Installing
the Microphone Wizard Program on page 15.
5
USB PowerMic+Scanner Microphone
USB PowerMic+Scanner Microphone
Before using your PowerMic+Scanner, you will need
to install a set of scanner driver files. The necessary
drivers are on the USB Microphone Driver CD that is
included with your microphone (see below). The
drivers are also available for download from the
Dictaphone Web site (see page 6).
Installing the Driver Files
To install the drivers for the PowerMic+Scanner
from the USB Microphone Driver CD:
1. Insert the USB Microphone Driver CD into your
computer’s CD-ROM drive.
2. Start the Windows Explorer application.
To open Windows Explorer, select Start >
Programs > Accessories > Windows Explorer.
OR
Select Start > Run..., type explorer.exe, and
then click OK.
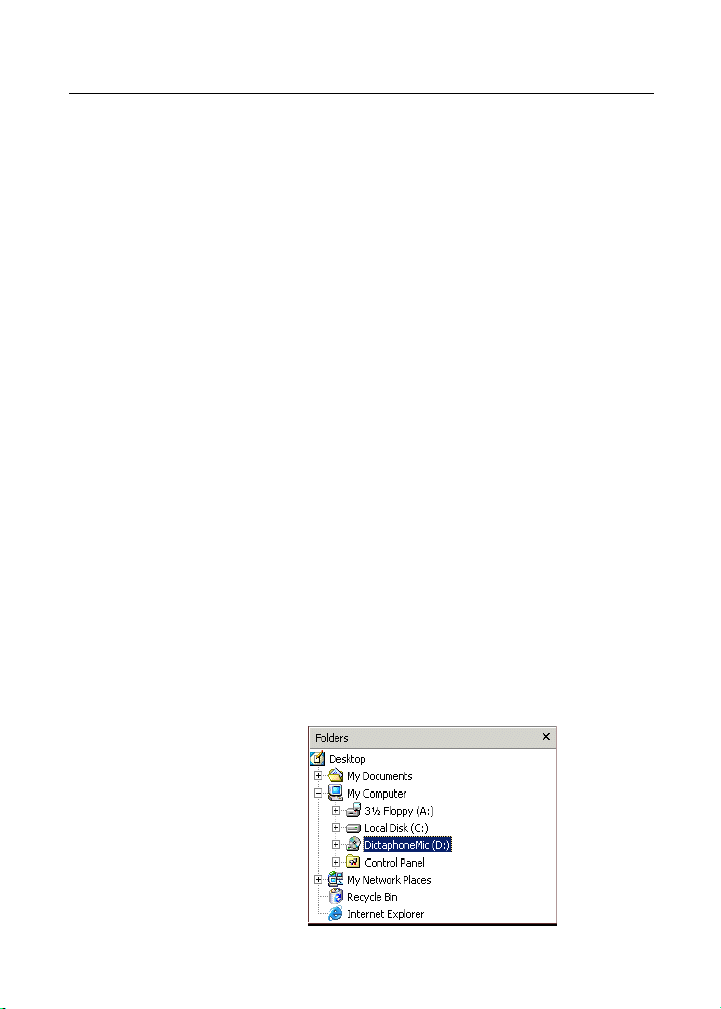
3. In the left pane, select the CD-ROM drive (usually
the D: drive) identified as DictaphoneMic (D:).

6
PowerMic™ Microphones Installation Guide
4. In the right pane, right-click the USBSerialDrv
folder and select Copy from the shortcut menu.
5. In the left pane, navigate to your C:\Windows or
C:\WINNT folder where you will save the driver
files. (The name of this folder depends on the
operating system on your PC.)
6. Right-click this folder and select Paste from the
shortcut menu. The USBSerialDrv folder is
copied into the Windows/WINNT folder. The
drivers are now installed.
You can now install your microphone as indicated in
Installing the USB PowerMic+Scanner on page 9.
To download the drivers from the Dictaphone Web
site:
1. Start Internet Explorer and go to the Dictaphone
Web site at www.dictaphone.com.
2. Click the Support link in the top navigation bar
on the Dictaphone home page.
3. On the Support page, scroll down and click the
Downloads link. You can go directly to the
Downloads page at http://www.dictaphone.com/
support/productService/downloads.asp.
4. Click the heading PowerMic Microphones.
5. Click the link under the heading USB
PowerMic+Scanner Microphone to download
the drivers.

7
USB PowerMic+Scanner Microphone
6. When prompted to do so, click Save to save the
installation file, PowerMicDrivers.exe, on your
computer.
7. In the Save As dialog box, navigate to and select
your Temp folder (C:/Temp) where you will save
the downloaded file.
8. Click Save to begin the download. When the
download is finished, click Close and continue
with the procedure below for installing the
drivers.
To install the drivers from the downloaded
installation file:
1. Open Windows Explorer, navigate to the Temp
folder where you downloaded the drivers, and
double-click the PowerMicDrivers.exe file. A
message displays telling you the drivers will be
installed.

8
PowerMic™ Microphones Installation Guide
2. Click OK. A file extraction dialog box opens.
3. Click Unzip to begin extracting the files. Accept
the default location so that the drivers are
extracted to C:\PowerMicDrivers.
4. When the extraction of files is finished, click OK
and close any remaining dialog boxes.
5. Connect your PowerMic+Scanner to your
computer as indicated in Installing the USB
PowerMic+Scanner on page 9.
6. Run the Microphone Wizard (MicWiz) program
to test your microphone as indicated in Installing
the Microphone Wizard Program on page 15.

9
USB PowerMic+Scanner Microphone
Installing the USB PowerMic+Scanner
To install and connect the USB PowerMic+Scanner
microphone to your PC:
1. After downloading and installing the drivers for
the USB PowerMic+Scanner microphone,
connect the USB cable to an available USB port
on the back or front of your computer.
2. Your computer will automatically detect the new
device and open the Hardware Installation
Wizard. Follow any instructions provided by the
Hardware Installation Wizard. When prompted to
indicate the location of the PowerMic+Scanner’s
driver files, enter the name and location of the
folder where the drivers were installed, that is,
C:\PowerMicDrivers.
3. Follow the remaining instructions provided by the
Wizard, keeping the default settings.
4. It is recommended that you follow the procedures
to install the Microphone Wizard program and test
the PowerMic+Scanner as indicated on page 15.
When the installation is complete, you are ready to use
the PowerMic+Scanner.

10
PowerMic™ Microphones Installation Guide
PowerScanner™Microphone
The PowerScanner microphone connects to a serial
port on your computer. Before you install the
PowerScanner, be sure you have installed the Turtle
Beach Santa Cruz sound card and its driver files
following the manufacturer’s instructions. The drivers
are provided with your sound card, or you can
download them from the Dictaphone Web site.
To download the sound card drivers from the
Dictaphone Web site:
1. Start Internet Explorer and go to the Dictaphone
Web site at www.dictaphone.com.
2. Click the Support link in the top navigation bar
on the Dictaphone home page.
3. On the Support page, scroll down and click the
Downloads link. You can go directly to the
Downloads page at http://www.dictaphone.com/
support/productService/downloads.asp.
4. Click the heading PowerMic Microphones.
5. Click the link for your computer’s operating
system under the heading PowerScanner Serial
Microphone to download the correct drivers.
6. When prompted to do so, click Save to save the
installation file on your computer.

11
PowerScanner™ Microphone
7. In the Save As dialog box, navigate to and select
your Temp folder (C:/Temp) where you will save
the downloaded file.
8. Click Save to begin the download. When the
download is finished, click Close and continue
with the procedure below for installing the drivers
for the sound card.
To install the drivers from the downloaded
installation file:
1. Open Windows Explorer, navigate to the Temp
folder where you downloaded the drivers, and
double-click the executable file for your operating
system:
•sc_4161s.exe for Windows 2000 and
Windows XP
•TBSCWin98Drivers.exe for Windows 98
and Windows ME
•TBSCWinNTDrivers.exe for Windows
NT

12
PowerMic™ Microphones Installation Guide
A message, similar to the one shown below,
displays telling you the drivers will be installed.
2. Click OK. A file extraction dialog box opens.
3. Click Unzip to begin extracting the files. Accept
the default location so that the drivers are
extracted to C:\SoundCardDrivers.
4. When the extraction of files is finished, click OK.
The InstallShied Wizard opens and installs the
driver files automatically.
5. If a Reboot needed message indicates that you
should restart your computer, close any open
applications, and click Yes.
6. When your computer is restarted, connect your
PowerScanner to your computer as indicated in
Installing the PowerScanner on page 13.
7. Run the Microphone Wizard (MicWiz) program
to test your microphone as indicated in Installing
the Microphone Wizard Program on page 15.

13
PowerScanner™ Microphone
Installing the PowerScanner
To install the PowerScanner:
1. The PowerScanner’s cable is split into five cables.
a. Insert the speaker cable into the sound card’s
Speaker port. The speaker cable’s connector is
green and has a small speaker icon embossed
on it.
b. Insert the MIDI cable into the sound card’s Mic
port. The MIDI cable’s connector is orange and
has a small microphone icon embossed on it.
c. Insert the game port connector (15-pin
connection) into the sound card’s game port.
d. Insert the serial cable (7-pin connection) into a
serial port on your computer.
Note: Refer to your sound card’s documentation
if you need help locating these ports.
e. Connect the remaining cable to the Switching
AC Adaptor’s cable.
2. Plug the Switching AC Adaptor’s power cord
into an electrical outlet.
3. Follow the instructions beginning on page 15 to
install the Microphone Wizard and test the
microphone. When you have finished the test, you
are ready to use the PowerScanner.

14
PowerMic™ Microphones Installation Guide
Sound card
AC Adaptor
Mic
Spur
Game
Serial
Connection
This manual suits for next models
2
Table of contents
Other Dictaphone Microphone manuals


