10
▪ ▪ ▪ ▪ ▪ ▪ ▪ ▪ ▪ ▪ ▪ ▪ ▪ ▪ ▪ ▪ ▪ ▪ ▪ ▪ ▪ ▪ ▪ ▪ ▪ ▪ ▪ ▪ ▪ ▪ ▪ ▪ ▪ ▪ ▪ ▪ ▪ ▪ ▪ ▪ ▪ ▪ ▪ ▪ ▪ ▪ ▪ ▪ ▪ ▪ ▪ ▪ ▪ ▪ ▪ ▪ ▪ ▪ ▪ ▪ ▪ ▪ ▪ ▪ ▪ ▪ ▪ ▪ ▪ ▪ ▪ ▪ ▪ ▪ ▪ ▪ ▪ ▪ ▪ ▪ ▪ ▪ ▪ ▪ ▪
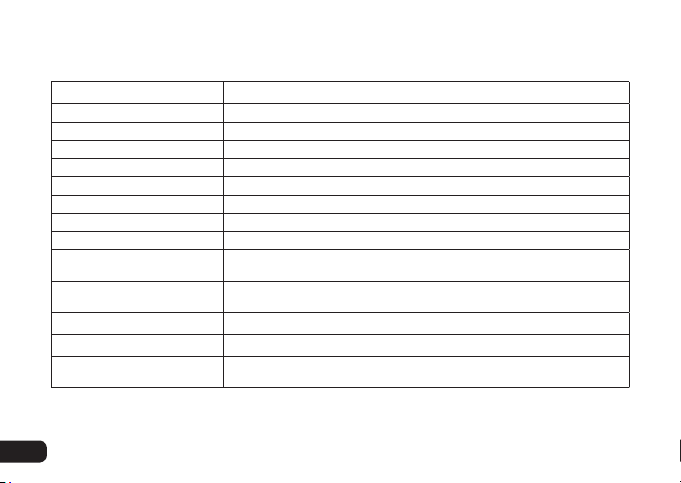
Specications
▪ ▪ ▪ ▪ ▪ ▪ ▪ ▪ ▪ ▪ ▪ ▪ ▪ ▪ ▪ ▪ ▪ ▪ ▪ ▪ ▪ ▪ ▪ ▪ ▪ ▪ ▪ ▪ ▪ ▪ ▪ ▪ ▪ ▪ ▪ ▪ ▪ ▪ ▪ ▪ ▪ ▪ ▪ ▪ ▪ ▪ ▪ ▪ ▪ ▪ ▪ ▪ ▪ ▪ ▪ ▪ ▪ ▪ ▪ ▪ ▪ ▪ ▪ ▪ ▪ ▪ ▪ ▪ ▪ ▪ ▪ ▪ ▪ ▪ ▪ ▪ ▪ ▪ ▪ ▪ ▪ ▪ ▪ ▪
Specications
Transducer Back electret condenser
Polar Pattern Cardioid
Frequency Response 30 Hz to 18 kHz
Maximum Input Level 120 dB (@1 kHz, THD <1%)
Sensitivity -45 dB ±3 dB (0 dB = 1 V / Pa @1 Hz indicated by open circuit)
Output Impedance 200 Ω ±30% (@1,000 Hz)
Power Requirements Phantom power DC 12 to 48 V
Output Connector XLR 3-pin male
Housing Material Metal
Gooseneck Length (including
base connector)
CXGN-12C: 16.3 in. (41.5 cm)
CXGN-18C: 22.5 in. (57.1 cm)
Gooseneck Diameter CXGN-12C: 0.5 in. (12 mm)
CXGN-18C: 0.5 in. (12 mm)
Dimensions (H × W × D) Base: 4 × 3.6 × 5.7 in. (10.2 × 9.1 × 14.5 cm)
Flange Mount Diameter 0.77 in. (1.95 cm)
Weight (without ange) CXGN-12C: 4.7 oz. (133.2 g)
CXGN-18C: 7 oz. (198.4 g)
Specifications