DIEDRICH MANUFACTURING, INC. IR-5 Installation instructions

Issued: 3-14-2013
DIEDRICH MANUFACTURING, INC.
P.O. Box 430
Ponderay, Idaho 83852
Telephone: (208) 263-1276
Toll Free: (877) 263-1276
Fax: (208) 265-4584
Copyright 2013 © by Diedrich Manufacturing, Inc.
PROPRIETARY RIGHTS NOTICE: All rights reserved. No part of this material may be reproduced or transmitted
in any form or by means, electronic, mechanical or otherwise, including photocopy and recording or in connection
with any information storage or retrieval system, without the written
permission of Diedrich Manufacturing, Inc.
READ THIS MANUAL
For important safety, installation, operation and
maintenance instructions.
Keep this manual with the afterburner at all times and
locate it in a prominent place.
DIEDRICH MANUFACTURING, INC.
IR-5 and IR-12
Operator and Maintenance Manual

DIEDRICH MANUFACTURING, INC.
Contents
1.0 IMPORTANT SAFEGUARDS........................................................................................................................4
2.0 COMPONENT DESCRIPTION ......................................................................................................................5
3.0 INITIAL START-UP .......................................................................................................................................9
4.0 SEASONING THE ROASTING DRUM.......................................................................................................11
5.0 ROASTING FOR CONSUMPTION .............................................................................................................12
6.0 SHUT DOWN................................................................................................................................................16
7.0 ROASTING LOG...........................................................................................................................................16
8.0 CLEANING....................................................................................................................................................19
8.1 GENERAL .....................................................................................................................................................19
8.2 DAILY BASIS ...............................................................................................................................................22
8.3 EVERY TWO WEEKS..................................................................................................................................22
8.4 AFTER 40 HOURS OF ROASTING ..........................................................................................................22
8.5 LOWER COMPARTMENTS........................................................................................................................24
8.6 INFRARED BURNER COMPARTMENT ................................................................................................24
8.7 COOLING BIN.............................................................................................................................................25
8.8 BLOWER IMPELLER ..................................................................................................................................27
8.9 VACUUM TUBE..........................................................................................................................................33
8.10 ROAST AIR DUCT ......................................................................................................................................34
8.11 ROASTER EXHAUST DUCTING .............................................................................................................35
9.0 MAINTENANCE...........................................................................................................................................37
9.1 SUGGESTED HAND TOOLS ......................................................................................................................37
9.2 BLOWER MOTOR........................................................................................................................................38
9.3 AGITATOR MOTOR ....................................................................................................................................39
9.4 DRUM MOTOR.............................................................................................................................................40
9.5 ROASTING DRUM DRIVE CHAIN ............................................................................................................41
9.6 ROASTING DRUM DRIVE CHAIN ADJUSTMENT .................................................................................41
9.7 FRONT AND REAR DRUM BEARINGS....................................................................................................42
9.8 BURNER & DRUM CHAFF TRAY ACCESS DOORS...............................................................................43
9.9 AGITATOR DRIVE SHAFT COUPLING....................................................................................................43
9.10 AGITATOR ASSEMBLY ADJUSTMENT ..................................................................................................44
9.11 AIR FLOW CONTROL LEVER ...................................................................................................................44
9.12 COOLING BIN ..............................................................................................................................................45
10.0 FIRE CONTROL - READ CAREFULLY AND PRACTICE!......................................................................46
Diedrich Manufacturing, Inc. www.diedrichroasters.com Page 3
PREFACE
The Diedrich IR-5 and IR-12 Coffee
Roasters are identical in construction
detail and features offered. They differ
only in scale so the descriptions
provided in this Manual are generic and
if differences exist, they will be
specifically mentioned.
This manual covers all of the
components which make up a coffee
roaster. If you have any questions about
the roaster, its accessories, or the proper
use of them and they are not answered
in this manual contact Diedrich
Manufacturing, Inc. immediately.
Over the years, Diedrich Coffee Roasters have undergone an evolutionary design
process. As new technologies have become available they have been incorporated. As
the demands of the modern market have changed, Diedrich Manufacturing, Inc. has
found ways to meet them while maintaining the fundamental principles by which
premium coffee is roasted for optimum cup quality.
The Diedrich IR Series Coffee Roasters feature a highly efficient gas-infrared heating
system, which is combined with non-perforated, carbon steel roasting drum. Using
radiant heat to roast the coffee beans evenly and at such low temperatures that
optimum roasting standards are achieved.
This manual is not necessarily intended to teach one how to roast coffee but does
describe the proper techniques to operate the Diedrich Coffee Roaster.

Diedrich Manufacturing, Inc. www.diedrichroasters.com Page 4
1.0 IMPORTANT SAFEGUARDS
Proper installation, cleaning and safe operation of the coffee roaster is the owner’s and
operator’s responsibility. Read this manual carefully for important operation,
maintenance and safety information.
All persons operating the Diedrich Coffee Roaster must be familiar with this manual
and properly trained in the safe and proper use of the roasting system. This owner’s
manual must be kept with the roaster at all times and be located in a prominent, easily
accessible place. All operators must have a clear understanding of, roasting methods,
cleaning requirements, fire suppression procedures, all safety precautions, and the
proper and intended use of the equipment The contents of the manual, including the
fire control instructions, must be reviewed regularly by all operators of this roasting
system. Never permit an unqualified person to operate the roaster.
The safe use of this equipment also requires an understanding of the basic
chemistries that occur during the roasting process so that subtle warnings can be
identified before critical problems arise.
The roaster’s internal compartments should be cleaned on a daily basis with a more
thorough cleaning after every 60 hours of use. More frequent cleaning may be required
if chaff and residue build-up becomes excessive. Refer to the cleaning section for
detailed instructions.
CAUTION - Always be aware of the risk of a fire. Fires are caused by failure to
maintain a clean roaster and its exhaust duct system. A dirty roaster will also affect
the efficiency of the roasting process. We cannot over-emphasize the importance of a
safe installation that is kept clean!
A fire extinguisher should be located within easy reach of the roasting system. A CO2
extinguisher with sufficient capacity for a roasting fire is preferable. Consult with your
local fire department for recommendations on suitable fire extinguishers. You should
also have water accessible near the roaster. If a water hose installation is not possible, a
two-gallon (6 liter) water sprayer is recommended. If water is used, great care must be
taken to keep the water away from the electrical system.
Never leave the roaster unattended while it is in operation...from start-up to shut down.
Leave the drum and blower motors running until the temperatures have dropped
below 250° Fahrenheit (120° Celsius). Prior to leaving the roaster, perform all necessary
post-roasting cleaning.

Diedrich Manufacturing, Inc. www.diedrichroasters.com Page 5
Never under ANY circumstances, while operating or servicing the machine, thrust a
hand or arm into the roasting drum or any other access port until the roaster is
switched “OFF” and disconnected at its electrical source. Keep clear of moving parts
such as the drive chain at the rear of the roaster and the agitator arm and brushes in the
cooling bin if so equipped. Injury can result from loose clothing, jewelry, hair, or
fingers catching in equipment.
Keep your customers clear of the roaster when it is operating. They may not be aware of
potential hazards. A barrier must separate the roaster from the customers.
Keep the roasting area clear and free of combustible material, such as gasoline and other
flammable vapors and liquids.
Install a CO Monitor when roasting or storing roasted coffee in confined spaces due to
the emission of carbon monoxide.
During and after the roasting, take care when touching the roaster’s exterior surfaces.
The upper half of the front plate can be very hot while the lower half is usually very
warm. The painted mantle encasing the roasting drum is warm to the touch during
roasting. The cooling bin becomes hot when cooling freshly roasted beans.
FIRE CONTROL - Be sure to read and understand the fire control section of this
manual. PRACTICE!!
WARNING
The completed roaster installation MUST BE INSPECTED for compliance to codes by
local City, County, Municipality, Province, State or Country building inspectors and
by the local fire inspector BEFORE OPERATING THE ROASTER. Failure to have
these inspections performed may invalidate the warranty and will relieve Diedrich
Manufacturing Inc. of any liability associated with the installation and use of your
machine.
2.0 COMPONENT DESCRIPTION
Below are descriptions of various parts of the roaster.

Diedrich Manufacturing, Inc. www.diedrichroasters.com Page 6
Figure 1 - Left and Front Views

Diedrich Manufacturing, Inc. www.diedrichroasters.com Page 7
Figure 2 - Roaster Right Side and Rear End Views
Diedrich Manufacturing, Inc. www.diedrichroasters.com Page 8
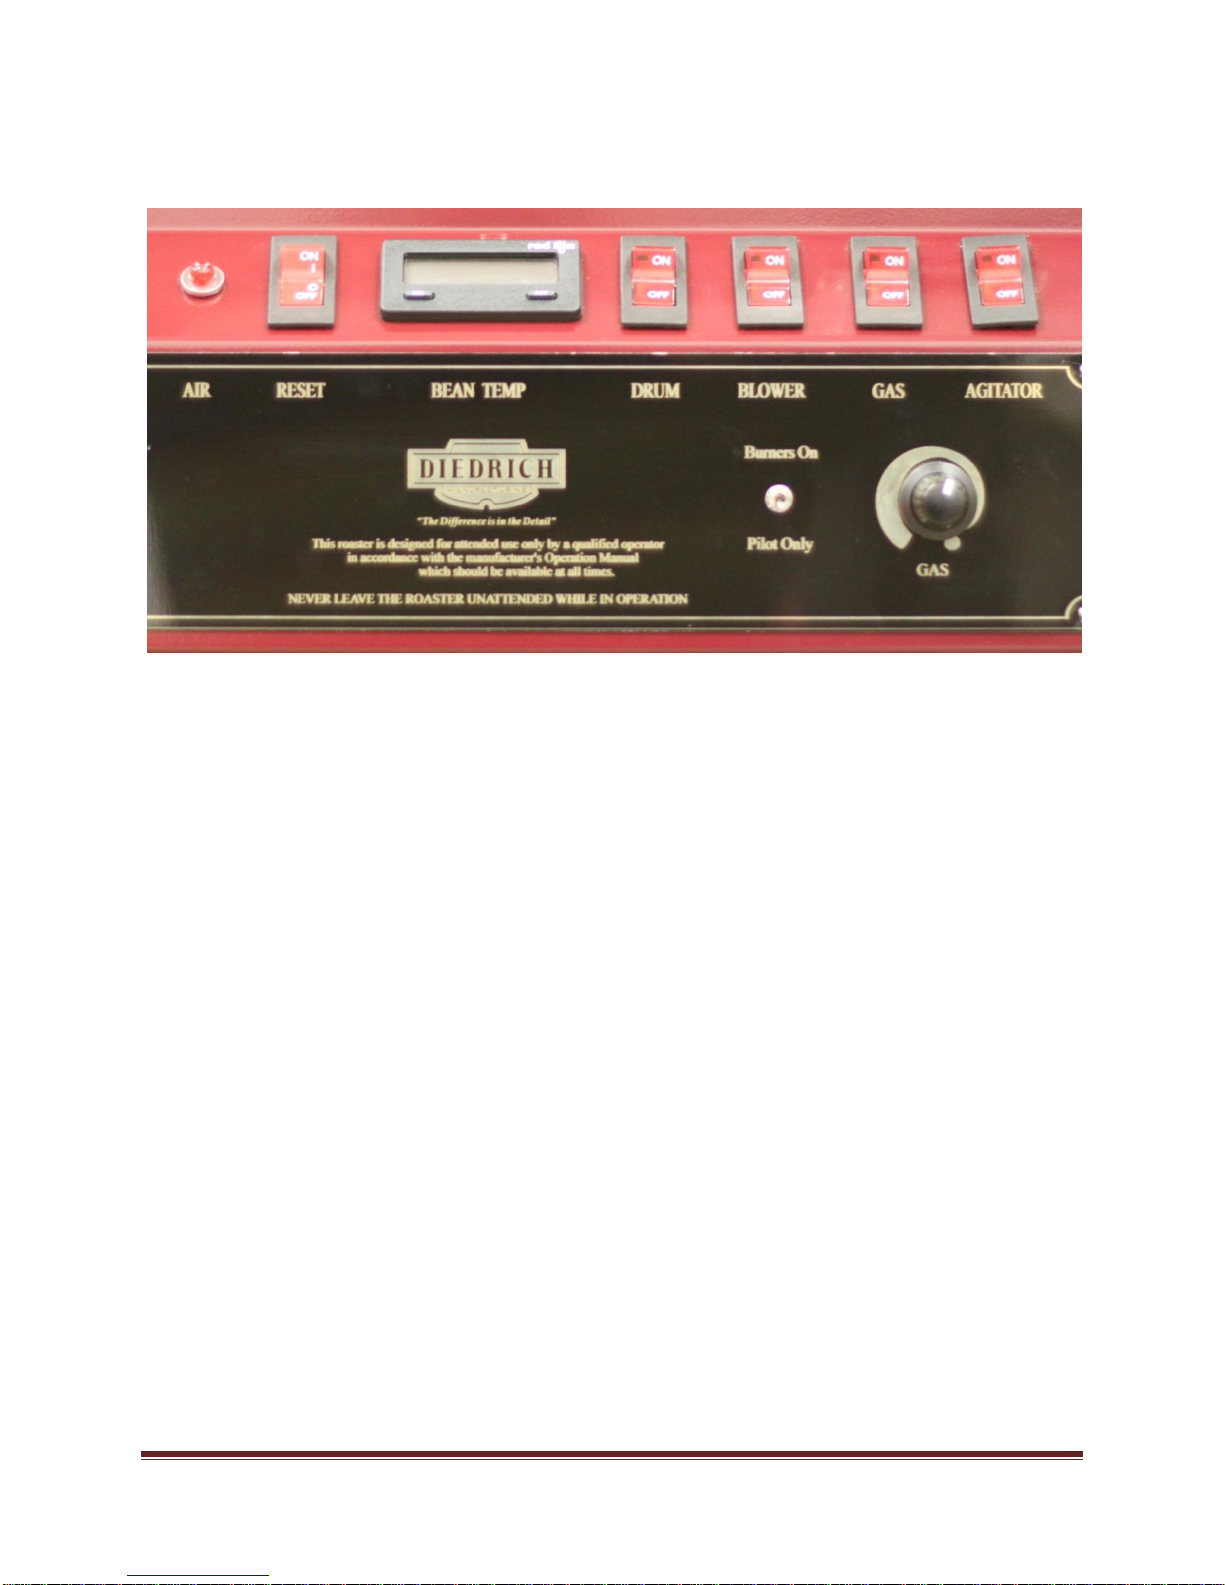
The operator control panel is described as follows.
AIR light: This light may be on or off depending on the model of roaster.
Standard model roasters have a red light. If it is illuminated there is an air flow
restriction and the roaster will not ignite the burners.
Universal model roasters have a blue air light. This light will be illuminated during
normal operation. If it is NOT illuminated there may be a draft in the exhaust ducting
and the roaster will not ignite the burners.
RESET switch: This switch will reset the high limit safety module if the temperature
climbs above 485°F.
Note: At 475°F (246°C) - the main burner shuts off, but the pilot does NOT (No alarm
sounds). At 485°F or 252°C- the alarm will sound and the Excess Temperature limit
shuts down the roaster's entire gas system. You will have to reset the roaster once it
has cooled down below the excess limit temperature. To restart the burners, follow the
normal start up procedure. If the coffee is not removed from the drum before 500°F (260C), the
coffee may ignite even though the flame was turned off at 485°F (252°C).
BEAN TEMP display: This is the temperature of the beans in the drum.
DRUM switch: This switch starts the drum spinning.
BLOWER switch: This switch starts the blower fan.

Diedrich Manufacturing, Inc. www.diedrichroasters.com Page 9
GAS switch: This switch turns on the gas.
AGITATOR switch: This switch turns on the agitator in the cooling bin.
GAS knob: This knob controls the flame level. The intensity can be viewed through the
window below the below the sample trowel and gas pressure on the manometer on the
top or the roaster.
Pilot Only/Burners On toggle switch: This switch toggles the main burners on and off.
If lower than the minimum GAS knob setting is required, the operator can turn the
main burners off.
3.0 INITIAL START-UP
NOTE: After completing the installation of the roaster, locate two or more fire
extinguishers near the roaster and readily accessible by the operator. Consult with your
local fire department for recommendation of an appropriate type fire extinguisher.
The next step is lighting the pilot burner. The pilot burner is a small flame which is in
between the main burners. It looks like three small candle flames and can be seen
through the view window below the sample trowel. Please follow these steps to ignite
the pilot burner.
The "Pilot Only /Burners On" toggle switch should be in the "Pilot Only" position. Place
the air flow handle in the Cooling Bin position. Turn the “GAS” knob all the way to the
right.
Figure 3 - Air Flow Control Handle

Diedrich Manufacturing, Inc. www.diedrichroasters.com Page 10
Standard model roasters and Universal model roasters have different start-up
procedures. A Standard roaster has a red air light on the control panel a serial
number that starts with “S”. A Universal roaster has a blue air light on the control
panel and a serial number that starts with “U”.
For Standard roasters: Standard roasters have a serial numbers which starts with “S”.
Turn on the (1) Drum, (2) Blower, and (3) Gas switches. The igniter will spark until the
pilot burner ignites or for a maximum 90 seconds. If the pilot does not ignite turn the
GAS switch off and back on again to retry.
For Universal roasters: Universal roasters have a serial numbers which starts with
“U”. Turn on Drum & Gas switches. Wait for BLUE air light to come on then turn on
the Blower switch. After the roaster will goes through a 30 second purge cycle the
igniter will start to spark. Should the pilot fail to light, shut off the blower and gas
switches, let blower motor come to a complete stop then restart the procedure. The
blower must stop turning before attempting to light the roaster again.
All roasters: Once the pilot is lit, switch to the "Burners On" position and use the gas
control knob to adjust the gas.
Note: The first time the pilot ignites, extra time may be necessary to allow air to bleed out of the
gas line. Following the ignition of the pilot, two to three minutes may be required to allow the
two infrared burners to ignite for the first time. Watch through the view window for burner
ignition.
Move flame control to obtain a medium flame setting while the drum continues to
rotate. If a grinding noise is heard, stop operation and contact Diedrich Manufacturing
Inc. for instructions.
Move flame control to a high flame setting and watch the digital temperature unit on
the control panel. Let the roaster warm to 415° F, (213° C). If no grinding sounds occur
up to 415°F, the initial warm-up is complete and roasting can commence. If there is a
grinding sound, turn off the drum motor and contact the Diedrich Manufacturing
Technical Support Department for instructions.
Check the exhaust system for leaks. The vent that MUST be installed is a positive
pressure system and if leaks are present, the integrity of the system is compromised. If
leaks are present, the ventilation contractor must be notified to correct the situation
before proceeding to the next step.
This completes the initial start-up procedure.

Diedrich Manufacturing, Inc. www.diedrichroasters.com Page 11
4.0 SEASONING THE ROASTING DRUM
The drum of the roaster must be seasoned before roasted coffee is fit for consumption.
Use an inexpensive coffee for the seasoning process. Do not use a Robusta coffee as it
does not emit enough oil for the seasoning process.
The new drum requires from 5 to 10 seasoning roasts to become properly oiled. Each
seasoning roast requires about 50% of roaster capacity of coffee, enough to fully cover
the drum's lower surfaces. After completion of each seasoning roast, discard the
roasted coffee after it cools. It may take additional roasts to achieve the best flavor from
your new roaster. Seasoning the roasting drum process will give you the opportunity
to become familiar with the roaster's controls and the roasting process itself.
Preheat the roaster to 400ºF (204ºC). After preheating, load the green coffee beans into
the funnel, through the hopper gate and into the drum.
Ensure you are in the “COOLING BIN" position. The coffee will change in color from
green to a pale yellow. During this progression look through the drum door view
window, you will start to see chaff, the bean's outer skin, separating from the coffee
bean. Unwashed coffee has considerably more chaff than washed coffees and decaf
coffees have almost no chaff.
As the coffee develops from the green to the yellow stage and chaff is visible through
the view window, the airflow control handle must be temporarily moved to the
”THROUGH ROASTING DRUM” position so that the increased airflow will remove
the chaff from the roasting drum. Leave the airflow lever in the "THROUGH
ROASTING DRUM" position for 15 seconds or so, until the coffee becomes clean and
free of chaff.
When the coffee is free of chaff, return the airflow control handle to the "THROUGH
COOLING BIN" position. If the chaff is not pulled out of the drum with the increased
air flow, before it is broken up and soaked with oil, it will become more difficult to separate
from the beans. Even with increased air flow through the drum during the latter part of
the roast, it may not be sufficient to clean the coffee. As a result, the compartment
below the cooling bin screen will require more frequent cleaning.
When the coffee reaches the yellow stage 280°F (138°C); the airflow control handle
should be moved to the "50/50" (mid) position. As the coffee reaches the yellow stage,
the moisture in the coffee that was a good conductor of heat early on in the roast, is now

Diedrich Manufacturing, Inc. www.diedrichroasters.com Page 12
turning to steam. At this stage in the roast, the air flowing through the roasting drum
becomes a more uniform heat medium. The roast will progress from the yellow to the
cinnamon color as the coffee begins to expel a fair volume of carbon dioxide (CO2) gas.
After the cinnamon color stage of the roast is reached, the coffee will start its first
cracking. It is important to move the airflow control handle to the "THROUGH
ROASTING DRUM" (horizontal) position for the remainder of the roast.
Let the roast progress until the coffee develops through the second crack and oil begins
to appear at the tips of the beans. When you begin to notice the first traces of oil, turn
the gas control “OFF”. Let the coffee roast on its own liberated heat until the beans are
fully oiled and almost black. At this point in the roast, with good lighting, you should
still see some brown in the coffee. Discharge the coffee into the cooling bin when the
coffee is almost black and fully oiled, while moving the airflow control handle to the
"THROUGH COOLING BIN" position.
As the coffee reaches a temperature of 340°F (171°C) the chemical changes in the coffee
start an exothermic reaction (the chemistry creates its own heat). This exothermic
reaction continues through the remainder of the roast.
Excess Limit Note:
At 475°F (246°C) - the main burner shuts off, but the pilot does NOT (No alarm
sounds). At 485°F or 252°C- the alarm will sound and the Excess Temperature limit
shuts down the roaster's entire gas system. You will have to reset the roaster once it
has cooled down below the excess limit temperature. To restart the burners, follow the
normal start up procedure. If the coffee is not removed from the drum before 500°F (260C), the
coffee may ignite even though the flame was turned off at 485°F (252°C).
Load the next batch of green beans into the drum. After the coffee is in the drum, reset
the excess limit alarm and turn the flame “ON” to start the next roast. Repeat this
complete dark roasting cycle (18-20 minutes) 5-8 times, then start to develop lighter (15-
18 minutes) roasts. This procedure will properly season the roasting drum. This
completes the procedure of seasoning the roasting drum.
5.0 ROASTING FOR CONSUMPTION
The instructions below explain the operation of the roaster. They are not an attempt to
teach all the subtleties and proper techniques of roasting the many varieties of coffee
beans.

Diedrich Manufacturing, Inc. www.diedrichroasters.com Page 13
Further information on roasting is available during the Diedrich Manufacturing Inc.
roasting seminars.
Follow the procedures outlined in the Start-Up section. Move flame control to “HIGH”
(temperature) setting for warm-up. Watch through burner front view window for
burner ignition.
Preheat the empty drum until the digital unit reads 415º (213ºC) or until you reach your
desired charge temperature.
Average roasting times are from 14 -15 minutes for a light roast and 15-18 minutes for a
darker roast, depending on the source or type of beans. Reducing the burner flame is
one of several ways to lengthen roast times. The temperature of the roasting system
(comprised of the coffee beans, roasting drum, and end plates) reacts slower than the
flame adjustments. Do not expect an immediate temperature change when the heat
level is changed. After a short time the beans and roasting system will show signs of
dissipating heat.
The bean development and color can be observed by using the sample trowel. You can
develop a consistent roast profile by referring to a set of roasted bean samples or color
tiles. Sampling of beans should be consistently viewed under a full-spectrum natural
fluorescent lamp to maintain a consistent sample comparison.
Load the green beans into the hopper funnel after the roaster's empty drum has been
preheated. The charge temperature is the temperature which the beans are loaded into
the drum. Depending on type of coffee, batch size, and roasting technique charge
temperatures will typically be between 350°F (177°C) and 440°F (227°C). The display
temperature will fall drastically after charging. The temperature at which the coffee
stops decreasing and starts rising is known as the bottom out temperature. Charge
temperature and initial fuel setting are determined by but not limited to the desired
bottom out temperature and rate of climb from bottom out.
Do not allow green beans to sit in the hopper for prolonged periods of time. This
area of the roaster becomes very hot and beans sitting in the funnel will result in pre-
roasting, uneven roasting, or even scorching.
Before starting the roasting process, move the airflow control handle to the "THROUGH
COOLING BIN" (vertical) position. This splits the airflow mostly through the cooling
bin and partially through the drum. This allows sufficient airflow through the drum to
gently assist in the heating process without excessively drying out the coffee. The

Diedrich Manufacturing, Inc. www.diedrichroasters.com Page 14
Diedrich Coffee Roaster utilizes the moisture that is present in the green coffee to assist
in the conduction of heat to the core of the bean. Our philosophy is to allow the beans
to absorb heat at their own natural potential since various types of coffee have different
weight densities and absorb heat differently.
Move the hopper gate handle up to release the green beans from the hopper into the
drum. Move the handle down to close the hopper gate. If the hopper is not closed after
loading, heat will be lost and roasting time will be longer.
Adjust the flame control to an appropriate heat setting batch size. A larger the batch
has greater the heat absorbing capacity and the higher flame setting can be used
without accelerating the roast too quickly.
The display temperature will fall drastically after charging the drum with beans. The
temperature at which the coffee stops decreasing and starts rising is known as the
bottom out temperature. Charge temperature and initial fuel setting are determined by
the desired bottom out temperature and rate of climb from bottom out.
A stage of roast that is easy to identify is when the beans turn yellow. It makes a good
time/color reference point at about six or seven minutes. The yellow color of varietal
coffees is an off-shade of orange for decaf coffees. The yellow color indicates about
270°F (132C). This is a stage of the roast that is easy to identify and makes a good time
reference.
The coffee requires more heat if you are at six minutes but far from the yellow color.
The coffee requires less heat if you are at four minutes and the coffee is already turning
yellow. The yellow color of varietal coffees is an off-shade of orange for decaf coffees.
When the beans have reached the yellow color, move the air flow control handle to the
"50/50" (mid) position. This increased flow of air through the drum exhausts the chaff
shedding from the beans out of the drum. Some coffees will require more air to remove
the chaff than the 50/50 position requires. In these cases, move the air control handle to
the “THROUGH ROASTING DRUM” position. This changes the airflow to move most
of the air through the drum and the lower percentage of air through the cooling bin.
This increased flow of air through the drum exhausts the chaff, which is shedding from
the beans, out of the drum.
Leave the air control lever in the “THROUGH ROASTING DRUM” position until the
coffee appears clean and then return it to the 50/50 position. It is important to get the
chaff out of the drum at this early stage, before it gets broken up and soaked with oil. It

Diedrich Manufacturing, Inc. www.diedrichroasters.com Page 15
is relatively easy for the air to pick the chaff up when the particles are large and light,
but more difficult later in the roast.
This chaff removal procedure is very important especially when working with coffee
varietals that have very heavy chaff coatings. Decaffeinated coffee has no chaff on the
exterior of the bean, so this procedure becomes unnecessary.
The cinnamon brown color is another checkpoint that is easily identifiable. You should
reach this color at 340°F (171°C) in 9 to 11 minutes. Some fine-tuning of the heat setting
may be necessary at this point.
Between 11 and 13 minutes the beans will reach the 1st Crack and you will observe a
gradual color change of the beans to brown. This is the most significant stage of bean
development. At this stage the beans fully open up and the roasted coffee may be ready
to release into the cooling bin for a lighter roast. The chemical changes in the coffee
start to produce a large volume of carbon dioxide (CO2) gas. This gas will pressurize
the roasting drum if the airflow is not increased. Normally, a pressurized roasting
vessel is the most efficient heat transfer medium, but for coffee, a pressurized roasting
drum will hinder bean development. As more airflow through the drum is needed,
move the air control handle to the “THROUGH ROASTING DRUM” position.
The bean development accelerates very rapidly and these last few minutes are very
critical. The operator should pay close attention to the coffee and frequent sampling is
important. While learning to roast, it may be advisable to lower the heat to slow down
this stage of the roast.
When the coffee reaches this final stage of roast, prepare to discharge the roasted coffee
into the cooling bin. Move the air flow control handle to the “THROUGH COOLING
BIN” position and turn the flame “Pilot Only”. Discharge the coffee into the cooling bin
when it has reached the desired color and bean development.
After the coffee has been in the cooling bin for a minute or so, turn off the agitator and
spread out the coffee. Remove the coffee from the cooler discharge gate. With the
agitator turned off, the air cool can find a path through the coffee. This will allow the
coffee to cool faster.
When the beans have cooled to room temperature, position a container under the
cooling bin chute, turn on the agitator, and discharge the beans from the cooling bin.

Diedrich Manufacturing, Inc. www.diedrichroasters.com Page 16
Note: If any of the following happens:
1. Excessive smoke in the room.
2. Smoke coming from the sample trowel port.
3. Longer cool down times.
4. Excessive chaff in the burner compartment.
Check for the following:
1. Excessive build-up of residue throughout the airflow system within the roaster.
2. Excessive build-up of residue in the exhaust ducting.
If these abnormalities occur, inspect the roaster and ducting for probable cause and take
immediate action to rectify the situation. This completes the roasting procedure.
6.0 SHUT DOWN
Set gas switch to “OFF” position. After the temperature reading has dropped to 250ºF
(120ºC) or lower, set the blower and drum switches to “OFF”. Make sure the flame
control is turned to the “OFF” position. Remove the chaff from the lower
compartments of the roaster. Open the side doors to remove chaff and for general
cleaning. Inspect for smoldering chaff. If found, extinguish with water (a small spray
bottle is handy for this purpose). Vacuum the cooled chaff out of the roaster.
WARNING! NEVER LEAVE THE ROASTER AFTER ROASTING WITHOUT
CLEANING OUT THE CHAFF.
Note: For faster cooling of the roaster, leave all the doors closed, place the airflow
control handle in the “THROUGH ROASTING DRUM” position. This action moves the
air through the roasting drum cooling down the complete system evenly and efficiently.
7.0 ROASTING LOG
Diedrich recommends that you maintain roasting and cleaning logs. These logs will
assist in keeping track of the amount of coffee roasted during the course of the day,
week or month, how long the machine has been working since the last cleaning or
maintenance, and how much weight has been lost from the green to the roasted beans.
You will find the log very valuable for many different aspects of the roasting process.

Diedrich Manufacturing, Inc. www.diedrichroasters.com Page 17
Make entries into the log between roasts or after the green beans have been discharged
into the roasting drum before the coffee roast requires all your attention.
Type of Coffee: Naturals (unwashed coffees, i.e. Indonesians) have much more chaff
than washed coffees (i.e. Central and South American coffees); and decafs have
virtually no chaff on the outside of the bean. Thus, the chaff box and burner tray
require much more attention if a fair quantity of Sumatra is roasted, but almost no
cleaning if you are roasting decaf.
Weight Loss: The green weight IN minus the roasted weight OUT divided by the green
weight equals the percentage of weight loss.
Example: 15 lbs. IN minus 12.75 lbs. OUT = 2.25 lbs. = 15% weight loss
The weight loss is a good indicator of the degree of roast. For example, take a coffee
that has a 15% weight loss. Such variables as humidity, how the coffee was stored and
ambient air temperature, will affect the weight loss. It may go up or down 1% from day
to day or month to month, but you should always see 15% +/- 1%. If, after a few
months, you start to see the weight loss moving to 16-17%, the roast is gradually getting
darker. On the other hand, if the weight loss starts to drop down to 13-14%, the roast is
gradually getting lighter.
Roast Time: Roasting time for a particular roast is important. This may explain why
the weight loss is different from the last time a particular coffee was roasted (the longer
the roast, the higher the weight loss) even if the color is the same. Longer roasting and
cooling times are also indicators that the airflow passages may be plugging up. There
should be no more than 1/8” of residue anywhere inside the roaster. Roast times are
also important to calculate total time on the roaster.
Total Time: Total time on the roaster is very important as it directly relates to the
servicing/cleaning needs of the roaster.
Comments: This is a good place for notations about techniques required for particular
coffees or any type of comment that you feel is important. It may also be wise to note
the weather of the day as climatic and elevation conditions vary and will affect the way
some coffees roast.
It is useful to note any changes in the way the roaster performs. This will be helpful in
diagnosing future problems with the roaster.

Diedrich Manufacturing, Inc. www.diedrichroasters.com Page 18
Comments
Note: The green weight IN minus the roasted weight OUT divided by green weight IN equals the percentage of weight loss.
Example: 15 lbs IN - 12.75 lbs OUT = 2.25 lbs / 15 = 15% weight loss
Roast Time
% Wgt Loss
Total roasting time
Weight Out
Weight In
Type of Coffee
Date
Table 1 - Roast Log

Diedrich Manufacturing, Inc. www.diedrichroasters.com Page 19
NOTE: THE SERVICING OF THE ROASTER IS EXTREMELY IMPORTANT. THE
ROASTING LOG WILL INDICATE ABOUT WHEN AND HOW OFTEN THE MACHINE
NEEDS TO BE SERVICED. DO NOT TAKE THE SIGNIFICANCE OF THE LOG
LIGHTLY!
8.0 CLEANING
8.1 GENERAL
CAUTION: ALWAYS DISCONNECT ROASTER AT ELECTRICAL SOURCE (at circuit
breaker or safety shut-off switch) BEFORE SERVICING MOTORS OR MOVING
COMPONENTS.
The cleaning schedule we recommend should be used as a guideline. Your specific
roasting style, coffee, and climate will affect the time between cleaning.
Keeping your roaster and its exhaust ducting clean, from inside the roaster to its
termination outside the building, is of utmost importance. Failure to do so will create a
SEVERE FIRE HAZARD. Accumulated chaff and oil residues are extremely flammable.
Poor airflows can result in a build-up of flammable gases in the roaster as well as the
exhaust ducting. Residue also insulates the ducting from within, resulting in higher
internal duct temperatures.
It is vitally important that all qualified operators of the roaster understand that A
DIRTY AIR FLOW SYSTEM INCREASES THE RISK OF A FIRE.
Any restriction of airflow anywhere in the system (including exhaust ducting) will
create a "snowball" effect of residue/creosote build-up in all airflow passages. This
build-up directly affects the performance and efficiency of the roaster. To prevent
excessive residue build-up, the airflow system requires periodic cleaning. Establish a
cleaning schedule that is proportional to the amount of coffee roasted, taking into
consideration the type of coffee and the degree of roast, as well as the climatic
conditions.
The seasonal climate of the region will greatly affect the amount of cleaning required. A
moist, humid climate requires more frequent cleaning of the roaster than a hot, dry
climate. A moist, cold climate or coffees with excessive moisture create severe
condensation. The moisture will adhere to the roaster's internal components and
exhaust duct causing build-up to accumulate faster.

Diedrich Manufacturing, Inc. www.diedrichroasters.com Page 20
The types of coffees and degree of roast will also influence the amount of cleaning
required. Some geographic regions, more than others, are known for their dark roasted
coffees. With darker roasts, more oils come to the surface of the bean, which in turn
contributes to more oil in the exhaust smoke. The oily smoke adheres to all surfaces it
comes in contact with. Thus, if more coffee is roasted dark rather than light, more
frequent cleaning is required.
Natural or unwashed coffees (i.e., Indonesians) have much more chaff on the bean than
washed (i.e., Central and South American) coffees. Thus, if more unwashed coffees are
roasted than washed coffees, the chaff box, burner tray and cooling bin require more
frequent cleanings.
Decaffeinated coffee has almost no chaff on the exterior of the bean so if a fair quantity
of decaf is roasted light, the chaff box will require very little cleaning. Decafs are
usually roasted dark and oily, so duct cleaning will require more attention.
Painted surfaces which have oxidized can be cleaned with a light abrasive paste
(Maguire’s Mirror Glaze is recommended and available at most auto parts stores). Take
care when using abrasive products since they will actually remove paint. The view
windows, chute, and agitator assembly (in cooling bin) are easier to clean while they are
still warm from roasting heat. For polishing brass or stainless parts, use only a
polishing compound made for these types of metals.
This manual suits for next models
1
Table of contents


