Digi-Shot DC-7630 User manual


Table of Contents
Welcome....................................................................................1
Getting Started......................................................................... 2~5
-Contents of package...................................................................2
-System Requirements.................................................................3
-Camera Feature......................................................................4
-LCD Screen DisplayDefinition.....................................................5
Powering Up............................................................................. 6
-Battery Installation
-Turning CameraON/OFF
-Sleep Mode
Taking Pictures.........................................................................7
LCD Monitor Indicator...............................................................8
Setup Mode..............................................................................9-11
-Shooting.......................................................................................................9
-Self-Timer .................................................................................................9
-Flash............................................................................................................9
-Exposure....................................................................................................9
-Setup..........................................................................................................9
-Quick View................................................................................................10
-White Balance...............................................................................................10
-Sharpness....................................................................................................10
-Image Quality..............................................................................................11
-Resolution....................................................................................................11
-Video Format...............................................................................................11
-Language.....................................................................................................11
-Format...........................................................................................................11
-Install Camera Driver................................................................................13
-Arcsoft Photo Impression 4.0......................................................14
-Arcsoft Photo Base 3.0...............................................................15
-Arcsoft Video Impression 1.6...................................................... 16
-QuickTime Player 6....................................................................17
Install Arcsoft Programs and Camera Drivers.......................13~17
Uninstall Application Programs..............................................18
Downloading record photo/video via "removable disk".......19
Downloading Photos Using PhotoImpression 4.0 ................20
Photo and Sharing Management Using PhotoBase 3.0.......21
Video Playback Using VideoImpression 1.6...........................22
Playing Movie Clips using QuickTime Player 6.....................23
Troubleshooting...........................................................................24
Specifications............................................................................25
Playback Mode..........................................................................12
-Thumbnail
-Delete
-DPOF Print

Welcome
Thank you for choosing the Camera to pursue your digital
adventures. Whether you are creating memories of your friends and
family or exploring the great outdoors to get the utmost satisfaction
from your digital camera, please take a moment to read through
this manual. Its contents will send you on an educational journey into
your camera's multiple capabilities.
This camera is not resistant to water and should not be used outdoors
in snow or rain. If accidentally dropped in water, please quickly pour
out the water. Dry it with sunlight or an air-blower.
Protect it from excessive humidity. It will wet the lens and the pictures
taken will be blurred.
Do not attempt to disassemble the camera yourself. Always take it
to an authorized service facility for repair.
To store the camera, wrap it in a piece of clean, soft cloth and place
it in a cool, dry, dust-free lace.
Thank you again for choosing the camera!
1

Getting Started
Contents of package
1
2
3
4
5
6
7
QOG
Carry Bag
Video Cable
Neck Strap
USB Cable
Installation CD
Digital Camera
2

Personal computer, laptop, desktop, or IBM compatible with
Pentium 166 MHz minimum, and with an active USB
(universal serial bus) port.
Windows 98SE/ ME/ 2000/ XP, CD ROM drive, color monitor, mouse
and keyboard.
NOTE
For transferring still images or for video conferening, your computer
must have a modem and communication software for internet connection.
Getting Started
System Requirements
3
Getting Started
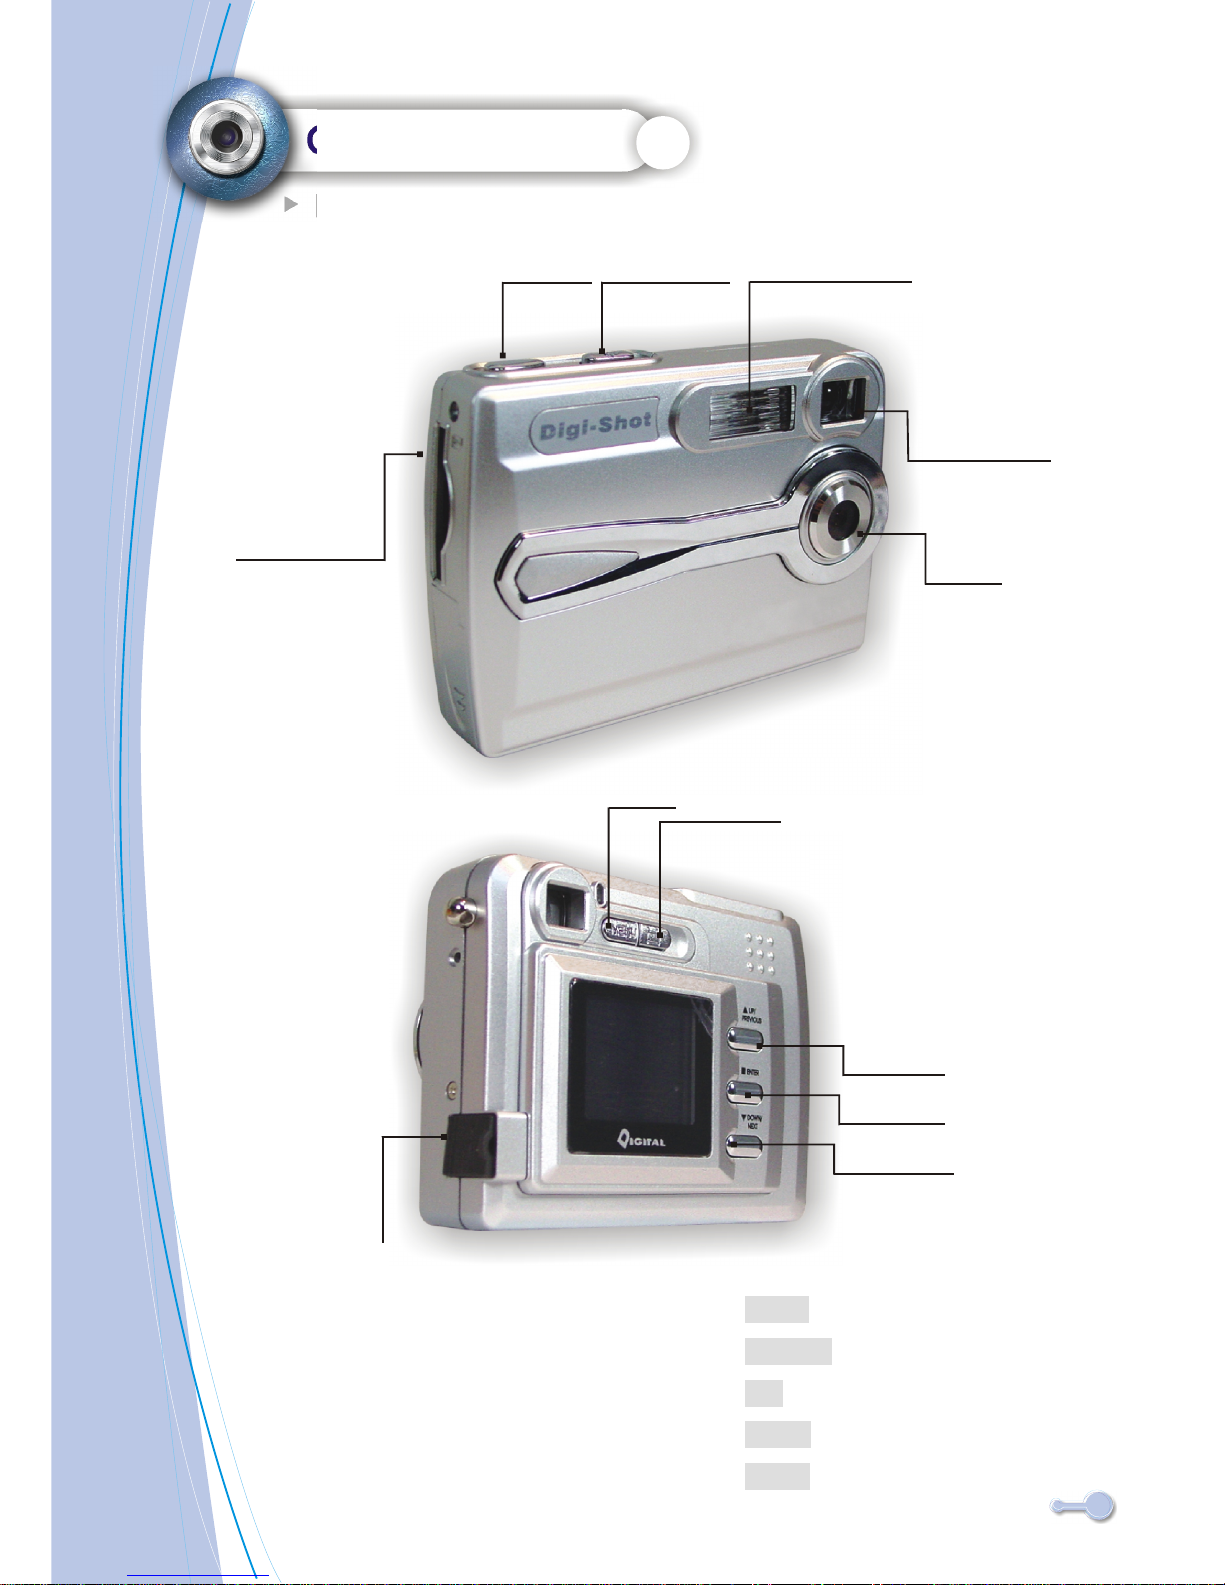
Feature
Menu
Display
Up
Enter
Down
OSD Menu ON/OFF
LCD, Status Icons ON/OFF
Up / Previous / Zoom in
Menu Enter/Playback
Down / Next / Zoom out
1.Shutter 2.Power 3.Flash Strobe
4.View Finder
5.Lens
6.SD/MMC slot
7.Menu 8.Display
9. Up
10.Enter
11. Down
12.USB & TV port
4

Getting Started
LCD Screen Display Definition
5

Power Up
Battery Installation
Battery Installation
1. Open the battery chamber cover.
2. Insert batteries in correct polarity(+ and -)as shown on the inside
of the battery chamber.
3. Close the battery chamber cover.
4. Power turns ON after pressing the power button.
5. The camera is now ready to take pictures.
Turning the Power ON/OFF
1. Power turns ON after pressing the power button.
2. To turn camera OFF press and Power button until the camera beeps
and the LCD screen is blank.
3. To turn camera ON from the OFF mode, press Power button until
a beep is heard and the LCD screen turn on.
Sleep Mode
When the camera is ON while not being used for 60 seconds, it will
automatically perform sleep mode to save battery power.
To re-activate the camera from sleep mode :
1. Press the Power button once.
2. The camera is ready to take the next picture.
6

Taking Pictures
Taking a Snapshot
1. Aim the camera and compose your image by looking through
the viewfinder.
2. Press the shutter button down. A buzz sound will be heard indicating
that a picture has been taken.
3. The LCD screen will show the number of pictures taken.
The camera stores all pictures in the built-in memory , Secure
Digital Memory Card or Multi Media Card.
NOTE
7
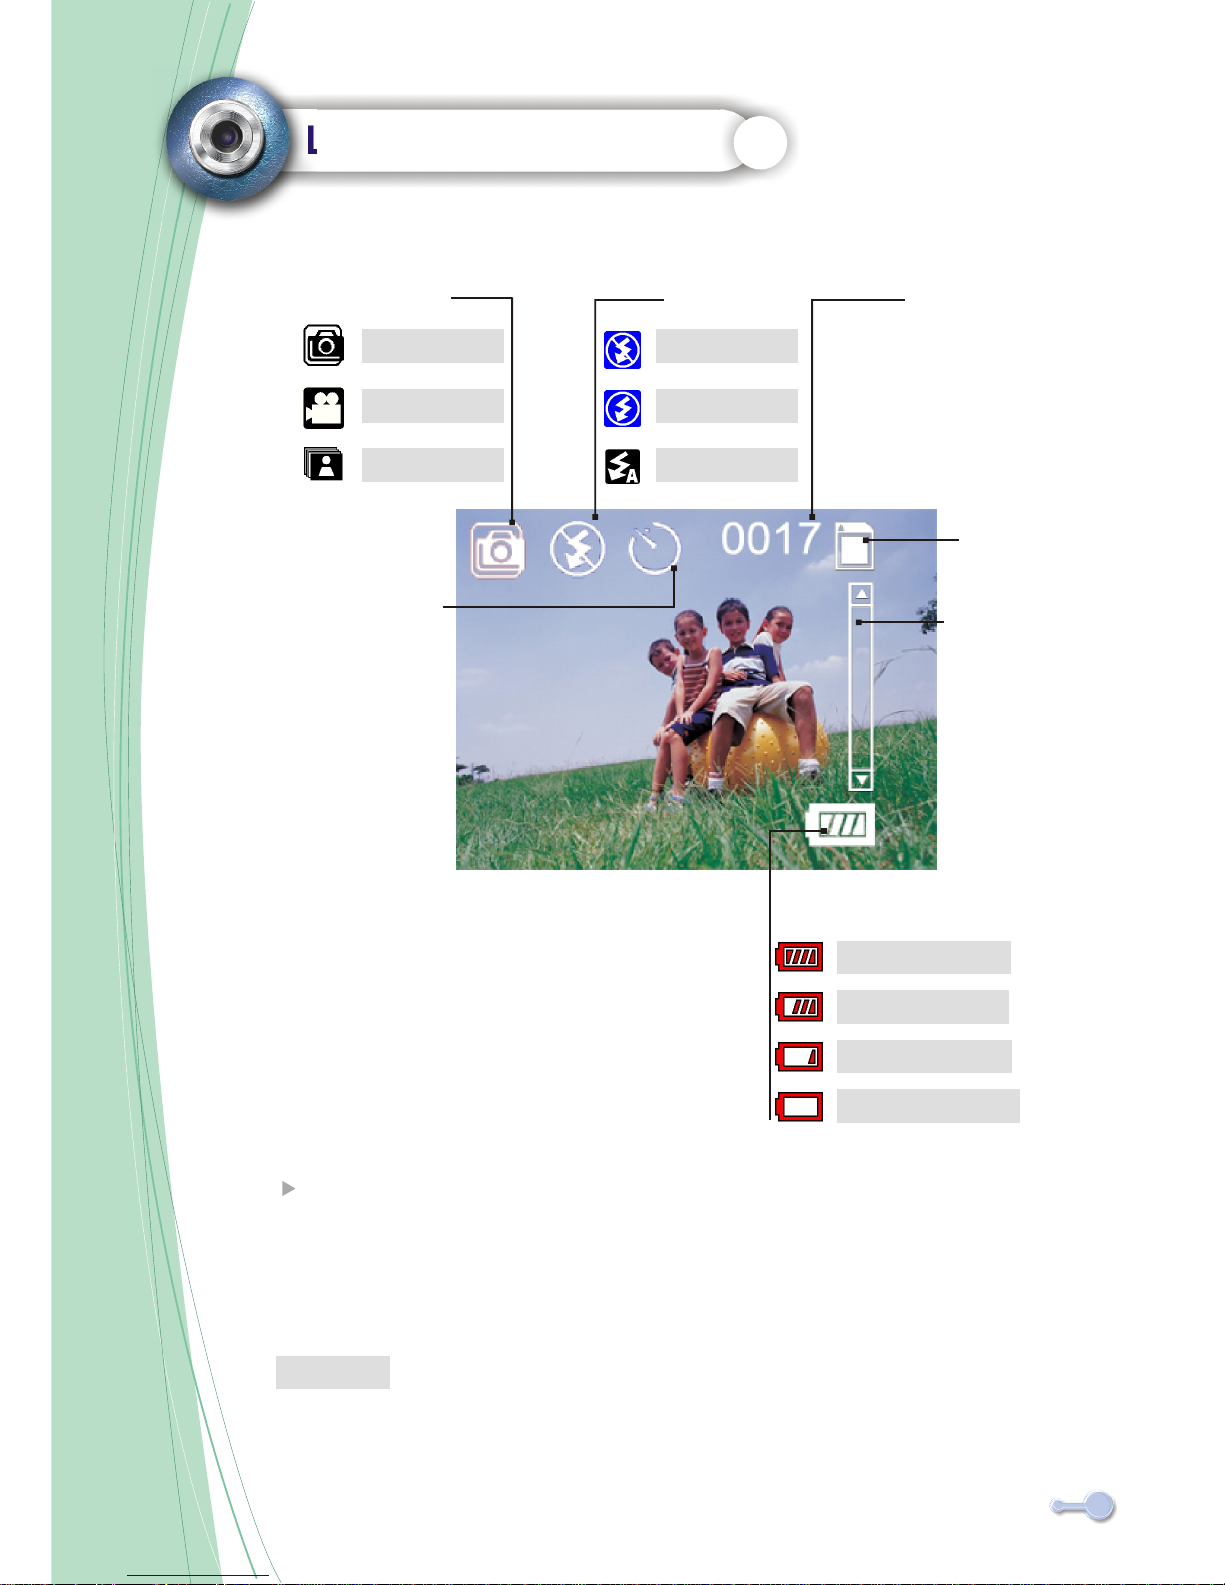
Record Mode
Photography
AVI
Burst
Flash State
Force Off
Force On
Automatic
Self-Timer
No.of Pictures
Can be Taken
Card Indicator
Digital Zoom
State Bar
Battery Indicator
Full Battery
Low Battery
Battery Exhausted
Digital Zoom In/Out
1.Press up/down button to change Zoom in/out.
2.Digital zoom state bar will display currant zoom status
LCD Monitor Indicator
NOTE
Medium Battery
1.The picture taken by doing Zoom In/Out will be blurred
compared to no zoom state.
2.There is no Digital Zoom In/Out function under AVI mode. 8

SETUP MODE
Shooting MODE (default : PHOTOGRAPHY)
Use this mode to take a single image each time the shutter button is
pressed.
Use this mode to record video clips at a resolution of 320x240 pixels.
Use this mode to take up to five images when the shutter button is pressed.
Use this mode to open the WebCam mode.
Use this mode to view the images/video clips. Thumbnail display, delete
or set DPOF recorded images is available.
PHOTOGRAPHY
AVI
BURST
PC CAMERA
PLAYBACK
SELF-TIMER (default : OFF)
The self-timer will delay the release of the shutter for approximately ten seconds
after the shutter button is pressed.
Flash (default : FORCE OFF)
the flash is down and cannot fire.
the flash fires with each exposure regardless of the amount of ambient light.
the flash fires automatically in low light conditions.
FORCE OFF
FORCE ON
AUTOMATIC
EXPOSURE (default : 0)
+2 as much light
+1.3 as much light
+0.6 as much light
Calculated exposure
-0.6 as much light
1.3 as much light
-2 as much light
SETUP
Choose your preference on the camera's settings.
9

SETUP MODE
QUICK VIEW (default : ON)
Display image on the LCD after taking a picture.
WHITE BALANCE(default : AUTOMATIC)
Automatic White Balance
Daylight
Cloudy
Fluorescent
Tungsten
The automatic white balance compensates for the color
temperature of scene. When the built-in flash is used, the white balance is set for the
color temperature of the flash.
for outdoor and sunlit subjects.
for overcast outdoor scenes.
for fluorescent lighting: office ceiling lights.
for incandescent lighting: household light bulbs.
SHARPNESS (default : NORMAL)
HARD
NORMAL
SOFT
Sharpen the edge of the image detail.
Leave the image detail as captured.
Soften the edge of the image detail for special effect.
10

IMAGE QUALITY (default : HIGH)
SUPER HIGH Less compression , High quality, Big file size.
HIGH Normal compression, Normal quality, Normal file size.
NORMAL High compression, Poor quality, Small file size.
RESOLUTION(default : 2048x1536)
2976x2232
2560x1920
2048x1536
1280x1024
VIDEO FORMAT (default : NTSC)
Set the video output format for displaying recorded pictures/video clips on a television.
For North America,Japen
For Europo, South America and China, etc,area
NTSC
PAL
LANGUAGE
Specify in which language menus and messages are to be displayed on the LCD monitor.
FORMAT
The formatting function is used to erase all data on a memory card.
SETUP MODE
11

PLAYBACK MODE
THUMBNAIL
This function allows you to view nine images on the LCD monitor simultaneously
so that you may search for a particular image.
DELETE
To delete one image at a time.
To delete all images at a time.
The formatting function is used to erase all data on a memory card.
DPOF PRINT (Digital Print Order Format)
DPOF is the standard for recording printing information directly on the
SD memory card and other media. Files saved in the DPOF format can be
printed using compatible printers or through laboratory printing service.
To create a DPOF file for the displayed image.
To delete a DPOF file for the displayed image.
To create a DPOF file for all images.
To delete all DPOF file.
CURRENT
ALL
REFORMAT
PRINT IMAGE
CANCEL PRINT
PRINT ALL
CANCEL ALL
12
INSTALL CAMERA DRIVERS
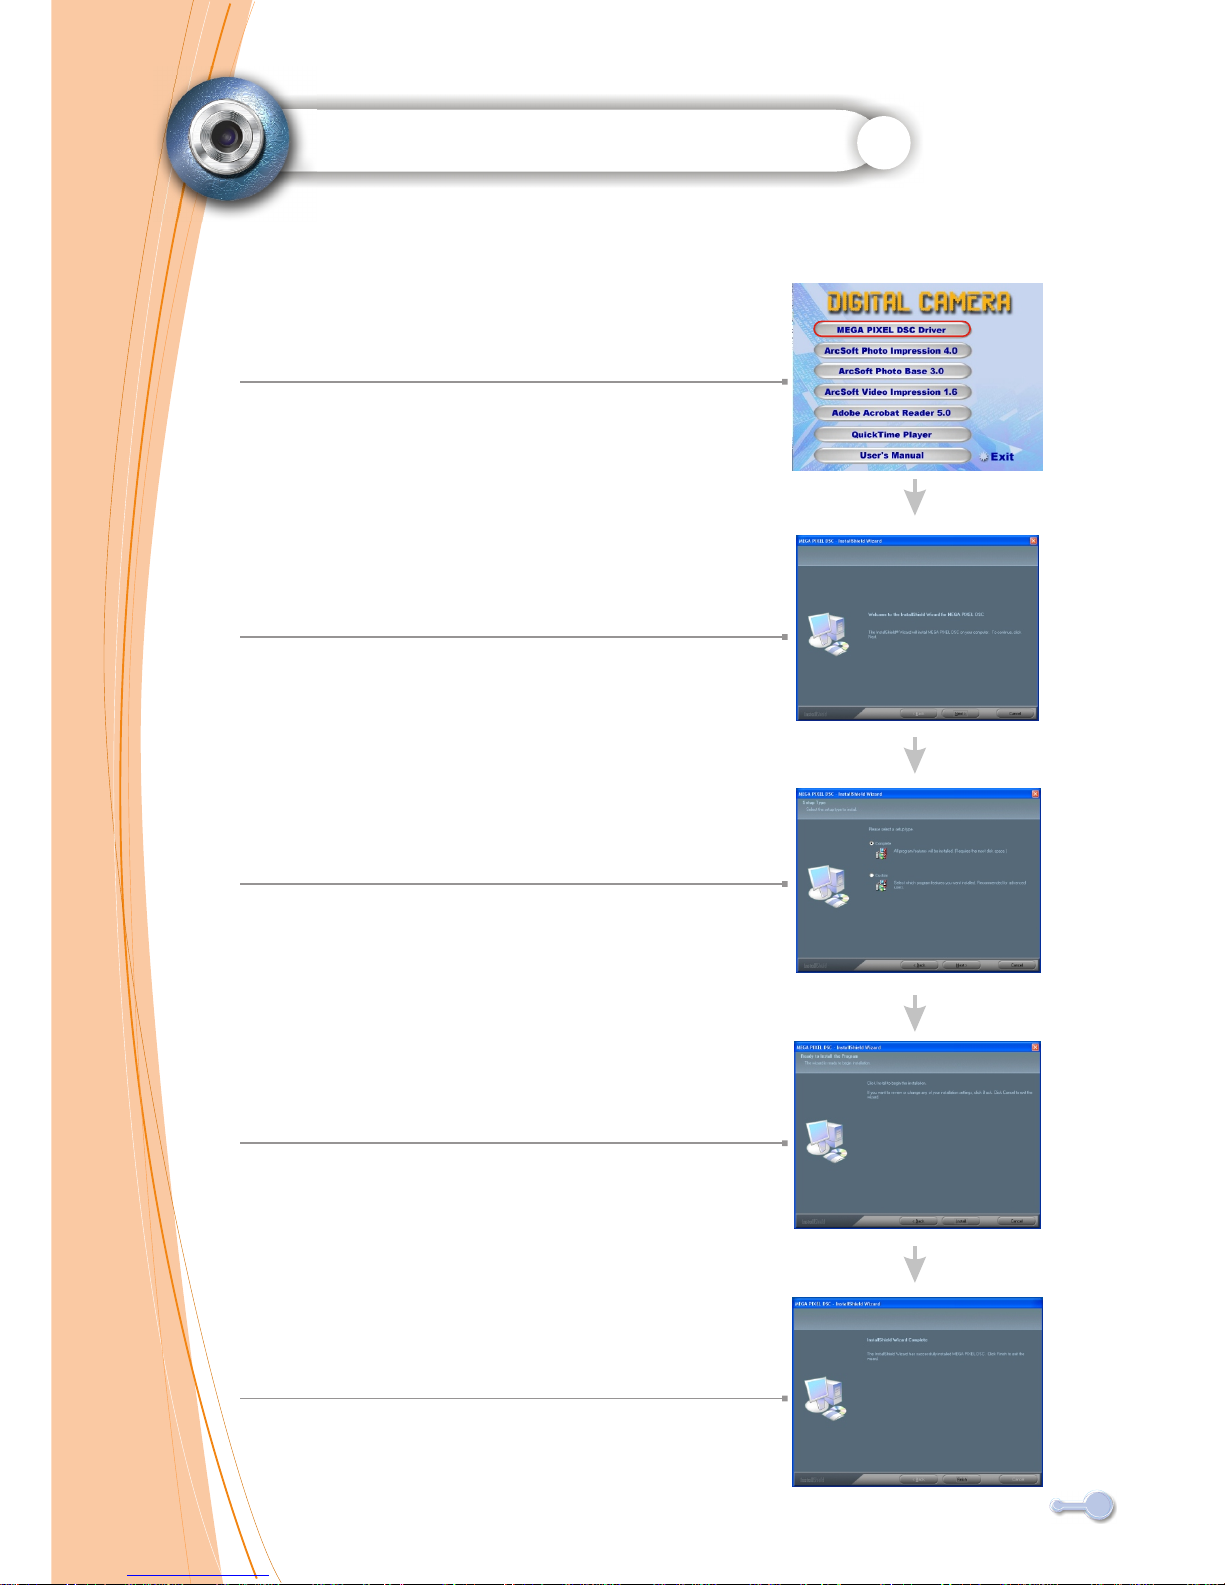
1.Insert CD-Disc & Select"MEGA PIXEL DSC Driver"
2.Click "Next"
3.Click "Next"
4.Click "Install"
5.Click " Finsh".
13
INSTALL ARCSOFT PROGRAMS
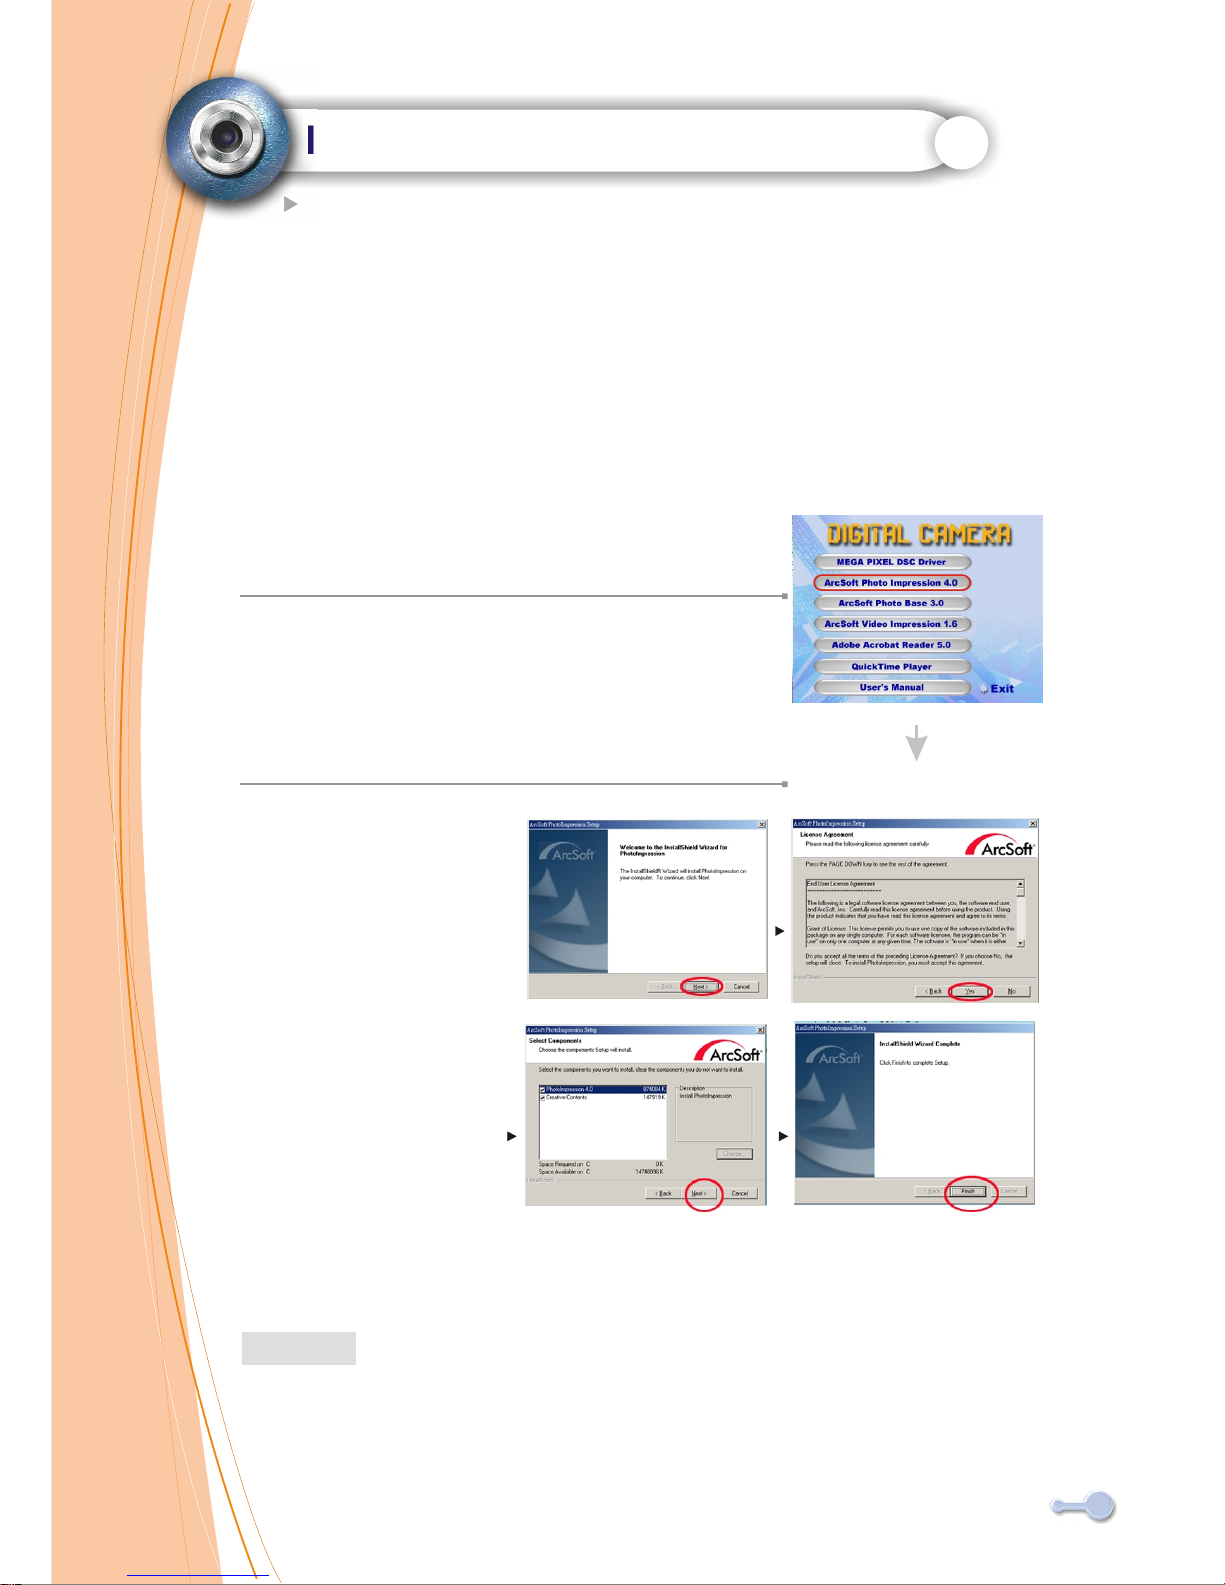
1.Turn computer ON.
2.Insert installation CD into your PC's CD-ROM drive.
3.Introduction screen will appear automatically.
4.Click "Arcsoft Photo Impression 4.0 " .
5.Follow on-screen instruction to install camera drivers.
6.Re-starting your computer is recommended.
To find out more about PhotoImpression 4.0 or how to use it, consult online
help by clicking"?" Icon or "help" on the pull-down menu.
NOTE
Arcsoft Photo Impression 4.0
14

INSTALL ARCSOFT PROGRAMS
1.Turn computer ON.
2.Insert installation CD into your PC's CD-ROM drive.
3.Introduction screen will appear automatically.
4.Click "Arcsoft PhotoBase 3.0 " .
.
5.Follow on-screen instruction to install camera drivers.
6.Re-starting your computer is recommended.
To find out more about Photo Base 3.0 or how to use it, consult online
help by clicking"?" Icon or "help" on the pull-down menu.
NOTE
Arcsoft Photo Base 3.0
15

INSTALL ARCSOFT PROGRAMS
Arcsoft Video Impression 1.6
1.Turn computer ON.
2.Insert installation CD into your PC's CD-ROM drive.
3.Introduction screen will appear automatically.
4.Click "Arcsoft VideoImpression 1.6 " .
5.Follow on-screen instruction to install camera drivers.
6.Re-starting your computer is recommended.
To find out more about Video Impression 1.6 or how to use it, consult online
help by clicking"?" Icon or "help" on the pull-down menu.
NOTE
16
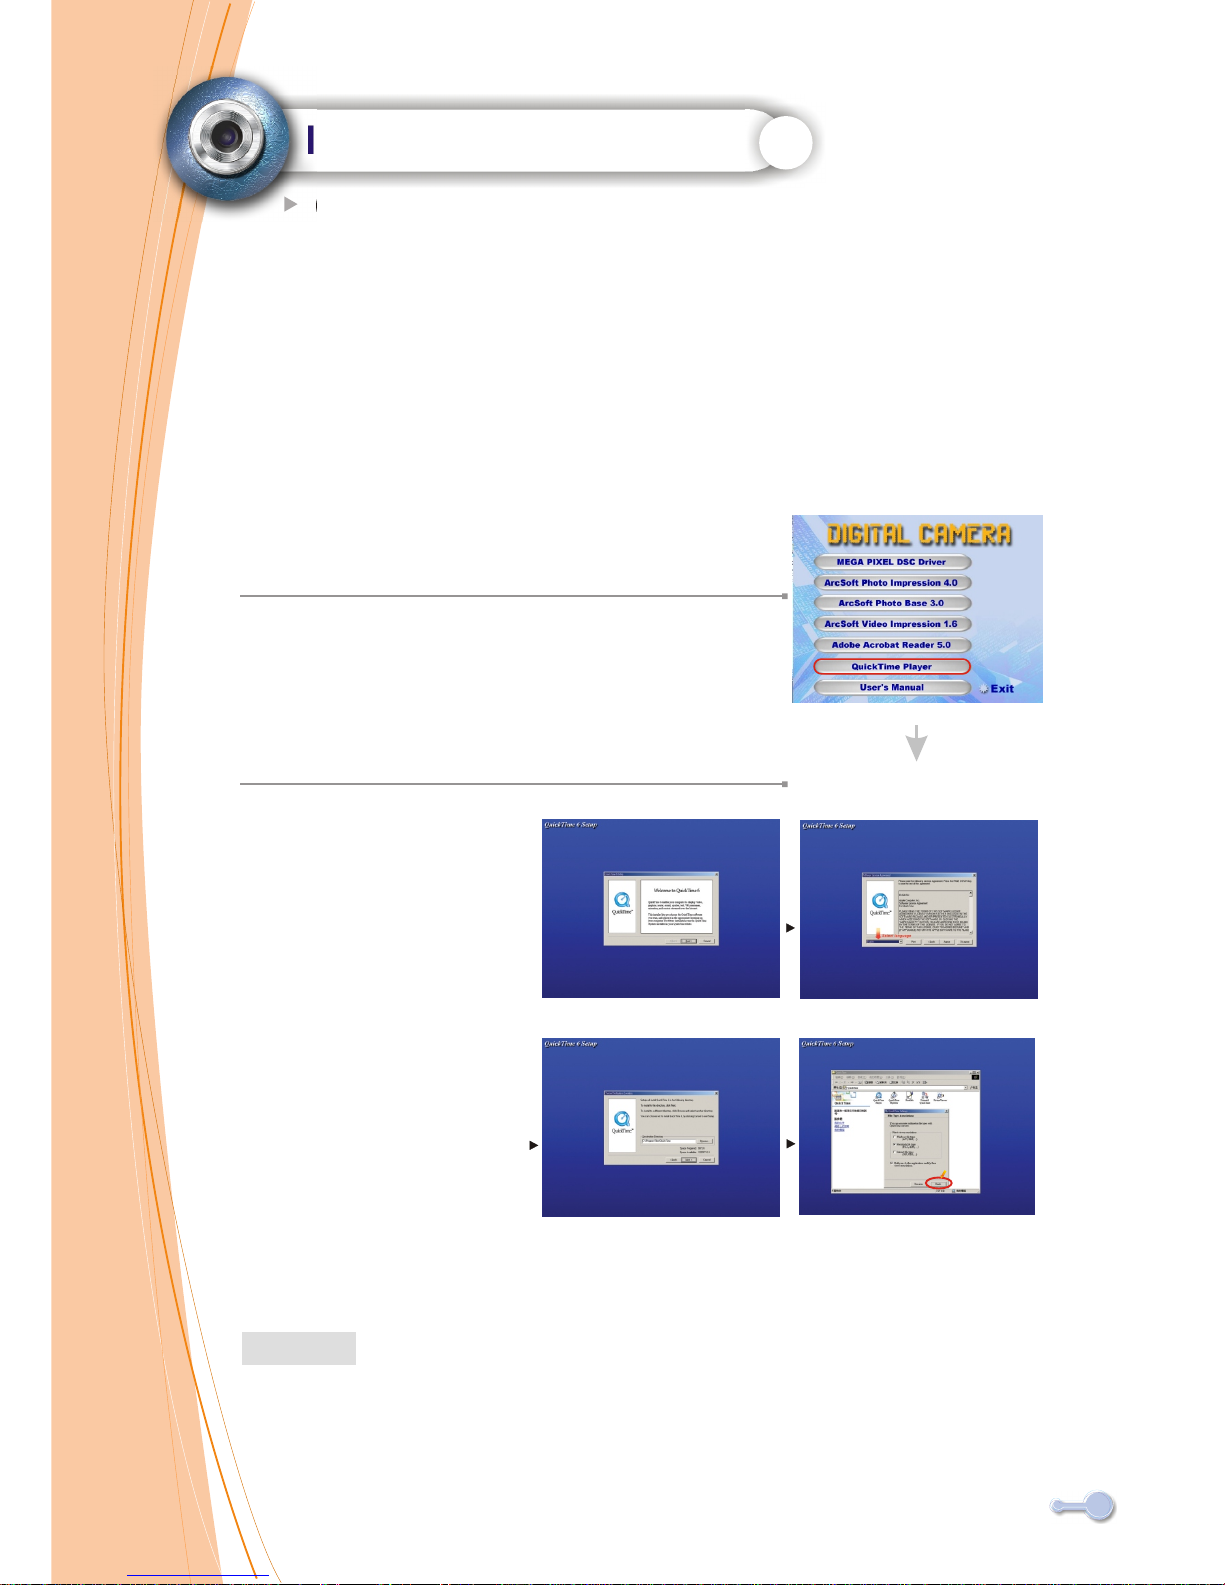
INSTALL PROGRAMS
QuickTime Player 6
1.Turn computer ON.
2.Insert installation CD into your PC's CD-ROM drive.
3.Introduction screen will appear automatically.
4.Click "QuickTime Player " .
5.Follow on-screen instruction to install camera drivers.
6.Re-starting your computer is recommended.
To find out more about QuickTime Player 6 or how to use it, consult online
help by clicking"?" Icon or "help" on the pull-down menu.
NOTE
Finish
17

Uninstall Application Programs
Uninstall Arcsoft Photo Impression 4.0
1.Search through Start > Programs > AcroSoft> Photo Impression 4.0
>Uninstall.
2.Follow on-screen instruction to uninstall software.
Uninstall Arcsoft Photo Base 3.0
1.Search through Start > Programs > AcroSoft> Photo Base 3.0
>Uninstall.
2.Follow on-screen instruction to uninstall software.
Uninstall Arcsoft Video Impression 1.6
1.Search through Start > Programs > AcroSoft>Video Impression 1.6
>Uninstall.
2.Follow on-screen instruction to uninstall software
18
This manual suits for next models
1
Table of contents


