DigiDesign VENUE AO16 User manual

Digidesign
2001 Junipero Serra Boulevard
Daly City, CA 94014-3886 USA
tel: 650·731·6300
fax: 650·731·6399
Technical Support (USA)
tel: 650·731·6100
fax: 650·731·6375
Product Information (USA)
tel: 650·731·6102
tel: 800·333·2137
International Offices
Visit the Digidesign Website
for contact information
Website
www.digidesign.com
VENUE AO16 Analog Output
Card
For VENUE Mix Rack and VENUE SC48
™
9321-61199-00 REV A 03/09

Legal Notices
This guide is copyrighted ©2009 by Digidesign, a division of Avid Technology, Inc.
(hereafter “Digidesign”), with all rights reserved. Under copyright laws, this guide
may not be duplicated in whole or in part without the written consent of
Digidesign.
003, 96 I/O, 96i I/O, 192 Digital I/O, 192 I/O, 888|24 I/O, 882|20 I/O,
1622 I/O, 24-Bit ADAT Bridge I/O, AudioSuite, Avid, Avid DNA, Avid Mojo,
Avid Unity, Avid Unity ISIS, Avid Xpress, AVoption, Axiom, Beat Detective,
Bomb Factory, Bruno, C|24, Command|8, Control|24, D-Command, D-Control,
D-Fi, D-fx, D-Show, D-Verb, DAE, Digi 002, DigiBase, DigiDelivery, Digidesign,
Digidesign Audio Engine, Digidesign Intelligent Noise Reduction, Digidesign
TDM Bus, DigiDrive, DigiRack, DigiTest, DigiTranslator, DINR, D-Show,
DV Toolkit, EditPack, Eleven, HD Core, HD Process, Hybrid, Impact, Interplay,
LoFi, M-Audio, MachineControl, Maxim, Mbox, MediaComposer, MIDI I/O, MIX,
MultiShell, Nitris, OMF, OMF Interchange, PRE, ProControl, Pro Tools M-Powered,
Pro Tools, Pro Tools|HD, Pro Tools LE, QuickPunch, Recti-Fi, Reel Tape, Reso,
Reverb One, ReVibe, RTAS, Sibelius, Smack!, SoundReplacer, Sound
Designer II, Strike, Structure, SYNC HD, SYNC I/O, Synchronic, TL Aggro,
TL AutoPan, TL Drum Rehab, TL Everyphase, TL Fauxlder, TL In Tune,
TL MasterMeter, TL Metro, TL Space, TL Utilities, Transfuser, Trillium Lane Labs,
Vari-Fi Velvet, X-Form, and XMON are trademarks or registered trademarks of
Digidesign and/or Avid Technology, Inc. Xpand! is Registered in the U.S. Patent
and Trademark Office. All other trademarks are the property of their respective
owners.
Product features, specifications, system requirements, and availability are
subject to change without notice.
Guide Part Number 9321-61199-00 REV A 03/09
Documentation Feedback
At Digidesign, we're always looking for ways to improve our documentation. If you
have comments, corrections, or suggestions regarding our documentation, email
Communications and Safety Regulation Information
Compliance Statement
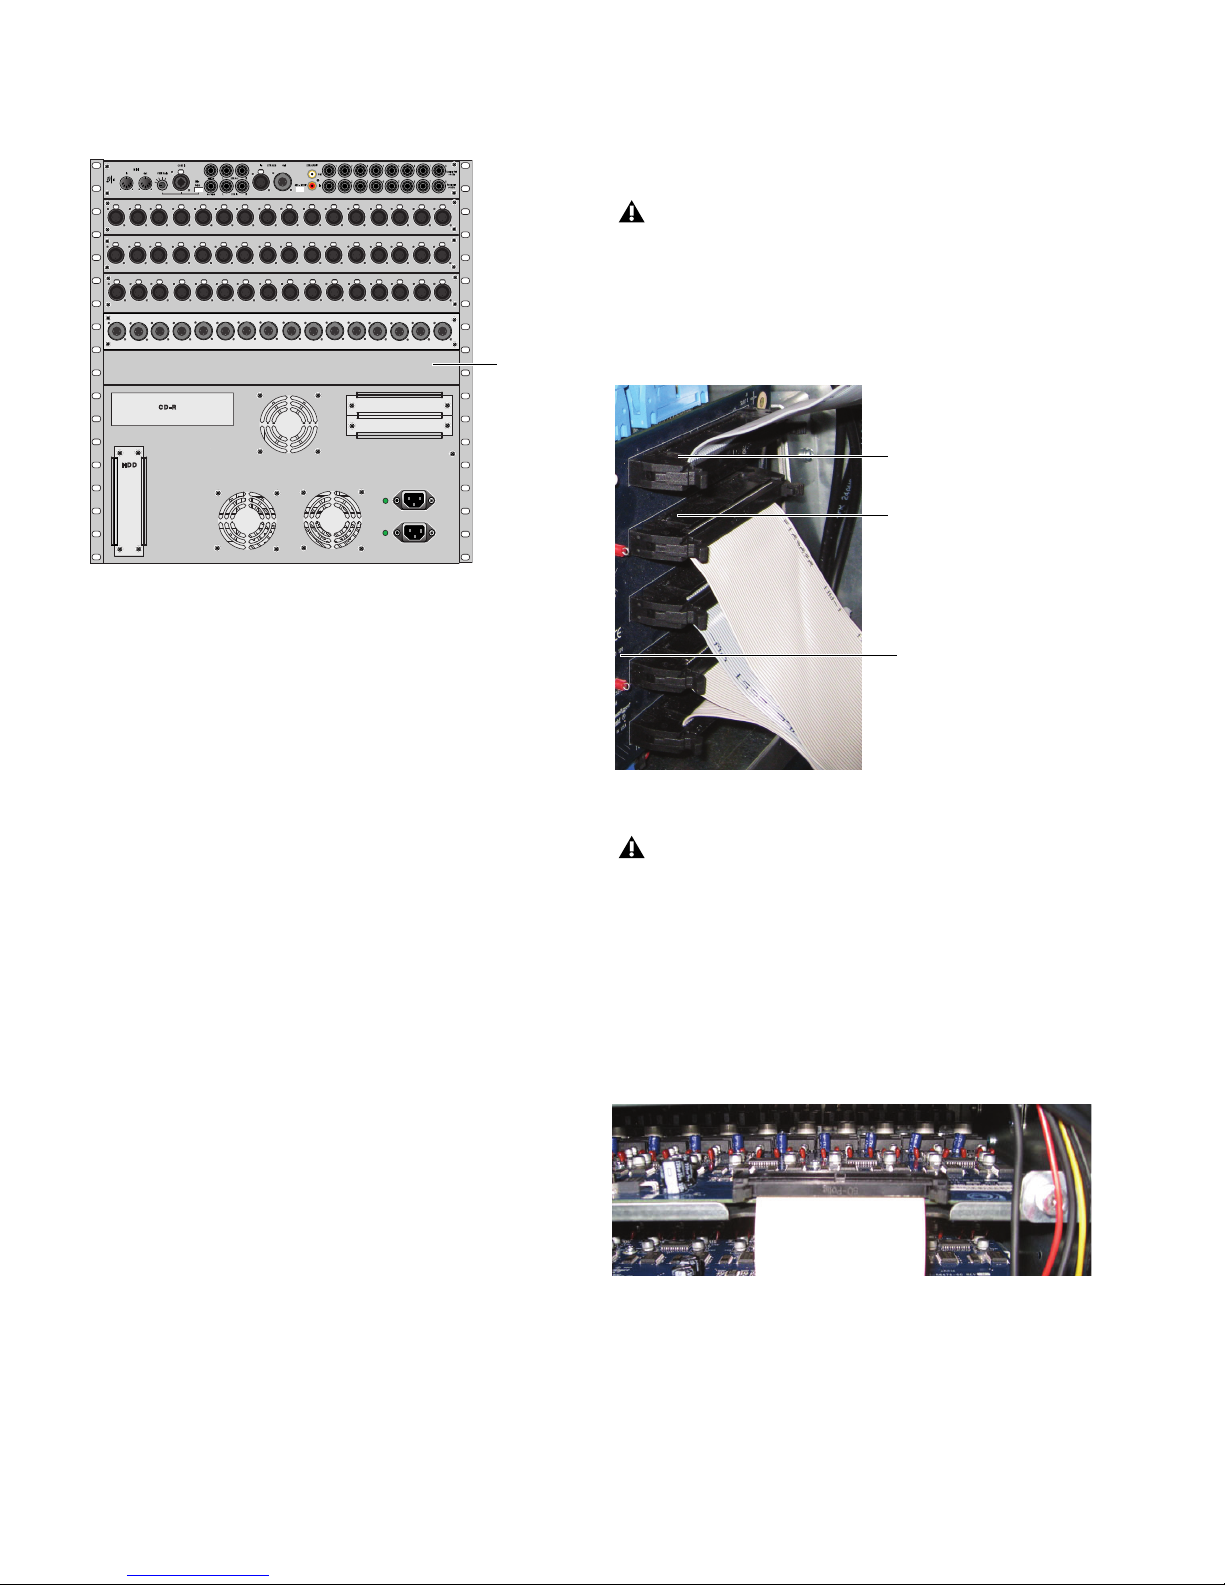
This model Digidesign AO16 Analog Output Card complies with the following
standards regulating interference and EMC:
• FCC Part 15 Class B
• EN 55103-1 E3
• EN 55103-2 E3
• AS/NZS 3548 Class B
• CISPR 22 Class B
Radio and Television Interference
This equipment has been tested and found to comply with the limits for a Class B
digital device, pursuant to Part 15 of the FCC Rules.
DECLARATION OF CONFORMITY
We Digidesign,
2001 Junipero Serra Boulevard, Suite 200
Daly City, CA 94014 USA
tel: 650-731-6300
declare under our sole responsibility that the product
AO16 Analog Output Card
complies with Part 15 of FCC Rules.
Operation is subject to the following two conditions: (1) this device may not
cause harmful interference, and (2) this device must accept any interference
received, including interference that may cause undesired operation.
Communication Statement
NOTE: This equipment has been tested and found to comply with the limits for a
Class B digital device, pursuant to Part 15 of the FCC Rules. These limits are
designed to provide reasonable protection against harmful interference in a
residential installation. This equipment generates, uses, and can radiate radio
frequency energy and, if not installed and used in accordance with the
instructions, may cause harmful interference to radio communications. However,
there is no guarantee that interference will not occur in a particular installation.
If this equipment does cause harmful interference to radio or television
reception, which can be determined by turning the equipment off and on, the user
is encouraged to try and correct the interference by one or more of the following
measures:
• Reorient or locate the receiving antenna.
• Increase the separation between the equipment and receiver.
• Connect the equipment into an outlet on a circuit different from that to which
the receiver is connected.
• Consult the dealer or an experienced radio/TV technician for help.
Any modifications to the unit, unless expressly approved by Digidesign, could
void the user's authority to operate the equipment.
Canadian Compliance Statement:
This Class B digital apparatus complies with Canadian ICES-003.
Cet appareil numérique de la classe B est conforme à la norme NMB-003 du
Canada.
Australian Compliance
European Compliance
AO16 Analog Output Card

Contents iii
Contents
Chapter 1. Overview . . . . . . . . . . . . . . . . . . . . . . . . . . . . . . . . . . . . . . . . . . . . . . . . . . . . . . . . . . . . . . . . . . . . . . . . . . . . . . 1
AO16 Card Components . . . . . . . . . . . . . . . . . . . . . . . . . . . . . . . . . . . . . . . . . . . . . . . . . . . . . . . . . . . . . . . . . . . . . . . . 1
AO16 Card Capabilities and Features . . . . . . . . . . . . . . . . . . . . . . . . . . . . . . . . . . . . . . . . . . . . . . . . . . . . . . . . . . . . . . . 1
System Requirements . . . . . . . . . . . . . . . . . . . . . . . . . . . . . . . . . . . . . . . . . . . . . . . . . . . . . . . . . . . . . . . . . . . . . . . . . . 1
Conventions Used in This Guide . . . . . . . . . . . . . . . . . . . . . . . . . . . . . . . . . . . . . . . . . . . . . . . . . . . . . . . . . . . . . . . . . . . 2
Chapter 2. Installing the AO16 Card. . . . . . . . . . . . . . . . . . . . . . . . . . . . . . . . . . . . . . . . . . . . . . . . . . . . . . . . . . . . . . . . 3
Installing an AO16 Card in Mix Rack . . . . . . . . . . . . . . . . . . . . . . . . . . . . . . . . . . . . . . . . . . . . . . . . . . . . . . . . . . . . . . . . 3
Installing an AO16 Card in SC48. . . . . . . . . . . . . . . . . . . . . . . . . . . . . . . . . . . . . . . . . . . . . . . . . . . . . . . . . . . . . . . . . . . 5
Chapter 3. Specifications. . . . . . . . . . . . . . . . . . . . . . . . . . . . . . . . . . . . . . . . . . . . . . . . . . . . . . . . . . . . . . . . . . . . . . . . . . 7
Audio Specifications . . . . . . . . . . . . . . . . . . . . . . . . . . . . . . . . . . . . . . . . . . . . . . . . . . . . . . . . . . . . . . . . . . . . . . . . . . . 7

AO16 Analog Output Cardiv

Chapter 1: Overview 1
Chapter 1: Overview
The AO16 Analog Output Card provides 16 channels of soft-
ware controlled and fully recallable analog line outputs to the
Digidesign®VENUE Mix Rack or the VENUE SC48™.
AO16 Card Components
The AO16 Card includes the following items:
•AO16Card
•Mountingscrews
• Digidesign Registration Information Card
•Thisguide
AO16 Card Capabilities and Features
The AO16 Card provides the following:
• 16 channels of analog line level outputs via XLR-3 male
connectors
• 24 dBu maximum output level
System Requirements
One of the following are required to use the AO16 Card with
your installed and configured VENUE system:
• A Mix Rack with an available output card slot
– or –
• An SC48 console with an available output card slot
For complete system requirements, visit the Digidesign
website (www.digidesign.com).
Figure 1. AO16 Analog Output Card

AO16 Analog Output Card2
Conventions Used in This Guide
All Digidesign guides use the following conventions to indi-
cate menu choices and key commands in D-Show and
Pro Tools:
:
The names of Commands, Options, and Settings that appear
on-screen are in a different font.
The following symbols are used to highlight important infor-
mation:
Convention Action
File > Save Session In Pro Tools, choose Save
Session from the File menu.
Options > System Config In the D-Show software
screen, click Options to dis-
play the Options page, then
click the System Config tab.
Ctrl+N Hold down the Control key
and press the N key.
Ctrl-click Hold down the Control key
and click the mouse button.
User Tips are helpful hints for getting the
most from your VENUE system.
Important Notices include information that
could affect data or performance.
Shortcuts show you useful keyboard or
mouse shortcuts.
Cross References point to related sections in
the D-Show or Pro Tools Guides.

Chapter 2: Installing the AO16 Card 3
Chapter 2: Installing the AO16 Card
This chapter provides information on installing an AO16 card
in a Mix Rack or an SC48 console.
For instructions on installing a card in a Mix Rack, see “Install-
ing an AO16 Card in Mix Rack” on page 3.
For instructions on installing a card in an SC48 console, see
“Installing an AO16 Card in SC48” on page 5.
Installing an AO16 Card in Mix Rack
Mix Rack has two available output card slots, slots D and E.
AO16 Cards can be installed in either or both slots. These in-
structions assume you already have an AO16 Card installed in
slot D and that slot E is empty.
To install an AO16 Card:
1 Shut down the VENUE system, and turn off power to the
Mix Rack.
2 Disconnect all cables from Mix Rack.
3 Remove Mix Rack’s front panel cover by unscrewing its
mounting screws (#1 Phillips).
If you are replacing an AO16 Card, you must first remove
one of the cards. See the Venue Service Guide for more
information on removing and replacing cards.
Mix Rack front panel
Mounting screws (remove all)

AO16 Analog Output Card4
4 On the back panel of Mix Rack, locate output slot E and re-
move the card slot cover.
5 Remove the card from its packing material. Hold the card by
its edges.
6 Gently slide the card into the output slot.
7 When the card is seated in its slot, use the captive thumb-
screw to secure the card to Mix Rack’s chassis in the back of
Mix Rack.
8 Secure the card to the front panel of Mix Rack using the cap-
tive thumbscrews you removed earlier.
9 Find the Hub48 Board ribbon cable that corresponds to the
output slot in which you have installed the card. The Hub48
board’s five ribbon cables connect to the input and output
cards
10 Connect the ribbon cable to the card socket on the A016
card. Make sure the pins on the socket are correctly aligned
with the ribbon cable connector. Secure the connection by
moving the retaining clips on each side of the socket connec-
tor inward. Check to make sure the ribbon cable is connected
securely.
Mix Rack back panel
Output
slot E
Do not remove or re-seat the ribbon cable connections on
the Hub48 Board while the board is installed in the Mix
Rack. This may cause excessive flexing of the Hub48
Board. If necessary, disconnect the Hub48 and all Expan-
sion Card ribbon connections, and remove the entire assem-
bly from the rack prior to changing connections.
Detail of back of Mix Rack, the Hub48 Board, and the ribbon cables
Mix Rack contains 5 ribbon cables that connect to the Input
and Output Cards. The top two ribbon cables connect to the
output cards installed in output slots D and E.
A properly connected Expansion Card
Connects to card
Connects to card
in Output Slot E
in Output Slot D
Hub48 Board

Chapter 2: Installing the AO16 Card 5
Completing and Confirming Installation
To complete and confirm installation:
1 Reattach Mix Rack’s front panel.
2 Reconnect the power and any audio cables to Mix Rack.
3 Turn on the system.
4 Go to the Options page and click the Devices tab to view
your system hardware status. The newly installed AO16 Card
should be displayed.
5 Go to the Patchbay page and click the Stage tab to verify
that the output cards’ outputs are available in the patchbay.
6 On the standalone software’s Options > Devices page, you
can right-click the Mix Rack graphic to see and modify your
Mix Rack’s input and output card configuration.
Installing an AO16 Card in SC48
Your SC48 has two available output card slots, lots D and E.
AO16 Cards can be installed in either or both slots. These in-
structions assume you already have an AO16 Card installed in
slot D and that slot E is empty.
1 Shut down your system, and turn off power to the SC48.
2 Disconnect any power cables from the SC48, as well as any
other audio cables that may get in your way.
3 On the back panel of the SC48, locate output slot E.
4 Remove the four screws holding the card slot cover in place.
You can use a flathead screwdriver to pry the cover away from
the output slot after removing the screws.
Keep the screws nearby for securing the card to the SC48.
5 Clip the cable tie to free the ribbon cable that is attached to
the inside of the card slot cover.
If the Expansion Card does not appear in the Mix Rack
graphic, check the ribbon cable connection. Shut down your
system, then disconnect and reconnect the ribbon cable to
the Expansion Card, making sure to properly seat the con-
nector in its card socket.
Detail of Devices tab indicating presence of two AO16 Cards output
slots D and E
Detail of standalone software’s Devices tab pop-up menu showing two
AO16 Cards
See the VENUE SC48 Service Guide for more information on
replacing or removing cards.
Left side of the SC48 back panel
Use care when prying away the card slot cover. The ribbon
cable that you connect to the output card is attached to the
inside of the card slot cover.
Clip the cable tie to free the ribbon cable
Slot E (remove card slot cover)

AO16 Analog Output Card6
6 Remove the card from its packing material. Hold the card by
its edges.
7 Connect the ribbon cable to the card socket. Make sure the
pins on the socket are correctly aligned with the ribbon cable
connector. The retaining clips on each side of the socket con-
nector automatically close when the cable connector is prop-
erly seated. Check to make sure the ribbon cable is connected
securely.
.
8 Slide the output card into the slot, firmly pressing on both
ends of the card so that it fits snugly in the slot.
9 Secure the card to the rear panel using the four screws you
removed earlier.
Completing and Confirming Installation
To complete and confirm installation:
1 Reconnect the power cable and any other cables to the
SC48.
2 Turn on your SC48.
3 Go to the Options page and click the Devices tab to view
your system hardware status. The newly installed card should
be displayed.
4 Go to the Patchbay page and click the Stage tab to verify
that the output card outputs are available in the patchbay.
5 In the standalone software, click the Devices tab on the Op-
tions page. You can right-click the SC48 graphic to see and
modify your SC48’s input and output card configuration.
Connecting the ribbon cable to the card socket
Installing the AO16 Card
If the card does not appear in the graphic, check the ribbon
cable connection. Shut down your system, then disconnect
and reconnect the ribbon cable to the output card, making
sure to seat the connector properly in its card socket.
Detail of Devices tab indicating presence of two AO16 Cards output
slots D and E
Detail of standalone software’s Devices tab pop-up menu showing two
AO16 Cards

Chapter 3: Specifications 7
Chapter 3: Specifications
Audio Specifications
All measurements at Fs=48 kHz with 150 Ohm source impedance and 600 Ohm load impedance, unless otherwise specified.
0 dBU = 0.775Vrms.
AO16 Analog Line Outputs
Parameter Specifications Limit Units Condition/Comment
Type Balanced, XLR3-Male
Impedance 50 Ohm Each leg to ground
Maximum Output Level +24 max dBu
D/A Converter Latency 0.58 ms Fs=48kHz

AO16 Expansion Card Guide8
Table of contents
Other DigiDesign Sound Card manuals