DigiPower RF-6H50 User manual

ACTIONPACK
RECHARGEABLE
BATTERY
High capacity power for GoPro HERO6 & HERO5
USER GUIDE
Item No. RF-6H50
Item No. RF-6H50KIT
2
ENGLISH ENGLISH
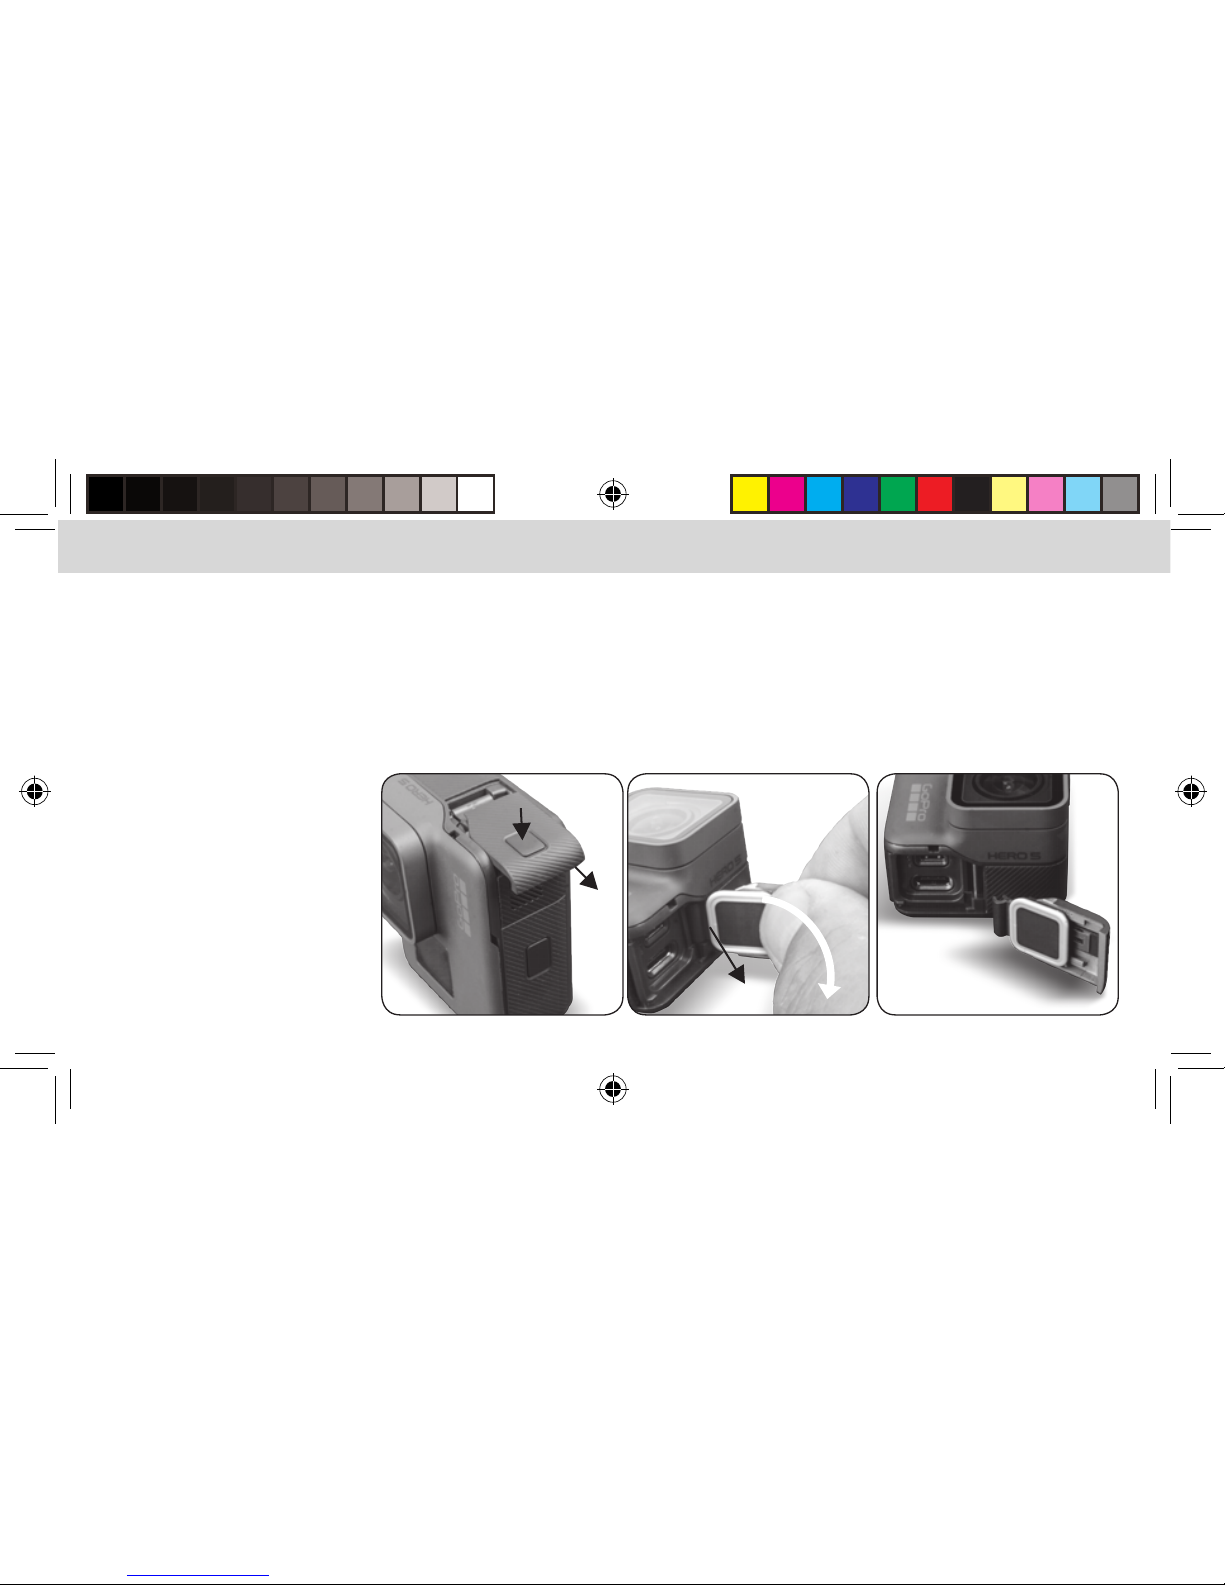
PREPARING THE CAMERA FOR USE WITH THE ACTIONPACK
It is necessary to remove the USB door on the HERO6 & HERO5 so the camera can connect to the ActionPack.
The USB door is designed to be safely removed and reinstalled on the camera as needed.
1. Open the USB door on the right side of the camera.
2. With the door open at a 90 degree angle to the camera body gently pull downward at a 45 degree angle
to remove the door.
3. Keep the door in a safe place,
you will need this when not
using the ActionPack on
the camera.

3
ENGLISH ENGLISH
USING THE ACTIONPACK IN 4 EASY STEPS
1. Open the ActionPack housing by pressing up on the security clip
(the security clip is found towards the top/middle of the ActionPack).
2. Move the security clip and pivoting frame to the left so you can install the GoPro camera.
3. Slide the GoPro camera to the right so that it FIRMLY connects to the Type-C plug on the ActionPack,
close the housing.
4. Secure the case latch. IT IS VERY IMPORTANT TO PROPERLY LATCH THE CASING OR THE PRODUCT WILL NOT BE WATERPROOF.

4
ENGLISH ENGLISH
CHARGING THE ACTIONPACK
1. The micro USB charging port is located behind the round cap on the side of the ActionPack
2. Turn the cap door to the unlocked position as shown
3. Remove the cap
4. Insert the included micro USB charging cable
Unlocked
Locked

5
ENGLISH ENGLISH
5. For fastest charging use a 2 Amp (10 Watt) power supply (not included).
6. If the camera is installed in the ActionPack the camera’s internal battery will also charge.
7. IT IS VERY IMPORTANT TO PROPERLY LOCK THE MICRO USB DOOR AFTER CHARGING OR THE PRODUCT WILL NOT BE WATERPROOF.
8. Press and hold the power button for 2 seconds to turn the ActionPack on. Press and hold for 2 seconds to turn it o.
Locked

6
ENGLISH ENGLISH
CHARGING STATUS INDICATOR
STATUS DISPLAY STATE CHARGE STATUS
One LED is blinking Below 25%
One LED is on, next LED is blinking 25% - 50%
Two LEDs are on, next LED is blinking 50% - 75%
Three LEDS are on, last LED is blinking 75% - 100%
All four LEDs are on Charging complete
When the ActionPack is fully charged, all 4 LEDs will
remain lit.
When using a 1 amp charger the camera battery will charge
rst, the #1 LED will blink for a long time until the internal bat-
tery is fully charged then the ActionPack will begin to charge.
Charge level LEDs
The percent of charge by LED is an approximation, it is best to
wait until all four LEDs are lit, the unit will be fully charged then.

7
ENGLISH ENGLISH
BATTERY LEVEL INDICATOR
STATUS DISPLAY STATE BATTERY LEVEL
One LED is blinking Very low, recharge soon
One LED is on Below 25%
Two LEDs are on 25% - 50%
Three LEDs are on 50% - 75%
All four LEDs are on 75% - 100%
CHECKING THE BATTERY CHARGE LEVEL
To check the charge level tap the power button.
TIME TO CHARGE (ASSUMING THE CAMERA BATTERY
AND ACTIONPACK ARE COMPLETELY DRAINED)
Power supply
( not included) Camera installed Camera not installed
1 Amp (5 Watt) Camera charges then
ActionPack, total charge
time approximately
6 hours 45 minutes
ActionPack charge
time
5 hours 45 minutes
2 Amp (10 Watt) Camera and ActionPack
charge at the same time,
total charge time
approximately
3 hours 45 minutes
ActionPack charge
time 3 hours
15 minutes
Charge level LEDs

8
ENGLISH ENGLISH
APPROXIMATE USE TIME FOR ACTIONPACK RF6H50
RF6H50
CAMERA VERSION MEMORY CARD RESOLUTION WiFi STATUS TOTAL TIME
HERO6 & HERO5 Class 10 - UHS 1 720/30FPS OFF 9 HOURS
HERO6 & HERO5 Class 10 - UHS 1 1080/60FPS OFF 8 HOURS
HERO6 & HERO5 Class 10 - UHS 1 4K/30FPS OFF 6 HOURS
A Class 10/UHS1 memory card is required for best performance.
Class 10/UHS 1
memory card

9
ENGLISH ENGLISH
Mounts slide in and
lock onto the body
Standard GoPro Mount
¼” 20 thread standard tripod
mount
USING THE GOPRO AND TRIPOD MOUNTS
• Slide the plate onto the body of the ActionPack
until the tabs click into place.
• To remove, push the tabs inward and slide the
mounting plate out.

10
ENGLISH ENGLISH
• The LEDs on the ActionPack remain on when the
ActionPack is powered on. It will tell you the level of
charge remaining in the ActionPack by the number
of LEDs lit.
• The ActionPack provides power to the camera
battery which then powers the camera. The camera’s
battery level will not begin to go down until the
ActionPack battery has been fully depleted.
• With the ActionPack powered on and the camera in
standby or playback modes the battery display on
the camera will show charging.
• With the ActionPack powered on and the camera in
record mode the battery display on the camera will
not show charging but it is still charging, the battery
charge percentage number will remain the same or
slowly increase.
• When you are done using the ActionPack power it o
by pressing the power button for 2 seconds. If you do
not press the power button it will continue to provide
power to the internal battery the same way a USB
charger would provide power to your Smartphone.
• Turning on the ActionPack does not turn on the
camera, use the camera’s power button to turn it on.
• Turning o the ActionPack does not turn o the
camera, use the camera’s power button to turn it o.
•For proper functioning, it is necessary to have the
internal camera battery installed while using the
ActionPack.
• The ActionPack has been tested and approved to IEC
standard IP68 for water and dust ingress. Lab testing
done in a pressurized water tank for 2 hours’
submersion, simulated 33ft/10m depth
IMPORTANT NOTES ABOUT THE ACTIONPACK RF6H50

11
ENGLISH ENGLISH
PASS THRU POWER
Pass thru power allows you to record indenitely and
keep your battery charged up at the same time.
1. Open the micro USB port door as noted on page 4 .
2. Connect the micro USB cable to a power source such
as a USB car charger, wall charger, or power bank
3. You do not need to press the power button on the
ActionPack, it starts working automatically.
4. Operate the camera as you normally would
REMOVING YOUR CAMERA FROM THE
ACTIONPACK CASE AFTER IT HAS BEEN
IN WATER
1. Visually inspect the camera, dry o any residual
water found before opening the case.
2. Hold the camera so the side with the power button
is facing down.
3. Unlatch the casing and pivot the frame away from
the camera
4. Remove the camera with the USB port side still
facing downward.
5. Visually look for any water around the USB C port on
the camera, if any is found dry it immediately.
12
ENGLISH ENGLISH
CARE OF THE ACTIONPACK EXTENDED
BATTERY
• 1. Before using, especially if you plan to use it in water,
visually inspect the ActionPack for signs of dust, dirt,
or anything that may aect its ability to maintain a
waterproof seal.
• 2. If the ActionPack is used in salt water clean the
areas around the USB-C port and the micro USB port
with a damp clean (lint free) cloth then dry
thoroughly.
•DO NOT IMMERSE THE ACTIONPACK IN WATER
WITHOUT THE CAMERA IN PLACE AND THE LATCH
SECURED OR IT CAN BE PERMANENTLY DAMAGED.
ACTIONPACK RF6H50
SPECIFICATIONS:
• 5000mAh (18.5Wh) Lithium Ion battery
• Micro USB Input: 5V DC, 2A(10W)
• USB-C Output: 5V DC, 1.2A (6W)
• Battery Output: 3.7V DC
• Weight and dims: 4.9oz | 1.37” x 3.5” x 3.3”
Please
recycle

13
ENGLISH ENGLISH
We want you to have the best possible experience
when using our products, and we’re ready to help you
with any questions or problems. Technical support can
be reached at techsupport@mizco.com. Please allow
up to one business day for email replies.
WARRANTY INFORMATION FOR DIGIPOWER
PRODUCTS, A DIVISION OF MIZCO
INTERNATIONAL, INC.
Mizco’s responsibility with regard to this warranty
shall be limited solely to the repair or replacement,
at its option, of any product that fails during normal
consumeruse for a period of one year from the date of
purchase. This warranty does not extend to damage or
failure resulting from misuse, neglect, accident,
alteration, abuse, or improper installation or
maintenance. This warranty does not extend to
equipment used with the product. If at any time
during the one year period following your purchase
the product fails due to defects in materials or work-
manship, please contact us at 800-838-3200 between
the hours of 9AM and 6PM M-F Eastern time, to obtain
an RMA number and return shipping instructions.
For fastest service, have a copy of your product receipt
available with the model number, date, and location of
purchase. This warranty gives you specic legal rights,
and you may have other rights that may vary in certain
states or provinces.
Visit: www.digipowersolutions.com
2018 Mizco International, Inc. Avenel, New Jersey.
All rights reserved.
email: [email protected]
DigiPower is a registered trademark of
Mizco International, Inc.

BLOC-PILES
RECHARGEABLE
ACTIONPACK
Source d’énergie puissante pour
GoPro HERO6 et HERO5
GUIDE D’UTILISATION
Item No. RF-6H50
Item No. RF-6H50KIT

ENGLISHFRANÇAIS FRANÇAIS
2
PRÉPARATION DE LA CAMÉRA POUR UTILISATION AVEC L’ACTIONPACK
Il faut enlever la porte USB sur les modèles HERO6 et HERO5 pour pouvoir brancher la caméra sur le bloc-piles
ActionPack. Cette porte est conçue de façon à pouvoir être facilement retirée et réinstallée au besoin sur la caméra.
1. Ouvrez la porte USB située sur le côté droit de la caméra.
2. Tout en maintenant la porte ouverte dans un angle de 90 degrés par rapport au boîtier de la caméra, tirez-la
doucement vers le bas à un angle de 45 degrés pour l’enlever.
3. Gardez la porte dans un endroit
sûr, car vous en aurez besoin
lorsque vous n’utiliserez
pas l’ActionPack sur
la caméra.

3
ENGLISHFRANÇAIS FRANÇAIS
UTILISATION DU BLOCPILES ACTIONPACK EN 4 ÉTAPES SIMPLES
1. Ouvrez le boîtier de l’ActionPack en pressant sur l’agrafe de sécurité (située sur le dessus de l’ActionPack).
2. Déplacez l’agrafe de sécurité et le cadre pivotant vers la gauche de façon à pouvoir installer la caméra GoPro.
3. Ensuite, faites glisser la caméra GoPro vers la droite de façon à l’insérer FERMEMENT dans la prise de type C
sur l’ActionPack, puis fermez le boîtier.
4. Fixez le loquet. IL EST TRÈS IMPORTANT DE BIEN FIXER LE LOQUET DU BOÎTIER CAR SINON, LE PRODUIT NE
SERA PAS ÉTANCHE À L’EAU.
3

FRANÇAIS FRANÇAIS
4
CHARGEMENT DU BLOCPILES ACTIONPACK
1. Le port de charge micro-USB est situé derrière le capuchon rond sur le côté de l’ActionPack.
2. Tournez le capuchon pour le mettre à la position Déverrouillé, comme on le voit sur l’illustration.
3. Enlevez le capuchon.
4. Insérez le câble de charge micro-USB fourni.
Déverrouillé
Verrouillé

FRANÇAIS FRANÇAIS
5
5. Pour une charge plus rapide, utilisez un bloc d’alimentation de 2 A (10 Watts) (non inclus).
6. Si la caméra est installée sur l’ActionPack, la pile interne de la caméra se chargera aussi.
7. IL EST TRÈS IMPORTANT DE BIEN VERROUILLER LA PORTE DU PORT USB UNE FOIS LA CHARGE TERMINÉE CAR SINON, LE PRODUIT NE SERA
PAS ÉTANCHE À L’EAU.
8. Appuyez sur bouton d’alimentation pendant 2 secondes pour allumer l’ActionPack. Appuyez et maintenez-le enfoncé
pendant 2 secondes pour l’éteindre.
Verrouillé

ENGLISHFRANÇAIS FRANÇAIS
6
INDICATEUR D’ÉTAT DE CHARGE
AFFICHAGE D’ÉTAT
ÉTAT DE LA CHARGE
Un voyant clignote Moins de 25%
Un voyant est allumé, le suivant clignote 25% - 50%
Deux voyants sont allumés, le suivant clignote
50% - 75%
Trois voyants sont allumés, le dernier clignote
75% - 100%
Les quatre voyants sont allumés L’opération de
charge est terminée
Si vous utilisez un chargeur de 1 A, la pile de la caméra
se chargera en premier; le premier voyant clignotera
longtemps jusqu’à ce que la pile interne soit
complètement chargée, puis l’ActionPack commencera
à se charger.
Voyants indicateurs de charge
Le pourcentage de charge indiqué par les voyants est
approximatif; il est préférable d’attendre que les quatre
voyants soient tous allumés, ce qui conrmera que l’unité
est complètement chargée.
This manual suits for next models
1
Table of contents
Languages:
Other DigiPower Camera Accessories manuals


