Digisol DG-SC8860VI User manual

1
DG-SC8860VI
Megapixel Vandal Proof Fixed Dome IP Camera with IR
LED, IR Cut Filter & Digital WDR feature
User Manual
V1.0
2014-06-05
As our products undergo continuous development the specifications are subject to change without prior notice.

DG-SC8860VI User Manual
2
COPYRIGHT
Copyright 2014 by Smartlink Network Systems Ltd. No part of this publication may be reproduced,
transmitted, transcribed, stored in a retrieval system, or translated into any language or computer
language, in any form or by any means, electronic, mechanical, magnetic, optical, chemical,
manual or otherwise, without the prior written permission of this company
This company makes no representations or warranties, either expressed or implied, with respect to
the contents hereof and specifically disclaims any warranties, merchantability or fitness for any
particular purpose. Any software described in this manual is sold or licensed "as is". Should the
programs prove defective following their purchase, the buyer (and not this company, its distributor,
or its dealer) assumes the entire cost of all necessary servicing, repair, and any incidental or
consequential damages resulting from any defect in the software. Further, this company reserves
the right to revise this publication and to make changes from time to time in the contents thereof
without obligation to notify any person of such revision or changes.
Trademarks:
DIGISOL™ is a trademark of Smartlink Network Systems Ltd. All other trademarks are the
property of the respective manufacturers.
Safety
This equipment is designed with the utmost care for the safety of those who install and use it.
However, special attention must be paid to the dangers of electric shock and static electricity when
working with electrical equipment. All guidelines of this and of the computer manufacturer must
therefore be allowed at all times to ensure the safe use of the equipment.

DG-SC8860VI User Manual
3
INDEX
1. Product Information.........................................................................................................................5
1-1 Product Introduction..............................................................................................................5
1-2 Safety Information.................................................................................................................6
1-3 System Requirements............................................................................................................ 7
1-4 Package Contents...................................................................................................................7
1-5 Get Familiar with your new Network Fixed Dome IP Camera............................................. 8
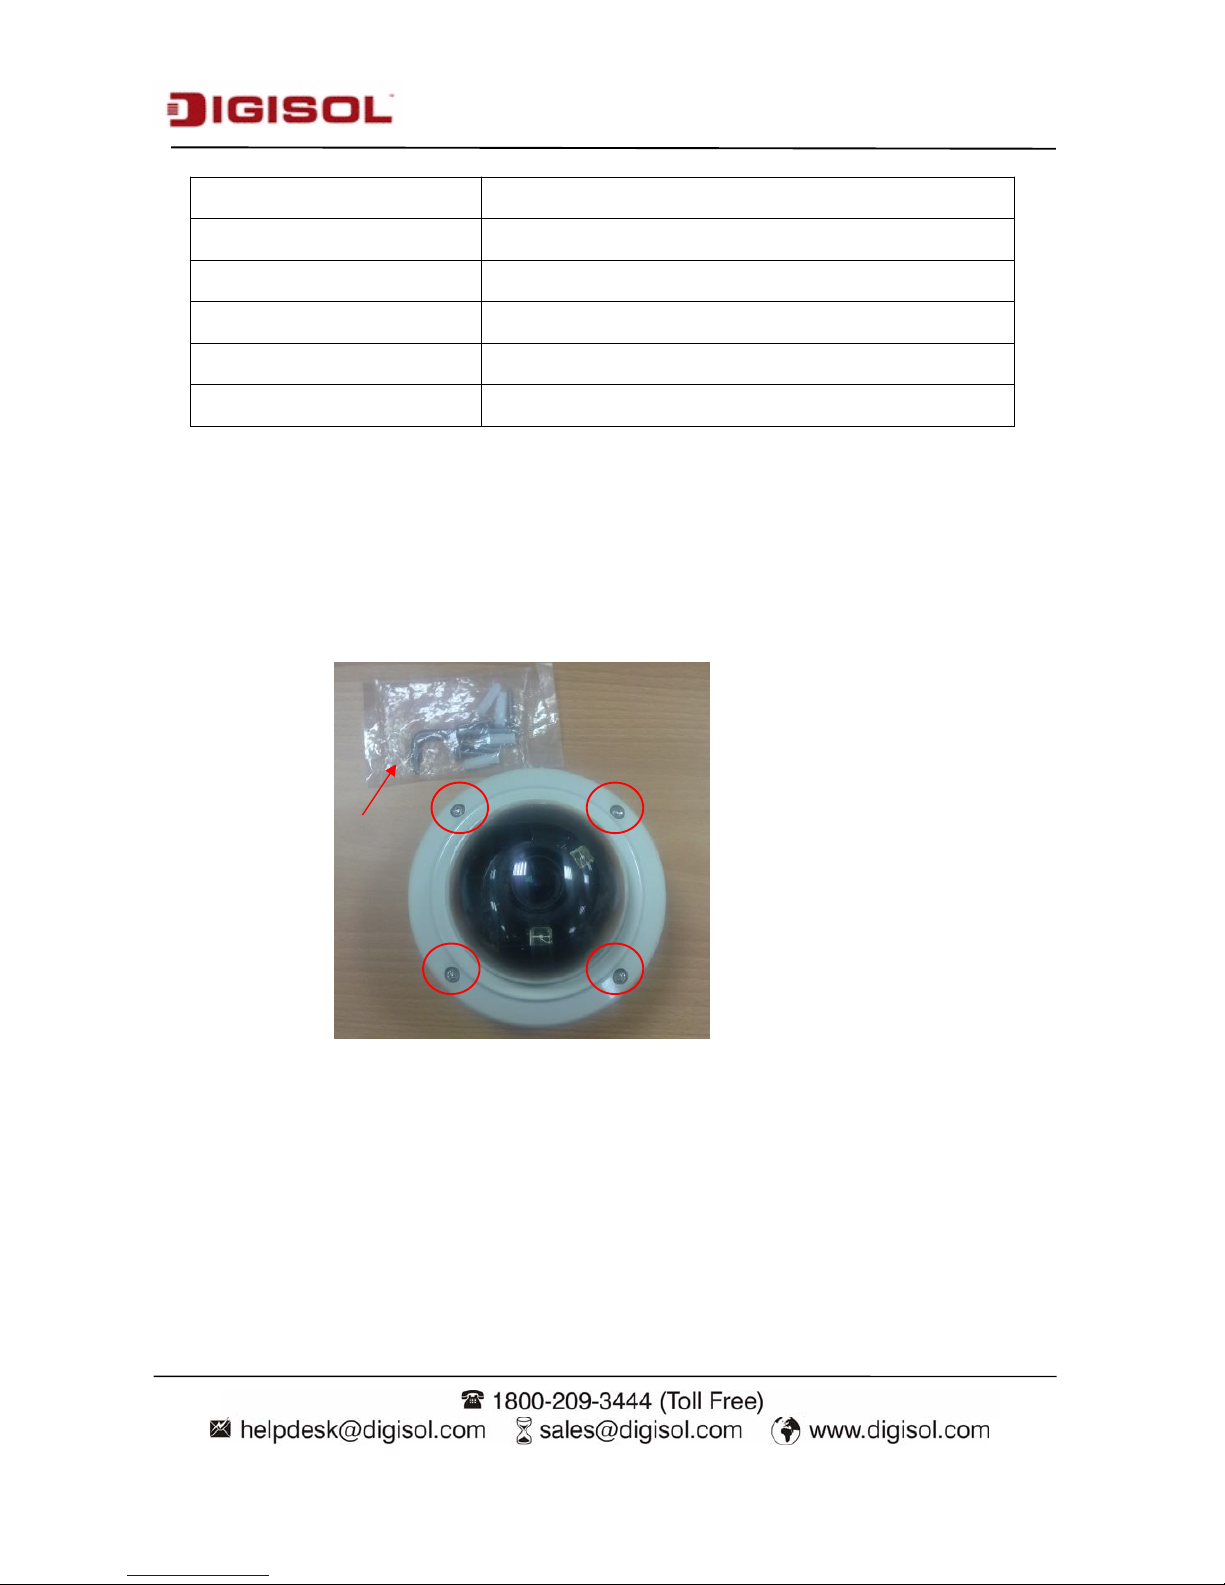
1-6 Installation of the Network IP Camera................................................................................ 11
2 Using Network IP Camera by Web Interface..................................................................................15
2-1 Locate the IP address of Network IP Camera......................................................................15
2-2 Connect to IP camera’s Web User Interface........................................................................ 16
2-3 Viewing Live Video.............................................................................................................20
2-4 Client Settings..................................................................................................................... 23
3. Advanced Configuration................................................................................................................ 25
3-1 System................................................................................................................................. 26
3-2 Security................................................................................................................................27
3-3 Network............................................................................................................................... 29
3-3-1 “General” Setup Page...............................................................................................29
3-3-2 “Advanced” setup page............................................................................................ 31
3-4 IP Filter................................................................................................................................ 33
3-5 Video....................................................................................................................................34
3-5-1 Image Setting........................................................................................................... 35
3-5-2 Video Setting............................................................................................................ 38
3-5-3 Overlay Setting.........................................................................................................40
3-6 Motion................................................................................................................................. 42
3-7 Privacy Mask....................................................................................................................... 44
3-8 Event....................................................................................................................................45
3-8-1 Settings.....................................................................................................................46
3-8-2 Media........................................................................................................................47
3-8-3 Event Server............................................................................................................. 48
3-9 Recording to SD Card/ Samba Server................................................................................. 52
3-10 SDHC................................................................................................................................ 54

DG-SC8860VI User Manual
4
3-11 Log.....................................................................................................................................56
3-12 Device Info........................................................................................................................ 57
3-13 Maintenance...................................................................................................................... 58
3-14 Language........................................................................................................................... 59
4. Using SKYROS i-View software.................................................................................................. 60
4-1 Installing SKYROS i-View Software..........................................................................................60
5 Getting familiar with SKYROS iView Software............................................................................68
5-1 Configure SKYROS iview.................................................................................................. 74
5-1-1 Device...................................................................................................................... 75
5-1-2 Recording................................................................................................................. 78
5-1-3 System...................................................................................................................... 81
5-1-4 Schedule................................................................................................................... 85
5-1-5 Event........................................................................................................................ 88
5-1-6 Security.................................................................................................................... 89
5-2 Video Playback.................................................................................................................... 92
5-2-1 Start Video Playback................................................................................................ 92
5-2-2 Advanced Search......................................................................................................94
5-2-3 Event Search.............................................................................................................98
5-2-4 Video Playback.......................................................................................................102
6 Secureview Application for Android phones/ devices..................................................................104
7 Secureview Application for i-Phones/ i-Pads............................................................................... 118
8 Appendix.......................................................................................................................................129
8-1 Specification...................................................................................................................... 129
8-2 Troubleshooting.................................................................................................................130
8-3 Glossary.............................................................................................................................131

DG-SC8860VI User Manual
5
1. Product Information
1-1 Product Introduction
DG-SC8860VI is a 2Megapixel Fixed Dome IP camera with IR LED and IR-cut Filter. This camera
offers the latest compression technology with a CMOS sensor & a real time image processing
hardware. With its high performance H.264 compression, users can stream high quality video at
low bandwidth and storage capacity requirements. It has IR LED for visibility under no light
condition.The IR cut filter offers a true image quality during day/night operations.
DG-SC8860VI supports Power over Ethernet, which helps in easy installation by eliminating the
need of a dedicated power source for the camera.
DG-SC8860VI supports Digital WDR, a software-based technique that enables the camera to
produce clearer images in less than ideal lighting conditions. Digital-WDR balances the contrast of
light and shadow to improve visibility in dark areas within a scene.
This IP camera complies with IP66 standard thus protecting it from dust and direct sprays from all
directions (limited ingress permitted). The weather-proof and vandal-resistant casing is perfectly
adapted for harsh environments.
Other features of this network IP Camera include:
Ultra-high resolution 2Mega pixel CMOS image sensor.
Supports Digital-WDR
Built-in Micro SD slot for local storage, which can act like a stand-alone DVR.
3GPP Mobile Surveillance Supported.
ONVIF Compliant.
Continuous Recording to Samba Server.
Support IEEE802.3af Power over Ethernet (PoE) standard.
Weatherproof
Vandalproof

DG-SC8860VI User Manual
6
1-2 Safety Information
In order to keep the safety of users and your properties, please follow the safety instructions as mentioned
below. The warranty will become void if you disobey these safety instructions.
This Network IP Camera is sophisticated electronic device; DO NOT drop it from a height.
DO NOT place this IP Camera at hot / humid places, and avoid direct sunlight.
Accessories of this IP Camera like power supply are dangerous to small children. KEEP THIS
IP CAMERA OUT OF REACH OF CHILDREN.
If you want to use this IP Camera at any place that may be spilled by water or dirt, a secure and
water-proof camera housing is required.
DO NOT pull any cord that is connected to this IP Camera by force.
The IP Camera will get heated up when used for a long time. (This is normal and is not a
malfunction). DO NOT put this IP camera on paper, cloth, or other flammable materials.
If the IP Camera falls into water when powered, DO NOT attempt to retrieve it back yourself!
Find a qualified electrical technician for help.
1-3 System Requirements
Windows XP, Vista or Win 7 operating system (both 32 or 64 bits version)
2GB of system memory
1GB of Display card memory
20GB of available hard disk space on system drive

DG-SC8860VI User Manual
7
1-4 Package Contents
Before you start using this IP camera, please check if there’s anything missing in the package, and
contact your dealer of purchase to claim for missing items:
DG-SC8860VI Megapixel Fixed Dome IP Camera (1 No.)
PU foam pad
Installation Guide CD (includes User Manual, QIG & Utility)
Tools Package (includes one allen key, 4 nylon anchors, 4 screws and 4 washers)
Patch Cord
Note: Power Adapter (12V DC, 2A) is NOT a part of the standard package. It will have to be
ordered separately.

DG-SC8860VI User Manual
8
1-5 Get Familiar with your new Network Fixed Dome IP Camera
Front cover:
Item Description
1. Front Cover
Transparent & Metal cover
2. Rear Cover
Metal Cover
1
2
3

DG-SC8860VI User Manual
9
Item Description
1. Bubble Cover Transparent bubble cover, for lens and LEDs protection.
2. Black inner cover Inside protection.
3. Anti - drop line Protective front cover drop during installation.
Rear Cover:
Item Description
1. IR LED Board IR illumination
2. Top Mount For Rotation
3. Mid Mount For Tilt function
4. Down Mount For Pan function
1
2
3
4
5
6
7,8
9
10

DG-SC8860VI User Manual
10
5. LENS Varifocal Lens
6. Main Board PCBA platform
7. SD Board Micro SD card slot
8. Reset button For resetting function (on SD card board)
9. Power Terminal Block J15
10. RJ45 connector Network connection
1-6 Installation of the Network IP Camera
Please follow the instructions mentioned below to setup your new IP camera.
1. Unscrew your front cover by using the tool from the tools package.

DG-SC8860VI User Manual
11
2. Attach your PU foam pad on the bottom of your rear cover.
Please refer to the definition of the terminal blocks chart below. It is also printed on the
motherboard.
Power Terminal
Blocks
(J15, 2pins)
Pin No. Function
Pin 1 DC 12V
Pin 2 GND

DG-SC8860VI User Manual
12
3. Insert all your cables through the conduit hole (optional A or B). If necessary, use the standard
M20x15 water proof straight plug to prevent the device from water or dirt. Or the other
equivalence plug to assembly.
Note: The water proof straight plug shown above will be inserted into the conduit
hole labeled ‘B’. This plug will not be provided along with the product.
4. Connect all your cables to their respective terminals. Insert your micro SD/SDHC card for
storage option.
5. If this camera is connected to a PoE switch then the device can be powered on without using the
power adapter.
6. Repower on the camera and refer to the following procedures in section 2 to access and
configure it.
7. If everything works fine, you can put the camera on the wall or ceiling by using the screw in the
tools package.
A
B

DG-SC8860VI User Manual
13
8. If local storage is required then insert micro SD card in the slot then the camera can detect the
card and enable the UI of SD card.
9. See the above image and find the location of reset button on the SD card board. Press the button
0ver 10 seconds to reset the device when needed.

DG-SC8860VI User Manual
14
2 Using Network IP Camera by Web Interface
2-1 Locate the IP address of Network IP Camera
You can use your new Network IP Camera by its web user interface via web browser. You must
know the IP address of IP Camera before you can connect to it. The IP Camera will use DHCP
server on your local network to obtain an IP address automatically by default. So, you can check
your DHCP server’s IP address lease table to find the IP address of IP Camera.
You can also use the utility named ‘IP Finder.exe’ to find the IP address of IP Camera, which is
located on CD-ROM.

DG-SC8860VI User Manual
15
Press ‘Discover’ button to search for all IP cameras on your local network (make sure all IP
cameras are powered on and are connected to the local network first). When you find any IP camera,
you can click on it and click ‘Link’ button to connect to it by your web browser.
If you need to change a certain IP camera’s IP address, you can also click on the dome camera
whose IP address you wish to change, then click ‘Change IP’ button to change selected dome
camera’s IP address setting.
If you no longer need to use this utility, click ‘Exit’ button to close it.
2-2 Connect to IP camera’s Web User Interface
When you know the IP address of IP camera, you can connect to it by Internet Explorer web
browser by entering its IP address in address bar. The user login screen will appear when you get
connected:
Note:
If you have several network connections, such as “Wireless Function”, disable the “Wireless
Functions” or other network connections that are not connected to the IP camera, as IP finder
may fail to search IP camera.

DG-SC8860VI User Manual
16
IP Camera’s administrator username and password are both ‘admin’ (lower case) by default. Click
‘OK’ button or press ‘ENTER’ key on your keyboard when you finish entering username and
password.
When you connect to IP Camera for the first time, you’ll see the following message. This message
prompts you that you need to install ActiveX plug-in before you can see the video from IP Camera.
For IE 8 version:
Right click the indication bar and click: ‘‘Run Add-on” for All Users on this Computer to install
ActiveX plug-in.

DG-SC8860VI User Manual
17
Click ‘Allow’ button located at the bottom of IE to install ActiveX plugin.
If you’re prompted that Windows Firewall has blocked some features of this program as shown
below.
Click ‘Allow access’ or IP Camera will not be able to function properly.
When you’re installing Internet Explorer plug-in, you may also be prompted if you want to allow
changes to be made to your computer:

DG-SC8860VI User Manual
18
Click on Continue. It will display the screen shown below:
Click ‘Run’ to install the Active X control.
After ActiveX plug-in is installed, you should be able to see the video stream from camera.
NOTE: If this is the first time you use this IP Camera, you can refer to chapter 2.4 for instructions
on Setup Wizard, which will guide you to complete the software setup of your new
IP Camera.

DG-SC8860VI User Manual
19
2-3 Viewing Live Video
After ActiveX control is installed, you can view IP camera’s video by web browser. Just connect to
IP camera by web browser and login, than you can see live video from IP camera:
There are various controls on the web page; here is the description of every control item:
Item Description
‘Home’ button This button is visible in all setup pages of IP camera, and you can go
back to live video view by clicking this button when you’re in other
tab.
Stream Select video stream type: H.264 or MJPEG. MPEG4 option is visible,
when you navigate to Video-> video settings and enable the ‘MPEG4’
option. H.264 requires less network bandwidth and this will help when
network connection is slow.
Client Settings Open ‘Client Setting’ menu.
Configuration Open ‘Configuration’ menu.
Language Open language menu, you can switch web interface to other language.
Available languages: English, Simplified Chinese, Traditional
Chinese.

DG-SC8860VI User Manual
20
Original size / Fit
screen
/
Switches live image view between original size (full size: 3M pixels)
and fit screen (smaller size).
If you want to see video in detail, switch to original size. If your
computer monitor’s resolution is not enough and you want to see full
image view, switch to fit screen and image size will adjust
automatically.
‘Connect’ button Start live video view.
‘Disconnect’ button Stop live video view.
‘Snapshot’ button Take a snapshot and save image file on your computer. When you
click this button, a new window will appear:
Click ‘Save’ button when you see the image you wish to save, and
you’ll be prompted to indicate the folder on your computer to save
image file. If you don’t want to save image file, click ‘Cancel’.
‘Start Video Record’
button
Click this button to record video and save video file on your computer.
The recorded file by default will be saved at C:\Program
Files\Recording. To change the path for saving video files go to
Client settings-> Storage option->folder and change the path there.
‘Enable Digital Zoom’ This function will enlarge video view digitally from 1X to 10X, so you
Table of contents
Other Digisol Security Camera manuals