Digital Aquatics Reef Keeper User manual
Digital Aquatics Reef Keeper Setup Guide (for Shlobster dosing pumps
dosing 2 part)
Physical Connection:
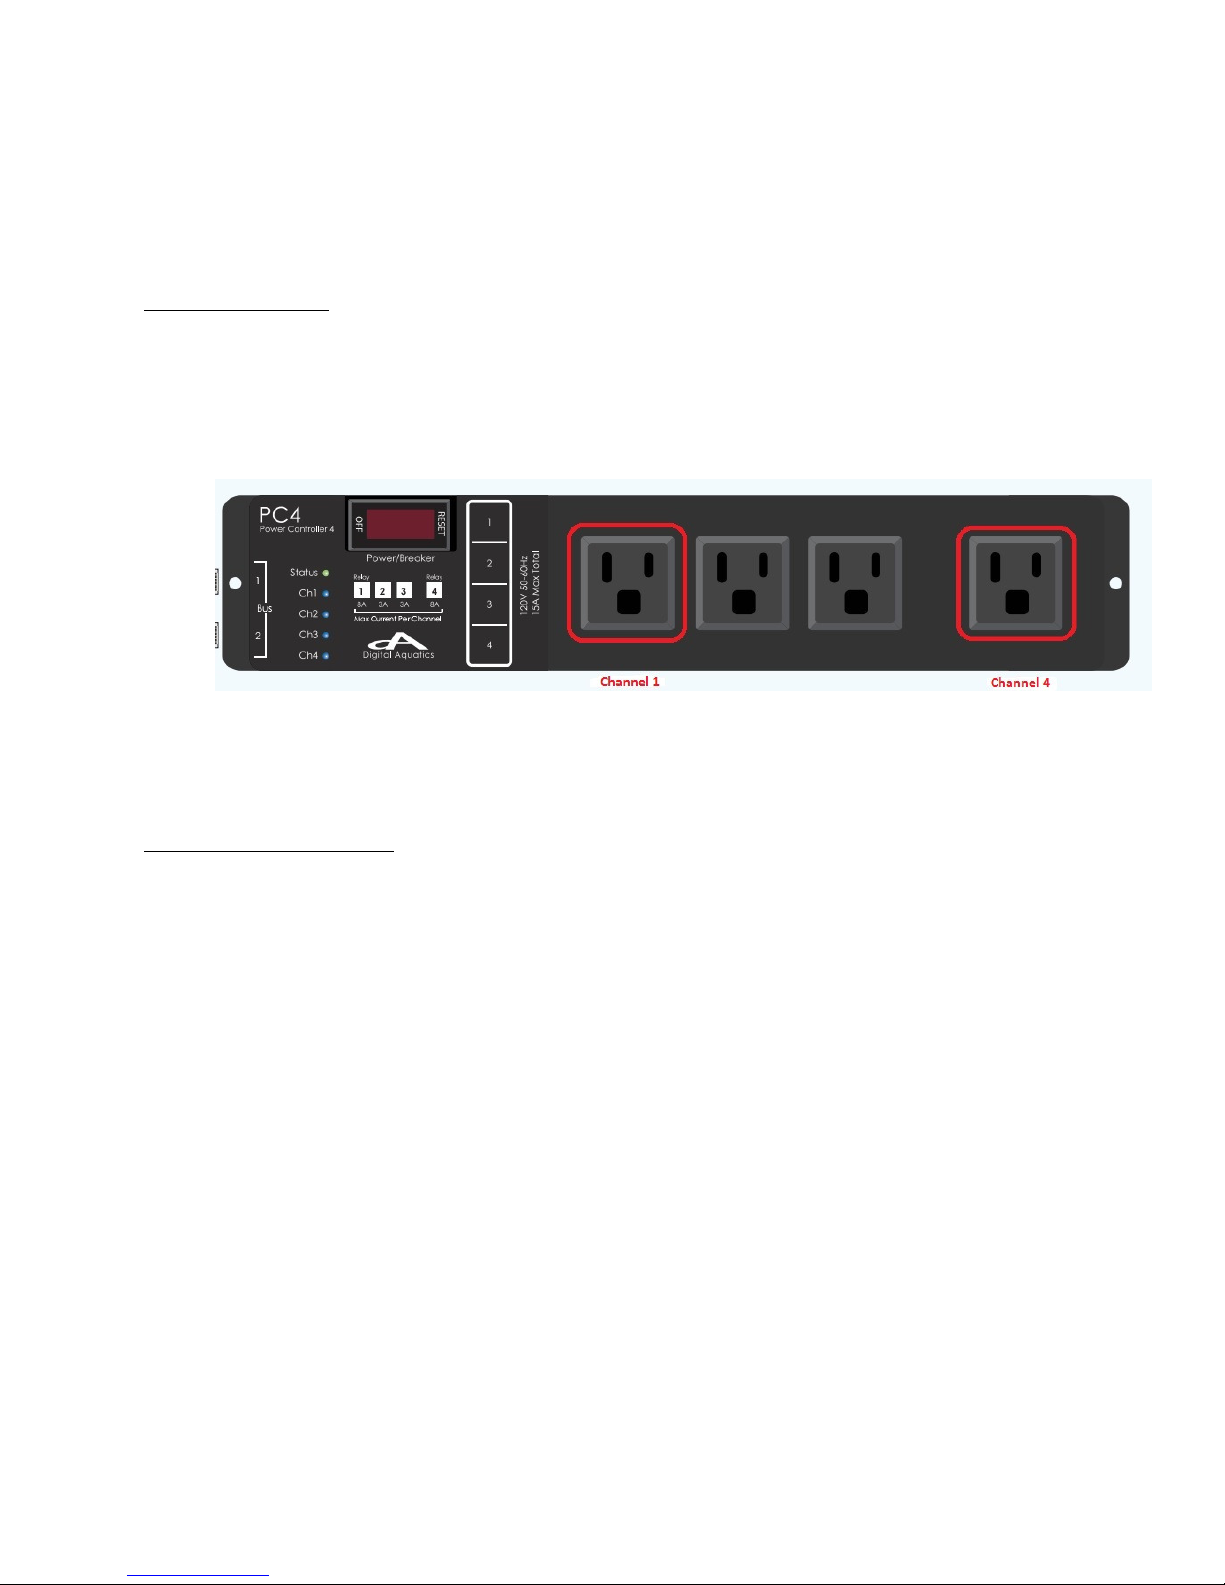
The DA Reef Keeper – Power Controller 4 has two mechanical relays and two solid state relays.
Channel #1 and Channel #4 on the power ar are the mechanical relays, pictured in the red
squares here:
Mechanical relays perform etter when switching low power devices such as the Shlo ster
dosing pumps, so it’s important to use them for est performance.
A word a out 2 part dosing:
Before we proceed to programming, a word a out what we are trying to accomplish. When using 2-part
in most cases our goal is to add the same amount of part A as part B. Part A is typically Calcium, and Part
B is typically Car onate (alkalinity). The amount of each that a given aquarium needs will depend on
many factors, and you must make a decision a out how much you want to add to your specific
aquarium efore you continue. Each rand has a different recommendation of where to start printed on
the ottle. Also, it must e decided how we want to dose these amounts to the aquarium. Generally, we
add Alkalinity starting at the eginning of our photoperiod (“lights on”) and Calcium starting at the end
of our photoperiod. We dose in this way primarily to avoid an interaction etween the two, and to avoid
the creation of a very high pH condition resulting from adding car onate alkalinity near the end of the
photoperiod, a time when pH is generally highest in the aquarium. While in some cases we could dump
in the entire allotment of part B right at the eginning of the photoperiod, and Part A right at the end, it
is est to spread the additions out. Doing so is needed to ensure the life of the dosing pump, and it’s
etter for the chemistry in the aquarium.
-Summary of relevant points:
oGoal 1: We want to dose the same amount of A as B.
oGoal 2: We need to figure out how much of A & B our system needs. (see ottle)
oGoal 3: We want to dose A & B separately from each other.
oGoal 4: We want to dose A & B in many small increments.

So, efore we program the DA Reefkeeper we need to
get our num ers in order (Goal 2). To do that, let’s figure
out how much we want to dose each day. For example,
let’s say the total dose we need is 50ml of Part A & B.
Since we will e running the pump y time, we need to
figure out how much they pump in a given time period.
Assuming the 1.1ml/min model, the easy way is to run
the pump 1 minute for every ml desired. With that
assumption made, we need to run our pump for 50 minutes. But, we want to split this up in to
many small doses (say 10, as per goal 4). So, we will run the pump for 5 minutes, 10 times in a
row.
Note: This will put us within 10% of where we ultimately need to be, because we assumed 1
ml/min when in fact the pumps move 10% more than that at 1.1 ml/min. For further
e planation, see the advanced section at the end of this guide.
Example:
Let’s assume a photoperiod from 11AM to 7PM – 8 hours. We will dose B (car onate alkalinity)
during the photoperiod, and part A afterwards (calcium, as per Goal 3).
Starting at 11AM, we will dose 50ml of part B, spread out in 10 increments. We will put a reak
of 30 min etween each dose. (Goal 4)
Starting at 7PM, we will dose 50ml of part A (same amount as part B as per Goal 1), spread out
in 10 increments. We will put a reak of 30 min etween each dose.
Because we are dosing A & B at different times of the day, we will need to program two
different timers in to the DA ReefKeeper.
All that is left to do now is to program the Reef Keeper to carry out our plan…
Programming:
The two settings that we will use to control the operation of
the pumps are named “Timer” and “Multi-Timer” in the DA software.
We will program the two timers we need, and then we will assign them
via the “Multi-Timer” function to the outlets the pumps are connected
to.
The ReefKeeper Lite has 16 timers
that can e used. Timers have a
num er of settings that allow them to
e used in powerful ways. Timers are
used to run on/off cycles that can e
linked to a variety of functions. They
can e set to turn on for specific days
of the week, have their durations e
set to random and have added repeat
cycles.
Shlo ster dosing pumps are
availa le in two models:
1.1ml/min & 50ml/min. We
recommend using the
1.1ml/min model for the
purpose of dosing two part and
other additives
.

Step 1: Define the timers that we need the ReefKeeper to follow. As per our example, the settings
would e as follows:
Select Timer 1
Days of Wee – SMTWTFS *we want to dose every day.
Start Time: Enter the eginning of the photoperiod. In our example, 11AM.
On Duration: Enter the “on” interval. In our example, 5 minutes.
Off Duration: Enter the “off” interval. In our example, 30 minutes.
Repeat Count: This is the num er of times the timer is to alternate etween on & off efore
stopping. Important: if set to zero, the timer will operate only once. If set to one, it will repeat
one time, for a total of two operations etc. In our example, set this to 9. (as in, it will repeat 9
times after the first time it runs)
Oscillate: Off (If oscillate is turned on the timer will alternate etween the on & off time
indefinitely, ignoring the other settings – we definitely don’t want that for 2 part application!)
Random: No (If random is turned on the Reefkeeper will treat the On duration and Off duration
as maximum times, and randomize a time equal to or elow that – we definitely don’t want
that.)
Save
Repeat this process for our second timer (Part A). Remem er, it is not exactly the same timer
ecause it will run when lights are out, which is a different time of the day:

Select Timer 2
Days of Wee – SMTWTFS
Start Time: In our example, 7PM.
On Duration: In our example, 5 minutes.
Off Duration: In our example, 30 minutes.
Repeat Count: In our example, 9.
Oscillate: Off
Random: No
Save
Step 2: Assign the Multi-Timers to the channels (the only way to assign our timers to the
channels the pumps are attached to).
As a feature, the “Multi-Timer” function allows you to assign one or two timers to a
given channel. Don’t get confused though, for our purposes we will e using the Multi-Timer

function to assign only one timer per channel. Timer 1 to our Part B pump (on channel #1) and
timer 2 to our Part A pump (on channel #4).
Navigate to Channel #1 to egin the programming of the Multi-Timer:
Menu >> Modules >> PC4 >> CH1 >> Function >> Multi-Timer
Timer A with 00 flashes. – Enter the timer # you previously programmed that you would
like CH1 to follow. (Timer 1 in our example)
Timer B with 00 flashes – skip this.
In Standby – set to ignore
Standby Delay – leave at 00:00:00
Default State – set to off.
Save.
Now we want to set our second pump to our second timer:
Menu >> Modules >> PC4 >> CH4 >> Function >> Multi-Timer
Timer A with 00 flashes. – Enter the timer # you previously programmed that you would
like CH4 to follow. (Timer 2 in our example)
Timer B with 00 flashes – skip this.
In Standby – set to ignore
Standby Delay – leave at 00:00:00
Default State – set to off.
Save.
Done! The only thing left to do now is to check in on the pumps to ensure they are running properly,
and to keep an eye on your water parameters to see if they are increasing or decreasing. If you need
more, you simply go ack and edit Timer 1 and Timer 2. In general, we recommend making adjustments
of only 5% at a time. Keep in mind: a) the timer repeats any changes you make 10 times, so for example,
adding 5 seconds of extra time to the timer will add 50 seconds total dosing time each day. b) adding 5
to the timer will increase the total dose for that channel by 5 as well.

Advanced Section
Many people will want to dose as accurately as possi le and for that a couple of facts must e
realized:
A) In order to determine the exact amount of fluid the pumps actually move per unit time,
it is necessary to time how long it takes the pumps to move a given amount of fluid –
after being mounted and intake/outtake lines are run. We find the est way to do this is
to get a couple of old test vials. Use a test syringe to add 5ml to one of them, and put
the output of the pump in the second one. Run the pump until the level of fluid in the
second vial is the same as the first, and keep track of the time it takes. If it took 4:35
minutes to pump 5ml, the pump actually moves 1 ml every 55 seconds. How did we
figure that out?
4:35 is equivalent to 275 seconds.
275 seconds / 5 ml = 55 seconds per ml
B) Many people will try to determine the length of time they need to run the pump y
dividing the amount they want to dose y the pumps specification of 1.1 ml/min. If that
is done, remem er that the result of that is not in minutes and seconds!
For example:
75 ml divided y 1.1ml/min = 68.18.
68.18 is not 68 minutes and 18 seconds. It is 68 minutes and 10.8 seconds.
Table of contents
Other Digital Aquatics Pet Care Product manuals

Popular Pet Care Product manuals by other brands

VEVOR
VEVOR SX50014M user manual

K&H
K&H Thermo Outdoor Kitty House Care Instructions

Ritchie
Ritchie Classic Equine ULTRAFOUNT ES1 installation instructions

Exo Terra
Exo Terra Scorpion Light PT2365 operating instructions

Songmics
Songmics feandrea PCT59 quick start guide

Tri-Tronics
Tri-Tronics Beeper manual


PetChatz
PetChatz Pet Care Product Instructions for use

Zen Habitats
Zen Habitats 2'x2'x4' PVC Panel Reptile Enclosure Assembly instructions

Prevue Hendryx
Prevue Hendryx Silverado Cage quick start guide

New Cat Condos
New Cat Condos Prestige Cat Trees 130252-Neutral Assembly instructions

Ferplast
Ferplast Ristodog quick start guide

Frisco
Frisco 120133 instruction manual