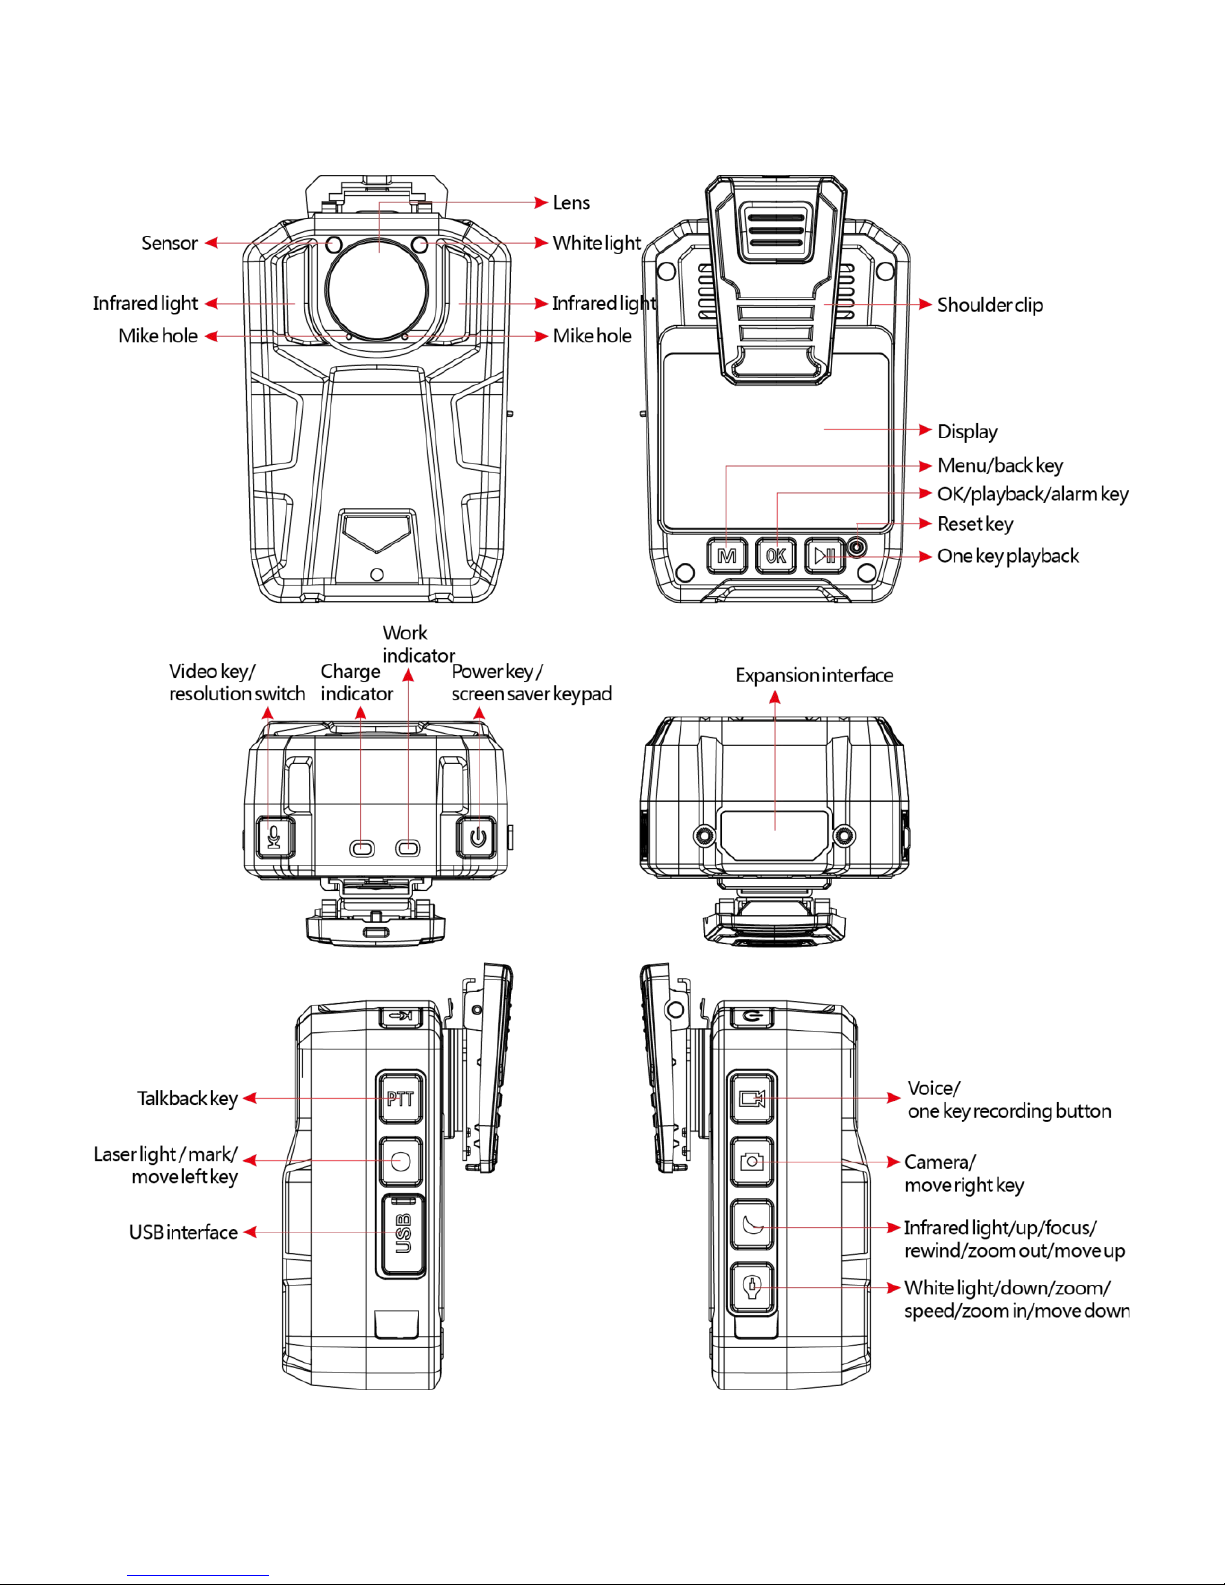
DIGITALas D-EyE User manual

Single-Police law enforcement video and audio recorder
D-EyE 3x1 body camera
Product manual
VER 2.0

Foreword
Thank you for choosing our company's law enforcement recorder. Please read this m
anual carefully before using it. Please keep this manual carefully so that you can in u
ire when necessary.
The final interpretation of the contents of this manual is owned by the Company and i
s subject to change without notice.
This manual is the manual of the product, a brief introduction to the product features,
performance indicators, appearance structure, the use of operations and precautions
for the majority of users in the use of reference, please read carefully before using it.
If the e uipment fails or have uestions about the contents of this manual, please
contact us in time and welcome suggestions and criticisms.
Caveat:
1. Keep away from fire;
2. Avoid placing the LCD screen and the camera lens directly in sunlight.
Note:
1. A particular fre uency of electromagnetic waves may affect the image uality;
2. Before using the product, please do a pilot video in order to master the use;
3. If product have not been using for a long time,please be fully charged before using
again.
4. When the machine fails, please do not open and repair by yourself, the
machine only authorized maintenance personnel to carry out maintenance;
5. When switching machine, the machine screen has chromatic aberration, (red
color), please re-open the power button ,you can restore the normal color.

-1- Description of key function

-2- Introduction of key
Name Icon Met od Effect
Power
key /
screen
saver
keypad
Short
press
In the shutdown state, short press has no effect;
In the boot state, the on / off screen saver function
Long
press
Press and hold for 3 seconds to turn on / off.
voice
key/resol
ution
switch
Short
press
In standby mode, short press to record audio files, press again to stop
recording and save automatically.
Long
press
In standby mode, press and hold to switch between 1920x1080P and
1280x720P resolution.
Recordin
g key
Short
press
Power on, press the video recording after a short press, press it again to stop
shooting, and automatically save.
Long
press
Shutdown, long press and start recording, press again to stop shooting, and
automatically save.
Camera Short
press
Standby mode, press the photo can be taken; video press, you can capture
and save photos;
After the picture is zoomed in, press it again to move right.
Infrared
light/up/fo
cus/rewin
d
Short
press
Standby mode, short press to switch to night infrared mode, can be video
capture or photo shoot;
Menu setting or file selection state, for the flip function;
After the local picture is zoomed in, press it again to have the up function.
Long
press
Standby mode, long press to adjust the focal length, focal length range of 1-
16 times;
Playback state, long press for the fast rewind, rewind the range of 2-128
times;
Open the local photo, long press to zoom in on the camera after zooming in.
White
light/down
/zoom/sp
eed/
Short
press
Standby mode, short press to open the white (lighting) lights, can be light and
fill light;
Menu setting or file selection state, for the flip function;
After the local picture is zoomed in, the short press has the function of moving
down.
Long
press
Standby mode, long press to adjust the small focal length, focal length range
of 1-16 times;
Playback state, long press for the fast forward, fast forward range of 2-128
times;
Open the local photo, press and hold to zoom in on the picture.
Talkback
key
Short
press
Through the intercom connection to the walkie-talkie to achieve shoulder
microphone function.

laser light
/ mark
key
Short
press
Short press to turn on / off the laser light (laser light is optional);
After the local picture is zoomed in, the short press has the function of moving
to the left.
Long
press
Voice / recording state, long press to add yellow five-star, mark this paragraph
recording / video as the key document.
USB
interface connect Data transmission interface, charging interface.
menu/bac
k key
Short
press
Standby mode, short press to enter the menu settings;
Menu settings or file selection state, short press to return to the previous
interface.
OK/playb
ack/alarm
key
Short
press
Standby mode, short press to enter the selective playback, you can playback
the local video / photo / audio files;
In the menu settings or file selection state, confirm the function.
Long
press Long press to turn on / off the alarm function, the machine alarm and flash.
Playback
key
Short
press
In standby mode, short press to play back the latest recorded file.
reset key Short
press Standby or crash state, press the reset button to force the shutdown reset.
-3- Functions and c aracteristics
Main functions
Professional video, video and audio working at the same time, you can zoom 16 times the digital zoom,
zoom in detail, one key to start the camera function, the highest resolution up to 2304* 1296P, one key
switch between 1296p to 720p.
One key camera, you can set a continuous camera and automatic camera function, Video can also use the
shooting function to intercept the photos at the time, the camera pixels up to 36 million pixels, it can be
zoomed on the machine.
Independent recording, dual-microphone noise-proof function, which makes video more clearly;
Playback files, 2 inch LCD monitor, you can playback files on the machine and browse all
Laser positioning, fixed-point shooting, to ensure that the shooting screen is not offset;
White light can be opened at night, you can in the evening of the camera, the camera can be used in the
evening,
Alarm function, in case of an emergency, you can open the alarm flash;
Long watermark technology, including shooting time, the police, the police can use the camera, but also
can be used in the fill light;
Key mark, shooting can be marked as a key file;

Alarm function n, Number, product number, more legitimate interests;
Long file name technology, including shooting time, police number, Product number, easy to search and
level management;
Password protection, with special software can set the password, unauthorized personnel can not tamper
with and delete files;
Main c aracteristics
Ambarella A7 main control chip,the product is running more stable, lower energy consumption.
With industrial-grade CMOS sensor, the image effect is more outstanding, more brilliant colors;
140 degree widen-lens, a wider field of view.
Professional waterproof and weatherproof design, protection level: IP66, effectively prevent rain and dust
into the machine inside.
Small body, light weight, flexible key , make law enforcement more easily;
Industrial grade plastic and structural design, bare machine can afford 2.5m free fall, the machine and data
will not be damaged, shell is flame retardant,
6000mAh large cycle-charging Lithium battery, can be recorded continuously for 16 hours,Charging time <
6 hours.
Under dim condition,IR can support 8h working continuously.
360 degree rotatable metal clip for anywhere in the clothes;
Optional lights, make night law enforcement more convenient.
-4- Performance Index
Chip Ambarella A7 Master chip
Compatible OS Windows 98/2000/ME/XP/Windows 7/8/10
Screen 2 inch full HD LCD screen
Lens and angle F2.0 iris diaphragm,140° wide angle,1-16 times Digital zoom
Video frame rate 30 frames per second, 60 frames per second
Video format MP4,H.264 compressed format
Video resolution 2560x1080 30P/2304x1296 30P/1920x1080 30P/1280x720 30/60P
Video playback Support 2 ~ 128 times fast forward and rewind
Photo format JPEG
Camera resolution 36million/33million/16million/12million/8million/5million/3million seven gears optional
Storage capacity Support 64GB/128GB
Outline size 84*58*37mm
weight 182g+15g(machine+back clip)
Battery capacity 6000 mAh
Color recording time 16hours(No infrared lamp)
Black and white video
recording time
8hours(Open IR)
Full charging time ≤6hours
Secondary light source Infrared light,Highlight white light
night visual range 10-20m
Working environment
Temperature
-40~60℃
Protection level IP67
Anti dropping grade 2.5m
data interface USB 2.0 data interface
-5- Basic operation
5.1 On/off mac ine
Long press “power key”,the machine will on and enter standby state,the top blue light will long bright,short
press again will enter screen saver,at any state,long press “power key” 3 seconds,the machine will off.

5.2 Audio Recording
After start on machine,will enter standby preview state.press “voice key” to start audio recording,machine short
vibration twice,top yellow indicator light will long bright,on the machine screen prompts a recording state
image,press the "voice key" again in the audio recording mode, will stop it and save the audio file.
5.3 Video recording
After start on machine,will enter standby preview state.press “video key” to start video recording,machine short
vibration twice,top red indicator light long bright,at video recording state,press “video key” again,machine short
vibration twice accompanied by beep tips,will stop it and save video file.
At off state,long press “video key” 2 seconds,the machine will start on automaticlly and start video recording,if
you need to end and save the video file, method ibid.
When shooting at night without light,need press “Infrared key”,At this time the infrared lamp opens into the
night shooting mode,night shooting pictures for black and white.
5.4 Camera
After on machine,will enter standby preview state,press “camera key”to take photos,Shooting at night without
light is re uired to open or automatically open a machine infrared lamp or a supplemental light.
In the state of the video, press the camera button can capture photos.
5.5 Infrared nig t vision
The machine can be set manually / automatically open the infrared lamp,the settings manually, press the
infrared button, infrared lamp can be turned on / off,general use of the environment in the case of low illumination,
then the image into an infrared camera mode, color reduction ability will be reduced to black and white, which is a
normal phenomenon.
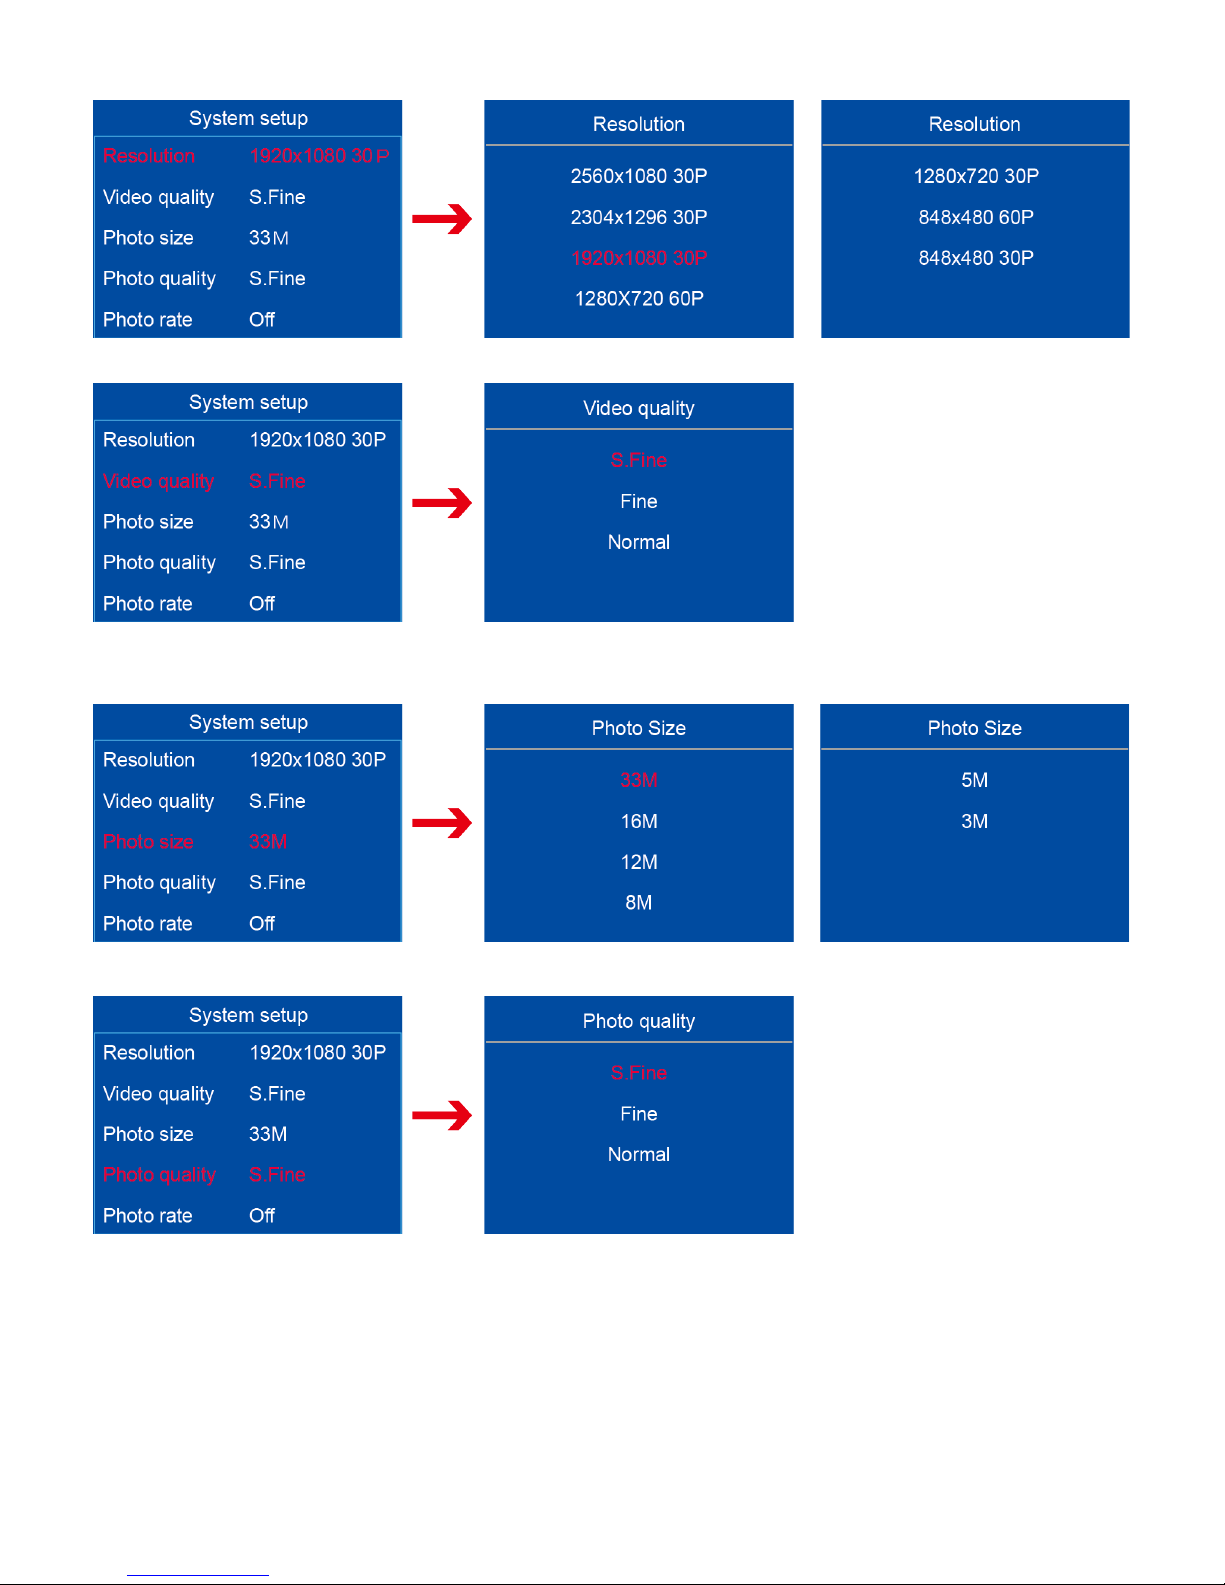
5.6 Switc ing resolution
At standby state,long press “audio key” can switch 1920*1080p and 1280*720p resolution.
5.7 Adjust t e focal lengt
At standby or video recording state,long press “UP key”to tune recently focus,”down key” to tune far focus.the
focal length can be adjusted in the range of 0 to 16 times.
5.8 Fast forward and rewind playback
In Video Play Status,click on the "Up key" for the Quick rewind playback, "down key" for fast forward playback, a
short time to increase the speed of twice times, can be adjusted in the 2x~128x range of fast forward/rewind.
5.9 One-key playback
The law enforcement instrument designed the "one-key playback" key and the "local playback" key,at standby
state short press “one-key playback key” ,the machine will play recently video automatically;If you need to select
playback video, press the "Local Playback" button to enter the Selective Playback menu.
5.10 Video playback
At standby status, press the "Local Playback" button to enter the playback menu, select "Video" to enter the
video playback mode, press the "up, down" button to select the video to play, press the "OK" button to play the
currently selected video file.

5.11 Picture playback
In the standby mode, press the "Local Play" button to enter the playback menu, select "Photo" to enter the photo
playback mode, press the "up, down" button to select the photo to see, press the "OK" button to open the current
choice to view the photo.When you set the slide in the system settings to "On", you can automatically play the
photo in turn.
5.12 Enlarge or s rink picture
After opening the photo, long press "white light / infrared light" then you can enlarge / shrink the photo, the
maximum zoom can be enlarged to X10 times.After enlarging the picture, short press "laser light and camera
keys" you can move photos left or right;short press "infrared light / White light button "you can move photos up or
down
5.13 Voice recording playback
In the standby mode, press the "Local Play" button to enter the playback menu, select "Record" to enter the
voice recording playback mode, press the "up, down" key to select the audio file to play, press "OK" to play the
currently selected recording file.
5.14 Mac ine formatting
Connecting the computer to the computer, open the "My Computer", right click on the "removable disk", then
select "format (A) ...", the file system select "exFAT", click "Start" ,then it will format all the files in memory card .
(Machine with drivers needs to log in the software).
Note: Win XP computer system needs to install exfat patch, patch file can uery CD, or download online, and
then install.
-6- Menu parameter setting
Notes:when turned on,press the "Menu" key then enter the parameter setting interface to select the appropriate
parameters, press the "OK" button to enter the option, then press the "up, down" key to select the appropriate
parameters and press the "OK" button to confirm,press the "up, down" key to modify other options. Press the
"Back" key to return to the standby preview.
6.1 Resolution
There are five options “2560*1080 30P、 2304*1296 30P 、1920*1080 30P、1280*720 30/60P”.The bigger the number is, the
greater the resolution, the larger the file size, the shorter the recording time with the same memory capacity and power, the small
number and vice versa. The default resolution is "1920x1080 30P".

6.2 Video quality
Video uality options are"high, good, normal" t. The default video uality is "high”.
6.3 Image size
“36M、33M、16M、12M、8M、5M、3M”seven options,from 3 megapixels to 36 megapixels. The default
pixel is "33M".
6.4 Picture quality
There are three options“High、good normal”.The default photo uality is "high".
6.5 Burst p oto s ooting
There are six options "turn off, 5, 10, 15, 20, 25" . Burst photo shooting means that you can take multiple photos in row after
pressing the camera key in the standby state or during recording , press the camera once the camera can take multiple photos
in succession. The default burst is "off".

6.6 Time-operated camera
There are six options "off, 3 seconds, 5 seconds, 10 seconds, 30 seconds, 60 seconds" . After setting 3
seconds , press the camera button, the machine automatically take a photo every 3 seconds, then press the
camera button to close. The default auto photo is "off".
6.7 Screen brig tness
Screen brightness has "high, medium and low" three options. Screen brightness refers to the high or dark of
LCD display screen . The default screen brightness is "Medium".
6.8 Volume
There are four options "off, low, medium, high" . The volume size means the size of the recorded video and
sound during recording. The default volume size is "high".
6.9 PID
PID contains "3 digit machine type ,4 digit ID number , 6 digit user number ". The machine model can’t be edited,
but ID number and user number can be edited from 0-9, A-Z. The default PID is "P100000_000000".

6.10 System time
System time includes "year / month / day time", as long as the machine does not lose power, the system time
will not change. The system time can return to the default time after power failure, can also be set to the
current time. The default system time is the current time.
6.11 P otosensitive sensor
Photosensors have three options: "high, medium and low". Photosensor refers to the sensitivity of the sensor
light to the external environment.The default light sensor is "high".
6.12 Video segmentation
There are four options "5 minutes, 10 minutes, 15 minutes, 30 minutes" . Video segmentation refers to the
minutes you set, the video automatically save a file every few minutes according to set minutes. The default
segment time is "15 minutes".
6.13 IR switc
There are two options "manual, automatic" . When setting automatic mode, the sensor automatically senses the
brightness of external environment , the sensor light automatically switch to infrared mode when the light is low,
and the infrared light will turn on, the image color becomes black and white . When setting the manual mode, you
need to switch to infrared mode, the infrared light can be opened after press for seconds. The default IR switch is
"Manual".

6.14 Motion detection
There are four options "off, low, medium and high" . When the machine is not moving, boot and then open the
video button, when there is no moving objects in front of the camera , the machine keeps to prepared recorded ,
when there are moving objects, it starts recording automatically .It stops recording and save automatically at
static state. “High ,medium and low ”refers to the sensitivity of the machine sensor. The default motion detection
is "off".
6.15 Video pre-record
There are two options “off or on”.Video pre-recording refers to that the machine can record 5 seconds before
pressing the video button . Default video pre-record is "off".
6.16 Video post-record
There are six options “Off, 10 seconds, 20 seconds, 30 seconds, 60 seconds, 300 seconds. "Video post-record
means that you can record extended seconds you set after you press the video button. Default post-record is
"closed".
6.17 Screen timeout
There are five options"off, 30 seconds, 1 minute, 3 minutes, 5 minutes" . Screen timeout means that when the
machine is without any operation, the screen automatically turns off and then enter into the sleep state. Default
screen timeout is "3 minutes".

6.18 Automatic s utdown
There are four options "off, 3 minutes, 5 minutes, 10 minutes" . Automatic shutdown means that the machine is
turned off when there is not any operation. The default auto power off is "10 minutes".
6.19 Slides ow
There are two options "off or open" . When you open the slideshow, the machine automatically plays the photo in
turn . The default slide mode is "off".
6.20 Voice broadcast
Voice broadcast has two options"off, open" . After opening the voice broadcast, the machine broadcasts the
police number when it is switched on, and broadcasts the hourly time . The default voice is "off".
6.21 Car mode
There are two options”off or on”.When the vehicle mode is turned on, the machine turns on automatically and
starts recording when the car is connected or charged. When the charging is stopped, it will shut down
automatically after 10 seconds. The default car mode is "off".

6.22 Loop recording
There are two options “off or on”.When the memory is full during recording and can no longer continue to save
the recording, you can open the loop recording settings, the system will automatically delete the first five
minutes recorded files, then continue to record. The default loop recording is "off".
6.23 GPS
GPS has two options"off, open". When opening GPS,the light blue "GPS" words will appear at the upper right
corner of the display. When the outdoor signal is good, the "GPS" icon turns red, indicating that GPS signal
has been searched. Pressing the "camera" button , then start to record video. The default GPS mode is "off".
6.24 Default setting
The default setting is "Yes or No". Select Yes, the system will restore the factory system parameters.
6.25 Fixed version
The software version number is embedded at the factory, generally display year/month/day.

6.26 Language
You can choose “Simplified Chinese or English”.The default language is "English".
-7- Software installation and use
1. Suggested that quit the anti-virus software from your computer before the installation, then confirm the system of the
computer. he software compatible with Windows98/2000/XP/Windows7/8/10 etc. Under Win system you need put a patch
before installation, Win8 or over Win8 need set “Disable driver forced digital signature”. hen Click “My computer”===Click
“property”, find out the version of the system, showing as below: Check the computer information:
2. Put the CD into CD-ROM-----open it----Double click “my computer”-----open my CD----find out the installation file, picture
show as below:

3. Double click install,according to the guide,Click the "next" software to automatically install,picture show as below:
4. Click the “next” will appear Following interface, click ”finish” to finish the installation.
5. After click “Next”3 times,Software will appear automatically install surface,waiting a few seconds,Click again “Next”,after
5 times of “Next” will appear the surface of the picture showing.
PS:please install the file to C Plate,don’t change the Installation path, Click to ”next” enter the next step.

6. PC software Log in----backstage management. Connect the police camera to the computer.
7. he machine will “on” automatically, the double click the shortcut on your computer desk,then will appear the
following surface:( he latest version is V1.09 version, showing as top left corner)

8. Initial password:000000
Customer type can be divided into:manager and domestic consumer
Manager:Can manage all surface, can operate settings of machine “time,machine NO. and Number of police officers, modify
login password,document function” etc.
Domestic consumer:Just can read the U disk. Searching file, and operation of select upload path ,other settings will be
displayed as gray.
he following is a specific operation:
9. Click connect the machine---Click login to enter. After entering, will Automatic correction for current time.(please confirm
the time of the computer whether on time) then click confirm.
10. Click to enter U disk----will appear the surface of choosing whether to enter the U disk or not.

11. Click “Yes” to enter U disk. Can find the removable disc from your computer, then can check the file of the machine.
12. Click to choose the upload path,can set the upload path of the machine.
13. Finishing the setting of path. Must confirm the path is OK before you upload the file, then click Search file, into the
Search File.then click Search, Select All, Upload.

14. At the same time will remind delete the file inside the machine or not. Click “Yes” will delete, Click “No” will
continue to have in the machine after you upload the file.
15. Click “Yes”! he file will uploaded to the path which you setted,After finished it,please click Yes to finish the operation of
uploading.
16. When you need to revise the Machine Number and Number of police officers, after number entry, click Setting.
17. When you need to revise the password, firstly entry the new password twice, click confirm. hen the new password is
OK.
You can according with your own way to test, not sure that you need to follow our steps.
PS: If you find there is something wrong or couldn’t use, please try to change the computer or change the USB interface.
Table of contents
Popular Recording Equipment manuals by other brands

DigiDesign
DigiDesign D-Control installation guide

Citronic
Citronic CLP122DSP-B manual

Clare Controls
Clare Controls ClareVision installation guide

360 Systems
360 Systems Short/cut 2000 Audio Editor specification

Onkyo
Onkyo CDR-201A operating instructions

Minebea Intec
Minebea Intec PR1625/60 Instrument manual