Digitek 18ASF-7000 User manual

Power Supply
Input Voltage Adapter
Free Voltage (100~240V AC 50/60Hz)
Power Consumption
11W MAX
Power charger output
14V DC 3.0A
Battery
12.6V/4000mAh
Battery charging time
3~6H
Battery standard discharging time
>5H
A/V Data input/output
A/V IN/OUT
Video CVBS input/output
Audio L/R input/output
Audio output
Built-in Loudspeaker
HD TV
VER1.3 interface, up to 1080p
USB
1*USB 2.0 slot Compatible for Host
Transport Stream
MPEG-2/4,H.264
Physical Specification
LCD Display
5 inch
Size[W*H*D]
210 x150x 52(mm)
Net Weight
0.93Kg
Operating Temperature
0℃~ + 45℃
Storage Temperature
-10℃~ + 70℃
Storage Humidity
5%~95% RH (Non-Condensing)
User Manual
18ASF-7000
Digital Signal Meter

Chapter 4 Technical Specifications
System Resources
Main Processor
600M Hz based CPU
Flash Memory
64M Bits
DDR SDRAM
1024M Bits
Tuner/Front-end
Tuner Type
DVB-S/DVB-S2
Input Connector
F-type, Connector, Male
Frequency Range
950MHz~2150MHz
Signal Level
-65~-25dBm
Impedance
75Ω
LNB Power & Polarization
Vertical:+13V
Horizontal:+18V
Current:Max.500mA
Overload Protection
DiSEqC Control
Version 1.0/1.1/1.2/1.3,USALS Available
22KHz Tone
Frequency:22±1KHz
Demodulation
QPSK,8PSK
Symbol Rate
2~45Msps
Tuner Type
DVB-T/DVB-T2
Input Connector
F-type, Connector, Male
Input Frequency
(UHF)470-866MHz,(VHF)170-230MHz
Signal Level
-82~-20dBm
Impedance
75Ω
Demodulation
QPSK,16-QAM, 64-QAM, 256-QAM
Bandwidth
6,7,8 MHz

3.6 Upgrade
Move cursor to “Upgrade ’’and press “OK’’, then you can enter the “Software Update’’ interface.
To restore the factory default and keep the satellite information, you can press Backup to USB.
CONTENTS
Safety use
Danger warning
Battery Note
Chapter 1 Overview
1.1 Features
1.2 Accessories
Chapter 2 Introduction of panel functions
2.1 Remote Control
2.2 Front panel introduction
2.3 Top panel introduction
2.4 Rear panel introduction
Chapter 3 Detail operation guide
3.1 Satellite
3.1.1 Spectrum Analyzer
3.1.2 Constellation Analyzer
3.1.3 Satellite Setting
3.1.4 Satellite Finding
3.1.5 Angle Calculation
3.2 Terrestrial
3.3 System Setting
3.3.1 Device Setup
3.3.2 Time
3.3.3 System
3.3.4 Option
3.4 Program
3.5 Multimedia
3.6 Upgrade
Chapter 4 Technical Specifications

Safety use:
1. Consumers using the product for the first time should read this manual carefully.
2. Do not touch the LCD screen.
3. Do not place heavy items on the device.
4. Do not lay the device close to heating source, in the sunshine, in place with strong mechanical vibration or dusty
environments.
5. Please place the device in ventilated surroundings.
6. The device should be fully charged before using for the first time (recommend 6 hours for the first charging).
7. Contact the provider if malfunction of the device happens.
8. Damaging the device during operation without following the guidelines will not be warranted.
9. Do not use the other cables like headphone; only use the AV cables supplied.
Danger warning:
1. Prohibition of decomposition of batteries.
2. Prohibition of battery short circuit.
3. Do not reverse the positive and negative pole terminals.
4. No heating and burning batteries.
5. Avoid using batteries near heat sources.
6. Do not get wet.
7. Avoid charging in the vicinity of fire or direct sunlight.
8. Use the dedicated charger and charge lead.
9. Prohibit the destruction of batteries.
10. No direct soldering on battery.
11. Do not connect the battery charging in the power outlet or car cigarette lighter.
12. Do not use batteries for other devices.
13. Do not direct contact with the battery.
14. When the battery and the electric equipment are connected or charge, pay attention to the polarity of the battery.
Press [▲/▼] on PVR Configure and press “OK’’, then you can see the following menu. In this submenu, you can
get the information about the USB device you insert and set the correct format for PVR.

Press[◀/ ▶]to select PVR and press “OK’’ , press[▲/▼] to select the [HBPVR] file and press “OK’’ , then you can
see the program you have recorded.
Press [▲/▼] on Photo Configure and press “OK’’, then you can see the following menu. In this submenu, you can
set some parameters for photo play, like slide time/mode and so on.
Press [▲/▼] on Movie Configure and press “OK’’, then you can see the following menu. In this submenu, you can
set some parameters for movie play, like subtitle display function and so on.
Battery Note
:
1. Avoid use of the battery in strong sunlight. Please do not use the battery in the strong sunlight exposure, so as not to overheat,
deform, smoke, affect battery performance, reducing life.
2. Anti-static: The battery is equipped with protective circuit to avoid the occurrence of various accidents. Do not use the battery
in the generation of static electricity, the static electricity (100V above) may cause damage the protection board, and lead to
the battery becoming inoperative, overheat, deform, smoke or fire.
3. Charge temperature range: Recommended charge temperature range is 0~45. Charging in the environment beyond this range
may cause a decrease in battery performance and reduce the life span.
4. Charging mode: Please use the supplied charger as described and charge the battery in the recommended environment. After
the discharge of the battery, please charge the battery in the time recommended.
5. Note: Due to the special characteristics of the car, the battery cannot reach the saturation state when the vehicle is used to
charge the battery. It is not recommended to use the car charger adaptor on a regular basis.
6. First use: In the first use of the battery, if the battery is not clean or abnormal smell and other abnormal phenomenon, do not
continue to use the battery for its equipment, returned to the seller for assessment.
7. When is not a long time, to remove the battery from the device and put them in the low temperature and humidity
environment preservation. Battery has a life, if the use of the battery when the work of the device is less than usual, to replace
the battery.
8. Children's use: Children’s use of the battery should be subject to parental guidance, it is not recommended that children have
access to the battery.
9. Avoid contact with children: The battery should be placed in a position where a child cannot reach. Children should avoid
taking the battery from the charger or use the device to play.
10. Pay attention to leakage: If the battery leakage to the skin or clothing, please rinse immediately with water, so as to avoid skin
discomfort, etc.
11. Consultation: When buying batteries, please pay attention to the vendor contact details. In order to get in contact with the
seller when needed and get advice.
12. Period of guarantee: The warranty period is 6 months from the date of shipment. However, if the problem is not due to the
failure of the company's manufacturing process, but due to improper use, even in the warranty period, the warranty will be
voided.
13. Safe use: In order to ensure the safety, please consider whether the electric type, system and lithium ion battery protection
circuit is matched in advance. In addition, it is also to consider the high rate current, fast charge and the feasibility of specific
applications.
14. Any loss caused by the improper use of the above shall not be responsible for the company!

Chapter 1: Overview
The 18ASF-7000 is a HD digital signal meter and portable device for installation and adjustment of satellite and terrestrial
receiving antenna.
1.1 Features:
Combo of DVB-S2 and DVB-T2
High resolution 5’’TFT LCD
Multi-lingual OSD and use-friendly UI
Support Spectrum function (Satellite Only)
Real time constellation display
Support TP search and blind search
USB 2.0 for software update/media play back
Support time shift
Support TP PVR
Support program edit (move/skip/lock/delete/rename)
Support electronic program guide (EPG)
Support HDTV video/audio output
Support AV input for monitor installing
Support DC+12V out for monitor installing
Very easy to use with shortcut key
Support RCU
Build in loudspeaker for audio play
Visual and audible signal when signal received
Build in highlight LED light
Large lithium battery capacity (4000mAh)
1.2 Accessories:
Manual x 1
Power Adapter x 1
Power Line x 1
Car Adaptor x 1
Connector F to F type x 1
Connector F to IEC type x 1
Connector BNC to AV x 1
AV Cable x 2
Remote Control Unit (RCU) x 1
Device Bag x 1
Music
Photo
Movie

1.5 Multimedia
Move cursor to “Multimedia’’ and press “OK’’, then you can enter the “USB’’ interface.
Press [▲/▼] on Multimedia and press “OK’’, then you can see the following menu.
Press[◀/ ▶] to select the item you want to get into and press “OK ’’to select the file you want to play.
Chapter 2: Introduction of panel function
2.1 Remote Control

2.2 Front panel introduction
1. Long press for 3~4 seconds to switch the device power on/off
2. Power indicator
3. Battery indicator (Red light for charging, green light for fully charged)
4. 13V indicator
5. 18V indicator
6. 22 KHz indicator
7. Signal Locked indicator
8. Remote Control Input
9. F1~F4: shortcut keys
10. Numeric keys
11. GOTO: Select satellite or transponder
12. DOT: use for input data, Long press 3~4seconds for turn on LED floodlight
13. SCREEN: Turn on or turn off the screen display (Long press close backlight)
14. MUTE: turn on or turn off the voice
15. SPEC: shortcut key for spectrum analyzer
16. CONS: shortcut key for constellation analyzer
17. FIND: shortcut key for satellite finding
18. ANGLE: Shortcut key for Angle calculation
19. Navigation keys: The keys offer the movement of cursor to desired position
20. OK: confirm key
21. MENU: Show main menu
22. EXIT: exit menu (main menu or sub menu)
23. The product name and Logo
24. Digital Display : Show the current signal quality percentage
25. LCD screen
Press [▲/▼] on EPG option and press “OK’’, here you can see the all the program guide.
Press [▲/▼] on Sort option and press “OK ’’, here you can Press [◀/ ▶] to select “By Freq’’ , “By Service Name’’,
“Default’’ or “By Encrypt’’.

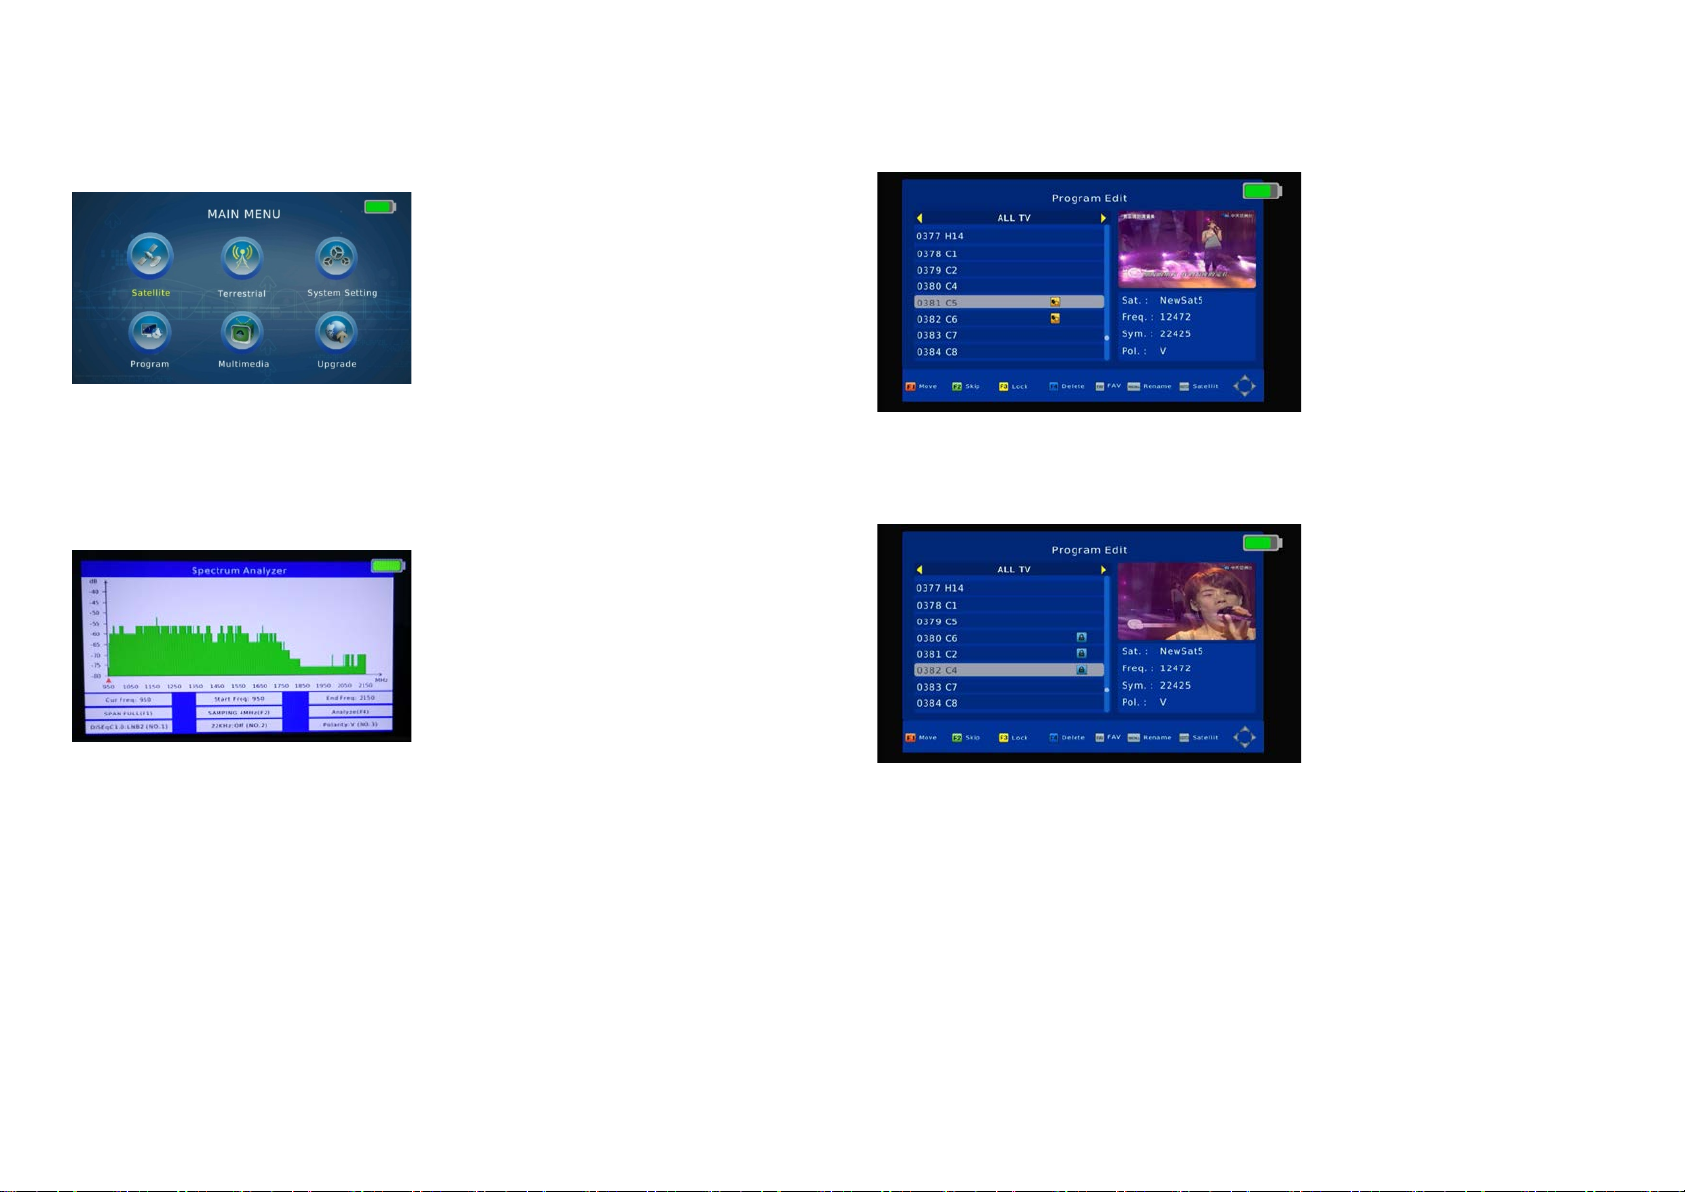
Delete
1. Press [▲/▼] on channel list, select the channels which you want to edit in channel list by press [Blue/F4] Key.
2. Press the [OK] key to sure delete the channel.
3. Press [EXIT] Key to save the settings.
Favorite
2. Press [▲/▼] on channel list, select the channels which you want to edit in channel list by press [FAV] Key.
3. Press [▲/▼] choose what you want “Favourite Type” and press the [OK] key.
4. Press [EXIT] Key to save the settings.
Skip and rename
Follow the same way you can set the channel’s Skip or give the new name.
2.3 Top panel introduction
1. F connector male for LNB IN
2. F connector male for ANT IN
3. USB connector
4. HD TV connector (HDMI)
5. AV OUT connector (3.5mm PHONE JACK)
6. AV IN connector (3.5mm PHONE JACK)
7. Reset key
8. DC jack (for charger)
2.4 Rear panel introduction
1. LED floodlight
2. Holder
3. Loudspeaker
4. Battery
5. Bumper
Chapter 3: Detailed operation guide.
When you turn on the device, you can see the main menu which consists of Satellite, Terrestrial, System Setting, Program,
Multimedia and Upgrade.
3.1 Satellite
3.1.1 Spectrum Analyzer
Move cursor to “Spectrum Analyzer’’ and press “OK’’ , then you can enter the “Parameter Setting’’ interface.
Press [F1] to switch SPAN of spectrum frequency, FULL as default, the smaller span will show clearer signal status
of frequencies.
Press [F4] to pause current status.
Press [▲/▼] to move vertical coordinates’ position.
Press [◀/▶] to move cursor to select frequency, the signal strength of the selected frequency will be displayed on the
left-top corner.
Move
1. Press [▲/▼] on channel list, select the channels which you want to edit in channel list by press [Red/F1] Key.
2. Press [▲/▼] move the cursor to the position you want and press the [OK] key.
3. Press [EXIT] Key to save the settings.
Lock (Password: 000000)
1. Press [▲/▼] on channel list, select the channel which you want to edit in channel list by press [Yellow/F3] Key.
2. Press [Yellow/F3] Key to lock or unlock the channel.
3. Press [EXIT] Key to save the settings.

3.3.4 Option
Press [▲/▼] on Option and press “OK’’, then you can see the following menu.
Press [▲/▼] to choose OSD Language, Subtitle Language or Audio Language you want.
3.4 Program
Move cursor to “Program ’’and press “OK ’’, then you can enter the “program ’’interface.
Press [▲/▼] on Program Edit option and press “OK ’’, then you can see all the TV list.
3.1.2 Constellation Analyzer
Move cursor to “Constellation Analyzer ’’ and press “OK’’, then you can enter the “Constellation Analyzer’’ interface.
Press [▲/▼] to move cursor to choose “Analyze by Frequency’’ and press “OK’’ , then you can see this interface.
Press [◀/ ▶] to select satellite and you can see the Transponder changes correspondingly.
Press [◀/ ▶] to select Transponder and you can see TP frequency, Symbol Rate and Polarity change
correspondingly.
Press “OK ’’, then you can see the quality bar and the strength bar.
Under Constellation Analyzer interface (by Frequency), press [▲/▼] to switch between other frequencies of
selected satellites.

Press “EXIT’’ and press [▲/▼]to move cursor to choose “Analyze by Program’’ and press “OK’’ , then you can
see this interface.
Under Constellation Analyzer interface (by Program), press [▲/▼] to switch between the entire searched program.
When a frequency with signal is detected (not locked yet), the signal strength bar will be displayed on LCD.
When the signal is locked, the signal quality bar will be displayed on the LCD. Meanwhile, the LOCK LED will
light up.
3.1.3 Satellite Setting
Move cursor to “Satellite Setting’’ and press “OK’’ , then you can enter the “Dish Setup’’ interface.
Under the Satellite list page, you can press [▲/▼] to select the satellite.
Press [F1] to add a new satellite through setting Satellite Name, Longitude Direction, Longitude Angle or Band.
Press “OK ’’on Restore Factory Default to Factory Reset.
Press “OK ’’on information option to get the hardware or software version.

3.3.3 System
Press [▲/▼] on System and press “OK ’’, then you can see the following menu.
Press “OK’’ to get into the Parental Guidance (the default password is 000000).
Press “OK ’’on Set Password option to reset the user password.
Press [F2] to edit existed satellite, which is including Satellite Name, Longitude Direction, Longitude Angle and
Band.
Press [F3] to delete existing satellite. If you press OK, the satellite will be deleted or you can press “EXIT’’ to
exit.
Press [F4] to Begin Scan, with Default, Blind Scan, Network these three scan modes. When the signal is locked, the
buzzer will sound with the fastest repetition.
The signal quality bar will also be displayed on the LCD.
Meanwhile, the LOCK LED will light up. (Press “MUTE’’ to mute the buzzer sound if you don't want to hear it.)

Press [GOTO] to get into the TP list, you can also use [F1] [F2] [F3] [F4] to add, edit, delete or begin to scan the
selected TP, and Press [GOTO] to return to the satellite list.
Select one of the satellites and press [◀/ ▶] to get into the LNB TYPE setting.
LNB Type: Press [▲/▼] to choose LNB Type between 9750/10600, 9750/10750, 05150, 05750, 09750, 10600,
10700, 10750, 11300 and 11475.
LNB Power: Press [◀/ ▶] to choose between Off/13V/ (13V/18V)/18V.
3.3.2 Time
Press [▲/▼] on Time option and press “OK’’, then you can see the following menu.
Press [◀/ ▶] to select Auto or Manual for Time Offset adjustments and to Choose Time Zone, Date or Time when
[Time Offset] is set to Manual.

3.3 System Setting
Move cursor to “System Setting ’’and press “OK’’, then you can enter the “System Setting’’ interface.
3.3.1 Device Setup
Press [▲/▼] on “Device Setup ’’ option and press “OK’’ , then you can see the following menu.
Press [▲/▼] on Lighting, Loudspeaker or Keypad Tone option, then press[◀/ ▶]to choose Lighting, Loudspeaker,
Keypad Tone or Led Display between “On’’ & “Off’’
DiSEqC1.1: Press [◀/ ▶] to choose between None / LNB1~LNB16.
Motor: Press [◀/ ▶] to choose between None / DiSEqC1.2 / DiSEqC1.3.

22KHz: Choose AUTO/ON/OFF.
Tone burst: Press [◀/ ▶] to choose between None / Burst A / Burst B.
DiSEqC1.0: Press [◀/ ▶] to choose between None / LNB1 / LNB2 / LNB3 / LNB4.
Press [▲/▼] on Manual Search and press “OK’’, then you can see the following menu.

3.2 Terrestrial
Move cursor to “Terrestrial ’’and press “OK’’, then you can enter the “Terrestrial ’’ interface.
Press [◀/ ▶] on Channel Check and press “OK’’, then you can see the following menu.
Press [◀/ ▶] on Channel Search and press “OK’’ , then you can see the following menu.
3.1.4 Satellite Finding
Move cursor to “Satellite Finding ’’and press “OK’’, then you can enter the “Satellite Finding’’ interface.
Press “OK’’ on the Satellite option, then you can see the following window. Press [▲/▼] to select the existing
satellite and you can press “OK’’ to confirm.
Press “OK’’ on the LNB Type option, then you can see the following window. Press [▲/▼] to select the LNB Type
and you can press “OK’’ to confirm.
Press “OK’’ on the Freq, Symbol Rate, Polarity option, then you can see the following window.

Use the digital button to input the Frequency, Symbol Rate and Polarity manually, then you can press “OK’’ to
confirm.
When a frequency with signal is detected (not locked yet), the buzzer will sound according to the signal strength,
the signal strength bar will also be displayed on LCD.
When the signal is locked, the buzzer will sound with the fastest repetition. The signal quality bar will also be
displayed on the LCD. Meanwhile, the LOCK LED will light up. (Press “MUTE’’ to close the buzzer sound if you
don't want to hear it.)
Press “OK ’’on the Search option, and the satellite finder will begin to search the channel according to the TP you
select or input manually. It will switch to the Program page after the search (if there is a program on the
Transponder).
3.1.5 Angle Calculation
Move cursor to “Angle Calculation ’’and press “OK’’, then you can enter the “Angle Calculation’’ interface.
Press [▲/▼] on Satellite option to select the existed satellite, the longitude of the satellite will be changed
correspondingly.
Press [▲/▼] on Sat Longitude option, then you can use the digital button to input the satellite longitude you want.
If you select Manual, then you can move cursor to the Local Longitude and the Local Latitude and use the digital
button to input the number you want. (Press [◀/ ▶] to select east or west local longitude, south or north
Hemisphere).
When a parameter has changed, the system will calculate the result and will show the picture on the screen.
Table of contents


