DIMAX GROUP Konner & Sohnen KS 4HP-70 User manual

KS 4HP-70
GASOLINE TILLERS
EN
Please, read this manual before
use!
Manual

PREFACE
We are grateful to you for your purchase of ТМ Könner & Söhnen series gasoline tiller. This manual con-
tains safe working recommendations, operation and adjustment description of these tillers and maintenance
instructions.
All data, specied in this operation manual is the most up to date for the moment of its publishing. At the end
of this manual, you may nd contact information which you are free to use in case of any issues occurrence.
Manufacturer reserves the right to make alterations into the tillers, which may not be reected in this
manual. Pictures and photos of the product may vary from its actual appearance.
More information and contacts can be found on the website: www.ks-power.de/en.
Model KS 4HP-70A – see picture 1 in the Appendix.
We care about the environment, therefore, we consider it expedient to save
paper and leave in print a short description of the most important sections.
Be sure to read the full version of the manual before getting started!
Safety symbols and description of inscriptions can be found in the full web version of the manual.
OVERVIEW AND COMPONENTS 1
Fig. 1 1. Operator’s panel
2. Engine
3. Fenders
4. Plant shielding wheel
5. Transport wheel
6. Gearbox
7. Cutters
8. Coulter
9. Air lter
10. Fuel tank
SAFETY TECHNIQUE 2
Illustrations are for reference only and may
vary with the cultivator model.
Before operating the cultivator, please carefully read the owner’s manual. Do not allow unauthorized
people and children to operate the device. Do not use the device in close proximity to the working area
of adults, children and animals - the user of the cultivator is solely responsible for personal injury and
property damage. The Könner & Söhnen power cultivator complies with the current European safety
standards. Never attempt to make any changes to the design of the device.
WARNING THESE REQUIREMENTS FOR WORKING WITH THE TILLER:
1. Before getting started, please carefully read the owner’s manual. Keep the owner’s manual in a safe
place for future reference; follow the recommendations contained therein in order to avoid personal
injury and property damage.
2. Familiarize yourself with the cultivator controls and functions. In case of an emergency, the operator must
know how to stop the working parts of the cultivator and its engine.
3. The operator of the device must be in good physical and mental health and be quick in decisions, if
necessary. Do not operate the cultivator under the influence of alcohol, drugs or medications that can
slow down the reaction.
4. The cultivator is designed to cultivate soil when sowing, as well as to handle and process plants. Do not
use the cultivator for purposes other than those initially intended.
www.ks-power.de/en |12

Warning! Stop the engine before refueling, transporting
and if the unit is unattended.
ATTENTION - DANGEROUS
The fuel contaminates the earth and groundwater. Do not
allow gasoline to run out of the tank!
ATTENTION - DANGEROUS
The operating conditions of the device, storage and transportation can be found in the full web version
of the manual.
WORKING WITH THE TILLER
The device should be turned on in accordance with the instructions in the owner’s manual. Make sure the
operator keeps a safe distance from the working parts of the cultivator. Never place your legs or arms on the
rotating parts or underneath them. To lift the device, two people must grab the handles and shafts of the
cultivator. Wear special safety gloves to protect your hands and safety shoes; do not operate the cultivator
in open toe shoes.
BE CAREFUL!
- The engine and exhaust pipe must be kept clean to avoid potential fire. Thoroughly check them for
foliage, grass, and oil or fuel leaks.
- Watch out for the rotating parts. Do not touch the rotating cutters
COMPOSITION 3
1. Cultivator with cutters
2. Left handle
3. Clutch handle
4. Tilling depth limiter
5. Steering column
6.Transport whee
7. Right handle (ON/OFF, speed)
COLLECTING THE TILLER 4
ASSEMBLE THE CULTIVATOR AS ILLUSTRATED IN THE APPENDIX:
1. Insert the coulter in the bracket - see fig. 2 in the Appendix.
2. Mount the transport wheel - see fig. 3 in the Appendix.
3. Pull the spring - see fig. 4 in the Appendix.
4. Mount the steering column - see fig. 5 in the Appendix.
5. Install the right and left handles on the control panel - see fig. 6 in the Appendix.
Be sure to read the full version of the manual
before getting started!
www.ks-power.de/en |13

OPERATION INSTRUCTION 6
The tiller is supplied without oil and fuel.
Before first start-up, be sure to fill in the oil and refuel
the device! Use a funnel to refuel.
IMPORTANT!
SPECIFICATIONS 5
Recommended oil – SAE 10W30, SAE 10W40
PLEASE NOTE!
Tiller KS 4HP-70
Engine power, HP/kW 4,0/2,6
Engine model KS 160
Engine capacity, сm3139
Tilling width, cm ≤ 70
Tilling depth, cm ≤ 27
Fuel tank volume, l 1,5
Crank case volume, l 0,6
Transmission case volume, l 0,1
Blades, psc. 24
Engine start manual
Drive type Belt drive, worm drive
Forward speed +1 0
Noise level Lpa (7m)/Lwa, dB 68/93
Net weight, kg 36
Gross weight, kg 39
Net dimensions (L*W*H), mm 1350*600*800
Gross dimensions (L*W*H), mm 680*380*650
COMMISSIONING
During the commissioning:
1. Fill the crankcase with oil
2. Fill the fuel tank with gasoline
Fill the crankcase with engine oil Fill the fuel tank with gasoline
www.ks-power.de/en |14

FUEL AND ENGINE OIL
Only unleaded gasoline is recommended for the generator. Only use fresh,
premium-grade gasoline. Use a funnel (not included) to refuel the device.
Just like without fuel, the cultivator cannot work without oil, so be sure to fill the oil tank before the first
start. To do this, place the device on a flat horizontal surface, open the oil tank cap and add the oil to the
minimum mark. Use the oil dipstick to check the oil level. The oil filling level must be monitored at all times.
Do not exceed or fall short of the oil level. Information on the used engine oil can be found in technical
data of the cultivator.
USEFUL TIPS
1. To determine the plowing depth, use the coulter at different heights. With the coulter driven deeper into
the soil, the cutters also go deep into the soil and the advancement of the device forward slows down
considerably.
2. The cultivator speed is determined by adjusting the engine speed. The cutters go deep into the soil with
the device in the fixed position.
3. To speed up the cultivator advancement, adjust the coulter higher to lift the cutters.
4. Dry and hard ground may possibly contain big lumps and thus require two passes. Do not process raw
soil, because it is difficult to break loose.
5. Immediately release the clutch lever when the cultivator is blocked by foreign objects. Kill the engine,
remove obstacles and check the cultivator for deformation and damage. Replace damaged parts as
necessary.
Always transport the device with the front wheel lowered. After completion of work or in between the
plowing sessions, release the clutch lever and stop the engine.
COUPLING OF WORKING PARTS
The engine clutch transmits torque from the engine to the transmission. When the clutch lever is pressed,
the belts start to rotate merely to transmit the movement to the chain transmission.
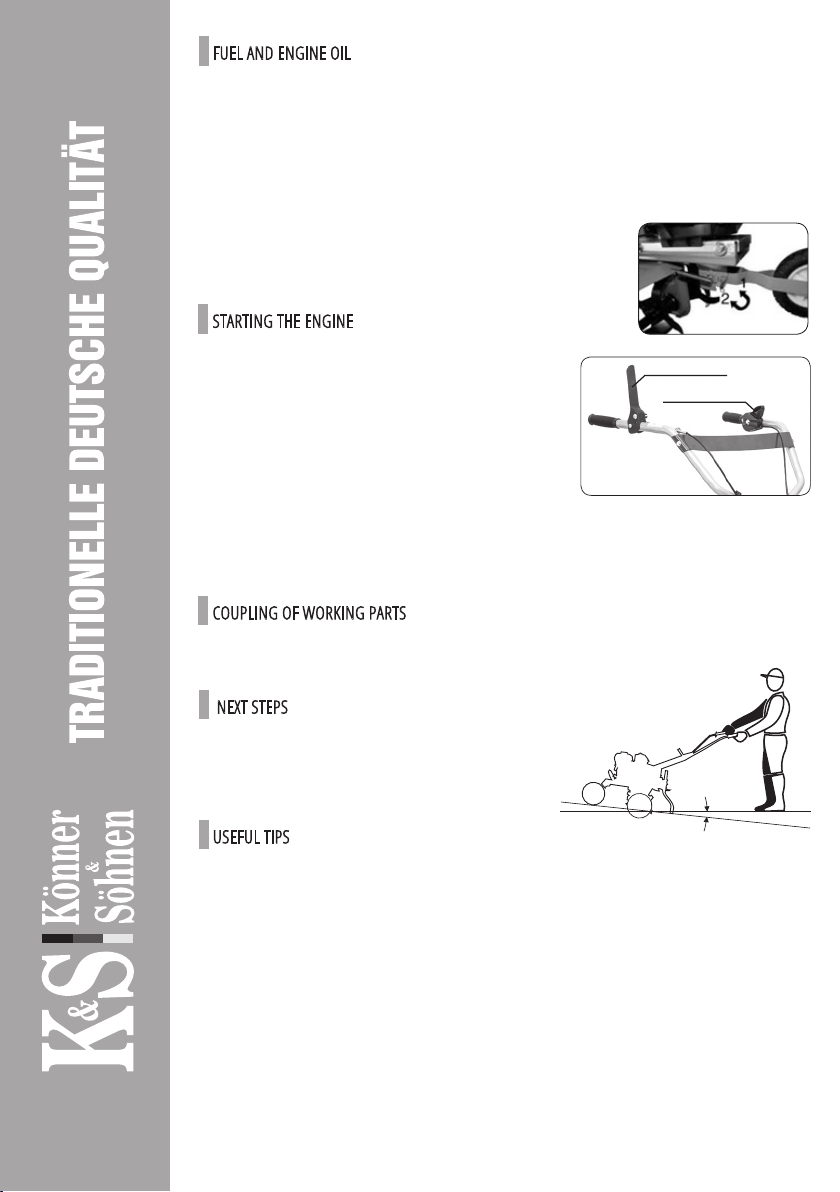
STARTING THE ENGINE
1. Turn the engine speed control to “MAX”.
2. Grasp the starter handle and slowly pull it until resistance
is felt.
3. Pull the manual start cord to the full length with a sharp
movement.
4. The engine will start at maximum speed.
5. Use the engine speed control to decrease the speed.
6. Press and hold down the clutch lever.
7. By pressing and holding the lever, the cultivator will begin to
deepen into the ground while moving forward.
Transport the cultivator to the land plot that needs to be plowed.
Start the engine.
Before cultivating the soil, raise the transport wheel.
Clutch lever
Engine speed adjustment
NEXT STEPS
Gradually increase the plowing depth when cultivating
hard soil, for which purpose apply pressure on the
steering wheel to increase the coulter depth.
6 ~ 80
www.ks-power.de/en |15

In order to prevent unintentional inclusion of the engine, disconnect the spark plug of the engine when
storaging device, transportation and all the works on cleaning and maintenance (such work is permitted
only with cooled engine).
The use, storage and maintenance of Könner & Söhnen tillers must be made according to this manual.
For all the damage and malfunctions, which were caused by mishandling of service, safety and working with
the machine manufacturer is not responsible.
STOPPING THE ENGINE
To stop the engine, reduce the engine speed by setting the engine speed lever to the “MIN” position.
THE MANUFACTURER IS NOT LIABLE FOR:
- Using of lubricants, gasoline and motor oil, which are prohibited by supplier.
- Using the device for other purposes.
- Losses due to further use of faulty tiller parts.
- Technical changes of the device.
MAINTENANCE WORK
All works shown in “maintenance ” section should be done regularly. If you can not perform work, tiller
user should contact the service center to complete an application for technical works execution. In case of
losses due to injury, acquired as a result of outstanding maintenance, the manufacturer is not responsible.
MAINTENANCE 7
MANUFACTURER IS NOT RESPONSIBLE FOR DAMAGES:
- Damage and losses resulting from the use of non-original spare parts.
- Corrosive damage and other consequences of invalid storage.
- Damage caused by the maintenance works that were carried out by unauthorized personnel.
TILLER CLEANING
Thorough cleaning and care of the device extends its life and protects it from damage. After each use, clean
the tiller blades of the land, dust and grass straw. Keep under control the state of the product – damaged
parts, landing threaded elements.
It is forbidden to send jets of water on the seals, engine components and bearing seats. Otherwise the tiller
may need an expensive repair.
Oil pollutes soil and groundwater. Do not allow oil to
leak out of the crankcase. Drain used oil into a sealed
container. Return used oil to your local used oil collec-
tion point.
ATTENTION - DANGEROUS
The cultivator is delivered without oil and
fuel. Before the first start, be sure to fill the
device with oil and gasoline! Use a funnel
(not included) to fuel the device.
IMPORTANT!
REPLACING OR ADDING ENGINE OIL
Follow the maintenance schedule and check the engine oil level on a regular basis. When the oil level drops,
add fresh oil to ensure proper operation of the engine. To replace oil, proceed as follows:
www.ks-power.de/en |16

1. Ensure that the cultivator is placed on a flat,
level surface.
2. Place an oil drain tray under the cultivator
engine.
3. Unscrew the drain cap located under the
dipstick cap using a 10 mm wrench.
5. Wait for the oil to drain.
6. Replace and tighten the drain cap.
Dipstick cap
Drain cap
1. Make sure the device is mounted on a flat, level surface.
2. Unscrew the dipstick cap on the engine.
3. Fill the crankcase with highly refined oil using a funnel.
4. The oil level should be as shown in Fig.
TO ADD OIL, PROCEED AS FOLLOWS:
Oil level
Oil drain plug
Spark plug Electrode
0,6-0,8 mm
SPARK PLUG MAINTENANCE
Spark plug is an important part which provides correct and long work of the engine. It is important to keep
an eye on the plug – it should not have cracks, must be installed in a right way and have no soot.
DPARK PLUG CHECKING
Recommended for use are spark plugs F6RTC, for example NGK BPR6ES.
Follow this steps to check the spark plug (see the pictures below):
1. Take off the cap from the spark plug.
2. Loosen the plug with the help of candle brace.
3. Carefully check if the plug is damged. Remove if it has any damage.
4. Measure the gap – it should be within 0,6-0,8 mm.
5. Carefully clean the spark plug with the metal brush and remove the dust before reuse of the unit.
Please don’t forget to measure the gap.
6. Plug in the spark plug to its place.
INTERNAL COMBUSTION ENGINE
To ensure the greatest service life of the engine, monitor the oil level and check oil and air filters for soiling
on a regular basis. The cooling fins must be kept clean at all times to ensure sufficient cooling of the engine.
www.ks-power.de/en |17

A collision with parts of the system of release or a touch
of a hot engine can provoke a strong burn or ash.
Allow the engine to cool completely before moving,
transporting or storing the tiller.
ATTENTION - DANGEROUS
The device is made of suitable to the secondary use
materials.
IMPORTANT!
Potential faults and troubleshooting methods can be found in the full web version of the manual.
Conditions of transportation, storage and disposal can be found in the full web version of the manual.
CONDITIONS OF TRANSPORTATION,
STORAGE AND DISPOSAL 8
Follow the maintenance instructions listed in the instruction manual yourself. Works that are not foreseen
for self-fulfillment must be performed at an authorized Könner & Söhnen Service Center.
The addresses of the service centers can be found on our official website www.ks-power.de/en.
AIR FILTER
To ensure proper airflow in the carburetor regular
maintenance of the air filter should be conducted. From time
to time it is important to check for contamination:
1. Loosen the clamp on the top cover of the air filter.
2. Remove the casing from the sponge filter element.
3. Remove dirt inside the filter casing.
4. Rinse sponge filter element in warm water, then dry it.
5. Dip a dry filter with clean engine oil and squeeze it to remove excess oil.
6. The filter сleaning should be carried out every 50 working hours of a tiller. If the engine often runs in
dusty or other harsh conditions, clean the air filter every 10 operating hours.
CULTIVATOR ENGINE MAINTENANCE INTERVALS
Unit Action
Each time
you start
First month or
every
20 operating
hours
Every month or
every 20 operat-
ing hours
Every 3 month
(or every
50 hours)
Every 6 month
(or every
100 hours)
Every year
(or every
200 hours)
Oil
Level check
Replacement
Air filter
Cleaning
Replacement
Spark plug
Cleaning
Replacement
Fuel tank
Fuellevelcheck
Cleaning
Air filter
www.ks-power.de/en |18

TERMS AND CONDITIONS:
The international manufacturer warranty is 1 year. The warranty period starts from the date of purchase.
In cases when warranty period is longer than 1 year according to local legislation please contact your local
dealer. The Seller which sells the product is responsible for granting the warranty. Please contact the Seller
for warranty. Within the warranty period, if the product fails because of defects in the production process,
it will be exchanged on the same product or repaired.
The warranty card should be kept throughout the warranty period. In case of warranty card loss, a second
one will not be provided. The customer must provide the warranty card and buyer`s check during request
for repair or exchange. Otherwise, the warranty service will not be provided. The warranty card, attached to
the product during sale, should be correctly and fully completed by the retailer and customer, signed and
stamped. In other cases, warranty is not considered as valid.
Provide clean product to the service center. Parts, that must be replaced, are the property of the service
center.
WARRANTY EXCLUSIONS:
• If the user has failed to comply with the instructions in this manual.
• If the product features damaged or missing identification stickers or labels, serial numbers, etc.
• If product malfunction was due to improper transportation, storage and maintenance.
• In case of mechanical damages (cracks, chips, impact and fall marks, deformation of housing, power
cord, plug or any other components), including those resulting from the freezing of water (ice formation),
provided there are foreign objects inside the unit.
• If the product has been improperly installed and connected to the mains supply or misused.
• If the claimed malfunction cannot be diagnosed or demonstrated.
• If proper operation of the product can be restored following cleaning from dust and dirt, appropriate
adjustment, maintenance, oil change, etc.
• If the product is used for business related purposes.
• If faults are detected, which have been caused by product overload. Signs of overload are molten or
discolored parts as a result of high temperatures, damaged cylinder or piston surfaces, degraded piston
rings or connecting rod bushes.
• The warranty does not cover the failure of the product automatic voltage regulator due to careless
handling or mishandling.
• If faults are detected, which have been caused by instability of the user’s power grid.
• If there are faults caused by contamination or fouling such as contamination of the fuel, oil or cooling
system.
• If electrical cables or plugs show signs of mechanical or thermal damage.
• In the event of foreign liquids and objects, metal chips, etc. inside the product.
• If the malfunction is caused by the use of non-original spare parts and materials, oils, etc.
• If there are two or more faulty units that are not interconnected.
• If the damage was caused by natural factors such as dirt, dust, humidity, high or low temperature, natural
disasters.
• To quick-wear parts and components (spark plugs, nozzles, pulleys, filter and safety elements, batteries,
removable devices, belts, rubber seals, clutch springs, axles, manual starters, oils, gear).
• To preventive maintenance (cleaning, greasing, washing), installation and adjustment.
• If the product was tampered with, independently repaired or modified.
• In case of malfunctions resulting from normal wear and tear as a result of longterm use (end of life).
• If product operation was not stopped and continued after detecting a malfunction.
• Batteries supplied with equipment are covered by a warranty of three months.
WARRANTY SERVICE TERMS 9
www.ks-power.de/en |19

www.ks-power.de | 58
1.
ANNEX
1
7
4
6
2
9
10
5
3
8
Мodell KS 4HP-70

2. 3.
4. 5.
6.
ANNEX
www.ks-power.de |59


CONTACTS
Deutschland:
DIMAX International GmbH
Deutschland, Hauptstr. 134,
51143 Köln,
www.ks-power.de
Polska:
DIMAX International
Poland Sp.z o.o.
Polen, Warczawska, 306B
05-082 Stare Babice,
www.ks-power.pl
Україна:
ТОВ «Техно Трейд КС»,
вул. Електротехнічна 47,
02222, м. Київ, Україна
www.ks-power.com.ua
This manual suits for next models
1
Table of contents
Popular Lawn And Garden Equipment manuals by other brands

Vitavia
Vitavia Basic 401 Assembly instructions

Lentek
Lentek Eco Trap Directions for use

Pioneer Athletics
Pioneer Athletics P-REX MINI Operator's manual

Toro
Toro Reelmaster 5010- H Operator's manual

P.Lindberg
P.Lindberg Halley 2214 S Original manual

4F Maschinentechnik
4F Maschinentechnik Limpar SP-94 operating manual