Dingheng DHM-15 User manual

DHM-15 HEIGHT AND WEIGHT MACHINE
1
The Standard Basic Unit of DHM-15 Height and Weight Machine:
Mainframe-
-Saddle-
Picture 2
Picture 1
Height measuring component --
Picture 3 picture 4
DHM-15 HEIGHT AND WEIGHT MACHINE
2
Installment instruction:
First: Open the packaging bag and check all the components.
Second: Connect mainframe and saddle with M8 screw (picture1), insert the sensor to the
bottom of the saddle. (picture2)
Third: Insert height-measuring component to the two holes on the top of the mainframe,
then fix them with four M4 screws. Then connect the wire of the height-measuring
component with the mainframe. (picture4)
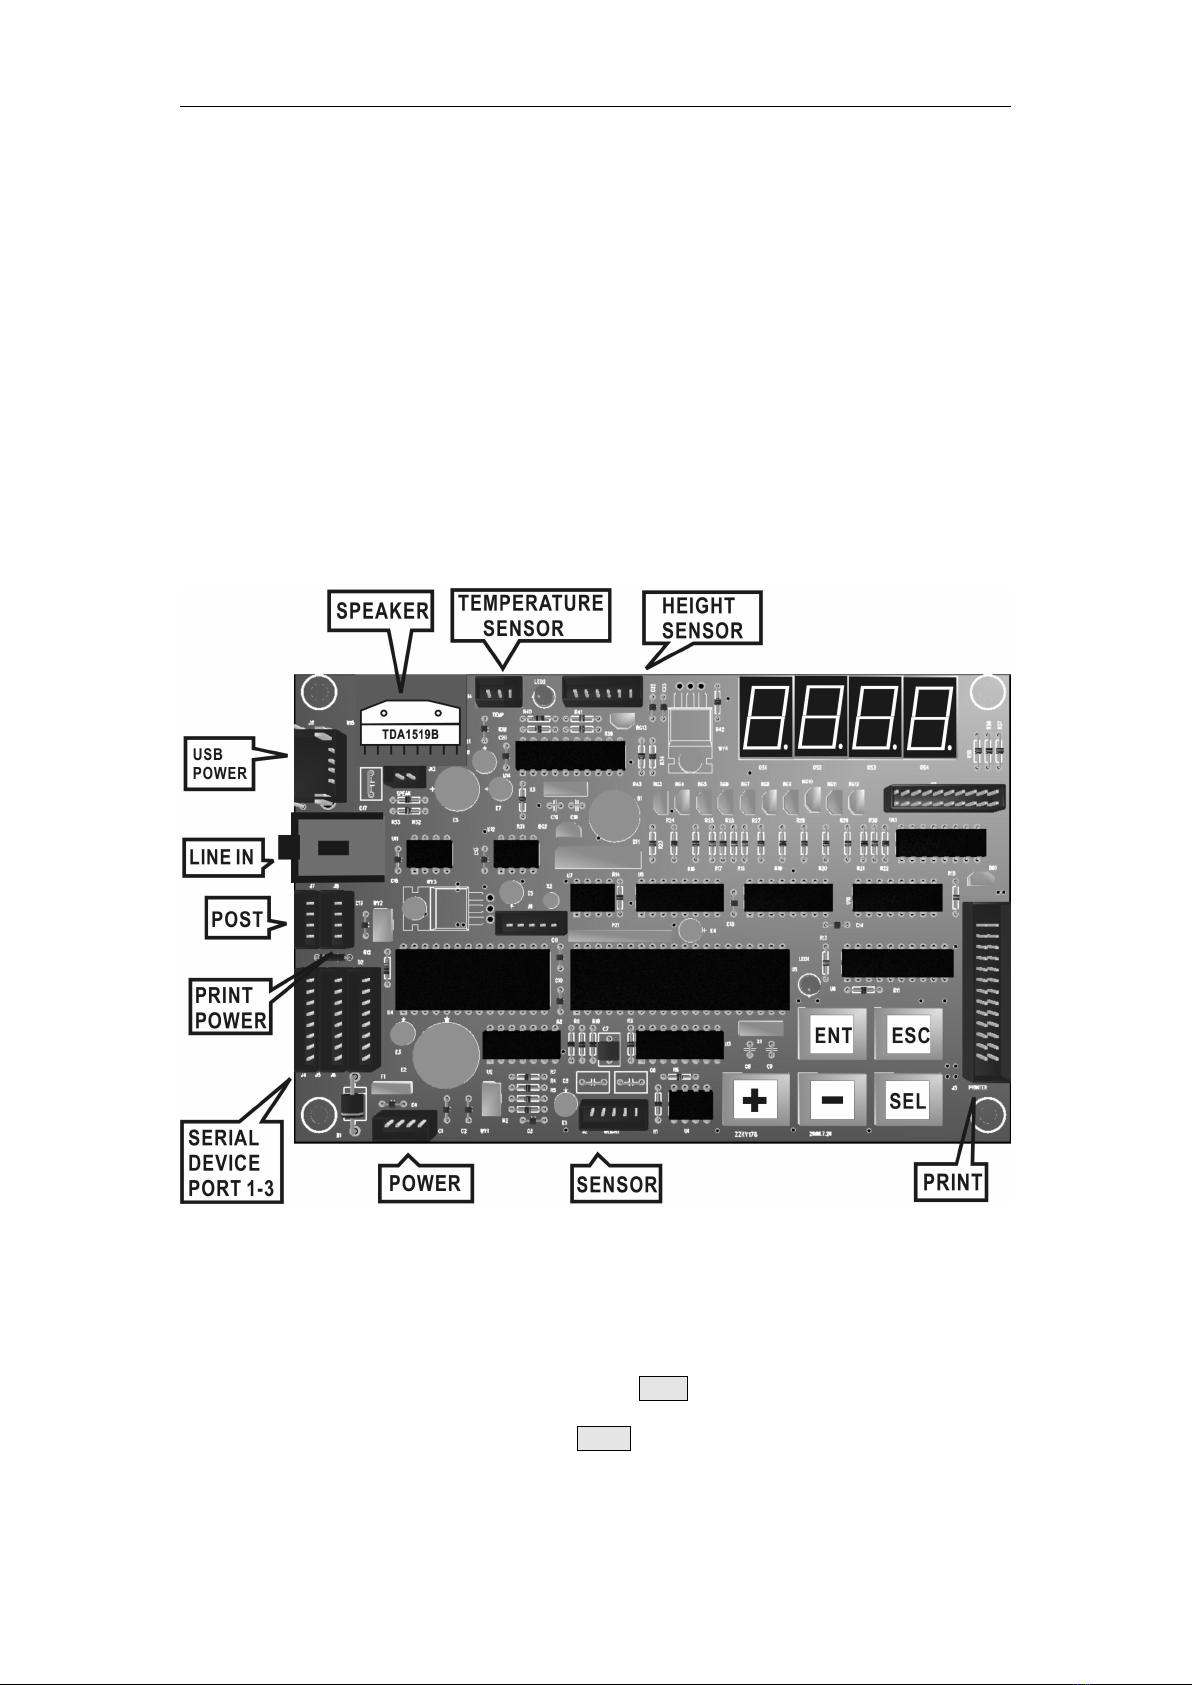
Diagram of the main board:
Diagram of the main board:.
Operation
Startup: Connect the power wire and switch on; the screen will display the information of
beginning. The height screen will display 25 which means the temperature is
25℃.The weight screen will display 17:30which refers to the time.
Attention: Make sure that the voltage of the power source is 12V and nothing on the

DHM-15 HEIGHT AND WEIGHT MACHINE
3
saddle.
Measurement: the scale enters into the measurement state when puts in
fixed number of coins. The scale begins to measure the height and
weight after person standing on the saddle. After the measurement of height and
weight, some sound will hint you. The results can be spoken out and printed.
(Please refer to the measuring diagram as follows)
First Second Third
Please pay attention when measuring:
First: Put the coin. After entering into the measuring state, if there is no measuring in 20
seconds (nothing on saddle), the scale will exit measuring state automatically.
Second: Measure height and weight. Standing stable and do not move or speak to get an
accurate result.
Third: Take the print ticket.
Pronunciation: It can speak out the measurement results automatically (also can be set
without pronunciation), under the state of waiting they can speak out welcome
continuously. Please read the functional setting (function code 6) to get the method
of setting volume and time interval of pronunciation “welcome”.
Print: It can print the measurement results and the total calculating figures.
Color lights control: Press ESC to turn on or turn off the color lights when the machine is
not in the working condition (not measure or adjust).
Function setting and adjustment:
DHM-15 HEIGHT AND WEIGHT MACHINE
4
All functions are set and adjusted by keys on the main board( + - SEL
ENT ESC ).Please look at the diagram of the main board.
Menu Introduction: There are 12 items in the menu and you can enter into the main menu
codes selection by pressing + or - under the state of waiting. (Range:
1-12)
Date adjustment:
Choose menu code 01 ,press ENT to into the state of adjustment. Display
0603 in height screen and the setting display screen means the present date is
Mar, 2006. Flickering means they are under the state of adjustment.
Press + or - , the date will be adjusted to present date.
Press SEL, change the needed number of year, month, day and week
continuously.
Press ENT, store and exit. Press ESC exit without store.
Time adjustment:
Choose menu code 02 ,press ENT into the state of adjustment.
Display 17:05 in setting display screen means the present time. Flickering
means they are under the state of adjustment.
Press + or - , the time will be adjusted to present time.
Press SEL, change the needed number of minutes and hours continuously.
Press ENT, store and exit. Press ESC exit without store.
Weight adjustment:
Choose menu code 03 ,press ENT into the state of adjustment.
Display 500 in the weight screen means the present corrected value is 500
(range: 1-999).Display 0.00 in setting display screen means the present
weight. Put something with confirmed weight on the saddle. After a stable
weight display, press + or – to adjust the display data.
You can press SEL when it is required to measure again.

DHM-15 HEIGHT AND WEIGHT MACHINE
5
Press ENT store and exit. Press ESC exit without store.
The division is 0.01kg.After the adjustment, please see the corrected value, if
it reaches the maximum figure, there may be something wrong with the
scale.
Height adjustment:
Choose menu code 04 ,press ENT into adjustment state.
Display 00.0 in the height screen means the present height. Display 120 in
the weight screen means the present corrected value is 120(scale: 0-250).
Put something with confirmed height on the saddle. After a stable height
display, press + or – to adjust the display data.
You can press SEL when it is required to measure again.
Press ENT store and exit. Press ESC exit without store.
The division is 0.1cm.After the adjustment, please see the corrected value, if
it reaches the maximum figure, there may be something wrong with the
scale.
Pronunciation interval setting:
Choose menu code 05 ,press ENT into adjustment state.
Display 4 in weight screen means the present parameter is 4 with a scope of
1-200. The display value 4 means the interval of pronouncing “welcome” is 20
seconds. The present value multiply 5 refer to the interval seconds of
pronunciation “welcome”.
Press + or - adjust the present value into that of needed.
Press ENT ,store the results and exit. Press ESC exit without being stored.
Pronunciation setting:
Choose menu code 06 ,press ENT into adjustment state.
Display 3 in the weight screen is the present parameter(scope 0-3).Displaying 3
means scales pronounces “ welcome” while in the waiting state and speak out
DHM-15 HEIGHT AND WEIGHT MACHINE
6
the results after measurement. 0 means scale will not pronounce.1 means the
scale only speaks out the results after measurement. 2 means the scale
pronounces “welcome” while in the waiting state but does not speak out the
results.
Press + or - , to adjust the present value that of needed.
Press ENT, store and exit. Press ESC exit without store.
High value setting of body mass index:
Choose menu code 07 ,press ENT into adjustment state.
Display 25.0 in the height screen means high value of body mass index
(range: 22.0-28.0).Meanwhile, the weight screen will display 19.0 which
means low value of body mass index (range: 16.00-22.00).Flickering means
under the state of adjustment. For instance, the normal height scope is 1.7
meter: high value of body mass index multiplies height value’s square-low
value of body mass index multiply height value’s square.
Press + or - adjust the display value into that of needed.
Press ENT ,store results and exit. Press ESC exit without being stored.
Press SEL; enter into setting of body mass index.
Low value setting of body mass index:
Choose menu code 08 ,press ENT ,into adjustment state.
Display 25.0 in the height screen is the high value of body mass index (scope:
22.0-28.0). Display 19.0 in the weight screen is the low value of body mass
index (scope: 16.0-22.0). Flickering means under a state of adjustment.
Press + or - adjust the present value into that of needed.
Press ENT ,store results and exit. Press ESC exit without being stored.
Press SEL, enter into high value setting of body mass index.
Print setting:
Choose menu code 09 ,press ENT into adjustment state.

DHM-15 HEIGHT AND WEIGHT MACHINE
7
Display 2 in the weight screen is the present print parameter(scope:0-3).The
present parameter 2 means print.0 means no need to be printed out, 1 means
no print of the normal weight scope,3 means print out the former result.
Press + or - adjust the present value into that of needed.
Press ENT ,store results and exit. Press ESC exit without being stored.
Coin setting:
Choose menu code 10 ,press ENT into adjustment state.
Display 1 in the weight screen is the present coin machine parameter
(scope: 0-9).0 means no need to put coin, 0 means set up the needed coin
quantity.
Press + or - will adjust the present value into that of needed.
Press ENT ,store results and exit. Press ESC exit without being stored.
Examine quantities of people being measured:
Choose menu code 11 ,press ENT into examination state. Display 168 in
the height screen means the total times of measurement is 168. With 18 in
the weight screen is the part measurement numbers (the measuring
amount between the former measure and the later examination.) range of
total measuring quantity: 0-9999, return to 0 once beyond this scope.
Press SEL can print out total quantity of measurement (clear part
measurement result) and date.
Press ENT ,store results and exit. Press ESC exit without being stored.
Renew set of machine:
Choose menu code 12 ,show 8888 on the screen.
Press ENT to renew the set of machine.
Presses ESC to exit.
Volume adjustment:
Choose menu code 13 ,pressENT into adjustment state.
DHM-15 HEIGHT AND WEIGHT MACHINE
8
Press + or - will adjust the present value into that of needed. Press +
continuously will increase the volume: Press - continuously will decrease the
volume.
Press SEL can adjust the pronunciation or set the outside volume.
Press ENT ,store results and exit. Press ESC exit without being stored.
How to add the printing information:
Connect the machine with communication cable in the computer.
Choose the menu code 14 , press ENT to enter the condition of printing.
Use the accessory to compose the printing content.
It will exit automatically after receiving the data.
Technical data:
Range of weight: 8-200kg
Minimum division: 0.1kg
Range of height: 100-200cm
Minimum division: 0.5 cm
Working voltage: 110V/60W
Net weight: 45kg
DHM-15 HEIGHT AND WEIGHT MACHINE
9
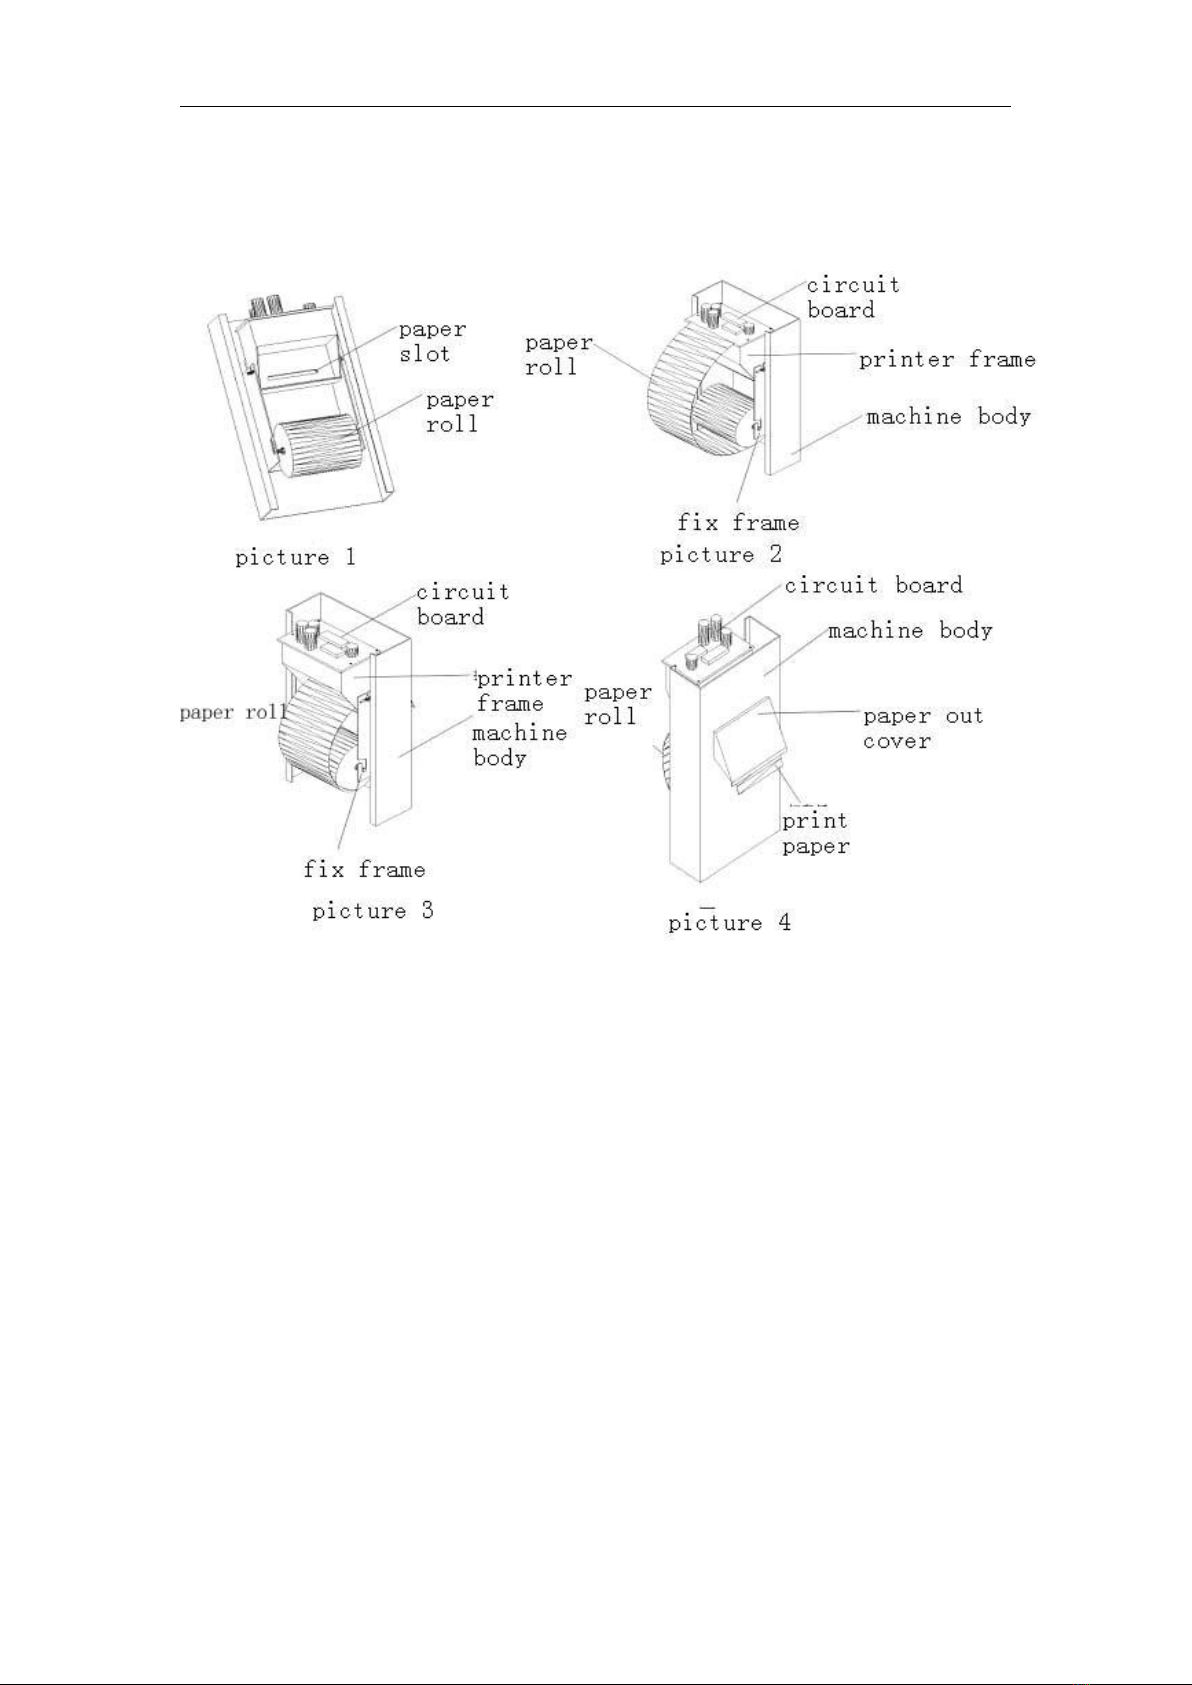
Changing print paper instruction:
First: Make the axis threads the printing paper and fix them on the frame (picture 1)
Second: Open the paper roll, tear the opening place and make sure the tearing place is
flat and straight (picture 2)
Third: Put the paper in the paper slot; make sure the paper is stable during the process
of putting paper. The paper can come into the printer automatically (picture 3)
Forth: After putting the paper, then try to print to see if the paper can come from the out
cover smoothly. If the paper can’t come out, then examine the printer to see if the
paper was blocked in the printer.(picture 4)

DHM-15 HEIGHT AND WEIGHT MACHINE
10
The Settings of Coin Acceptor
1. Setting
a) Turn on the machine
b) Move the switch of “MGM, NOM, MAX” at the rear part of the coin acceptor to the
position of “NOM”, and then move the switch of “set, start” to the position of “set”.
c) Choose coins of different versions and degrees of wear, and then use these
coins (both the front sides and the reverse sides) to try the coin acceptor, the
coins will come out from the outlet at the bottom of the acceptor. If the acceptor
produces a sound like “di”, it indicates the successful setting. This coin acceptor
can remember as many as 45 kinds of coins.
d) At the end please move the switch of “start, set” to the position of “start”.
2. Clearance
a) Move the switch of “MGM, NOM, MAX” at the rear part of the coin acceptor to the
position of “NOM”, and then move the switch of “start, set” to the position of “set”.
b) Press the key of “clearance” (besides the label 145) on the side of the acceptor
for 5 seconds, until you hear the sound like “di”, which indicates the original
memory has been cleared. You’d better firstly clear the memory before resetting
so that the acceptor can remember coins as many as possible.
3. Usage
Move the switch of “MGM, NOM, MAX” at the rear part of the coin acceptor to the
position of “NOM”, and then move the switch of “start, set” to the position of “set”.
Test the acceptor with coins which are settled in the acceptor’s memory. If the coin
is false, the acceptor will spit it out automatically.
Attention: before leaving the factory, the coin acceptor has already been set by the
manufacturer, so please do not adjust it at ease. If the coin acceptor makes a
warning sound, firstly please cut off the power supply and then make checks as
below: whether the switch of “start, set” is moved to the position of “start”; whether
the wire of power supply is loosening, or the coin is stuck in the acceptor.
Table of contents


