Dingo Tools 65CC User manual

1
2
DINGO TOOLS TREMOR
CONTENTS OF BOOKLET
Warnings Check List Page 3
What Is In Your Box/Assembly Page 4
Mixing Fuel Page 5
Operation Page 6
Starting Sequence Page 7
Warm Engine Start/Maintenance and Storage Page 8
Air Filter Page 9
NOTE:
Extension Length May Vary Depending On Advertised Offer.

3
PLEASE READ SAFETY INSTRUCTIONS
» Carefully follow assembly instructions
» Maintain the auger according to directions and
schedule included in this Earthquake’s manual.
» Ensure that anyone who uses the Auger is familiar
with all controls and safety precautions.
BURNS AND FIRES
The muffler, muffler guard and other parts of the engine
become extremely hot during the operation of the engine.
These parts remain extremely hot after the engine
has stopped.
PREVENTION OF BURNS AND FIRES
Never remove the muffler guard from the engine.
Never touch the muffler guard because it is extremely hot
and will cause severe burns.
Never touch parts of the engine that become hot after
operation.
Always keep materials and debris away from the muffler
guard and other hot parts of the engine to avoid fires.
15m (50ft)
WARNING! PLEASE READ BELOW VERY IMPORTANT
*DO NOT CARRY THE AUGER POWERHEAD BETWEEN HOLES WITH
THE ENGINE RUNNING.
*THE AUGER SHOULD NOT ROTATE WHEN THE ENGINE IS IDLING.
IF IT DOES ROTATE WHEN ENGINE IS IDLING, CONTACT DEALER FOR
INSTRUCTIONS.
*ALWAYS KEEP HANDS, FEET, HAIR AND LOOSE CLOTHING AWAY
FROM ANY MOVING PARTS ON ENGINE AND AUGER.
*DO NOT ALLOW CHILDREN TO OPERATE THIS POWER AUGER. DO
NOT ALLOW ADULTS TO OPERATE THE AUGER WITHOUT PROPER
INSTRUCTION.
*DO NOT OPERATE ANY POWER EQUIPMENT UNDER THE INFLUENCE
OF ALCOHOL OR DRUGS.
*KEEP ALL SCREWS, NUTS AND BOLTS TIGHT.
*ENGINE SHOULD BE TURNED OFF AND COOL, SPARK PLUG WIRE
MUST BE REMOVED FROM SPARK PLUG BEFORE ANY REPAIRS ARE
ATTEMPTED.
*TEMPERATURE OF MUFFLER AND NEARBY AREAS MAY EXCEED 150
DEGREES. AVOID THESE AREAS.
*NEVER RUN ENGINE INDOORS OR IN AN ENCLOSED AREA. ENGINE
EXHAUST CONTAINS CARBON MONOXIDE, AN ODORLESS AND
DEADLY GAS.
*IF THE EARTH AUGER WILL NOT TURN IN A HOLE, TURN ENGINE
OFF AND ALLOW TO COOL BEFORE ATTEMPTING TO REMOVE IT
MANUALLY.
NEVER RUN ENGINE INDOORS
NEVER TRY TO VENTILATE ENGINE ENGINE EXHAUST INDOORS.
CARBON MONOXIDE CAN REACH DANGEROUS LEVELS VERY QUICKLY.
NEVER USE FUEL WHERE A SPARK OR FLAME MAY BE PRESENT.
NEVER USE FUEL WHERE A POTENTIAL SOURCE OF IGNITION COULD
OCCUR E.G HOT WATER OR SPACE HEATERS, CLOTHES DRYERS,
ELECTRIC MOTORS ETC.
KEEP FLAMES AND SPARKS AWAY FROM ENGINE AND FUEL TO
PREVENT FIRE. FUEL FIRES SPREAD VERY QUICKLY AND ARE HIGHLY
EXPLOSIVE.
NEVER REMOVE FUEL CAP OR ADD FUEL WITH THE ENGINE RUNNING.
STOP ENGINE AND ALLOW TO COOL BEFORE FILLING.
NEVER DRAIN FUEL FROM ENGINE IN AN ENCLOSED AREA.
ALWAYS WIPE UP EXCESS ΈSPILLEDΉFUEL FROM ENGINE BEFORE
STARTING. CLEAN UP SPILLED FUEL IMMEDIATELY.
ALLOW SPILLED FUEL TO DRY, AFTER WIPING
AND BEFORE STARTING.KE WHILE REFUELING ENGINE FUEL TANK.

4
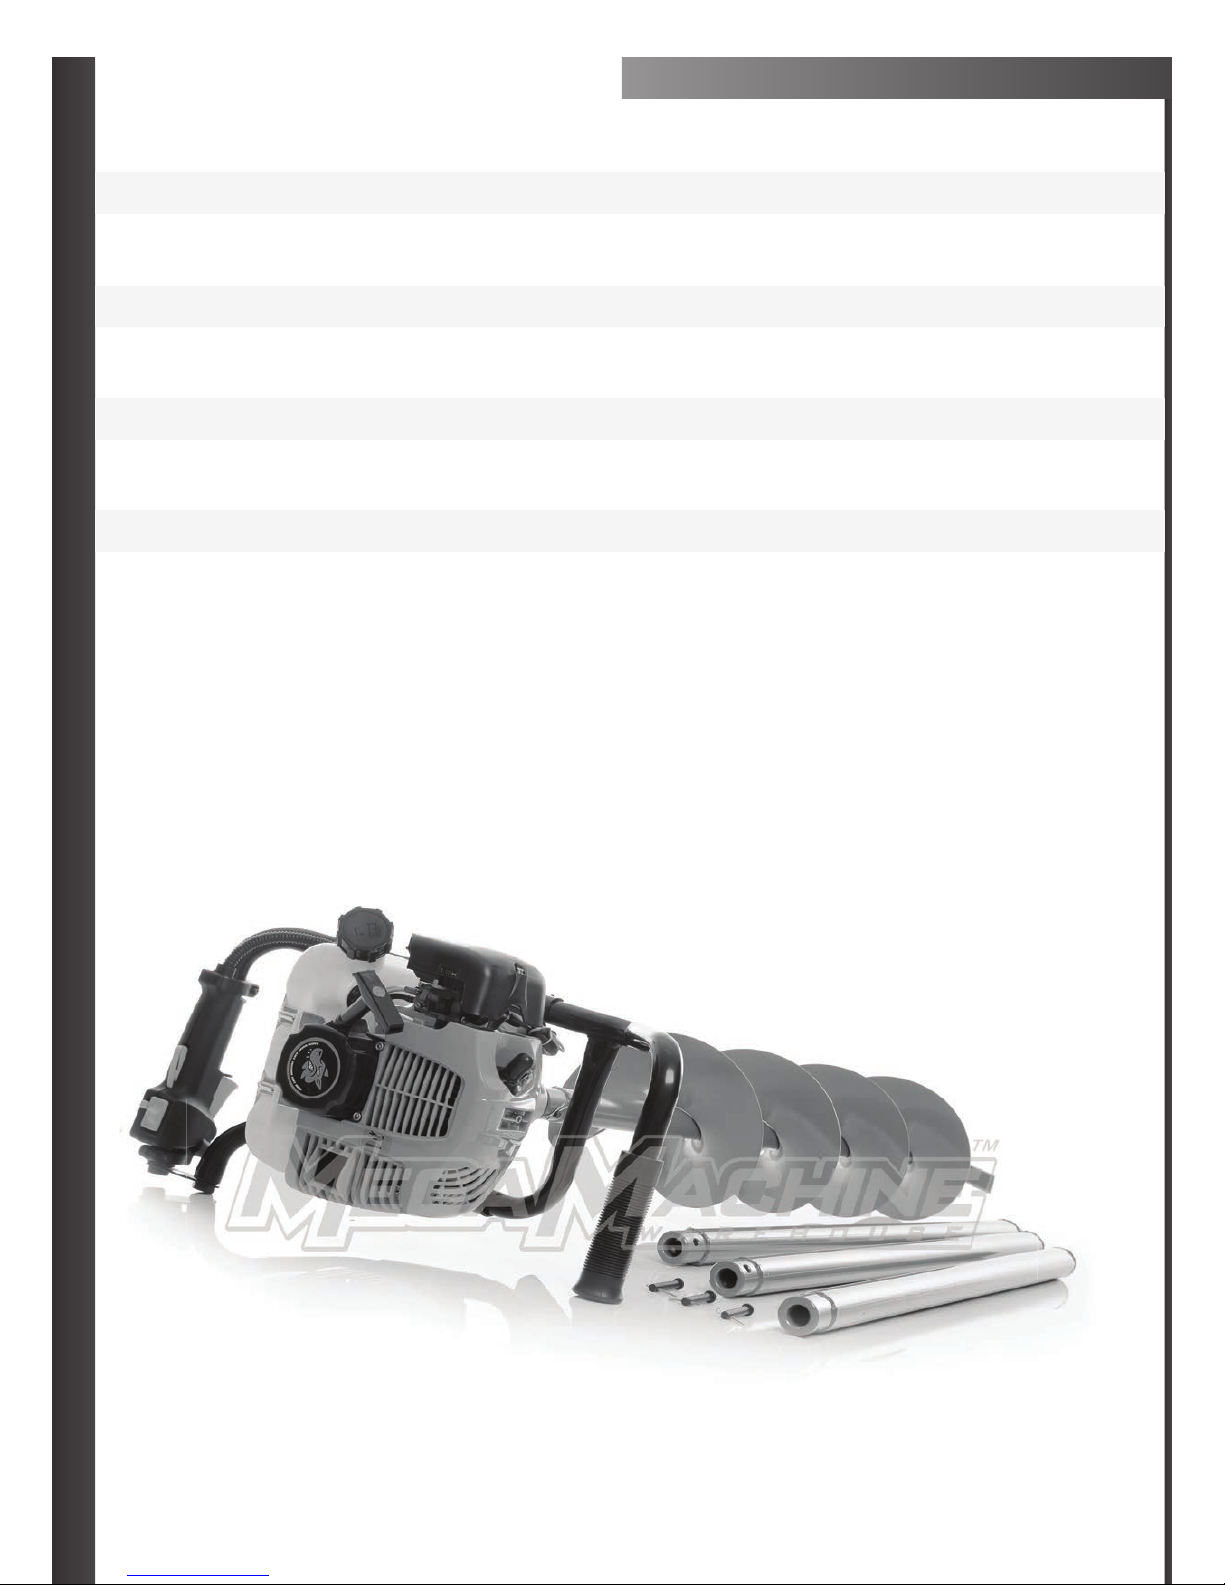
WHAT IS IN YOUR BOX.
STANDARD COMPONENTS
A. Bolts and drop pins
B. Augers 200mm
C. Motor
D1. Extension arms 800mm
D2. Extension arms 800mm
D3. Extension arms 800mm
A
A
A
B
C
D1
D2
D3
5
HOW TO MIX YOUR FUEL
Common mixtures are 25:1/30:1. If you find your machine is
too smoky please use the higher ratio which is 30:1 as seen in
diagram C.
WHAT IS 25:1/30:1?
The first part of the formula refers to how many parts of fuel
as seen in diagram A. The second part of the formula refers to
how many parts of oil (diagram B or C). For example, 25 parts
of unleaded fuel or low octane to 1 part of two stroke oil or 30
parts of unleaded or low octane fuel to 1 part of two stroke oil.
REMEMBER TO MIX WELL (SHAKE BOTTLE)
ONLY USE THIS RECOMMENDED 2 STROKE FUEL MIX WITH A GOOD QUALITY 2 STROKE OIL FROM YOUR LOCAL SUPPLIER, USING A MIX
RATIO OF 25:1/30:1 IN THE MACHINE. UNLEADED OR LOW OCTANE FUEL ANY OTHER FUEL MUST BE USED IN A TWO STROKE MIX. MIX WELL
AS RECOMMENDED. INCORRECT MIX COULD DAMAGE YOUR ENGINE VOIDING YOUR WARRANTY, USE THIS FUEL MIX EVERY TIME YOUR
MACHINE IS IN OPERATION FOR THE BEST DINGO TOOLS PERFORMANCE YOU CAN EXPECT OUT OF YOUR DINGO TOOLS MACHINE.
1
:
25
OIL
600
576.92
500
400
300
200
100
GASOLINE
FULL
1
:
25
OIL
600
576.92
30:1
C
1
:
25
OIL
600
576.92
25:1
BA
1
:
:
:
:
:
:
:
25
25
25
25
2
5
5
25
5
OI
O
O
O
O
O
O
O
L
L
L
L
600
576 92
57
57
7
7
7
57
7
7
6.
6.
.
6.
.
.
92
92
92
9
9
500
25
AT ALL TIMES PLEASE KEEP THE FUEL TANK FULL WHEN IN OPERATION,
“AVOID HAVING THE YOUR ENGINE FINISHING OPERATION FROM FUEL
STARVATION. FUEL TANKS BEING KEPT FULL AT ALL TIMES WILL IMPROVE
YOUR MACHINE PERFORMANCE.
FUEL RUNNING OUT WHILE IN OPERATION MAY DAMAGE YOUR ENGINE,
PLEASE BE SURE TO REFILL THE TANK, KEEPING THE FUEL WELL FILLED
DURING OPERATION IN ASSISTING AND AVOIDING BREAK DOWNS OR
OPERATION INTERRUPTIONS. FUEL TANKS BEING EMPTIED DURING
OPERATION, MAY RISK DEBRIS ALL FOREIGN OBJECTS ENTERING INTO
THE FUEL INTAKE CONFIGURATION SYSTEM CAUSING BLOCKAGES, OVER
HEATING AND EVEN PISTON FAILURE. TO AVOID THESE CIRCUMSTANCES
PLEASE KEEP YOUR FUEL TANK WELL FILLED AT ALL TIMES, AVOIDING
ENGINE BREAKS INCURRED, FROM THE RESULT OF FUEL STARVATION.

6
OPERATION
FILING GAS TANK
1. Shut off engine and allow engine to completely cool
before refilling the gas tank. (Show Picture Of Off
button on Engine)
2. Move to a well ventilated area, outdoors, away from
flames and sparks.
3. Clean debris from area around the gas cap
4. Loosen gas cap slowly. Please the cap on a clean, dry
surface. Picture of gas cap
5. Carefully add fuel without spilling.
6. Do not fil fas tank completely full, allow space for fuel to
expand.
7. Immediately replace gas cap and tighten. Wipe off
spilled fuel and allow to dry before starting engine.
NORMAL OPERATION
1. The clutch will transfer maximum power after about two hours of normal operation. During this break-in period clutch slippage
may occur. The clutch should be kept free of oil or other moisture for efficient operation.
2. Drill holes without placing excessive body weight on the unit. The auger operates most efficiently with a shaving action caused
by the weight of the unit itself.
3. Never run engine indoors. Exhaust fumes are deadly.
4. Do not use an earth auger in the ice.
5. To attach auger to powerhead, align hole at top of auger shaft with the output shaft hole. Insert 3/8 – 16x1-1/2” bolt and secure
bolt with provided 3/8 bi-way lock nut using a wrench.
NOTE:
The ends of the bolt should be flush with the auger collar. Bolt head and thread end should never go beyond earth collar.
USING THE SCREW TYPE, MANUAL VENTING GAS CAP
1. Your power earth auger is equipped with a screw type, manual venting gas cap.
2. Before starting the engine, turn the screw in the top of the gas cap all the way open (counterclockwise) to its venting position.
To ensure that gas will not spill during use, check that the gas cap is screwed on tightly and the gas cap screw is in
the venting position.
3. After using the power earth auger and before putting away or transporting it in a vehicle, screw the gas cap screw on
(clockwise) tightly. This will prevent gas from leaking during storage. The gas cap will not leak gas during storage if the gas cap
is tight and the screw at the top is tight.
NOTE:
When storing unit in an upright position for pro-longed periods of time in warm weather, vent gas cap to prevent gas from leaking
from carburetor.
STOPPING THE ENGINE

7
EASY TO FOLLOW STARTING SEQUENCE
STEP 1
Open gas cap vent all of the way.
STEP 4
Move choke lever to CHOKE or
ON position.
NOTE: CHOKE position is defined by
moving the choke lever as far to the ON
position as possible.
STEP 7
Squeeze throttle trigger.
STEP 13
Pull the recoil starter until the engine
starts.
STEP 14
Slide chock all the way to the run
position.
STEP 15
To stop engine push rocker switch to
‘OFF’ position.
STEP 2
Move choke lever to choke position.
STEP 5
Push rocker switch to the ON position.
STEP 8
Apply locking button for the open
throttle position.
STEP 9
Push the primer four to five times until
you see fuel return down the clear tube.
STEP 10
Pull the decompression switch out.
STEP 11
Pull the recoil starter until the engine
starts and stops.
STEP 2
Prime unit until primer hose is filed
with gas.
STEP 6
Squeeze top lever on throttle control.
STEP 12
Slide the choke to half position.

8
WARM ENGINE START
1. Open gas cap vent screw all the way (counter clockwise)
2. Move choke lever to CHOKE or ON position
NOTE:
CHOKE position is defined by moving the choke lever as far to the ON position as possible.
3. Continue with Step 5 of Cold Engine Starting
HOT ENGINE START
1. Open gas vent screw al the way (counterclockwise)
2. Continue with Step 5 of Cold Engine Starting
3. If engine does not fire, refer to Step 2 of Warm Engine Starting
DO NOT USE STARTING FLUID DO NOT SPRAY FLAMMABLE LIQUIDS OR VAPOURS INTO AIR CLEANER, CARBURETOR OR SPARK PLUG CHAMBER.
DO NOT REMOVE SPARK PLUG AND PULL ON STARTER ROPE. FLAMMABLE FUEL CAN SPRAY OUT AND IGNITE FROM A SPARK FROM SPARK PLUG.
MAINTENANCE AND STORAGE
AUGER MAINTENANCE
1. The gear case has 4 oz of grease installed at the factory. It is recommended that once a year the gear case be split and the
grease level checked. Add grease only if level of grease is below top of the gears. DO NOT OVERFILL
2. Keep all screws, nuts and bolts tight.
3. For cold weather operation, store the unit in a cool environment. Transferring the unit from a warm to a cold place can cause
the build up of harmful condensation.
4. If blade performance decreases, turn unit off and disconnect spark plug wire. Carefully inspect cutting edge of blade for any
signs of wear. If blades show any of these signs, they need to be sharpened or replaced.
COOLING FINS
Cooling fins, air inlets and linkages must be free from any debris before each use.

9
AIR FILTER
Never run engine without aircleaner properly installed. Added wear and engine failure may occur if air cleaner is not installed.
Service air cleaner every 3 months or after 20 hours of operation. Clean filter in extremely dusty conditions.
STEPS FOR CLEANING AIR FILTER
1. Wash in warm water with mild soap until dirt and debris are removed. Press filter when washing do not twist.
2. Rinse in warm water until soap and dirt are removed.
3. Dry filter by wrapping in a clean cloth and pressing filter until it is dry.
4. Apply oil to the entire filter.
5. Remove excess oil.
6. Attach the filter and air cleaner cover to the engine.
CHECKING SPARK PLUG
1. Check spark plug every 50 operating hours
2. Disconnect the spark plug cap, and clean any debris from around the spark plug area.
3. Remove spark plug and replace if any of the following occur, pitted electrodes, burned electrodes, cracked porcelain, or
deposits around electrodes.
4. After analysis, seat spark plug and tighten with spark plug wrench.
CARBURETOR
Never tamper with factory setting of the carburetor.
TRANSPORTING YOUR EARTH AUGER
1. Never transport engine inside an enclosed space of vehicle. Fuel or fuel vapors may ignite causing serious injury or death.
2. If fuel is present in the fuel tank , transport in an open vehicle in an upright position.
3. If an enclosed vehicle must be used, remove gas into an approved red fuel container. DO NOT siphon by mouth.
4. Run engine to use up the fuel in the carburetor and fuel tank. Always run engine in a well ventilated area.
5. Wipe away any spilled fuel from engine and earth auger. Alow to dry.
LONG TERM STORAGE
If your earth auger will not be used for more than one month, prepare it for long term storage.
STEPS FOR LONG TERM STORAGE
1. Add fuel stabilizer according to manufacturer’s instructions.
2. Run engine for 10-15 minutes to ensure that the stabilizer reaches the carburetor.
3. Remove the remainder of the fuel from the gas tank into an approved fuel container.
4. Remove auger from powerhead and apply a thin layer of grease to the output shaft.
5. Store auger and powerhead (engine) in a vertical position.
6. Remove all debris from auger and powerhead (engine).
Table of contents
Other Dingo Tools Lawn And Garden Equipment manuals

Popular Lawn And Garden Equipment manuals by other brands

Sunforce
Sunforce SOLAR user manual

GARDEN OF EDEN
GARDEN OF EDEN 55627 user manual

Goizper Group
Goizper Group MATABI POLMINOR instruction manual

Rain Bird
Rain Bird 11000 Series Operation & maintenance manual

Cub Cadet
Cub Cadet BB 230 brochure

EXTOL PREMIUM
EXTOL PREMIUM 8891590 Translation of the original user manual


Vertex
Vertex 1/3 HP Maintenance instructions

GHE
GHE AeroFlo 80 manual

Land Pride
Land Pride Post Hole Diggers HD25 Operator's manual

Yazoo/Kees
Yazoo/Kees Z9 Commercial Collection System Z9A Operator's & parts manual

Premier designs
Premier designs WindGarden 26829 Assembly instructions

Snapper
Snapper 1691351 installation instructions