Distech Controls TCND-I-PR Manual

TCND-I-PR Range
www.distech-controls.eu
I. User manual and LCD display for TCND-I
1) Keypad description
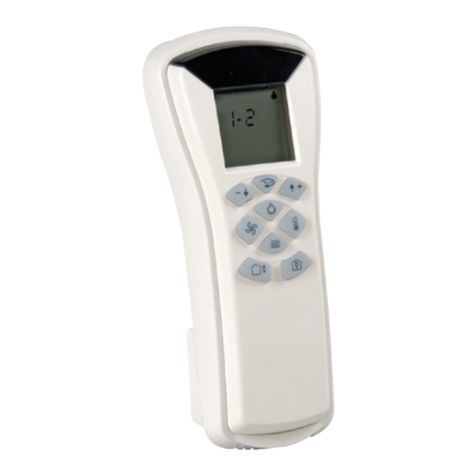
The keypad of the remote controller has 9 keys:
4 function keys in the middle : thermometer, fan, lamp, sunblind
3 operation keys at the top : up key, down key and rotate key
2 occupancy / unoccupancy keys at the bottom : occupied house, unoccupied house
2) Screen saver
The screen displays “ConF”: that means the remote control is dedicated for programming.
3) Default parameters
The zone menu is not available: the zone is configured at 0.
The temperature menu is not available.
The sunblind menu is inactive.
Hardware Installation Guide & End User Manual
TCND-I-PR
Remote controller for programming
Range

TCND-I-PR Range
www.distech-controls.eu
4) “Occupied house” key: sensitivity level setting
Pressing this key allow to switch the multi sensor in “setting” mode.
Setting of other functions (Lux level, GTB…) does not require pressing the “occupied key”. That allows to set the
“normal” mode and to enter the menu as explain below.
5) “Unoccupied house” key: switch to the “normal” mode
Pressing this key allow to switch the multi sensor in “normal” mode.
LCD display:
6) « Fan » key: Setting of multi sensor detection level sensitivity
A push on « fan » key will appear:
The fan icon « »
The text « SEnS » for the sensitivity.
The multi sensor is adjustable according a value of 1 to 8 defining the detection level sensitivity flowing table
below :
1 2 3 4 5 6 7 8
+ sensitive - sensitive
Values setting of 1to 5will directly influence the multi sensor.
Values setting of 6to 8will act on the controller associated to the multi sensor.
The first push on the key « arrow + » or « arrow - » display the last set value. Then each push on the key « arrow
+ » or « arrow - » increases or decreases the sensitivity of 1. A long push on the key « arrow + » or « arrow - »
increases or decreases the sensitivity of 2.

TCND-I-PR Range
www.distech-controls.eu
Push on key “fan” to access the sensitivity setting
Push on key “arrow +” or “arrow -” to configure / set the multi sensor sensitivity
Multi sensor’s LED will flash with an interval of 1 second, the number of flashing corresponding to the value
of the parameter (reading or writing).
CAUTION: regarding the setting of sensitivity between 6 to 8, the LED flashing only 5 times at most. This setting
installment acts, in addition to the multi sensor, on the controller of lighting is belongs
Default value (Reset) : 1.
7) « Lamp » key: lighting control
When the « lamp » key is pressed, that displays:
The lamp icon
The text « Lu. » that means the remote control is in “setting mode” to adjust the lux level setpoint.
By pressing button repeatly on key « lighting » it show successively text indicate the adjustement mode selected :
« Lu. » : Lux level setpoint: setting the setpoint from 0 to 1000 lux pressing keys « arrow + » or « arrow -
» by step of 40 lux on short push and by step of 120 lux on long push.
« dE1°2 » : Delta circuit between the 1st day and the 2nd day: setting away from 0 to 100% by pressing
keys « arrow + » or « arrow - » by step of 5% on short push and 10% on long push. On the first push,
displays the last value.
Lux level setpoint: “Lu”. for Lux

TCND-I-PR Range
www.distech-controls.eu
A push on key “arrow +” or “arrow -” allow for Lux level setpoint setting.
This keys allow to increase or decrease the lux level setpoint.
The value shown on the remote control’ screen is in Lux value and can be adjust by step of 40 Lux.
Note: for a setpoint of 1000 lux, the remote control’ screen displays “999”.
Delta circuit between 1st day and 2nd day :
A push on key “arrow +” or “arrow -” allow to set the delta.
Default value (Reset): 320 Lux for setpoint and 25% for the gap of 2 circuits.
8) « sunblind» key: inactive key
9) « offset » key: BMS setting mode
A push on key “offset” will display:
The offset icon
The occupied icon for the choice of occupied mode.

TCND-I-PR Range
www.distech-controls.eu
By pressing button repeatly on key « offset » it will appear icons occupied, then inoccupied, then stand by, and
again occupied and so on, this is allow to choice the BMS mode :
Occupied icon : occupied mode
Inoccupied icon : inoccupied mode
Stand by icon (inoccupied with flashing men): standby mode
For the CTR:
Each BMS mode timing has a detection associated displayed by the selected.
You can set a timer for each mode of 0h to 1h4 by pressing button « arrow + » or « arrow - » by step of 0h1 on a
short push and 0h2 son long push. On the first push, displays the last value.
For the RS-P:
The setting of timing is the same whatever timing mode. When reading/writing of timing, the RS-P’s LED flashing
by overcome of 10mn.
Timing reading:
Occupied mode Inoccupied mode Stand By mode, the men flashing
A push on key « arrow + » or « arrow - » allow to set a timing according the selected choice.
Occupied mode Inoccupied mode Stand By mode, the men flashing
Occupied mode Inoccupied mode Stand By mode, the men flashing
The multi sensor or RS-P’s LED will flash with an interval of 1 second. Each flashing corresponds to a period
of 10mn. Default value (Reset): 0h1

TCND-I-PR Range
www.distech-controls.eu
10) « up arrow » key: action by function selected
A push on key « up arrow » has an action which depends on the function key previously supported:
In temperature command: inscrease the value of detection timing
In fan speed command: inscrease the value of lux level sensitivity of multi sensor
In lighting command: inscrease the lighting setpoint or the gap circuit between 1st day and 2nd day.
11) « down arrow » key: action by function selected
A push on key « up arrow » has an action which depends on the function key previously supported:
In temperature command: decrease the value of detection timing
In fan speed command: decrease the value of lux level sensitivity of multi sensor
In lighting command: decrease the lighting setpoint or the gap circuit between 1st day and 2nd day.
12) « rotate arrow » : test
A push on key « rotate arrow »:
Flashes actives menus
Shows the battery state to display the text « BAT. ON » when battery are a good state of charge or
« BAT. OFF » in otherwise.
Show state battery on digits of LCD.
LCD display:
(flashing active menu)
Standby mode: display « ConF »
Lighting mode: display « Lu. » or « dE1°2 »
Offset mode: display « tPo »
Fan speed mode: display « SenS »
Request NSD mode: display « nSd »
Occupied mode / inoccupatied mode / initialization filtering
temperature : no display

TCND-I-PR Range
www.distech-controls.eu
II. Configuration and LCD display for TCND-I
To enter in configuration mode, severail keys must be pressed together and held during 3 seconds.
When any key are push for 20 seconds, the selected configuration is validated and stored.
Initialization filtering temperature
+
A security is etablished in CTR for not taking into account a temperature that is too different from the previous. If
the temperature is not taken into account because of this security, it can reset the filter to take into account the
next temperature. After reception of this trame, the CTR’s variable which manages temperature goes into default,
and is egal to 327,67.
LCD display:
Table of contents
Other Distech Controls Remote Control manuals
Popular Remote Control manuals by other brands
Z-Wave
Z-Wave Z-URC 550EU operating instructions
Daikin
Daikin ARC417A14 Operation manual
Tele Radio
Tele Radio PN-RX-MNB5 installation instructions

AERTECNICA
AERTECNICA TUBO ROBO CM186TR instructions
iClick
iClick Super Remote quick start guide
Sony
Sony RM-AV2100B Operating Instructions (primary... operating instructions
Kramzzz Electronics Design & Development
Kramzzz Electronics Design & Development SICOS-LCD owner's manual
Allo RemoteControl
Allo RemoteControl PROGET ETY 433 4N instructions
Multiplex
Multiplex Royal Evo instructions
Linksys
Linksys DMRW1000 - Controller / Wireless-N Touchscreen Remote... Quick installation guide
Bosch
Bosch RF3332 user guide

Nvidia
Nvidia SHIELD manual
