DITA celeste APV2 User manual
User Manual

Contents
Welcome
Important safety instructions
APV2 — Awesome Plug V.2
To change a connector plug
To insert a different type of plug
Using the APV2
How to insert 2-pin plugs
How to insert MMCX plugs
Precautions for use
Warranty
3
4
5
6
6
7
8
9
10
11

3
With the help of Kondo Audio Note Japan’s pure silver conductors, the DITA Celeste
brings you a refreshed take on the silver cable, as you’ve never heard it before —
unprecedented levels of speed and clarity, with the body to match.
Possibly the first time Kondo’s silver conductors have been implemented in portable
audio, the addition of DITA’s new Awesome plug V2 makes this groundbreaking
cable the full package.
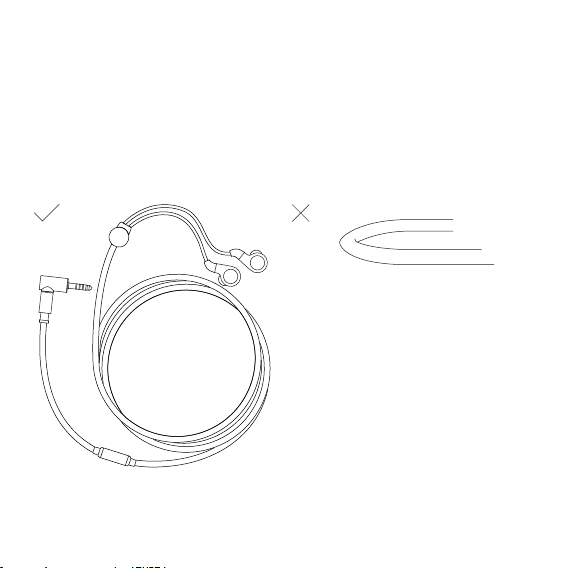
The Celeste’s white outer weave serves as a deliberate design choice referring to
the clarity and purity of Celeste’s sound, a call to users to treat this upgrade cable
and its delicate silver conductors with care.
Welcome

4
1. Always practice safe listening habits.
2. Ensure that the output volume of your device is set to a minimum before
inserting earphones into your ears.
3. Listening at high volumes for extended periods of time can permanently damage
your hearing.
4. Never insert the earphones into your ears without the supplied tips.
5. Take extreme care when inserting and removing your earphones.
6. Always keep your earphones dry. These earphones are not designed for wet use.
7. Do not wear your earphones in any environment where you need to have an
auditory sense of your surroundings (e.g. on the streets, or while driving).
8. Do not plug your earphones into anything other than the output jack of your
media player.
9. Do not insert any sharp objects into the nozzle of your earphones. You may
permanently damage the highly sensitive diaphragm of the driver.
10. If you develop any skin or medical conditions, cease the use of this product
immediately and consult your doctor. DITA is not responsible for any medical
conditions/symptoms that may develop or arise due to the use of this product.
Use at your own risk.
Important safety instructions
5
Introduced on the original DITA Dream in 2016, the Awesome Plug was revolutionary,
spurring numerous manufacturers to create their own versions. Developed to future
proof your cables so that you can adapt them for use with different playback devices
for a more versatile rig.
APV2 is the newest version of the Awesome Plug — it has been updated to accom-
modate a wider variety of enthusiast level cables reflecting the developments in
high-end earphone cable developments.
APV2—Awesome Plug V.2
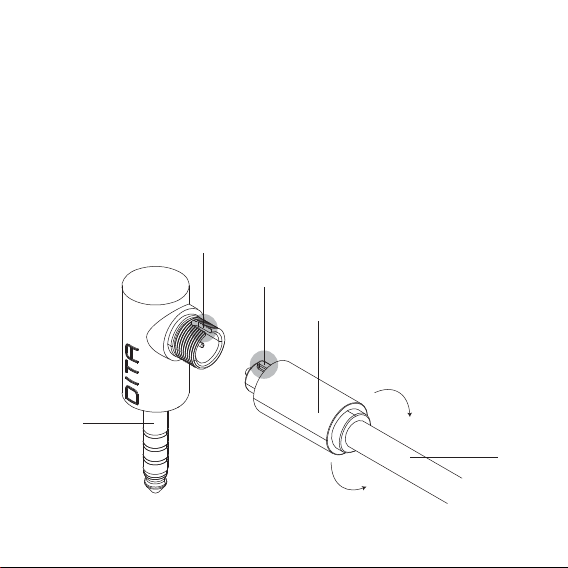
CABLE
LOCK
UNLOCK
KNURLED LOCKING RING
90º PLUG
2.5MM TRRS/
3.5MM TRS/
4.4MM TRRRS
LOCATING PIN
LOCATING GROOVE

6
1. Grasp the body of the plug firmly with one hand and pinch the knurled knob
with the other.
2. With the plug facing you, firmly twist the knurled ring counter-clockwise to
unscrew it.
3. The knurled ring should fall into position once it has been completely unscrewed.
4. Pull out the plug.
1. Gently position the plug to the body while aligning the locating pins.
2. Move the knurled ring into position. While gently pushing the knurled ring
against the screw threads, turn the ring counter-clockwise until you feel
a slight snap. This positions the threads correctly.
3. Holding it in the above position, turn the knurled ring clockwise to tighten it.
4. Do not use a tool such as pliers to loosen or to tighten the knurled ring.
It is designed for finger pressure only.
To change a connector type
To insert a dierent type of plug

7
1. Great care has been taken to ensure the durability and longevity of the APV2
under normal usage conditions.
2. By design and by its nature, the 3.5mm TRS plug is not for professional use.
As such, do not subject the plug to any undue pressure. E.g. items resting on
the plug while they are in your bag.
3. In some instances, different types of connectors will be supplied with APV2
equipped cables. These are the 4.4mm TRRRS, 3.5mm TRS and 2.5mm TRRS
connectors. Ensure that you are using the correct one for your media playback
device. If you are unsure, check with your dealer before proceeding further.
4. Always remove the plug from an appropriate receptacle by grasping the
connector body. DO NOT tug on the cables.
5. Careful usage of the cables can prolong the lifespan of your product.
Using the APV2
8
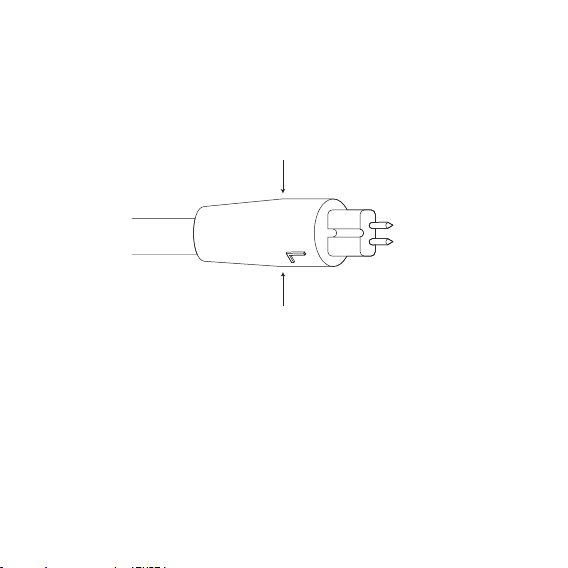
1. Ensure that you have the correct polarity before inserting the 2-pin plug.
2. If you are unsure of the polarity, check with your earphone manufacturer.
3. Check the Left and Right markings on the cables to ensure that you are
inserting them into the correct earphone.
4. Grasp the 2-pin plug body closest to the pins without actually holding
onto the pins.
How to insert 2-pin plugs
The DITA Celeste cable features a moulded ear hook which incorporates a memory
cable. This allows the user to shape the cable to a shape most suited for their ears
and earphones.
HOLD HERE
HOLD HERE

9
How to insert 2-pin plugs (con’t)
5. Gently align the pins to the female jack on your earphone.
6. Push very, very gently to ensure that the pin sizes are compatible.
7. Do not use force when plugging in the cables to your earphones. This could
result in damge to your cable or earphone.
8. Always remove the plug from an appropriate receptacle by grasping the
connector body. DO NOT tug on the cables.
9. Due to the huge variety of earphones adopting 2-pin type connectors makes
it impossible for us to test them all. It is the user’s responsibility to ensure
compatibility before using them with the Celeste replacement cables.
10
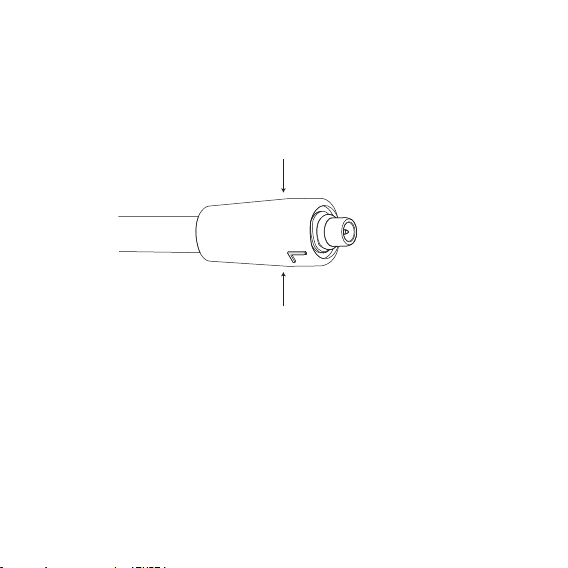
1. The Center signal contact pin is Positive and the Outer Contact is Negative.
2. Ensure that you have the correct polarity before inserting the plug into a
receptacle.
3. Check the Left and Right markings on the cables to ensure that you are inserting
them into the correct earphone.
4. Grasp the MMCX plug body closest to the connector without actually holding
onto the pins.
How To insert MMCX plugs
The DITA Celeste cable features a moulded ear hook which incorporates a memory
cable. This allows the user to shape the cable to a shape most suited for their ears
and earphones.
HOLD HERE
HOLD HERE

11
5. Gently align the contact points to the female jack on your earphone.
6. Push very, very gently to ensure that the connector sizes are compatible.
7. Do not use force when plugging in the cables to your earphones. This could
result in permanent damage to your cable or earphone.
8. Always remove the plug from an appropriate receptacle by grasping the
connector body. DO NOT tug on the cables.
9. Due to the huge variety of earphones adopting 2-pin type connectors makes
it impossible for us to test them all. It is the user’s responsibility to ensure
compatibility before using them with the Celeste replacement cables.
How to insert MMCX plugs (con’t)
12
• Do not wind the cable tightly.
• Do not subject the cable to any tight bends for extended periods of time.
• Do not subject your cables or earphones to harsh chemicals, solvents or acids.
Precautions for use

13
• There are countless types of earphones on the market and we cannot ensure
that earphones equipped with similar connector types will perform correctly
when using our cables.
• There are no clear standards that manufacturers can adopt when using
these connectors. As such, the Celeste replacement cable may not always be
compatible with your earphones.
• The best way to ensure that your earphone is compatible is to check with your
dealer.
• In your package are both a commonly used 3.5mm TRS plug as well as a 2.5mm
TRRS and a 4.4mm TRRRS plug. Please be sure that you are using the correct
plug for your media playback device before proceeding with playback.
• We are not responsible for any damage caused to your earphone or media
playback device arising from mis-use or incompatibility.
• In most cases, your cable is warranted from manufacturer’s defect for 6 months.
Such defects do not include wear and tear. Contact your local distributor for
more information.
• If you experience a problem with your cable, please contact your country
representative. Should you wish to contact us directly, you may do so at:
Warranty and Disclaimer
Project Perfection
7030 Ang Mo Kio Avenue 5
Unit 05-03
Singapore 569880
+65 6756 6522
WWW.DITAAUDIO.COM
DITAAUDIO
PROJECTPERFECTIONSG
PPERFECTIONAUDIO
WWW.PP-DISTRIBUTION.COM
Table of contents
Other DITA Headphones manuals


