DittNyeBad WG-U881 R User manual
Page 1
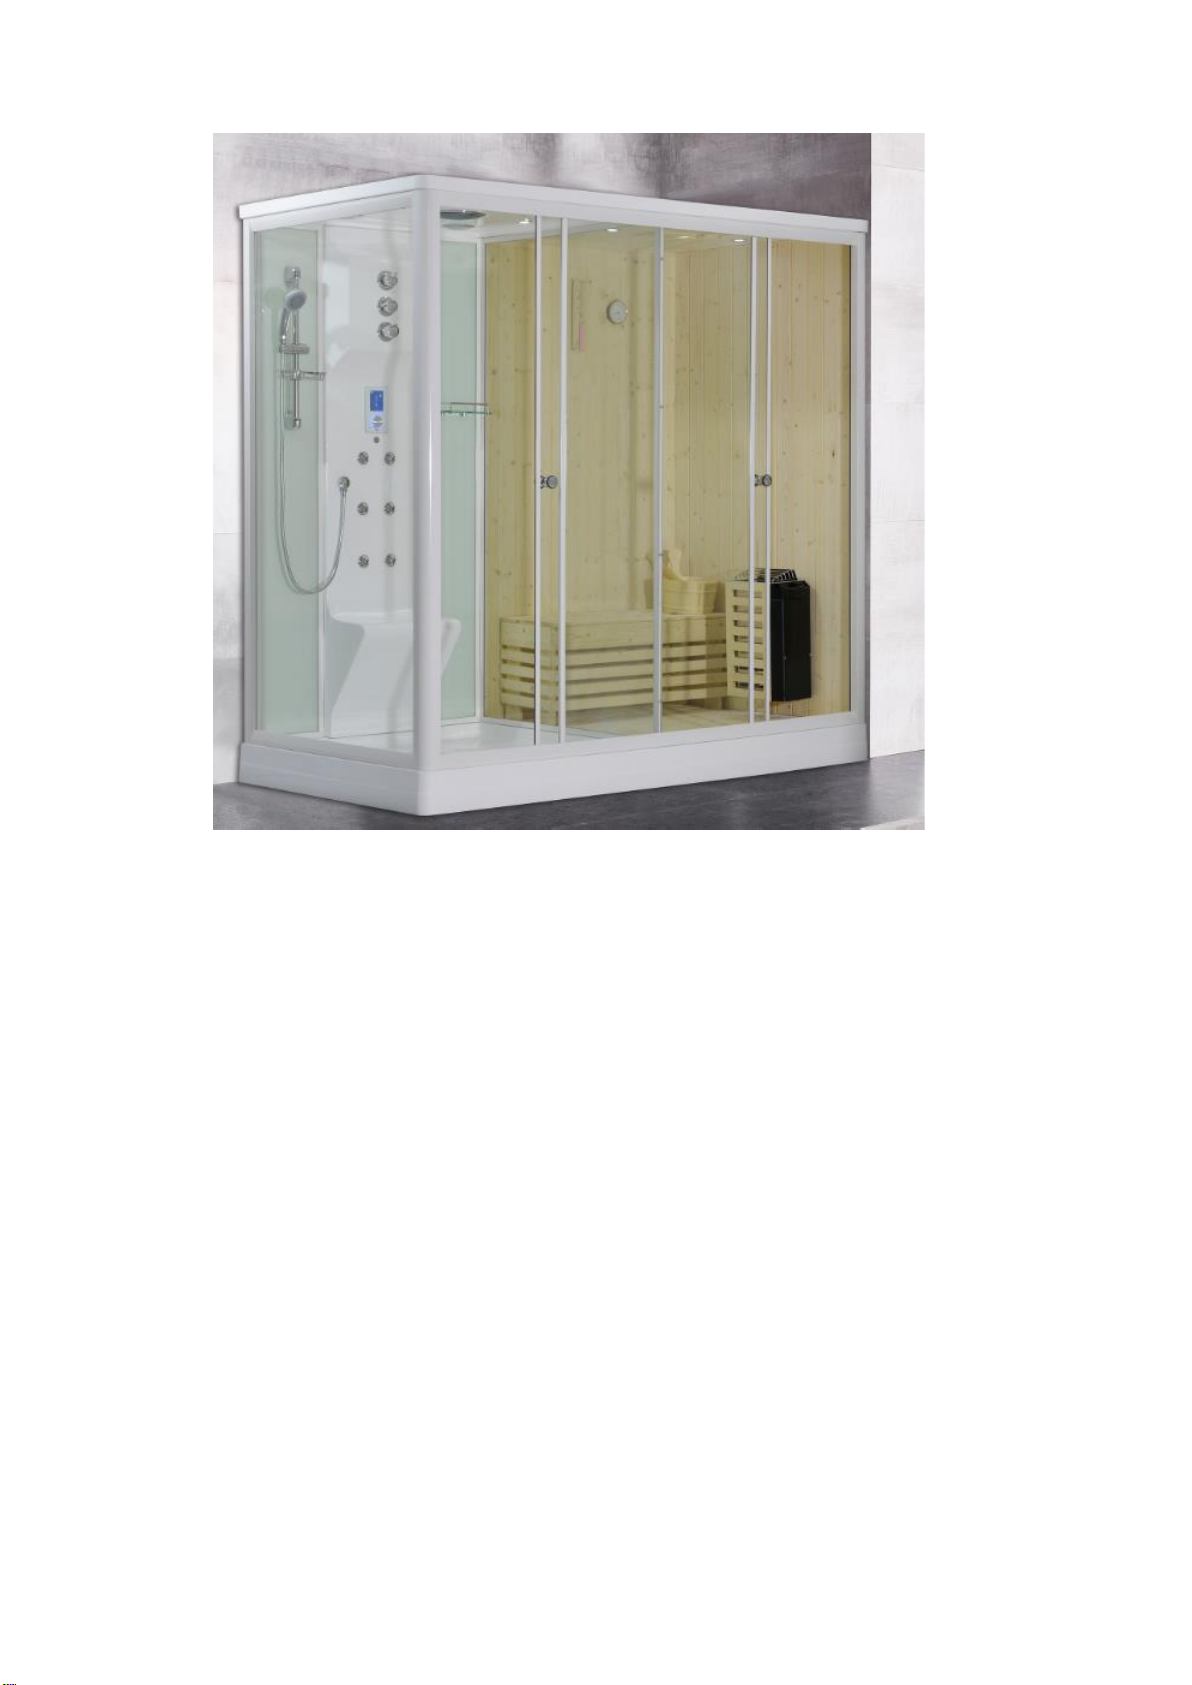
WG-U881 R
Page 2
Specifications
Model
Size
LxWxH mm
Light
Sauna Stove
and stone
Wood barrel
and ladle
Skylight
Thermometer
hygrometer
hourglass
WG-U
881
2200x1200x22000
√
√
√
√
√
√
Installation instruction

Page 3
Electricity installation for sauna
1. The supply parameters (e.g., voltage and frequency) for this product must comply
with those indicated on the manual of the product.
2. As the closed environment may shorten the service life of the product, please keep the
environment always well ventilated.
3. To avoid any accident, water or electricity supply do not complying with the
parameters on the manual of this product is not allowed for use.
4. The water and electricity installations of this product must be carried out by the
qualified and licensed technicians or professionals appointed by the dealer.
5. A separate electric box shall be installed in advance for this product, with a 20A ~40A
bipolar overload breaker and a leakage protection switch at least 30A equipped in it. The
supply passes through the breaker first and leakage switch then to the product. The
electric box must be arranged in a place away from water and easy for operation. Cut off
the breaker after use to shut off the master supply of this product.
6. Copper-core double insulated sheathed wires in the size of 3x2.5mm2 at least
(3x4mm2 for any product of 4.5KW, and 3x6mm2 for any product of 6KW) must be the
power wire of this product. Firmly connect the earth wire to the ground terminal already
approved by the responsible power supply department. No other object can be used as
the ground terminal. Otherwise, we will hold no liability for any accident, leakage or
electric shock arising therefrom.
7. Special three-core grounding socket resistant to water, fire, flame and excessive
temperature shall be used between the power supply and this product. No other
electrical appliance can be connected to this socket. Do not change or cut off any
connecting wire or connector of this product. Otherwise, we will hold no liability for

Page 4
any accident, leakage or electric shock arisen therefrom.
8. Keep any flammable material or any object with the temperature of over 80°C away
from the product surface, for it may damage the product and cause the fire.
9. Protect the electric wires from water, dampness, insects and mice when the product is
unused for a long time. Shut off the master power supply and the cut-off master water
supply. Check the wires and grounding before the start of the product which is unused
for a long time.
10. It is required to shut off all functions of the product and wipe off the water on hands
before taking out the power plug. It is strictly forbidden to take out the plug when the
product is still on or with a wet hand.
11. It is forbidden to use this product in case of lightning. Cut off the master supply of
the product and take out the power plug!
12. Stop immediately using of the product when trouble of electric circuit happens, for it
may cause the fire by short-circuit or electric shock by trouble. Ask the qualified and
licensed professionals to make the repairing.
Water supply for steam
1.Connect the cold/hot water hose(red is hot water hose, blue is cold water hose) to
water supply, and make sure install a valve before connecting the cold/hot hose.
2.To prolong the service life of steam generator, we suggest install a wire mesh filter to
the cold/hot water hose.
Electricity installation for steam:
1. Connect the master computer control box of the steam room to the wire connectors of
all functional electrical parts. Insert the wiring cords firmly, and keep them away from
any water pipe connector that may have water drips due to leakage. Identify the

Page 5
connection symbols on the wiring cards before insertion, as the error connection may
damage the electrical parts in the steam room.
2. Reliably connect the earth wire of the steam room to the indoor electrical grounding
unit and make sure that it really works.
3. Connect the power supply.
(1)A fixed socket shall be taken for the power supply of the steam room, which
should be the bipolar switching socket for independent service (i.e., the null and live
wires can be on or off at the same time). No other electrical appliance can be
connected to the same supply. The power wire shall be the rubber-sheathed three-
core wire, with the sectional area for each core no less than 2mm2 (i.e., 3x2mm2).
Fire-retardant wall bushing shall be used for the supply crossing the wall to make it
safe.
(2) This product is supplied with the special power wires and special plugs with
leakage protection. The user shall install the socket at the water-resistant place within
the length of the special power wire of the steam room, which is recommended to be
at least 2 meters from the ground (see installation and construction drawing).
4. Earth wire: the earth wire of the steam room shall be connected reliably to the
grounding unit of the building, as well as the earth wire of the power socket.
5. Connect and insert the internal-heat protection switch in the steam generator properly.
Warning for using the steam
1. Please read this manual carefully before using, and guarantee the reliable grounding.
2. For the sake of safe use, please don't lock the steam room.

Page 6
3. People after drinking, suffering from heart disease or hypertension, the elder and the
pregnant women is not allowed to use this product.
4. Any child or person with mental disability use this product must be with the company
of a normal adult.
5. Pay attention to anti-slip.
6. Each time before use, check to confirm the power switch is turned on, and the leakage
protection , the master valve for cold/hot water supplies . Remember to cut off the
master supply each time after use.
7. If you feel uncomfortable, please shut off the power immediately.
8. Before turn on the faucet, please rotate the handle of cold/hot to the middle of H/C,
and turn on the faucet, test the water temperature by finger, and then rotate the handle
to adjust the temperature of water until feel comfortable.
9. When using steam function, please don’t use the shower or water massage function.
10. Keep your body away from the outlet of steam, to avoid scald.
11. Never start the motor without water.
12.Close the door and do not enter the steam shower when the sterilization is on.
Warning for using the sauna
1. Please read this manual carefully before using, and guarantee the reliable grounding.
It is essential that the installation is carried out by a qualified electrician.
2. For the sake of safe use, please don't lock the sauna room.
3. People after drinking, suffering from heart disease or hypertension, the elder and the
pregnant women is not allowed to use this product.

Page 7
4. Any child or person with mental disability use this product must be with the company
of a normal adult.
5. This product is designed to induce the perspiration by steam, and thus to keep the user
slim and health. Pay attention to anti-scald measures.
6. Cut off the master supply each time after use.
7. If you feel uncomfortable, please stop using the sauna room and shut off the power
immediately.
8. Do not stay inside the sauna room for a long time, should less than half an hour.
Please take a rest outside and come in again.
9. Keep your body away from sauna stove, at least 30cm away,never touch sauna stone
with your hand, for this may scald your skin.
10. Only can put the sauna stone producing by the manufacturer into the sauna stove,
because other stone may burst after heating and give out harm materials.
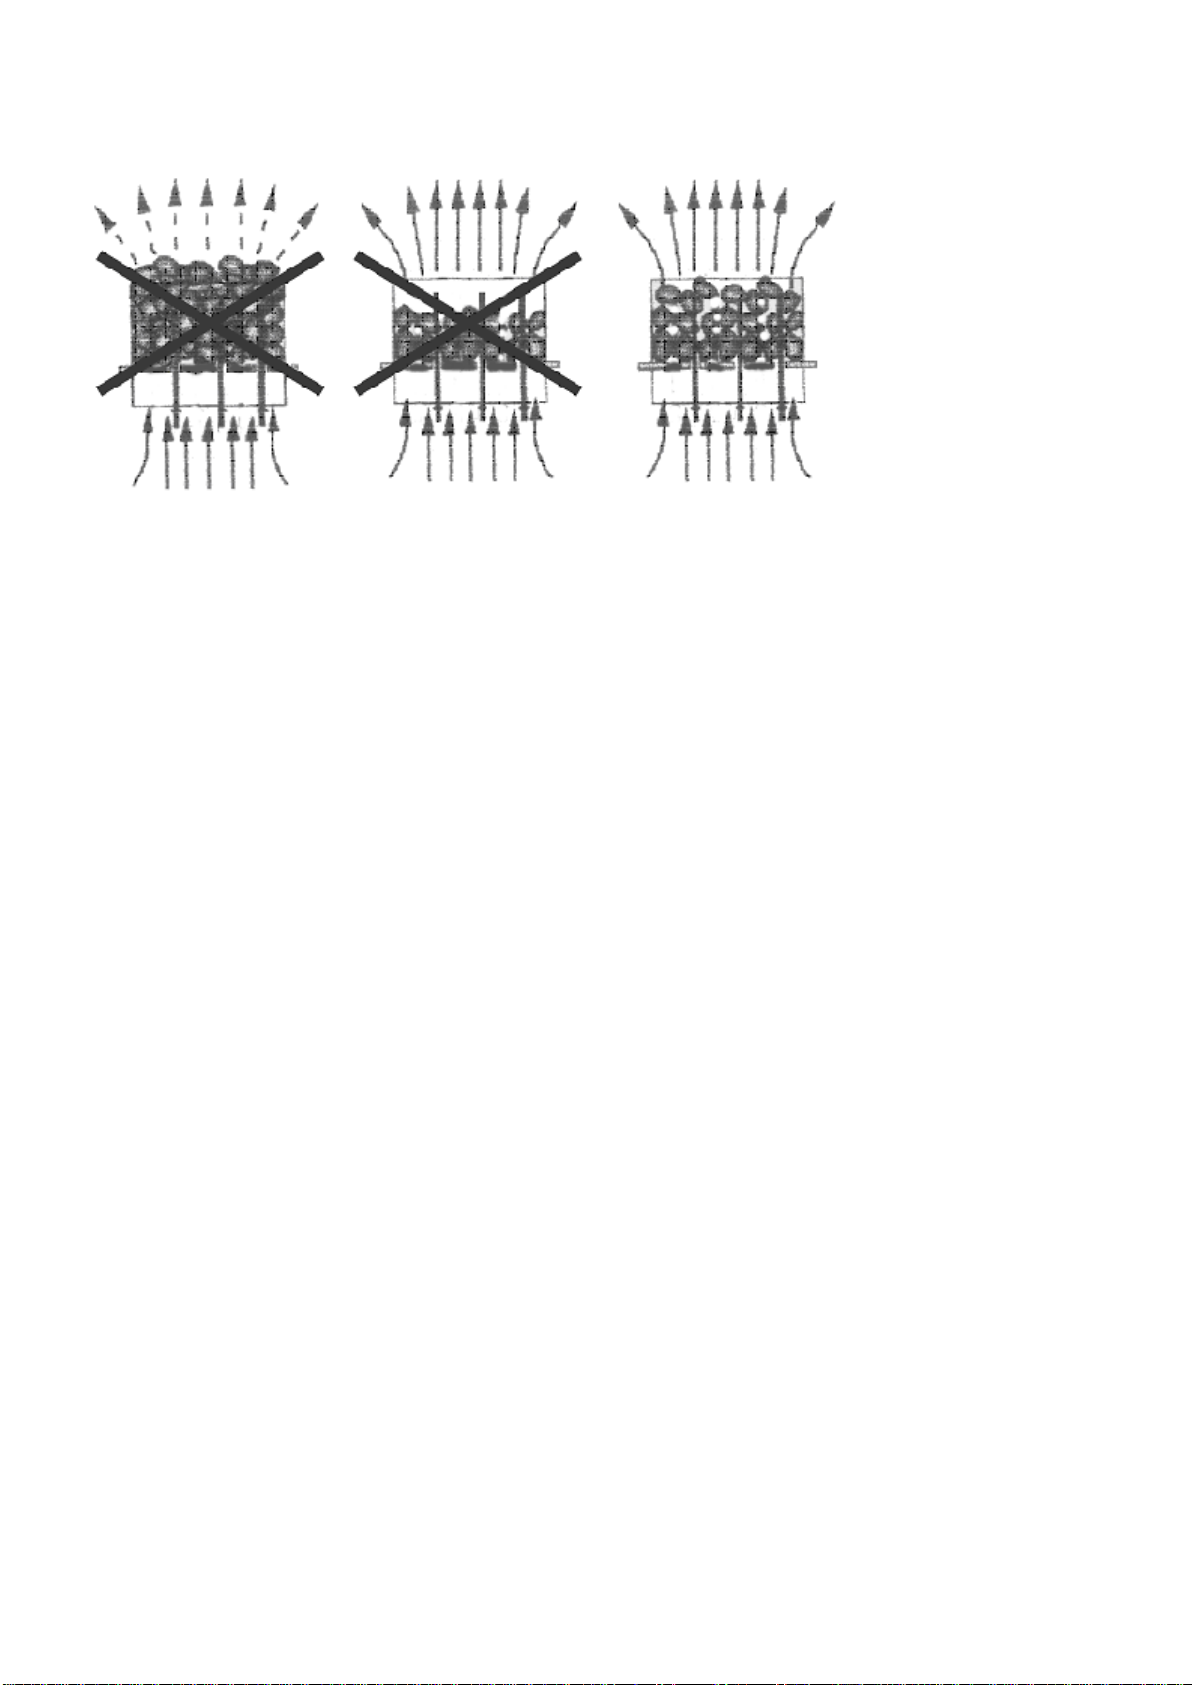
11. We recommend that the stone should be rinsed before being put into the oven ,
the largest stone should be put at the bottom, don’t put the stones too tight, so the air
can easily ventilate between the stones. Rearrange the stones in the heater at least once a
year or twice if it is in frequent use (maximum 500 hours).
Electrical parameters
Supply Voltage
Power
Sauna Stove
220V
3KW/4.5KW/6KW
Lights
12V
2W/PCS

Page 8
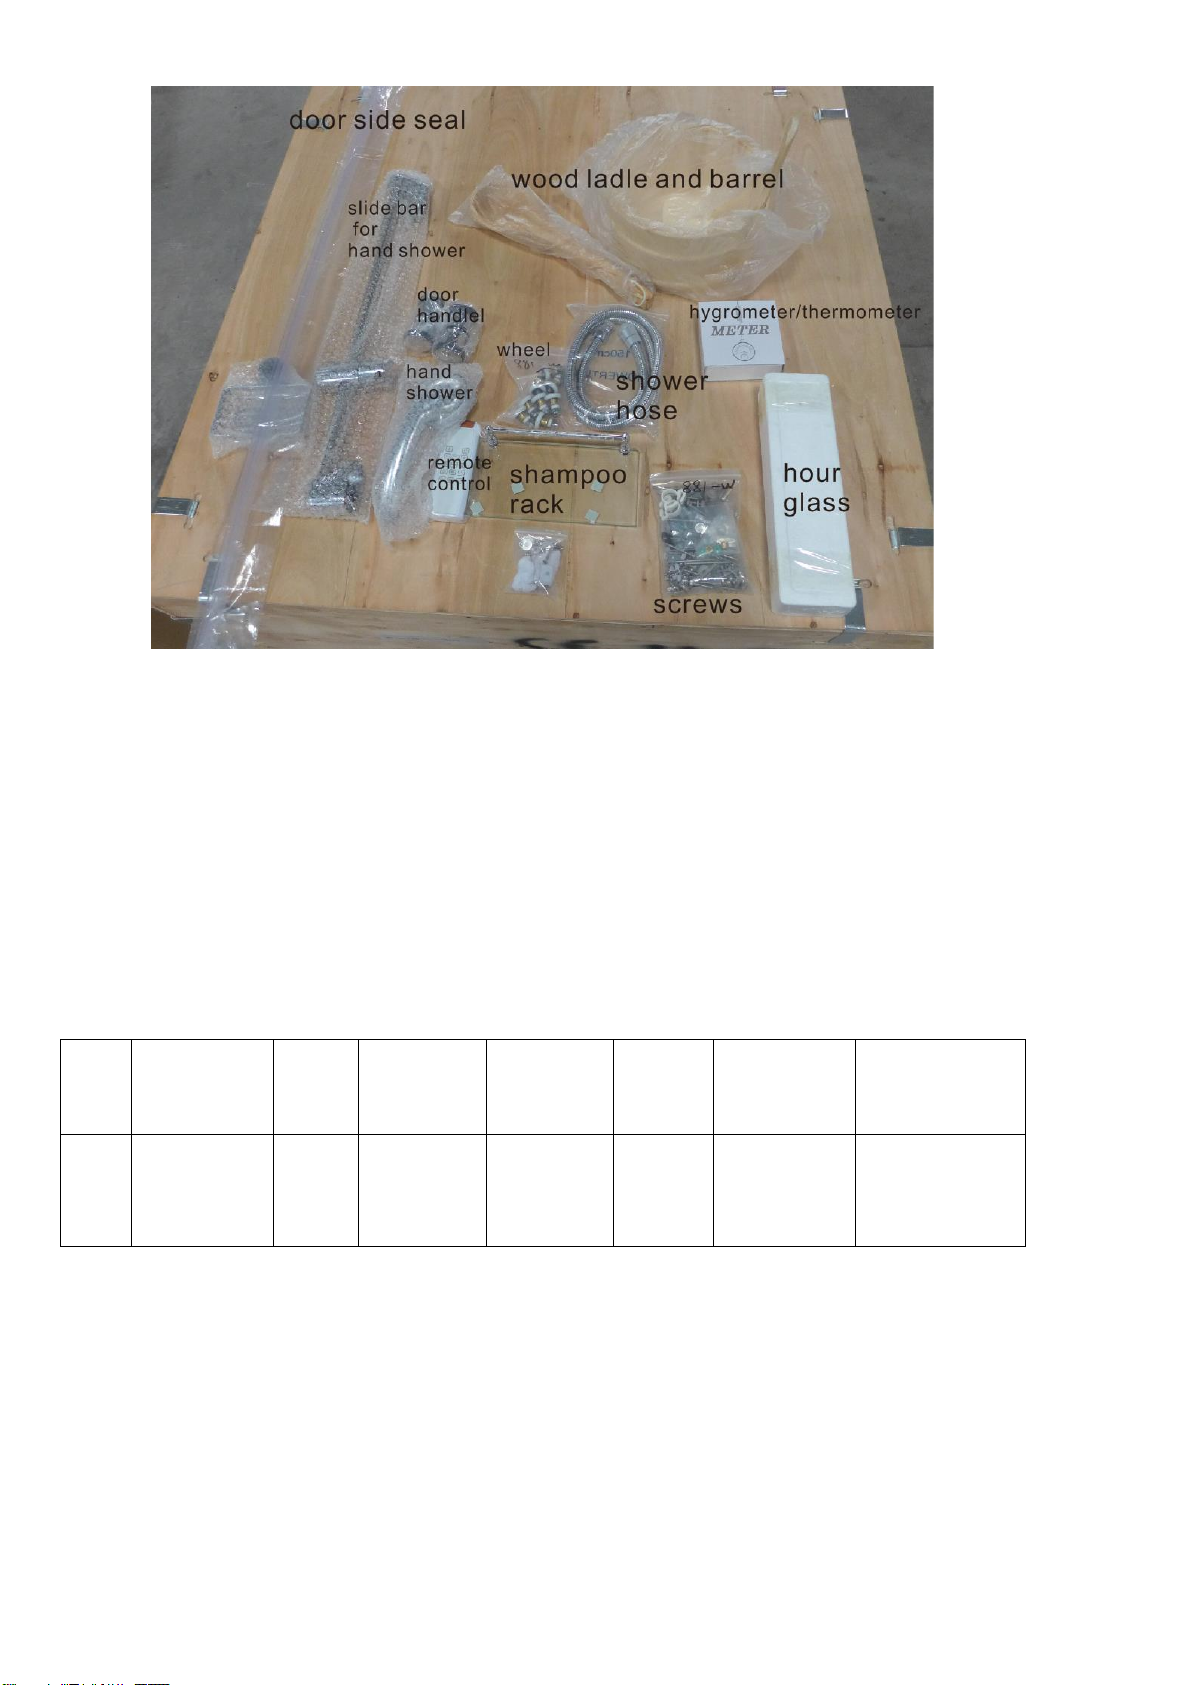
Installation:
1. Two persons are required to assemble the unit.
2. The glass is toughened safety glass. Please take great care when handling
and fitting the glass panels. In particular, avoid the glass edges coming into
contact with hard surfaces
1
Level the tray to the ground(adjust the feet if
needed), make sure the drain hose is installed
already and put it into the water outlet of the ground.
Put a blanket or carton on the tray to prevent from
scratches
The stainless steel support the
bottom of wood wall

Page 9
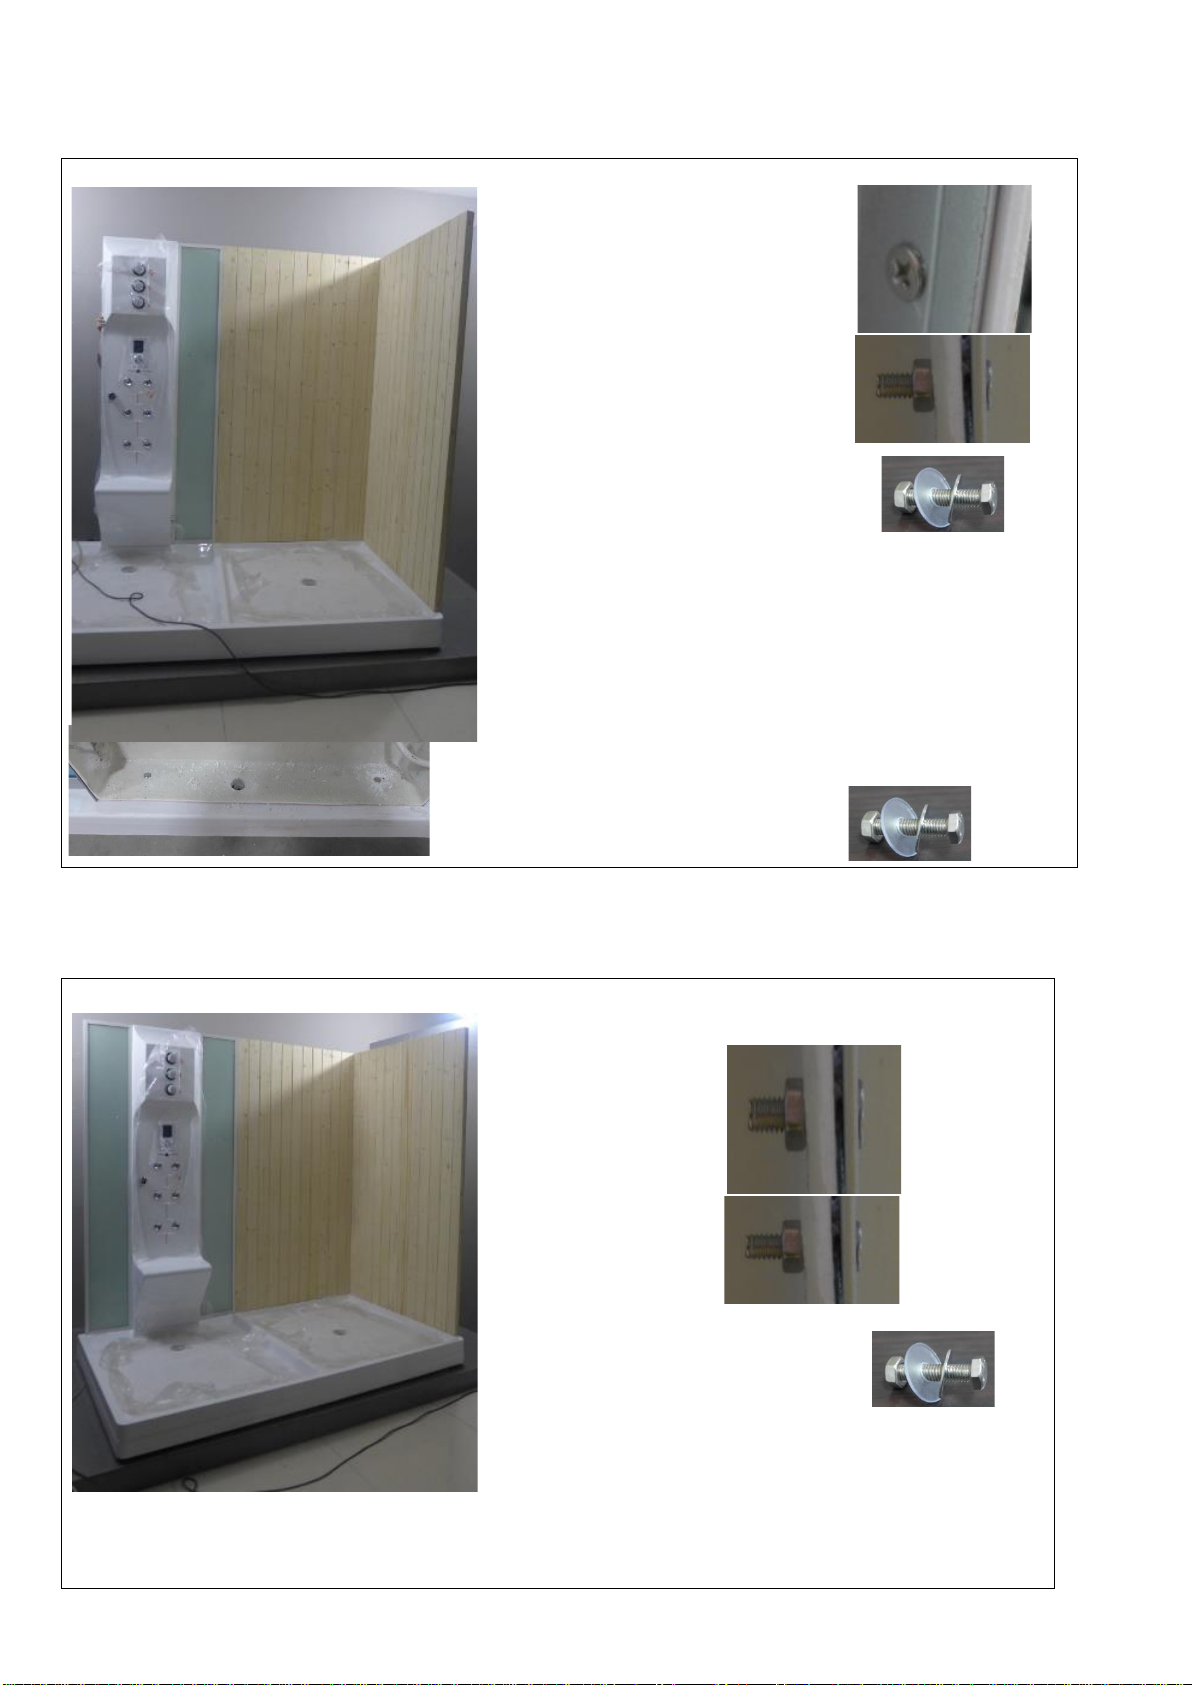
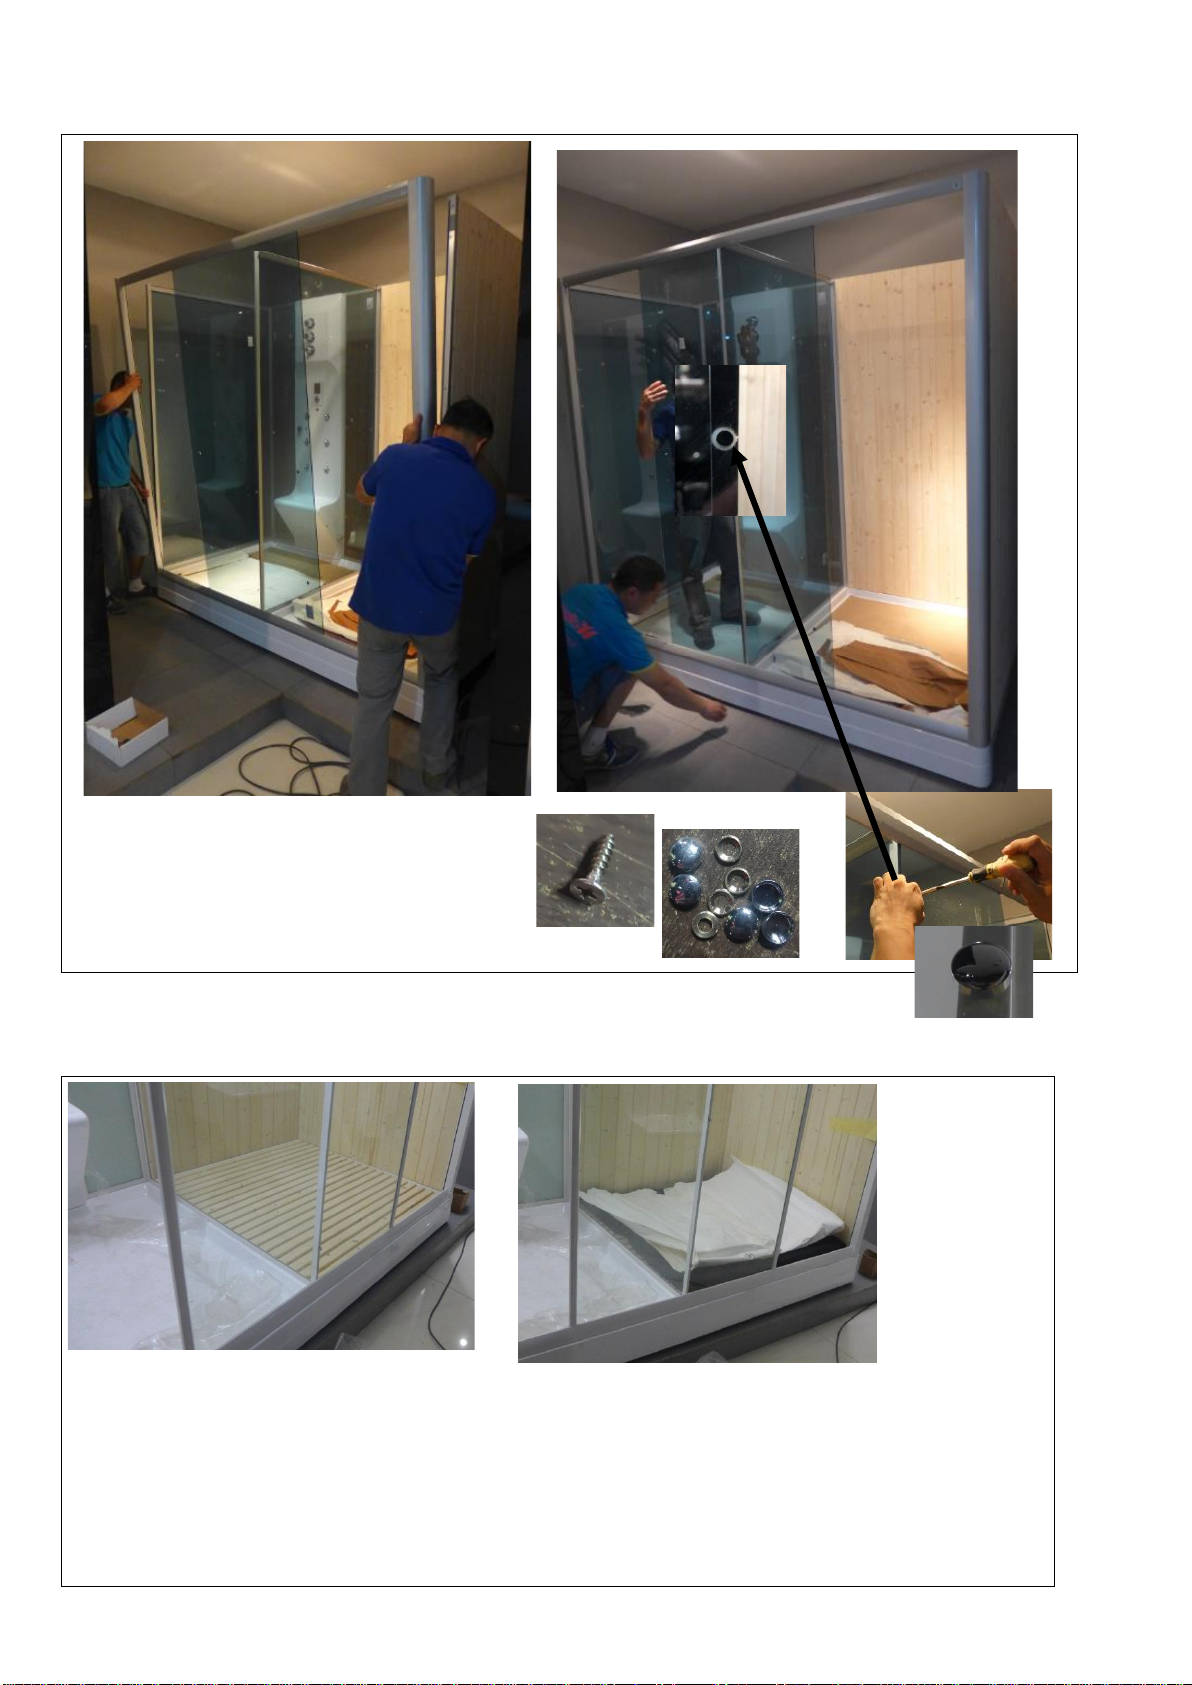
2.
3.
Install the walls first, fasten two walls with
5*60mm screw, there are already holes for
screws, 4 pcs
Connect the small glass and wood wall,4x16mm
screw,5 pcs
Page 10
4.
5.
Install the shower column,fasten with
4x16mm screw and nuts, there are
already holes for screws, 5 pcs
And in bottom of shower column,
6x25mm screw and nuts,2 pcs
Connect the small glass with shower
column,4x16mm screw and nut,5 pcs
Page 11
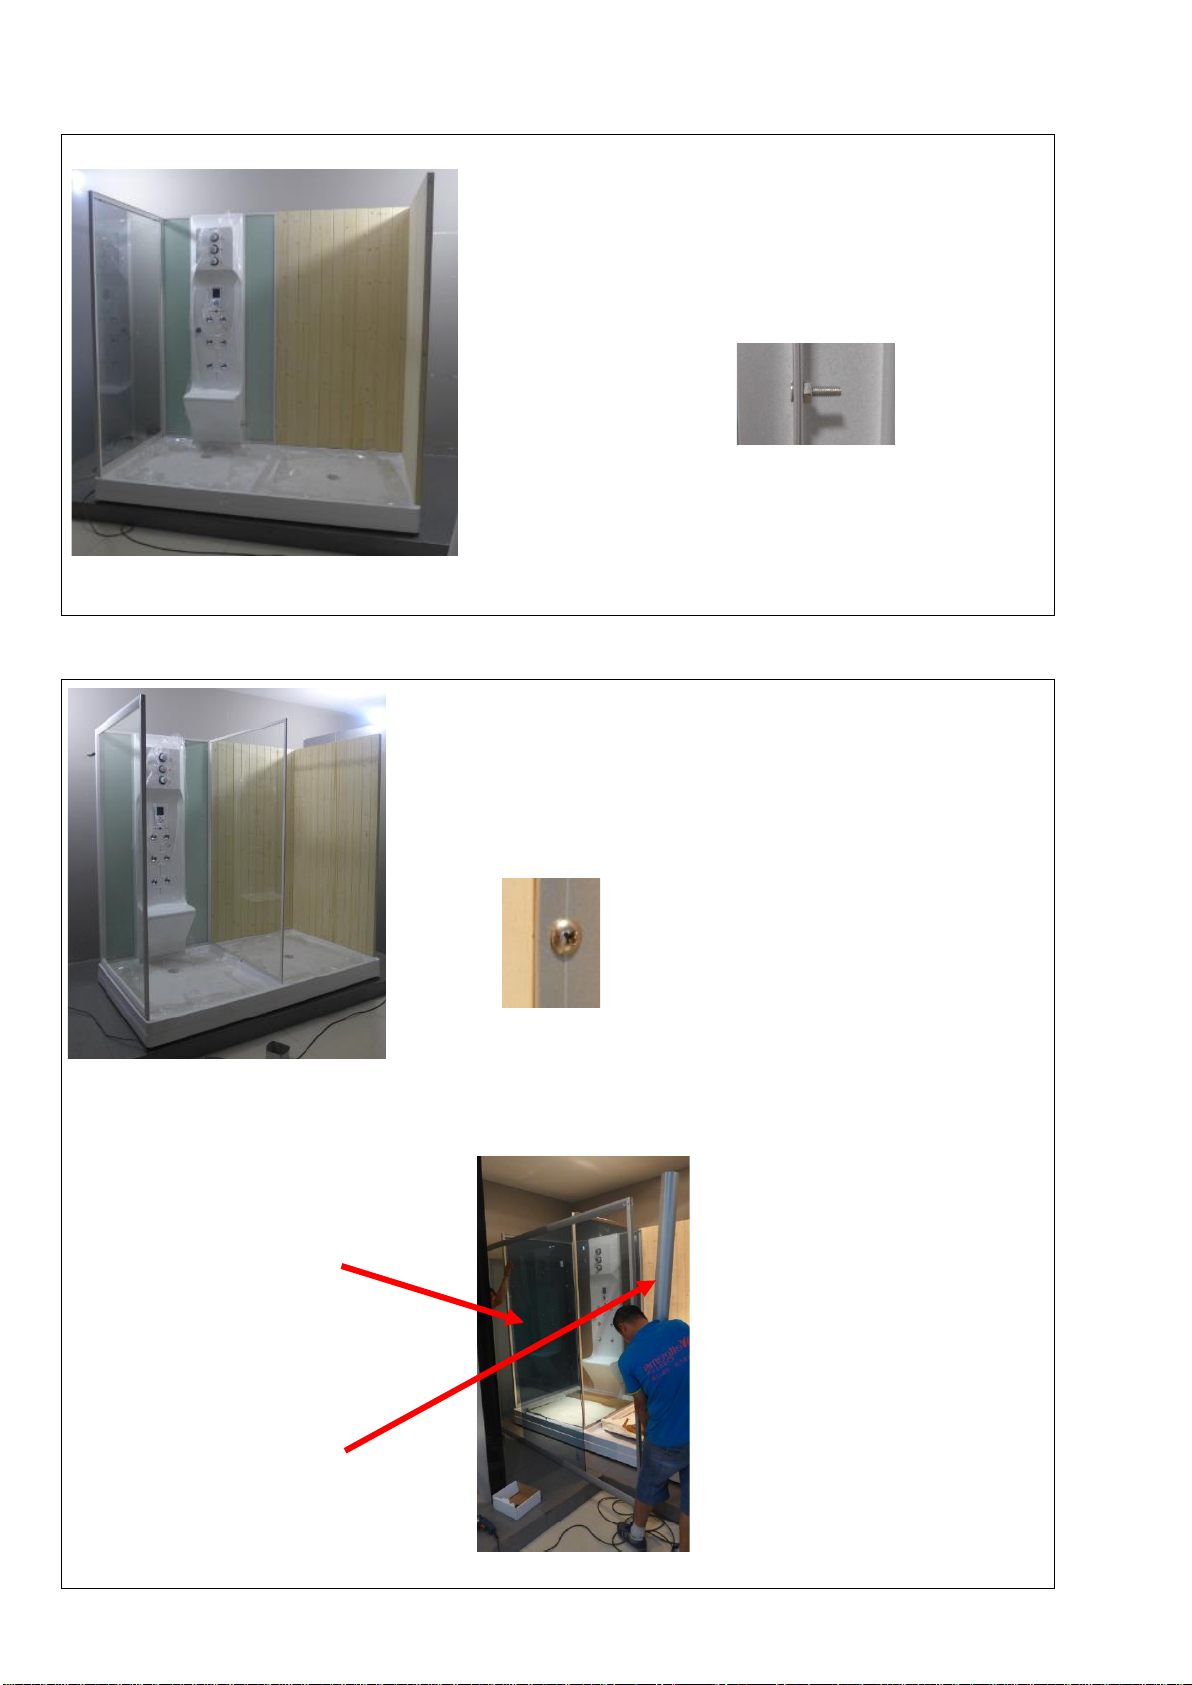
6.
7.
Connect the small glass to big side
glass,fasten with 4x16mm screw and nuts,
there are already holes for screws, 5 pcs
Install the middle glass, connect it to wood wall,
with4x16mm screw, 5 pcs
Install the glass in
aluminum frame
Put this aluminum into 2
side of the frame
Page 12
8.
9.
Need to drill holes in aluminum, and
fasten it with 16mm screw,4 pcs
Put the wood floor into tray, and put blanket or soft paper to keep the wood clean

Page 13
10.
11.
Put the door glass on a table,install
the wheel,don’t fasten the screw of
wheel too tightly now
Hang door glass into the track of
aluminium,adjust the wheel to fit well,finally
fasten the screw of wheel
Install the cover,fasten screws
4x16mm,11 pcs
Page 14
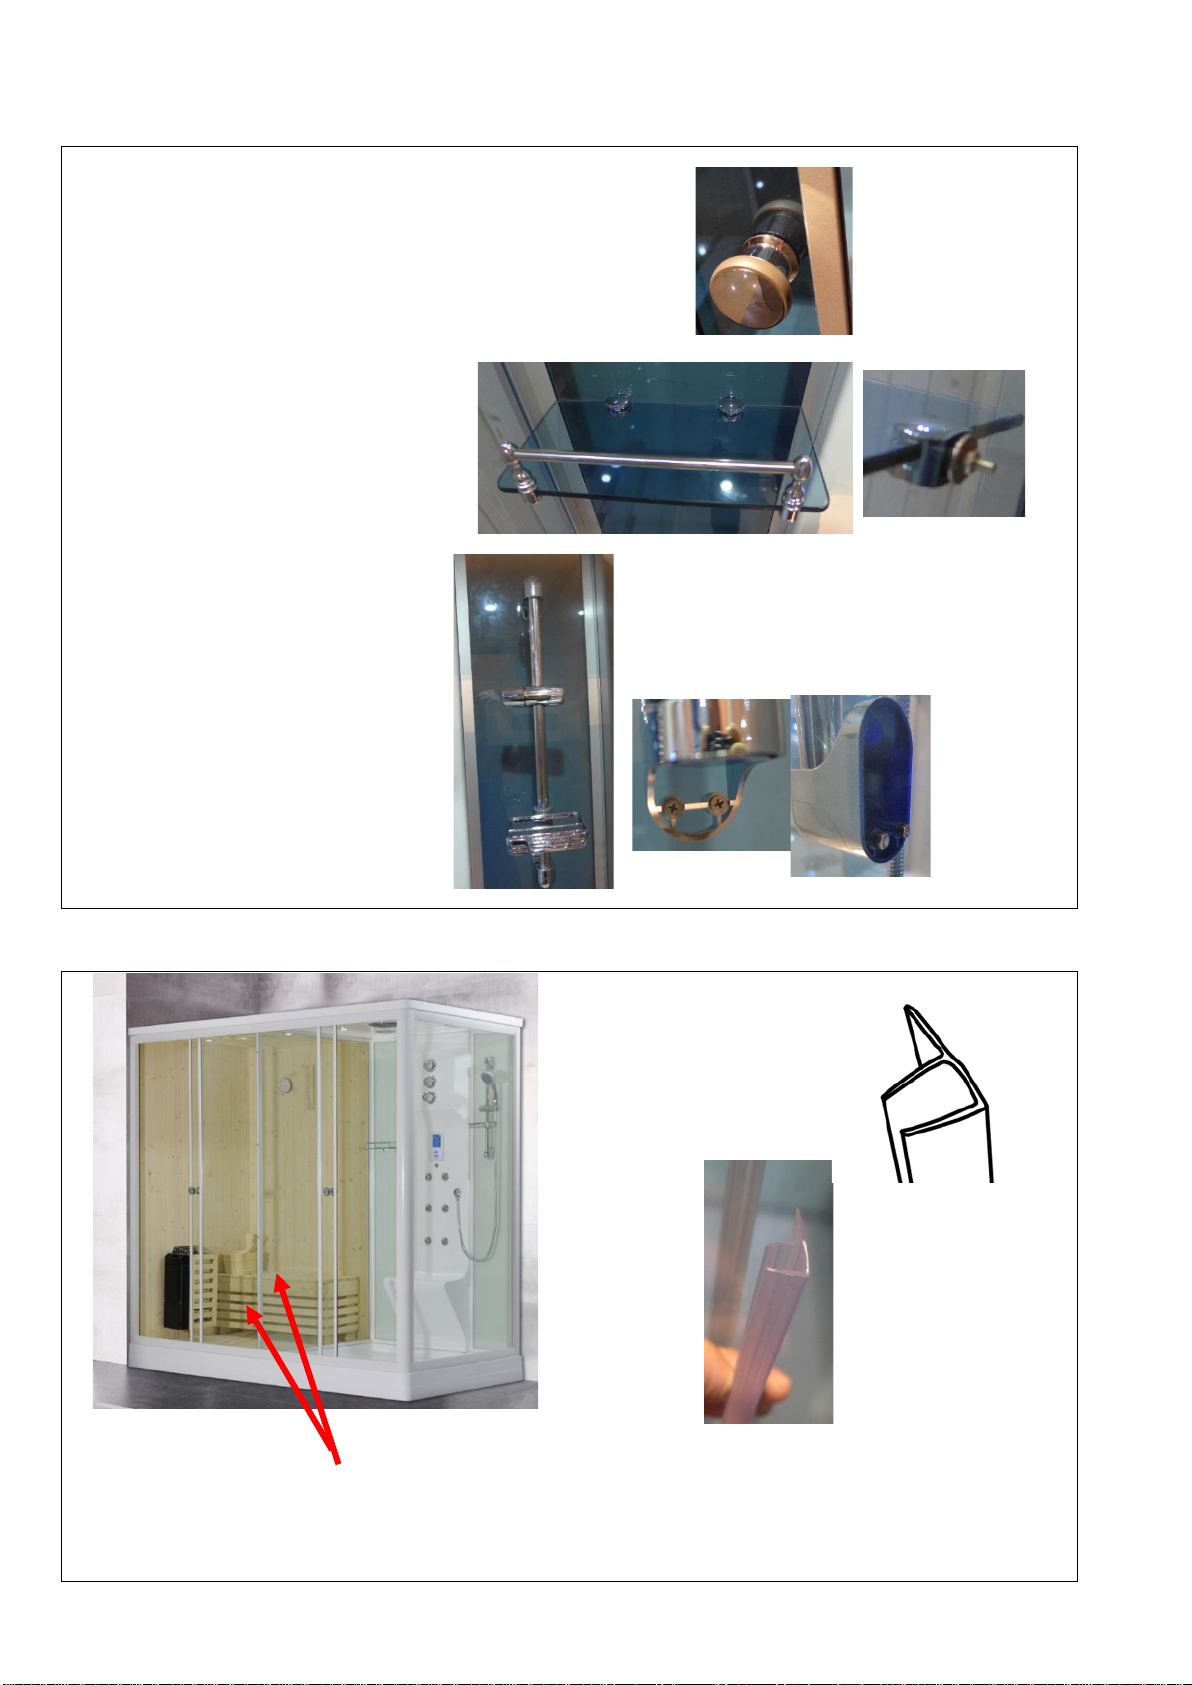
12.
13.
Install the door handle
Install the shelf
Install the hand shower
pole
Install the door side glass seal
Page 15
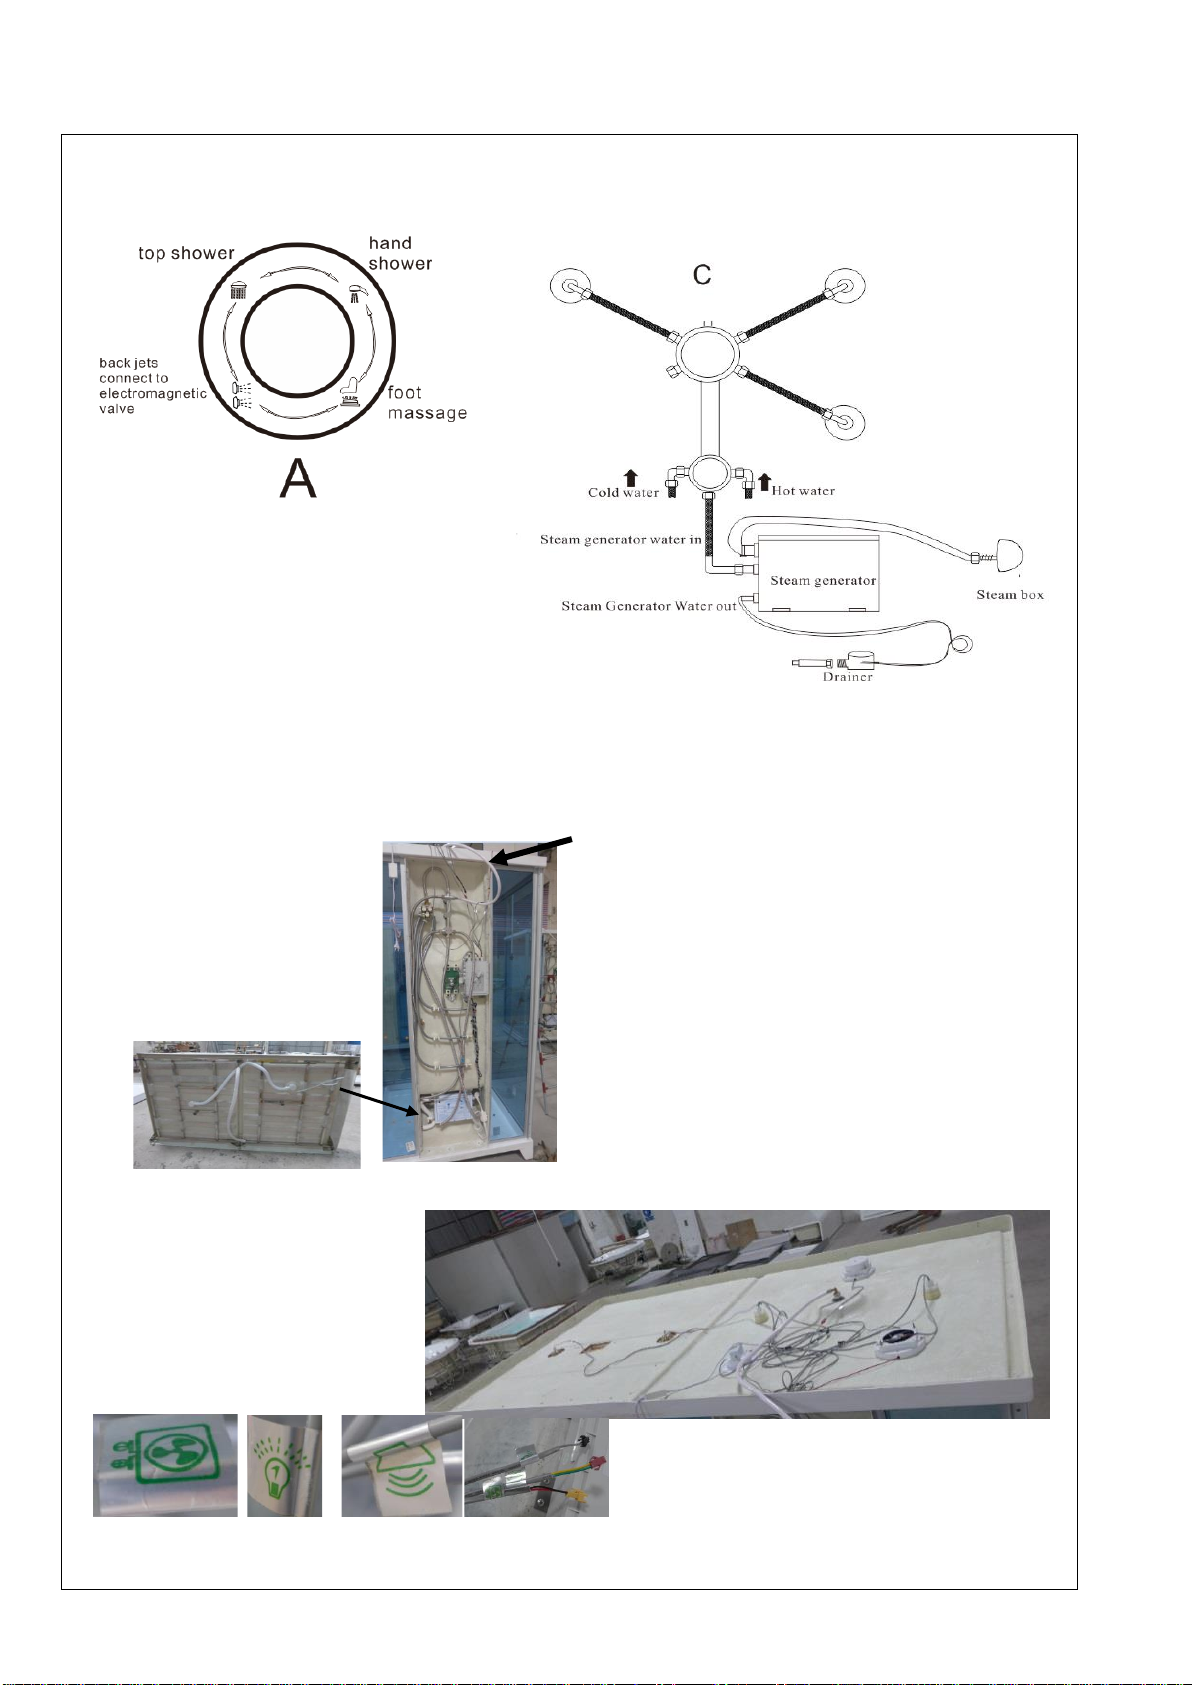
14.
Connect hose to top shower
And connect steam water out
To drainer hose
Connect the wire of cover to control
box,
fan to fan, light to light,
loudspeaker to loudspeaker.
fan
light
loudspeaker
Connect the hoses to C. Check the symbols on your thermo mixers front plate to find the correct position for
the hoses on the back side of the mixer.
Page 16
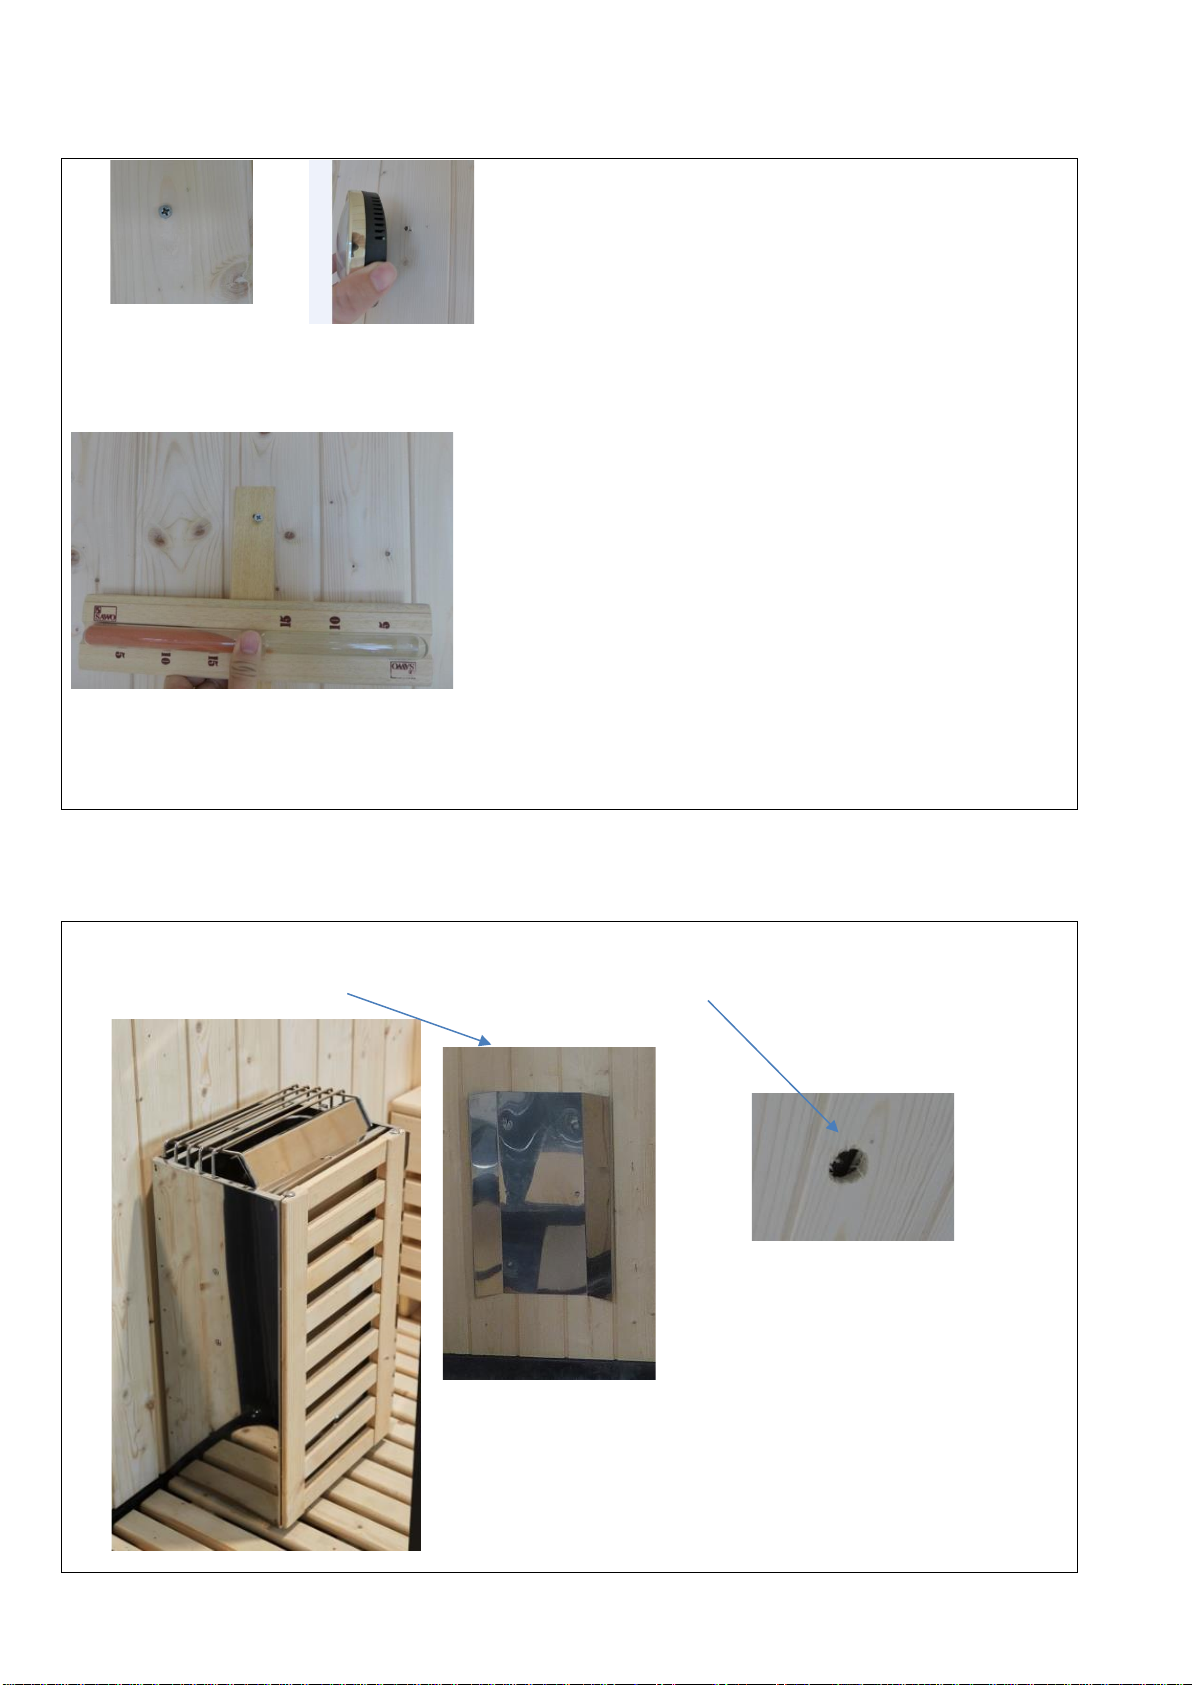
15.
16.
Fasten one pcs screw, hang up the
hygrometer/thermometer
Fasten the hourglass
Hang up the oven on the plate, pull out the cable from the hole

Page 17
Manuals for oven
Time controller
0-180 minute
Temperature controller
Page 18
Piling of the stone
Temperature setting
The Thermostat controls the temperature by turning operating knob.
The heater should be equipped with proper size of sauna room. 30-60 minutes, it
can reach the preset temperature and remains.
The power switch or the timer
The timer is the main power switch in heater.
The timer automatically cut off the power if it exceeds the setting time. While leaving the
sauna
room, please shut off the power.
ATTENTION: Check sauna room before restart the timer.
Table of contents
Popular Bathroom Fixture manuals by other brands

Kohler
Kohler Mira Sport Max J03G Installation and user guide

Moen
Moen 186117 Series installation guide

Hans Grohe
Hans Grohe Raindance Showerpipe 27235000 Instructions for use/assembly instructions

Signature Hardware
Signature Hardware ROUND SWIVEL BODY SPRAY 948942 Install

fine fixtures
fine fixtures AC3TH installation manual

LIXIL
LIXIL HP50 Series quick start guide


